- Ruby on Rails Tutorial
- Ruby on Rails - Home
- Ruby on Rails - Introduction
- Ruby on Rails - Installation
- Ruby on Rails - Framework
- Ruby on Rails - Directory Structure
- Ruby on Rails - Examples
- Ruby on Rails - Database Setup
- Ruby on Rails - Active Records
- Ruby on Rails - Migrations
- Ruby on Rails - Controllers
- Ruby on Rails - Routes
- Ruby on Rails - Views
- Ruby on Rails - Layouts
- Ruby on Rails - Scaffolding
- Ruby on Rails - AJAX
- Ruby on Rails - File Uploading
- Ruby on Rails - Send Emails
- Ruby on Rails Resources
- Ruby on Rails - References Guide
- Ruby on Rails - Quick Guide
- Ruby on Rails - Resources
- Ruby on Rails - Discussion
- Ruby Tutorial
- Ruby Tutorial
Ruby on Rails - Scaffolding
While you're developing Rails applications, especially those which are mainly providing you with a simple interface to data in a database, it can often be useful to use the scaffold method.
Scaffolding provides more than cheap demo thrills. Here are some benefits −
You can quickly get code in front of your users for feedback.
You are motivated by faster success.
You can learn how Rails works by looking at the generated code.
You can use scaffolding as a foundation to jump start your development.
Scaffolding Example
To understand scaffolding, let's create a database called cookbook and a table called recipes.
Creating an Empty Rails Web Application
Open a command window and navigate to where you want to create this cookbook web application. So, run the following command to create a complete directory structure.
tp> rails new cookbook
Setting up the Database
Here is the way to create a database −
mysql> create database cookbook;
Query OK, 1 row affected (0.01 sec)

mysql> grant all privileges on cookbook.*
to 'root'@'localhost' identified by 'password';
Query OK, 0 rows affected (0.00 sec)

mysql> FLUSH PRIVILEGES;
Query OK, 0 rows affected (0.00 sec)
To instruct Rails how to find the database, edit the configuration file cookbook\config\database.yml and change the database name to cookbook. Leave the password empty. When you finish, it should look as follows −
development:
   adapter: mysql
   database: cookbook
   username: root
   password: [password]
   host: localhost

test:
   adapter: mysql
   database: cookbook
   username: root
   password: [password]
   host: localhost

production:
   adapter: mysql
   database: cookbook
   username: root
   password: [password]
   host: localhost
Rails lets you run in the development mode, test mode, or production mode, using different databases. This application uses the same database for each.
The Generated Scaffold Code
With the scaffold action, Rails generates all the code it needs dynamically. By running scaffold as a script, we can get all the code written to disk, where we can investigate it and then start tailoring it to our requirements.
So now, let's start once again to generate Scaffold code manually by using the scaffold helper script −
cookbook> rails generate scaffold recipe
It generates auto-files as shown below −
The Controller
Let's look at the code behind the controller. This code is generated by the scaffold generator. If you open app/controllers/recipes_controller.rb, then you will find something as follows −
class RecipesController < ApplicationController
   before_action :set_recipe, only: [:show, :edit, :update, :destroy]

   # GET /recipes
   # GET /recipes.json
   def index
      @recipes = Recipe.all
   end

   # GET /recipes/1
   # GET /recipes/1.json
   def show
   end

   # GET /recipes/new
   def new
      @recipe = Recipe.new
   end

   # GET /recipes/1/edit
   def edit
   end

   # POST /recipes
   # POST /recipes.json
   def create
      @recipe = Recipe.new(recipe_params)

      respond_to do |format|
         if @recipe.save
            format.html { redirect_to @recipe, notice: 'Recipe was successfully created.' }
            format.json { render :show, status: :created, location: @recipe }
         else
            format.html { render :new }
            format.json { render json: @recipe.errors, status: :unprocessable_entity }
         end
      end

   end

   # PATCH/PUT /recipes/1
   # PATCH/PUT /recipes/1.json
   def update
      respond_to do |format|
         if @recipe.update(recipe_params)
            format.html { redirect_to @recipe, notice: 'Recipe was successfully updated.' }
            format.json { render :show, status: :ok, location: @recipe }
         else
            format.html { render :edit }
            format.json { render json: @recipe.errors, status: :unprocessable_entity }
         end
      end

   end

   # DELETE /recipes/1
   # DELETE /recipes/1.json
   def destroy
      @recipe.destroy
         respond_to do |format|
         format.html { redirect_to recipes_url, notice: 'Recipe was successfully destroyed.' }
         format.json { head :no_content }
      end
   end

   private

   # Use callbacks to share common setup or constraints between actions.
   def set_recipe
      @recipe = Recipe.find(params[:id])
   end

   # Never trust parameters from the scary internet, only allow the white list through.
   def recipe_params
      params.require(:recipe).permit(:tittle, :instructions)
   end
end
When the user of a Rails application selects an action, e.g. "Show" - the controller will execute any code in the appropriate section - "def show" - and then by default will render a template of the same name - "show.html.erb". This default behavior can be overwritten.
The controller uses ActiveRecord methods such as find, find_all, new, save, update_attributes, and destroy to move data to and from the database tables. Note that you do not have to write any SQL statements, rails will take care of it automatically.
This single line of code will bring the database table to life. It will provide with a simple interface to your data, and ways of −
- Creating new entries
- Editing current entries
- Viewing current entries
- Destroying current entries
When creating or editing an entry, scaffold will do all the hard work like form generation and handling for you, and will even provide clever form generation, supporting the following types of inputs −
- Simple text strings
- Text areas (or large blocks of text)
- Date selectors
- Date-time selectors
You can use Rails Migrations to create and maintain tables.
rake db:migrate RAILS_ENV=development
Now, go to the cookbook directory and run the Web Server using the following command −
cookbook> rails server
Now, open a browser and navigate to http://127.0.0.1:3000/recipe/new. This will provide you a screen to create new entries in the recipes table. A screenshot is shown below −

Once you press the Create button to create a new recipe, your record is added into the recipes table and it shows the following result −
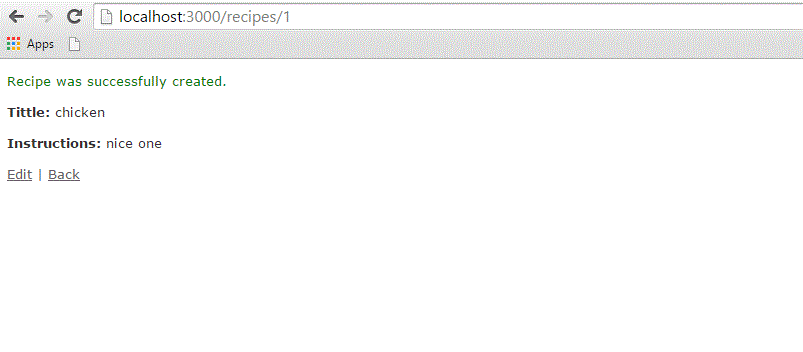
You can see the option to edit, show, and destroy the records. So, play around with these options.
You can also list down all the recipes available in the recipes table using the URL http://127.0.0.1:3000/recipe/list.
Enhancing the Model
Rails gives you a lot of error handling for free. To understand this, add some validation rules to the empty recipe model −
Modify app/models/recipe.rb as follows and then test your application −
class Recipe < ActiveRecord::Base
   validates_length_of :title, :within => 1..20
   validates_uniqueness_of :title, :message => "already exists"
end
These entries will give automatic checking.
validates_length_of − the field is not blank and not too long.
validates_uniqueness_of − duplicate values are trapped. Instead of the default Rails error message, we have given a custom message here.
Alternative Way to Create Scaffolding
Create an application as shown above and The Generated Scaffold Code as shown below
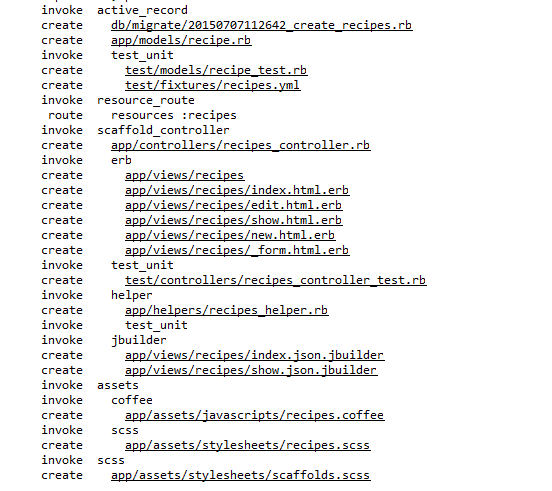
rails g scaffold Recipe tittle:string instructions:text
Above code generates the auto files with data base by using with sqlite3 with tittle and instruction column as shown below an image.
we need to migrate the data base by using below syntax.
$ rake db:migrate RAILS_ENV=development
Finally run the application by using the following command line −
rails server
It will generate the result as shown above output images.
The Views
All the views and corresponding all the controller methods are created by scaffold command and they are available in the app/views/recipes directory.
How Scaffolding is Different?
If you have gone through the previous chapters, then you must have seen that we had created methods to list, show, delete and create data etc., but scaffolding does that job automatically.