- OpenCV Tutorial
- OpenCV - Home
- OpenCV - Overview
- OpenCV - Environment
- OpenCV - Storing Images
- OpenCV - Reading Images
- OpenCV - Writing an Image
- OpenCV - GUI
- Types of Images
- OpenCV - The IMREAD_XXX Flag
- Reading an Image as Grayscale
- OpenCV - Reading Image as BGR
- Image Conversion
- Colored Images to GrayScale
- OpenCV - Colored Image to Binary
- OpenCV - Grayscale to Binary
- Drawing Functions
- OpenCV - Drawing a Circle
- OpenCV - Drawing a Line
- OpenCV - Drawing a Rectangle
- OpenCV - Drawing an Ellipse
- OpenCV - Drawing Polylines
- OpenCV - Drawing Convex Polylines
- OpenCV - Drawing Arrowed Lines
- OpenCV - Adding Text
- Filtering
- OpenCV - Bilateral Filter
- OpenCV - Box Filter
- OpenCV - SQRBox Filter
- OpenCV - Filter2D
- OpenCV - Dilation
- OpenCV - Erosion
- OpenCV - Morphological Operations
- OpenCV - Image Pyramids
- Sobel Derivatives
- OpenCV - Sobel Operator
- OpenCV - Scharr Operator
- Transformation Operations
- OpenCV - Laplacian Transformation
- OpenCV - Distance Transformation
- Camera and Face Detection
- OpenCV - Using Camera
- OpenCV - Face Detection in a Picture
- Face Detection using Camera
- Geometric Transformations
- OpenCV - Affine Translation
- OpenCV - Rotation
- OpenCV - Scaling
- OpenCV - Color Maps
- Miscellaneous Chapters
- OpenCV - Canny Edge Detection
- OpenCV - Hough Line Transform
- OpenCV - Histogram Equalization
- OpenCV Useful Resources
- OpenCV - Quick Guide
- OpenCV - Useful Resources
- OpenCV - Discussion
OpenCV - Quick Guide
OpenCV - Overview
OpenCV is a cross-platform library using which we can develop real-time computer vision applications. It mainly focuses on image processing, video capture and analysis including features like face detection and object detection.
Let’s start the chapter by defining the term "Computer Vision".
Computer Vision
Computer Vision can be defined as a discipline that explains how to reconstruct, interrupt, and understand a 3D scene from its 2D images, in terms of the properties of the structure present in the scene. It deals with modeling and replicating human vision using computer software and hardware.
Computer Vision overlaps significantly with the following fields −
Image Processing − It focuses on image manipulation.
Pattern Recognition − It explains various techniques to classify patterns.
Photogrammetry − It is concerned with obtaining accurate measurements from images.
Computer Vision Vs Image Processing
Image processing deals with image-to-image transformation. The input and output of image processing are both images.
Computer vision is the construction of explicit, meaningful descriptions of physical objects from their image. The output of computer vision is a description or an interpretation of structures in 3D scene.
Applications of Computer Vision
Here we have listed down some of major domains where Computer Vision is heavily used.
Robotics Application
Localization − Determine robot location automatically
Navigation
Obstacles avoidance
Assembly (peg-in-hole, welding, painting)
Manipulation (e.g. PUMA robot manipulator)
Human Robot Interaction (HRI) − Intelligent robotics to interact with and serve people
Medicine Application
- Classification and detection (e.g. lesion or cells classification and tumor detection)
- 2D/3D segmentation
- 3D human organ reconstruction (MRI or ultrasound)
- Vision-guided robotics surgery
Industrial Automation Application
- Industrial inspection (defect detection)
- Assembly
- Barcode and package label reading
- Object sorting
- Document understanding (e.g. OCR)
Security Application
Biometrics (iris, finger print, face recognition)
Surveillance − Detecting certain suspicious activities or behaviors
Transportation Application
- Autonomous vehicle
- Safety, e.g., driver vigilance monitoring
Features of OpenCV Library
Using OpenCV library, you can −
Read and write images
Capture and save videos
Process images (filter, transform)
Perform feature detection
Detect specific objects such as faces, eyes, cars, in the videos or images.
Analyze the video, i.e., estimate the motion in it, subtract the background, and track objects in it.
OpenCV was originally developed in C++. In addition to it, Python and Java bindings were provided. OpenCV runs on various Operating Systems such as windows, Linux, OSx, FreeBSD, Net BSD, Open BSD, etc.
This tutorial explains the concepts of OpenCV with examples using Java bindings.
OpenCV Library Modules
Following are the main library modules of the OpenCV library.
Core Functionality
This module covers the basic data structures such as Scalar, Point, Range, etc., that are used to build OpenCV applications. In addition to these, it also includes the multidimensional array Mat, which is used to store the images. In the Java library of OpenCV, this module is included as a package with the name org.opencv.core.
Image Processing
This module covers various image processing operations such as image filtering, geometrical image transformations, color space conversion, histograms, etc. In the Java library of OpenCV, this module is included as a package with the name org.opencv.imgproc.
Video
This module covers the video analysis concepts such as motion estimation, background subtraction, and object tracking. In the Java library of OpenCV, this module is included as a package with the name org.opencv.video.
Video I/O
This module explains the video capturing and video codecs using OpenCV library. In the Java library of OpenCV, this module is included as a package with the name org.opencv.videoio.
calib3d
This module includes algorithms regarding basic multiple-view geometry algorithms, single and stereo camera calibration, object pose estimation, stereo correspondence and elements of 3D reconstruction. In the Java library of OpenCV, this module is included as a package with the name org.opencv.calib3d.
features2d
This module includes the concepts of feature detection and description. In the Java library of OpenCV, this module is included as a package with the name org.opencv.features2d.
Objdetect
This module includes the detection of objects and instances of the predefined classes such as faces, eyes, mugs, people, cars, etc. In the Java library of OpenCV, this module is included as a package with the name org.opencv.objdetect.
Highgui
This is an easy-to-use interface with simple UI capabilities. In the Java library of OpenCV, the features of this module is included in two different packages namely, org.opencv.imgcodecs and org.opencv.videoio.
A Brief History of OpenCV
OpenCV was initially an Intel research initiative to advise CPU-intensive applications. It was officially launched in 1999.
- In the year 2006, its first major version, OpenCV 1.0 was released.
- In October 2009, the second major version, OpenCV 2 was released.
- In August 2012, OpenCV was taken by a nonprofit organization OpenCV.org.
OpenCV - Environment
In this chapter, you will learn how to install OpenCV and set up its environment in your system.
Installing OpenCV
First of all, you need to download OpenCV onto your system. Follow the steps given below.
Step 1 − Open the homepage of OpenCV by clicking the following link: http://opencv.org/ On clicking, you will see its homepage as shown below.

Step 2 − Now, click the Downloads link highlighted in the above screenshot. On clicking, you will be directed to the downloads page of OpenCV.

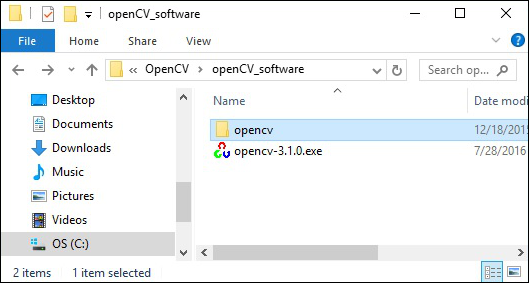
Step 3 − On clicking the highlighted link in the above screenshot, a file named opencv-3.1.0.exe will be downloaded. Extract this file to generate a folder opencv in your system, as shown in the following screenshot.
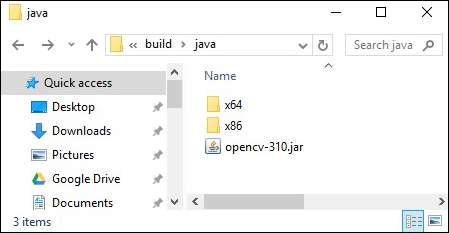
Step 4 − Open the folder OpenCV → build → java. Here you will find the jar file of OpenCV named opencv-310.jar. Save this file in a separate folder for further use.
Eclipse Installation
After downloading the required JAR files, you have to embed these JAR files to your Eclipse environment. You can do this by setting the Build Path to these JAR files and by using pom.xml.
Setting Build Path
Following are the steps to set up OpenCV in Eclipse −
Step 1 − Ensure that you have installed Eclipse in your system. If not, download and install Eclipse in your system.
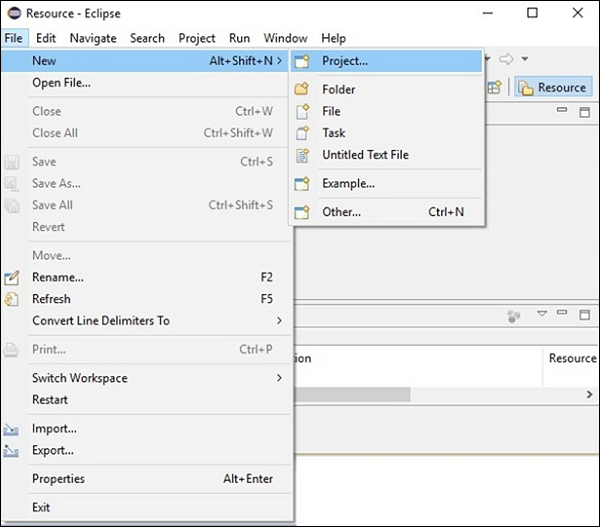
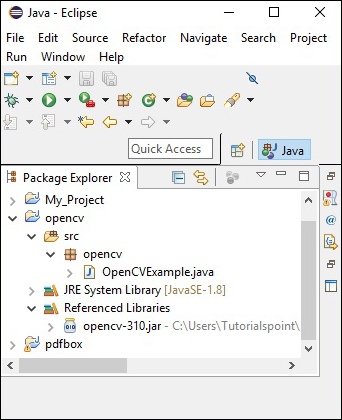
Step 2 − Open Eclipse, click on File, New, and Open a new project as shown in the following screenshot.
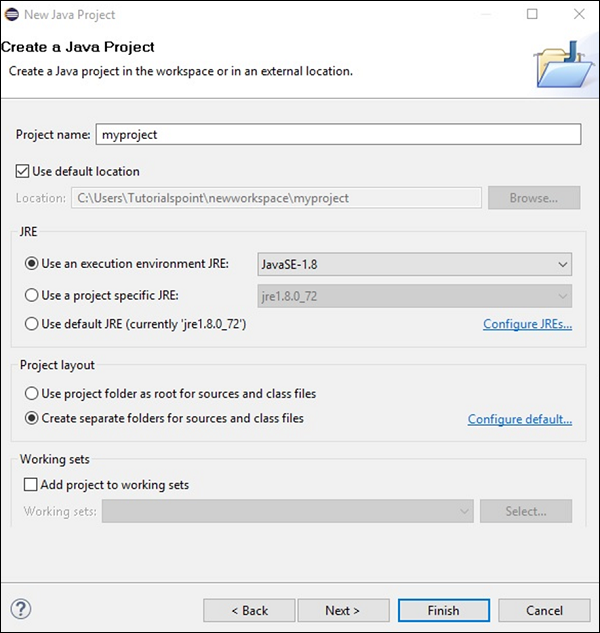
Step 3 − On selecting the project, you will get the New Project wizard. In this wizard, select Java project and proceed by clicking the Next button, as shown in the following screenshot.

Step 4 − On proceeding forward, you will be directed to the New Java Project wizard. Create a new project and click Next, as shown in the following screenshot.
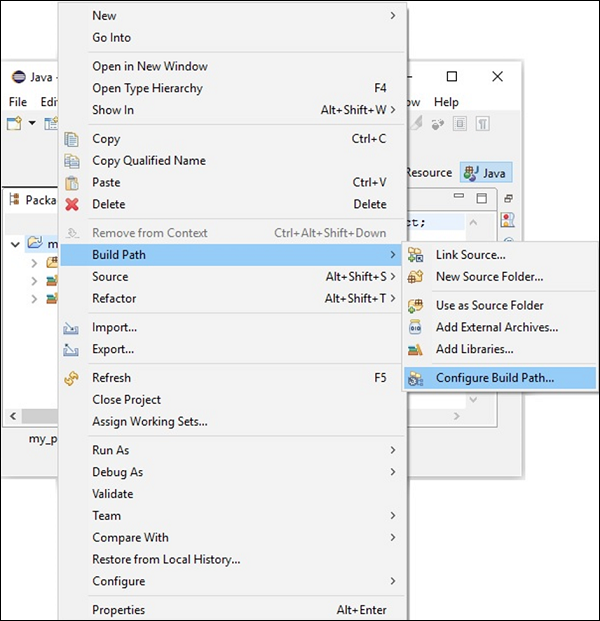
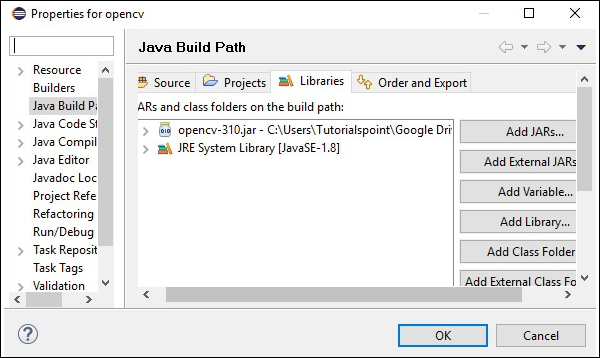
Step 5 − After creating a new project, right-click on it. Select Build Path and click Configure Build Path… as shown in the following screenshot.
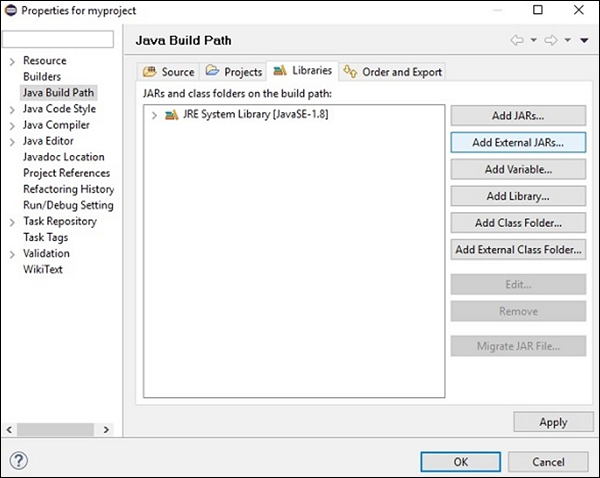
Step 6 − On clicking the Build Path option, you will be directed to the Java Build Path wizard. Click the Add External JARs button, as shown in the following screenshot.
Step 7 − Select the path where you have saved the file opencv-310.jar.
Step 8 − On clicking the Open button in the above screenshot, those files will be added to your library.
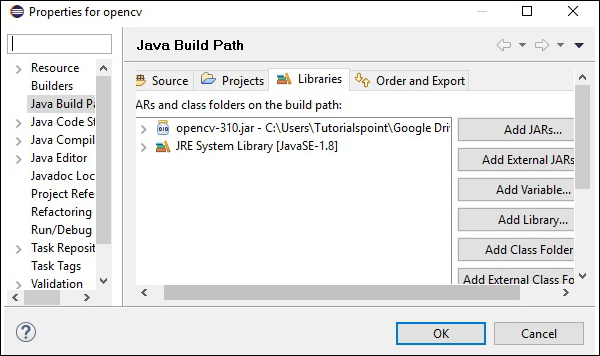
Step 9 − On clicking OK, you will successfully add the required JAR files to the current project and you can verify these added libraries by expanding the Referenced Libraries.
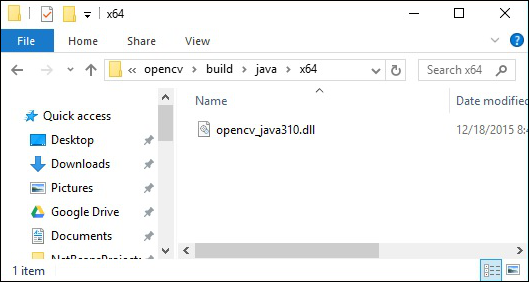
Setting the Path for Native Libraries
In addition to the JAR files, you need to set path for the native libraries (DLL files) of OpenCV.
Location of DLL files − Open the installation folder of OpenCV and go to the sub-folder build → java. Here you will find the two folders x64 (64 bit) and x86 (32 bit) which contain the dll files of OpenCV.

Open the respective folder suitable for your operating system, then you can see the dll file, as shown in the following screenshot.
Now, set the path for this file too by following the steps given below −
Step 1 − Once again, open the JavaBuildPath window. Here you can observe the added JAR file and the JRE System Library.
Step 2 − On expanding it, you will get the system libraries and Native library location, as highlighted in the following screenshot.
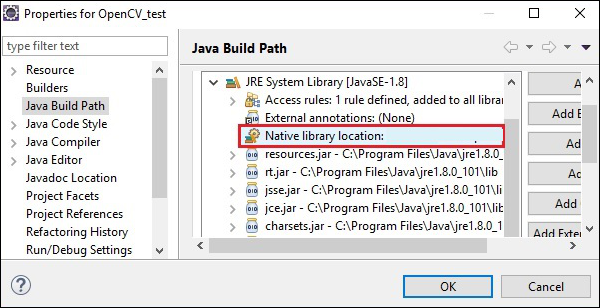
Step 3 − Double-click on the Native library location. Here, you can see the Native Library Folder Configuration window as shown below.
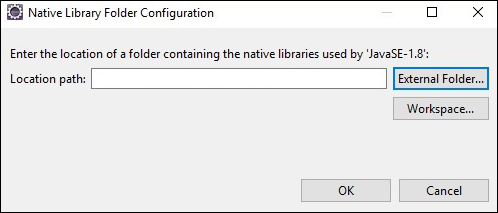
Here, click the button External Folder… and select the location of the dll file in your system.
OpenCV - Storing Images
To capture an image, we use devices like cameras and scanners. These devices record numerical values of the image (Ex: pixel values). OpenCV is a library which processes the digital images, therefore we need to store these images for processing.
The Mat class of OpenCV library is used to store the values of an image. It represents an n-dimensional array and is used to store image data of grayscale or color images, voxel volumes, vector fields, point clouds, tensors, histograms, etc.
This class comprises of two data parts: the header and a pointer
Header − Contains information like size, method used for storing, and the address of the matrix (constant in size).
Pointer − Stores the pixel values of the image (Keeps on varying).
The Mat Class
The OpenCV Java library provides this class with the same name (Mat) within the package org.opencv.core.
Constructors
The Mat class of OpenCV Java library has various constructors, using which you can construct the Mat object.
| S.No | Constructors and Description |
|---|---|
| 1 |
Mat() This is the default constructor with no parameters in most cases. We use this to constructor to create an empty matrix and pass this to other OpenCV methods. |
| 2 |
Mat(int rows, int cols, int type) This constructor accepts three parameters of integer type representing the number of rows and columns in a 2D array and the type of the array (that is to be used to store data). |
| 3 |
Mat(int rows, int cols, int type, Scalar s) Including the parameters of the previous one, this constructor additionally accepts an object of the class Scalar as parameter. |
| 4 |
Mat(Size size, int type) This constructor accepts two parameters, an object representing the size of the matrix and an integer representing the type of the array used to store the data. |
| 5 |
Mat(Size size, int type, Scalar s) Including the parameters of the previous one, this constructor additionally accepts an object of the class Scalar as parameter. |
| 6 | Mat(long addr) |
| 7 |
Mat(Mat m, Range rowRange) This constructor accepts an object of another matrix and an object of the class Range representing the range of the rows to be taken to create a new matrix. |
| 8 |
Mat(Mat m, Range rowRange, Range colRange) Including the parameters of the previous one, this constructor additionally accepts an object of the class. Range representing the column range. |
| 9 |
Mat(Mat m, Rect roi) This constructor accepts two objects, one representing another matrix and the other representing the Region Of Interest. |
Note −
Array type. Use CV_8UC1, ..., CV_64FC4 to create 1-4 channel matrices, or CV_8UC(n), ..., CV_64FC(n) to create multi-channel (up to CV_CN_MAX channels) matrices.
The type of the matrices were represented by various fields of the class CvType which belongs to the package org.opencv.core.
Methods and Description
Following are some of the methods provided by the Mat class.
| S.No | Methods and Description |
|---|---|
| 1 |
Mat col(int x) This method accepts an integer parameter representing the index of a column and retrieves and returns that column. |
| 2 |
Mat row(int y) This method accepts an integer parameter representing the index of a row and retrieves and returns that row. |
| 3 |
int cols() This method returns the number of columns in the matrix. |
| 4 |
int rows() This method returns the number of rows in the matrix. |
| 5 |
Mat setTo(Mat value) This method accepts an object of the Mat type and sets the array elements to the specified value. |
| 6 |
Mat setTo(Scalar s) This method accepts an object of the Scalar type and sets the array elements to the specified value. |
Creating and Displaying the Matrix
In this section, we are going to discuss our first OpenCV example. We will see how to create and display a simple OpenCV matrix.
Given below are the steps to be followed to create and display a matrix in OpenCV.
Step 1: Load the OpenCV native library
While writing Java code using OpenCV library, the first step you need to do is to load the native library of OpenCV using the loadLibrary(). Load the OpenCV native library as shown below.
//Loading the core library
System.loadLibrary(Core.NATIVE_LIBRARY_NAME);
Step 2: Instantiate the Mat class
Instantiate the Mat class using any of the functions mentioned in this chapter earlier.
//Creating a matrix
Mat matrix = new Mat(5, 5, CvType.CV_8UC1, new Scalar(0));
Step 3: Fill the matrix using the methods
You can retrieve particular rows/columns of a matrix by passing index values to the methods row()/col().
And, you can set values to these using any of the variants of the setTo() methods.
//Retrieving the row with index 0
Mat row0 = matrix.row(0);

//setting values of all elements in the row with index 0
row0.setTo(new Scalar(1));

//Retrieving the row with index 3
Mat col3 = matrix.col(3);

//setting values of all elements in the row with index 3
col3.setTo(new Scalar(3));
Example
You can use the following program code to create and display a simple matrix in Java using OpenCV library.
import org.opencv.core.Core;
import org.opencv.core.Mat;
import org.opencv.core.CvType;
import org.opencv.core.Scalar;

class DisplayingMatrix {
   public static void main(String[] args) {
      //Loading the core library
      System.loadLibrary(Core.NATIVE_LIBRARY_NAME);

      //Creating a matrix
      Mat matrix = new Mat(5, 5, CvType.CV_8UC1, new Scalar(0));

      //Retrieving the row with index 0
      Mat row0 = matrix.row(0);

      //setting values of all elements in the row with index 0
      row0.setTo(new Scalar(1));

      //Retrieving the row with index 3
      Mat col3 = matrix.col(3);

      //setting values of all elements in the row with index 3
      col3.setTo(new Scalar(3));

      //Printing the matrix
      System.out.println("OpenCV Mat data:\n" + matrix.dump());
   }
}
On executing the above program, you will get the following output −
OpenCV Mat data:
[  1,   1,   1,   3,   1;
   0,   0,   0,   3,   0;
   0,   0,   0,   3,   0;
   0,   0,   0,   3,   0;
   0,   0,   0,   3,   0]
Loading Image using JavaSE API
The BufferedImage class of the java.awt.image.BufferedImage package is used to store an image and the ImageIO class of the package import javax.imageio provides methods to read and write Images.
Example
You can use the following program code to load and save images using JavaSE library.
import java.awt.image.BufferedImage;
import java.io.File;
import java.io.IOException;
import javax.imageio.ImageIO;

public class LoadingImage_JSE_library {
   public static void main( String[] args ) throws IOException {
      //Input File
      File input = new File("C:/EXAMPLES/OpenCV/sample.jpg");

      //Reading the image
      BufferedImage image = ImageIO.read(input);

      //Saving the image with a different name
      File ouptut = new File("C:/OpenCV/sample.jpg");
      ImageIO.write(image, "jpg", ouptut);

      System.out.println("image Saved");
   }
}
On executing the above program, you will get the following output −
image Saved
If you open the specified path, you can observe the saved image as follows −

OpenCV - Reading Images
The Imgcodecs class of the package org.opencv.imgcodecs provides methods to read and write images. Using OpenCV, you can read an image and store it in a matrix (perform transformations on the matrix if needed). Later, you can write the processed matrix to a file.
The read() method of the Imgcodecs class is used to read an image using OpenCV. Following is the syntax of this method.
imread(filename)
It accepts an argument (filename), a variable of the String type representing the path of the file that is to be read.
Given below are the steps to be followed to read images in Java using OpenCV library.
Step 1: Load the OpenCV native library
Load the OpenCV native library using the load() method, as shown below.
//Loading the core library
System.loadLibrary(Core.NATIVE_LIBRARY_NAME);
Step 2: Instantiate the Imgcodecs class
Instantiate the Imgcodecs class.
//Instantiating the Imgcodecs class
Imgcodecs imageCodecs = new Imgcodecs();
Step 3: Reading the image
Read the image using the method imread(). This method accepts a string argument representing the path of the image and returns the image read as Mat object.
//Reading the Image from the file
Mat matrix = imageCodecs.imread(Path of the image);
Example
The following program code shows how you can read an image using OpenCV library.
import org.opencv.core.Core;
import org.opencv.core.Mat;
import org.opencv.imgcodecs.Imgcodecs;

public class ReadingImages {
   public static void main(String args[]) {
      //Loading the OpenCV core library
      System.loadLibrary( Core.NATIVE_LIBRARY_NAME );

      //Instantiating the Imagecodecs class
      Imgcodecs imageCodecs = new Imgcodecs();

      //Reading the Image from the file
      String file ="C:/EXAMPLES/OpenCV/sample.jpg";
      Mat matrix = imageCodecs.imread(file);

      System.out.println("Image Loaded");
   }
}
On executing the above program, OpenCV loads the specified image and displays the following output −
Image Loaded
OpenCV - Writing an Image
The write() method of the Imgcodecs class is used to write an image using OpenCV. To write an image, repeat the first three steps from the previous example.
To write an image, you need to invoke the imwrite() method of the Imgcodecs class.
Following is the syntax of this method.
imwrite(filename, mat)
This method accepts the following parameters −
filename − A String variable representing the path where to save the file.
mat − A Mat object representing the image to be written.
Example
Following program is an example to write an image using Java program using OpenCV library.
import org.opencv.core.Core;
import org.opencv.core.Mat;
import org.opencv.imgcodecs.Imgcodecs;

public class WritingImages {
   public static void main(String args[]) {
      //Loading the OpenCV core library
      System.loadLibrary(Core.NATIVE_LIBRARY_NAME);

      //Instantiating the imagecodecs class
      Imgcodecs imageCodecs = new Imgcodecs();

      //Reading the Image from the file and storing it in to a Matrix object
      String file ="C:/EXAMPLES/OpenCV/sample.jpg";
      Mat matrix = imageCodecs.imread(file);

      System.out.println("Image Loaded ..........");
      String file2 = "C:/EXAMPLES/OpenCV/sample_resaved.jpg";

      //Writing the image
      imageCodecs.imwrite(file2, matrix);
      System.out.println("Image Saved ............");
   }
}
On executing the above program, you will get the following output −
Image Loaded ..........
Image Saved ...........
If you open the specified path, you can observe the saved image as shown below −

OpenCV - GUI
In the earlier chapters, we have discussed how to read and save an image using OpenCV Java library. In addition to it, we can also display the loaded images in a separate window using GUI libraries such as AWT/Swings and JavaFX.
Converting Mat to Buffered Image
To read an image we use the method imread(). This method returns the image read in the form of Matrix. But, to use this image with GUI libraries (AWT/Swings and JavaFX), it should be converted as an object of the class BufferedImage of the package java.awt.image.BufferedImage.
Following are the steps to convert a Mat object of OpenCV to BufferedImage object.
Step 1: encode the Mat to MatOfByte
First of all, you need to convert the matrix to matrix of byte. You can do it using the method imencode() of the class Imgcodecs. Following is the syntax of this method.
imencode(ext, image, matOfByte);
This method accepts the following parameters −
Ext − A String parameter specifying the image format (.jpg, .png, etc.)
image − A Mat object of the image
matOfByte − An empty object of the class MatOfByte
Encode the image using this method as shown below.
//Reading the image
Mat image = Imgcodecs.imread(file);

//instantiating an empty MatOfByte class
MatOfByte matOfByte = new MatOfByte();

//Converting the Mat object to MatOfByte
Imgcodecs.imencode(".jpg", image, matOfByte);
Step 2: Convert the MatOfByte object to byte array
Convert the MatOfByte object into a byte array using the method toArray().
byte[] byteArray = matOfByte.toArray();
Step 3: Preparing the InputStream object
Prepare the InputStream object by passing the byte array created in the previous step to the constructor of the ByteArrayInputStream class.
//Preparing the InputStream object
InputStream in = new ByteArrayInputStream(byteArray);
Step 4: Preparing the InputStream object
Pass the Input Stream object created in the previous step to the read() method of the ImageIO class. This will return a BufferedImage object.
//Preparing the BufferedImage
BufferedImage bufImage = ImageIO.read(in);
Displaying Image using AWT/Swings
To display an image using the AWT/Swings frame, first of all, read an image using the imread() method and convert it into BufferedImage following the above-mentioned steps.
Then, instantiate the JFrame class and add the buffered image created to the ContentPane of the JFrame, as shown below −
//Instantiate JFrame
JFrame frame = new JFrame();

//Set Content to the JFrame
frame.getContentPane().add(new JLabel(new ImageIcon(bufImage)));
frame.pack();
frame.setVisible(true);
Example
The following program code shows how you can read an image and display it through swing window using OpenCV library.
import java.awt.image.BufferedImage;

import java.io.ByteArrayInputStream;
import java.io.InputStream;

import javax.imageio.ImageIO;
import javax.swing.ImageIcon;
import javax.swing.JFrame;
import javax.swing.JLabel;

import org.opencv.core.Core;
import org.opencv.core.Mat;
import org.opencv.core.MatOfByte;
import org.opencv.imgcodecs.Imgcodecs;

public class DisplayingImagesUsingSwings {
   public static void main(String args[]) throws Exception {
      //Loading the OpenCV core library
      System.loadLibrary( Core.NATIVE_LIBRARY_NAME );

      //Reading the Image from the file and storing it in to a Matrix object
      String file = "C:/EXAMPLES/OpenCV/sample.jpg";
      Mat image = Imgcodecs.imread(file);

      //Encoding the image
      MatOfByte matOfByte = new MatOfByte();
      Imgcodecs.imencode(".jpg", image, matOfByte);

      //Storing the encoded Mat in a byte array
      byte[] byteArray = matOfByte.toArray();

      //Preparing the Buffered Image
      InputStream in = new ByteArrayInputStream(byteArray);
      BufferedImage bufImage = ImageIO.read(in);

      //Instantiate JFrame
      JFrame frame = new JFrame();

      //Set Content to the JFrame
      frame.getContentPane().add(new JLabel(new ImageIcon(bufImage)));
      frame.pack();
      frame.setVisible(true);

      System.out.println("Image Loaded");
   }
}
On executing the above program, you will get the following output −
Image Loaded
In addition to that, you can see a window displaying the image loaded, as follows −
Displaying Image using JavaFX
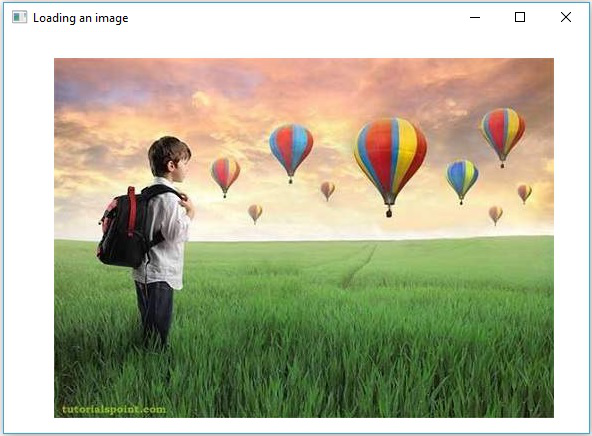
To display an image using JavaFX, first of all, read an image using the imread() method and convert it into BufferedImage. Then, convert the BufferedImage to WritableImage, as shown below.
WritableImage writableImage = SwingFXUtils.toFXImage(bufImage, null);
Pass this WritableImage object to the constructor of the ImageView class.
ImageView imageView = new ImageView(writableImage);
Example
The following program code shows how to read an image and display it through JavaFX window using OpenCV library.
import java.awt.image.BufferedImage;

import java.io.ByteArrayInputStream;
import java.io.IOException;
import java.io.InputStream;

import javafx.application.Application;
import javafx.embed.swing.SwingFXUtils;
import javafx.scene.Group;
import javafx.scene.Scene;
import javafx.scene.image.ImageView;
import javafx.scene.image.WritableImage;
import javafx.stage.Stage;

import javax.imageio.ImageIO;

import org.opencv.core.Core;
import org.opencv.core.Mat;
import org.opencv.core.MatOfByte;
import org.opencv.imgcodecs.Imgcodecs;

public class DisplayingImagesJavaFX extends Application {
   @Override
   public void start(Stage stage) throws IOException {
      WritableImage writableImage = loadImage();

      //Setting the image view
      ImageView imageView = new ImageView(writableImage);

      //Setting the position of the image
      imageView.setX(50);
      imageView.setY(25);

      //setting the fit height and width of the image view
      imageView.setFitHeight(400);
      imageView.setFitWidth(500);

      //Setting the preserve ratio of the image view
      imageView.setPreserveRatio(true);

      //Creating a Group object
      Group root = new Group(imageView);

      //Creating a scene object
      Scene scene = new Scene(root, 600, 400);

      //Setting title to the Stage
      stage.setTitle("Loading an image");

      //Adding scene to the stage
      stage.setScene(scene);

      //Displaying the contents of the stage
      stage.show();
   }
   public WritableImage loadImage() throws IOException {
      //Loading the OpenCV core library
      System.loadLibrary( Core.NATIVE_LIBRARY_NAME );

      //Reading the Image from the file and storing it in to a Matrix object
      String file ="C:/EXAMPLES/OpenCV/sample.jpg";
      Mat image = Imgcodecs.imread(file);

      //Encoding the image
      MatOfByte matOfByte = new MatOfByte();
      Imgcodecs.imencode(".jpg", image, matOfByte);

      //Storing the encoded Mat in a byte array
      byte[] byteArray = matOfByte.toArray();

      //Displaying the image
      InputStream in = new ByteArrayInputStream(byteArray);
      BufferedImage bufImage = ImageIO.read(in);

      System.out.println("Image Loaded");
      WritableImage writableImage = SwingFXUtils.toFXImage(bufImage, null);
      return writableImage;
   }
   public static void main(String args[]) {
      launch(args);
   }
}
On executing the above program, you will get the following output −
Image Loaded
In addition to that, you can see a window displaying the image loaded, as follows −
OpenCV - The IMREAD_XXX Flag
OpenCV supports various types of images such as colored, binary, grayscale, etc. Using the imread() method and predefined fields of the Imgcodecs class, you can read a given image as another type.
The flags parameter of imread() method (IMREAD_XXX)
In the earlier chapters, we have seen the syntax of imread() method of the Imgcodecs class. It accepts a string argument representing the location of the image that is to be read.
imread(filename)
The imread() method has another syntax.
imread(filename, int flags)
This syntax accepts two parameters −
filename − It accepts an argument (filename), a variable of the String type representing the path of the file that is to be read.
flags − An integer value representing a predefined flag value. For each value, this reads the given image as a specific type (gray scale color etc.)
Following is the table listing various fields provided in the Imgproc class as values for this parameter.
| S.No | Fields and Description |
|---|---|
| 1 |
IMREAD_COLOR If the flag is set to this value, the loaded image will be converted to a 3-channel BGR (Blue Green Red) color image. |
| 2 |
IMREAD_GRAYSCALE If the flag is set to this value, the loaded image will be converted to a single-channel grayscale image. |
| 3 |
IMREAD_LOAD_GDAL If the flag is set to this value, you can load the image using the gdal driver. |
| 4 |
IMREAD_ANYCOLOR If the flag is set to this value, the image is read in any possible color format. |
| 5 |
IMREAD_REDUCED_COLOR_2 IMREAD_REDUCED_COLOR_4 IMREAD_REDUCED_COLOR_8 If the flag is set to this value, the image is read as three-channel BGR, and the size of the image is reduced to ½, ¼th or ⅛th of the original size of the image with respect to the field used. |
| 6 |
IMREAD_REDUCED_GRAYSCALE_2 IMREAD_REDUCED_GRAYSCALE_4 IMREAD_REDUCED_GRAYSCALE_8 If the flag is set to this value, the image is read as a single-channel grayscale image, and the size of the image is reduced to ½, ¼th or ⅛th of the original size of the image with respect to the field used. |
| 7 |
IMREAD_UNCHANGED If the flag is set to this value, the loaded image is returned as it is. |
OpenCV - Reading an Image as Grayscale
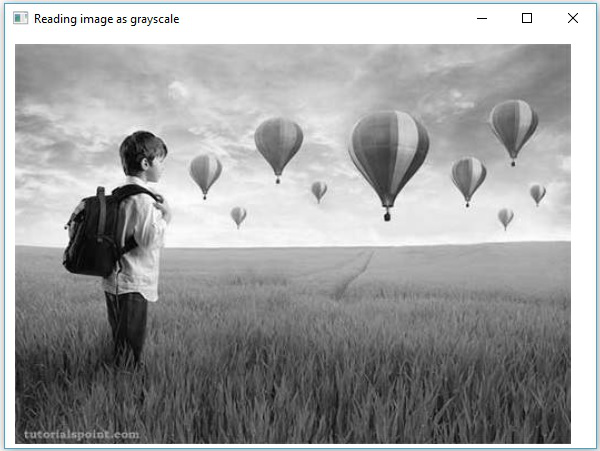
The following program demonstrates how to read a colored image as grayscale and display it using JavaFX window. In here, we have read the image by passing the flag IMREAD_GRAYSCALE along with the String holding the path of a colored image.
import java.awt.image.BufferedImage;

import org.opencv.core.Core;
import org.opencv.core.Mat;
import org.opencv.imgcodecs.Imgcodecs;

import javafx.application.Application;
import javafx.embed.swing.SwingFXUtils;
import javafx.scene.Group;
import javafx.scene.Scene;
import javafx.scene.image.ImageView;
import javafx.scene.image.WritableImage;
import javafx.stage.Stage;

public class ReadingAsGrayscale extends Application {
   @Override
   public void start(Stage stage) throws Exception {
      WritableImage writableImage = loadAndConvert();

      // Setting the image view
      ImageView imageView = new ImageView(writableImage);

      // Setting the position of the image
      imageView.setX(10);
      imageView.setY(10);

      // setting the fit height and width of the image view
      imageView.setFitHeight(400);
      imageView.setFitWidth(600);

      // Setting the preserve ratio of the image view
      imageView.setPreserveRatio(true);

      // Creating a Group object
      Group root = new Group(imageView);

      // Creating a scene object
      Scene scene = new Scene(root, 600, 400);

      // Setting title to the Stage
      stage.setTitle("Reading image as grayscale");

      // Adding scene to the stage
      stage.setScene(scene);

      // Displaying the contents of the stage
      stage.show();
   }
   public WritableImage loadAndConvert() throws Exception {
      // Loading the OpenCV core library
      System.loadLibrary( Core.NATIVE_LIBRARY_NAME );

      // Instantiating the imagecodecs class
      Imgcodecs imageCodecs = new Imgcodecs();

      String input = "C:/EXAMPLES/OpenCV/sample.jpg";

      // Reading the image
      Mat src = imageCodecs.imread(input, Imgcodecs.IMREAD_GRAYSCALE);

      byte[] data1 = new byte[src.rows() * src.cols() * (int)(src.elemSize())];
      src.get(0, 0, data1);

      // Creating the buffered image
      BufferedImage bufImage = new BufferedImage(src.cols(),src.rows(),
         BufferedImage.TYPE_BYTE_GRAY);

      // Setting the data elements to the image
      bufImage.getRaster().setDataElements(0, 0, src.cols(), src.rows(), data1);

      // Creating a WritableImage
      WritableImage writableImage = SwingFXUtils.toFXImage(bufImage, null);
      System.out.println("Image Read");
      return writableImage;
   }
   public static void main(String args[]) throws Exception {
      launch(args);
   }
}
Input Image
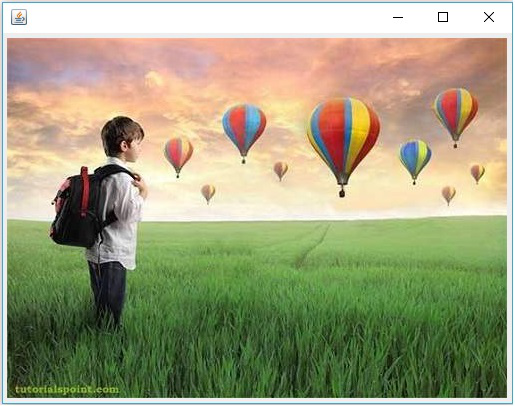
Assume that following is the input image sample.jpg specified in the above program.

Output Image
On executing the program, you will get the following output.
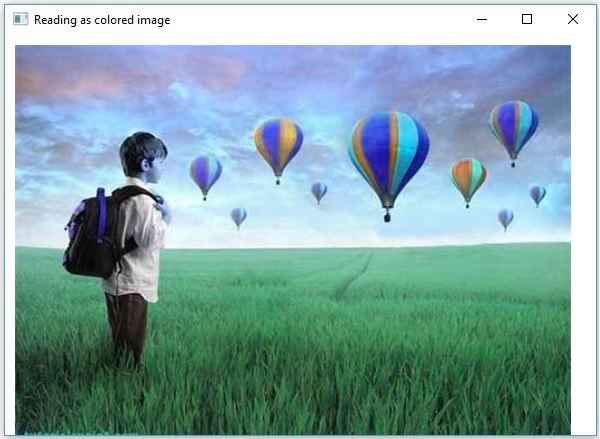
OpenCV - Reading Image as BGR
The following program demonstrates how to read a colored image as BGR type image and display it using JavaFX window. In here, we have read the image by passing the flag IMREAD_COLOR to the method imread() along with the String holding the path of a colored image.
import java.awt.image.BufferedImage;

import org.opencv.core.Core;
import org.opencv.core.Mat;
import org.opencv.imgcodecs.Imgcodecs;

import javafx.application.Application;
import javafx.embed.swing.SwingFXUtils;
import javafx.scene.Group;
import javafx.scene.Scene;
import javafx.scene.image.ImageView;
import javafx.scene.image.WritableImage;
import javafx.stage.Stage;

public class ReadingAsColored extends Application {
   @Override
   public void start(Stage stage) throws Exception {
      WritableImage writableImage = loadAndConvert();

      // Setting the image view
      ImageView imageView = new ImageView(writableImage);

      // Setting the position of the image
      imageView.setX(10);
      imageView.setY(10);

      // setting the fit height and width of the image view
      imageView.setFitHeight(400);
      imageView.setFitWidth(600);

      // Setting the preserve ratio of the image view
      imageView.setPreserveRatio(true);

      // Creating a Group object
      Group root = new Group(imageView);

      // Creating a scene object
      Scene scene = new Scene(root, 600, 400);

      // Setting title to the Stage
      stage.setTitle("Reading as colored image");

      // Adding scene to the stage
      stage.setScene(scene);

      // Displaying the contents of the stage
      stage.show();
   }
   public WritableImage loadAndConvert() throws Exception {
      // Loading the OpenCV core library
      System.loadLibrary( Core.NATIVE_LIBRARY_NAME );

      String input = "C:/EXAMPLES/OpenCV/sample.jpg";

      Mat dst = new Mat();

      // Reading the image
      Mat src = Imgcodecs.imread(input, Imgcodecs.IMREAD_COLOR);

      byte[] data1 = new byte[src.rows() * src.cols() * (int)(src.elemSize())];
      src.get(0, 0, data1);

      // Creating the buffered image
      BufferedImage bufImage = new BufferedImage(src.cols(),src.rows(),
         BufferedImage.TYPE_3BYTE_BGR);

      // Setting the data elements to the image
      bufImage.getRaster().setDataElements(0, 0, src.cols(), src.rows(), data1);

      // Creating a WritableImage
      WritableImage writableImage = SwingFXUtils.toFXImage(bufImage, null);

      System.out.println("Image read");
      return writableImage;
   }
   public static void main(String args[]) throws Exception {
      launch(args);
   }
}
Input Image
Assume that following is the input image sample.jpg specified in the above program.
Output Image
On executing the program, you will get the following output.
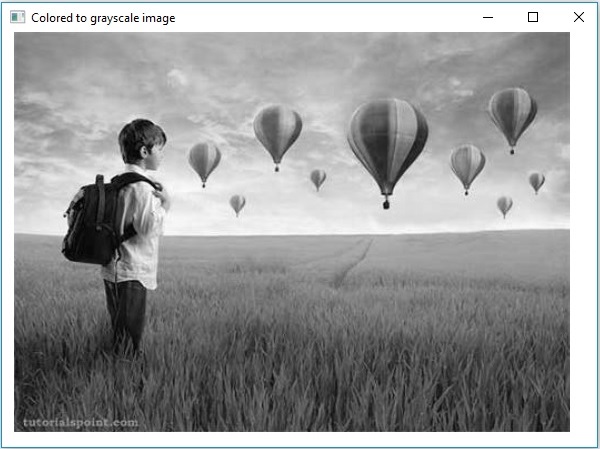
OpenCV - Colored Images to GrayScale
In the earlier chapters, we discussed how to read an input image as different types (binary, grayscale, BGR, etc.). In this chapter, we will learn how to convert one type of image to another.
The class named Imgproc of the package org.opencv.imgproc provides methods to convert an image from one color to another.
Converting Colored Images to Grayscale
A method named cvtColor() is used to convert colored images to grayscale. Following is the syntax of this method.
cvtColor(Mat src, Mat dst, int code)
This method accepts the following parameters −
src − A matrix representing the source.
dst − A matrix representing the destination.
code − An integer code representing the type of the conversion, for example, RGB to Grayscale.
You can convert colored images to gray scale by passing the code Imgproc.COLOR_RGB2GRAY along with the source and destination matrices as a parameter to the cvtColor() method.
Example
The following program demonstrates how to read a colored image as a grayscale image and display it using JavaFX window.
import java.awt.image.BufferedImage;

import org.opencv.core.Core;
import org.opencv.core.Mat;
import org.opencv.imgcodecs.Imgcodecs;
import org.opencv.imgproc.Imgproc;

import javafx.application.Application;
import javafx.embed.swing.SwingFXUtils;
import javafx.scene.Group;
import javafx.scene.Scene;
import javafx.scene.image.ImageView;
import javafx.scene.image.WritableImage;

import javafx.stage.Stage;

public class ColorToGrayscale extends Application {
   @Override
   public void start(Stage stage) throws Exception {
      WritableImage writableImage = loadAndConvert();

      // Setting the image view
      ImageView imageView = new ImageView(writableImage);

      // Setting the position of the image
      imageView.setX(10);
      imageView.setY(10);

      // setting the fit height and width of the image view
      imageView.setFitHeight(400);
      imageView.setFitWidth(600);

      // Setting the preserve ratio of the image view
      imageView.setPreserveRatio(true);

      // Creating a Group object
      Group root = new Group(imageView);

      // Creating a scene object
      Scene scene = new Scene(root, 600, 400);

      // Setting title to the Stage
      stage.setTitle("Colored to grayscale image");

      // Adding scene to the stage
      stage.setScene(scene);

      // Displaying the contents of the stage
      stage.show();
   }
   public WritableImage loadAndConvert() throws Exception {
      //Loading the OpenCV core library
      System.loadLibrary( Core.NATIVE_LIBRARY_NAME );

      String input = "C:/EXAMPLES/OpenCV/sample.jpg";

      //Reading the image
      Mat src = Imgcodecs.imread(input);

      //Creating the empty destination matrix
      Mat dst = new Mat();

      //Converting the image to gray sacle and saving it in the dst matrix
      Imgproc.cvtColor(src, dst, Imgproc.COLOR_RGB2GRAY);

      //Extracting data from the transformed image (dst)
      byte[] data1 = new byte[dst.rows() * dst.cols() * (int)(dst.elemSize())];
      dst.get(0, 0, data1);

      //Creating Buffered image using the data
      BufferedImage bufImage = new BufferedImage(dst.cols(),dst.rows(),
         BufferedImage.TYPE_BYTE_GRAY);

      //Setting the data elements to the image
      bufImage.getRaster().setDataElements(0, 0, dst.cols(), dst.rows(), data1);

      //Creating a WritableImage
      WritableImage writableImage = SwingFXUtils.toFXImage(bufImage, null);
      System.out.println("Converted to Grayscale");
      return writableImage;
   }
   public static void main(String args[]) throws Exception {
      launch(args);
   }
}
Input Image
Assume that following is the input image sample.jpg specified in the above program.
Output Image
On executing the program, you will get the following output.
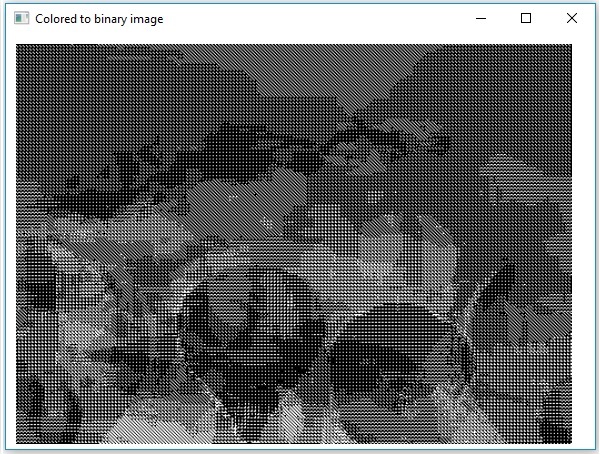
OpenCV - Colored Image to Binary
A method called threshold() is used to convert grayscale images to binary image. Following is the syntax of this method.
threshold(Mat src, Mat dst, double thresh, double maxval, int type)
This method accepts the following parameters −
mat − A Mat object representing the input image.
dst − A Mat object representing the output image.
thresh − An integer representing the threshold value.
maxval − An integer representing the maximum value to use with the THRESH_BINARY and THRESH_BINARY_INV thresholding types.
type − An integer code representing the type of the conversion, for example, RGB to Grayscale.
You can convert a grayscale image to binary image by passing the code Imgproc.THRESH_BINARY along with the values to the remaining parameters.
Example
The following program demonstrates how to read a colored image as a binary image and display it using JavaFX window.
import java.awt.image.BufferedImage;

import org.opencv.core.Core;
import org.opencv.core.Mat;
import org.opencv.imgcodecs.Imgcodecs;
import org.opencv.imgproc.Imgproc;

import javafx.application.Application;
import javafx.embed.swing.SwingFXUtils;
import javafx.scene.Group;
import javafx.scene.Scene;
import javafx.scene.image.ImageView;
import javafx.scene.image.WritableImage;
import javafx.stage.Stage;

public class ColorToBinary extends Application {
   @Override
   public void start(Stage stage) throws Exception {
      WritableImage writableImage = loadAndConvert();

      // Setting the image view
      ImageView imageView = new ImageView(writableImage);

      // Setting the position of the image
      imageView.setX(10);
      imageView.setY(10);

      // setting the fit height and width of the image view
      imageView.setFitHeight(400);
      imageView.setFitWidth(600);

      // Setting the preserve ratio of the image view
      imageView.setPreserveRatio(true);

      // Creating a Group object
      Group root = new Group(imageView);

      // Creating a scene object
      Scene scene = new Scene(root, 600, 400);

      // Setting title to the Stage
      stage.setTitle("Loading an image");

      // Adding scene to the stage
      stage.setScene(scene);

      // Displaying the contents of the stage
      stage.show();
   }
   public WritableImage loadAndConvert() throws Exception {
      // Loading the OpenCV core library
      System.loadLibrary( Core.NATIVE_LIBRARY_NAME );

      // Instantiating the Imgcodecs class
      Imgcodecs imageCodecs = new Imgcodecs();

      // File input = new File("C:/EXAMPLES/OpenCV/sample.jpg");
      String input = "C:/EXAMPLES/OpenCV/sample.jpg";

      // Reading the image
      Mat src = imageCodecs.imread(input);

      // Creating the destination matrix
      Mat dst = new Mat();

      // Converting to binary image...
      Imgproc.threshold(src, dst, 200, 500, Imgproc.THRESH_BINARY);

      // Extracting data from the transformed image (dst)
      byte[] data1 = new byte[dst.rows() * dst.cols() * (int)(dst.elemSize())];
      dst.get(0, 0, data1);

      // Creating Buffered image using the data
      BufferedImage bufImage = new BufferedImage(dst.cols(),dst.rows(),
         BufferedImage.TYPE_BYTE_GRAY);

      // Setting the data elements to the image
      bufImage.getRaster().setDataElements(0, 0, dst.cols(), dst.rows(), data1);

      // Creating a Writable image
      WritableImage writableImage = SwingFXUtils.toFXImage(bufImage, null);

      System.out.println("Converted to binary");
      return writableImage;
   }
   public static void main(String args[]) throws Exception {
      launch(args);
   }
}
Input Image
Assume that following is the input image sample.jpg specified in the above program.
Output Image
On executing the program, you will get the following output.
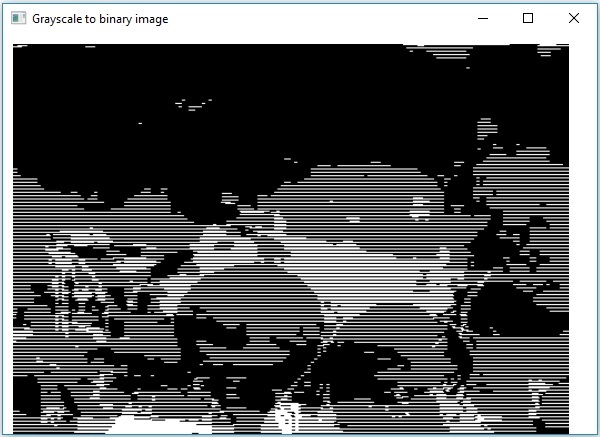
OpenCV - Grayscale to Binary
You can use the same method mentioned in the previous chapter to convert a grayscale image to a binary image. Just pass the path for a grayscale image as input to this program.
Example
The following program demonstrates how to read a grayscale image as a binary image and display it using JavaFX window.
import java.awt.image.BufferedImage;

import org.opencv.core.Core;
import org.opencv.core.Mat;
import org.opencv.imgcodecs.Imgcodecs;
import org.opencv.imgproc.Imgproc;

import javafx.application.Application;
import javafx.embed.swing.SwingFXUtils;
import javafx.scene.Group;
import javafx.scene.Scene;
import javafx.scene.image.ImageView;
import javafx.scene.image.WritableImage;
import javafx.stage.Stage;

public class GrayScaleToBinary extends Application {
   @Override
   public void start(Stage stage) throws Exception {
      WritableImage writableImage = loadAndConvert();

      // Setting the image view
      ImageView imageView = new ImageView(writableImage);

      // Setting the position of the image
      imageView.setX(10);
      imageView.setY(10);

      // Setting the fit height and width of the image view
      imageView.setFitHeight(400);
      imageView.setFitWidth(600);

      // Setting the preserve ratio of the image view
      imageView.setPreserveRatio(true);

      // Creating a Group object
      Group root = new Group(imageView);

      // Creating a scene object
      Scene scene = new Scene(root, 600, 400);

      // Setting title to the Stage
      stage.setTitle("Grayscale to binary image");

      // Adding scene to the stage
      stage.setScene(scene);

      // Displaying the contents of the stage
      stage.show();
   }
   public WritableImage loadAndConvert() throws Exception {
      // Loading the OpenCV core library
      System.loadLibrary( Core.NATIVE_LIBRARY_NAME );

      // Instantiating the imagecodecs class
      Imgcodecs imageCodecs = new Imgcodecs();

      String input = "E:/OpenCV/chap7/grayscale.jpg";

      // Reading the image
      Mat src = imageCodecs.imread(input);

      // Creating the destination matrix
      Mat dst = new Mat();

      // Converting to binary image...
      Imgproc.threshold(src, dst, 200, 500, Imgproc.THRESH_BINARY);

      // Extracting data from the transformed image (dst)
      byte[] data1 = new byte[dst.rows() * dst.cols() * (int)(dst.elemSize())];
      dst.get(0, 0, data1);

      // Creating Buffered image using the data
      BufferedImage bufImage = new BufferedImage(dst.cols(),dst.rows(),
         BufferedImage.TYPE_BYTE_BINARY);

      // Setting the data elements to the image
      bufImage.getRaster().setDataElements(0, 0, dst.cols(), dst.rows(), data1);

      // Creating a Writable image
      WritableImage writableImage = SwingFXUtils.toFXImage(bufImage, null);

      System.out.println("Converted to binary");
      return writableImage;
   }
   public static void main(String args[]) throws Exception {
      launch(args);
   }
}
Input Image
Assume that following is the input image sample.jpg specified in the above program.
Output Image
On executing the program, you will get the following output.
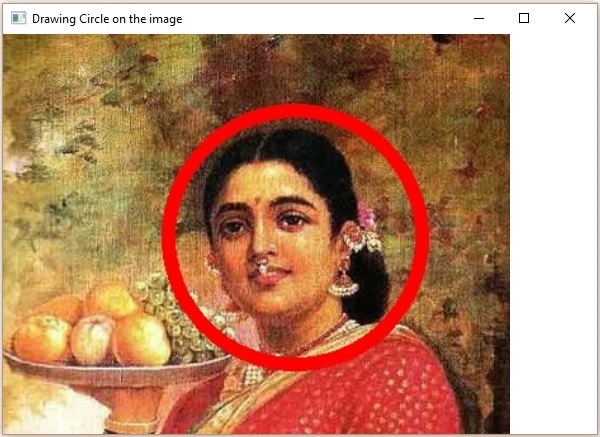
OpenCV - Drawing a Circle
You can draw various shapes like Circle, Rectangle, Line, Ellipse, Polylines, Convex, Polylines, Polylines on an image using the respective methods of the org.opencv.imgproc package.
You can draw a circle on an image using the method circle() of the imgproc class. Following is the syntax of this method −
circle(img, center, radius, color, thickness)
This method accepts the following parameters −
mat − A Mat object representing the image on which the circle is to be drawn.
point − A Point object representing the center of the circle.
radius − A variable of the type integer representing the radius of the circle.
scalar − A Scalar object representing the color of the circle. (BGR)
thickness − An integer representing the thickness of the circle; by default, the value of thickness is 1.
Example
The following program demonstrates how to draw a circle on an image and display it using JavaFX window.
import java.awt.image.BufferedImage;

import java.io.ByteArrayInputStream;
import java.io.InputStream;
import javax.imageio.ImageIO;

import javafx.application.Application;
import javafx.embed.swing.SwingFXUtils;
import javafx.scene.Group;
import javafx.scene.Scene;
import javafx.scene.image.ImageView;
import javafx.scene.image.WritableImage;
import javafx.stage.Stage;

import org.opencv.core.Core;
import org.opencv.core.Mat;
import org.opencv.core.MatOfByte;
import org.opencv.core.Point;
import org.opencv.core.Scalar;
import org.opencv.imgcodecs.Imgcodecs;
import org.opencv.imgproc.Imgproc;

public class DrawingCircle extends Application {
   Mat matrix = null;

   @Override
   public void start(Stage stage) throws Exception {
      // Capturing the snapshot from the camera
      DrawingCircle obj = new DrawingCircle();
      WritableImage writableImage = obj.LoadImage();

      // Setting the image view
      ImageView imageView = new ImageView(writableImage);

      // setting the fit height and width of the image view
      imageView.setFitHeight(600);
      imageView.setFitWidth(600);

      // Setting the preserve ratio of the image view
      imageView.setPreserveRatio(true);

      // Creating a Group object
      Group root = new Group(imageView);

      // Creating a scene object
      Scene scene = new Scene(root, 600, 400);

      // Setting title to the Stage
      stage.setTitle("Drawing Circle on the image");

      // Adding scene to the stage
      stage.setScene(scene);

      // Displaying the contents of the stage
      stage.show();
   }
   public WritableImage LoadImage() throws Exception {
      // Loading the OpenCV core library
      System.loadLibrary( Core.NATIVE_LIBRARY_NAME );

      // Reading the Image from the file and storing it in to a Matrix object
      String file ="E:/OpenCV/chap8/input.jpg";
      Mat matrix = Imgcodecs.imread(file);

      //Drawing a Circle
      Imgproc.circle (
         matrix,                 //Matrix obj of the image
         new Point(230, 160),    //Center of the circle
         100,                    //Radius
         new Scalar(0, 0, 255),  //Scalar object for color
         10                      //Thickness of the circle
      );

      // Encoding the image
      MatOfByte matOfByte = new MatOfByte();
      Imgcodecs.imencode(".jpg", matrix, matOfByte);

      // Storing the encoded Mat in a byte array
      byte[] byteArray = matOfByte.toArray();

      // Displaying the image
      InputStream in = new ByteArrayInputStream(byteArray);
      BufferedImage bufImage = ImageIO.read(in);
      this.matrix = matrix;

      // Creating the Writable Image
      WritableImage writableImage = SwingFXUtils.toFXImage(bufImage, null);

      return writableImage;
   }
   public static void main(String args[]) {
      launch(args);
   }
}
On executing the above program, you will get the following output −
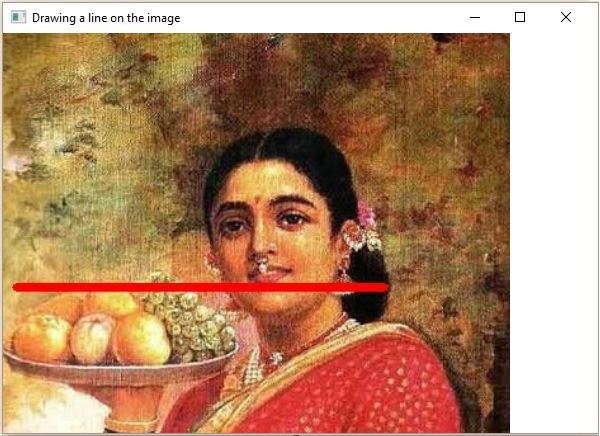
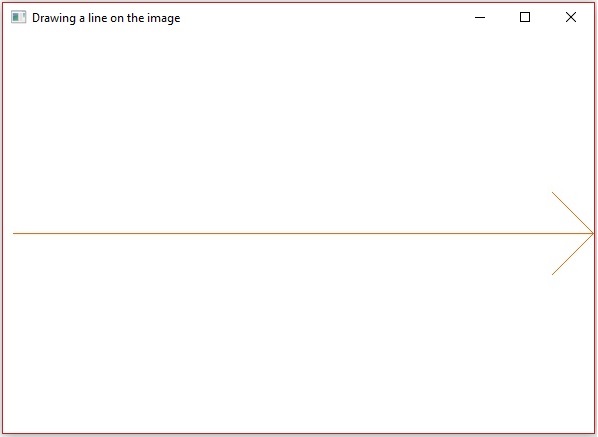
OpenCV - Drawing a Line
You can draw a line on an image using the method line() of the imgproc class. Following is the syntax of this method.
line(img, pt1, pt2, color, thickness)
This method accepts the following parameters −
mat − A Mat object representing the image on which the line is to be drawn.
pt1 and pt2 − Two Point objects representing the points between which the line is to be drawn.
scalar − A Scalar object representing the color of the circle. (BGR)
thickness − An integer representing the thickness of the line; by default, the value of thickness is 1.
Example
The following program demonstrates how to draw a line on an image and display it using JavaFX window.
import java.awt.image.BufferedImage;

import java.io.ByteArrayInputStream;
import java.io.InputStream;
import javax.imageio.ImageIO;

import javafx.application.Application;
import javafx.embed.swing.SwingFXUtils;
import javafx.scene.Group;
import javafx.scene.Scene;
import javafx.scene.image.ImageView;
import javafx.scene.image.WritableImage;
import javafx.stage.Stage;

import org.opencv.core.Core;
import org.opencv.core.Mat;
import org.opencv.core.MatOfByte;
import org.opencv.core.Point;
import org.opencv.core.Scalar;
import org.opencv.imgcodecs.Imgcodecs;
import org.opencv.imgproc.Imgproc;

public class DrawingLine extends Application {
   Mat matrix = null;

   @Override
   public void start(Stage stage) throws Exception {

      // Capturing the snapshot from the camera
      DrawingLine obj = new DrawingLine();
      WritableImage writableImage = obj.LoadImage();

      // Setting the image view
      ImageView imageView = new ImageView(writableImage);

      // setting the fit height and width of the image view
      imageView.setFitHeight(600);
      imageView.setFitWidth(600);

      // Setting the preserve ratio of the image view
      imageView.setPreserveRatio(true);

      // Creating a Group object
      Group root = new Group(imageView);

      // Creating a scene object
      Scene scene = new Scene(root, 600, 400);

      // Setting title to the Stage
      stage.setTitle("Drawing a line on the image");

      // Adding scene to the stage
      stage.setScene(scene);

      // Displaying the contents of the stage
      stage.show();
   }
   public WritableImage LoadImage() throws Exception {
      // Loading the OpenCV core library
      System.loadLibrary( Core.NATIVE_LIBRARY_NAME );

      // Reading the Image from the file and storing it in to a Matrix object
      String file ="E:/OpenCV/chap8/input.jpg";
      Mat matrix = Imgcodecs.imread(file);

      // Drawing a line
      Imgproc.line (
         matrix,                    //Matrix obj of the image
         new Point(10, 200),        //p1
         new Point(300, 200),       //p2
         new Scalar(0, 0, 255),     //Scalar object for color
         5                          //Thickness of the line
      );
      // Encoding the image
      MatOfByte matOfByte = new MatOfByte();
      Imgcodecs.imencode(".jpg", matrix, matOfByte);

      // Storing the encoded Mat in a byte array
      byte[] byteArray = matOfByte.toArray();

      // Displaying the image
      InputStream in = new ByteArrayInputStream(byteArray);
      BufferedImage bufImage = ImageIO.read(in);

      this.matrix = matrix;

      // Creating the Writable Image
      WritableImage writableImage = SwingFXUtils.toFXImage(bufImage, null);
      return writableImage;
   }
   public static void main(String args[]) {
      launch(args);
   }
}
On executing the above program, you will get the following output −
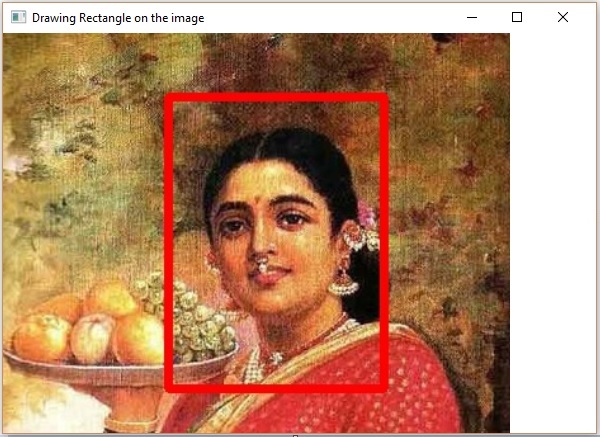
OpenCV - Drawing a Rectangle
You can draw a rectangle on an image using the method rectangle() of the imgproc class. Following is the syntax of this method −
rectangle(img, pt1, pt2, color, thickness)
This method accepts the following parameters −
mat − A Mat object representing the image on which the rectangle is to be drawn.
pt1 and pt2 − Two Point objects representing the vertices of the rectangle that is to be drawn.
scalar − A Scalar object representing the color of the rectangle. (BGR)
thickness − An integer representing the thickness of the rectangle; by default, the value of thickness is 1.
Example
The following example demonstrates how to draw a rectangle on an image and display it using JavaFX window.
import java.awt.image.BufferedImage;

import java.io.ByteArrayInputStream;
import java.io.InputStream;
import javax.imageio.ImageIO;

import javafx.application.Application;
import javafx.embed.swing.SwingFXUtils;
import javafx.scene.Group;
import javafx.scene.Scene;
import javafx.scene.image.ImageView;
import javafx.scene.image.WritableImage;
import javafx.stage.Stage;

import org.opencv.core.Core;
import org.opencv.core.Mat;
import org.opencv.core.MatOfByte;
import org.opencv.core.Point;
import org.opencv.core.Scalar;
import org.opencv.imgcodecs.Imgcodecs;
import org.opencv.imgproc.Imgproc;

public class DrawingRectangle extends Application {
   Mat matrix = null;

   @Override
   public void start(Stage stage) throws Exception {
      // Capturing the snapshot from the camera
      DrawingRectangle obj = new DrawingRectangle();
      WritableImage writableImage = obj.LoadImage();

      // Setting the image view
      ImageView imageView = new ImageView(writableImage);

      // setting the fit height and width of the image view
      imageView.setFitHeight(600);
      imageView.setFitWidth(600);

      // Setting the preserve ratio of the image view
      imageView.setPreserveRatio(true);

      // Creating a Group object
      Group root = new Group(imageView);

      // Creating a scene object
      Scene scene = new Scene(root, 600, 400);

      // Setting title to the Stage
      stage.setTitle("Drawing Rectangle on the image");

      // Adding scene to the stage
      stage.setScene(scene);

      // Displaying the contents of the stage
      stage.show();
   }
   public WritableImage LoadImage() throws Exception {
      // Loading the OpenCV core library
      System.loadLibrary( Core.NATIVE_LIBRARY_NAME );

      // Reading the Image from the file and storing it in to a Matrix object
      String file ="E:/OpenCV/chap8/input.jpg";
      Mat matrix = Imgcodecs.imread(file);

      // Drawing a Rectangle
      Imgproc.rectangle (
         matrix,                    //Matrix obj of the image
         new Point(130, 50),        //p1
         new Point(300, 280),       //p2
         new Scalar(0, 0, 255),     //Scalar object for color
         5                          //Thickness of the line
      );

      // Encoding the image
      MatOfByte matOfByte = new MatOfByte();
      Imgcodecs.imencode(".jpg", matrix, matOfByte);

      // Storing the encoded Mat in a byte array
      byte[] byteArray = matOfByte.toArray();

      // Displaying the image
      InputStream in = new ByteArrayInputStream(byteArray);
      BufferedImage bufImage = ImageIO.read(in);

      this.matrix = matrix;

      // Creating the Writable Image
      WritableImage writableImage = SwingFXUtils.toFXImage(bufImage, null);
      return writableImage;
   }
   public static void main(String args[]) {
      launch(args);
   }
}
On executing the above program, you will get the following output −
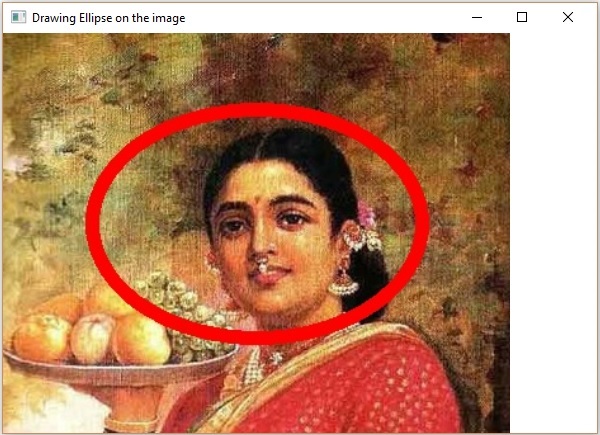
OpenCV - Drawing an Ellipse
You can draw an ellipse on an image using the method rectangle() of the imgproc class. Following is the syntax of this method −
ellipse(img, box, color, thickness)
This method accepts the following parameters −
mat − A Mat object representing the image on which the Rectangle is to be drawn.
box − A RotatedRect object (The ellipse is drawn inscribed in this rectangle.)
scalar − A Scalar object representing the color of the Rectangle. (BGR)
thickness − An integer representing the thickness of the Rectangle; by default, the value of thickness is 1.
The constructor of the RotatedRect class accepts an object of the class Point, an object of the class Size, and a variable of the type double, as shown below.
RotatedRect(Point c, Size s, double a)
Example
The following program demonstrates how to draw an ellipse on an image and display it using JavaFX window.
import java.awt.image.BufferedImage;

import java.io.ByteArrayInputStream;
import java.io.InputStream;
import javax.imageio.ImageIO;

import javafx.application.Application;
import javafx.embed.swing.SwingFXUtils;
import javafx.scene.Group;
import javafx.scene.Scene;
import javafx.scene.image.ImageView;
import javafx.scene.image.WritableImage;
import javafx.stage.Stage;

import org.opencv.core.Core;
import org.opencv.core.Mat;
import org.opencv.core.MatOfByte;
import org.opencv.core.Point;
import org.opencv.core.RotatedRect;
import org.opencv.core.Scalar;
import org.opencv.core.Size;
import org.opencv.imgcodecs.Imgcodecs;
import org.opencv.imgproc.Imgproc;

public class DrawingEllipse extends Application {
   Mat matrix = null;

   @Override
   public void start(Stage stage) throws Exception {
      // Capturing the snapshot from the camera
      DrawingEllipse obj = new DrawingEllipse();
      WritableImage writableImage = obj.LoadImage();

      // Setting the image view
      ImageView imageView = new ImageView(writableImage);

      // setting the fit height and width of the image view
      imageView.setFitHeight(600);
      imageView.setFitWidth(600);

      // Setting the preserve ratio of the image view
      imageView.setPreserveRatio(true);

      // Creating a Group object
      Group root = new Group(imageView);

      // Creating a scene object
      Scene scene = new Scene(root, 600, 400);

      // Setting title to the Stage
      stage.setTitle("Drawing Ellipse on the image");

      // Adding scene to the stage
      stage.setScene(scene);

      // Displaying the contents of the stage
      stage.show();
   }
   public WritableImage LoadImage() throws Exception {
      // Loading the OpenCV core library
      System.loadLibrary( Core.NATIVE_LIBRARY_NAME );

      // Reading the Image from the file and storing it in to a Matrix object
      String file ="E:/OpenCV/chap8/input.jpg";
      Mat matrix = Imgcodecs.imread(file);

      // Drawing an Ellipse
      Imgproc.ellipse (
         matrix,                          //Matrix obj of the image
         new RotatedRect (                // RotatedRect(Point c, Size s, double a)
            new Point(200, 150),
            new Size(260, 180), 180
         ),
         new Scalar(0, 0, 255),           //Scalar object for color
         10                               //Thickness of the line
      );

      // Encoding the image
      MatOfByte matOfByte = new MatOfByte();
      Imgcodecs.imencode(".jpg", matrix, matOfByte);

      // Storing the encoded Mat in a byte array
      byte[] byteArray = matOfByte.toArray();

      // Displaying the image
      InputStream in = new ByteArrayInputStream(byteArray);
      BufferedImage bufImage = ImageIO.read(in);

      this.matrix = matrix;

      // Creating the Writable Image
      WritableImage writableImage = SwingFXUtils.toFXImage(bufImage, null);

      return writableImage;
   }
   public static void main(String args[]) {
      launch(args);
   }
}
On executing the above program, you will get the following output −
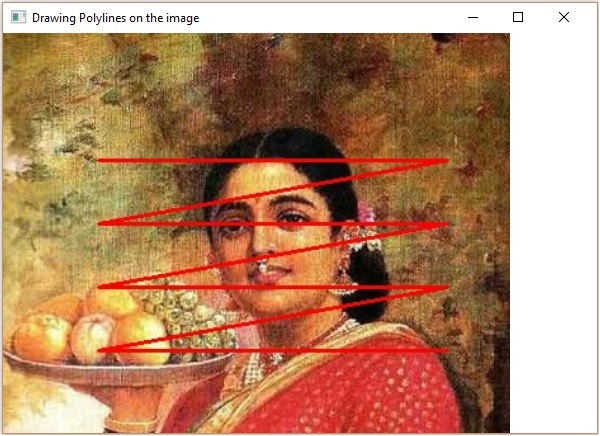
OpenCV - Drawing Polylines
You can draw Polylines on an image using the method polylines() of the imgproc class. Following is the syntax of this method.
polylines(img, pts, isClosed, color, thickness)
This method accepts the following parameters −
mat − A Mat object representing the image on which the Polylines are to be drawn.
pts − A List object holding the objects of the type MatOfPoint.
isClosed − A parameter of the type boolean specifying weather the polylines are closed.
scalar − A Scalar object representing the color of the Polylines. (BGR)
thickness − An integer representing the thickness of the Polylines; by default, the value of thickness is 1.
The constructor of the MatOfPoint class accepts objects of the class Point.
MatOfPoint(Point... a)
Example
The following program demonstrates how to draw polylines on an image and display it using JavaFX window.
import java.awt.image.BufferedImage;

import java.io.ByteArrayInputStream;
import java.io.InputStream;

import java.util.ArrayList;
import java.util.List;
import javax.imageio.ImageIO;

import javafx.application.Application;
import javafx.embed.swing.SwingFXUtils;
import javafx.scene.Group;
import javafx.scene.Scene;
import javafx.scene.image.ImageView;
import javafx.scene.image.WritableImage;
import javafx.stage.Stage;

import org.opencv.core.Core;
import org.opencv.core.Mat;
import org.opencv.core.MatOfByte;
import org.opencv.core.MatOfPoint;
import org.opencv.core.Point;
import org.opencv.core.Scalar;
import org.opencv.imgcodecs.Imgcodecs;
import org.opencv.imgproc.Imgproc;

public class DrawingPolyLines extends Application {
   Mat matrix = null;

   @Override
   public void start(Stage stage) throws Exception {
      // Capturing the snapshot from the camera
      DrawingPolyLines obj = new DrawingPolyLines();
      WritableImage writableImage = obj.LoadImage();

      // Setting the image view
      ImageView imageView = new ImageView(writableImage);

      // setting the fit height and width of the image view
      imageView.setFitHeight(600);
      imageView.setFitWidth(600);

      // Setting the preserve ratio of the image view
      imageView.setPreserveRatio(true);

      // Creating a Group object
      Group root = new Group(imageView);

      // Creating a scene object
      Scene scene = new Scene(root, 600, 400);

      // Setting title to the Stage
      stage.setTitle("Drawing Polylines on the image");

      // Adding scene to the stage
      stage.setScene(scene);

      // Displaying the contents of the stage
      stage.show();
   }
   public WritableImage LoadImage() throws Exception {
      // Loading the OpenCV core library
      System.loadLibrary( Core.NATIVE_LIBRARY_NAME );

      // Reading the Image from the file and storing it in to a Matrix object
      String file ="E:/OpenCV/chap8/input.jpg";
      Mat matrix = Imgcodecs.imread(file);

      List<MatOfPoint> list = new ArrayList();
      list.add(
         new MatOfPoint (
            new Point(75, 100), new Point(350, 100),
            new Point(75, 150), new Point(350, 150),
            new Point(75, 200), new Point(350, 200),
            new Point(75, 250), new Point(350, 250)
         )
      );
      // Drawing polylines
      Imgproc.polylines (
         matrix,                    // Matrix obj of the image
         list,                      // java.util.List<MatOfPoint> pts
         false,                     // isClosed
         new Scalar(0, 0, 255),     // Scalar object for color
         2                          // Thickness of the line
      );
      // Encoding the image
      MatOfByte matOfByte = new MatOfByte();
      Imgcodecs.imencode(".jpg", matrix, matOfByte);

      // Storing the encoded Mat in a byte array
      byte[] byteArray = matOfByte.toArray();

      // Displaying the image
      InputStream in = new ByteArrayInputStream(byteArray);
      BufferedImage bufImage = ImageIO.read(in);

      this.matrix = matrix;

      // Creating the Writable Image
      WritableImage writableImage = SwingFXUtils.toFXImage(bufImage, null);
      return writableImage;
   }
   public static void main(String args[]) {
      launch(args);
   }
}
On executing the above program, you will get the following output −
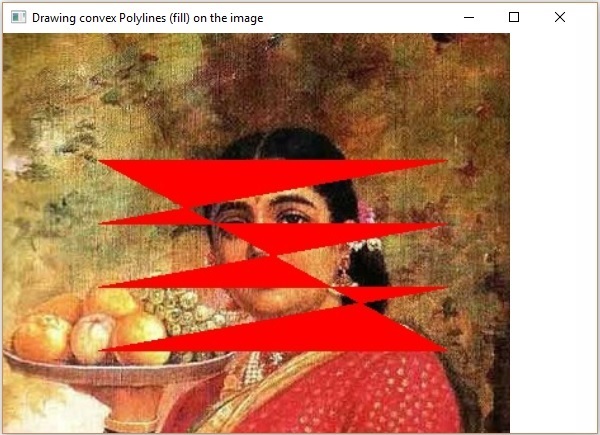
OpenCV - Drawing Convex Polylines
You can draw convex polylines on an image using the method fillconvexPoly() of the imgproc class. Following is the syntax of this method.
fillConvexPoly(Mat img, MatOfPoint points, Scalar color)
This method accepts the following parameters −
mat − A Mat object representing the image on which the convex Polylines are to be drawn.
points − A MatOfPoint object representing points between which the convex polylines are to be drawn.
scalar − A Scalar object representing the color of the convex Polylines. (BGR)
The constructor of the MatOfPoint class accepts objects of the class Point.
MatOfPoint(Point... a)
Example
The following program demonstrates how to draw convex polylines on an image and display it using JavaFX window.
import java.awt.image.BufferedImage;

import java.io.ByteArrayInputStream;
import java.io.InputStream;
import javax.imageio.ImageIO;

import javafx.application.Application;
import javafx.embed.swing.SwingFXUtils;
import javafx.scene.Group;
import javafx.scene.Scene;
import javafx.scene.image.ImageView;
import javafx.scene.image.WritableImage;
import javafx.stage.Stage;

import org.opencv.core.Core;
import org.opencv.core.Mat;
import org.opencv.core.MatOfByte;
import org.opencv.core.MatOfPoint;
import org.opencv.core.Point;
import org.opencv.core.Scalar;
import org.opencv.imgcodecs.Imgcodecs;
import org.opencv.imgproc.Imgproc;

public class FillConvexPoly extends Application {
   Mat matrix = null;

   @Override
   public void start(Stage stage) throws Exception {
      // Capturing the snapshot from the camera
      FillConvexPoly obj = new FillConvexPoly();
      WritableImage writableImage = obj.LoadImage();

      // Setting the image view
      ImageView imageView = new ImageView(writableImage);

      // setting the fit height and width of the image view
      imageView.setFitHeight(600);
      imageView.setFitWidth(600);

      //Setting the preserve ratio of the image view
      imageView.setPreserveRatio(true);

      // Creating a Group object
      Group root = new Group(imageView);

      // Creating a scene object
      Scene scene = new Scene(root, 600, 400);

      // Setting title to the Stage
      stage.setTitle("Drawing convex Polylines (fill) on the image");

      // Adding scene to the stage
      stage.setScene(scene);

      // Displaying the contents of the stage
      stage.show();
   }
   public WritableImage LoadImage() throws Exception {
      // Loading the OpenCV core library
      System.loadLibrary( Core.NATIVE_LIBRARY_NAME );

      // Reading the Image from the file and storing it in to a Matrix object
      String file ="E:/OpenCV/chap8/input.jpg";
      Mat matrix = Imgcodecs.imread(file);

      MatOfPoint matOfPoint = new MatOfPoint (
         new Point(75, 100), new Point(350, 100),
         new Point(75, 150), new Point(350, 150),
         new Point(75, 200), new Point(350, 200),
         new Point(75, 250), new Point(350, 250)
      );
      // Drawing polylines
      Imgproc.fillConvexPoly (
         matrix,                       // Matrix obj of the image
         matOfPoint,                   // java.util.List<MatOfPoint> pts
         new Scalar(0, 0, 255)         // Scalar object for color
      );
      // Encoding the image
      MatOfByte matOfByte = new MatOfByte();
      Imgcodecs.imencode(".jpg", matrix, matOfByte);

      // Storing the encoded Mat in a byte array
      byte[] byteArray = matOfByte.toArray();

      // Displaying the image
      InputStream in = new ByteArrayInputStream(byteArray);
      BufferedImage bufImage = ImageIO.read(in);
      this.matrix = matrix;

      // Creating the Writable Image
      WritableImage writableImage = SwingFXUtils.toFXImage(bufImage, null);
      return writableImage;
   }
   public static void main(String args[]) {
      launch(args);
   }
}
On executing the above program, you will get the following output −
OpenCV - Drawing Arrowed Lines
You can draw an arrowed line on an image using the method arrowedLine() of the imgproc class. Following is the syntax of this method −
arrowedLine(Mat img, Point pt1, Point pt2, Scalar color)
This method accepts the following parameters −
mat − A Mat object representing the image on which the arrowed line is to be drawn.
pt1 and pt2 − Two Point objects representing the points between which the arrowed line is to be drawn.
scalar − A Scalar object representing the color of the arrowed line. (BGR)
Example
The following program demonstrates how to draw arrowed line on an image and display it using JavaFX window.
import java.awt.image.BufferedImage;

import java.io.ByteArrayInputStream;
import java.io.InputStream;
import javax.imageio.ImageIO;

import javafx.application.Application;
import javafx.embed.swing.SwingFXUtils;
import javafx.scene.Group;
import javafx.scene.Scene;
import javafx.scene.image.ImageView;
import javafx.scene.image.WritableImage;
import javafx.stage.Stage;

import org.opencv.core.Core;
import org.opencv.core.Mat;
import org.opencv.core.MatOfByte;
import org.opencv.core.Point;
import org.opencv.core.Scalar;
import org.opencv.imgcodecs.Imgcodecs;
import org.opencv.imgproc.Imgproc;

public class DrawingArrowedLine extends Application {
   Mat matrix = null;

   @Override
   public void start(Stage stage) throws Exception {
      // Capturing the snapshot from the camera
      DrawingArrowedLine obj = new DrawingArrowedLine();
      WritableImage writableImage = obj.LoadImage();

      // Setting the image view
      ImageView imageView = new ImageView(writableImage);

      // setting the fit height and width of the image view
      imageView.setFitHeight(600);
      imageView.setFitWidth(600);

      // Setting the preserve ratio of the image view
      imageView.setPreserveRatio(true);

      // Creating a Group object
      Group root = new Group(imageView);

      // Creating a scene object
      Scene scene = new Scene(root, 600, 400);

      // Setting title to the Stage
      stage.setTitle("Drawing a line on the image");

      // Adding scene to the stage
      stage.setScene(scene);

      // Displaying the contents of the stage
      stage.show();
   }
   public WritableImage LoadImage() throws Exception {
      // Loading the OpenCV core library
      System.loadLibrary( Core.NATIVE_LIBRARY_NAME );

      // Reading the Image from the file and storing it in to a Matrix object
      String file ="C:/EXAMPLES/OpenCV/Aish.jpg";
      Mat matrix = Imgcodecs.imread(file);

      //Drawing a line
      Imgproc.arrowedLine(
         matrix,                       // Matrix obj of the image
         new Point(10, 200),           // p1
         new Point(590, 200),          // p2
         new Scalar(0, 100, 255)       // Scalar object for color
      );

      // arrowedLine(Mat img, Point pt1, Point pt2, Scalar color)
      // Encoding the image
      MatOfByte matOfByte = new MatOfByte();
      Imgcodecs.imencode(".jpg", matrix, matOfByte);

      // Storing the encoded Mat in a byte array
      byte[] byteArray = matOfByte.toArray();

      // Displaying the image
      InputStream in = new ByteArrayInputStream(byteArray);
      BufferedImage bufImage = ImageIO.read(in);
      this.matrix = matrix;

      // Creating the Writable Image
      WritableImage writableImage = SwingFXUtils.toFXImage(bufImage, null);

      return writableImage;
   }
   public static void main(String args[]) {
      launch(args);
   }
}
On executing the above program, you will get the following output −
OpenCV - Adding Text
You can add text to an image using the method arrowedLine() of the imgproc class. Following is the syntax of this method.
putText(img, text, org, fontFace, fontScale, Scalar color, int thickness)
This method accepts the following parameters −
mat − A Mat object representing the image to which the text is to be added.
text − A string variable of representing the text that is to be added.
org − A Point object representing the bottom left corner text string in the image.
fontFace − A variable of the type integer representing the font type.
fontScale − A variable of the type double representing the scale factor that is multiplied by the font-specific base size.
scalar − A Scalar object representing the color of the text that is to be added. (BGR)
thickness − An integer representing the thickness of the line by default, the value of thickness is 1.
Example
The following program demonstrates how to add text to an image and display it using JavaFX window.
import java.awt.image.BufferedImage;

import java.io.ByteArrayInputStream;
import java.io.InputStream;
import javax.imageio.ImageIO;

import javafx.application.Application;
import javafx.embed.swing.SwingFXUtils;
import javafx.scene.Group;
import javafx.scene.Scene;
import javafx.scene.image.ImageView;
import javafx.scene.image.WritableImage;
import javafx.stage.Stage;

import org.opencv.core.Core;
import org.opencv.core.Mat;
import org.opencv.core.MatOfByte;
import org.opencv.core.Point;
import org.opencv.core.Scalar;
import org.opencv.imgcodecs.Imgcodecs;
import org.opencv.imgproc.Imgproc;

public class AddingTextToImage extends Application {
   Mat matrix = null;

   @Override
   public void start(Stage stage) throws Exception {
      // Capturing the snapshot from the camera
      AddingTextToImage obj = new AddingTextToImage();
      WritableImage writableImage = obj.LoadImage();

      // Setting the image view
      ImageView imageView = new ImageView(writableImage);

      // setting the fit height and width of the image view
      imageView.setFitHeight(600);
      imageView.setFitWidth(600);

      // Setting the preserve ratio of the image view
      imageView.setPreserveRatio(true);

      // Creating a Group object
      Group root = new Group(imageView);

      // Creating a scene object
      Scene scene = new Scene(root, 600, 400);

      // Setting title to the Stage
      stage.setTitle("Adding text to an image");

      // Adding scene to the stage
      stage.setScene(scene);

      // Displaying the contents of the stage
      stage.show();
   }
   public WritableImage LoadImage() throws Exception {
      // Loading the OpenCV core library
      System.loadLibrary( Core.NATIVE_LIBRARY_NAME );

      // Reading the Image from the file and storing it in to a Matrix object
      String file ="E:/OpenCV/chap8/input.jpg";
      Mat matrix = Imgcodecs.imread(file);

      // Adding Text
      Imgproc.putText (
         matrix,                          // Matrix obj of the image
         "Ravivarma's Painting",          // Text to be added
         new Point(10, 50),               // point
         Core.FONT_HERSHEY_SIMPLEX ,      // front face
         1,                               // front scale
         new Scalar(0, 0, 0),             // Scalar object for color
         4                                // Thickness
      );

      // Encoding the image
      MatOfByte matOfByte = new MatOfByte();
      Imgcodecs.imencode(".jpg", matrix, matOfByte);

      // Storing the encoded Mat in a byte array
      byte[] byteArray = matOfByte.toArray();

      // Displaying the image
      InputStream in = new ByteArrayInputStream(byteArray);
      BufferedImage bufImage = ImageIO.read(in);
      this.matrix = matrix;

      //Creating the Writable Image
      WritableImage writableImage = SwingFXUtils.toFXImage(bufImage, null);
      return writableImage;
   }
   public static void main(String args[]) {
      launch(args);
   }
}
On executing the above program, you will get the following output −
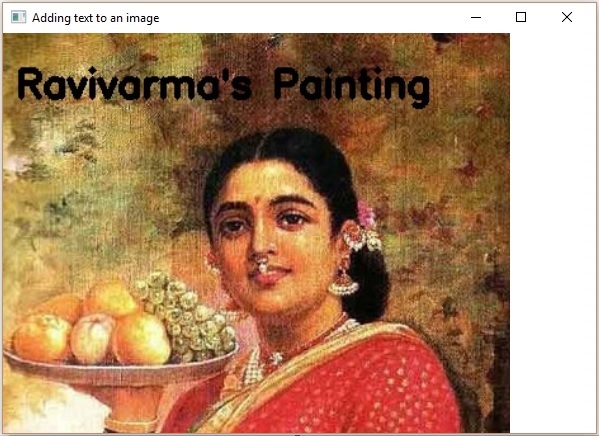
OpenCV - Blur (Averaging)
Blurring (smoothing) is the commonly used image processing operation for reducing the image noise. The process removes high-frequency content, like edges, from the image and makes it smooth.
In general blurring is achieved by convolving (each element of the image is added to its local neighbors, weighted by the kernel) the image through a low pass filter kernel.
Blur (Averaging)
During this operation, the image is convolved with a box filter (normalized). In this process, the central element of the image is replaced by the average of all the pixels in the kernel area.
You can perform this operation on an image using the method blur() of the imgproc class. Following is the syntax of this method −
blur(src, dst, ksize, anchor, borderType)
This method accepts the following parameters −
src − A Mat object representing the source (input image) for this operation.
dst − A Mat object representing the destination (output image) for this operation.
ksize − A Size object representing the size of the kernel.
anchor − A variable of the type integer representing the anchor point.
borderType − A variable of the type integer representing the type of the border to be used to the output.
Example
The following program demonstrates how to perform the averaging (blur) operation on an image.
import org.opencv.core.Core;
import org.opencv.core.Mat;
import org.opencv.core.Point;
import org.opencv.core.Size;
import org.opencv.imgcodecs.Imgcodecs;
import org.opencv.imgproc.Imgproc;

public class BlurTest {
   public static void main(String args[]) {
      // Loading the OpenCV core library
      System.loadLibrary( Core.NATIVE_LIBRARY_NAME );

      // Reading the Image from the file and storing it in to a Matrix object
      String file ="C:/EXAMPLES/OpenCV/sample.jpg";
      Mat src = Imgcodecs.imread(file);

      // Creating an empty matrix to store the result
      Mat dst = new Mat();

      // Creating the Size and Point objects
      Size size = new Size(45, 45);
      Point point = new Point(20, 30);

      // Applying Blur effect on the Image
      Imgproc.blur(src, dst, size, point, Core.BORDER_DEFAULT);

      // blur(Mat src, Mat dst, Size ksize, Point anchor, int borderType)
      // Writing the image
      Imgcodecs.imwrite("E:/OpenCV/chap9/blur.jpg", dst);
      System.out.println("Image processed");
   }
}
Assume that following is the input image sample.jpg specified in the above program.
Output
On executing the program, you will get the following output −
Image Processed
If you open the specified path, you can observe the output image as follows −
OpenCV - Gaussian Blur
In Gaussian Blur operation, the image is convolved with a Gaussian filter instead of the box filter. The Gaussian filter is a low-pass filter that removes the high-frequency components are reduced.
You can perform this operation on an image using the Gaussianblur() method of the imgproc class. Following is the syntax of this method −
GaussianBlur(src, dst, ksize, sigmaX)
This method accepts the following parameters −
src − A Mat object representing the source (input image) for this operation.
dst − A Mat object representing the destination (output image) for this operation.
ksize − A Size object representing the size of the kernel.
sigmaX − A variable of the type double representing the Gaussian kernel standard deviation in X direction.
Example
The following program demonstrates how to perform the Gaussian blur operation on an image.
import org.opencv.core.Core;
import org.opencv.core.Mat;
import org.opencv.core.Size;
import org.opencv.imgcodecs.Imgcodecs;
import org.opencv.imgproc.Imgproc;

public class GaussianTest {
   public static void main(String args[]) {
      // Loading the OpenCV core library
      System.loadLibrary(Core.NATIVE_LIBRARY_NAME);

      // Reading the Image from the file and storing it in to a Matrix object
      String file ="C:/EXAMPLES/OpenCV/sample.jpg";
      Mat src = Imgcodecs.imread(file);

      // Creating an empty matrix to store the result
      Mat dst = new Mat();

      // Applying GaussianBlur on the Image
      Imgproc.GaussianBlur(src, dst, new Size(45, 45), 0);

      // Writing the image
      Imgcodecs.imwrite("E:/OpenCV/chap9/Gaussian.jpg", dst);
      System.out.println("Image Processed");
   }
}
Assume that following is the input image sample.jpg specified in the above program.
Output
On executing the program, you will get the following output −
Image Processed
If you open the specified path, you can observe the output image as follows −

OpenCV - Median Blur
The Median blur operation is similar to the other averaging methods. Here, the central element of the image is replaced by the median of all the pixels in the kernel area. This operation processes the edges while removing the noise.
You can perform this operation on an image using the medianBlur() method of the imgproc class. Following is the syntax of this method −
medianBlur(src, dst, ksize)
This method accepts the following parameters −
src − A Mat object representing the source (input image) for this operation.
dst − A Mat object representing the destination (output image) for this operation.
ksize − A Size object representing the size of the kernel.
Example
The following program demonstrates how to perform the median blur operation on an image.
import org.opencv.core.Core;
import org.opencv.core.Mat;
import org.opencv.imgcodecs.Imgcodecs;
import org.opencv.imgproc.Imgproc;

public class MedianBlurTest {
   public static void main(String args[]) {
      // Loading the OpenCV core library
      System.loadLibrary( Core.NATIVE_LIBRARY_NAME );

      // Reading the Image from the file and storing it in to a Matrix object
      String file ="C:/EXAMPLES/OpenCV/sample.jpg";
      Mat src = Imgcodecs.imread(file);

      // Creating an empty matrix to store the result
      Mat dst = new Mat();

      // Applying MedianBlur on the Image
      Imgproc.medianBlur(src, dst, 15);

      // Writing the image
      Imgcodecs.imwrite("E:/OpenCV/chap9/median.jpg", dst);

      System.out.println("Image Processed");
   }
}
Assume that following is the input image sample.jpg specified in the above program.
Output
On executing the program, you will get the following output −
Image Processed
If you open the specified path, you can observe the output image as follows −

OpenCV - Bilateral Filter
Image filtering allows you to apply various effects to an image. In this chapter and the subsequent three chapters, we are going to discuss various filter operations such as Bilateral Filter, Box Filter, SQR Box Filter and Filter2D.
Bilateral Filter
The Bilateral Filter operation applies a bilateral image to a filter. You can perform this operation on an image using the medianBlur() method of the imgproc class. Following is the syntax of this method.
bilateralFilter(src, dst, d, sigmaColor, sigmaSpace, borderType)
This method accepts the following parameters −
src − A Mat object representing the source (input image) for this operation.
dst − A Mat object representing the destination (output image) for this operation.
d − A variable of the type integer representing the diameter of the pixel neighborhood.
sigmaColor − A variable of the type integer representing the filter sigma in the color space.
sigmaSpace − A variable of the type integer representing the filter sigma in the coordinate space.
borderType − An integer object representing the type of the border used.
Example
The following program demonstrates how to perform the Bilateral Filter operation on an image.
import org.opencv.core.Core;
import org.opencv.core.Mat;
import org.opencv.imgcodecs.Imgcodecs;
import org.opencv.imgproc.Imgproc;

public class BilateralFilter {
   public static void main(String args[]) {
      // Loading the OpenCV core library
      System.loadLibrary( Core.NATIVE_LIBRARY_NAME );

      // Reading the Image from the file and storing it in to a Matrix object
      String file ="E:/OpenCV/chap11/filter_input.jpg";
      Mat src = Imgcodecs.imread(file);

      // Creating an empty matrix to store the result
      Mat dst = new Mat();

      // Applying Bilateral filter on the Image
      Imgproc.bilateralFilter(src, dst, 15, 80, 80, Core.BORDER_DEFAULT);

      // Writing the image
      Imgcodecs.imwrite("E:/OpenCV/chap11/bilateralfilter.jpg", dst);

      System.out.println("Image Processed");
   }
}
Assume that following is the input image filter_input.jpg specified in the above program.
Output
On executing the program, you will get the following output −
Image Processed
If you open the specified path, you can observe the output image as follows −
OpenCV - Box Filter
The Box Filter operation is similar to the averaging blur operation; it applies a bilateral image to a filter. Here, you can choose whether the box should be normalized or not.
You can perform this operation on an image using the boxFilter() method of the imgproc class. Following is the syntax of this method −
boxFilter(src, dst, ddepth, ksize, anchor, normalize, borderType)
This method accepts the following parameters −
src − A Mat object representing the source (input image) for this operation.
dst − A Mat object representing the destination (output image) for this operation.
ddepth − A variable of the type integer representing the depth of the output image.
ksize − A Size object representing the size of the blurring kernel.
anchor − A variable of the type integer representing the anchor point.
Normalize − A variable of the type boolean specifying weather the kernel should be normalized.
borderType − An integer object representing the type of the border used.
Example
The following program demonstrates how to perform the Box Filter operation on an image.
import org.opencv.core.Core;
import org.opencv.core.Mat;
import org.opencv.core.Point;
import org.opencv.core.Size;
import org.opencv.imgcodecs.Imgcodecs;
import org.opencv.imgproc.Imgproc;

public class BoxFilterTest {
   public static void main( String[] args ) {
      // Loading the OpenCV core library
      System.loadLibrary( Core.NATIVE_LIBRARY_NAME );

      // Reading the Image from the file and storing it in to a Matrix object
      String file = "E:/OpenCV/chap11/filter_input.jpg";
      Mat src = Imgcodecs.imread(file);

      // Creating an empty matrix to store the result
      Mat dst = new Mat();

      // Creating the objects for Size and Point
      Size size = new Size(45, 45);
      Point point = Point(-1, -1);

      // Applying Box Filter effect on the Image
      Imgproc.boxFilter(src, dst, 50, size, point, true, Core.BORDER_DEFAULT);

      // Writing the image
      Imgcodecs.imwrite("E:/OpenCV/chap11/boxfilterjpg", dst);

      System.out.println("Image Processed");
   }
}
Assume that following is the input image filter_input.jpg specified in the above program.
Output
On executing the program, you will get the following output −
Image Processed
If you open the specified path, you can observe the output image as follows −
OpenCV - SQRBox Filter
You can perform the SQRBox Filter operation on an image using the boxFilter() method of the imgproc class. Following is the syntax of this method −
sqrBoxFilter(src, dst, ddepth, ksize)
This method accepts the following parameters −
src − A Mat object representing the source (input image) for this operation.
dst − A Mat object representing the destination (output image) for this operation.
ddepth − A variable of the type integer representing the depth of the output image.
ksize − A Size object representing the size of the blurring kernel.
Example
The following program demonstrates how to perform Sqrbox filter operation on a given image.
import org.opencv.core.Core;
import org.opencv.core.Mat;
import org.opencv.core.Size;
import org.opencv.imgcodecs.Imgcodecs;
import org.opencv.imgproc.Imgproc;

public class SqrBoxFilterTest {
   public static void main( String[] args ) {
      // Loading the OpenCV core library
      System.loadLibrary( Core.NATIVE_LIBRARY_NAME );

      // Reading the Image from the file and storing it in to a Matrix object
      String file ="E:/OpenCV/chap11/filter_input.jpg";
      Mat src = Imgcodecs.imread(file);

      // Creating an empty matrix to store the result
      Mat dst = new Mat();

      // Applying Box Filter effect on the Image
      Imgproc.sqrBoxFilter(src, dst, -1, new Size(1, 1));

      // Writing the image
      Imgcodecs.imwrite("E:/OpenCV/chap11/sqrboxfilter.jpg", dst);

      System.out.println("Image Processed");
   }
}
Assume that following is the input image filter_input.jpg specified in the above program.
Output
On executing the program, you will get the following output −
Image Processed
If you open the specified path, you can observe the output image as follows −
OpenCV - Filter2D
The Filter2D operation convolves an image with the kernel. You can perform this operation on an image using the Filter2D() method of the imgproc class. Following is the syntax of this method −
filter2D(src, dst, ddepth, kernel)
This method accepts the following parameters −
src − A Mat object representing the source (input image) for this operation.
dst − A Mat object representing the destination (output image) for this operation.
ddepth − A variable of the type integer representing the depth of the output image.
kernel − A Mat object representing the convolution kernel.
Example
The following program demonstrates how to perform the Filter2D operation on an image.
import org.opencv.core.Core;
import org.opencv.core.CvType;
import org.opencv.core.Mat;
import org.opencv.imgcodecs.Imgcodecs;
import org.opencv.imgproc.Imgproc;

public class Filter2D {
   public static void main( String[] args ) {
      //Loading the OpenCV core library
      System.loadLibrary( Core.NATIVE_LIBRARY_NAME );

      //Reading the Image from the file and storing it in to a Matrix object
      String file ="E:/OpenCV/chap11/filter_input.jpg";
      Mat src = Imgcodecs.imread(file);

      //Creating an empty matrix to store the result
      Mat dst = new Mat();

      // Creating kernel matrix
      Mat kernel = Mat.ones(2,2, CvType.CV_32F);

      for(int i = 0; i<kernel.rows(); i++) {
         for(int j = 0; j<kernel.cols(); j++) {
            double[] m = kernel.get(i, j);

            for(int k = 1; k<m.length; k++) {
               m[k] = m[k]/(2 * 2);
            }
            kernel.put(i,j, m);
         }
      }
      Imgproc.filter2D(src, dst, -1, kernel);
      Imgcodecs.imwrite("E:/OpenCV/chap11/filter2d.jpg", dst);
      System.out.println("Image Processed");
   }
}
Assume that following is the input image filter_input.jpg specified in the above program.
Output
On executing the program, you will get the following output −
Image Processed
If you open the specified path, you can observe the output image as follows −
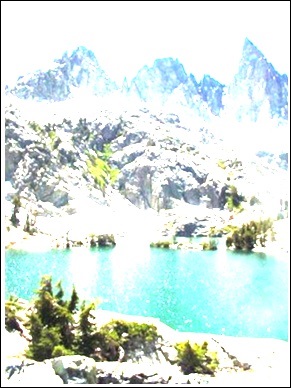
OpenCV - Dilation
Erosion and dilation are the two types of morphological operations. As the name implies, morphological operations are the set of operations that process images according to their shapes.
Based on the given input image a "structural element" is developed. This might be done in any of the two procedures. These are aimed at removing noise and settling down the imperfections, to make the image clear.
Dilation
This procedure follows convolution with some kernel of a specific shape such as a square or a circle. This kernel has an anchor point, which denotes its center.
This kernel is overlapped over the picture to compute maximum pixel value. After calculating, the picture is replaced with anchor at the center. With this procedure, the areas of bright regions grow in size and hence the image size increases.
For example, the size of an object in white shade or bright shade increases, while the size of an object in black shade or dark shade decreases.
You can perform the dilation operation on an image using the dilate() method of the imgproc class. Following is the syntax of this method.
dilate(src, dst, kernel)
This method accepts the following parameters −
src − A Mat object representing the source (input image) for this operation.
dst − A Mat object representing the destination (output image) for this operation.
kernel − A Mat object representing the kernel.
Example
You can prepare the kernel matrix using the getStructuringElement() method. This method accepts an integer representing the morph_rect type and an object of the type Size.
Imgproc.getStructuringElement(int shape, Size ksize);
The following program demonstrates how to perform the dilation operation on a given image.
import org.opencv.core.Core;
import org.opencv.core.Mat;
import org.opencv.core.Size;
import org.opencv.imgcodecs.Imgcodecs;
import org.opencv.imgproc.Imgproc;

public class DilateTest {
   public static void main( String[] args ) {
      // Loading the OpenCV core library
      System.loadLibrary( Core.NATIVE_LIBRARY_NAME );

      // Reading the Image from the file and storing it in to a Matrix object
      String file ="C:/EXAMPLES/OpenCV/sample.jpg";
      Mat src = Imgcodecs.imread(file);

      // Creating an empty matrix to store the result
      Mat dst = new Mat();

      // Preparing the kernel matrix object
      Mat kernel = Imgproc.getStructuringElement(Imgproc.MORPH_RECT,
         new  Size((2*2) + 1, (2*2)+1));

      // Applying dilate on the Image
      Imgproc.dilate(src, dst, kernel);

      // Writing the image
      Imgcodecs.imwrite("E:/OpenCV/chap10/Dilation.jpg", dst);

      System.out.println("Image Processed");
   }
}
Input
Assume that following is the input image sample.jpg specified in the above program.
Output
On executing the program, you will get the following output −
Image Processed
If you open the specified path, you can observe the output image as follows −

OpenCV - Erosion
Erosion is quite a similar process as dilation. But the pixel value computed here is minimum rather than maximum in dilation. The image is replaced under the anchor point with that minimum pixel value.
With this procedure, the areas of dark regions grow in size and bright regions reduce. For example, the size of an object in dark shade or black shade increases, while it decreases in white shade or bright shade.
Example
You can perform this operation on an image using the erode() method of the imgproc class. Following is the syntax of this method −
erode(src, dst, kernel)
This method accepts the following parameters −
src − A Mat object representing the source (input image) for this operation.
dst − A Mat object representing the destination (output image) for this operation.
kernel − A Mat object representing the kernel.
You can prepare the kernel matrix using the getStructuringElement() method. This method accepts an integer representing the morph_rect type and an object of the type Size.
Imgproc.getStructuringElement(int shape, Size ksize);
The following program demonstrates how to perform the erosion operation on a given image.
import org.opencv.core.Core;
import org.opencv.core.Mat;
import org.opencv.core.Size;
import org.opencv.imgcodecs.Imgcodecs;
import org.opencv.imgproc.Imgproc;

public class ErodeTest {
   public static void main( String[] args ) {
      // Loading the OpenCV core library
      System.loadLibrary( Core.NATIVE_LIBRARY_NAME );

      // Reading the Image from the file and storing it in to a Matrix object
      String file ="C:/EXAMPLES/OpenCV/sample.jpg";
      Mat src = Imgcodecs.imread(file);

      // Creating an empty matrix to store the result
      Mat dst = new Mat();

      // Preparing the kernel matrix object
      Mat kernel = Imgproc.getStructuringElement(Imgproc.MORPH_RECT,
         new  Size((2*2) + 1, (2*2)+1));

      // Applying erode on the Image
      Imgproc.erode(src, dst, kernel);

      // Writing the image
      Imgcodecs.imwrite("E:/OpenCV/chap10/Erosion.jpg", dst);

      System.out.println("Image processed");
   }
}
Assume that following is the input image sample.jpg specified in the above program.
Output
On executing the program, you will get the following output −
Image Loaded
If you open the specified path, you can observe the output image as follows −

OpenCV - Morphological Operations
In the earlier chapters, we discussed the process of erosion and dilation. In addition to these two, OpenCV has more morphological transformations. The morphologyEx() of the method of the class Imgproc is used to perform these operations on a given image.
Following is the syntax of this method −
morphologyEx(src, dst, op, kernel)
This method accepts the following parameters −
src − An object of the class Mat representing the source (input) image.
dst − object of the class Mat representing the destination (output) image.
op − An integer representing the type of the Morphological operation.
kernel − A kernel matrix.
Example
The following program demonstrates how to apply the morphological operation "top-hat" on an image using OpenCV library.
import org.opencv.core.Core;
import org.opencv.core.CvType;
import org.opencv.core.Mat;
import org.opencv.imgcodecs.Imgcodecs;
import org.opencv.imgproc.Imgproc;

public class MorphologyExTest {
   public static void main(String args[]) {
      // Loading the OpenCV core library
      System.loadLibrary( Core.NATIVE_LIBRARY_NAME );

      // Reading the Image from the file and storing it in to a Matrix object
      String file ="E:/OpenCV/chap12/morph_input.jpg";
      Mat src = Imgcodecs.imread(file);

      // Creating an empty matrix to store the result
      Mat dst = new Mat();

      // Creating kernel matrix
      Mat kernel = Mat.ones(5,5, CvType.CV_32F);

      // Applying Blur effect on the Image
      Imgproc.morphologyEx(src, dst, Imgproc.MORPH_TOPHAT, kernel);

      // Writing the image
      Imgcodecs.imwrite("E:/OpenCV/chap12/morph_tophat.jpg", dst);

      System.out.println("Image Processed");
   }
}
Assume that following is the input image morph_input.jpg specified in the above program.
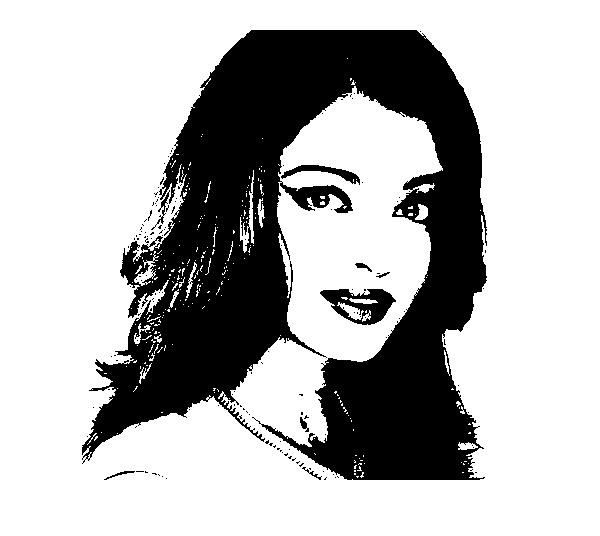
Output
On executing the program, you will get the following output −
Image Processed
If you open the specified path, you can observe the output image as follows −
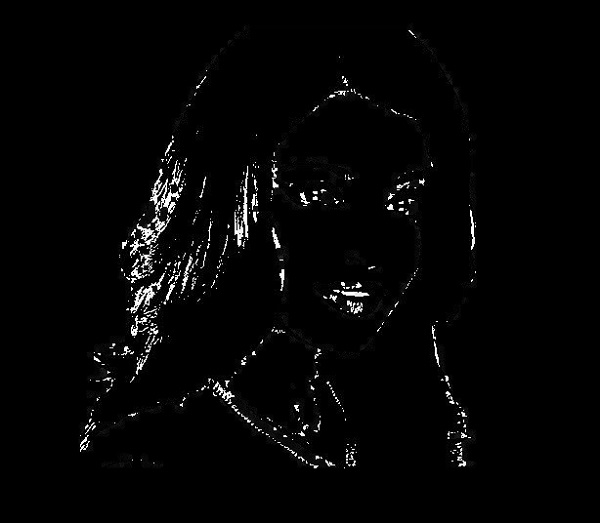
More Operations
In addition to the morphological operation TOPHAT, demonstrated in the previous example, OpenCV caters various other types of morphologies. All these types are represented by predefined static fields (fixed values) of Imgproc class.
You can choose the type of the morphology you need by passing their respective predefined value to the parameter op of the morphologyEx() method.
// Applying Blur effect on the Image
Imgproc.morphologyEx(src, dst, Imgproc.MORPH_TOPHAT, kernel);
Following are the values representing the type of morphological operations and their respective outputs.
| Operation and Description | Output |
|---|---|
| MORPH_BLACKHAT | 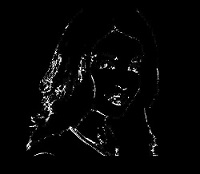 |
| MORPH_CLOSE | 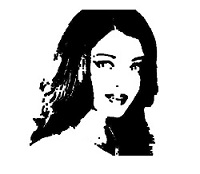 |
| MORPH_CROSS |  |
| MORPH_DILATE |  |
| MORPH_ELLIPSE |  |
| MORPH_ERODE | 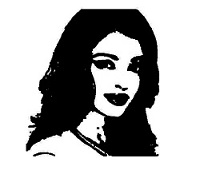 |
| MORPH_GRADIENT | 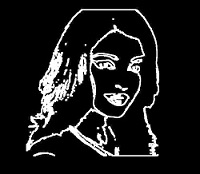 |
| MORPH_OPEN | 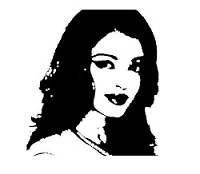 |
| MORPH_RECT |  |
| MORPH_TOPHAT |  |
OpenCV - Image Pyramids
Pyramid is an operation on an image where,
An input image is initially smoothed using a particular smoothing filter (ex: Gaussian, Laplacian) and then the smoothed image is subsampled.
This process is repeated multiple times.
During the pyramid operation, the smoothness of the image is increased and the resolution (size) is decreased.
Pyramid Up
In Pyramid Up, the image is initially up-sampled and then blurred. You can perform Pyramid Up operation on an image using the pyrUP() method of the imgproc class. Following is the syntax of this method −
pyrUp(src, dst, dstsize, borderType)
This method accepts the following parameters −
src − An object of the class Mat representing the source (input) image.
mat − An object of the class Mat representing the destination (output) image.
size − An object of the class Size representing the size to which the image is to be increased or decreased.
borderType − A variable of integer type representing the type of border to be used.
Example
The following program demonstrates how to perform the Pyramid Up operation on an image.
import org.opencv.core.Core;
import org.opencv.core.Mat;
import org.opencv.core.Size;
import org.opencv.imgcodecs.Imgcodecs;
import org.opencv.imgproc.Imgproc;

public class PyramidUp {
   public static void main( String[] args ) {
      // Loading the OpenCV core library
      System.loadLibrary( Core.NATIVE_LIBRARY_NAME );

      // Reading the Image from the file and storing it in to a Matrix object
      String file ="E:/OpenCV/chap13/pyramid_input.jpg";
      Mat src = Imgcodecs.imread(file);

      // Creating an empty matrix to store the result
      Mat dst = new Mat();

      // Applying pyrUp on the Image
      Imgproc.pyrUp(src, dst, new Size(src.cols()*2,  src.rows()*2), Core.BORDER_DEFAULT);

      // Writing the image
      Imgcodecs.imwrite("E:/OpenCV/chap13/pyrUp_output.jpg", dst);

      System.out.println("Image Processed");
   }
}
Assume that following is the input image pyramid_input.jpg specified in the above program.

Output
On executing the program, you will get the following output −
Image Processed
If you open the specified path, you can observe the output image as follows −

Pyramid Down
In Pyramid Down, the image is initially blurred and then down-sampled. You can perform Pyramid Down operation on an image using the pyrDown() method of the imgproc class. Following is the syntax of this method −
pyrDown(src, dst, dstsize, borderType)
This method accepts the following parameters −
src − An object of the class Mat representing the source (input) image.
mat − An object of the class Mat representing the destination (output) image.
size − An object of the class Size representing the size to which the image is to be increased or decreased.
borderType − A variable of integer type representing the type of border to be used.
Example
The following program demonstrates how to perform the Pyramid Down operation on an image.
import org.opencv.core.Core;
import org.opencv.core.Mat;
import org.opencv.core.Size;
import org.opencv.imgcodecs.Imgcodecs;
import org.opencv.imgproc.Imgproc;

public class PyramidDown {
   public static void main( String[] args ) {
      // Loading the OpenCV core library
      System.loadLibrary( Core.NATIVE_LIBRARY_NAME );

      // Reading the Image from the file and storing it in to a Matrix object
      String file ="E:/OpenCV/chap13/pyramid_input.jpg";
      Mat src = Imgcodecs.imread(file);

      // Creating an empty matrix to store the result
      Mat dst = new Mat();

      // Applying pyrDown on the Image
      Imgproc.pyrDown(src, dst, new Size(src.cols()/2,  src.rows()/2),
         Core.BORDER_DEFAULT);

      // Writing the image
      Imgcodecs.imwrite("E:/OpenCV/chap13/pyrDown_output.jpg", dst);

      System.out.println("Image Processed");
   }
}
Assume that following is the input image pyramid_input.jpg specified in the above program.
Output
On executing the program, you will get the following output −
Image Processed
If you open the specified path, you can observe the output image as follows −

Mean Shift Filtering
In Mean Shifting pyramid operation, an initial step of mean shift segmentation of an image is carried out.
You can perform pyramid Mean Shift Filtering operation on an image using the pyrDown() method of the imgproc class. Following is the syntax of this method.
pyrMeanShiftFiltering(src, dst, sp, sr)
This method accepts the following parameters −
src − An object of the class Mat representing the source (input) image.
mat − An object of the class Mat representing the destination (output) image.
sp − A variable of the type double representing the spatial window radius.
sr − A variable of the type double representing the color window radius.
Example
The following program demonstrates how to perform a Mean Shift Filtering operation on a given image.
import org.opencv.core.Core;
import org.opencv.core.Mat;
import org.opencv.imgcodecs.Imgcodecs;
import org.opencv.imgproc.Imgproc;

public class PyramidMeanShift {
   public static void main( String[] args ) {
      // Loading the OpenCV core library
      System.loadLibrary( Core.NATIVE_LIBRARY_NAME );

      // Reading the Image from the file and storing it in to a Matrix object
      String file ="E:/OpenCV/chap13/pyramid_input.jpg";
      Mat src = Imgcodecs.imread(file);

      // Creating an empty matrix to store the result
      Mat dst = new Mat();

      // Applying meanShifting on the Image
      Imgproc.pyrMeanShiftFiltering(src, dst, 200, 300);

      // Writing the image
      Imgcodecs.imwrite("E:/OpenCV/chap13/meanShift_output.jpg", dst);

      System.out.println("Image Processed");
   }
}
Assume that following is the input image pyramid_input.jpg specified in the above program.
Output
On executing the program, you will get the following output −
Image Processed
If you open the specified path, you can observe the output image as follows −

OpenCV - Simple Threshold
Thresholding is a method of image segmentation, in general it is used to create binary images. Thresholding is of two types namely, simple thresholding and adaptive thresholding.
Simple Thresholding
In simple thresholding operation the pixels whose values are greater than the specified threshold value, are assigned with a standard value.
You can perform simple threshold operation on an image using the method threshold() of the Imgproc class, Following is the syntax of this method.
threshold(src, dst, thresh, maxval, type)
This method accepts the following parameters −
src − An object of the class Mat representing the source (input) image.
dst − An object of the class Mat representing the destination (output) image.
thresh − A variable of double type representing the threshold value.
maxval − A variable of double type representing the value that is to be given if pixel value is more than the threshold value.
type − A variable of integer type representing the type of threshold to be used.
Example
The following program demonstrates how to perform simple thresholding operation on an image in OpenCV.
import org.opencv.core.Core;
import org.opencv.core.Mat;
import org.opencv.imgcodecs.Imgcodecs;
import org.opencv.imgproc.Imgproc;

public class Thresh {
   public static void main(String args[]) {
      // Loading the OpenCV core library
      System.loadLibrary( Core.NATIVE_LIBRARY_NAME );

      // Reading the Image from the file and storing it in to a Matrix object
      String file ="E:/OpenCV/chap14/thresh_input.jpg";
      Mat src = Imgcodecs.imread(file);

      // Creating an empty matrix to store the result
      Mat dst = new Mat();
      Imgproc.threshold(src, dst, 50, 255, Imgproc.THRESH_BINARY);

      // Writing the image
      Imgcodecs.imwrite("E:/OpenCV/chap14/thresh_trunc.jpg", dst);

      System.out.println("Image Processed");
   }
}
Assume that following is the input image thresh_input.jpg specified in the above program.

Output
On executing the program, you will get the following output −
Image Processed
If you open the specified path, you can observe the output image as follows −
Other types of simple thresholding
In addition to the THRESH_BINARY operation demonstrated in the previous example, OpenCV caters various other types of threshold operations. All these types are represented by predefined static fields (fixed values) of Imgproc class.
You can choose the type of the threshold operation you need, by passing its respective predefined value to the parameter named type of the threshold() method.
Imgproc.threshold(src, dst, 50, 255, Imgproc.THRESH_BINARY);
Following are the values representing various types of threshold operations and their respective outputs.
| Operation and Description | Output |
|---|---|
| THRESH_BINARY |  |
| THRESH_BINARY_INV |  |
| THRESH_TRUNC |  |
| THRESH_TOZERO |  |
| THRESH_TOZERO_INV |  |
OpenCV - Adaptive Threshold
In simple thresholding, the threshold value is global, i.e., it is same for all the pixels in the image. Adaptive thresholding is the method where the threshold value is calculated for smaller regions and therefore, there will be different threshold values for different regions.
In OpenCV, you can perform Adaptive threshold operation on an image using the method adaptiveThreshold() of the Imgproc class. Following is the syntax of this method.
adaptiveThreshold(src, dst, maxValue, adaptiveMethod, thresholdType, blockSize, C)
This method accepts the following parameters −
src − An object of the class Mat representing the source (input) image.
dst − An object of the class Mat representing the destination (output) image.
maxValue − A variable of double type representing the value that is to be given if pixel value is more than the threshold value.
adaptiveMethod − A variable of integer the type representing the adaptive method to be used. This will be either of the following two values
ADAPTIVE_THRESH_MEAN_C − threshold value is the mean of neighborhood area.
ADAPTIVE_THRESH_GAUSSIAN_C − threshold value is the weighted sum of neighborhood values where weights are a Gaussian window.
thresholdType − A variable of integer type representing the type of threshold to be used.
blockSize − A variable of the integer type representing size of the pixelneighborhood used to calculate the threshold value.
C − A variable of double type representing the constant used in the both methods (subtracted from the mean or weighted mean).
Example
The following program demonstrates how to perform Adaptive threshold operation on an image in OpenCV. Here we are choosing adaptive threshold of type binary and ADAPTIVE_THRESH_MEAN_C for threshold method.
import org.opencv.core.Core;
import org.opencv.core.Mat;
import org.opencv.imgcodecs.Imgcodecs;
import org.opencv.imgproc.Imgproc;

public class AdaptiveThresh {
   public static void main(String args[]) throws Exception {
      // Loading the OpenCV core library
      System.loadLibrary( Core.NATIVE_LIBRARY_NAME );

      // Reading the Image from the file and storing it in to a Matrix object
      String file ="E:/OpenCV/chap14/thresh_input.jpg";

      // Reading the image
      Mat src = Imgcodecs.imread(file,0);

      // Creating an empty matrix to store the result
      Mat dst = new Mat();

      Imgproc.adaptiveThreshold(src, dst, 125, Imgproc.ADAPTIVE_THRESH_MEAN_C,
         Imgproc.THRESH_BINARY, 11, 12);

      // Writing the image
      Imgcodecs.imwrite("E:/OpenCV/chap14/Adaptivemean_thresh_binary.jpg", dst);

      System.out.println("Image Processed");
   }
}
Assume that following is the input image thresh_input.jpg specified in the above program.
Output
On executing the program, you will get the following output −
Image Processed
If you open the specified path, you can observe the output image as follows −

Other Types of Adaptive Thresholding
In addition to the ADAPTIVE_THRESH_MEAN_C as the adaptive method and THRESH_BINARY as the threshold type as demonstrated in the previous example, we can choose more combinations of these two values.
Imgproc.adaptiveThreshold(src, dst, 125, Imgproc.ADAPTIVE_THRESH_MEAN_C,
   Imgproc.THRESH_BINARY, 11, 12);
Following are the values representing various combinations of values for the parameters adaptiveMethod and thresholdType and their respective outputs.
| adaptiveMethod / thresholdType | ADAPTIVE_THRESH_MEAN_C | ADAPTIVE_THRESH_GAUSSIAN_C: |
|---|---|---|
| THRESH_BINARY |  |
 |
| THRESH_BINARY_INV |  |
 |
OpenCV - Adding Borders
This chapter teaches you how toad borders to an image.
The copyMakeBorder() Method
You can add various borders to an image in using the method copyMakeBorder() of the class named Core, which belongs to the package org.opencv.core. following is the syntax of this method.
copyMakeBorder(src, dst, top, bottom, left, right, borderType)
This method accepts the following parameters −
src − An object of the class Mat representing the source (input) image.
dst − An object of the class Mat representing the destination (output) image.
top − A variable of integer the type integer representing the length of the border at the top of the image.
bottom − A variable of integer the type integer representing the length of the border at the bottom of the image.
left − A variable of integer the type integer representing the length of the border at the left of the image.
right − A variable of integer the type integer representing the length of the border at the right of the image.
borderType − A variable of the type integer representing the type of the border that is to be used.
Example
Following program is an example demonstrating, how to add border to a given image.
import org.opencv.core.Core;
import org.opencv.core.Mat;
import org.opencv.imgcodecs.Imgcodecs;

public class AddingBorder {
   public static void main( String[] args ) {
      // Loading the OpenCV core library
      System.loadLibrary( Core.NATIVE_LIBRARY_NAME );

      // Reading the Image from the file and storing it in to a Matrix object
      String file ="E:/OpenCV/chap15/input.jpg";
      Mat src = Imgcodecs.imread(file);

      // Creating an empty matrix to store the result
      Mat dst = new Mat();

      Core.copyMakeBorder(src, dst, 20, 20, 20, 20, Core.BORDER_CONSTANT);
      Imgcodecs.imwrite("E:/OpenCV/chap15/border_constant.jpg", dst);

      System.out.println("Image Processed");
   }
}
Assume that following is the input image thresh_input.jpg specified in the above program.
Output
On executing the program, you will get the following output −
Image Processed
If you open the specified path, you can observe the output image as follows −

Other Types of Borders
In addition to the border type, BORDER_CONSTANT demonstrated in the previous example, OpenCV caters various other types of borders. All these types are represented by predefined static fields (fixed values) of Core class.
You can choose the type of the threshold operation you need, by passing its respective predefined value to the parameter named borderType of the copyMakeBorder() method.
Core.copyMakeBorder(src, dst, 20, 20, 20, 20, Core.BORDER_CONSTANT);
Following are the values representing various types of borders operations and their respective outputs.
| Operation and Description | Output |
|---|---|
| BORDER_CONSTANT |  |
| BORDER_ISOLATED |  |
| BORDER_DEFAULT |  |
| BORDER_REFLECT |  |
| BORDER_REFLECT_101 |  |
| BORDER_REFLECT101 |  |
| BORDER_REPLICATE |  |
| BORDER_WRAP |  |
OpenCV - Sobel Operator
Using the sobel operation, you can detect the edges of an image in both horizontal and vertical directions. You can apply sobel operation on an image using the method sobel(). Following is the syntax of this method −
Sobel(src, dst, ddepth, dx, dy)
This method accepts the following parameters −
src − An object of the class Mat representing the source (input) image.
dst − An object of the class Mat representing the destination (output) image.
ddepth − An integer variable representing the depth of the image (-1)
dx − An integer variable representing the x-derivative. (0 or 1)
dy − An integer variable representing the y-derivative. (0 or 1)
Example
The following program demonstrates how to perform Sobel operation on a given image.
import org.opencv.core.Core;
import org.opencv.core.Mat;

import org.opencv.imgcodecs.Imgcodecs;
import org.opencv.imgproc.Imgproc;

public class SobelTest {
   public static void main(String args[]) {
      // Loading the OpenCV core library
      System.loadLibrary(Core.NATIVE_LIBRARY_NAME);

      // Reading the Image from the file and storing it in to a Matrix object
      String file ="E:/OpenCV/chap16/sobel_input.jpg";
      Mat src = Imgcodecs.imread(file);

      // Creating an empty matrix to store the result
      Mat dst = new Mat();

      // Applying sobel on the Image
      Imgproc.Sobel(src, dst, -1, 1, 1);

      // Writing the image
      Imgcodecs.imwrite("E:/OpenCV/chap16/sobel_output.jpg", dst);

      System.out.println("Image processed");
   }
}
Assume that following is the input image sobel_input.jpg specified in the above program.

Output
On executing the program, you will get the following output −
Image Processed
If you open the specified path, you can observe the output image as follows −
sobel Variants
On passing different values to the last to parameters (dx and dy) (among 0 and 1), you will get different outputs −
// Applying sobel on the Image
Imgproc.Sobel(src, dst, -1, 1, 1);
The following table lists various values for the variables dx and dy of the method Sobel() and their respective outputs.
| X-derivative | Y-derivative | Output |
|---|---|---|
| 0 | 1 |  |
| 1 | 0 |  |
| 1 | 1 |  |
OpenCV - Scharr Operator
Scharr is also used to detect the second derivatives of an image in horizontal and vertical directions. You can perform scharr operation on an image using the method scharr(). Following is the syntax of this method −
Scharr(src, dst, ddepth, dx, dy)
This method accepts the following parameters −
src − An object of the class Mat representing the source (input) image.
dst − An object of the class Mat representing the destination (output) image.
ddepth − An integer variable representing the depth of the image (-1)
dx − An integer variable representing the x-derivative. (0 or 1)
dy − An integer variable representing the y-derivative. (0 or 1)
Example
The following program demonstrates how to apply scharr to a given image.
import org.opencv.core.Core;
import org.opencv.core.Mat;

import org.opencv.imgcodecs.Imgcodecs;
import org.opencv.imgproc.Imgproc;

public class ScharrTest {

   public static void main( String[] args ) {

      // Loading the OpenCV core library
      System.loadLibrary( Core.NATIVE_LIBRARY_NAME );

      // Reading the Image from the file and storing it in to a Matrix object
      String file ="E:/OpenCV/chap16/sobel_input.jpg";
      Mat src = Imgcodecs.imread(file);

      // Creating an empty matrix to store the result
      Mat dst = new Mat();

      // Applying Box Filter effect on the Image
      Imgproc.Scharr(src, dst, Imgproc.CV_SCHARR, 0, 1);

      // Writing the image
      Imgcodecs.imwrite("E:/OpenCV/chap16/scharr_output.jpg", dst);

      System.out.println("Image processed");
   }
}
Assume that following is the input image scharr_input.jpg specified in the above program.
Output
On executing it, you will get the following output −
Image Processed
If you open the specified path you can observe the output image as follows −
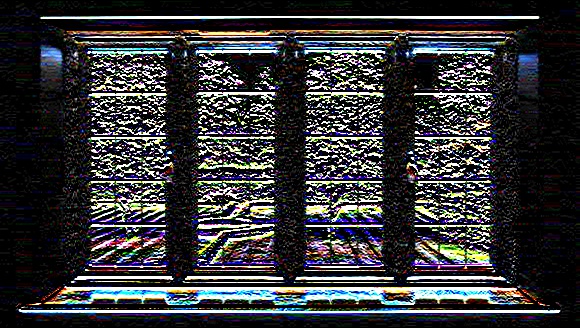
More scharr Derivatives
On passing different values to the last to parameters (dx and dy) (among 0 and 1) you will get different outputs −
// Applying scharr on the Image
Imgproc.Scharr(src, dst, -1, 1, 1);
Following is a table listing various values for the variables dx and dy of the method scharr() and their respective outputs.
| X-derivative | Y-derivative | Output |
|---|---|---|
| 0 | 1 | 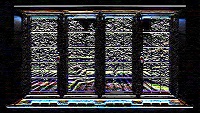 |
| 1 | 0 |  |
OpenCV - Laplacian Transformation
Laplacian Operator is also a derivative operator which is used to find edges in an image. It is a second order derivative mask. In this mask we have two further classifications one is Positive Laplacian Operator and other is Negative Laplacian Operator.
Unlike other operators Laplacian didn’t take out edges in any particular direction but it takes out edges in following classification.
- Inward Edges
- Outward Edges
You can perform Laplacian Transform operation on an image using the Laplacian() method of the imgproc class, following is the syntax of this method.
Laplacian(src, dst, ddepth)
This method accepts the following parameters −
src − A Mat object representing the source (input image) for this operation.
dst − A Mat object representing the destination (output image) for this operation.
ddepth − A variable of the type integer representing depth of the destination image.
Example
The following program demonstrates how to perform Laplace transform operation on a given image.
import org.opencv.core.Core;
import org.opencv.core.Mat;
import org.opencv.imgcodecs.Imgcodecs;
import org.opencv.imgproc.Imgproc;

public class LaplacianTest {
   public static void main(String args[]) {
      // Loading the OpenCV core library
      System.loadLibrary(Core.NATIVE_LIBRARY_NAME);

      //Reading the Image from the file and storing it in to a Matrix object
      String file ="E:/OpenCV/chap18/laplacian_input.jpg";
      Mat src = Imgcodecs.imread(file);

      // Creating an empty matrix to store the result
      Mat dst = new Mat();

      // Applying GaussianBlur on the Image
      Imgproc.Laplacian(src, dst, 10);

      // Writing the image
      Imgcodecs.imwrite("E:/OpenCV/chap18/laplacian.jpg", dst);

      System.out.println("Image Processed");
   }
}
Assume that following is the input image laplacian_input.jpg specified in the above program.
Output
On executing the program, you will get the following output −
Image Processed
If you open the specified path, you can observe the output image as follows −
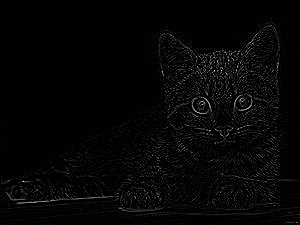
OpenCV - Distance Transformation
The distance transform operator generally takes binary images as inputs. In this operation, the gray level intensities of the points inside the foreground regions are changed to distance their respective distances from the closest 0 value (boundary).
You can apply distance transform in OpenCV using the method distanceTransform(). Following is the syntax of this method.
distanceTransform(src, dst, distanceType, maskSize)
This method accepts the following parameters −
src − An object of the class Mat representing the source (input) image.
dst − An object of the class Mat representing the destination (output) image.
distanceType − A variable of the type integer representing the type of the distance transformation to be applied.
maskSize − A variable of integer type representing the mask size to be used.
Example
The following program demonstrates how to perform distance transformation operation on a given image.
import org.opencv.core.Core;
import org.opencv.core.Mat;
import org.opencv.imgcodecs.Imgcodecs;
import org.opencv.imgproc.Imgproc;

public class DistanceTransform {
   public static void main(String args[]) {
      // Loading the OpenCV core library
      System.loadLibrary( Core.NATIVE_LIBRARY_NAME );

      // Reading the Image from the file and storing it in to a Matrix object
      String file ="E:/OpenCV/chap19/input.jpg";
      Mat src = Imgcodecs.imread(file,0);

      // Creating an empty matrix to store the results
      Mat dst = new Mat();
      Mat binary = new Mat();

      // Converting the grayscale image to binary image
      Imgproc.threshold(src, binary, 100, 255, Imgproc.THRESH_BINARY);

      // Applying distance transform
      Imgproc.distanceTransform(mat, dst, Imgproc.DIST_C, 3);

      // Writing the image
      Imgcodecs.imwrite("E:/OpenCV/chap19/distnceTransform.jpg", dst);

      System.out.println("Image Processed");
   }
}
Assume that following is the input image input.jpg specified in the above program.
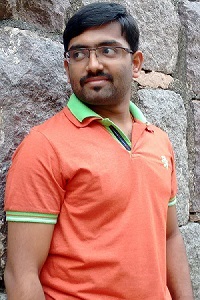
Output
On executing the program, you will get the following output −
Image Processed
If you open the specified path, you can observe the output image as follows −

Types of Distance Transform Operations
In addition to the distance operation type DIST_C demonstrated in the previous example, OpenCV caters various other types of distance transform operations. All these types are represented by predefined static fields (fixed values) of Imgproc class.
You can choose the type of the distance transform operation you need, by passing its respective predefined value to the parameter named distanceType of the distanceTransform() method.
// Applying distance transform
Imgproc.distanceTransform(mat, dst, Imgproc.DIST_C, 3);
Following are the values representing various types of distanceTransform operations and their respective outputs.
| Operation and Description | Output |
|---|---|
| DIST_C |  |
| DIST_L1 |  |
| DIST_L2 |  |
| DIST_LABEL_PIXEL | |
| DIST_MASK_3 |  |
OpenCV - Using Camera
In this chapter, we will learn how to use OpenCV to capture frames using the system camera. The VideoCapture class of the org.opencv.videoio package contains classes and methods to capture video using the camera. Let’s go step by step and learn how to capture frames −
Step 1: Load the OpenCV native library
While writing Java code using OpenCV library, the first step you need to do is to load the native library of OpenCV using the loadLibrary(). Load the OpenCV native library as shown below.
// Loading the core library
System.loadLibrary(Core.NATIVE_LIBRARY_NAME);
Step 2: Instantiate the video capture class
Instantiate the Mat class using any of the functions mentioned in this tutorial earlier.
// Instantiating the VideoCapture class (camera:: 0)
VideoCapture capture = new VideoCapture(0);
Step 3: Read the frames
You can read the frames from the camera using the read() method of the VideoCapture class. This method accepts an object of the class Mat to store the frame read.
// Reading the next video frame from the camera
Mat matrix = new Mat();
capture.read(matrix);
Example
The following program demonstrates how to capture a frame using camera and display it using JavaFX window. It also saves the captured frame.
import java.awt.image.BufferedImage;
import java.awt.image.DataBufferByte;
import java.awt.image.WritableRaster;

import java.io.FileNotFoundException;
import java.io.IOException;

import javafx.application.Application;
import javafx.embed.swing.SwingFXUtils;
import javafx.scene.Group;
import javafx.scene.Scene;
import javafx.scene.image.ImageView;
import javafx.scene.image.WritableImage;
import javafx.stage.Stage;

import org.opencv.core.Core;
import org.opencv.core.Mat;
import org.opencv.imgcodecs.Imgcodecs;
import org.opencv.videoio.VideoCapture;

public class CameraSnapshotJavaFX extends Application {
   Mat matrix = null;

   @Override
   public void start(Stage stage) throws FileNotFoundException, IOException {
      // Capturing the snapshot from the camera
      CameraSnapshotJavaFX obj = new CameraSnapshotJavaFX();
      WritableImage writableImage = obj.capureSnapShot();

      // Saving the image
      obj.saveImage();

      // Setting the image view
      ImageView imageView = new ImageView(writableImage);

      // setting the fit height and width of the image view
      imageView.setFitHeight(400);
      imageView.setFitWidth(600);

      // Setting the preserve ratio of the image view
      imageView.setPreserveRatio(true);

      // Creating a Group object
      Group root = new Group(imageView);

      // Creating a scene object
      Scene scene = new Scene(root, 600, 400);

      // Setting title to the Stage
      stage.setTitle("Capturing an image");

      // Adding scene to the stage
      stage.setScene(scene);

      // Displaying the contents of the stage
      stage.show();
   }
   public WritableImage capureSnapShot() {
      WritableImage WritableImage = null;

      // Loading the OpenCV core library
      System.loadLibrary( Core.NATIVE_LIBRARY_NAME );

      // Instantiating the VideoCapture class (camera:: 0)
      VideoCapture capture = new VideoCapture(0);

      // Reading the next video frame from the camera
      Mat matrix = new Mat();
      capture.read(matrix);

      // If camera is opened
      if( capture.isOpened()) {
         // If there is next video frame
         if (capture.read(matrix)) {
            // Creating BuffredImage from the matrix
            BufferedImage image = new BufferedImage(matrix.width(),
               matrix.height(), BufferedImage.TYPE_3BYTE_BGR);

            WritableRaster raster = image.getRaster();
            DataBufferByte dataBuffer = (DataBufferByte) raster.getDataBuffer();
            byte[] data = dataBuffer.getData();
            matrix.get(0, 0, data);
            this.matrix = matrix;

            // Creating the Writable Image
            WritableImage = SwingFXUtils.toFXImage(image, null);
         }
      }
      return WritableImage;
   }
   public void saveImage() {
      // Saving the Image
      String file = "E:/OpenCV/chap22/sanpshot.jpg";

      // Instantiating the imgcodecs class
      Imgcodecs imageCodecs = new Imgcodecs();

      // Saving it again
      imageCodecs.imwrite(file, matrix);
   }
   public static void main(String args[]) {
      launch(args);
   }
}
Output
On executing the program, you will get the following output.
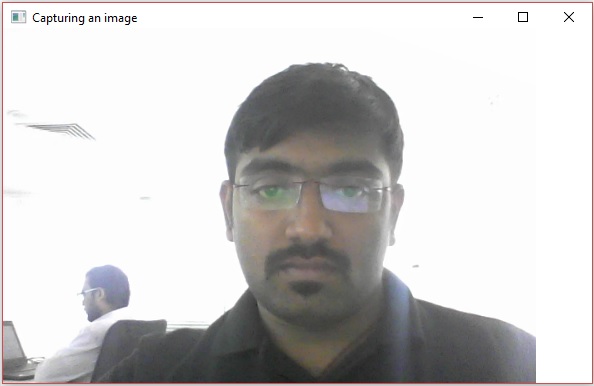
If you open the specified path, you can observe the same frame which is saved as a jpg file.
OpenCV - Face Detection in a Picture
The VideoCapture class of the org.opencv.videoio package contains classes and methods to capture video using the system camera. Let’s go step by step and learn how to do it.
Step 1: Load the OpenCV native library
While writing Java code using OpenCV library, the first step you need to do is to load the native library of OpenCV using the loadLibrary(). Load the OpenCV native library as shown below.
// Loading the core library
System.loadLibrary(Core.NATIVE_LIBRARY_NAME);
Step 2: Instantiate the CascadeClassifier class
The CascadeClassifier class of the package org.opencv.objdetect is used to load the classifier file. Instantiate this class by passing the xml file lbpcascade_frontalface.xml as shown below.
// Instantiating the CascadeClassifier
String xmlFile = "E:/OpenCV/facedetect/lbpcascade_frontalface.xml";
CascadeClassifier classifier = new CascadeClassifier(xmlFile);
Step 3: Detect the faces
You can detect the faces in the image using method detectMultiScale() of the class named CascadeClassifier. This method accepts an object of the class Mat holding the input image and an object of the class MatOfRect to store the detected faces.
// Detecting the face in the snap
MatOfRect faceDetections = new MatOfRect();
classifier.detectMultiScale(src, faceDetections);
Example
The following program demonstrates how to detect faces in an image.
import org.opencv.core.Core;
import org.opencv.core.Mat;
import org.opencv.core.MatOfRect;
import org.opencv.core.Point;
import org.opencv.core.Rect;
import org.opencv.core.Scalar;

import org.opencv.imgcodecs.Imgcodecs;
import org.opencv.imgproc.Imgproc;
import org.opencv.objdetect.CascadeClassifier;

public class FaceDetectionImage {
   public static void main (String[] args) {
      // Loading the OpenCV core library
      System.loadLibrary( Core.NATIVE_LIBRARY_NAME );

      // Reading the Image from the file and storing it in to a Matrix object
      String file ="E:/OpenCV/chap23/facedetection_input.jpg";
      Mat src = Imgcodecs.imread(file);

      // Instantiating the CascadeClassifier
      String xmlFile = "E:/OpenCV/facedetect/lbpcascade_frontalface.xml";
      CascadeClassifier classifier = new CascadeClassifier(xmlFile);

      // Detecting the face in the snap
      MatOfRect faceDetections = new MatOfRect();
      classifier.detectMultiScale(src, faceDetections);
      System.out.println(String.format("Detected %s faces",
         faceDetections.toArray().length));

      // Drawing boxes
      for (Rect rect : faceDetections.toArray()) {
         Imgproc.rectangle(
            src,                                               // where to draw the box
            new Point(rect.x, rect.y),                            // bottom left
            new Point(rect.x + rect.width, rect.y + rect.height), // top right
            new Scalar(0, 0, 255),
            3                                                     // RGB colour
         );
      }

      // Writing the image
      Imgcodecs.imwrite("E:/OpenCV/chap23/facedetect_output1.jpg", src);

      System.out.println("Image Processed");
   }
}
Assume that following is the input image facedetection_input.jpg specified in the above program.

Output
On executing the program, you will get the following output −
Detected 3 faces
Image Processed
If you open the specified path, you can observe the output image as follows −
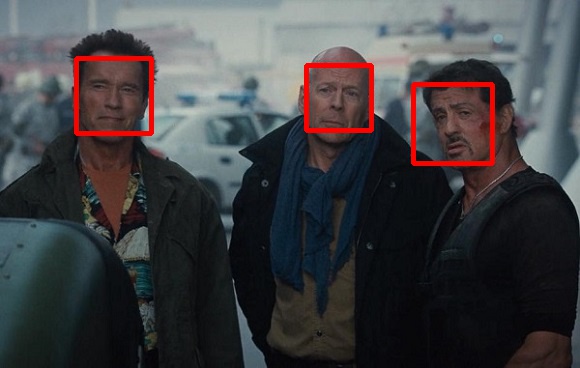
OpenCV - Face Detection using Camera
The following program demonstrates how to detect faces using system camera and display it using JavaFX window.
Example
import java.awt.image.BufferedImage;
import java.awt.image.DataBufferByte;
import java.awt.image.WritableRaster;

import java.io.FileNotFoundException;
import java.io.IOException;

import javafx.application.Application;
import javafx.embed.swing.SwingFXUtils;
import javafx.scene.Group;
import javafx.scene.Scene;
import javafx.scene.image.ImageView;
import javafx.scene.image.WritableImage;
import javafx.stage.Stage;

import org.opencv.core.Core;
import org.opencv.core.Mat;
import org.opencv.core.MatOfRect;
import org.opencv.core.Point;
import org.opencv.core.Rect;
import org.opencv.core.Scalar;
import org.opencv.imgcodecs.Imgcodecs;
import org.opencv.imgproc.Imgproc;
import org.opencv.objdetect.CascadeClassifier;
import org.opencv.videoio.VideoCapture;

public class faceDetectionJavaFXX extends Application {
   Mat matrix = null;

   @Override
   public void start(Stage stage) throws FileNotFoundException, IOException {
      // Capturing the snapshot from the camera
      faceDetectionJavaFXX obj = new faceDetectionJavaFXX();
      WritableImage writableImage = obj.capureFrame();

      // Saving the image
      obj.saveImage();

      // Setting the image view
      ImageView imageView = new ImageView(writableImage);

      // setting the fit height and width of the image view
      imageView.setFitHeight(400);
      imageView.setFitWidth(600);

      // Setting the preserve ratio of the image view
      imageView.setPreserveRatio(true);

      // Creating a Group object
      Group root = new Group(imageView);

      // Creating a scene object
      Scene scene = new Scene(root, 600, 400);

      // Setting title to the Stage
      stage.setTitle("Capturing an image");

      // Adding scene to the stage
      stage.setScene(scene);

      // Displaying the contents of the stage
      stage.show();
   }
   public WritableImage capureFrame() {
      WritableImage writableImage = null;

      // Loading the OpenCV core library
      System.loadLibrary( Core.NATIVE_LIBRARY_NAME );

      // Instantiating the VideoCapture class (camera:: 0)
      VideoCapture capture = new VideoCapture(0);

      // Reading the next video frame from the camera
      Mat matrix = new Mat();
      capture.read(matrix);

      // If camera is opened
      if(!capture.isOpened()) {
         System.out.println("camera not detected");
      } else
         System.out.println("Camera detected ");

      // If there is next video frame
      if (capture.read(matrix)) {
         /////// Detecting the face in the snap /////
         String file = "E:/OpenCV/facedetect/lbpcascade_frontalface.xml";
         CascadeClassifier classifier = new CascadeClassifier(file);

         MatOfRect faceDetections = new MatOfRect();
         classifier.detectMultiScale(matrix, faceDetections);
         System.out.println(String.format("Detected %s faces",
            faceDetections.toArray().length));

         // Drawing boxes
         for (Rect rect : faceDetections.toArray()) {
            Imgproc.rectangle(
               matrix,                                   //where to draw the box
               new Point(rect.x, rect.y),                            //bottom left
               new Point(rect.x + rect.width, rect.y + rect.height), //top right
               new Scalar(0, 0, 255)                                 //RGB colour
            );
         }
         // Creating BuffredImage from the matrix
         BufferedImage image = new BufferedImage(matrix.width(), matrix.height(),
            BufferedImage.TYPE_3BYTE_BGR);

         WritableRaster raster = image.getRaster();
         DataBufferByte dataBuffer = (DataBufferByte) raster.getDataBuffer();
         byte[] data = dataBuffer.getData();
         matrix.get(0, 0, data);

         this.matrix = matrix;

         // Creating the Writable Image
         writableImage = SwingFXUtils.toFXImage(image, null);
      }
      return writableImage;
   }
   public void saveImage() {
      // Saving the Image
      String file = "E:/OpenCV/chap23/facedetected.jpg";

      // Instantiating the imagecodecs class
      Imgcodecs imageCodecs = new Imgcodecs();

      // Saving it again
      imageCodecs.imwrite(file, matrix);
   }
   public static void main(String args[]) {
      launch(args);
   }
}
Output
On executing the program, you will get the following output.
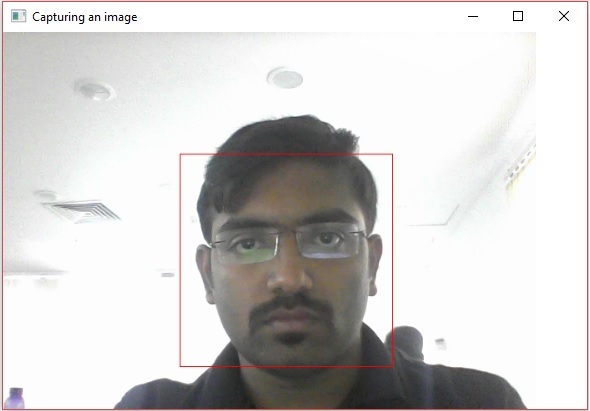
If you open the specified path, you can see the same snapshot saved as a jpg image.
OpenCV - Affine Translation
You can perform affine translation on an image using the warpAffine() method of the imgproc class. Following is the syntax of this method −
Imgproc.warpAffine(src, dst, tranformMatrix, size);
This method accepts the following parameters −
src − A Mat object representing the source (input image) for this operation.
dst − A Mat object representing the destination (output image) for this operation.
tranformMatrix − A Mat object representing the transformation matrix.
size − A variable of the type integer representing the size of the output image.
Example
The following program demonstrates how to apply affine operation on a given image.
import org.opencv.core.Core;
import org.opencv.core.Mat;
import org.opencv.core.MatOfPoint2f;
import org.opencv.core.Point;
import org.opencv.core.Size;
import org.opencv.imgcodecs.Imgcodecs;
import org.opencv.imgproc.Imgproc;

public class AffineTranslation {
   public static void main(String args[]) {
      // Loading the OpenCV core library
      System.loadLibrary( Core.NATIVE_LIBRARY_NAME );

      // Reading the Image from the file and storing it in to a Matrix object
      String file ="E:/OpenCV/chap24/transform_input.jpg";
      Mat src = Imgcodecs.imread(file);

      //Creating an empty matrix to store the result
      Mat dst = new Mat();

      Point p1 = new Point( 0,0 );
      Point p2 = new Point( src.cols() - 1, 0 );
      Point p3 = new Point( 0, src.rows() - 1 );
      Point p4 = new Point( src.cols()*0.0, src.rows()*0.33 );
      Point p5 = new Point( src.cols()*0.85, src.rows()*0.25 );
      Point p6 = new Point( src.cols()*0.15, src.rows()*0.7 );

      MatOfPoint2f ma1 = new MatOfPoint2f(p1,p2,p3);
      MatOfPoint2f ma2 = new MatOfPoint2f(p4,p5,p6);

      // Creating the transformation matrix
      Mat tranformMatrix = Imgproc.getAffineTransform(ma1,ma2);

      // Creating object of the class Size
      Size size = new Size(src.cols(), src.cols());

      // Applying Wrap Affine
      Imgproc.warpAffine(src, dst, tranformMatrix, size);

      // Writing the image
      Imgcodecs.imwrite("E:/OpenCV/chap24/Affinetranslate.jpg", dst);

      System.out.println("Image Processed");
   }
}
Assume that following is the input image transform_input.jpg specified in the above program.
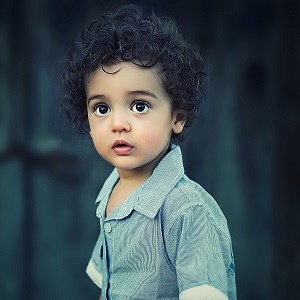
Output
On executing it, you will get the following output −
Image Processed
If you open the specified path, you can observe the output image as follows −
OpenCV - Rotation
You can perform rotation operation on an image using the warpAffine() method of the imgproc class. Following is the syntax of this method −
Imgproc.warpAffine(src, dst, rotationMatrix, size);
This method accepts the following parameters −
src − A Mat object representing the source (input image) for this operation.
dst − A Mat object representing the destination (output image) for this operation.
rotationMatrix − A Mat object representing the rotation matrix.
size − A variable of the type integer representing the size of the output image.
Example
The following program demonstrates how to rotate an image.
import org.opencv.core.Core;
import org.opencv.core.Mat;
import org.opencv.core.Point;
import org.opencv.core.Size;

import org.opencv.imgcodecs.Imgcodecs;
import org.opencv.imgproc.Imgproc;

public class Rotation {
   public static void main(String args[]) {
      // Loading the OpenCV core library
      System.loadLibrary( Core.NATIVE_LIBRARY_NAME );

      // Reading the Image from the file and storing it in to a Matrix object
      String file ="E:/OpenCV/chap24/transform_input.jpg";
      Mat src = Imgcodecs.imread(file);

      // Creating an empty matrix to store the result
      Mat dst = new Mat();

      // Creating a Point object
      Point point = new Point(300, 200)

      // Creating the transformation matrix M
      Mat rotationMatrix = Imgproc.getRotationMatrix2D(point, 30, 1);

      // Creating the object of the class Size
      Size size = new Size(src.cols(), src.cols());

      // Rotating the given image
      Imgproc.warpAffine(src, dst, rotationMatrix, size);

      // Writing the image
      Imgcodecs.imwrite("E:/OpenCV/chap24/rotate_output.jpg", dst);

      System.out.println("Image Processed");
   }
}
Assume that following is the input image transform_input.jpg specified in the above program.
Output
On executing the program, you will get the following output −
Image Processed
If you open the specified path, you can observe the output image as follows −

OpenCV - Scaling
You can perform scaling on an image using the resize() method of the imgproc class. Following is the syntax of this method.
resize(Mat src, Mat dst, Size dsize, double fx, double fy, int interpolation)
This method accepts the following parameters −
src − A Mat object representing the source (input image) for this operation.
dst − A Mat object representing the destination (output image) for this operation.
dsize − A Size object representing the size of the output image.
fx − A variable of the type double representing the scale factor along the horizontal axis.
fy − A variable of the type double representing the scale factor along the vertical axis.
Interpolation − An integer variable representing interpolation method.
Example
The following program demonstrates how to apply scale transformation to an image.
import org.opencv.core.Core;
import org.opencv.core.Mat;
import org.opencv.core.Size;

import org.opencv.imgcodecs.Imgcodecs;
import org.opencv.imgproc.Imgproc;

public class Scaling {
   public static void main(String args[]) {
      // Loading the OpenCV core library
      System.loadLibrary( Core.NATIVE_LIBRARY_NAME );

      // Reading the Image from the file and storing it in to a Matrix object
      String file ="E:/OpenCV/chap24/transform_input.jpg";
      Mat src = Imgcodecs.imread(file);

      // Creating an empty matrix to store the result
      Mat dst = new Mat();

      // Creating the Size object
      Size size = new Size(src.rows()*2, src.rows()*2);

      // Scaling the Image
      Imgproc.resize(src, dst, size, 0, 0, Imgproc.INTER_AREA);

      // Writing the image
      Imgcodecs.imwrite("E:/OpenCV/chap24/scale_output.jpg", dst);

      System.out.println("Image Processed");
   }
}
Assume that following is the input image transform_input.jpg specified in the above program (size − Width:300px and height:300px).
Output
On executing the program, you will get the following output −
Image Processed
If you open the specified path, you can observe the output image as follows (size − Width:600px and height:600px) −

OpenCV - Color Maps
In OpenCV, you can apply different color maps to an image using the method applyColorMap() of the class Imgproc. Following is the syntax of this method −
applyColorMap(Mat src, Mat dst, int colormap)
It accepts three parameters −
src − An object of the class Mat representing the source (input) image.
dst − An object of the class Mat representing the destination (output) image.
colormap − A variable of integer type representing the type of the color map to be applied.
Example
The following program demonstrates how to apply color map to an image.
import org.opencv.core.Core;
import org.opencv.core.Mat;

import org.opencv.imgcodecs.Imgcodecs;
import org.opencv.imgproc.Imgproc;

public class ColorMapTest {
   public static void main(String args[]) {
      // Loading the OpenCV core library
      System.loadLibrary(Core.NATIVE_LIBRARY_NAME);

      // Reading the Image from the file and storing it in to a Matrix object
      String file ="E:/OpenCV/chap25/color_input.jpg";
      Mat src = Imgcodecs.imread(file);

      // Creating an empty matrix to store the result
      Mat dst = new Mat();

      // Applying color map to an image
      Imgproc.applyColorMap(src, dst, Imgproc.COLORMAP_HOT);

      // Writing the image
      Imgcodecs.imwrite("E:/OpenCV/chap25/colormap_hot.jpg", dst);
      System.out.println("Image processed");
   }
}
Assume that following is the input image color_input.jpg specified in the above program.
Output
On executing the above program, you will get the following output −
Image Processed
If you open the specified path, you can observe the output image as follows −

More Operations
In addition to COLORMAP_HOT demonstrated in the previous example, OpenCV caters various other types of color maps. All these types are represented by predefined static fields (fixed values) of Imgproc class.
You can choose the type of the colormap you need, by passing its respective predefined value to the parameter named colormap of the applyColorMap() method.
Imgproc.applyColorMap(src, dst, Imgproc.COLORMAP_HOT);
Following are the values representing various types of color maps and their respective outputs.
| Operation and Description | Output |
|---|---|
| COLORMAP_AUTUMN |  |
| COLORMAP_BONE | 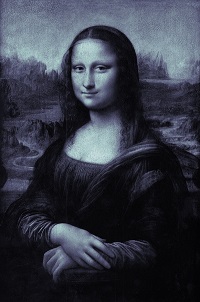 |
| COLORMAP_COOL |  |
| COLORMAP_HOT |  |
| COLORMAP_HSV |  |
| COLORMAP_JET |  |
| COLORMAP_OCEAN | 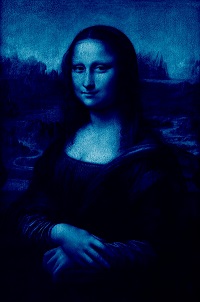 |
| COLORMAP_PARULA | 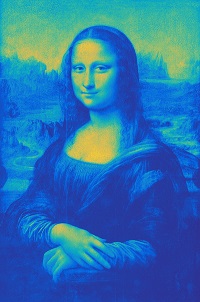 |
| COLORMAP_PINK | 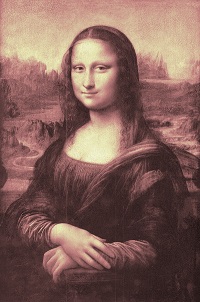 |
| COLORMAP_RAINBOW | 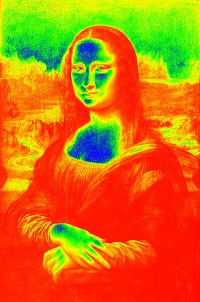 |
| COLORMAP_SPRING | 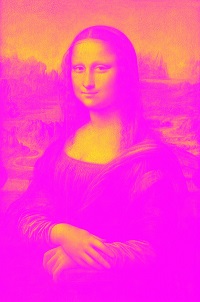 |
| COLORMAP_SUMMER | 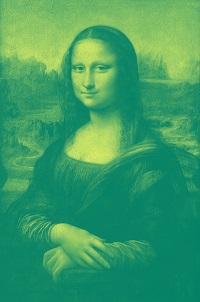 |
| COLORMAP_WINTER | 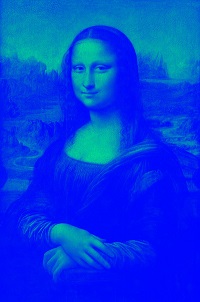 |
OpenCV - Canny Edge Detection
Canny Edge Detection is used to detect the edges in an image. It accepts a gray scale image as input and it uses a multistage algorithm.
You can perform this operation on an image using the Canny() method of the imgproc class, following is the syntax of this method.
Canny(image, edges, threshold1, threshold2)
This method accepts the following parameters −
image − A Mat object representing the source (input image) for this operation.
edges − A Mat object representing the destination (edges) for this operation.
threshold1 − A variable of the type double representing the first threshold for the hysteresis procedure.
threshold2 − A variable of the type double representing the second threshold for the hysteresis procedure.
Example
Following program is an example demonstrating, how to perform Canny Edge Detection operation on a given image.
import org.opencv.core.Core;
import org.opencv.core.Mat;

import org.opencv.imgcodecs.Imgcodecs;
import org.opencv.imgproc.Imgproc;

public class CannyEdgeDetection {
   public static void main(String args[]) throws Exception {
      // Loading the OpenCV core library
      System.loadLibrary(Core.NATIVE_LIBRARY_NAME);

      // Reading the Image from the file and storing it in to a Matrix object
      String file = "E:/OpenCV/chap17/canny_input.jpg";

      // Reading the image
      Mat src = Imgcodecs.imread(file);

      // Creating an empty matrix to store the result
      Mat gray = new Mat();

      // Converting the image from color to Gray
      Imgproc.cvtColor(src, gray, Imgproc.COLOR_BGR2GRAY);
      Mat edges = new Mat();

      // Detecting the edges
      Imgproc.Canny(gray, edges, 60, 60*3);

      // Writing the image
      Imgcodecs.imwrite("E:/OpenCV/chap17/canny_output.jpg", edges);
      System.out.println("Image Loaded");
   }
}
Assume that following is the input image canny_input.jpg specified in the above program.

Output
On executing the above program, you will get the following output −
Image Processed
If you open the specified path, you can observe the output image as follows −
OpenCV - Hough Line Transform
You can detect the shape of a given image by applying the Hough Transform technique using the method HoughLines() of the Imgproc class. Following is the syntax of this method.
HoughLines(image, lines, rho, theta, threshold)
This method accepts the following parameters −
image − An object of the class Mat representing the source (input) image.
lines − An object of the class Mat that stores the vector that stores the parameters (r, Φ) of the lines.
rho − A variable of the type double representing the resolution of the parameter r in pixels.
theta − A variable of the type double representing the resolution of the parameter Φ in radians.
threshold − A variable of the type integer representing the minimum number of intersections to “detect” a line.
Example
The following program demonstrates how to detect Hough lines in a given image.
import org.opencv.core.Core;
import org.opencv.core.Mat;
import org.opencv.core.Point;
import org.opencv.core.Scalar;

import org.opencv.imgcodecs.Imgcodecs;
import org.opencv.imgproc.Imgproc;

public class HoughlinesTest {
   public static void main(String args[]) throws Exception {
      // Loading the OpenCV core library
      System.loadLibrary( Core.NATIVE_LIBRARY_NAME );

      // Reading the Image from the file and storing it in to a Matrix object
      String file = "E:/OpenCV/chap21/hough_input.jpg";

      // Reading the image
      Mat src = Imgcodecs.imread(file,0);

      // Detecting edges of it
      Mat canny = new Mat();
      Imgproc.Canny(src, canny, 50, 200, 3, false);

      // Changing the color of the canny
      Mat cannyColor = new Mat();
      Imgproc.cvtColor(canny, cannyColor, Imgproc.COLOR_GRAY2BGR);

      // Detecting the hough lines from (canny)
      Mat lines = new Mat();
      Imgproc.HoughLines(canny, lines, 1, Math.PI/180, 100);

      System.out.println(lines.rows());
      System.out.println(lines.cols());

      // Drawing lines on the image
      double[] data;
      double rho, theta;
      Point pt1 = new Point();
      Point pt2 = new Point();
      double a, b;
      double x0, y0;

      for (int i = 0; i < lines.cols(); i++) {
         data = lines.get(0, i);
         rho = data[0];
         theta = data[1];

         a = Math.cos(theta);
         b = Math.sin(theta);
         x0 = a*rho;
         y0 = b*rho;

         pt1.x = Math.round(x0 + 1000*(-b));
         pt1.y = Math.round(y0 + 1000*(a));
         pt2.x = Math.round(x0 - 1000*(-b));
         pt2.y = Math.round(y0 - 1000 *(a));
         Imgproc.line(cannyColor, pt1, pt2, new Scalar(0, 0, 255), 6);
      }
      // Writing the image
      Imgcodecs.imwrite("E:/OpenCV/chap21/hough_output.jpg", cannyColor);

      System.out.println("Image Processed");
   }
}
Assume that following is the input image hough_input.jpg specified in the above program.
Output
On executing the program, you will get the following output −
143
1
Image Processed
If you open the specified path, you can observe the output image as follows −
OpenCV - Histogram Equalization
The histogram of an image shows the frequency of pixels’ intensity values. In an image histogram, the X-axis shows the gray level intensities and the Y-axis shows the frequency of these intensities.
Histogram equalization improves the contrast of an image, in order to stretch out the intensty range. You can equalize the histogram of a given image using the method equalizeHist() of the Imgproc class. Following is the syntax of this method.
equalizeHist(src, dst)
This method accepts the following parameters −
src − An object of the class Mat representing the source (input) image.
dst − An object of the class Mat representing the output. (Image obtained after equalizing the histogram)
Example
The following program demonstrates how to equalize the histogram of a given image.
import java.util.ArrayList;
import java.util.List;

import org.opencv.core.Core;
import org.opencv.core.Mat;
import org.opencv.core.Size;
import org.opencv.imgcodecs.Imgcodecs;
import org.opencv.imgproc.Imgproc;

public class HistoTest {
   public static void main (String[] args) {
      // Loading the OpenCV core library
      System.loadLibrary( Core.NATIVE_LIBRARY_NAME );

      // Reading the Image from the file and storing it in to a Matrix object
      String file ="E:/OpenCV/chap20/histo_input.jpg";

      // Load the image
      Mat img = Imgcodecs.imread(file);

      // Creating an empty matrix
      Mat equ = new Mat();
      img.copyTo(equ);

      // Applying blur
      Imgproc.blur(equ, equ, new Size(3, 3));

      // Applying color
      Imgproc.cvtColor(equ, equ, Imgproc.COLOR_BGR2YCrCb);
      List<Mat> channels = new ArrayList<Mat>();

      // Splitting the channels
      Core.split(equ, channels);

      // Equalizing the histogram of the image
      Imgproc.equalizeHist(channels.get(0), channels.get(0));
      Core.merge(channels, equ);
      Imgproc.cvtColor(equ, equ, Imgproc.COLOR_YCrCb2BGR);

      Mat gray = new Mat();
      Imgproc.cvtColor(equ, gray, Imgproc.COLOR_BGR2GRAY);
      Mat grayOrig = new Mat();
      Imgproc.cvtColor(img, grayOrig, Imgproc.COLOR_BGR2GRAY);

      Imgcodecs.imwrite("E:/OpenCV/chap20/histo_output.jpg", equ);
      System.out.println("Image Processed");
   }
}
Assume that following is the input image histo_input.jpg specified in the above program.
Output
On executing the program, you will get the following output −
Image Processed
If you open the specified path, you can observe the output image as follows −