- Microsoft Expression Web Tutorial
- MS Expression Web - Home
- MS Expression Web - Overview
- Environment Setup
- MS Expression Web - New Website
- Blank Web Page
- Webpage Layout
- MS Expression Web - HTML Layout
- Horizontal Navigation
- Vertical Navigation
- MS Expression Web - Validate Pages
- Dynamic Web Template
- MS Expression Web - Search Page
- MS Expression Web - Images
- MS Expression Web - Hyperlinks
- MS Expression Web - Video
- SQL Datasource
- MS Expression Web - MS Word
- MS Expression Web - Gridview
- MS Expression Web - Master Pages
- MS Expression Web - Data Table
- MS Expression Web - Publish
- Backup Website
- MS Expression Web - Add-Ins
- MS Expression Web Resources
- MS Expression Web - Quick Guide
- MS Expression Web - Resources
- MS Expression Web - Discussion
Microsoft Expression Web - Quick Guide
Microsoft Expression Web - Overview
Microsoft Expression Web is a full-featured professional tool for designing, developing, and publishing feature-rich websites that conform to web standards. You can use Expression Web to create web pages and sites that let you transfer files between your computer and your hosting account.
Expression Web can design and develop web pages using HTML5, CSS 3, ASP.NET, PHP, JavaScript, XML+XSLT and XHTML.
Expression Web 4 requires .NET Framework 4.0 and Silverlight 4.0 to install and run.
Microsoft Expression Web − History
Microsoft Expression Web − History Microsoft released the first Community Technology Preview (CTP) version of Expression Web on May 14, 2006.
Microsoft Expression Web 4 was released on June 7, 2010.
It added the option of HTML add-ins and access to a web-based functionality for testing pages on browsers that cannot be installed on the user's system, such as Mac OS X or Linux browsers.
It also provides an SEO Checker using which you can analyze already created websites against the best practices for getting the highest possible search engine rankings.
Expression Web Service Packs
Expression Web Service Packs Expression Web 4 Service Pack 1 was released in March 2011 and added support for IntelliSense for HTML5 and CSS.
Expression Web 4 Service Pack 2 was released in July 2011. It fixed a number of issues and introduced new features such as −
- jQuery IntelliSense support
- a panel for managing snippets
- Interactive Snapshot Panel
- comment/uncomment functionality in Code View, and
- workspace and toolbar customization.
In December 2012, Microsoft announced that Expression Studio will no longer be a standalone product. Expression Blend is being integrated into Visual Studio, while Expression Web and Expression Design will now be free products.
System Requirements
To create a website using Microsoft Expression Web, your computer should meet the following requirements −
- You should have at least Windows XP with Service Pack 3 or the latest operating systems.
- You should have a PC with 1 GHz or faster processor.
- Your PC should have 1 GB of RAM or more.
- Your PC should have 2 GB or more of available hard disk space.
- You should have .NET Framework 4.0 and Silverlight 4.0.
- Your PC should support Microsoft DirectX® 9.0 graphics.
- You should have DVD compatible drive.
- You should have 1024 × 768 or higher resolution monitor with 24-bit color.
- Some product features require Firefox 3.0 or later, Internet Explorer 8. So you should have the same version.
Actual requirements and product functionality may vary based on your system configuration and operating system.
Environment Setup
Microsoft provides a free version of Microsoft Expression Web which can be downloaded from Microsoft Expression Web Download
Installation
Step 1 − Before you can install Expression Web, you will need to have .NET Framework 4.0 installed.
Step 2 − Once downloading is complete, run the installer. The following dialog will be displayed.
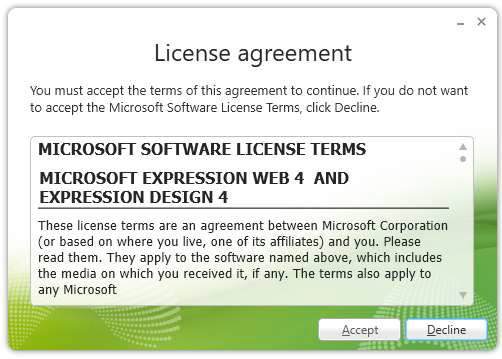
Step 3 − Click the Accept button.
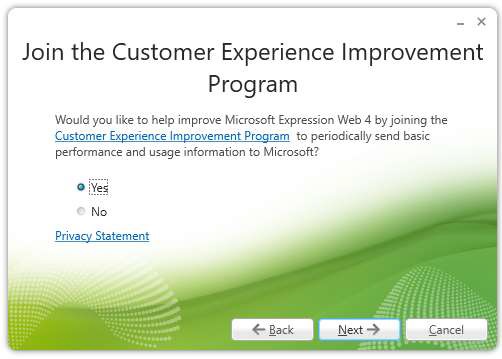
Step 4 − Select the Yes radio button and then click Next.
Step 5 − You can choose other location as well for installation. Select the location and click the Install button.
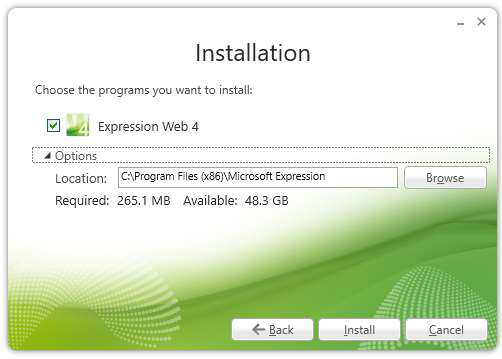
The installation process starts.

Once the installation is complete, you will see the following dialog.
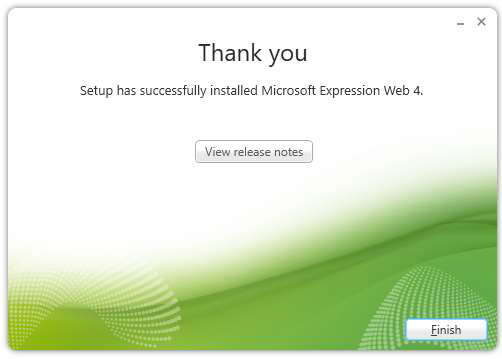
Step 6 − Click Finish to continue.
Microsoft Expression Web - New Website
In the previous chapter, we have installed Microsoft Expression Web and now we are ready to start working on it. In this chapter, we will learn how to create a new website from scratch.
Create a Website
To create a new website, let’s open Microsoft Expression Web.
Next, you need to follow the steps given below.
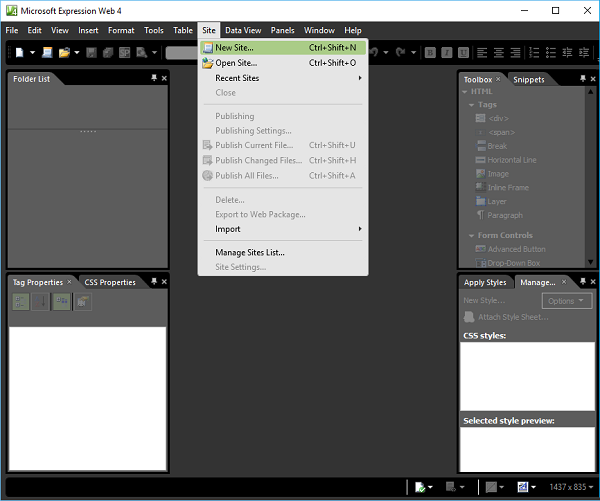
Step 1 − Select Site → New Site… menu option.
Step 2 − It will open the following dialog from which you can create or import different types of website.
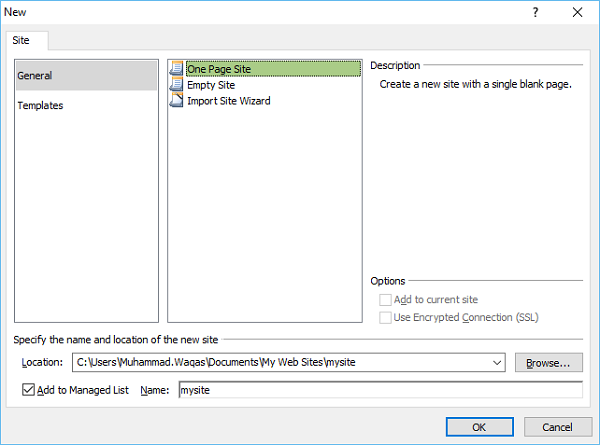
Step 3 − For simplicity let’s select General → One Page Site.
Specify the location or you can browse to the location where you want the new website to be created.
Type in the name of your web in the name field and click OK.
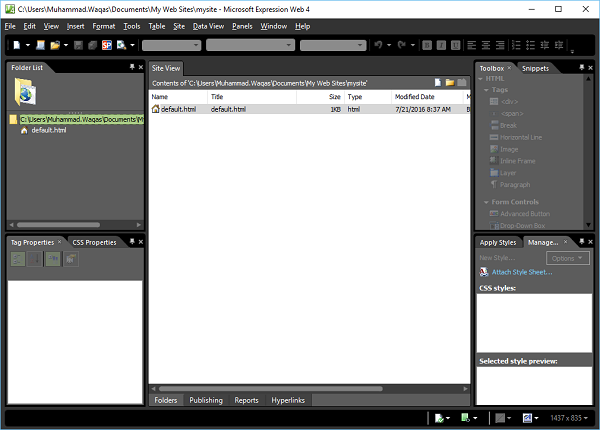
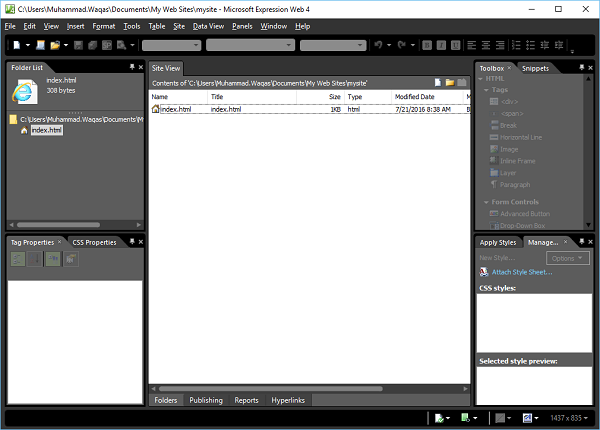
Step 4 − The new web will be created with one page named default.htm. Let’s rename it to index.html with a right-click on the file and clicking on the Rename option.
Step 5 − The default doctype used in Expression Web is −
<!DOCTYPE html PUBLIC "-//W3C//DTD XHTML 1.0 Transitional//EN"
   "http://www.w3.org/TR/xhtml1/DTD/xhtml1-transitional.dtd">
<html xmlns = "http://www.w3.org/1999/xhtml">
You can see it by just switching to the code view.
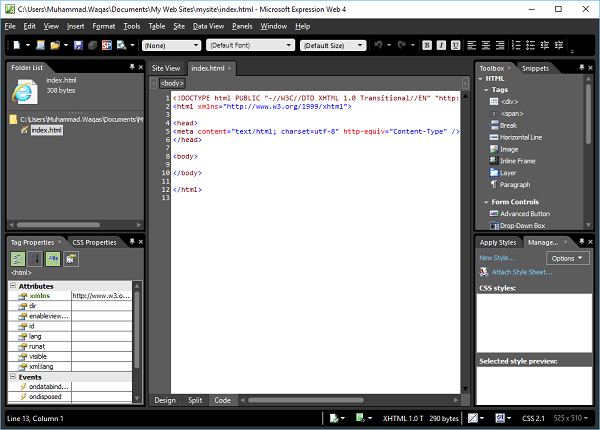
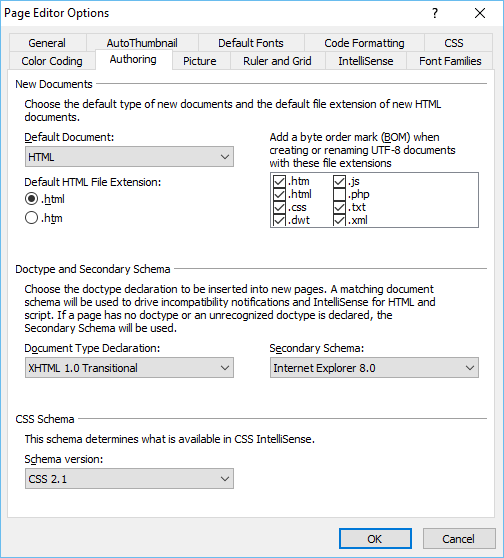
You can change the doctype from Tools → Page Editor Options → Authoring.
Step 6 − Now, let’s add <h1> tag inside the body tag and some text as shown in the following code.
<!DOCTYPE html PUBLIC "-//W3C//DTD XHTML 1.0 Transitional//EN"
"http://www.w3.org/TR/xhtml1/DTD/xhtml1-transitional.dtd">
<html xmlns = "http://www.w3.org/1999/xhtml">
<head>
<meta content = "text/html; charset = utf-8" http-equiv = "Content-Type" />
</head>
<body>
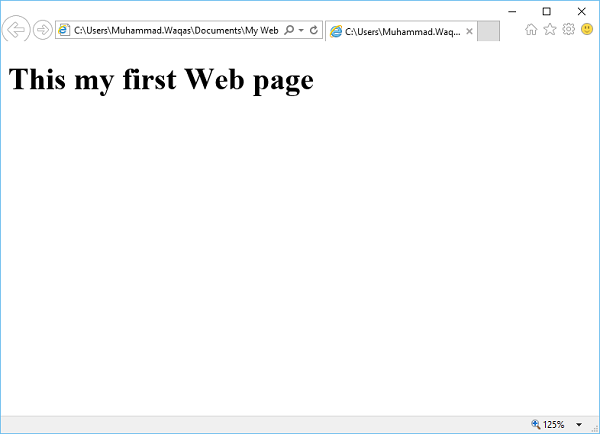
<h1>
This my first Web page
</h1>
</body>
</html>
Step 7 − To see our web in a browser, let’s go to the File menu and select the Preview in Browser → Any browser, let’s say, Internet Explorer.
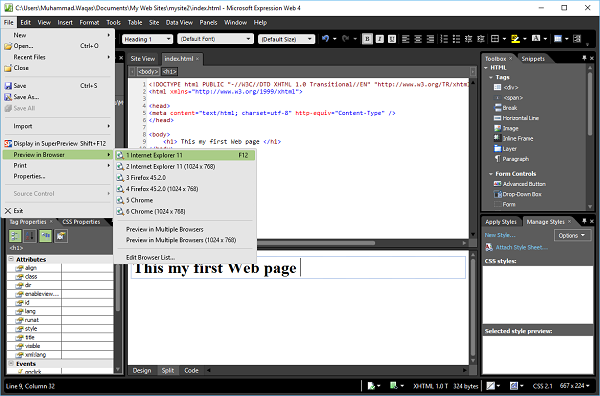
It will open our web in Internet Explorer.
Microsoft Expression Web - Blank Web Page
As we have already created our website, now we will need to create our Home Page. In the previous chapter, we have created a one-page website, and our Home Page was created at that time automatically by Expression Web. So, if you have created a blank website, then you will need to create a Home Page for your site.
Microsoft Expression Web can create the following types of pages −
- HTML
- ASPX
- ASP
- PHP
- CSS
- Master Page
- Dynamic Web Template
- JavaScript
- XML
- Text File
In this chapter, we will create an HTML page and its corresponding style sheet.
Create a Blank Page
To create a blank page, you can simply go to File menu and select New → Page… menu option.
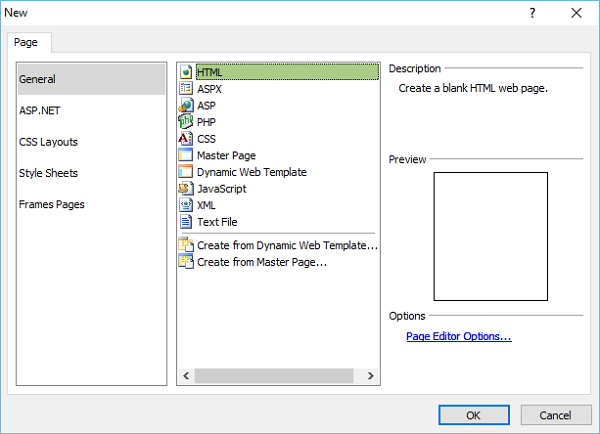
From the new dialog, you can create different types of blank pages such as HTML page, ASPX page, CSS page, etc. and click OK.
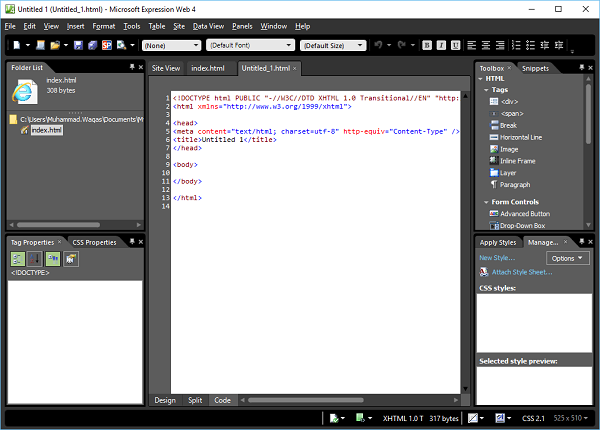
As you can see here, the default code is already added by Microsoft Expression Web.
<!DOCTYPE html PUBLIC "-//W3C//DTD XHTML 1.0 Transitional//EN"
"http://www.w3.org/TR/xhtml1/DTD/xhtml1-transitional.dtd">
<html xmlns = "http://www.w3.org/1999/xhtml">
<head>
<meta content = "text/html; charset = utf-8" http-equiv = "Content-Type" />
<title>Untitled 1</title>
</head>
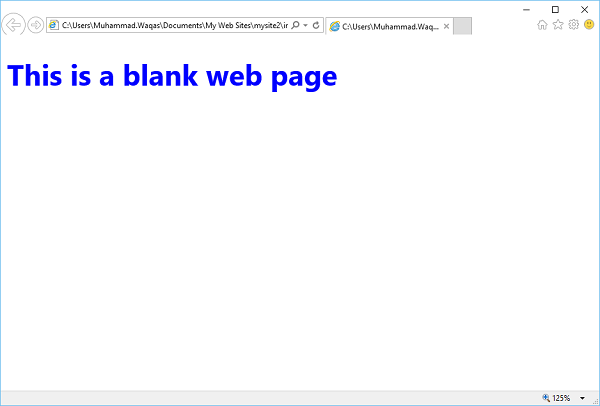
<body>
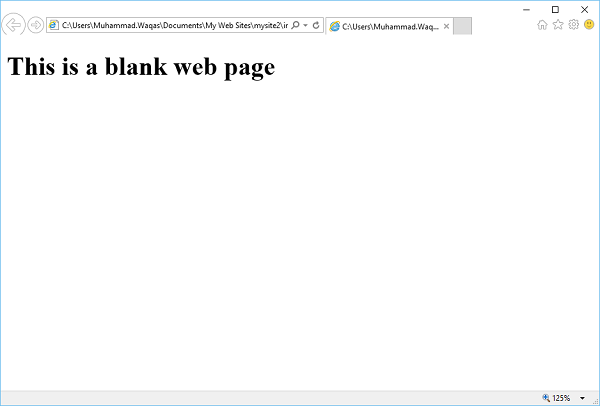
<h1>
This is a blank web page
</h1>
</body>
</html>
As you can see, your newly created page has the file name Untitled_1.html or Untitled_1.htm. You will need to save the page by pressing Ctrl + S and specify the name.
As our website already contains an index.html page, we don’t need another one. However, if you have created an Empty website, then name this page index.html.
To see your web in a browser, let’s go to the File menu and select the Preview in Browser → Any browser, let’s say Internet Explorer.
Create a CSS Page
Let’s take you through the step-by-step process of creating a CSS page.
Step 1 − To create a CSS page, go to the File menu and select New → Page… menu option.
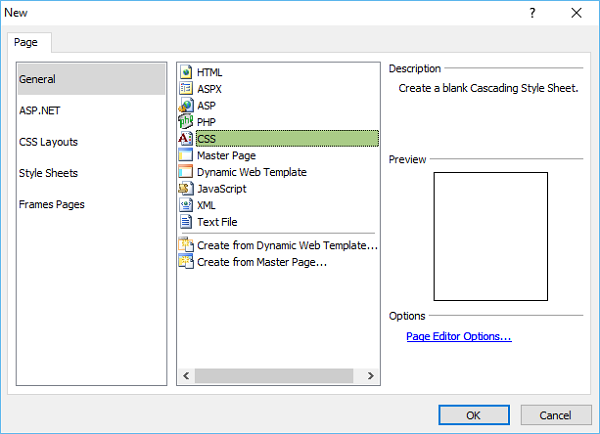
Step 2 − Select General → CSS and click OK.
Step 3 − Save the page and type a name for the style-sheet.
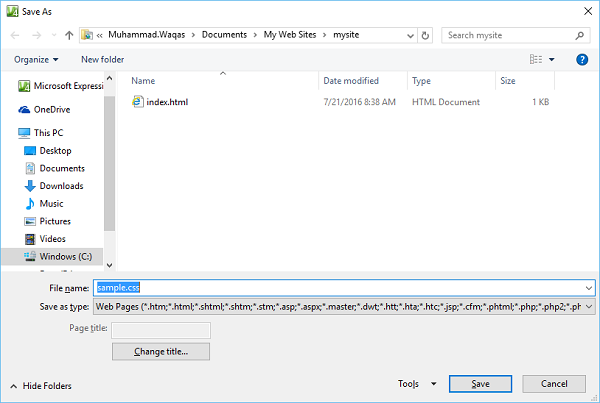
Step 4 − Click the Save button.
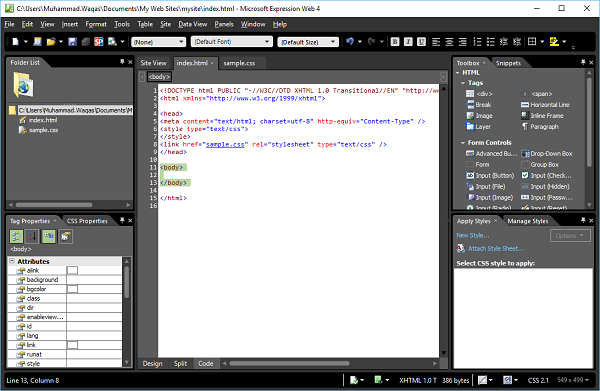
Step 5 − Now, let’s go to the index.html page.
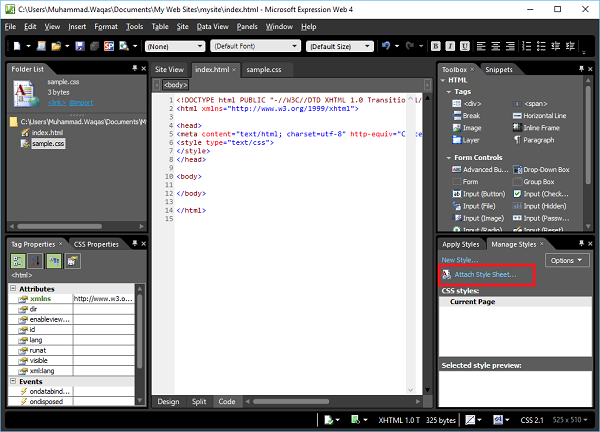
Step 6 − In the Manage Styles Panel, click Attach Style Sheet.
Step 7 − Browse to your style-sheet and select the Current page from “Attach to” and Link from “Attach as” and click OK.
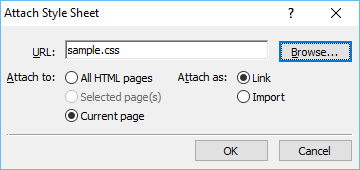
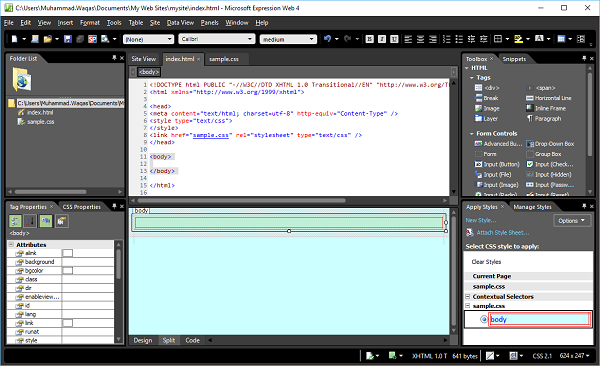
Step 8 − Now, you will see that a new line is added automatically in the index.html page.
<link href = "sample.css" rel = "stylesheet" type = "text/css" />
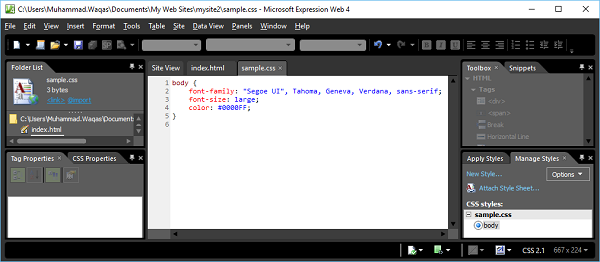
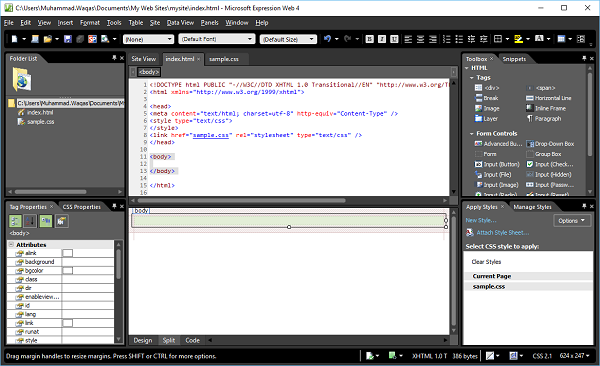
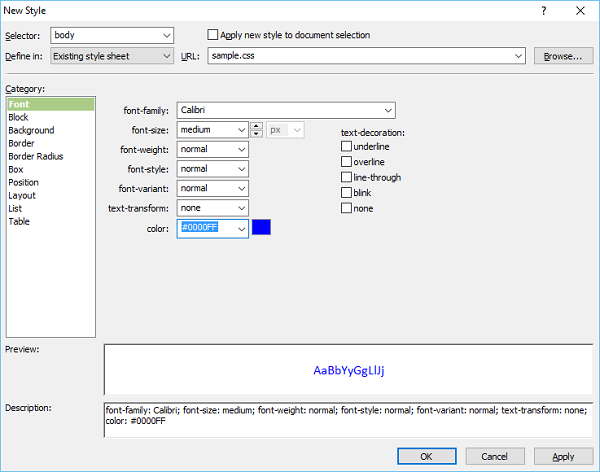
Step 9 − The body element defines the document's body. To style the <body> tag, we need to create a new style. First, select the body tag in Design View and then click on the New Style… in Apply Styles panel or Manage Styles panel, which will open the New Style dialog.
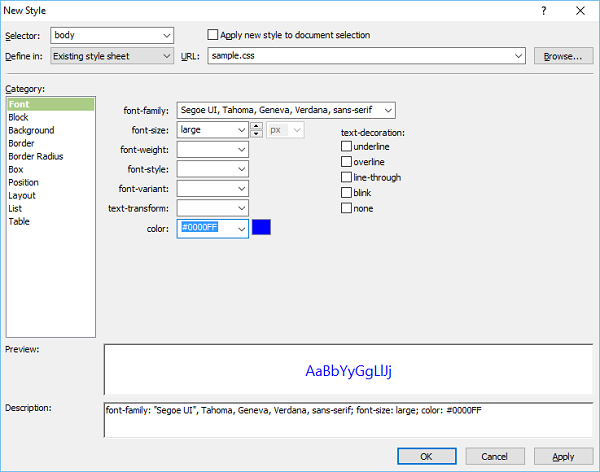
Here, you can define the different options for your style. The first step is to select the body from the Selector dropdown list and then select the Existing style sheet from “Define in” dropdown list.
Step 10 − From the URL, select the sample.css file. On the left side, there is a Category list like font, background, etc. and currently the Font is highlighted. Set the Font related information as per your requirements as shown in the above screenshot and click Ok.

Step 11 − Now you can see in the design view that the background color and the font has changed to what we have selected. Now, if you open the sample.css file, you will see that all the information is automatically stored in the CSS file.
Let’s preview our web page in a browser. You will observe that the style is applied from the CSS file.
Microsoft Expression Web - Webpage Layout
In this chapter, we will be covering the basic layout of your webpages. Before creating our webpage layout, we need to think about our content and then design how we want to present that content, as it is the content that will be visible on our website.
It is up to us how we present our content so that our viewers find our site and then stay to check it out. The layout will probably include the company logo or banner at the top, the navigation menu, a content area that may include multiple columns, and footer at the bottom of the page.
Previously, developers used tables to achieve this look. Tables created group of boxes that were used to create rows and columns. Now, web designers use <div>s to form the boxes and CSS to place those boxes on the page.
<div> tag
Following are some of the features of <div> tag.
The <div> tag defines a division or a section in an HTML document and makes it easy to manage, style, and manipulate those divisions or sections.
It is used to group block elements to format them with CSS.
Browsers usually place a line break before and after the div element.
The <div> tag is a block-level element.
The <div> tag can contain almost any other element.
The <div> tag cannot be inside a <p> tag.
Example
Let’s take a look at a simple example in which we will be using <div> </div> tags to create the various boxes and style rules.
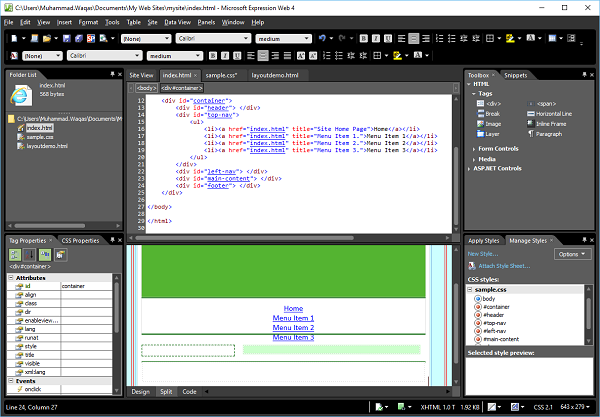
Step 1 − Open Expression Web and then the index.html page that we created in the previous chapter.
Step 2 − As seen in the above screenshot, the Code View is highlighted by default. You can work in Code View or Design View, but you can also see the Split View which will open both Code View and Design View. So let’s select the Split View option.
Step 3 − The body element defines the document's body. To style the <body> tag, we need to create a new style. First select the body tag in Design View and then click the New Style… in Apply Styles panel, which will open the New Style dialog. Here, you can define the different options for your style.
Step 4 − The first step is to select the body from the Selector dropdown list and then select the Existing style sheet from “Define in” the dropdown list. From the URL, select the CSS file we have created in the previous chapter.
On the left side, there is a Category list such as Font, Background, etc. and the current Font is highlighted. Set the Font-related information as per your requirements as shown in the above screenshot.
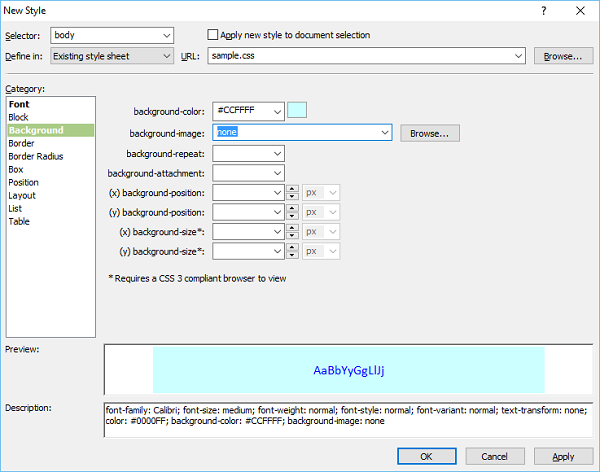
Step 5 − Select the Background color you want. You can also select the image for your background by using the browser button. Once you are done with the Background, define your Borders if you want.
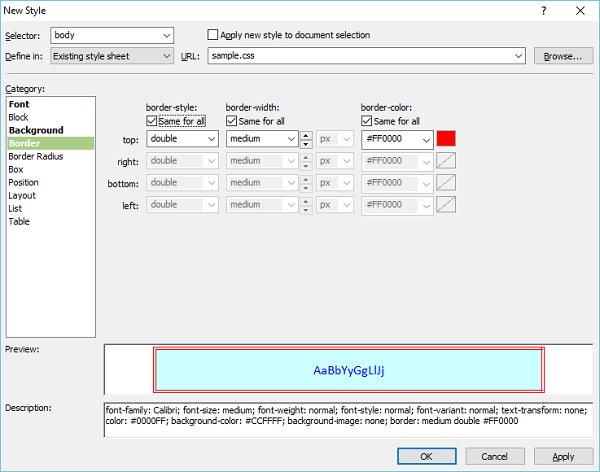
Step 6 − Let’s select the double line option for the border and choose the width and color also from the dropdown lists. Once you are done with the style, then click Ok.
Step 7 − Now you can see in the design view that the background color is changed to what we have selected. If you open the sample.css file, you will see that all the information is automatically stored in the CSS file.

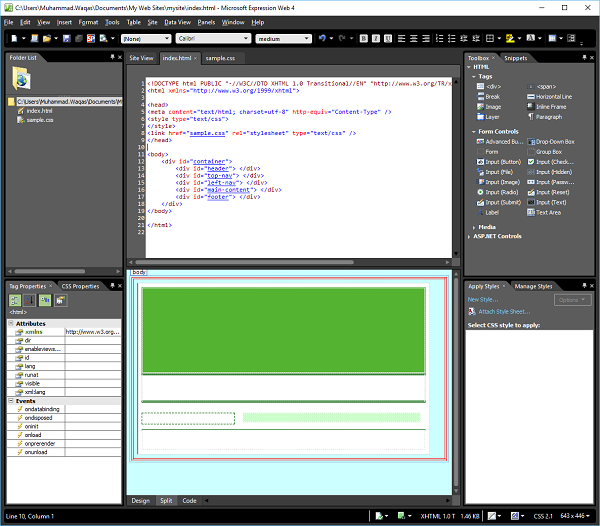
Step 8 − Go to the index.html page again and drag the <div> from the 'Toolbox' panel and drop it on your open page.
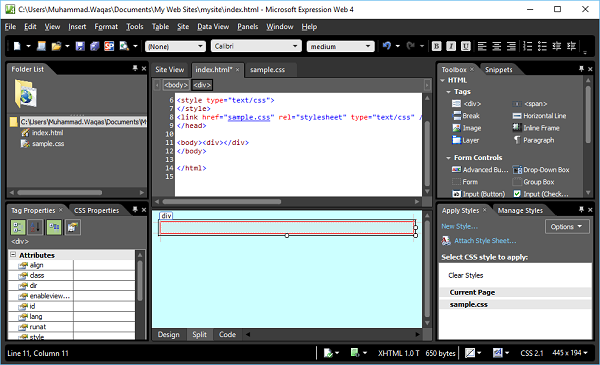
Step 9 − Above the code view, you will see <body> and <div> tags, click the <div> tag and then in Apply Styles panel click on the New Style…. which will open the New Style dialog.
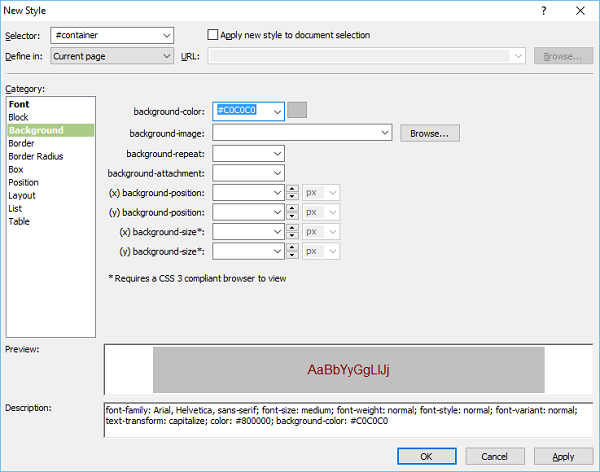
Type “#container” in the Selector field. The hash mark # is an ID selector. From the “Define in” dropdown list, select the Existing style sheet and check the “Apply new style to document selection” option. Go to the Background category.

Step 10 − Select the background color, let’s select white color and then go to the Box category.
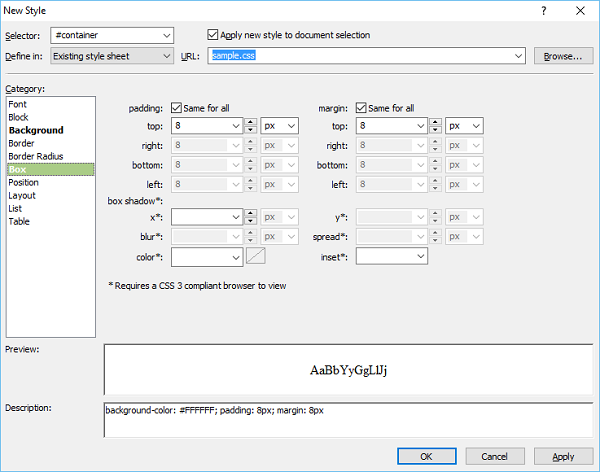
Step 11 − Define padding and margin and then go to the Position category
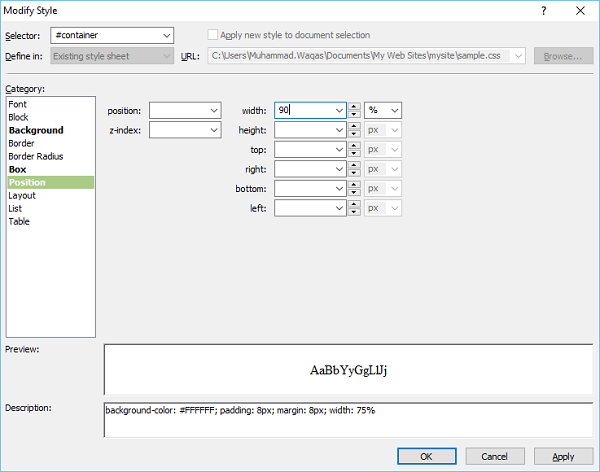
Step 12 − Set the width to 90%. However, don’t specify the height as here we want that the container should expand when we enter the content. Click the OK button.
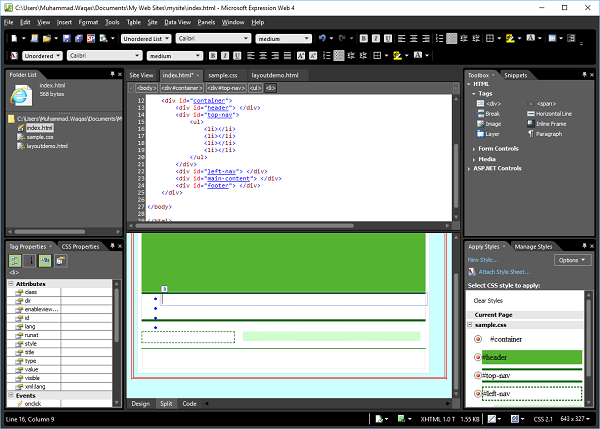
Similarly, let’s add styles for Header, top navigation, left navigation, main content, and footer.
sample.css
Following is the code in sample.css style-sheet after adding all the above-mentioned styles.
body {
   font-family: Calibri;
   font-size: medium;
   font-weight: normal;
   font-style: normal;
   font-variant: normal;
   text-transform: none;
   color: #0000FF;
   background-color: #CCFFFF;
   background-image: none;
   border: medium double #FF0000;
}

#container {
   background-color: #FFFFFF;
   padding: 8px;
   margin: 8px;
   width: 90%;
}

#header {
   background-color: #54B431;
   background-repeat: no-repeat;
   background-position: right center;
   height: 170px;
}

#top-nav {
   height: 50px;
   border-top: solid medium #006600;
   border-bottom: solid medium #006600;
   background-color: #FFFFFF;
}

#left-nav {
   margin: 20px 0px 10px 0px;
   width: 180px;
   float: left;
   border: thin dashed #006600;
}

#main-content {
   margin: 20px 10px 10px 200px;
   background-color: #CCFFCC;
}

#footer {
   border-top: 2px solid #006600;
   clear: both;
   padding: 10px 0px;
   text-align: center;
 }
index.html
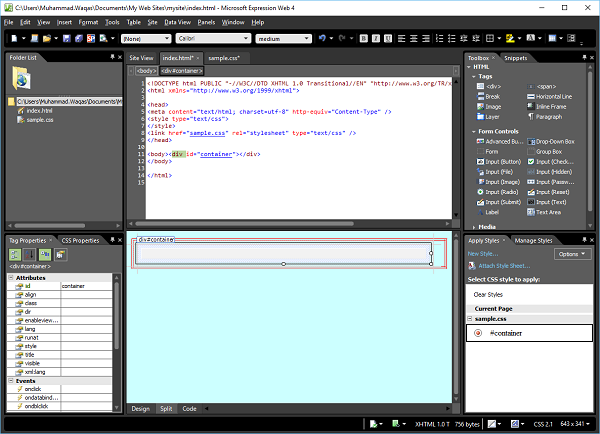
Following is the code in index.html file after adding all the <div> tags.
<!DOCTYPE html PUBLIC "-//W3C//DTD XHTML 1.0 Transitional//EN"
   "http://www.w3.org/TR/xhtml1/DTD/xhtml1-transitional.dtd">
<html xmlns = "http://www.w3.org/1999/xhtml">
   <head>
      <meta content = "text/html; charset = utf-8" http-equiv = "Content-Type" />
      <style type = "text/css"></style>
      <link href = "sample.css" rel = "stylesheet" type = "text/css" />
   </head>

   <body>
      <div id = "container">
         <div id = "header"></div>
         <div id = "top-nav"></div>
         <div id = "left-nav"></div>
         <div id = "main-content"></div>
         <div id = "footer"></div>
      </div>
   </body>
</html>
Output
Your page layout in the design view will look as shown in the following screenshot.
Microsoft Expression Web - HTML Layout
In this chapter, we will learn another way of designing the layout of a page. In the last chapter, we have used style sheet to apply the styles to header, footer, etc. but you can also specify the styles in HTML page itself without using an additional style-sheet.
This is not the recommended way to design a layout, however just for understanding purpose, we will cover this technique here. Try to follow the steps given below.
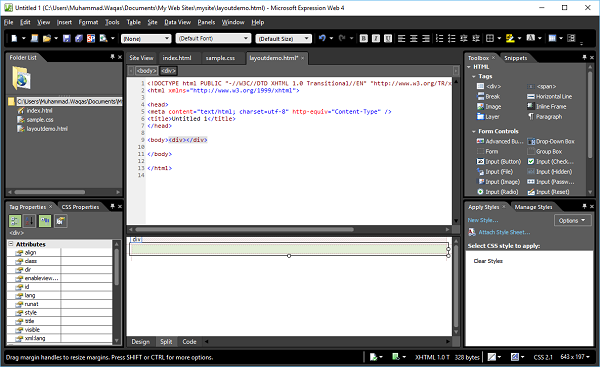
Step 1 − Let’s add an HTML page and call it layoutdemo.html
Step 2 − Now add the <div> tag from the Toolbox.
Step 3 − In the Apply Styles panel, click on the New Style…
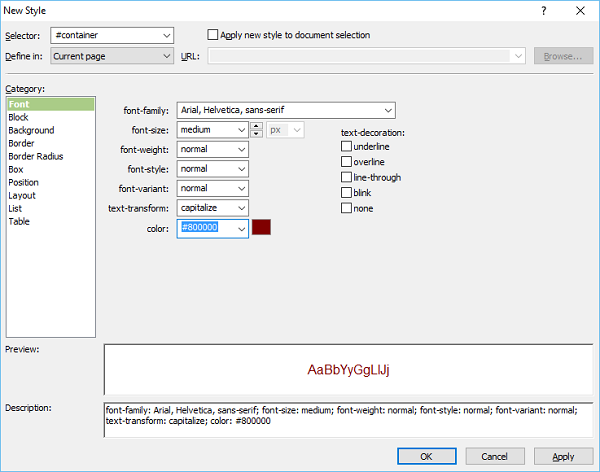
Step 4 − When you select the Current page option from “Define in” dropdown then the style will be saved in the same HTML page. Set the Font for your page and then go to the Background category.
Step 5 − Set the color for your Background. You can also set the Border, Box, and Position categories and then click OK.
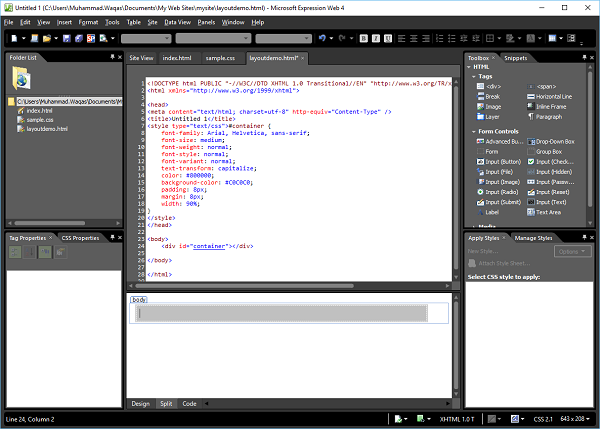
layoutdemo.html
You can see that the style is added in the same HTML file.
<!DOCTYPE html PUBLIC "-//W3C//DTD XHTML 1.0 Transitional//EN"
   "http://www.w3.org/TR/xhtml1/DTD/xhtml1-transitional.dtd">
<html xmlns = "http://www.w3.org/1999/xhtml">
   <head>
      <meta content = "text/html; charset = utf-8" http-equiv = "Content-Type" />
      <title>Untitled 1</title>
      <style type = "text/css">
         #container {
            font-family: Arial, Helvetica, sans-serif;
            font-size: medium;
            font-weight: normal;
            font-style: normal;
            font-variant: normal;
            text-transform: capitalize;
            color: #800000;
            background-color: #C0C0C0;
            padding: 8px;
            margin: 8px;
            width: 90%;
         }
      </style>
   </head>

   <body>
      <div id = "container"></div>
   </body>
</html>
Similarly, you can add other styles like header, footer, main content, etc. as shown above.
Horizontal Navigation
In this chapter, we will learn how to add horizontal navigation or menu items to the website.
Step 1 − To create menu items or horizontal navigation, let’s add the following code in <div id = “top-nav”> in the index.html file, which contains the list of menu items.
<div id = "top-nav">
   <ul>
      <li></li>
      <li></li>
      <li></li>
      <li></li>
   </ul>
</div>
Step 2 − It is a simple bulleted list for the top menu. To create a hyperlink, go to the design view or code view.
Step 3 − Select the item that you want to use as the hyperlink and press Ctrl + K.
Step 4 − Click on the ScreenTip… button.
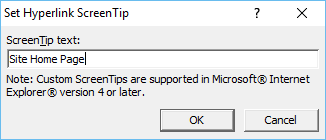
Step 5 − Enter the text you want as the screen tip and click OK.
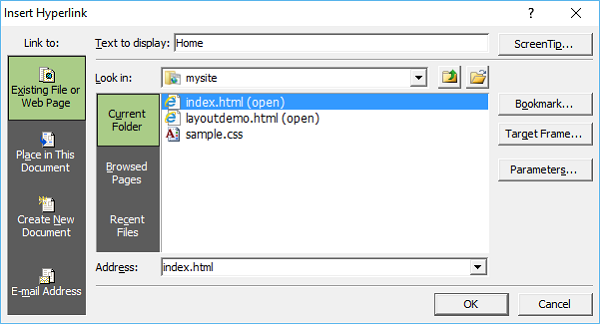
Step 6 − In the Text to display field, enter Home and select the index.html file and then click OK.
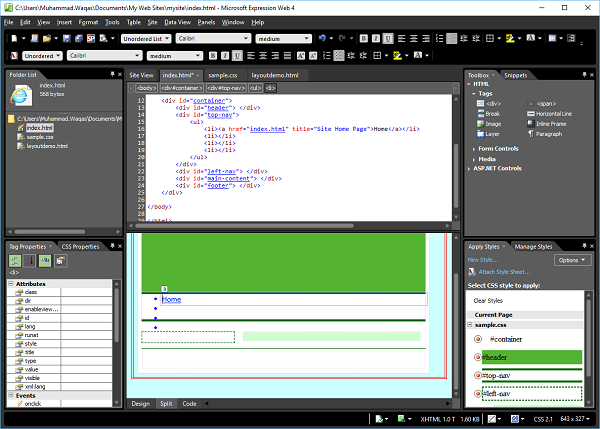
Step 7 − Similarly, add hyperlinks for other menu items, as shown in the following code.
<!DOCTYPE html PUBLIC "-//W3C//DTD XHTML 1.0 Transitional//EN"
   "http://www.w3.org/TR/xhtml1/DTD/xhtml1-transitional.dtd">
<html xmlns = "http://www.w3.org/1999/xhtml">
   <head>
      <meta content = "text/html; charset=utf-8" http-equiv = "Content-Type" />
      <style type = "text/css"></style>
      <link href = "sample.css" rel="stylesheet" type = "text/css" />
   </head>

   <body>
      <div id = "container">
         <div id = "header"></div>
         <div id = "top-nav">
            <ul>
               <li><a href = "index.html" title = "Site Home Page">Home</a></li>
               <li><a href = "index.html" title = "Menu Item 1.">Menu Item 1</a></li>
               <li><a href = "index.html" title =  "Menu Item 2.">Menu Item 2</a></li>
               <li><a href = "index.html" title = "Menu Item 3.">Menu Item 3</a></li>
            </ul>
         </div>
         <div id = "left-nav"> </div>
         <div id = "main-content"> </div>
         <div id = "footer"> </div>
      </div>
   </body>
</html>
Step 8 − To set the style for top navigation, go to the Manage Styles panel.

Step 9 − Right-click on “#top-nav” and select Modify Style. Select the 'Border' Category and change the width to thin.
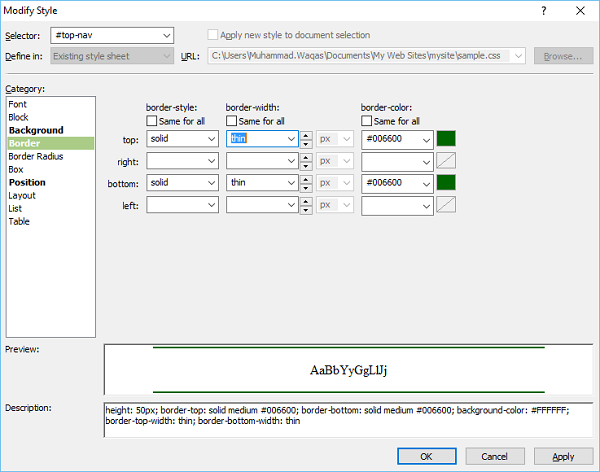
Step 10 − Select the Box category and uncheck padding ‘Same for all’ and enter 10 in the top and bottom fields.
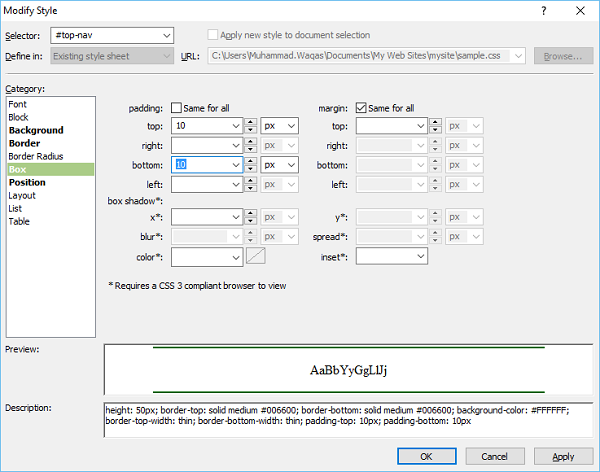
Step 11 − Go to the Position category.
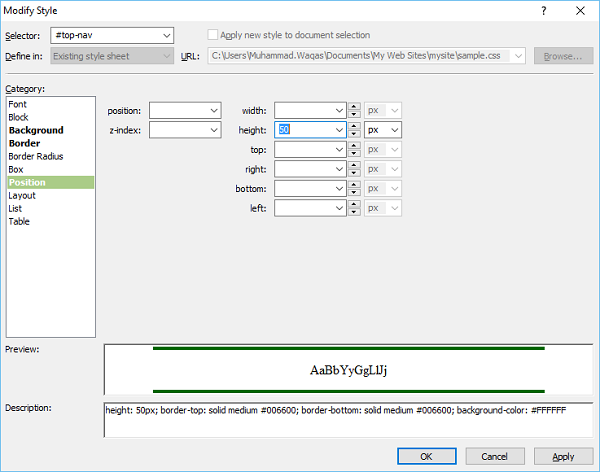
Step 12 − Remove the 50 from the height field and click OK. From the Apply Styles panel, click New Style…
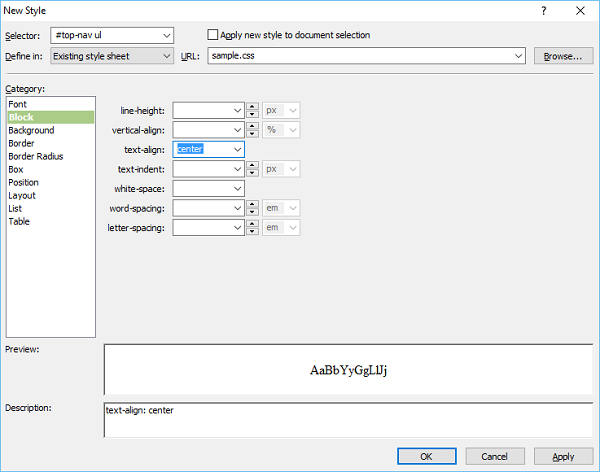
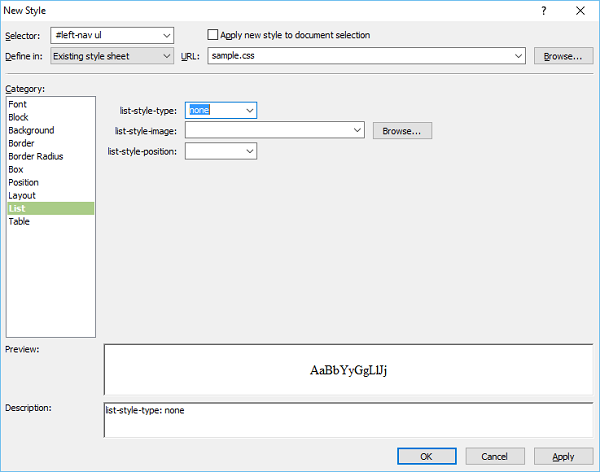
Step 13 − Enter #top-nav ul in the Selector field and select the Existing style sheet from the “Define in” dropdown. In the Block category, select center from the test-align field and go to the List category.
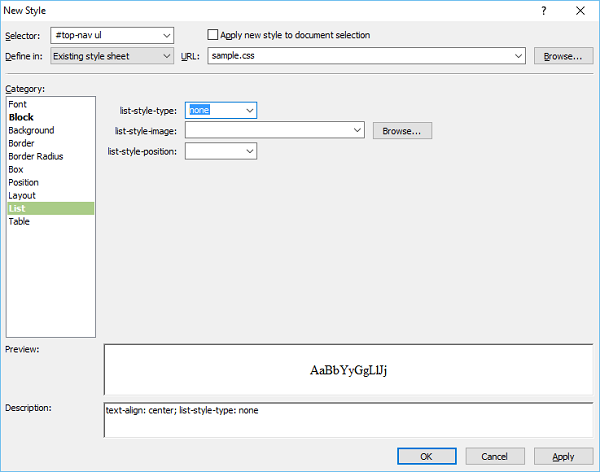
Step 14 − Select none from the list-style-type field and click OK.
Step 15 − Again, from the Apply Styles panel, click New Style… Enter #top-nav ul li in the Selector field. Then select the Existing style-sheet from the “Define in” dropdown and go to the Layout category.
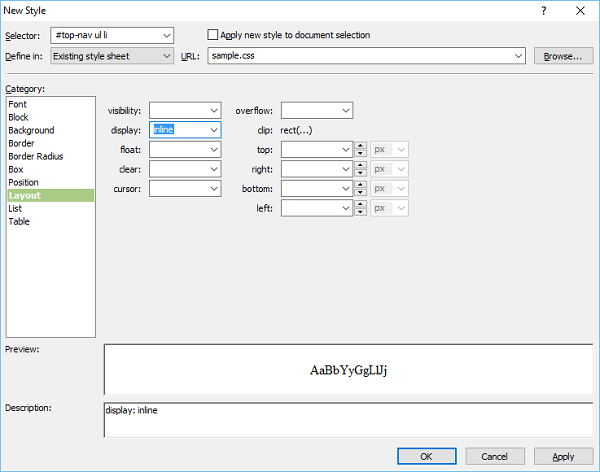
Step 16 − Select inline from the display field and click OK.

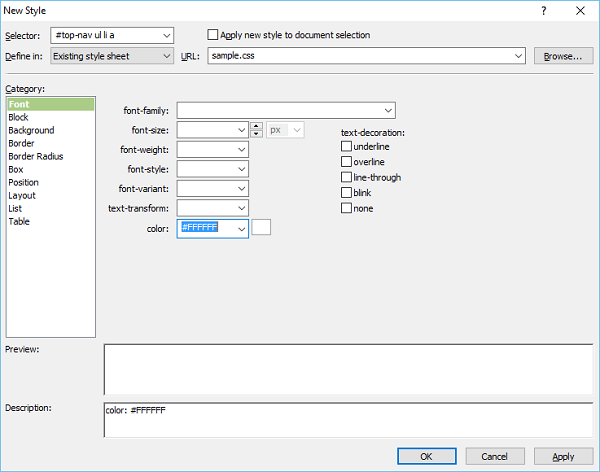
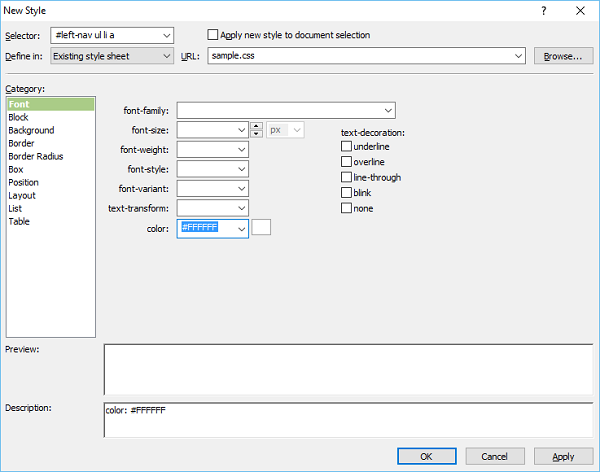
Step 17 − Go to Apply Styles panel, click New Style… Enter #top-nav ul li a in the Selector field and select the Existing style sheet from the “Define in” dropdown and select white as the font color.
Step 18 − Go to the Background category.

Step 19 − Select green as the background color and go to the Box category.
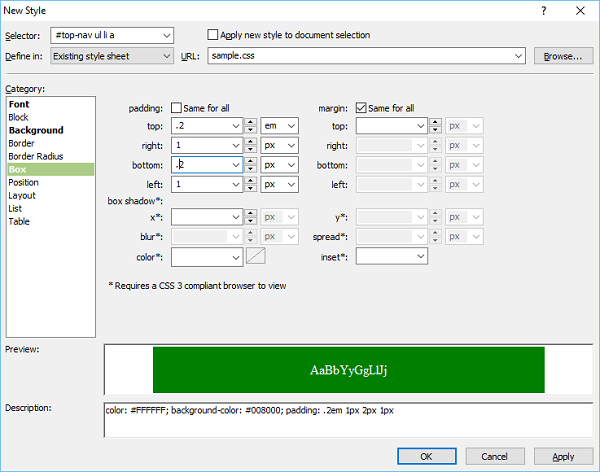
Step 20 − Set the padding values and click OK.
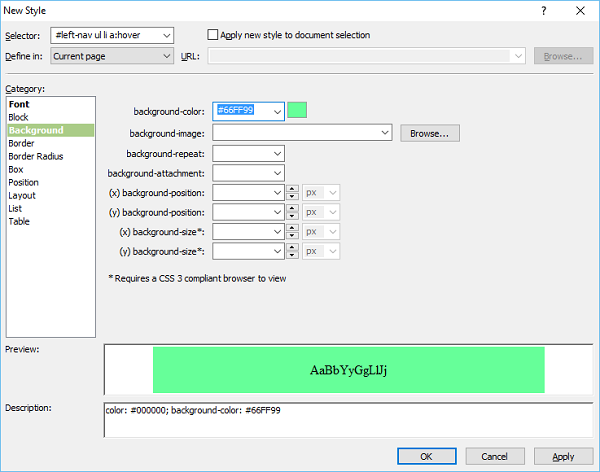
Step 21 − Now let’s go to the Apply Styles panel again and click New Style. Enter #topnav ul li a:hover in the Selector field and select the Existing style sheet from the “Define in” dropdown and select black as the font color.
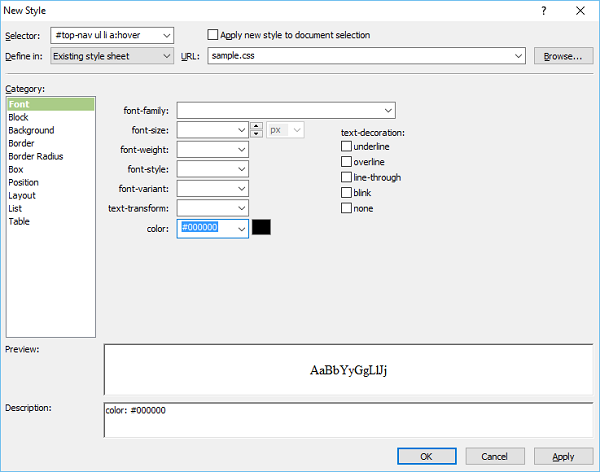
Step 22 − Now go to the Background category.

Step 23 − Select the background color for your menu option when the mouse is hovering on the menu item and go to the Border category.
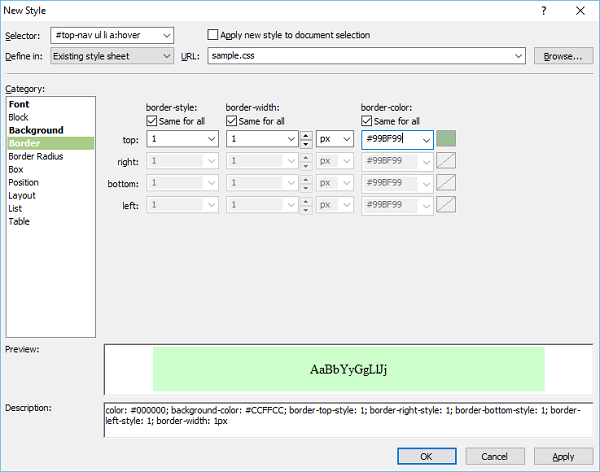
Step 24 − Select the border style, width, and color, and click OK. To check how it is looks, go to the File menu and select Preview in Browser.
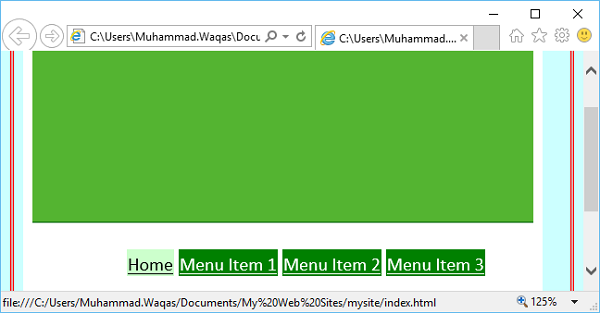
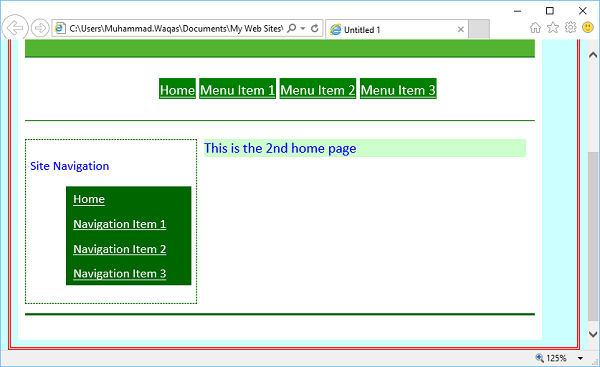
When you hover the mouse on any menu item, it will change the background and font color.
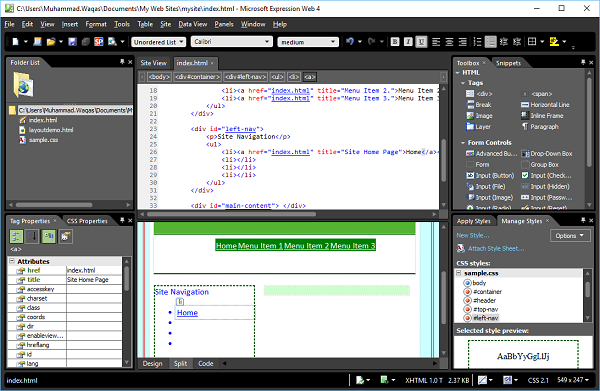
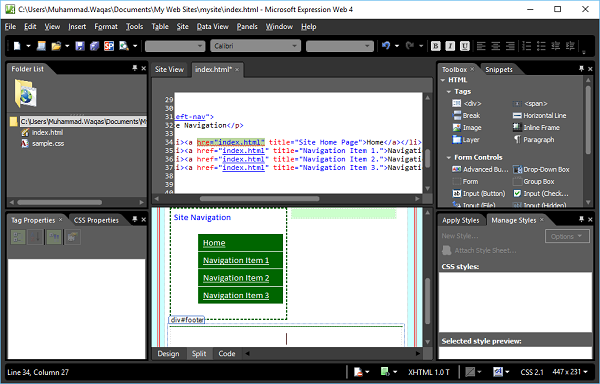
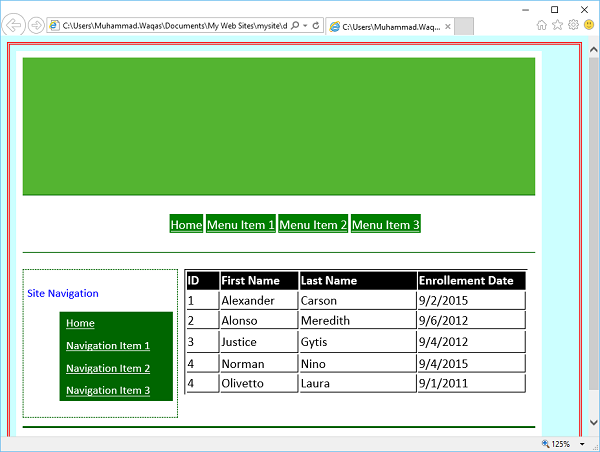
Vertical Navigation
In this chapter, we will learn how to add vertical navigation or menu items to the website. Let’s go step by step.
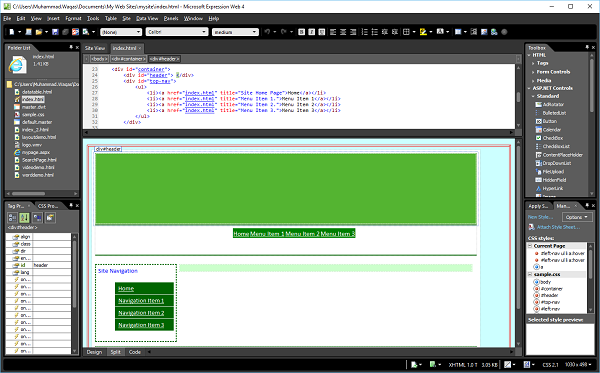
Step 1 − To create menu items or vertical navigation, let’s add the following code in <div id = “left-nav”> in the index.html file which contains the list of menu items.
<div id = "left-nav">
   <p>Site Navigation</p>
   <ul>
      <li></li>
      <li></li>
      <li></li>
      <li></li>
   </ul>
</div>
Step 2 − It is a simple bulleted list for your top menu. To create a hyperlink, go to the design view or code view.
Step 3 − Select the item that you want to use as the hyperlink and press Ctrl + K.
Step 4 − Click the ScreenTip… button. Enter the text you want as the screentip and click OK.
Step 5 − In the Text to display field, enter Home and select the index.html file and then click OK.
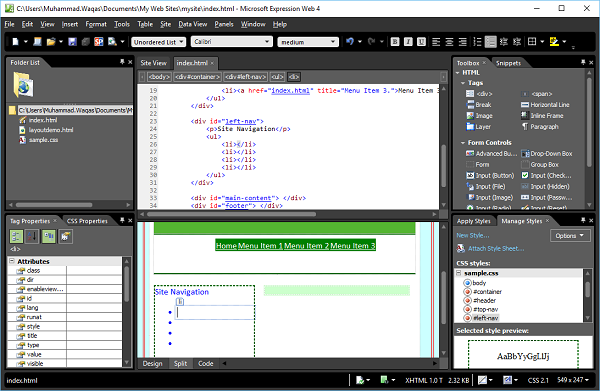
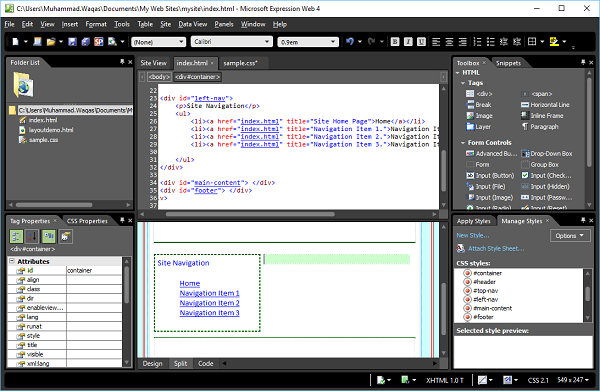
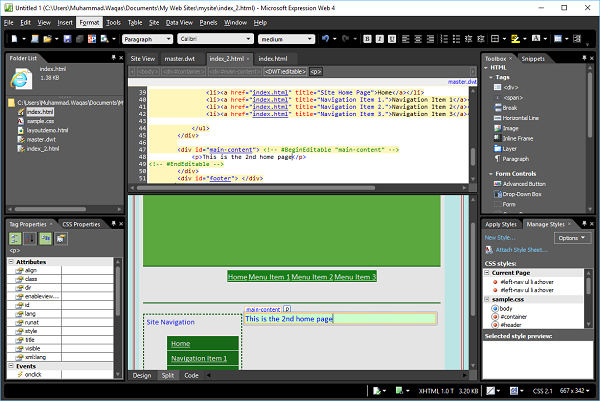
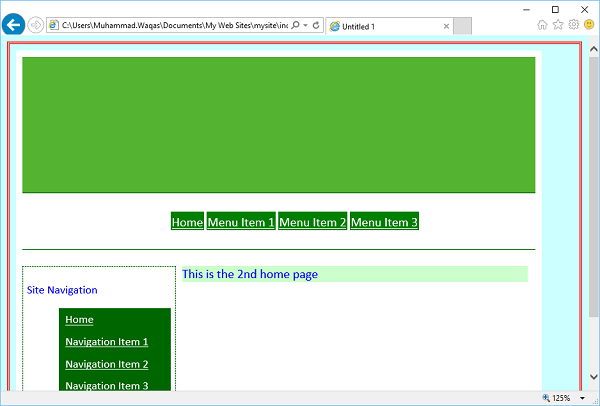
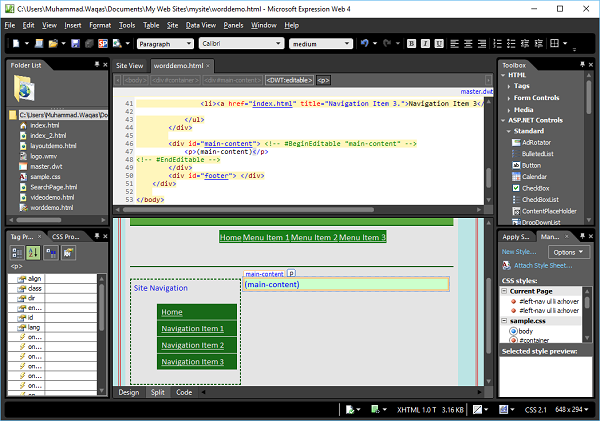
At this stage, our index.html page looks as follows −
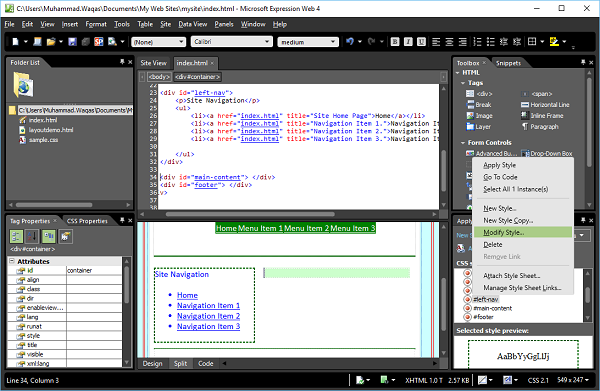
Step 6 − Add more hyperlinks for other menu items, as shown in the following code.
<!DOCTYPE html PUBLIC "-//W3C//DTD XHTML 1.0 Transitional//EN"
   "http://www.w3.org/TR/xhtml1/DTD/xhtml1-transitional.dtd">
<!DOCTYPE html PUBLIC "-//W3C//DTD XHTML 1.0 Transitional//EN"
   "http://www.w3.org/TR/xhtml1/DTD/xhtml1-transitional.dtd">

<html xmlns = "http://www.w3.org/1999/xhtml">
   <head>
      <meta content = "text/html; charset = utf-8" http-equiv = "Content-Type" />
      <style type = "text/css"></style>
      <link href = "sample.css" rel = "stylesheet" type = "text/css" />
   </head>

   <body>
      <div id = "container">
         <div id = "header"></div>
         <div id = "top-nav">
            <ul>
               <li><a href = "index.html" title = "Site Home Page">Home</a></li>
               <li><a href = "index.html" title = "Menu Item 1.">Menu Item 1</a></li>
               <li><a href = "index.html" title = "Menu Item 2.">Menu Item 2</a></li>
               <li><a href = "index.html" title = "Menu Item 3.">Menu Item 3</a></li>
            </ul>
         </div>

         <div id = "left-nav">
            <p>Site Navigation</p>
            <ul>
               <li><a href = "index.html" title = "Site Home Page">Home</a></li>
               <li><a href = "index.html" title = "Navigation Item 1.">Navigation Item 1</a></li>
               <li><a href = "index.html" title = "Navigation Item 2.">Navigation Item 2</a></li>
               <li><a href = "index.html" title = "Navigation Item 3.">Navigation Item 3</a></li>
            </ul>
         </div>
         <div id = "main-content"></div>
         <div id = "footer"></div>
      </div>
   </body>
</html>
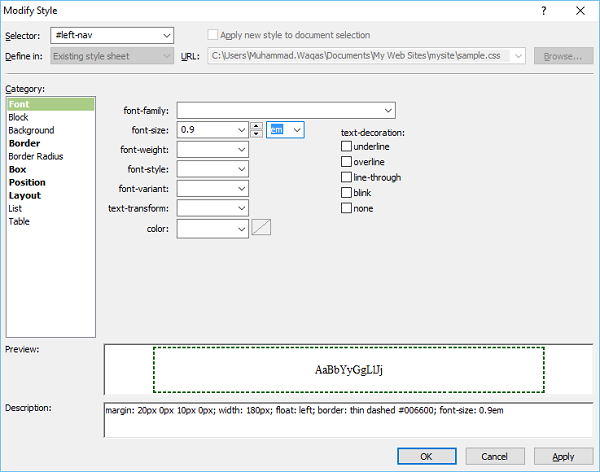
Step 7 − To set the style for top navigation, go to the Manage Styles panel. Right-click on #left-nav and select Modify Style…
Step 8 − Enter the value 0.9 in font-size field and select em from the dropdown list next to the font-size and go to the Box category.
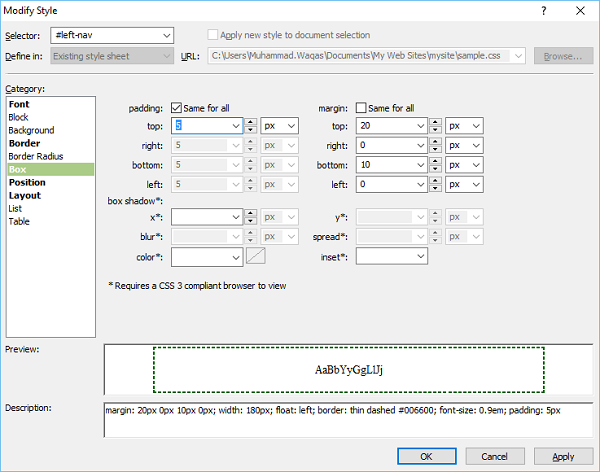
Step 9 − Check the padding ‘Same for all’ and enter 5 in the top field and click Ok. From the Apply Styles panel, click New Style…
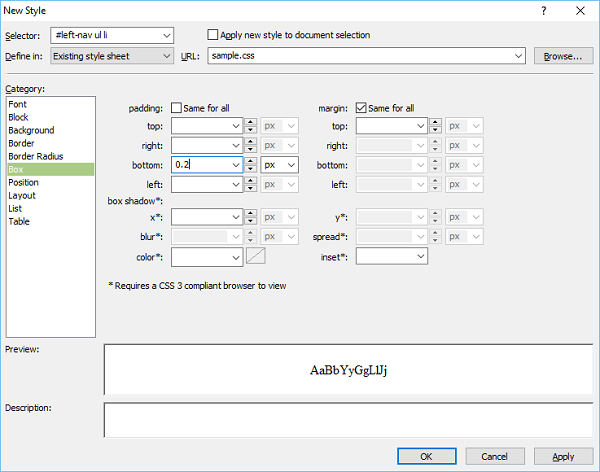
Step 10 − Enter #left-nav ul in the Selector field. Select the Existing style-sheet from the “Define in” dropdown and in the List category, select none from the list-style-type field and click OK.
Step 11 − Again, from the Apply Styles panel, click New Style. Uncheck the padding ‘Same for all’. Enter 0.2 in the bottom field and click OK.
Step 12 − Enter #left-nav ul li in the Selector field and select the Existing style sheet from the “Define in” dropdown and go to the Box category.
Step 13 − Go to Apply Styles panel and click New Style.
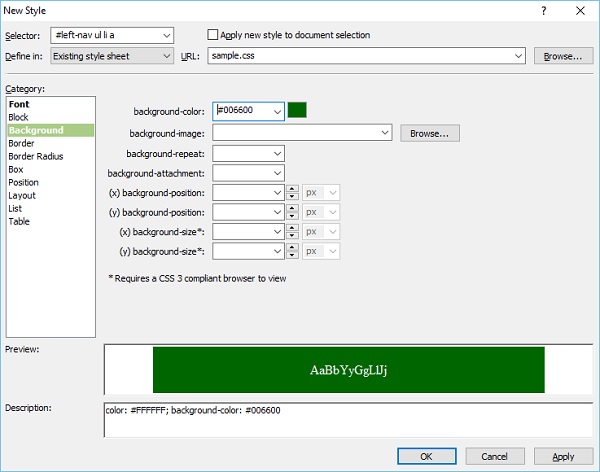
Step 14 − Enter #left-nav ul li a in the Selector field and select the Existing style sheet from the “Define in” dropdown and select white as the font color.
Step 15 − Go to the Background category. Select the color as the background color
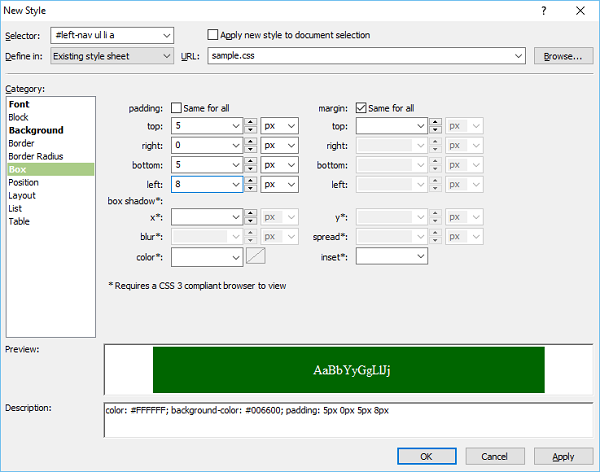
Step 16 − Go to the Box category and set the padding values.
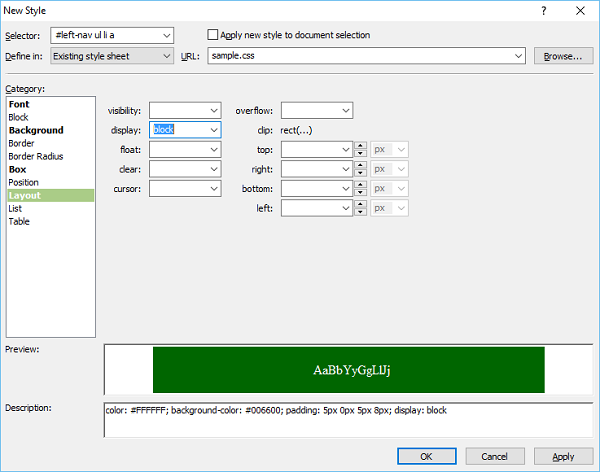
Step 17 − Go to the Layout category. Select block from the display dropdown and click OK.
Step 18 − Now let’s go to Apply Styles panel again and click New Style. Enter #left-nav ul li a:hover in the Selector field and select the Existing style sheet from the “Define in” dropdown. Select black as the font color.
Step 19 − Now go to the Background category. Select the background color for your menu option when the mouse is hovering on the menu item and click OK.
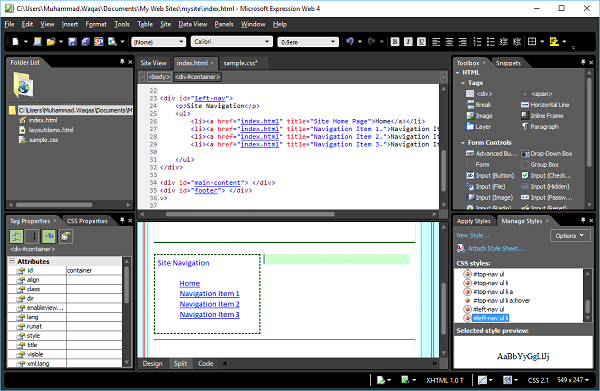
Step 20 − To check how it is looks, go to the File menu and select Preview in your browser.
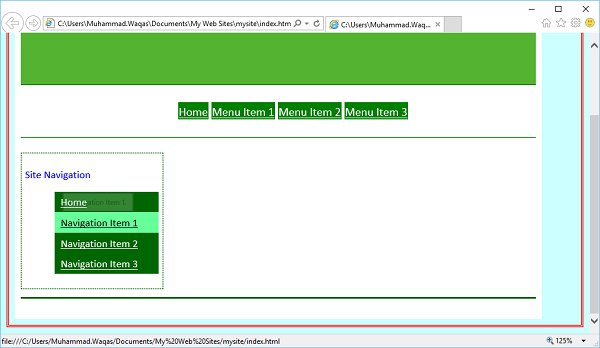
When you hover the mouse on any menu item, it will change its background and font color.
Microsoft Expression Web - Validate Pages
In this chapter, we will learn how to make sure that both our HTML and CSS code validates. Microsoft Expression Web provides several ways to check your webpages for code errors and the code that is incompatible with a particular HTML and CSS schema.
The status bar and Code view alert you to code errors and incompatibility in a single page, while the Compatibility task pane lists all code errors and incompatibility in one or more pages, or an entire website.
Expression Web identifies incompatible code by using a document schema that is based on the DocType declaration in a page.
If the page doesn't contain a DocType declaration or the DocType isn't recognized, Expression Web uses a secondary schema.
When you create a site and work on its pages, you should develop a habit of validating the pages. Microsoft Expression Web has various tools which can be very helpful while validating your webpages. There are two very helpful options in Expression web, so let’s go to the Tools menu and select the Page Editor Option.
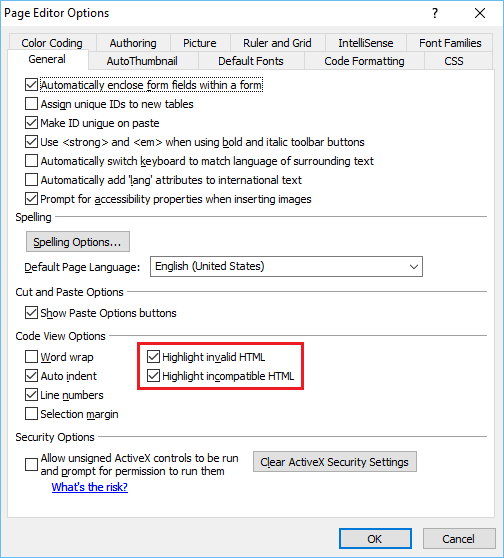
The General tab offers two options −
Highlight Invalid HTML − This option when checked, it will display an invalid HTML in a specific color scheme and the default in red text on a yellow background.
Highlight Incompatible HTML − This option when checked, it will display a wavy underline beneath the code that isn't compatible with HTML standards.
Status Bar
When the current, open web page contains a code error, then you get to see a Code Error Detected icon (highlighted in the following screenshot).
Let’s assume you forgot the symbol “>” in a </div> tag −
<div id = "footer"></div>
In this case, the status bar at the bottom of the program window displays the Code Error Detected icon.
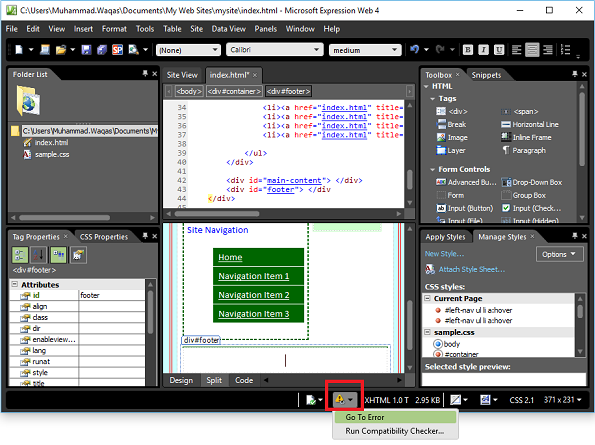
When you select “Go To Error” from the dropdown menu, it will take you to the line where the error exists and you can fix the syntax easily.
When the page contains a code that's incompatible with the specified DocType, then the status bar displays an HTML Incompatibility Detected icon.
Let’s assume you have used “hre” for a hyperlink instead of “href”, which is an error.
<li><a href = "index.html" title = "Site Home Page">Home</a></li>
The status bar displays the HTML Incompatibility Detected icon as shown in the following screenshot.
When you select the “Go To Error” from the dropdown menu, it will take you to the line where the error exists and you can fix the syntax easily.
Compatibility Report
A compatibility report checks the pages and CSS files for code errors and the code that's incompatible with the DocType and CSS schema you specify. You can generate a report that checks only particular files or an entire website.
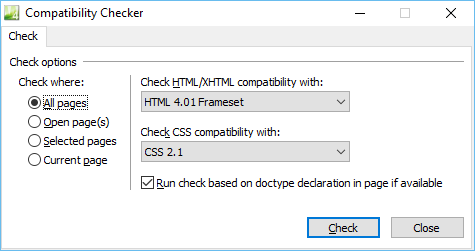
Step 1 − To generate a compatibility report, go to the tools menu and click the Compatibility Reports…option.
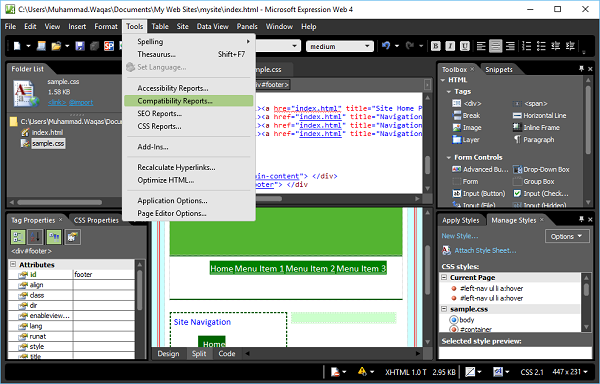
Step 2 − The Compatibility Checker dialog provides different options to check only particular files in your site, either open those files or select them in either the Folder List task pane or the Website view. Select the options as per the requirement and click the Check button.
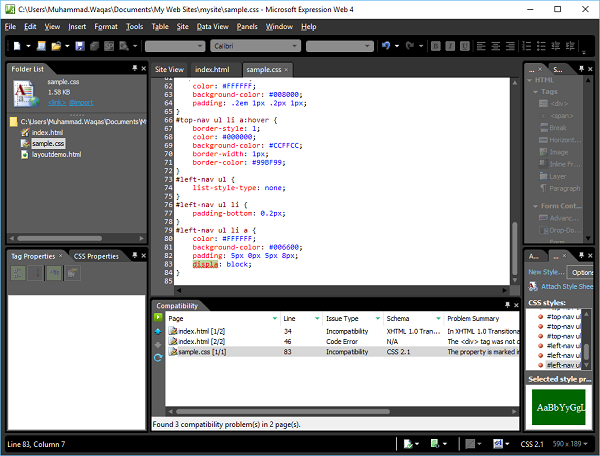
Step 3 − The Compatibility task pane opens and the status of the generation of the report appears at the bottom of the task pane. On double-click on any row, it will take you to the location where the error exists.
Dynamic Web Template
A Dynamic Web Template is a HTML-based master copy of a web page that you can create to contain settings, formatting, and page elements such as text, graphics, page layout, styles, and regions of a webpage that can be modified.
When you attach a Dynamic Web Template to the pages in a website, that template defines the layout for those pages. You can use any number of Dynamic Web Templates in a website, and you can attach a Dynamic Web Template to as many pages as you like.
By using Dynamic Web Templates, you can create HTML pages that share the same layout. In addition to providing a shared layout, you can make some regions in a template available for editing while preventing changes to other regions in that template.
This means that you can allow others to add and edit content, yet still preserve the layout of the pages and the template itself.
The Need for Dynamic Web Templates
The most important concept of website design is to maintain a consistent look and feel for your site and with Dynamic Web Template you can achieve it. Dynamic Web Template provides −
Basic pages such as a Sitemap, Contact, About, and Search pages. A visitor should be able to reach your home page from any page on the site.
Consistent navigation throughout your site.
Consistent look throughout the site.
Create a Dynamic Web Template
To create a Dynamic Web Template (DWT), you start with an empty HTML page and save it as a *.dwt file. Let’s go step by step and learn more about it.
Step 1 − Open the index.html file and select File → Save As… menu option, which will open the Save As dialog.
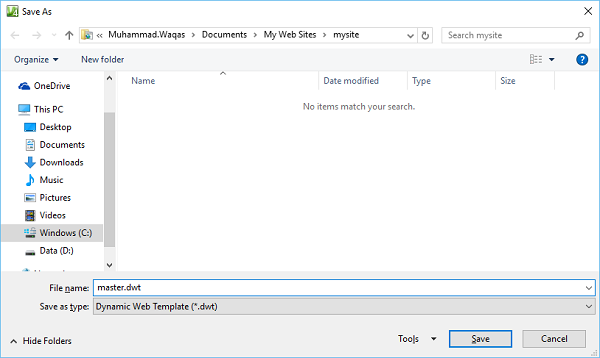
Select the Dynamic Web Template (*.dwt) from the Save as type dropdown and change the file name from the index to the master.dwt and click the Save button.
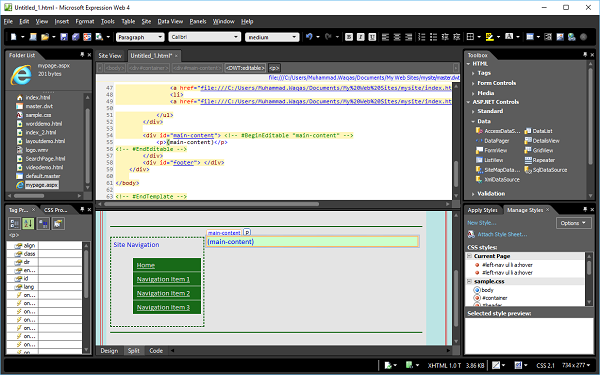
Step 2 − Now, you will see a new file master.dwt is created in the Folder list. Let’s create a new HTML file and call it index_2.html. Let’s open the master.dwt file and in the Design View or the Code View, right-click inside <div> tags of the main content.
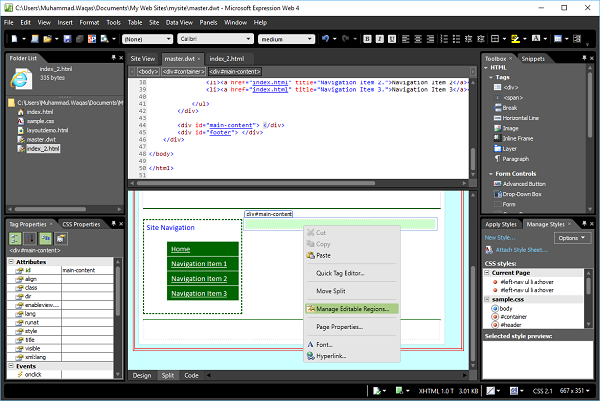
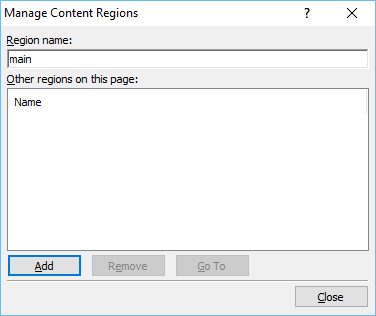
Step 3 − From the menu, select the Manage Editable Regions… which will open the Editable Regions dialog.
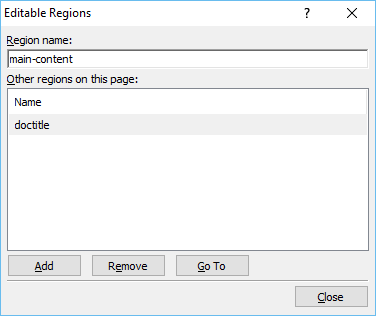
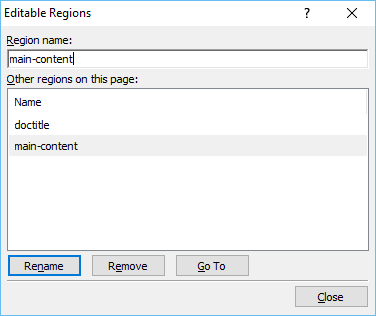
Step 4 − In the Region name, type a name for the editable region and then click Add. Repeat to add additional editable regions if you want.
Step 5 − Once you have added all editable regions, then click Close. Now go to the index_2.html file and select it in the Folder list as well.
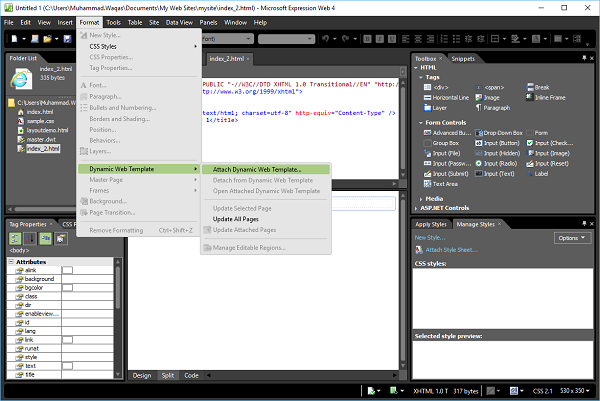
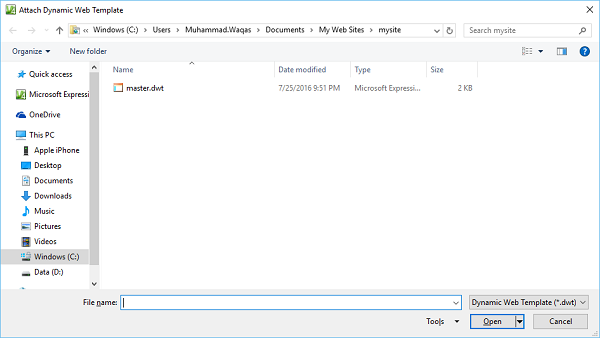
Step 6 − Go to the Format menu and select Dynamic Web Template → Attach Dynamic Web Template… which will open the Attach Dynamic Web Template dialog.
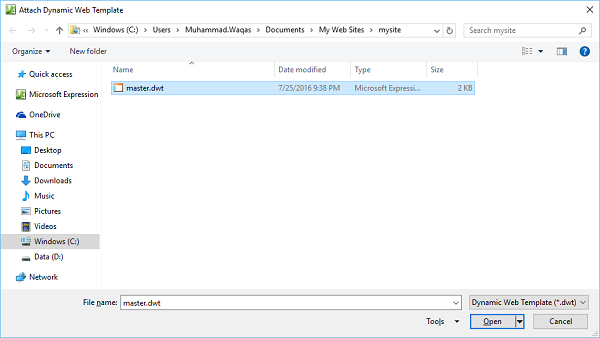
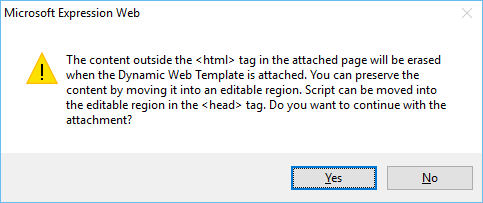
Step 7 − Select the Dynamic Web Template which here is the master.dwt file and click the Open button. You will receive a warning message. Click Yes.
Step 8 − You can see that the same template is applied to the index_2.html file. Similarly, you can add the same template to as many HTML pages as you want to the website.
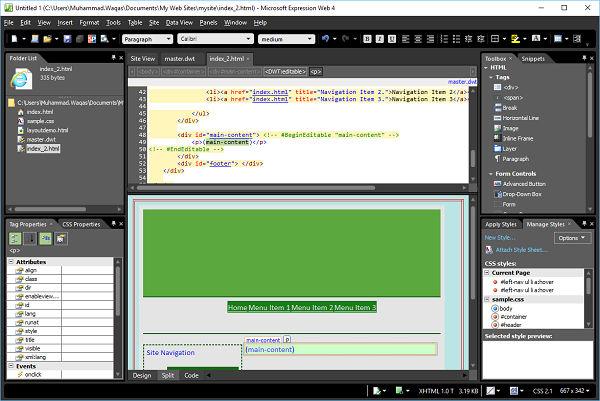
Step 9 − On this page, you can edit only the main-content section. If you move the mouse to the other section, you will see that it is not editable and the mouse curser also changes to the red cross circle.
Step 10 − To see how it looks, go to the File menu and select Preview in your browser.
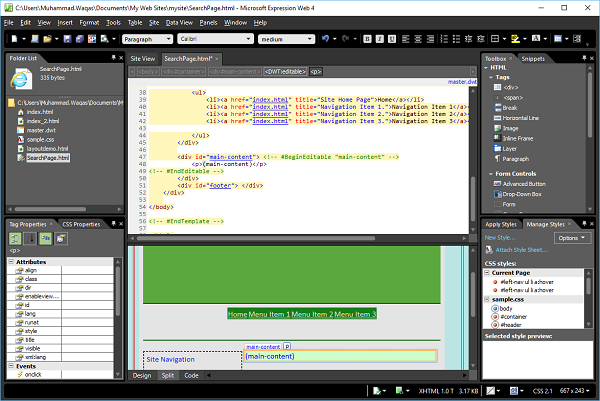
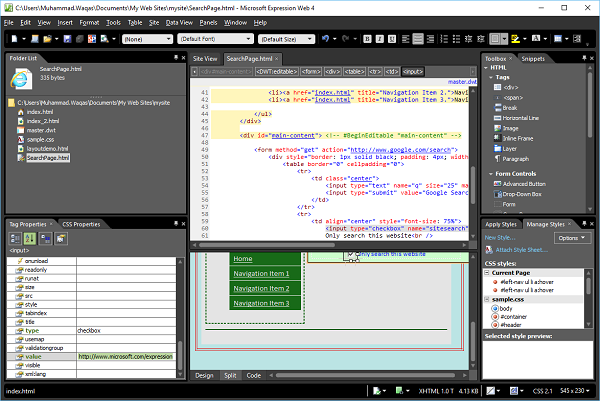
Microsoft Expression Web - Search Page
In this chapter, we will learn how to add a search option or a search box to the website. If it is a large site, then you will need to have a search box in the site so that the user can find any data easily. There are many free ones available such as Windows Live, Google, etc.
Windows Live Search
The following steps show you how to add a Windows Live Search box to your web page, and then set the search form to search the entire Web or only your website.
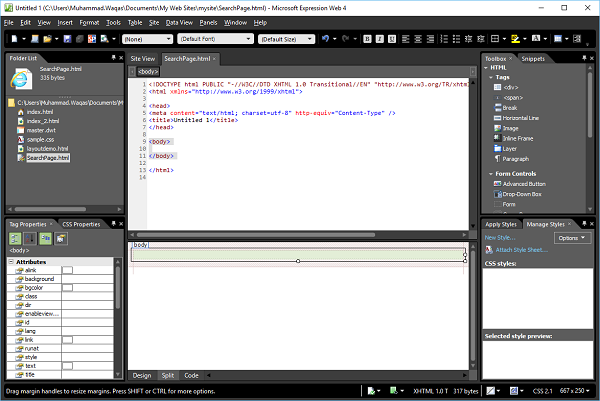
Step 1 − Create a new HTML page and call it SearchPage.
Step 2 − Go to the Format menu and select Dynamic Web Template → Attach Dynamic Web Template…option. Select the master.dwt file and click the Open button.
Step 3 − Let’s add the following code inside the editable region.
<form method = "get" action = "http://search.live.com/results.aspx">
   <input type = "hidden" name = "cp" value = "1252"/>
   <input type = "hidden" name = "FORM" value = "FREESS"/>
   <table style = "background-color: #ffffff;">
      <tr>
         <td>
            <a href = "http://search.live.com/">
               <img src = "http://search.live.com/s/affillogoLive.gif"
                  style = "border:0px;" alt = "Live Search"/>
            </a>
         </td>
         <td>
            <input type = "text" name = "q" size = "30" />
            <input type = "submit" value = "Search Site"/>
            <input type = "hidden" name = "q1"
               value = "site:http://www.microsoft.com/expression"/>
         </td>
      </tr>
   </table>
</form>
Step 4 − Save the page. Go to the File menu and select Preview in Browser.
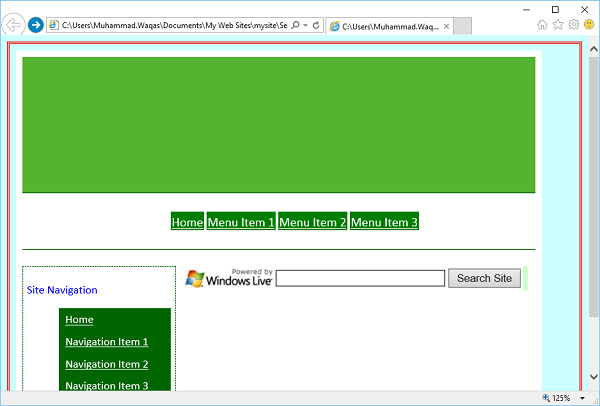
Step 5 − You will see the Windows Live Search in your webpage. Let’s enter something in the search and click the Search Site button
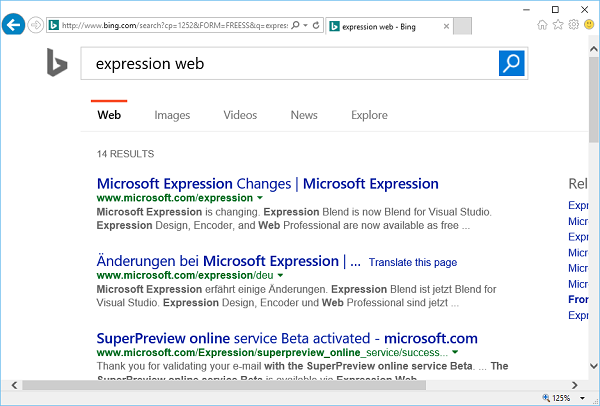
Step 6 − As you can see that it will search on the web. If you want to restrict the search to only your website, then you have to specify your site domain in the following name instead of https://www.microsoft.com/expression
<input type = "hidden" name = "q1" value = "site:http://www.microsoft.com/expression"/>
Step 7 − Similarly, you can add the Google search option by adding the following code in the editable region.
<form method = "get" action = "http://www.google.com/search">
   <div style = "border: 1px solid black; padding: 4px; width: 20em; margin: 0px auto 0px auto">
      <table border = "0" cellpadding = "0">
         <tr>
            <td class = "center">
               <input type = "text" name = "q" size = "25" maxlength = "255" value = "" />
               <input type = "submit" value = "Google Search" />
            </td>
         </tr>
         <tr>
            <td align = "center" style = "font-size: 75%">
               <input type = "checkbox" name = "sitesearch"
                  value = " http://www.microsoft.com/expression" checked = "checked" />
               Only search this website<br />
            </td>
         </tr>
      </table>
   </div>
</form>
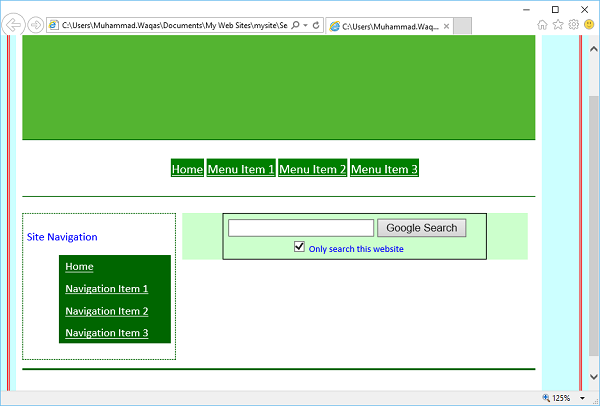
Step 8 − Save your HTML page and you will see a search box, search button, checkbox, and checkbox label.
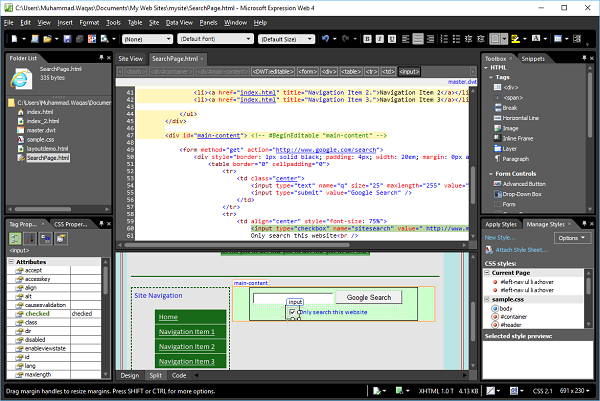
Step 9 − To restrict users to search only your website, select the checkbox and go to the Tag Properties panel and set the Value property to the URL of your website, such as https://www.microsoft.com/expression.
Step 10 − Save your page and preview it in the browser. Now you will see the Google Search option in your webpage.
Microsoft Expression Web - Images
Images are used heavily in webpages to make them look interesting and provide a better user experience. In this chapter, we will learn how to add images to the website. As usual, let’s go step by step and learn the process in detail.
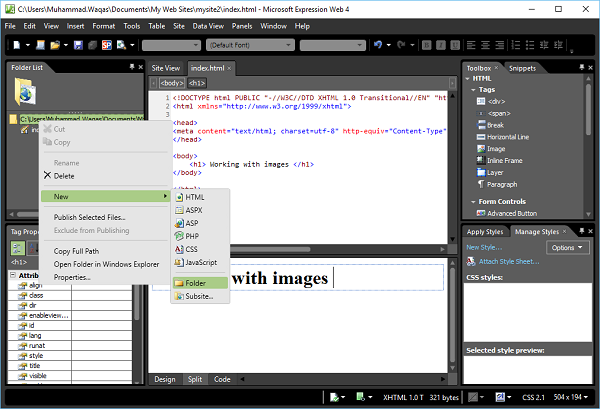
Step 1 − To start adding images, let’s create a new one-page site and change the name of default.html file to index.html.

Step 2 − Now we need to include images to the website so that we can use those images in the webpage. Let’s create a new folder. In the folder list, right-click on the website name.
Step 3 − Currently, there are no images in this folder. To add images in this folder, simply select and drag images from your hard drive and drop them over the images folder.
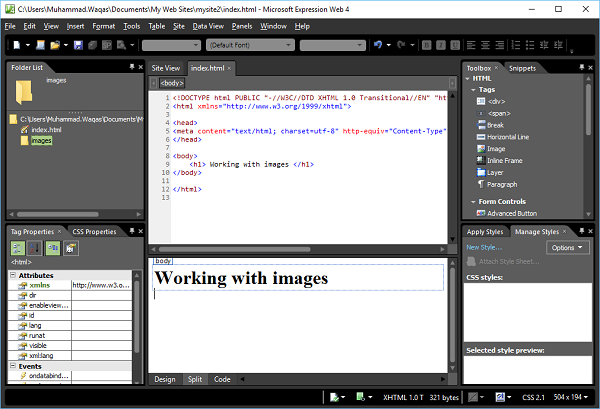
You will see that the images are added to the website images folder, as shown in the following screenshot.
Step 4 − Now these images are included in your website but none of these are used in a webpage. A simple way to add an image to in the webpage is to drag the image from the images folder and drop in the code view where you want to add the image in the webpage.
Suppose we want to add an image below the heading. When your drop the image and release the mouse button, it will display the following dialog box.
Here you can specify the alternate text and long description. Then click OK and save the webpage. Now you can see that <img> tag is added with the alternate name and source of the image.
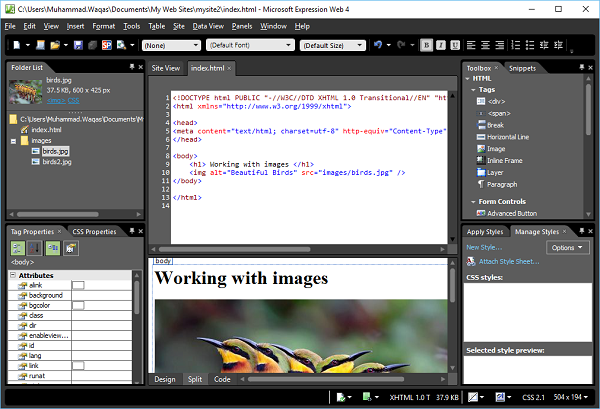
Step 5 − Follow the same process and add the second image along with its alternate name and source.
Now the index.html file will appear as follows −
<!DOCTYPE html PUBLIC "-//W3C//DTD XHTML 1.0 Transitional//EN"
"http://www.w3.org/TR/xhtml1/DTD/xhtml1-transitional.dtd">
<html xmlns = "http://www.w3.org/1999/xhtml">
<head>
<meta content = "text/html; charset = utf-8" http-equiv = "Content-Type" />
</head>
<body>
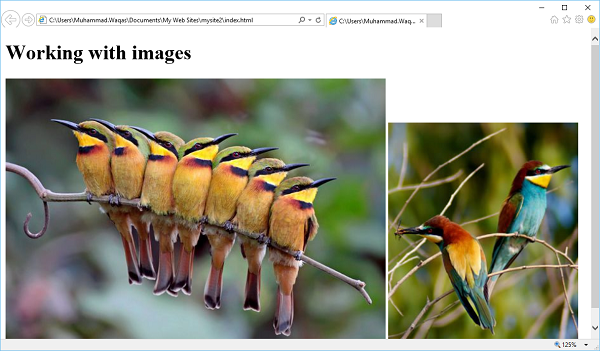
<h1> Working with images </h1>
<img alt = "Beautiful Birds" src = "images/birds.jpg" />
<img alt = "Other Birds" src = "images/birds2.jpg" />
</body>
</html>
Step 6 − The Picture Properties dialog box gives you access to the most commonly used picture attributes. When you double-click an image, it will display the Picture Properties box.
In Expression Web, Picture Properties dialog has two tabs, General and Appearance.
Following are the options available on the General tab.
Picture − It contains the folder/file name of the graphic image.
Alternate Text − Type the text you want to be displayed for pictures when the graphic is downloading, when it can't be found, or when a site visitor moves the pointer over it. This text will also be used by a screen reader if your viewer is using one.
Long Description − There are times a few words may not be enough to describe your image. Charts and graphs are examples. Click Browse to select a file that contains a longer description of the picture.
Location − If you want to link your image to a webpage or larger image, you insert the hyperlink here.
Target Frame − If the current page is a frames page, this option indicates which frame the link should be displayed in OR you can choose to have the image or page open in a new window.
Following options are available on the Appearance tab.
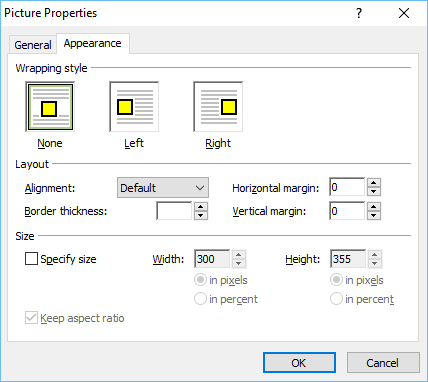
Wrapping Style − Specify how the picture floats in the page, such as None, Left, or Right.
Layout − In this section, you can set the alignment, border thickness, horizontal and vertical margins.
Size − Expression Web automatically sets the width and height properties for the image based on the actual dimensions of the picture. Rather than resizing your image by changing these dimensions, resize the image using your graphic editor.
Step 7 − Now, let’s preview the webpage in the browser; it will display the following output.
Microsoft Expression Web - Hyperlinks
In this chapter, we will learn how to use hyperlinks in your website. One of the things that makes the web so expansive is the capability of webpages to link to other webpages. Hyperlinks or links are found within nearly all web pages.
Hyperlinks also allow users to click and go to a different page, a place within a page, an image or another location on the Internet entirely. Following are some of the important features of hyperlink −
Expression Web's hyperlink tools and options make it very easy to work with hyperlinks.
Expression Web hyperlink views and reports also make it very easy to find and fix broken and incorrect links.
A hyperlink can be a word, a group of words, or an image that when clicked will take you to a new document or a place within the current document.
Anchor Tag
In HTML, <a> tag which is known as anchor tag is used to create a link to another document. An anchor can point to another html page, an image, a text document, or a pdf file among others. Here is the basic code of an anchor <a> tag.
<a href = "url">Text to be displayed as link<a>
In <a> tag, “href” attribute is used to address the link to the document, and the words between the open and close of the anchor tag will be displayed as a hyperlink.
When you move the cursor over a link in a webpage, the arrow will turn into a little hand.
A URL is an address that specifies a protocol, web server, and file path.
There are two types of URLs, absolute and relative. An absolute URL contains a full address while a relative URL is missing one or more parts of the address. However, the web browser obtains the missing information from the page that contains the URL.
Example
Let’s take a look at a simple example in which we will be using both absolute and relative URLs.
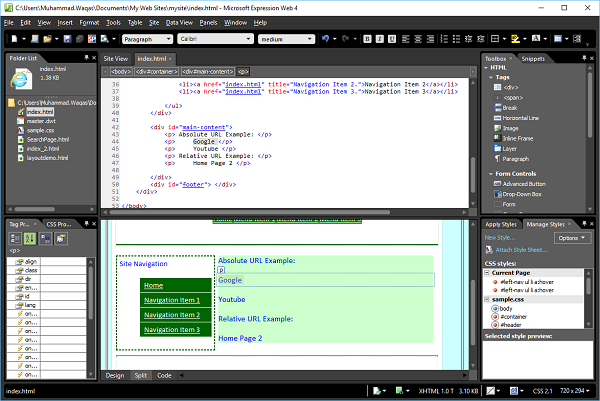
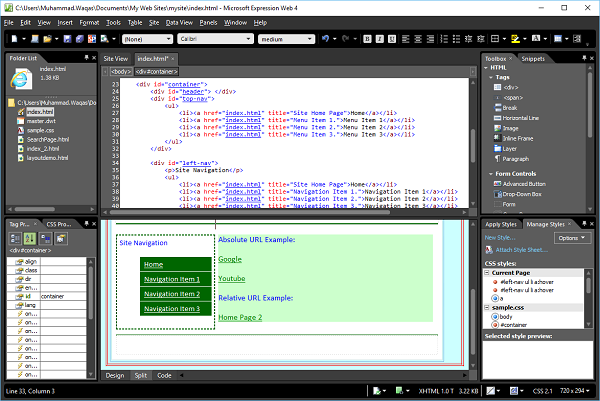
Step 1 − First, open the index.html page and add the following lines in the main content section.
<div id = "main-content">
   <p> Absolute URL Example: </p>
   <p>  Google </p>
   <p>  Youtube </p>
   <p> Relative URL Example: </p>
   <p>  Home Page 2 </p>
</div>
Following is the complete implementation of index.html page.
<!DOCTYPE html PUBLIC "-//W3C//DTD XHTML 1.0 Transitional//EN"
"http://www.w3.org/TR/xhtml1/DTD/xhtml1-transitional.dtd">
<html xmlns = "http://www.w3.org/1999/xhtml">
<head>
<meta content = "text/html; charset = utf-8" http-equiv = "Content-Type" />
<style type = "text/css">
#left-nav ul li a:hover {
color: #000000; background-color: #116611;
}
#left-nav ul li a:hover {
color: #000000; background-color: #66FF99;
}
</style>
<link href = "sample.css" rel = "stylesheet" type = "text/css" />
</head>
<body>
<div id = "container">
<div id = "header"> </div>
<div id = "top-nav">
<ul>
<li><a href = "index.html" title = "Site Home Page">Home</a></li>
<li><a href = "index.html" title = "Menu Item 1.">Menu Item 1</a></li>
<li><a href = "index.html" title = "Menu Item 2.">Menu Item 2</a></li>
<li><a href = "index.html" title = "Menu Item 3.">Menu Item 3</a></li>
</ul>
</div>
<div id = "left-nav">
<p>Site Navigation</p>
<ul>
<li><a href = "index.html" title = "Site Home Page">Home</a></li>
<li><a href = "index.html" title = "Navigation Item 1.">Navigation Item 1</a></li>
<li><a href = "index.html" title = "Navigation Item 2.">Navigation Item 2</a></li>
<li><a href = "index.html" title = "Navigation Item 3.">Navigation Item 3</a></li>
</ul>
</div>
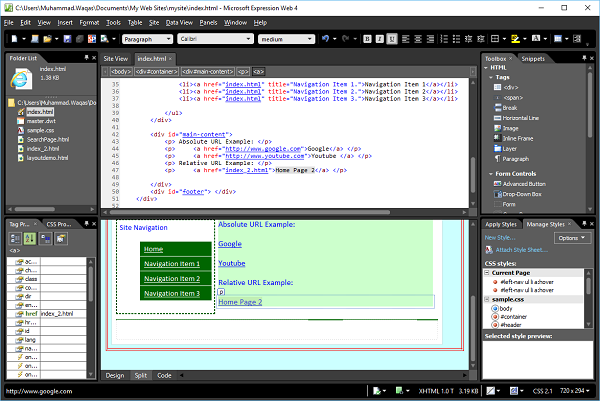
<div id = "main-content">
<p> Absolute URL Example: </p>
<p> Google </p>
<p> Youtube </p>
<p> Relative URL Example: </p>
<p> Home Page 2 </p>
</div>
<div id = "footer"> </div>
</div>
</body>
</html>
Step 2 − Let’s save the webpage and you will see the text in the main content section.
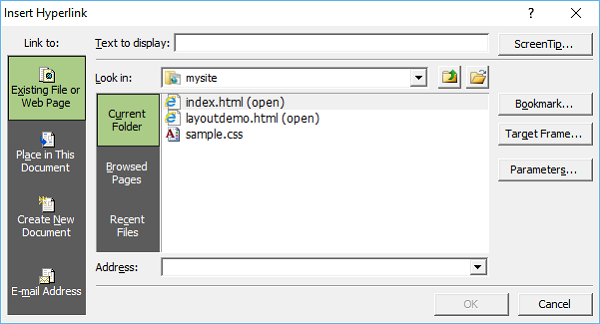
Step 3 − In the Design View, right-click on Google and then select Hyperlink… from the menu which will open the Insert Hyperlink dialog.
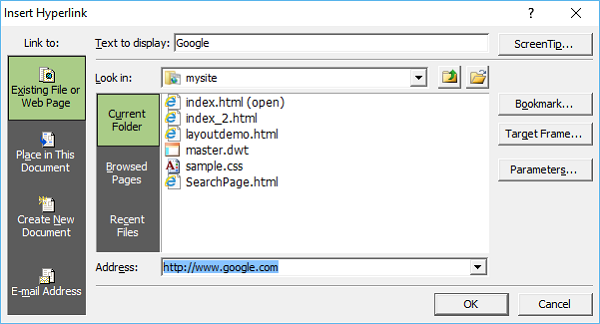
Step 4 − In the Address field, specify the URL for Google home page and click OK. Similarly, right-click on YouTube in the design view and select Hyperlink…
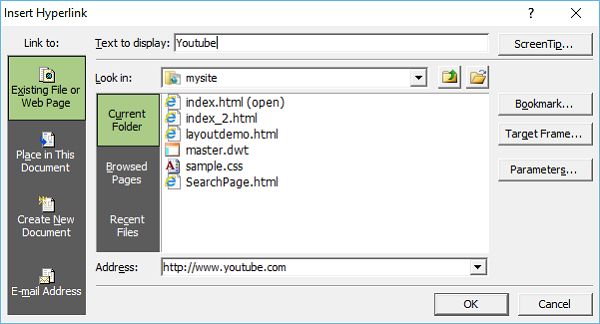
Step 5 − In the Address field, specify the URL for YouTube home page and click Ok. Now for relative right-click on the “Home Page 2” and select Hyperlink… from the menu which will open the Insert Hyperlink dialog.
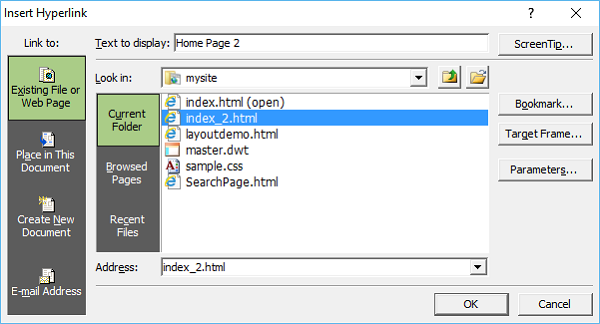
Step 6 − For relative path, select the index_2.html in the address field and Expression Web will get the remaining path from the index.html file, because both these files are in the same directory. Click OK.
As can be seen, these words are now underlined which means that hyperlinks are created.
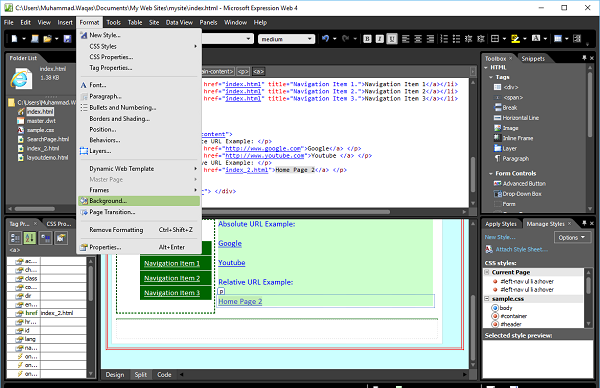
Step 7 − The default font color is blue and the default font color for Hyperlinks is also blue. To change the default color of the hyperlink, select any of the hyperlink and go the Format menu and select Background… menu option.
You will now see the following dialog.
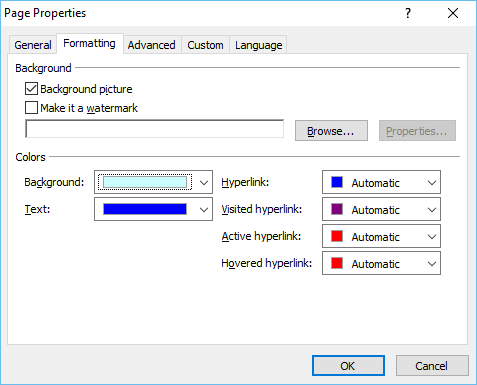
Step 8 − Let’s change the Hyperlink color to Green.
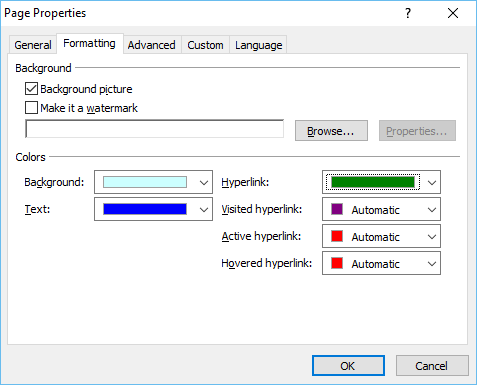
In the following screenshot, you will see that the Hyperlink color has changed to Green.
Step 9 − Let us now preview this web page in a browser.
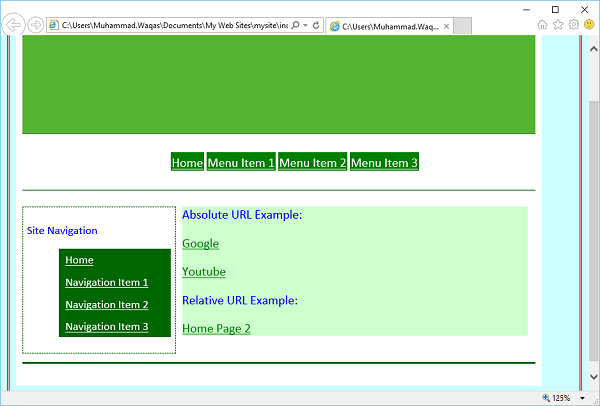
If you click the Google link, it will direct you to the Google homepage.
Step 10 − Similarly, if you go back to the Home page and click the YouTube link, it will direct you to the YouTube home page. Let’s go back to the home page.

Click the Home Page 2 link and you will see that it opens the index_2.hmtl file.
Microsoft Expression Web - Video
In this chapter, we will learn how to add videos to the website and which formats are supported in Expression Web. With the help of videos, you can easily attract the attention of potential customers to your company's products or services.
Microsoft Expression Web is a web design tool that simplifies the process of adding promotional, marketing, or training videos to webpages. You can easily insert your videos in Microsoft Expression's Design view.
By default, Expression Web supports video encoding formats like Silverlight, Adobe Flash, WMV, ASF, MWA, AVI, WVX and MPEG.
Example
Let us now take an example to understand the process of adding a video in a step-by-step manner.
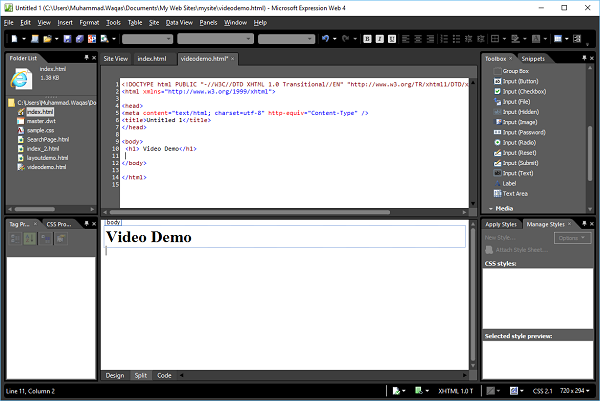
Step 1 − Add a new HTML file and call it videodemo.html.
Step 2 − Click the mouse at the location within the webpage where the video is to be inserted. Let’s say we want to add a video below the heading.
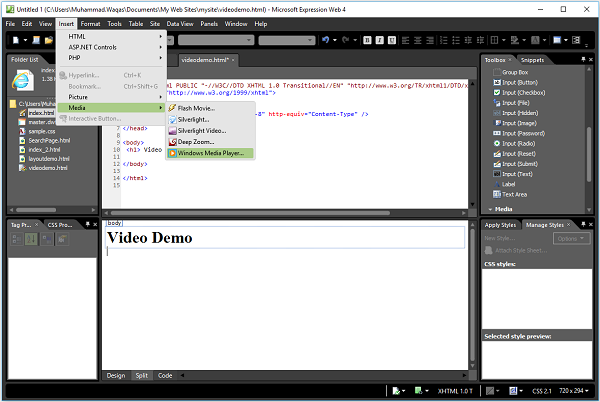
Step 3 − Go to the Insert menu → Media which will open the submenu containing the list of video player formats that Expressions supports by default. Let’s select Windows Media Player.
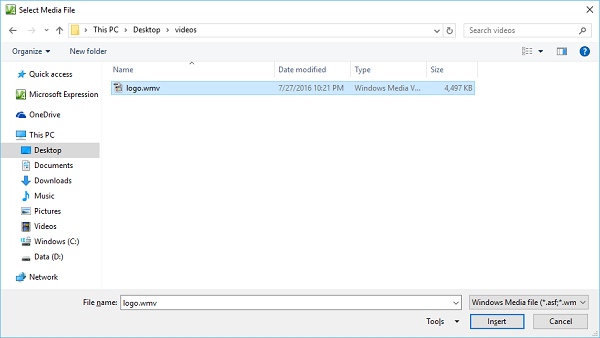
Step 4 − Locate the video you want to use. Select the video file's name and click the Insert button to insert it into the webpage. Save the file by pressing Ctrl + S and you will see the Save Embedded Files dialog box.
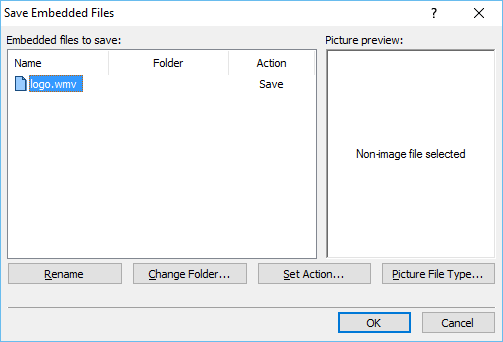
Step 5 − Click OK and you will see that the media file is added to the website folder.
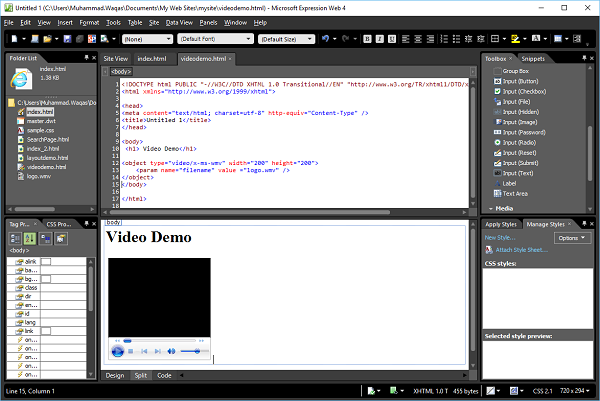
Following is the code in the videodemo.html page.
<!DOCTYPE html PUBLIC "-//W3C//DTD XHTML 1.0 Transitional//EN"
   "http://www.w3.org/TR/xhtml1/DTD/xhtml1-transitional.dtd">
<html xmlns = "http://www.w3.org/1999/xhtml">
   <head>
      <meta content = "text/html; charset = utf-8" http-equiv = "Content-Type" />
      <title>Untitled 1</title>
   </head>

   <body>
      <h1> Video Demo</h1>
      <p>
         <object id = "media1" height = "200" type = "video/x-ms-wmv" width = "200">
            <param name = "filename" value = "logo.wmv" />
         </object>
      </p>
   </body>
</html>
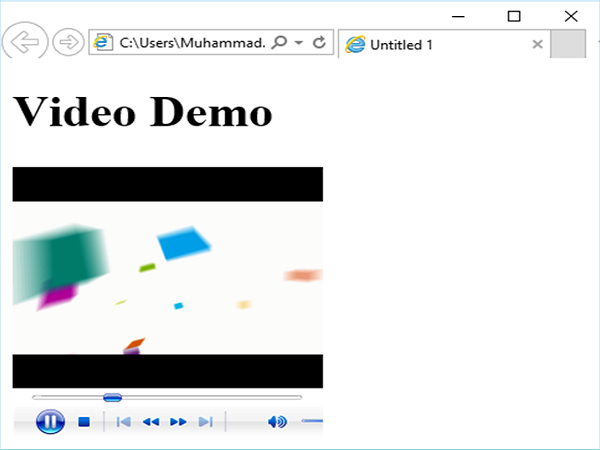
Step 6 − Let us now preview the webpage in a browser. You will see that the video is playing.
Microsoft Expression Web - SQL Datasource
Expression Web has many tools for working with static HTML pages, but it also has tools for creating more dynamic pages. Dynamic pages often retrieve data or content from a source of data. In this chapter, we will learn how to create a SQL DataSource to be used in dynamic pages.
Example
Let’s take a look at a simple example in which we create a dropdown list and fill the list by retrieving data from the database using SQL DataSource.
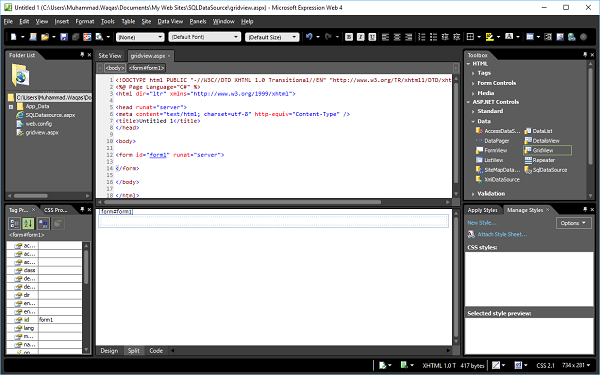
Step 1 − Start by creating a new empty website.
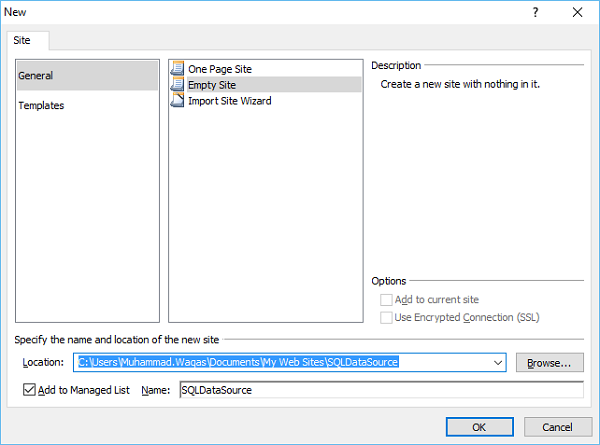
Let’s call it SQLDataSource. Click OK.
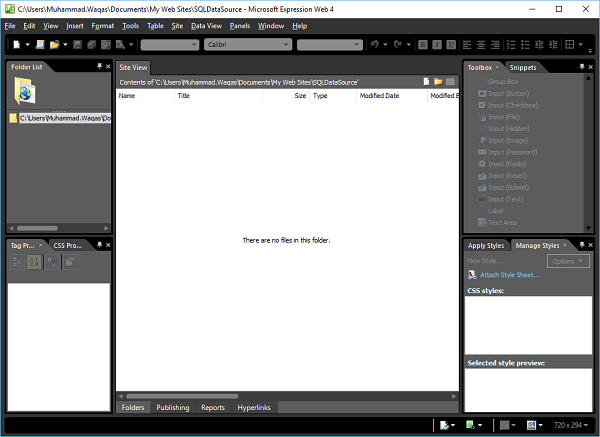
Step 2 − You will see that expression web has created a folder for us. However, since we chose to create an empty project, so we don't have any files yet.
Expression Web doesn't have to be used just to create static HTML sites; we can create dynamic sites using pages and controls with much ease.
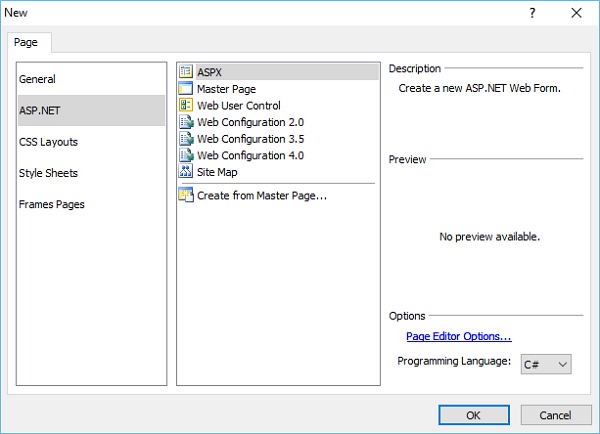
Step 3 − Expression web also allows us to create a lot of dynamic content without necessarily having to be a developer. So let’s add an ASPX file from the File → New Page menu option. Select ASPX in the middle model and click OK.
Step 4 − Here we will be creating a control in our form that needs to access data from a database to create a dynamic website.
In this particular case, we will create a SQL DataSource which will retrieve data from the database.
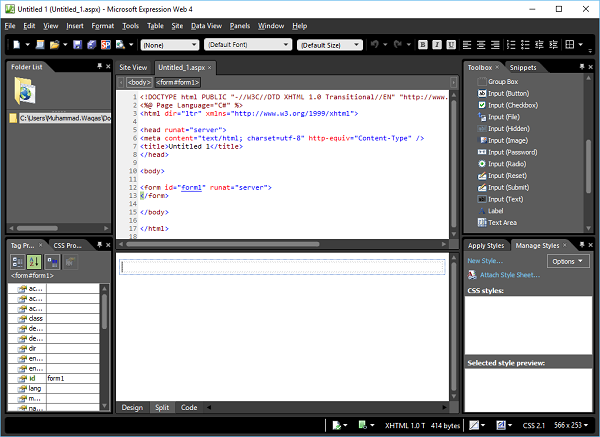
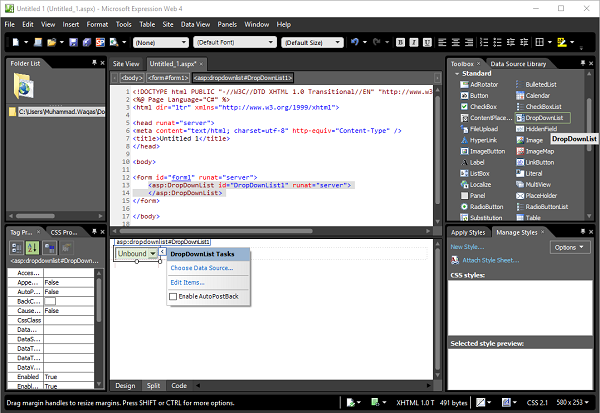
Step 5 − Go to the Toolbox and drag the DropDownList and drop it inside the <form> tag in Code View or you can also drop it in the form section in Design View. You will see that the code is added by Expression Web.
Here, we want to connect some data from our database and store that in our dropdown list. So, the first thing we need is the database.
Step 6 − Create a new Folder in your Project folder by going to the New → Folder menu option.
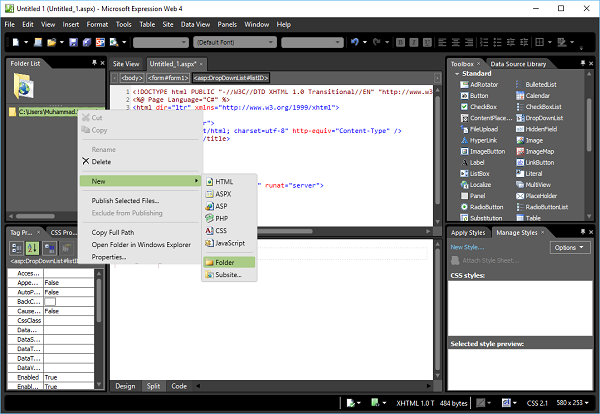
Step 7 − Call this folder App_Data.
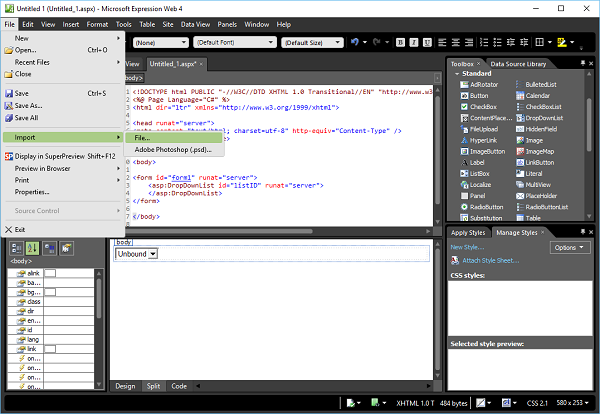
Step 8 − We need to import a database in our project by using the File → Import → File… menu option.
Step 9 − It will open the Import dialog, as shown below. Click on the Add File… button which will open the open file dialog box.

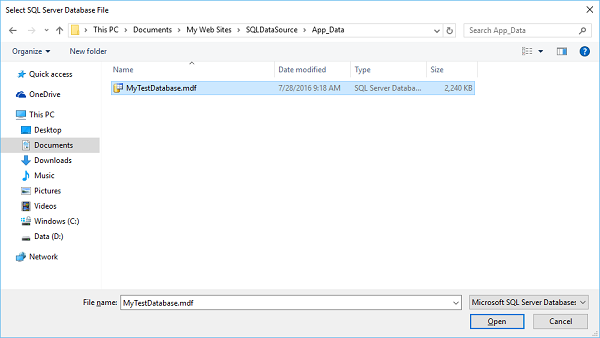
Step 10 − Browse to the database (*.mdf file) which you want to include in the website and click Open.
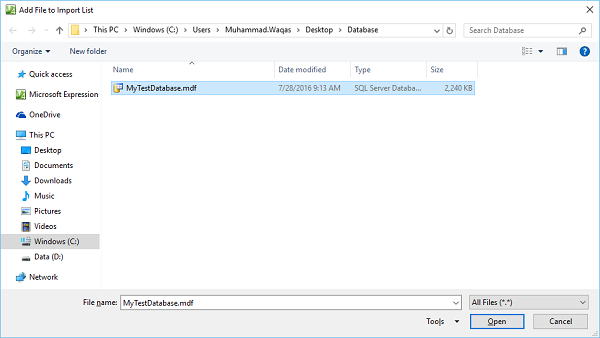
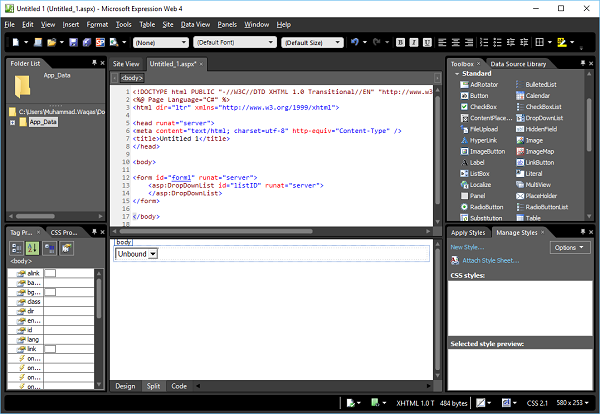
Step 11 − Open the MyTestDatabase.mdf. It will display the following dialog. Click OK.
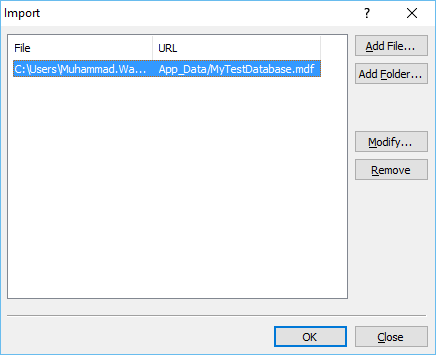
Step 12 − Now you can see that the database file is added in the App_Data folder. When you have a control like a dropdown list and Expression Web allows you to bind the data to it, then you will see a little arrow at the top right corner in the design view.
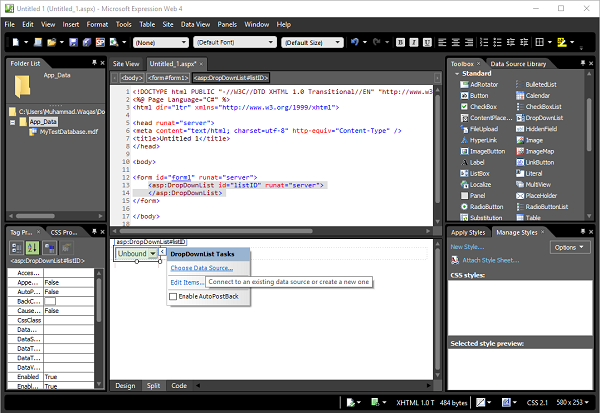
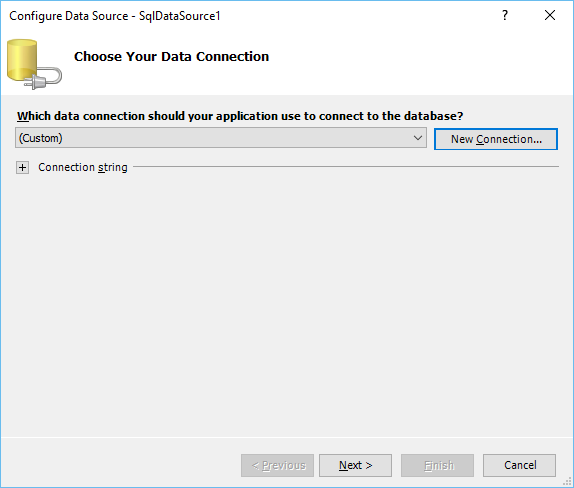
Step 13 − This is the current context menu that can allow us to do a very specific task for that particular control and one of those is to choose a data source. So let’s click on Choose Data Source… and that will open the data source configuration wizard.
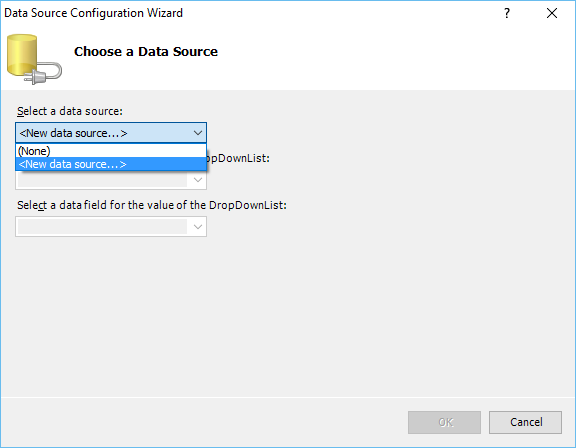
Step 14 − Currently, we don’t have a data source. Let’s select the New data source option from the menu.
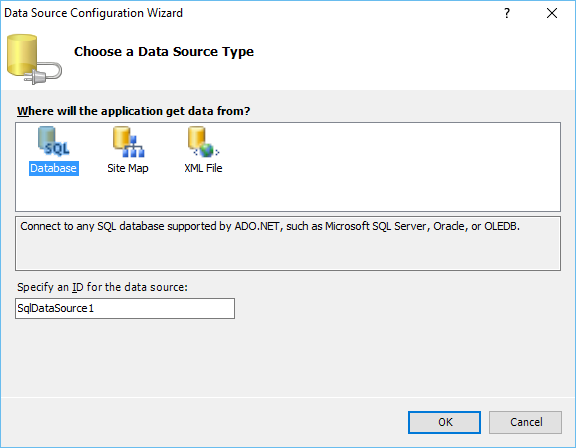
Here, we will import an SQL database. Let’s select the database and click OK.
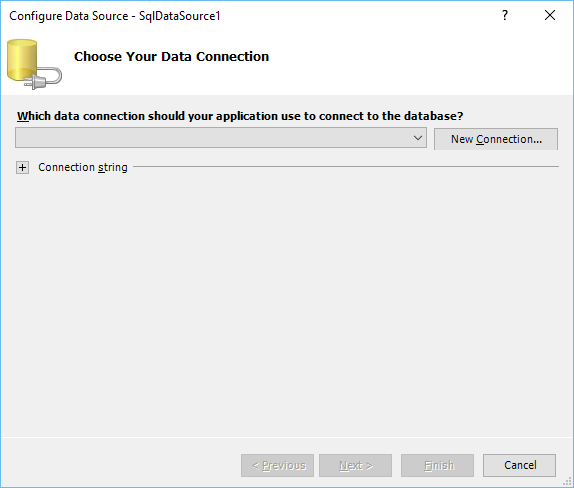
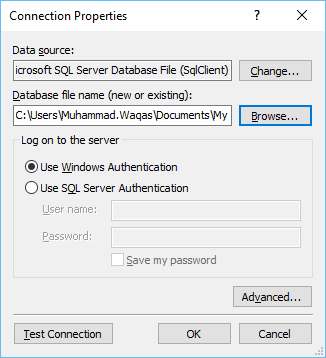
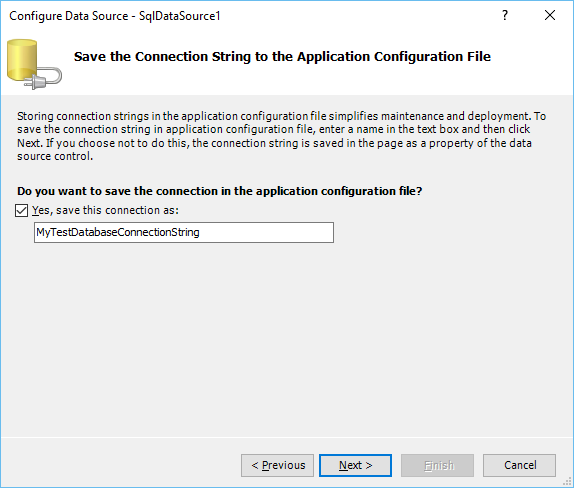
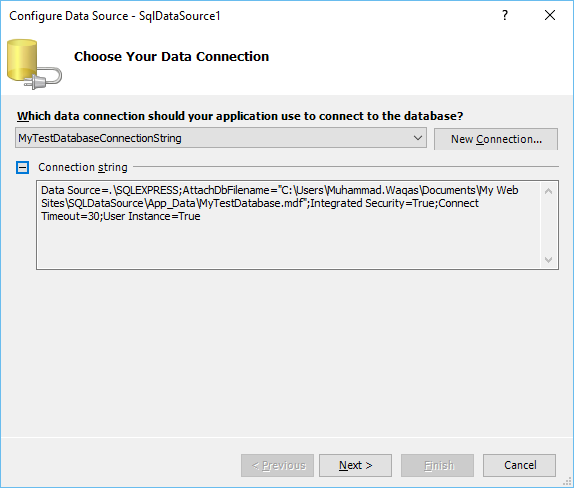
Step 15 − Now, we need to specify the connection string. Let’s click the New Connection button.
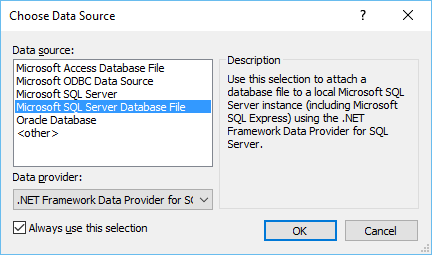
Step 16 − Select the Microsoft SQL Server Database File and click OK.
Step 17 − Click the Browse button to locate the database file.
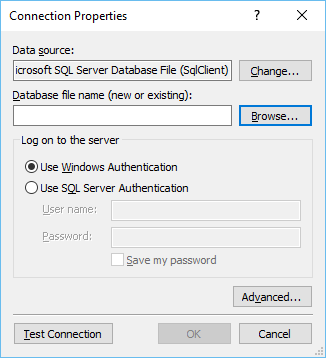
Step 18 − Select the database file and click the Open button or double-click the database file.
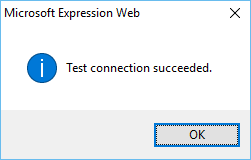
Step 19 − To test the connection, click the Test Connection button.
It will display the following screen. Click the OK button.
Step 20 − Now, we will configure the data source. Click Next on the following screen.
Check the checkbox and click Next again.
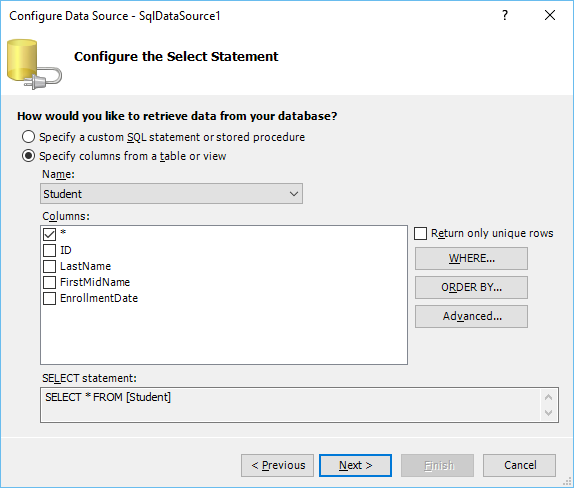
Step 21 − Here you will see all the tables from your database. Let’s select the Student table.
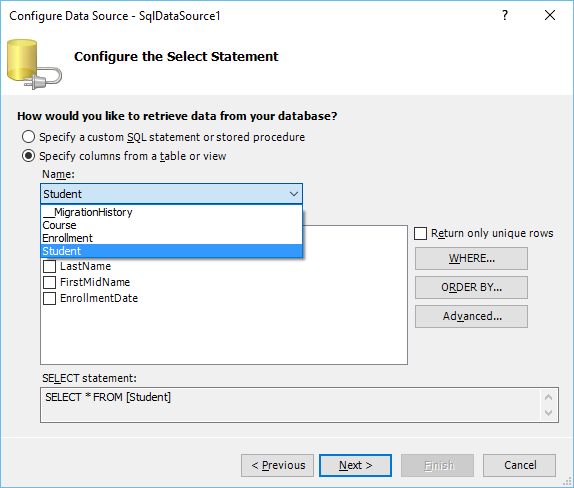
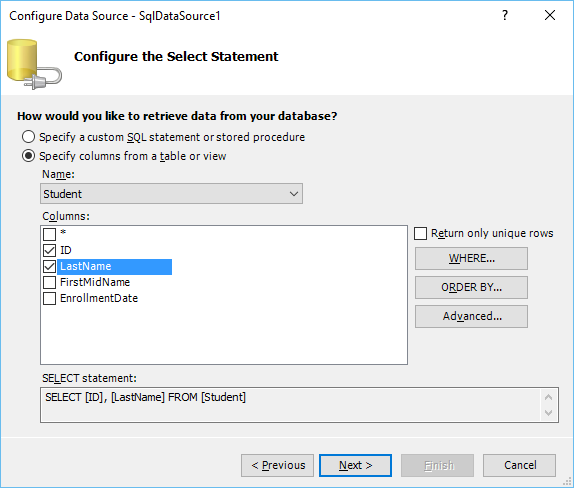
Step 22 − And you will see the all the columns in the list box. Select ID and LastName. At the bottom, you can see that it is actually creating a query. You can also you use the Where or ORDER BY clauses. Once you are done with the query, click Next.
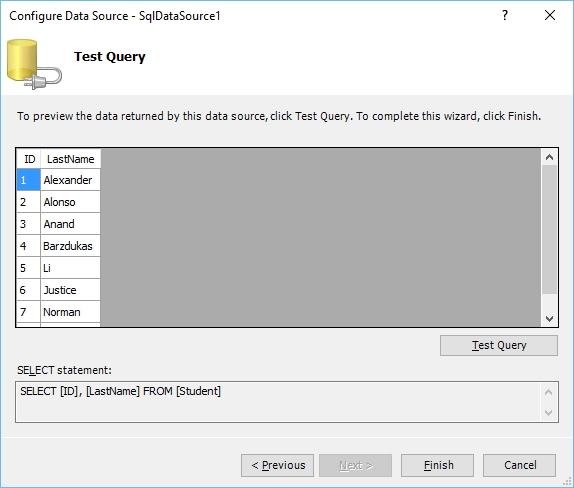
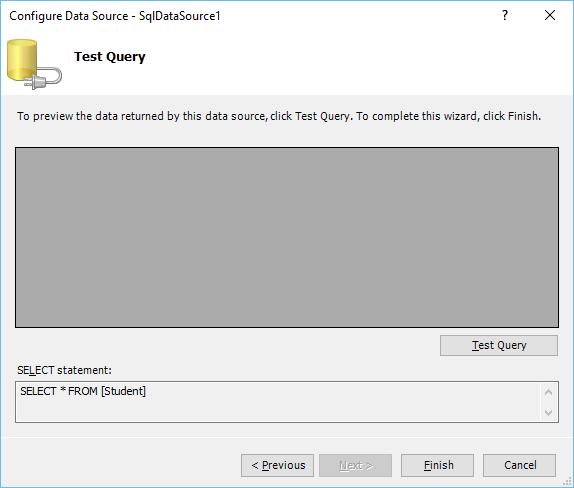
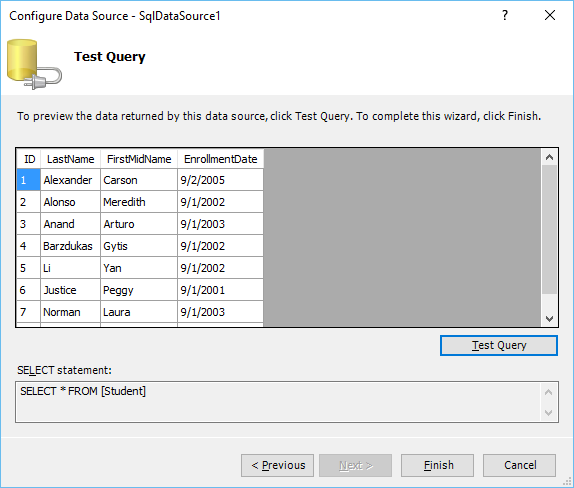
Step 23 − Click the Test Query button. It will display the query result as shown below.
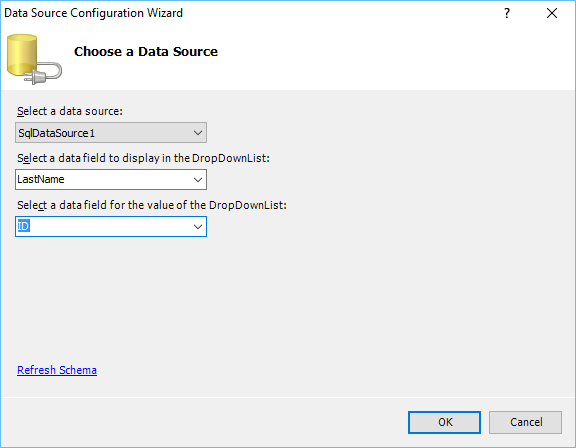
Step 24 − In the following dialog box, the data source is selected by default. The “Select a data field to display in the DropDownList” is the field that is actually going to be displayed. Let’s select LastName and select the ID from the “Select a data field for the value of the DropDownList” and click Ok.
As you can see in the following screenshot, DataSource is added in design view.
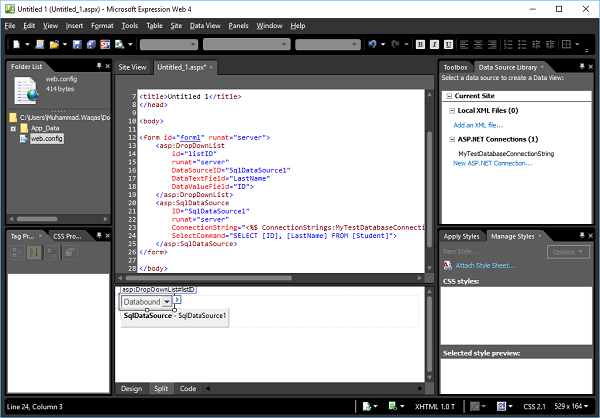
Following is the complete code in ASPX file, which is created by Expression Web.
<!DOCTYPE html PUBLIC "-//W3C//DTD XHTML 1.0 Transitional//EN"
   "http://www.w3.org/TR/xhtml1/DTD/xhtml1-transitional.dtd">
<%@ Page Language = "C#" %>
<html dir = "ltr" xmlns = "http://www.w3.org/1999/xhtml">
   <head runat = "server">
      <meta content = "text/html; charset = utf-8" http-equiv = "Content-Type" />
      <title>Untitled 1</title>
   </head>

   <body>
      <form id = "form1" runat = "server">
         <asp:DropDownList id = "listID" runat = "server" DataSourceID = "SqlDataSource1"
            DataTextField = "LastName" DataValueField = "ID">
         </asp:DropDownList>

         <asp:SqlDataSource ID = "SqlDataSource1" runat = "server"
            ConnectionString = "<%$ ConnectionStrings:MyTestDatabaseConnectionString %>"
               SelectCommand = "SELECT [ID], [LastName] FROM [Student]">
         </asp:SqlDataSource>
      </form>
   </body>
</html>
Step 25 − Let’s save the webpage by pressing Ctrl + S.
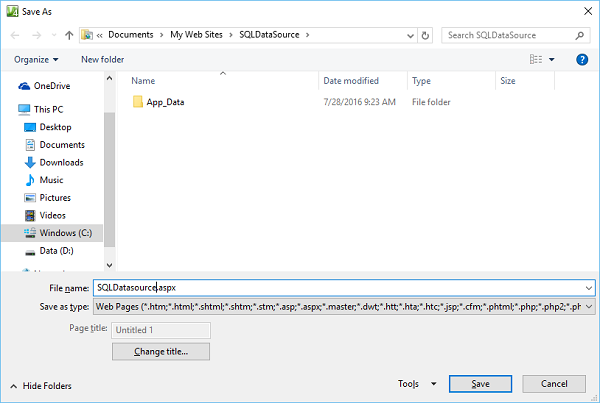
Call this page SQLDatasource.aspx and click Save.
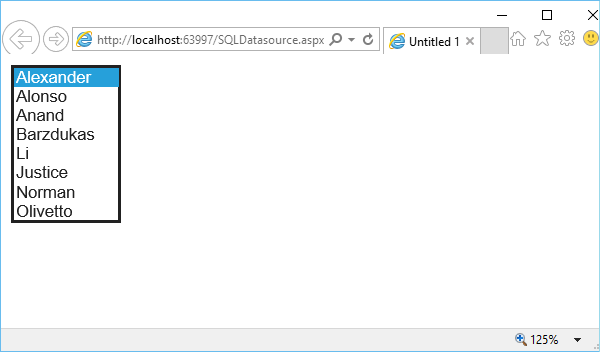
Step 26 − Let’s preview this page in a browser. You will see a dropdown list which contains the last name of the students from the Student table.
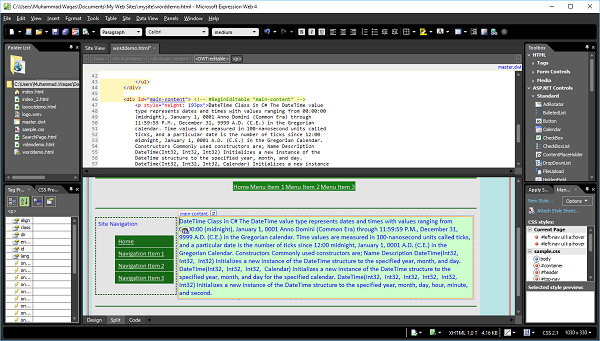
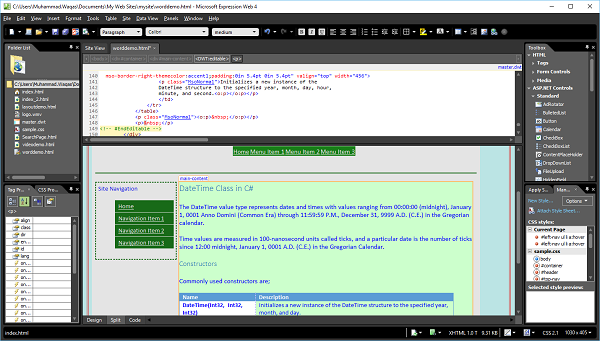
Microsoft Expression Web - Word
In this chapter, we will learn how to create a webpage from a Microsoft Word document using Expression Web. Instead of creating pages from scratch, you can also use Microsoft Word for web content and then bring that content to your HTML page.
Let's take a look at how you can get optimal results while using the content from Microsoft Word.
Create a new HTML page and call it worddemo.html. Apply the Dynamic Web Template (*.dwt) to this HTML page.
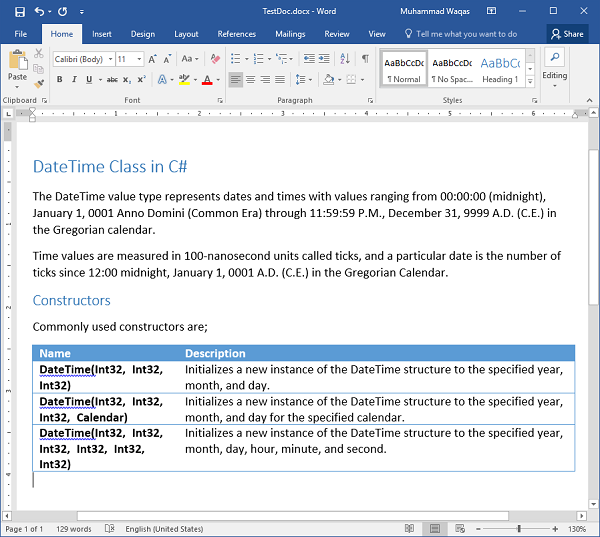
Here is a sample Word document with some styles applied and a table. First, copy this entire document to the clipboard and then switch over to Expression Web. Paste the document into a main-content section of the webpage.
Notice that when the content is pasted into Expression Web, we get an icon. This is referred to as the paste options button. By clicking on it, we can choose different ways in which the content is pasted into Expression Web.
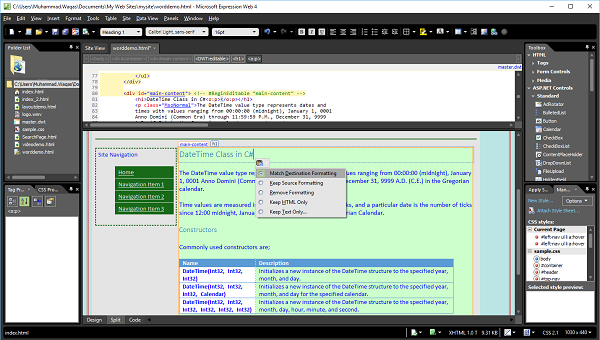
The default setting Match Destination Formatting means that Expression Web will use any formatting that is already applied in the current webpage.
For example, the document header in this document was styled using the H1 style in Microsoft Word. When pasted into the page, Expression Web will apply the formatting to the Heading one style in Expression Web.
If you select the Keep Source Formatting option, then Expression Web will still apply the H1 style to the text. However, it will create a new CSS class called Style one in this case that reformats the text to look like it did in Word.
If we select Remove Formatting, the page looks very similar to the way it did before, but if you look at the tables formatting, you'll see that it's just regular text now.

The styles supplied in Expression Web are still in effect, but any styles that were specific to the Word document are now gone.
The keep HTML only option applies only when you're copying HTML code. The last option on the paste options menu is Keep Text only and this is the option you want to choose if you really want just the text from Word. When you select this option, it will open the following Paste Text dialog.

From here, we can choose exactly how we want to format the text. The first option removes all formatting line breaks, paragraphs, etc. and replaces it with just one big block of text.
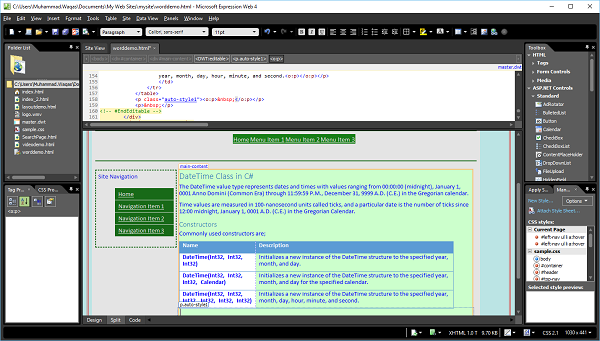
You can see that we have lost the table in the document as well as all formatting. You can play with options on the Paste Text dialog box. Let’s select the option Match Destination Formatting.
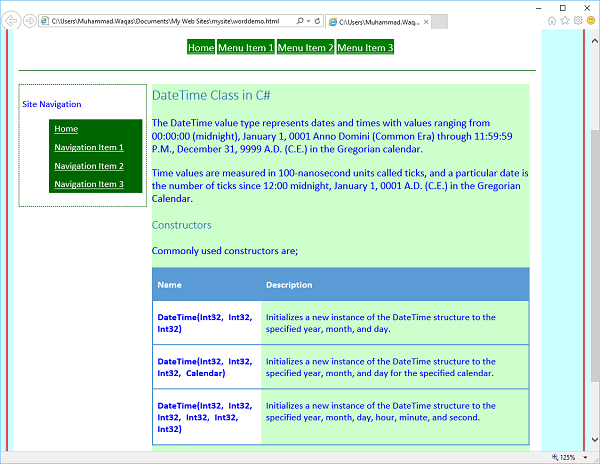
On previewing this webpage in a browser, it will look like the following screenshot.
Microsoft Expression Web - Gridview
The GridView control is used to display the values of a data source in a table. Each column represents a field, while each row represents a record. In this chapter, we will learn a very simple process to display data from a database on a webpage in a GridView.
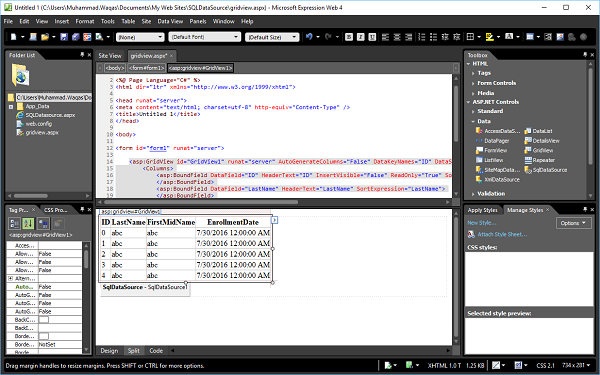
Step 1 − Let’s create a new ASPX page in SQLDataSource project and call it gridview.aspx
Step 2 − In the Toolbox, you will see the ASP.NET Controls. Drag the GridView control and drop it over the form section.
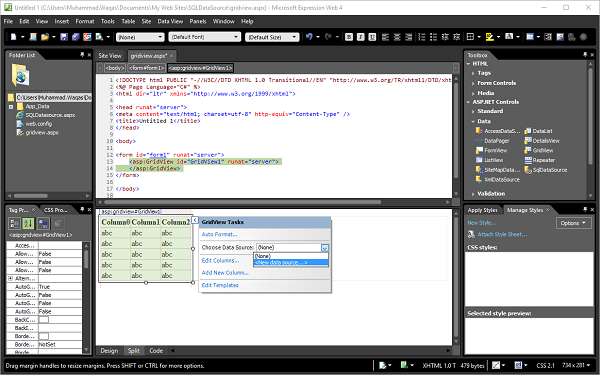
You can see that the GridView context menu is open. Now select the <New data source…> from the Choose Data Source dropdown list. It will display the Data Source Configuration Wizard.
Step 3 − Select the Database as we will get the data from SQL database and specify the data source ID. Click OK.

Step 4 − Select the existing connection string, which we have created in SQL DataSource chapter, as we will be using the same database in this chapter. Click Next.
Step 5 − For the purpose of understanding, let’s select the Student table and click the * checkbox which will retrieve all the columns from the student table. Click Next.
Step 6 − In the following wizard, you can test the query, so let’s click the Test Query button.
Upon clicking Next, it will display the following screen −
The Design View of gridview.aspx looks as follows −
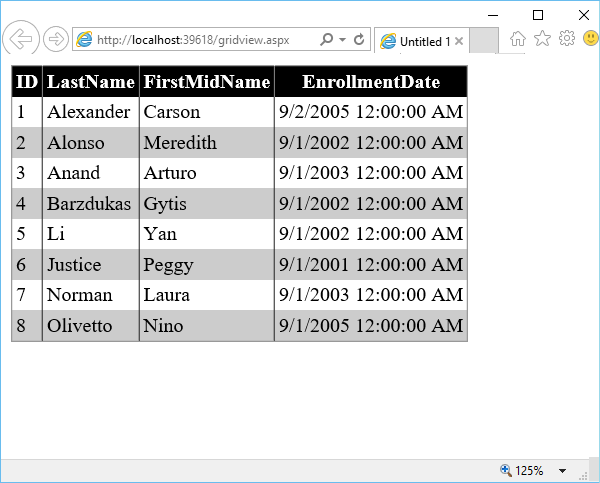
Step 7 − Let us preview the webpage in a browser. It will appear as follows −
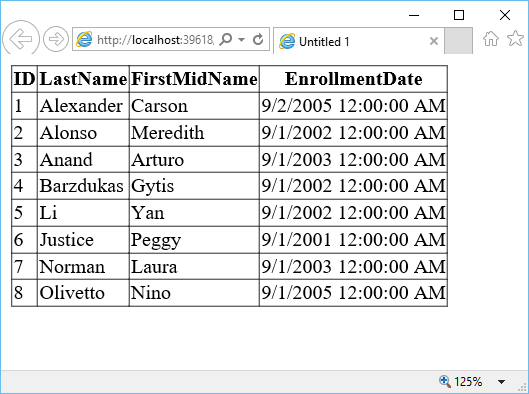
This is a simple table without any formatting.
Step 8 − You can format the GridView from the GridView Context menu.
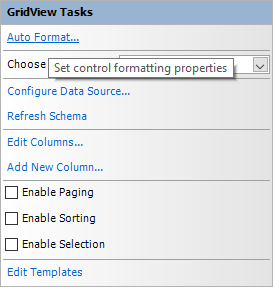
Click the Auto Format… link. In the Auto Format dialog box, there are many predefined schemes. Select a scheme as per your requirement and click OK.
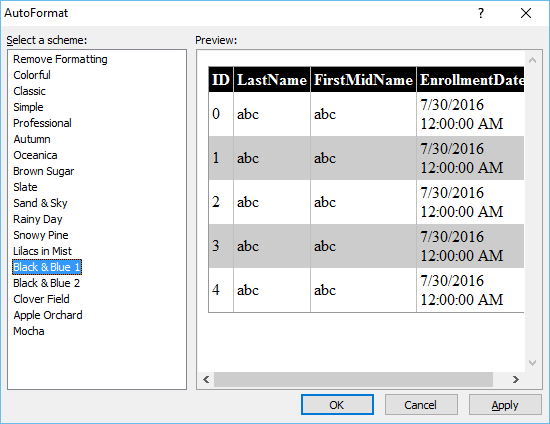
Let’s preview the webpage in a browser again. It will look like the following screenshot.
Microsoft Expression Web - Master Pages
In this chapter, we will learn about ASP.NET master pages. When we create a master page, we can lay it out, apply styles, and add ASP.NET controls in the same way as in other pages in Microsoft Expression Web. The layout and content we create in a master page are applied to the pages attached to the master page. It is a similar concept to Dynamic Web Template.
Dynamic Web Templates enable you to apply a common look and feel to all the pages in your website. As Dynamic Web Templates are applied in the pages to which they are attached at design time, applying changes to all the pages in a site can cause a delay while the HTML is updated in all the pages.
If the server is running ASP.NET, ASP.NET Master Pages allow for similar functionality by defining the editable areas in the template. However, the application of the template to the custom content in the pages is done dynamically at runtime.
Example
Let’s take a look at a simple example in which we will create a master page using CSS template and use this master page to create other pages.
Step 1 − Open the index.html page in which we have defined different sections using CSS style-sheet.
Step 2 − From the File menu, go to New → Page and you will see the New page dialog.
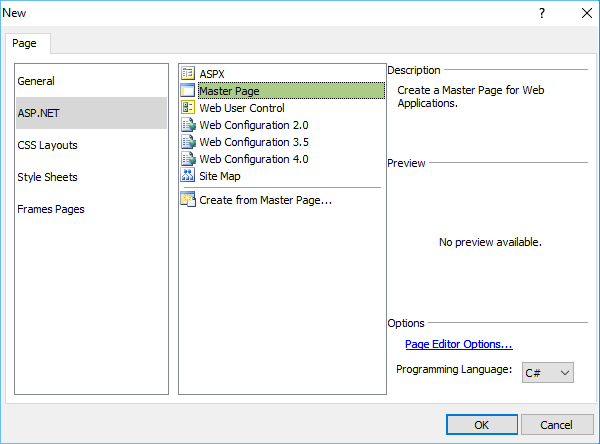
Step 3 − From the left pane, select ASP.NET and from the middle list, select Master Page and click the OK button.
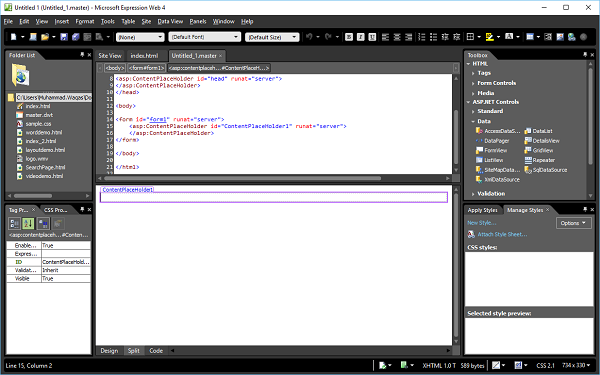
Step 4 − The above screen will produce a pop-up named Untitled1.master. Save this page and name it default.master.
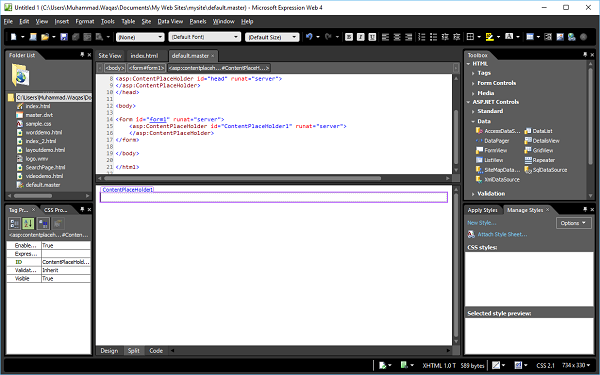
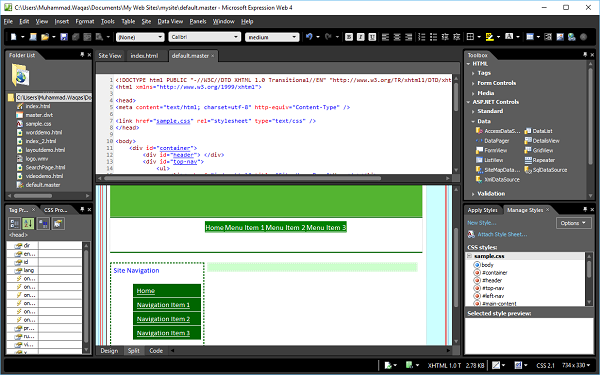
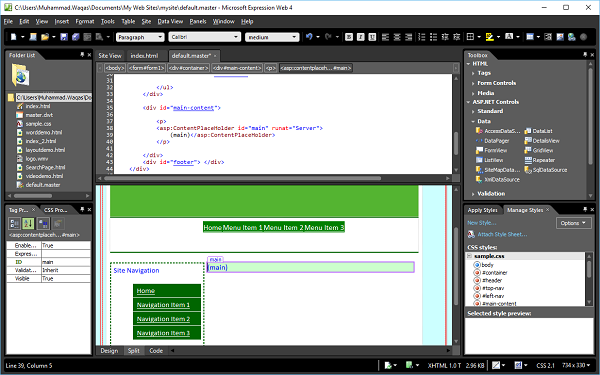
Step 5 − We want to build our design into the master page that will be shared throughout our site. So let’s copy the code of the content that you would like to have on each page from the index.html code and paste the code to the default.master page.
Step 6 − Now we have a layout that we would like to use on every page of the site. However, if we were to start building the content pages now, we wouldn't be able to actually enter any content into this layout. Hence, we need to create ASPX content pages from the master page. To do this, we have to add the content region as well so that we can add content to the specified pages.
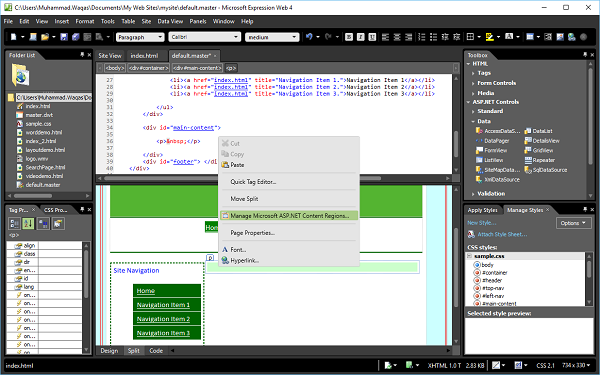
In the design view, right-click where you want the content on your pages. Let’s say we want to add content in the main-content section and then click the Manage Microsoft ASP.NET Content Regions…
Step 7 − In the Manage Content Regions wizard, enter the Region Name and click Close.
Step 8 − As can be seen in the following screenshot, the Content PlaceHolder is added in the main-content section. Now we have to add ASPX web page.
Step 9 − Go to the File menu and select New → Create from Master Page…
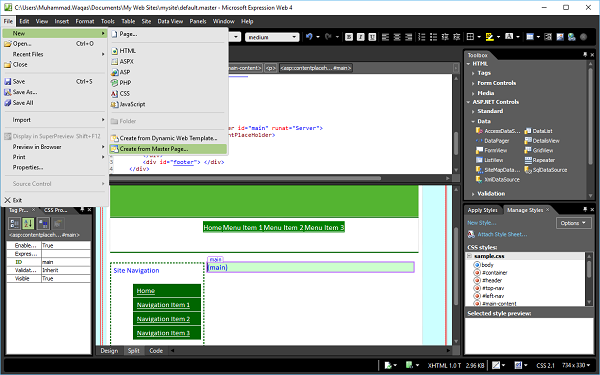
Step 10 − Browse to the default.master page and click OK.

Step 11 − Now, a new ASPX page is created and all the layout styles are applied from the master page.
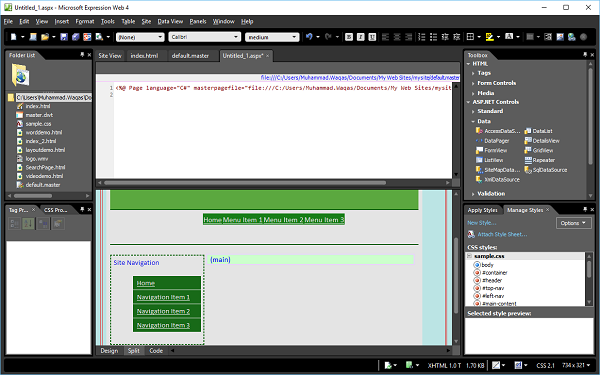
Add some text in the main section.
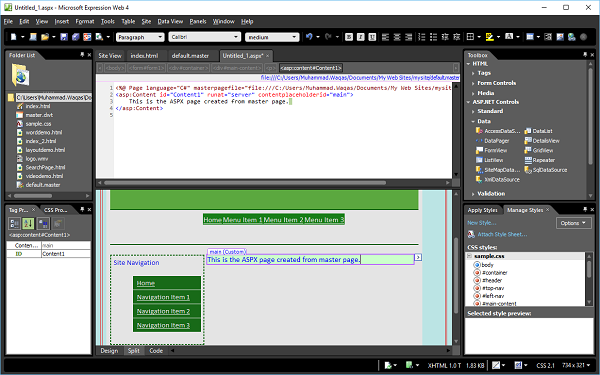
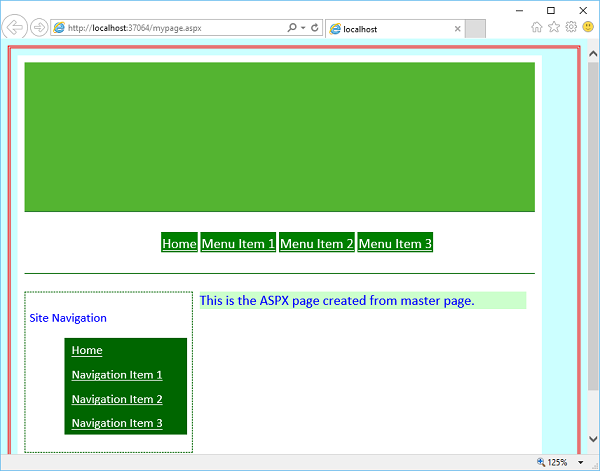
Step 12 − Save this page and call it mypage.aspx and then preview it in a browser.
Microsoft Expression Web - Data Table
In this chapter, we will learn how to add data table in your webpage. Let’s create a new HTML page, but here we want to apply the Dynamic Web Template as well to our HTML page.
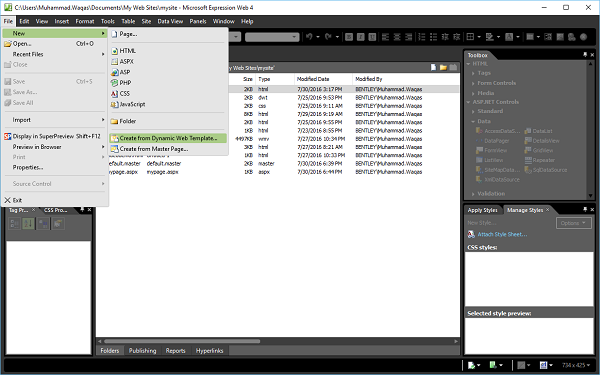
Step 1 − Let’s go to the File menu and select New → Create from Dynamic Web Template…
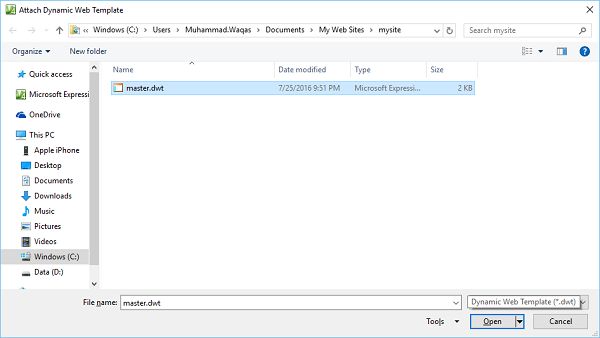
It will open the following dialog box as shown in the following screenshot.
Step 2 − Select the master.dwt file and then click the Open button.
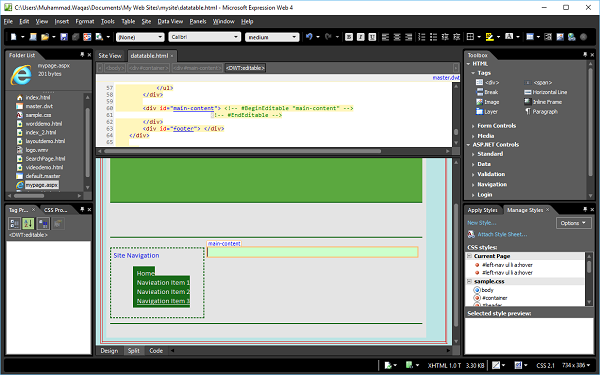
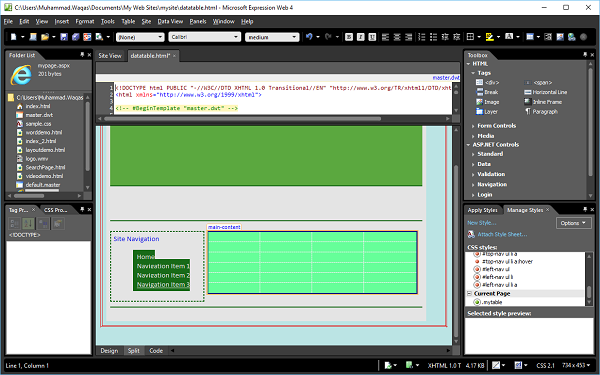
Step 3 − Save the web page and call it datatable.html.
Step 4 − In Design View, go to the main-content section and remove the text.
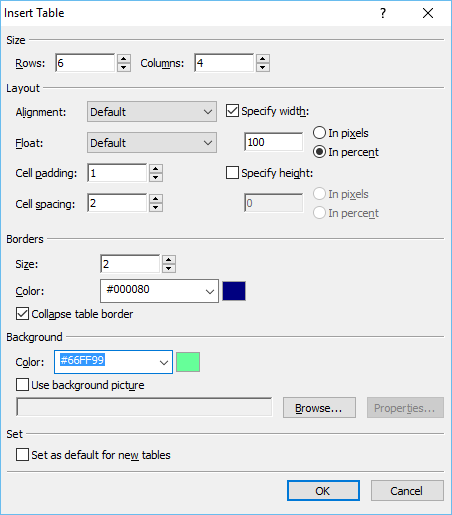
Step 5 − Next, go to the Table → Insert Table… menu option which will open the Insert Table dialog box.
Select the number of rows and columns. You can also set different layout options like alignment, padding, border’s size and color, and Background color, etc. Once you are done, click OK.
Step 6 − The Design View of datatable.html will now appear as follows −

Now, if you look at the Code View of the page, you will see the following code is added by Expression Web.
<table class = "auto-style2" style = "width: 100%">
   <tr>
      <td> </td>
      <td> </td>
      <td> </td>
      <td> </td>
   </tr>

   <tr>
      <td> </td>
      <td> </td>
      <td> </td>
      <td> </td>
   </tr>

   <tr>
      <td> </td>
      <td> </td>
      <td> </td>
      <td> </td>
   </tr>

   <tr>
      <td> </td>
      <td> </td>
      <td> </td>
      <td> </td>
   </tr>

   <tr>
      <td> </td>
      <td> </td>
      <td> </td>
      <td> </td>
   </tr>

   <tr>
      <td> </td>
      <td> </td>
      <td> </td>
      <td> </td>
   </tr>
</table>
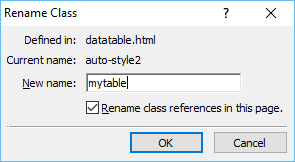
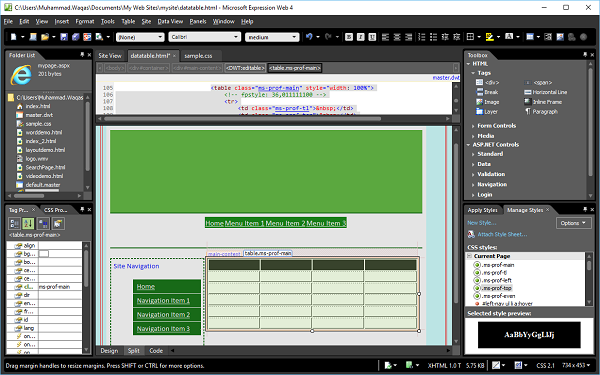
Step 7 − On the Manage Styles task panel, right-click “.auto-style2”. Click the Choose rename class "auto-style2".
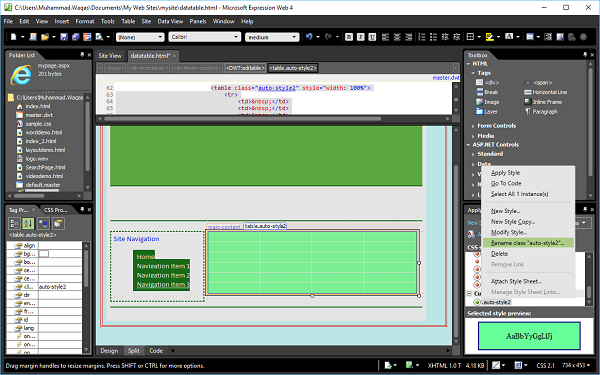
Step 8 − In the Rename Class dialog, enter mytable in the New name field. Make sure Rename class references in this page is ticked and then click OK.
Now, take a look at your web page in Design View. It will appear as follows −
Step 9 − To format this table and apply some style to it, go to the Manage Styles task panel and click New Style…

Step 10 − In the New Style dialog box, set the border settings and then click Ok. There is another option to format your data table. In the Design View, right-click on the table and select Modify → Table AutoFormat…

In this dialog box, you will see the different formats and other settings. Let’s select the Professional format and click OK.
Step 11 − Now, the Design View of your web page looks as follows −
Let’s add some data in the design view.
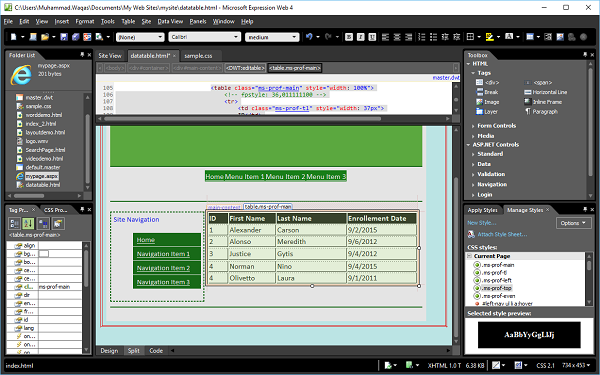
Step 12 − Save your webpage and preview it in a browser. It will look like the following screenshot.
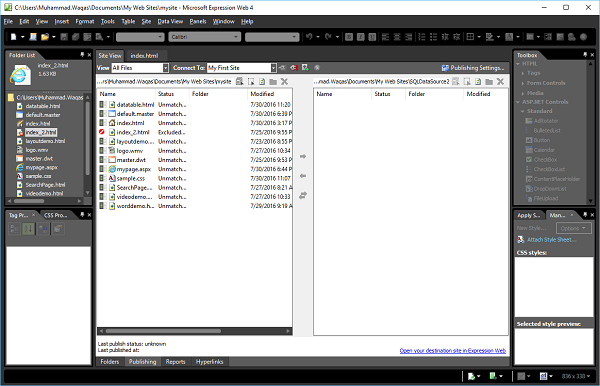
Microsoft Expression Web - Publish
In this chapter, we will learn how to publish a website. Microsoft Expression Web is a complete website development tool. You can use Expression Web to create webpages and sites that let you transfer files between your computer and your hosting account.
Step 1 − Let’s take a look at the site which we want to publish.
In the latest Expression Web version, new publishing features are added such as −
- The ability to exclude complete folders from publishing rather than just files.
- The ability to easily Publish Current Page.
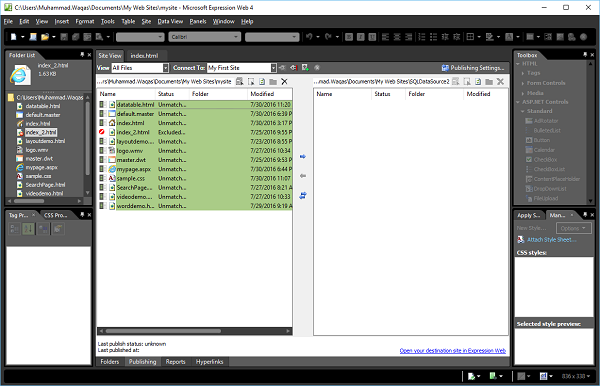
Step 2 − If you want any specific file or folder not to be published on the site, then rightclick on that folder or file and exclude it from publishing. Let’s say we want to exclude the index_2.html file.
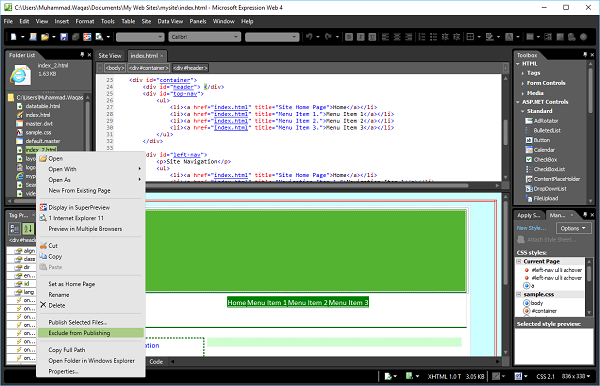
As shown in the above screenshot, click the Exclude from Publishing button. Similarly, you can exclude other files as well.
Step 3 − Now that you have finished designing the site, you will need to publish it for the world to see. Expression Web supports several different publishing scenarios.
To publish the site, first we need to make sure that we have saved all the pages. A warning will be received if we have not, once the publishing process starts.
Now, let’s go to the Tools menu.
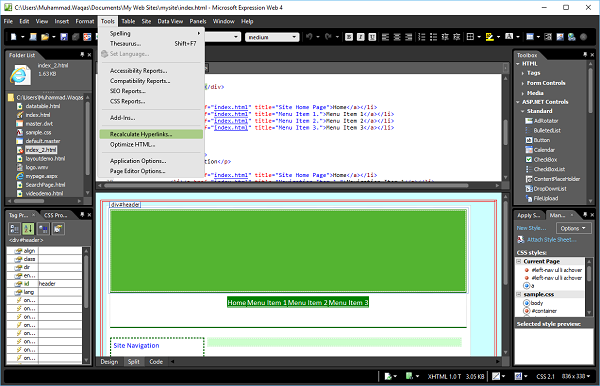
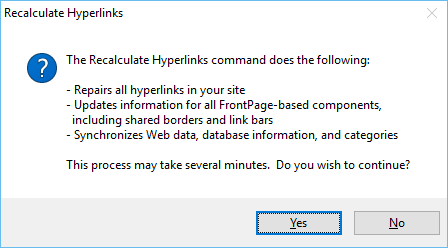
Select the Recalculate Hyperlinks…option. Click Yes on the following screen.
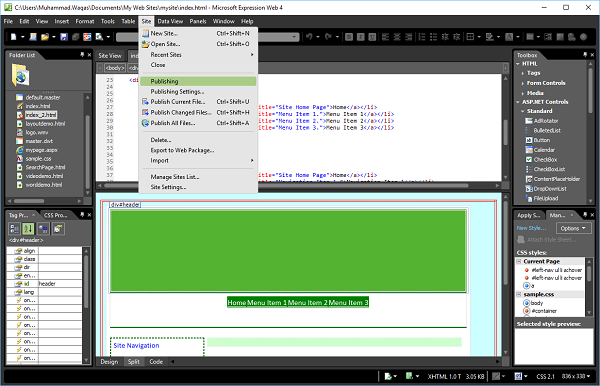
Step 4 − Go to the Site menu and click the Publishing menu option.
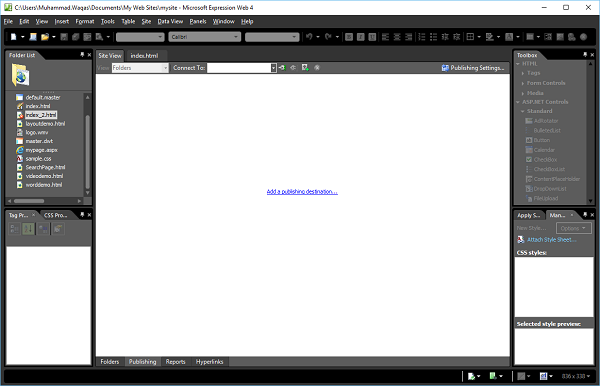
Step 5 − If this is the first time the site is published, we will receive the message Add a publishing destination, as shown in the following screenshot.

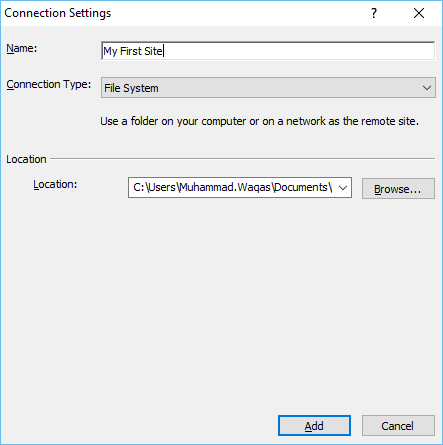
Step 6 − Click the message and the following Connection Settings dialog box will appear. Enter all the required information in the Connection Settings dialog and then click the Add button.

It will display the following dialog. Click Yes.
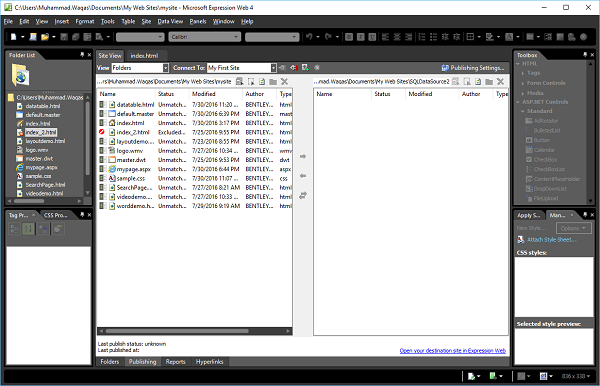
Step 7 − If the Publishing Setting is already set, we will receive the message Connect to current publishing destination. Click the message or use the Connect To button on the Site View tab.
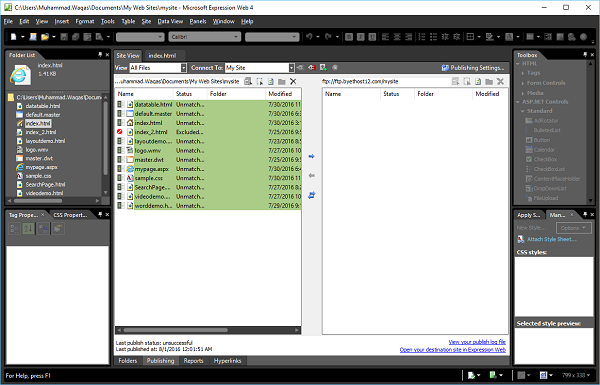
Step 8 − Once the publishing process starts, the files can be seen being transferred. When complete, we will get a message that the file has finished uploading.
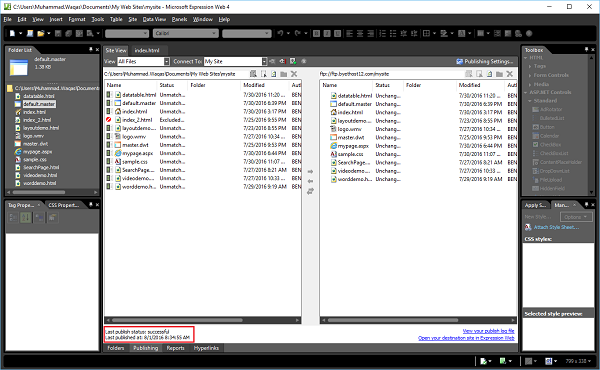
The next time we publish a site, this process will compare the server site with what is on the computer. If there are files on the remote server that we have deleted from the web on the computer, a message box may pop up asking if we want to delete them. If we are sure they are no longer needed, then click OK.
Microsoft Expression Web - Backup Website
In this chapter, we will learn how to copy the site to a local computer using Expression Web. Unlike Windows Explorer, there is no Recycle Bin in Expression Web. If we inadvertently delete the website or pages within the site, we are going to be in a Restore situation.
Step 1 − To take a backup of the website, let’s open the site in Expression Web.

Step 2 − Go to the Tools menu and click the Recalculate Hyperlinks… option.

Click Yes, as shown in the following screenshot.

Step 3 − Next, go to the Site menu and click on the Publishing menu option.

Step 4 − If this is the first time we have published this site, we will receive a message Add a publishing destination, as shown in the following screenshot.
Step 5 − Click the message and the Connection Settings dialog box will appear.
In the Name field, enter the site name. Choose File System from the Connection Type dropdown menu and then browse to the location where you want to back up your website. Next, click the Add button.
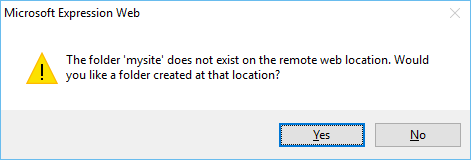
Step 6 − If the folder does not currently exist, we will be prompted to create it. Click 'Yes' and the web will be created.
Step 7 − Once connected, click the 'View' dropdown and select All Files.
Step 8 − Select all the files on the left side.
Step 9 − Click the right arrow (→) button.
Once the publishing process starts, the files will be seen as being transferred. When complete, a message will pop up suggesting that the files have been uploaded.
Microsoft Expression Web - Add-Ins
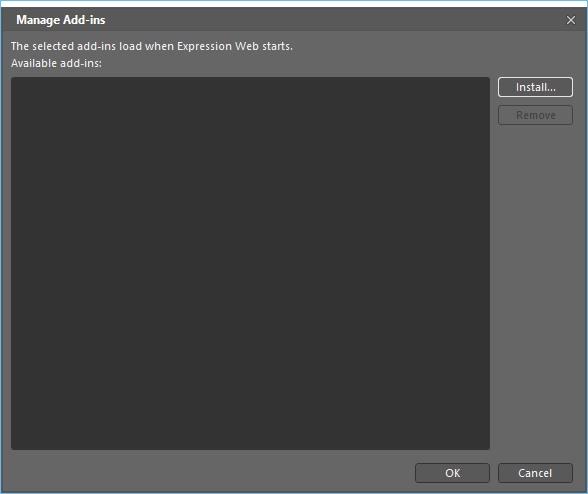
In this chapter, we will learn how to install Add-ins in Expression Web. An Expression Web Add-in, is an external software package that provides additional or enhanced functionality within Expression Web.
Add-ins can be downloaded from the following location https://msdn.microsoft.com/en-us/expression/jj873995. For instance, let’s download AddFeed add-in.
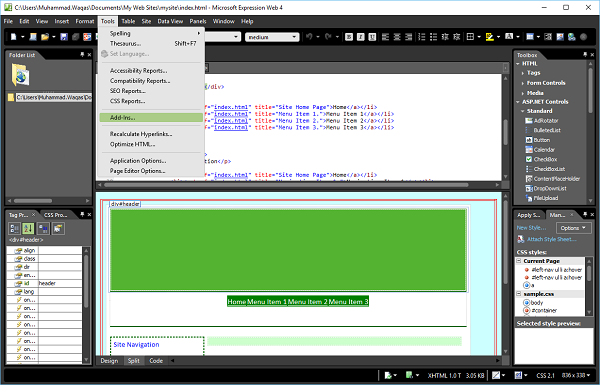
Step 1 − Let’s open Expression Web and go to the Tools menu. Click the Add-Ins…menu option.
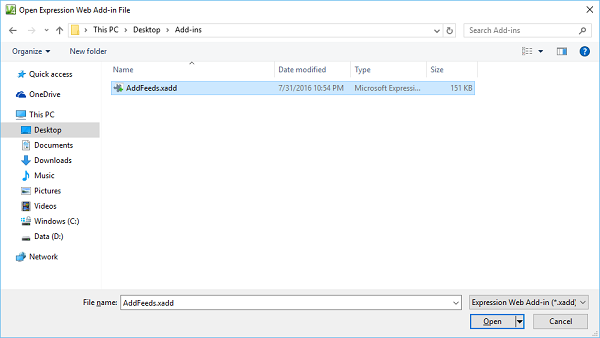
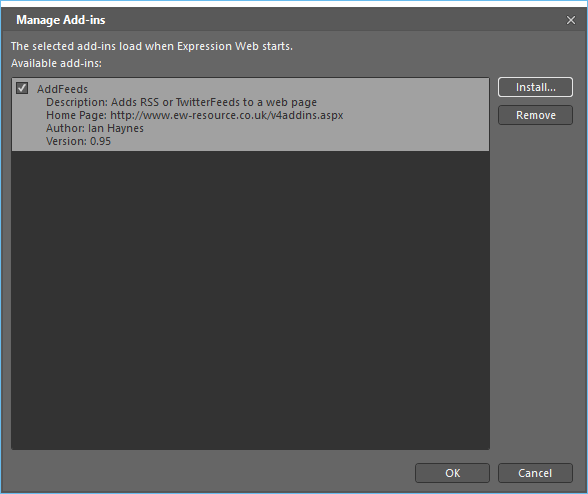
Step 2 − If this is the first time an Add-in is being installed, then there will be an empty list in the Manage Add-ins dialog box. Let’s click the Install button.
Step 3 − Select the AddFeeds.xadd file and click the Open button.
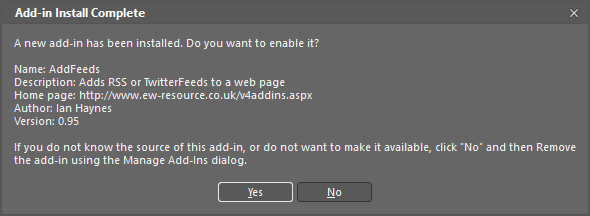
Step 4 − Once installed, it will show you the following screen. It will ask if we want to enable the add-in. The screen will give all the information on the particular add-in being installed. Click Yes.
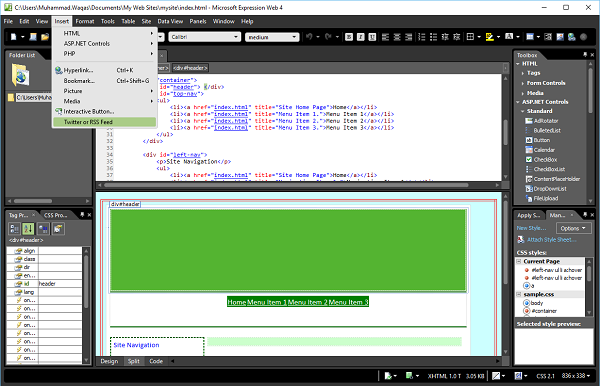
Step 5 − Depending on the add-ins installed, they will be available at a number of locations.
Step 6 − Next, go to Insert menu. You will see the Twitter or RSS Feed option which is now added after installing the add-in.
You can follow the same steps to install more add-ins as per requirements.