
- ExpressJS Tutorial
- ExpressJS - Home
- ExpressJS - Overview
- ExpressJS - Environment
- ExpressJS - Hello World
- ExpressJS - Routing
- ExpressJS - HTTP Methods
- ExpressJS - URL Building
- ExpressJS - Middleware
- ExpressJS - Templating
- ExpressJS - Static Files
- ExpressJS - Form Data
- ExpressJS - Database
- ExpressJS - Cookies
- ExpressJS - Sessions
- ExpressJS - Authentication
- ExpressJS - RESTful APIs
- ExpressJS - Scaffolding
- ExpressJS - Error handling
- ExpressJS - Debugging
- ExpressJS - Best Practices
- ExpressJS - Resources
- ExpressJS Useful Resources
- ExpressJS - Quick Guide
- ExpressJS - Useful Resources
- ExpressJS - Discussion
ExpressJS - Quick Guide
ExpressJS - Overview
ExpressJS is a web application framework that provides you with a simple API to build websites, web apps and back ends. With ExpressJS, you need not worry about low level protocols, processes, etc.
What is Express?
Express provides a minimal interface to build our applications. It provides us the tools that are required to build our app. It is flexible as there are numerous modules available on npm, which can be directly plugged into Express.
Express was developed by TJ Holowaychuk and is maintained by the Node.js foundation and numerous open source contributors.
Why Express?
Unlike its competitors like Rails and Django, which have an opinionated way of building applications, Express has no "best way" to do something. It is very flexible and pluggable.
Pug
Pug (earlier known as Jade) is a terse language for writing HTML templates. It −
- Produces HTML
- Supports dynamic code
- Supports reusability (DRY)
It is one of the most popular template language used with Express.
MongoDB and Mongoose
MongoDB is an open-source, document database designed for ease of development and scaling. This database is also used to store data.
Mongoose is a client API for node.js which makes it easy to access our database from our Express application.
ExpressJS - Environment
In this chapter, we will learn how to start developing and using the Express Framework. To start with, you should have the Node and the npm (node package manager) installed. If you don’t already have these, go to the Node setup to install node on your local system. Confirm that node and npm are installed by running the following commands in your terminal.
node --version
npm --version
You should get an output similar to the following.
v5.0.0
3.5.2
Now that we have Node and npm set up, let us understand what npm is and how to use it.
Node Package Manager(npm)
npm is the package manager for node. The npm Registry is a public collection of packages of open-source code for Node.js, front-end web apps, mobile apps, robots, routers, and countless other needs of the JavaScript community. npm allows us to access all these packages and install them locally. You can browse through the list of packages available on npm at npmJS.
How to use npm?
There are two ways to install a package using npm: globally and locally.
Globally − This method is generally used to install development tools and CLI based packages. To install a package globally, use the following code.
npm install -g <package-name>
Locally − This method is generally used to install frameworks and libraries. A locally installed package can be used only within the directory it is installed. To install a package locally, use the same command as above without the -g flag.
npm install <package-name>
Whenever we create a project using npm, we need to provide a package.json file, which has all the details about our project. npm makes it easy for us to set up this file. Let us set up our development project.
Step 1 − Start your terminal/cmd, create a new folder named hello-world and cd (create directory) into it −

Step 2 − Now to create the package.json file using npm, use the following code.
npm init
It will ask you for the following information.
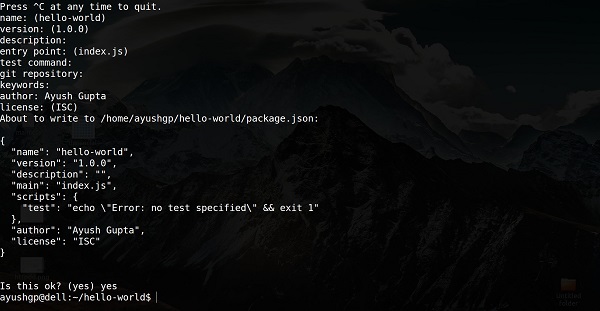
Just keep pressing enter, and enter your name at the “author name” field.
Step 3 − Now we have our package.json file set up, we will further install Express. To install Express and add it to our package.json file, use the following command −
npm install --save express
To confirm that Express has installed correctly, run the following code.
ls node_modules #(dir node_modules for windows)
Tip − The --save flag can be replaced by the -S flag. This flag ensures that Express is added as a dependency to our package.json file. This has an advantage, the next time we need to install all the dependencies of our project we can just run the command npm install and it will find the dependencies in this file and install them for us.
This is all we need to start development using the Express framework. To make our development process a lot easier, we will install a tool from npm, nodemon. This tool restarts our server as soon as we make a change in any of our files, otherwise we need to restart the server manually after each file modification. To install nodemon, use the following command −
npm install -g nodemon
You can now start working on Express.
ExpressJS - Hello World
We have set up the development, now it is time to start developing our first app using Express. Create a new file called index.js and type the following in it.
var express = require('express');
var app = express();

app.get('/', function(req, res){
   res.send("Hello world!");
});

app.listen(3000);
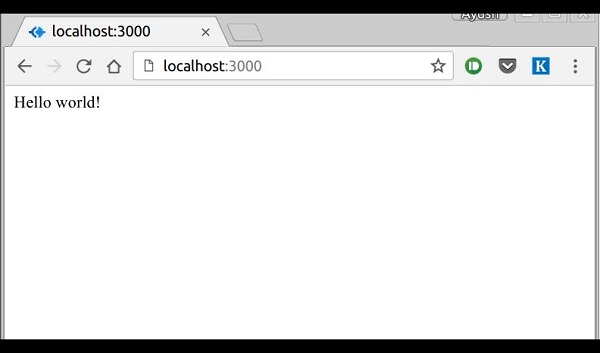
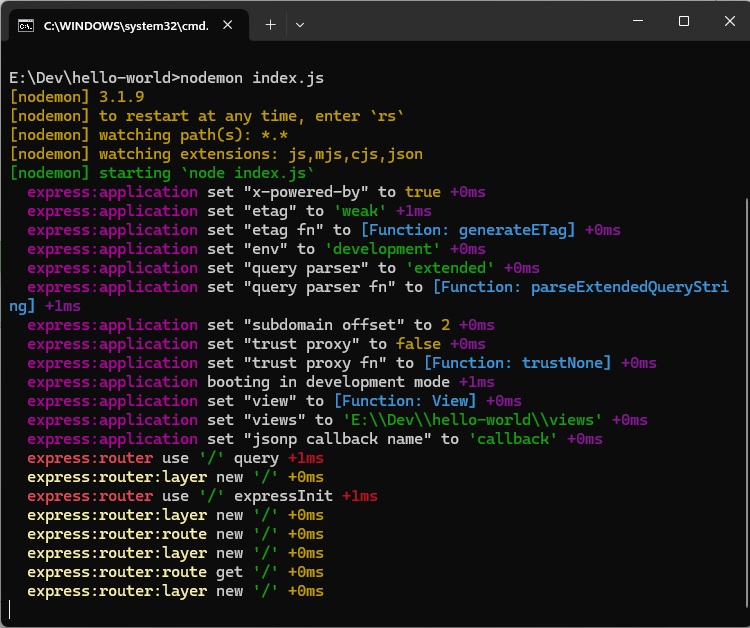
Save the file, go to your terminal and type the following.
nodemon index.js
This will start the server. To test this app, open your browser and go to http://localhost:3000 and a message will be displayed as in the following screenshot.
How the App Works?
The first line imports Express in our file, we have access to it through the variable Express. We use it to create an application and assign it to var app.
app.get(route, callback)
This function tells what to do when a get request at the given route is called. The callback function has 2 parameters, request(req) and response(res). The request object(req) represents the HTTP request and has properties for the request query string, parameters, body, HTTP headers, etc. Similarly, the response object represents the HTTP response that the Express app sends when it receives an HTTP request.
res.send()
This function takes an object as input and it sends this to the requesting client. Here we are sending the string "Hello World!".
app.listen(port, [host], [backlog], [callback]])
This function binds and listens for connections on the specified host and port. Port is the only required parameter here.
| S.No. | Argument & Description |
|---|---|
| 1 | port A port number on which the server should accept incoming requests. |
| 2 | host Name of the domain. You need to set it when you deploy your apps to the cloud. |
| 3 | backlog The maximum number of queued pending connections. The default is 511. |
| 4 | callback An asynchronous function that is called when the server starts listening for requests. |
ExpressJS - Routing
Web frameworks provide resources such as HTML pages, scripts, images, etc. at different routes.
The following function is used to define routes in an Express application −
app.method(path, handler)
This METHOD can be applied to any one of the HTTP verbs – get, set, put, delete. An alternate method also exists, which executes independent of the request type.
Path is the route at which the request will run.
Handler is a callback function that executes when a matching request type is found on the relevant route. For example,
var express = require('express');
var app = express();

app.get('/hello', function(req, res){
   res.send("Hello World!");
});

app.listen(3000);
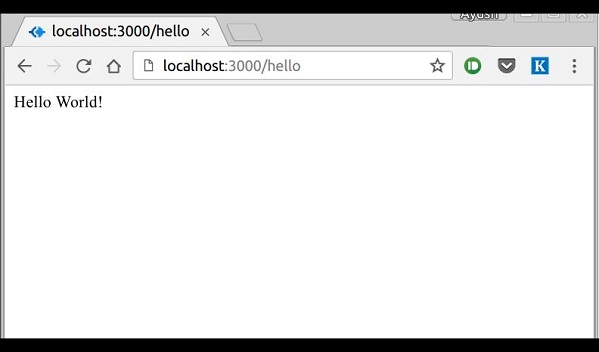
If we run our application and go to localhost:3000/hello, the server receives a get request at route "/hello", our Express app executes the callback function attached to this route and sends "Hello World!" as the response.
We can also have multiple different methods at the same route. For example,
var express = require('express');
var app = express();

app.get('/hello', function(req, res){
   res.send("Hello World!");
});

app.post('/hello', function(req, res){
   res.send("You just called the post method at '/hello'!\n");
});

app.listen(3000);
To test this request, open up your terminal and use cURL to execute the following request −
curl -X POST "http://localhost:3000/hello"

A special method, all, is provided by Express to handle all types of http methods at a particular route using the same function. To use this method, try the following.
app.all('/test', function(req, res){
   res.send("HTTP method doesn't have any effect on this route!");
});
This method is generally used for defining middleware, which we'll discuss in the middleware chapter.
Routers
Defining routes like above is very tedious to maintain. To separate the routes from our main index.js file, we will use Express.Router. Create a new file called things.js and type the following in it.
var express = require('express');
var router = express.Router();

router.get('/', function(req, res){
   res.send('GET route on things.');
});
router.post('/', function(req, res){
   res.send('POST route on things.');
});

//export this router to use in our index.js
module.exports = router;
Now to use this router in our index.js, type in the following before the app.listen function call.
var express = require('Express');
var app = express();

var things = require('./things.js');

//both index.js and things.js should be in same directory
app.use('/things', things);

app.listen(3000);
The app.use function call on route '/things' attaches the things router with this route. Now whatever requests our app gets at the '/things', will be handled by our things.js router. The '/' route in things.js is actually a subroute of '/things'. Visit localhost:3000/things/ and you will see the following output.

Routers are very helpful in separating concerns and keep relevant portions of our code together. They help in building maintainable code. You should define your routes relating to an entity in a single file and include it using the above method in your index.js file.
ExpressJS - HTTP Methods
The HTTP method is supplied in the request and specifies the operation that the client has requested. The following table lists the most used HTTP methods −
| S.No. | Method & Description |
|---|---|
| 1 | GET The GET method requests a representation of the specified resource. Requests using GET should only retrieve data and should have no other effect. |
| 2 | POST The POST method requests that the server accept the data enclosed in the request as a new object/entity of the resource identified by the URI. |
| 3 | PUT The PUT method requests that the server accept the data enclosed in the request as a modification to existing object identified by the URI. If it does not exist then the PUT method should create one. |
| 4 | DELETE The DELETE method requests that the server delete the specified resource. |
These are the most common HTTP methods. To learn more about the methods, visit http://www.tutorialspoint.com/http/http_methods.htm.
ExpressJS - URL Building
We can now define routes, but those are static or fixed. To use the dynamic routes, we SHOULD provide different types of routes. Using dynamic routes allows us to pass parameters and process based on them.
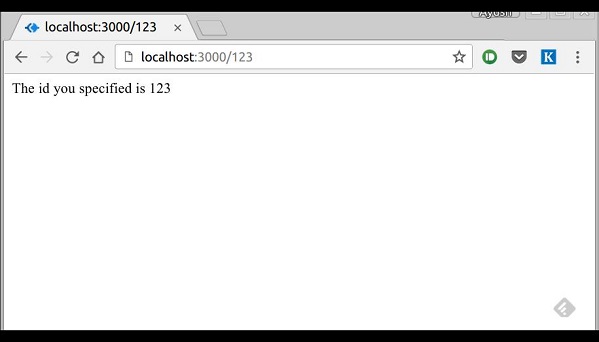
Here is an example of a dynamic route −
var express = require('express');
var app = express();

app.get('/:id', function(req, res){
   res.send('The id you specified is ' + req.params.id);
});
app.listen(3000);
To test this go to http://localhost:3000/123. The following response will be displayed.
You can replace '123' in the URL with anything else and the change will reflect in the response. A more complex example of the above is −
var express = require('express');
var app = express();
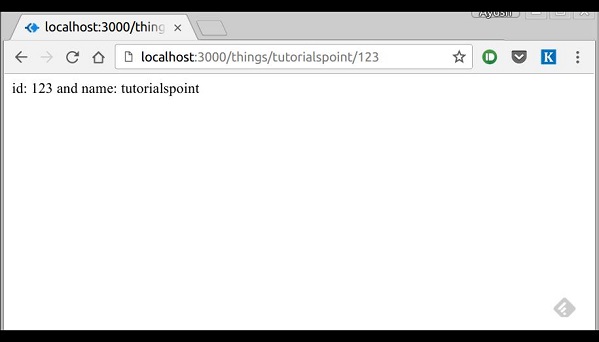
app.get('/things/:name/:id', function(req, res) {
res.send('id: ' + req.params.id + ' and name: ' + req.params.name);
});
app.listen(3000);
To test the above code, go to http://localhost:3000/things/tutorialspoint/12345.
You can use the req.params object to access all the parameters you pass in the url. Note that the above 2 are different paths. They will never overlap. Also if you want to execute code when you get '/things' then you need to define it separately.
Pattern Matched Routes
You can also use regex to restrict URL parameter matching. Let us assume you need the id to be a 5-digit long number. You can use the following route definition −
var express = require('express');
var app = express();

app.get('/things/:id([0-9]{5})', function(req, res){
   res.send('id: ' + req.params.id);
});

app.listen(3000);
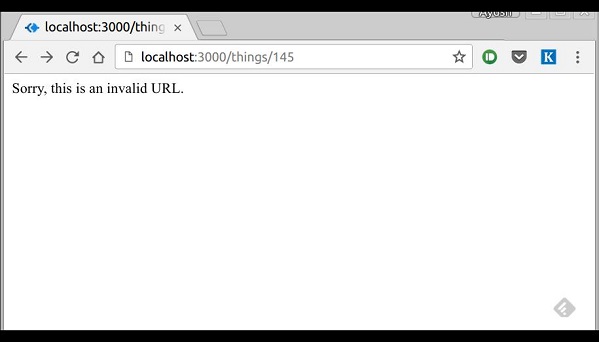
Note that this will only match the requests that have a 5-digit long id. You can use more complex regexes to match/validate your routes. If none of your routes match the request, you'll get a "Cannot GET <your-request-route>" message as response. This message be replaced by a 404 not found page using this simple route −
var express = require('express');
var app = express();

//Other routes here
app.get('*', function(req, res){
   res.send('Sorry, this is an invalid URL.');
});
app.listen(3000);
Important − This should be placed after all your routes, as Express matches routes from start to end of the index.js file, including the external routers you required.
For example, if we define the same routes as above, on requesting with a valid URL, the following output is displayed. −

While for an incorrect URL request, the following output is displayed.
ExpressJS - Middleware
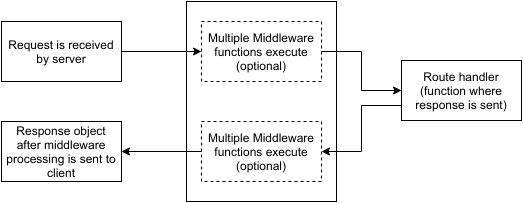
Middleware functions are functions that have access to the request object (req), the response object (res), and the next middleware function in the application’s request-response cycle. These functions are used to modify req and res objects for tasks like parsing request bodies, adding response headers, etc.
Here is a simple example of a middleware function in action −
var express = require('express');
var app = express();

//Simple request time logger
app.use(function(req, res, next){
   console.log("A new request received at " + Date.now());

   //This function call is very important. It tells that more processing is
   //required for the current request and is in the next middleware
   function route handler.
   next();
});

app.listen(3000);
The above middleware is called for every request on the server. So after every request, we will get the following message in the console −
A new request received at 1467267512545
To restrict it to a specific route (and all its subroutes), provide that route as the first argument of app.use(). For Example,
var express = require('express');
var app = express();

//Middleware function to log request protocol
app.use('/things', function(req, res, next){
   console.log("A request for things received at " + Date.now());
   next();
});

// Route handler that sends the response
app.get('/things', function(req, res){
   res.send('Things');
});

app.listen(3000);
Now whenever you request any subroute of '/things', only then it will log the time.
Order of Middleware Calls
One of the most important things about middleware in Express is the order in which they are written/included in your file; the order in which they are executed, given that the route matches also needs to be considered.
For example, in the following code snippet, the first function executes first, then the route handler and then the end function. This example summarizes how to use middleware before and after route handler; also how a route handler can be used as a middleware itself.
var express = require('express');
var app = express();

//First middleware before response is sent
app.use(function(req, res, next){
   console.log("Start");
   next();
});

//Route handler
app.get('/', function(req, res, next){
   res.send("Middle");
   next();
});

app.use('/', function(req, res){
   console.log('End');
});

app.listen(3000);
When we visit '/' after running this code, we receive the response as Middle and on our console −
Start
End
The following diagram summarizes what we have learnt about middleware −
Now that we have covered how to create our own middleware, let us discuss some of the most commonly used community created middleware.
Third Party Middleware
A list of Third party middleware for Express is available here. Following are some of the most commonly used middleware; we will also learn how to use/mount these −
body-parser
This is used to parse the body of requests which have payloads attached to them. To mount body parser, we need to install it using npm install --save body-parser and to mount it, include the following lines in your index.js −
var bodyParser = require('body-parser');

//To parse URL encoded data
app.use(bodyParser.urlencoded({ extended: false }))

//To parse json data
app.use(bodyParser.json())
To view all available options for body-parser, visit its github page.
cookie-parser
It parses Cookie header and populate req.cookies with an object keyed by cookie names. To mount cookie parser, we need to install it using npm install --save cookie-parser and to mount it, include the following lines in your index.js −
var cookieParser = require('cookie-parser');
app.use(cookieParser())
express-session
It creates a session middleware with the given options. We will discuss its usage in the Sessions section.
We have many other third party middleware in ExpressJS. However, we have discussed only a few important ones here.
ExpressJS - Templating
Pug is a templating engine for Express. Templating engines are used to remove the cluttering of our server code with HTML, concatenating strings wildly to existing HTML templates. Pug is a very powerful templating engine which has a variety of features including filters, includes, inheritance, interpolation, etc. There is a lot of ground to cover on this.
To use Pug with Express, we need to install it,
npm install --save pug
Now that Pug is installed, set it as the templating engine for your app. You don't need to 'require' it. Add the following code to your index.js file.
app.set('view engine', 'pug');
app.set('views','./views');
Now create a new directory called views. Inside that create a file called first_view.pug, and enter the following data in it.
doctype html
html
   head
      title = "Hello Pug"
   body
      p.greetings#people Hello World!
To run this page, add the following route to your app −
app.get('/first_template', function(req, res){
   res.render('first_view');
});
You will get the output as − Hello World! Pug converts this very simple looking markup to html. We don’t need to keep track of closing our tags, no need to use class and id keywords, rather use '.' and '#' to define them. The above code first gets converted to −
<!DOCTYPE html>
<html>
   <head>
      <title>Hello Pug</title>
   </head>

   <body>
      <p class = "greetings" id = "people">Hello World!</p>
   </body>
</html>
Pug is capable of doing much more than simplifying HTML markup.
Important Features of Pug
Let us now explore a few important features of Pug.
Simple Tags
Tags are nested according to their indentation. Like in the above example, <title> was indented within the <head> tag, so it was inside it. But the <body> tag was on the same indentation, so it was a sibling of the <head> tag.
We don’t need to close tags, as soon as Pug encounters the next tag on same or outer indentation level, it closes the tag for us.
To put text inside of a tag, we have 3 methods −
Space seperated
h1 Welcome to Pug
Piped text
div
   | To insert multiline text,
   | You can use the pipe operator.
Block of text
div.
   But that gets tedious if you have a lot of text.
   You can use "." at the end of tag to denote block of text.
   To put tags inside this block, simply enter tag in a new line and
   indent it accordingly.
Comments
Pug uses the same syntax as JavaScript(//) for creating comments. These comments are converted to the html comments(<!--comment-->). For example,
//This is a Pug comment
This comment gets converted to the following.
<!--This is a Pug comment-->
Attributes
To define attributes, we use a comma separated list of attributes, in parenthesis. Class and ID attributes have special representations. The following line of code covers defining attributes, classes and id for a given html tag.
div.container.column.main#division(width = "100", height = "100")
This line of code, gets converted to the following. −
<div class = "container column main" id = "division" width = "100" height = "100"></div>
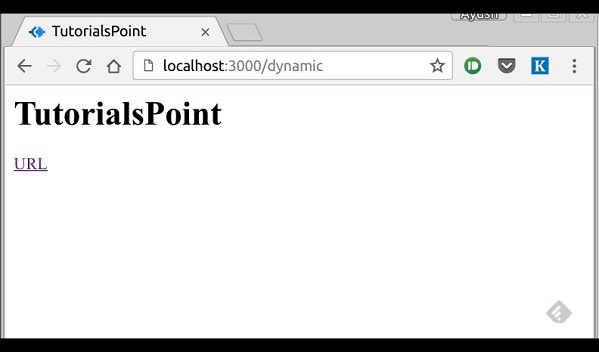
Passing Values to Templates
When we render a Pug template, we can actually pass it a value from our route handler, which we can then use in our template. Create a new route handler with the following.
var express = require('express');
var app = express();

app.get('/dynamic_view', function(req, res){
   res.render('dynamic', {
      name: "TutorialsPoint",
      url:"http://www.tutorialspoint.com"
   });
});

app.listen(3000);
And create a new view file in views directory, called dynamic.pug, with the following code −
html
   head
      title=name
   body
      h1=name
      a(href = url) URL
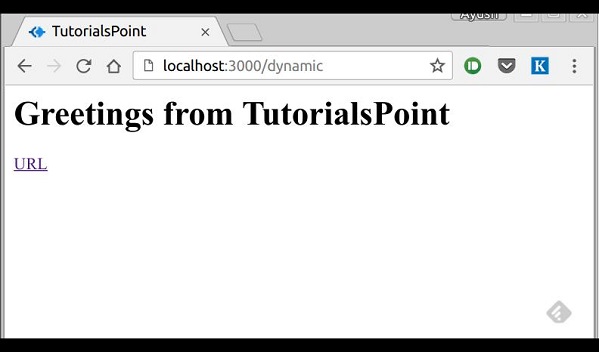
Open localhost:3000/dynamic_view in your browser; You should get the following output −
We can also use these passed variables within text. To insert passed variables in between text of a tag, we use #{variableName} syntax. For example, in the above example, if we wanted to put Greetings from TutorialsPoint, then we could have done the following.
html
   head
      title = name
   body
      h1 Greetings from #{name}
      a(href = url) URL
This method of using values is called interpolation. The above code will display the following output. −
Conditionals
We can use conditional statements and looping constructs as well.
Consider the following −
If a User is logged in, the page should display "Hi, User" and if not, then the "Login/Sign Up" link. To achieve this, we can define a simple template like −
html
   head
      title Simple template
   body
      if(user)
         h1 Hi, #{user.name}
      else
         a(href = "/sign_up") Sign Up
When we render this using our routes, we can pass an object as in the following program −
res.render('/dynamic',{
   user: {name: "Ayush", age: "20"}
});
You will receive a message − Hi, Ayush. But if we don’t pass any object or pass one with no user key, then we will get a signup link.
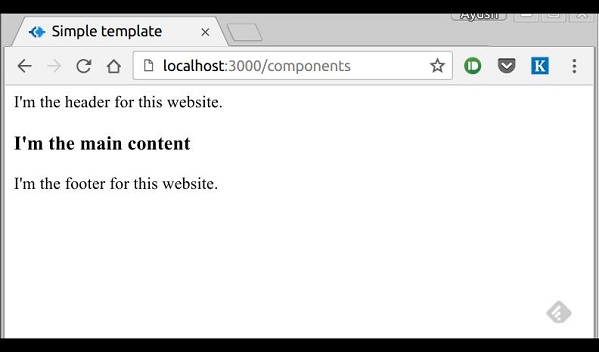
Include and Components
Pug provides a very intuitive way to create components for a web page. For example, if you see a news website, the header with logo and categories is always fixed. Instead of copying that to every view we create, we can use the include feature. Following example shows how we can use this feature −
Create 3 views with the following code −
HEADER.PUG
div.header.
   I'm the header for this website.
CONTENT.PUG
html
   head
      title Simple template
   body
      include ./header.pug
      h3 I'm the main content
      include ./footer.pug
FOOTER.PUG
div.footer.
   I'm the footer for this website.
Create a route for this as follows −
var express = require('express');
var app = express();

app.get('/components', function(req, res){
    res.render('content');
});

app.listen(3000);
Go to localhost:3000/components, you will receive the following output −
include can also be used to include plaintext, css and JavaScript.
There are many more features of Pug. But those are out of the scope for this tutorial. You can further explore Pug at Pug.
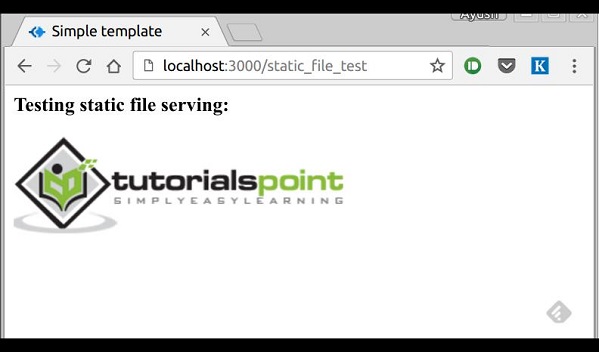
ExpressJS - Serving static files
Static files are files that clients download as they are from the server. Create a new directory, public. Express, by default does not allow you to serve static files. You need to enable it using the following built-in middleware.
app.use(express.static('public'));
Note − Express looks up the files relative to the static directory, so the name of the static directory is not part of the URL.
Note that the root route is now set to your public dir, so all static files you load will be considering public as root. To test that this is working fine, add any image file in your new public dir and change its name to "testimage.jpg". In your views, create a new view and include this file like −
html
   head
   body
      h3 Testing static file serving:
      img(src = "/testimage.jpg", alt = "Testing Image
You should get the following output −
Multiple Static Directories
We can also set multiple static assets directories using the following program −
var express = require('express');
var app = express();

app.use(express.static('public'));
app.use(express.static('images'));

app.listen(3000);
Virtual Path Prefix
We can also provide a path prefix for serving static files. For example, if you want to provide a path prefix like '/static', you need to include the following code in your index.js file −
var express = require('express');
var app = express();

app.use('/static', express.static('public'));

app.listen(3000);
Now whenever you need to include a file, for example, a script file called main.js residing in your public directory, use the following script tag −
<script src = "/static/main.js" />
This technique can come in handy when providing multiple directories as static files. These prefixes can help distinguish between multiple directories.
ExpressJS - Form data
Forms are an integral part of the web. Almost every website we visit offers us forms that submit or fetch some information for us. To get started with forms, we will first install the body-parser(for parsing JSON and url-encoded data) and multer(for parsing multipart/form data) middleware.
To install the body-parser and multer, go to your terminal and use −
npm install --save body-parser multer
Replace your index.js file contents with the following code −
var express = require('express');
var bodyParser = require('body-parser');
var multer = require('multer');
var upload = multer();
var app = express();
app.get('/', function(req, res){
res.render('form');
});
app.set('view engine', 'pug');
app.set('views', './views');
// for parsing application/json
app.use(bodyParser.json());
// for parsing application/xwww-
app.use(bodyParser.urlencoded({ extended: true }));
//form-urlencoded
// for parsing multipart/form-data
app.use(upload.array());
app.use(express.static('public'));
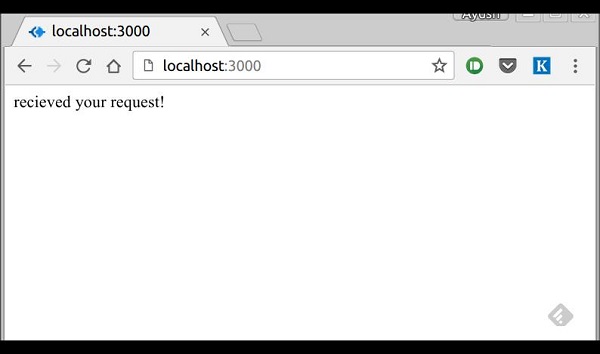
app.post('/', function(req, res){
console.log(req.body);
res.send("recieved your request!");
});
app.listen(3000);
After importing the body parser and multer, we will use the body-parser for parsing json and x-www-form-urlencoded header requests, while we will use multer for parsing multipart/form-data.
Let us create an html form to test this out. Create a new view called form.pug with the following code −
html
html
   head
      title Form Tester
   body
      form(action = "/", method = "POST")
         div
            label(for = "say") Say:
            input(name = "say" value = "Hi")
         br
         div
            label(for = "to") To:
            input(name = "to" value = "Express forms")
         br
         button(type = "submit") Send my greetings
Run your server using the following.
nodemon index.js
Now go to localhost:3000/ and fill the form as you like, and submit it. The following response will be displayed −
Have a look at your console; it will show you the body of your request as a JavaScript object as in the following screenshot −

The req.body object contains your parsed request body. To use fields from that object, just use them like normal JS objects.
This is the most recommended way to send a request. There are many other ways, but those are irrelevant to cover here, because our Express app will handle all those requests in the same way. To read more about different ways to make a request, have a look at this page.
ExpressJS - Database
We keep receiving requests, but end up not storing them anywhere. We need a Database to store the data. For this, we will make use of the NoSQL database called MongoDB.
To install and read about Mongo, follow this link.
In order to use Mongo with Express, we need a client API for node. There are multiple options for us, but for this tutorial, we will stick to mongoose. Mongoose is used for document Modeling in Node for MongoDB. For document modeling, we create a Model (much like a class in document oriented programming), and then we produce documents using this Model (like we create documents of a class in OOP). All our processing will be done on these "documents", then finally, we will write these documents in our database.
Setting up Mongoose
Now that you have installed Mongo, let us install Mongoose, the same way we have been installing our other node packages −
npm install --save mongoose
Before we start using mongoose, we have to create a database using the Mongo shell. To create a new database, open your terminal and enter "mongo". A Mongo shell will start, enter the following code −
use my_db
A new database will be created for you. Whenever you open up the mongo shell, it will default to "test" db and you will have to change to your database using the same command as above.
To use Mongoose, we will require it in our index.js file and then connect to the mongodb service running on mongodb://localhost.
var mongoose = require('mongoose');
mongoose.connect('mongodb://localhost/my_db');
Now our app is connected to our database, let us create a new Model. This model will act as a collection in our database. To create a new Model, use the following code, before defining any route −
var personSchema = mongoose.Schema({
   name: String,
   age: Number,
   nationality: String
});
var Person = mongoose.model("Person", personSchema);
The above code defines the schema for a person and is used to create a Mongoose Mode Person.
Saving Documents
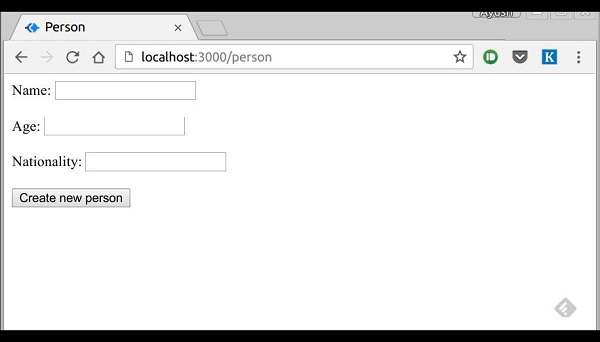
Now, we will create a new html form; this form will help you get the details of a person and save it to our database. To create the form, create a new view file called person.pug in views directory with the following content −
html
head
   title Person
   body
      form(action = "/person", method = "POST")
      div
         label(for = "name") Name:
         input(name = "name")
      br
      div
         label(for = "age") Age:
         input(name = "age")
      br
      div
         label(for = "nationality") Nationality:
         input(name = "nationality")
      br
      button(type = "submit") Create new person
Also add a new get route in index.js to render this document −
app.get('/person', function(req, res){
   res.render('person');
});
Go to "localhost:3000/person" to check if the form is displaying the correct output. Note that this is just the UI, it is not working yet. The following screenshot shows how the form is displayed −
We will now define a post route handler at '/person' which will handle this request
app.post('/person', function(req, res){
   var personInfo = req.body; //Get the parsed information

   if(!personInfo.name || !personInfo.age || !personInfo.nationality){
      res.render('show_message', {
         message: "Sorry, you provided worng info", type: "error"});
   } else {
      var newPerson = new Person({
         name: personInfo.name,
         age: personInfo.age,
         nationality: personInfo.nationality
      });

      newPerson.save(function(err, Person){
         if(err)
            res.render('show_message', {message: "Database error", type: "error"});
         else
            res.render('show_message', {
               message: "New person added", type: "success", person: personInfo});
      });
   }
});
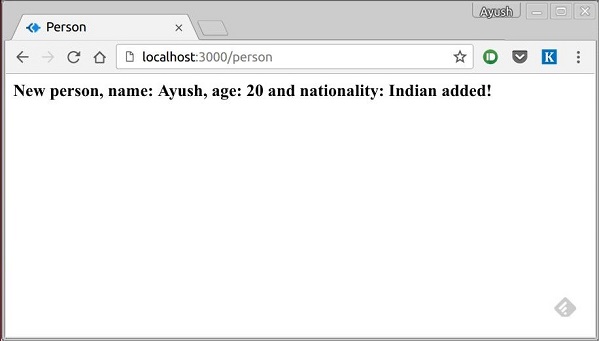
In the above code, if we receive any empty field or do not receive any field, we will send an error response. But if we receive a well-formed document, then we create a newPerson document from Person model and save it to our DB using the newPerson.save() function. This is defined in Mongoose and accepts a callback as argument. This callback has 2 arguments – error and response. These arguments will render the show_message view.
To show the response from this route, we will also need to create a show_message view. Create a new view with the following code −
html
   head
      title Person
   body
      if(type == "error")
         h3(style = "color:red") #{message}
      else
         h3 New person,
            name: #{person.name},
            age: #{person.age} and
            nationality: #{person.nationality} added!
We will receive the following response on successfully submitting the form(show_message.pug) −
We now have an interface to create persons.
Retrieving Documents
Mongoose provides a lot of functions for retrieving documents, we will focus on 3 of those. All these functions also take a callback as the last parameter, and just like the save function, their arguments are error and response. The three functions are as follows −
Model.find(conditions, callback)
This function finds all the documents matching the fields in conditions object. Same operators used in Mongo also work in mongoose. For example,
Person.find(function(err, response){
   console.log(response);
});
This will fetch all the documents from the person's collection.
Person.find({name: "Ayush", age: 20},
   function(err, response){
      console.log(response);
});
This will fetch all documents where field name is "Ayush" and age is 20.
We can also provide projection we need, i.e., the fields we need. For example, if we want only the names of people whose nationality is "Indian", we use −
Person.find({nationality: "Indian"}, "name", function(err, response){
   console.log(response);
});
Model.findOne(conditions, callback)
This function always fetches a single, most relevant document. It has the same exact arguments as Model.find().
Model.findById(id, callback)
This function takes in the _id(defined by mongo) as the first argument, an optional projection string and a callback to handle the response. For example,
Person.findById("507f1f77bcf86cd799439011", function(err, response){
   console.log(response);
});
Let us now create a route to view all people records −
var express = require('express');
var app = express();

var mongoose = require('mongoose');
mongoose.connect('mongodb://localhost/my_db');

var personSchema = mongoose.Schema({
   name: String,
   age: Number,
   nationality: String
});

var Person = mongoose.model("Person", personSchema);

app.get('/people', function(req, res){
   Person.find(function(err, response){
      res.json(response);
   });
});

app.listen(3000);
Updating Documents
Mongoose provides 3 functions to update documents. The functions are described below −
Model.update(condition, updates, callback)
This function takes a conditions and updates an object as input and applies the changes to all the documents matching the conditions in the collection. For example, following code will update the nationality "American" in all Person documents −
Person.update({age: 25}, {nationality: "American"}, function(err, response){
   console.log(response);
});
Model.findOneAndUpdate(condition, updates, callback)
It finds one document based on the query and updates that according to the second argument. It also takes a callback as last argument. Let us perform the following example to understand the function
Person.findOneAndUpdate({name: "Ayush"}, {age: 40}, function(err, response) {
   console.log(response);
});
Model.findByIdAndUpdate(id, updates, callback)
This function updates a single document identified by its id. For example,
Person.findByIdAndUpdate("507f1f77bcf86cd799439011", {name: "James"},
   function(err, response){
      console.log(response);
});
Let us now create a route to update people. This will be a PUT route with the id as a parameter and details in the payload.
var express = require('express');
var app = express();

var mongoose = require('mongoose');
mongoose.connect('mongodb://localhost/my_db');

var personSchema = mongoose.Schema({
   name: String,
   age: Number,
   nationality: String
});

var Person = mongoose.model("Person", personSchema);

app.put('/people/:id', function(req, res){
   Person.findByIdAndUpdate(req.params.id, req.body, function(err, response){
      if(err) res.json({message: "Error in updating person with id " + req.params.id});
      res.json(response);
   });
});

app.listen(3000);
To test this route, enter the following in your terminal (replace the id with an id from your created people) −
curl -X PUT --data "name = James&age = 20&nationality = American
"http://localhost:3000/people/507f1f77bcf86cd799439011
This will update the document associated with the id provided in the route with the above details.
Deleting Documents
We have covered Create, Read and Update, now we will see how Mongoose can be used to Delete documents. We have 3 functions here, exactly like update.
Model.remove(condition, [callback])
This function takes a condition object as input and removes all documents matching the conditions. For example, if we need to remove all people aged 20, use the following syntax −
Person.remove({age:20});
Model.findOneAndRemove(condition, [callback])
This functions removes a single, most relevant document according to conditions object. Let us execute the following code to understand the same.
Person.findOneAndRemove({name: "Ayush"});
Model.findByIdAndRemove(id, [callback])
This function removes a single document identified by its id. For example,
Person.findByIdAndRemove("507f1f77bcf86cd799439011");
Let us now create a route to delete people from our database.
var express = require('express');
var app = express();

var mongoose = require('mongoose');
mongoose.connect('mongodb://localhost/my_db');

var personSchema = mongoose.Schema({
   name: String,
   age: Number,
   nationality: String
});

var Person = mongoose.model("Person", personSchema);

app.delete('/people/:id', function(req, res){
   Person.findByIdAndRemove(req.params.id, function(err, response){
      if(err) res.json({message: "Error in deleting record id " + req.params.id});
      else res.json({message: "Person with id " + req.params.id + " removed."});
   });
});

app.listen(3000);
To check the output, use the following curl command −
curl -X DELETE http://localhost:3000/people/507f1f77bcf86cd799439011
This will remove the person with given id producing the following message −
{message: "Person with id 507f1f77bcf86cd799439011 removed."}
This wraps up how we can create simple CRUD applications using MongoDB, Mongoose and Express. To explore Mongoose further, read the API docs.
ExpressJS - Cookies
Cookies are simple, small files/data that are sent to client with a server request and stored on the client side. Every time the user loads the website back, this cookie is sent with the request. This helps us keep track of the user’s actions.
The following are the numerous uses of the HTTP Cookies −
- Session management
- Personalization(Recommendation systems)
- User tracking
To use cookies with Express, we need the cookie-parser middleware. To install it, use the following code −
npm install --save cookie-parser
Now to use cookies with Express, we will require the cookie-parser. cookie-parser is a middleware which parses cookies attached to the client request object. To use it, we will require it in our index.js file; this can be used the same way as we use other middleware. Here, we will use the following code.
var cookieParser = require('cookie-parser');
app.use(cookieParser());
cookie-parser parses Cookie header and populates req.cookies with an object keyed by the cookie names. To set a new cookie, let us define a new route in your Express app like −
var express = require('express');
var app = express();

app.get('/', function(req, res){
   res.cookie('name', 'express').send('cookie set'); //Sets name = express
});

app.listen(3000);
To check if your cookie is set or not, just go to your browser, fire up the console, and enter −
console.log(document.cookie);
You will get the output like (you may have more cookies set maybe due to extensions in your browser) −
"name = express"
The browser also sends back cookies every time it queries the server. To view cookies from your server, on the server console in a route, add the following code to that route.
console.log('Cookies: ', req.cookies);
Next time you send a request to this route, you will receive the following output.
Cookies: { name: 'express' }
Adding Cookies with Expiration Time
You can add cookies that expire. To add a cookie that expires, just pass an object with property 'expire' set to the time when you want it to expire. For example,
//Expires after 360000 ms from the time it is set.
res.cookie(name, 'value', {expire: 360000 + Date.now()});
Another way to set expiration time is using 'maxAge' property. Using this property, we can provide relative time instead of absolute time. Following is an example of this method.
//This cookie also expires after 360000 ms from the time it is set.
res.cookie(name, 'value', {maxAge: 360000});
Deleting Existing Cookies
To delete a cookie, use the clearCookie function. For example, if you need to clear a cookie named foo, use the following code.
var express = require('express');
var app = express();

app.get('/clear_cookie_foo', function(req, res){
   res.clearCookie('foo');
   res.send('cookie foo cleared');
});

app.listen(3000);
In the next chapter, we will see how to use cookies to manage sessions.
ExpressJS - Sessions
HTTP is stateless; in order to associate a request to any other request, you need a way to store user data between HTTP requests. Cookies and URL parameters are both suitable ways to transport data between the client and the server. But they are both readable and on the client side. Sessions solve exactly this problem. You assign the client an ID and it makes all further requests using that ID. Information associated with the client is stored on the server linked to this ID.
We will need the Express-session, so install it using the following code.
npm install --save express-session
We will put the session and cookie-parser middleware in place. In this example, we will use the default store for storing sessions, i.e., MemoryStore. Never use this in production environments. The session middleware handles all things for us, i.e., creating the session, setting the session cookie and creating the session object in req object.
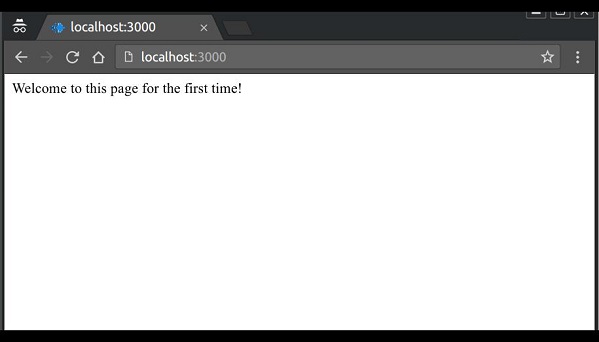
Whenever we make a request from the same client again, we will have their session information stored with us (given that the server was not restarted). We can add more properties to the session object. In the following example, we will create a view counter for a client.
var express = require('express');
var cookieParser = require('cookie-parser');
var session = require('express-session');

var app = express();

app.use(cookieParser());
app.use(session({secret: "Shh, its a secret!"}));

app.get('/', function(req, res){
   if(req.session.page_views){
      req.session.page_views++;
      res.send("You visited this page " + req.session.page_views + " times");
   } else {
      req.session.page_views = 1;
      res.send("Welcome to this page for the first time!");
   }
});
app.listen(3000);
What the above code does is, when a user visits the site, it creates a new session for the user and assigns them a cookie. Next time the user comes, the cookie is checked and the page_view session variable is updated accordingly.
Now if you run the app and go to localhost:3000, the following output will be displayed.
If you revisit the page, the page counter will increase. The page in the following screenshot was refreshed 42 times.

ExpressJS - Authentication
Authentication is a process in which the credentials provided are compared to those on file in a database of authorized users' information on a local operating system or within an authentication server. If the credentials match, the process is completed and the user is granted authorization for access.
For us to create an authentication system, we will need to create a sign up page and a user-password store. The following code creates an account for us and stores it in memory. This is just for the purpose of demo; it is recommended that a persistent storage (database or files) is always used to store user information.
var express = require('express');
var app = express();
var bodyParser = require('body-parser');
var multer = require('multer');
var upload = multer();
var session = require('express-session');
var cookieParser = require('cookie-parser');

app.set('view engine', 'pug');
app.set('views','./views');

app.use(bodyParser.json());
app.use(bodyParser.urlencoded({ extended: true }));
app.use(upload.array());
app.use(cookieParser());
app.use(session({secret: "Your secret key"}));

var Users = [];

app.get('/signup', function(req, res){
   res.render('signup');
});

app.post('/signup', function(req, res){
   if(!req.body.id || !req.body.password){
      res.status("400");
      res.send("Invalid details!");
   } else {
      Users.filter(function(user){
         if(user.id === req.body.id){
            res.render('signup', {
               message: "User Already Exists! Login or choose another user id"});
         }
      });
      var newUser = {id: req.body.id, password: req.body.password};
      Users.push(newUser);
      req.session.user = newUser;
      res.redirect('/protected_page');
   }
});

app.listen(3000);
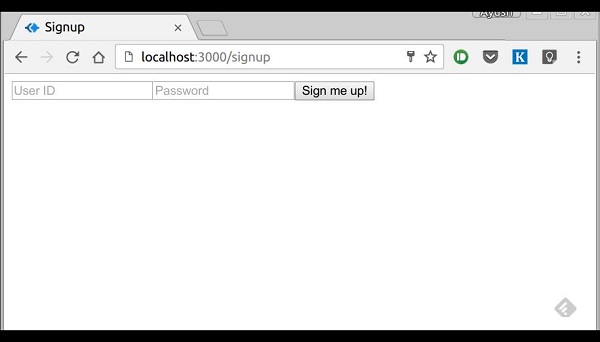
Now for the signup form, create a new view called signup.jade.
SIGNUP.JADE
html
   head
      title Signup
   body
      if(message)
         h4 #{message}
         form(action = "/signup" method = "POST")
         input(name = "id" type = "text" required placeholder = "User ID")
         input(name = "password" type = "password" required placeholder = "Password")
         button(type = "Submit") Sign me up!
Check if this page loads by visiting localhost:3000/signup.
We have set the required attribute for both fields, so HTML5 enabled browsers will not let us submit this form until we provide both id and password. If someone tries to register using a curl request without a User ID or Password, an error will be displayed. Create a new file called protected_page.pug in views with the following content −
html
head
title Protected page
body
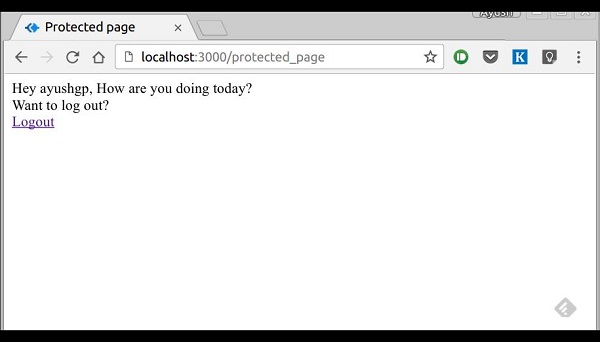
div Hey #{id}, How are you doing today?
div Want to log out?
div Logout
This page should only be visible if the user has just signed up or logged in. Let us now define its route and also routes to log in and log out −
var express = require('express');
var app = express();
var bodyParser = require('body-parser');
var multer = require('multer');
var upload = multer();
var session = require('express-session');
var cookieParser = require('cookie-parser');

app.set('view engine', 'pug');
app.set('views','./views');

app.use(bodyParser.json());
app.use(bodyParser.urlencoded({ extended: true }));
app.use(upload.array());
app.use(cookieParser());
app.use(session({secret: "Your secret key"}));

var Users = [];

app.get('/signup', function(req, res){
   res.render('signup');
});

app.post('/signup', function(req, res){
   if(!req.body.id || !req.body.password){
      res.status("400");
      res.send("Invalid details!");
   } else {
      Users.filter(function(user){
         if(user.id === req.body.id){
            res.render('signup', {
               message: "User Already Exists! Login or choose another user id"});
         }
      });
      var newUser = {id: req.body.id, password: req.body.password};
      Users.push(newUser);
      req.session.user = newUser;
      res.redirect('/protected_page');
   }
});
function checkSignIn(req, res){
   if(req.session.user){
      next();     //If session exists, proceed to page
   } else {
      var err = new Error("Not logged in!");
      console.log(req.session.user);
      next(err);  //Error, trying to access unauthorized page!
   }
}
app.get('/protected_page', checkSignIn, function(req, res){
   res.render('protected_page', {id: req.session.user.id})
});

app.get('/login', function(req, res){
   res.render('login');
});

app.post('/login', function(req, res){
   console.log(Users);
   if(!req.body.id || !req.body.password){
      res.render('login', {message: "Please enter both id and password"});
   } else {
      Users.filter(function(user){
         if(user.id === req.body.id && user.password === req.body.password){
            req.session.user = user;
            res.redirect('/protected_page');
         }
      });
      res.render('login', {message: "Invalid credentials!"});
   }
});

app.get('/logout', function(req, res){
   req.session.destroy(function(){
      console.log("user logged out.")
   });
   res.redirect('/login');
});

app.use('/protected_page', function(err, req, res, next){
console.log(err);
   //User should be authenticated! Redirect him to log in.
   res.redirect('/login');
});

app.listen(3000);
We have created a middleware function checkSignIn to check if the user is signed in. The protected_page uses this function. To log the user out, we destroy the session.
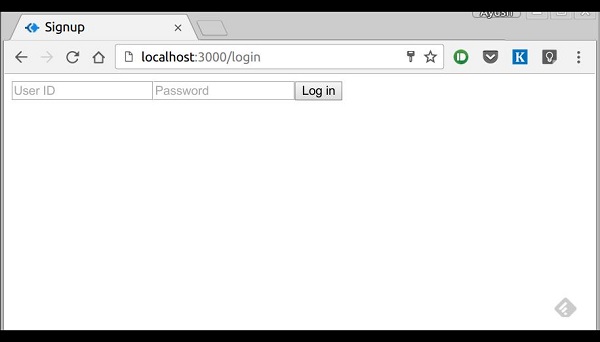
Let us now create the login page. Name the view as login.pug and enter the contents −
html
   head
      title Signup
   body
      if(message)
         h4 #{message}
         form(action = "/login" method = "POST")
         input(name = "id" type = "text" required placeholder = "User ID")
         input(name = "password" type = "password" required placeholder = "Password")
         button(type = "Submit") Log in
Our simple authentication application is now complete; let us now test the application. Run the app using nodemon index.js, and proceed to localhost:3000/signup.
Enter a Username and a password and click sign up. You will be redirected to the protected_page if details are valid/unique −
Now log out of the app. This will redirect us to the login page −
This route is protected such that if an unauthenticated person tries to visit it, he will be redirected to our login page. This was all about basic user authentication. It is always recommended that we use a persistent session system and use hashes for password transport. There are much better ways to authenticate users now, leveraging JSON tokens.
ExpressJS - RESTFul APIs
An API is always needed to create mobile applications, single page applications, use AJAX calls and provide data to clients. An popular architectural style of how to structure and name these APIs and the endpoints is called REST(Representational Transfer State). HTTP 1.1 was designed keeping REST principles in mind. REST was introduced by Roy Fielding in 2000 in his Paper Fielding Dissertations.
RESTful URIs and methods provide us with almost all information we need to process a request. The table given below summarizes how the various verbs should be used and how URIs should be named. We will be creating a movies API towards the end; let us now discuss how it will be structured.
| Method | URI | Details | Function |
|---|---|---|---|
| GET | /movies | Safe, cachable | Gets the list of all movies and their details |
| GET | /movies/1234 | Safe, cachable | Gets the details of Movie id 1234 |
| POST | /movies | N/A | Creates a new movie with the details provided. Response contains the URI for this newly created resource. |
| PUT | /movies/1234 | Idempotent | Modifies movie id 1234(creates one if it doesn't already exist). Response contains the URI for this newly created resource. |
| DELETE | /movies/1234 | Idempotent | Movie id 1234 should be deleted, if it exists. Response should contain the status of the request. |
| DELETE or PUT | /movies | Invalid | Should be invalid. DELETE and PUT should specify which resource they are working on. |
Let us now create this API in Express. We will be using JSON as our transport data format as it is easy to work with in JavaScript and has other benefits. Replace your index.js file with the movies.js file as in the following program.
index.js
var express = require('express');
var bodyParser = require('body-parser');
var multer = require('multer');
var upload = multer();

var app = express();

app.use(cookieParser());
app.use(bodyParser.json());
app.use(bodyParser.urlencoded({ extended: true }));
app.use(upload.array());

//Require the Router we defined in movies.js
var movies = require('./movies.js');

//Use the Router on the sub route /movies
app.use('/movies', movies);

app.listen(3000);
Now that we have our application set up, let us concentrate on creating the API.
Start by setting up the movies.js file. We are not using a database to store the movies but are storing them in memory; so every time the server restarts, the movies added by us will vanish. This can easily be mimicked using a database or a file (using node fs module).
Once you import Express then, create a Router and export it using module.exports −
var express = require('express');
var router = express.Router();
var movies = [
   {id: 101, name: "Fight Club", year: 1999, rating: 8.1},
   {id: 102, name: "Inception", year: 2010, rating: 8.7},
   {id: 103, name: "The Dark Knight", year: 2008, rating: 9},
   {id: 104, name: "12 Angry Men", year: 1957, rating: 8.9}
];

//Routes will go here
module.exports = router;
GET routes
Let us define the GET route for getting all the movies −
router.get('/', function(req, res){
   res.json(movies);
});
To test out if this is working fine, run your app, then open your terminal and enter −
curl -i -H "Accept: application/json" -H "Content-Type: application/json" -X GET
localhost:3000/movies
The following response will be displayed −
[{"id":101,"name":"Fight Club","year":1999,"rating":8.1},
{"id":102,"name":"Inception","year":2010,"rating":8.7},
{"id":103,"name":"The Dark Knight","year":2008,"rating":9},
{"id":104,"name":"12 Angry Men","year":1957,"rating":8.9}]
We have a route to get all the movies. Let us now create a route to get a specific movie by its id.
router.get('/:id([0-9]{3,})', function(req, res){
   var currMovie = movies.filter(function(movie){
      if(movie.id == req.params.id){
         return true;
      }
   });
   if(currMovie.length == 1){
      res.json(currMovie[0])
   } else {
      res.status(404);//Set status to 404 as movie was not found
      res.json({message: "Not Found"});
   }
});
This will get us the movies according to the id that we provided. To check the output, use the following command in your terminal −
curl -i -H "Accept: application/json" -H "Content-Type: application/json" -X GET
localhost:3000/movies/101
You'll get the following response −
{"id":101,"name":"Fight Club","year":1999,"rating":8.1}
If you visit an invalid route, it will produce a cannot GET error while if you visit a valid route with an id that doesn’t exist, it will produce a 404 error.
We are done with the GET routes, let us now move on to the POST route.
POST route
Use the following route to handle the POSTed data −
router.post('/', function(req, res){
   //Check if all fields are provided and are valid:
   if(!req.body.name ||
      !req.body.year.toString().match(/^[0-9]{4}$/g) ||
      !req.body.rating.toString().match(/^[0-9]\.[0-9]$/g)){

      res.status(400);
      res.json({message: "Bad Request"});
   } else {
      var newId = movies[movies.length-1].id+1;
      movies.push({
         id: newId,
         name: req.body.name,
         year: req.body.year,
         rating: req.body.rating
      });
      res.json({message: "New movie created.", location: "/movies/" + newId});
   }
});
This will create a new movie and store it in the movies variable. To check this route, enter the following code in your terminal −
curl -X POST --data "name = Toy%20story&year = 1995&rating = 8.5" http://localhost:3000/movies
The following response will be displayed −
{"message":"New movie created.","location":"/movies/105"}
To test if this was added to the movies object, Run the get request for /movies/105 again. The following response will be displayed −
{"id":105,"name":"Toy story","year":"1995","rating":"8.5"}
Let us move on to create the PUT and DELETE routes.
PUT route
The PUT route is almost the same as the POST route. We will be specifying the id for the object that'll be updated/created. Create the route in the following way.
router.put('/:id', function(req, res){
   //Check if all fields are provided and are valid:
   if(!req.body.name ||
      !req.body.year.toString().match(/^[0-9]{4}$/g) ||
      !req.body.rating.toString().match(/^[0-9]\.[0-9]$/g) ||
      !req.params.id.toString().match(/^[0-9]{3,}$/g)){

      res.status(400);
      res.json({message: "Bad Request"});
   } else {
      //Gets us the index of movie with given id.
      var updateIndex = movies.map(function(movie){
         return movie.id;
      }).indexOf(parseInt(req.params.id));

      if(updateIndex === -1){
         //Movie not found, create new
         movies.push({
            id: req.params.id,
            name: req.body.name,
            year: req.body.year,
            rating: req.body.rating
         });
         res.json({message: "New movie created.", location: "/movies/" + req.params.id});
      } else {
         //Update existing movie
         movies[updateIndex] = {
            id: req.params.id,
            name: req.body.name,
            year: req.body.year,
            rating: req.body.rating
         };
         res.json({message: "Movie id " + req.params.id + " updated.",
            location: "/movies/" + req.params.id});
      }
   }
});
This route will perform the function specified in the above table. It will update the object with new details if it exists. If it doesn't exist, it will create a new object. To check the route, use the following curl command. This will update an existing movie. To create a new Movie, just change the id to a non-existing id.
curl -X PUT --data "name = Toy%20story&year = 1995&rating = 8.5"
http://localhost:3000/movies/101
Response
{"message":"Movie id 101 updated.","location":"/movies/101"}
DELETE route
Use the following code to create a delete route. −
router.delete('/:id', function(req, res){
   var removeIndex = movies.map(function(movie){
      return movie.id;
   }).indexOf(req.params.id); //Gets us the index of movie with given id.

   if(removeIndex === -1){
      res.json({message: "Not found"});
   } else {
      movies.splice(removeIndex, 1);
      res.send({message: "Movie id " + req.params.id + " removed."});
   }
});
Check the route in the same way as we checked the other routes. On successful deletion(for example id 105), you will get the following output −
{message: "Movie id 105 removed."}
Finally, our movies.js file will look like the following.
var express = require('express');
var router = express.Router();
var movies = [
   {id: 101, name: "Fight Club", year: 1999, rating: 8.1},
   {id: 102, name: "Inception", year: 2010, rating: 8.7},
   {id: 103, name: "The Dark Knight", year: 2008, rating: 9},
   {id: 104, name: "12 Angry Men", year: 1957, rating: 8.9}
];
router.get('/:id([0-9]{3,})', function(req, res){
   var currMovie = movies.filter(function(movie){
      if(movie.id == req.params.id){
         return true;
      }
   });

   if(currMovie.length == 1){
      res.json(currMovie[0])
   } else {
      res.status(404);  //Set status to 404 as movie was not found
      res.json({message: "Not Found"});
   }
});
router.post('/', function(req, res){
   //Check if all fields are provided and are valid:
   if(!req.body.name ||
      !req.body.year.toString().match(/^[0-9]{4}$/g) ||
      !req.body.rating.toString().match(/^[0-9]\.[0-9]$/g)){
      res.status(400);
      res.json({message: "Bad Request"});
   } else {
      var newId = movies[movies.length-1].id+1;
      movies.push({
         id: newId,
         name: req.body.name,
         year: req.body.year,
         rating: req.body.rating
      });
      res.json({message: "New movie created.", location: "/movies/" + newId});
   }
});

router.put('/:id', function(req, res) {
   //Check if all fields are provided and are valid:
   if(!req.body.name ||
      !req.body.year.toString().match(/^[0-9]{4}$/g) ||
      !req.body.rating.toString().match(/^[0-9]\.[0-9]$/g) ||
      !req.params.id.toString().match(/^[0-9]{3,}$/g)){
      res.status(400);
      res.json({message: "Bad Request"});
   } else {
      //Gets us the index of movie with given id.
      var updateIndex = movies.map(function(movie){
         return movie.id;
      }).indexOf(parseInt(req.params.id));

      if(updateIndex === -1){
         //Movie not found, create new
         movies.push({
            id: req.params.id,
            name: req.body.name,
            year: req.body.year,
            rating: req.body.rating
         });
         res.json({
            message: "New movie created.", location: "/movies/" + req.params.id});
      } else {
         //Update existing movie
         movies[updateIndex] = {
            id: req.params.id,
            name: req.body.name,
            year: req.body.year,
            rating: req.body.rating
         };
         res.json({message: "Movie id " + req.params.id + " updated.",
            location: "/movies/" + req.params.id});
      }
   }
});

router.delete('/:id', function(req, res){
   var removeIndex = movies.map(function(movie){
      return movie.id;
   }).indexOf(req.params.id); //Gets us the index of movie with given id.

   if(removeIndex === -1){
      res.json({message: "Not found"});
   } else {
      movies.splice(removeIndex, 1);
      res.send({message: "Movie id " + req.params.id + " removed."});
   }
});
module.exports = router;
This completes our REST API. Now you can create much more complex applications using this simple architectural style and Express.
ExpressJS - Scaffolding
Scaffolding allows us to easily create a skeleton for a web application. We manually create our public directory, add middleware, create separate route files, etc. A scaffolding tool sets up all these things for us so that we can directly get started with building our application.
The scaffolder we will use is called Yeoman. It is a scaffolding tool built for Node.js but also has generators for several other frameworks (like flask, rails, django, etc.). To install Yeoman, enter the following command in your terminal −
npm install -g yeoman
Yeoman uses generators to scaffold out applications. To check out the generators available on npm to use with Yeoman, you can click on this link. In this tutorial, we will use the 'generator-Express-simple'. To install this generator, enter the following command in your terminal −
npm install -g generator-express-simple
To use this generator, enter the following command −
yo express-simple test-app
You will be asked a few simple questions like what things you want to use with your app. Select the following answers, or if you already know about these technologies then go about choosing how you want them to be.
express-simple comes with bootstrap and jquery
[?] Select the express version you want: 4.x
[?] Do you want an mvc express app: Yes
[?] Select the css preprocessor you would like to use: sass
[?] Select view engine you would like to use: jade
[?] Select the build tool you want to use for this project: gulp
[?] Select the build tool you want to use for this project: gulp
[?] Select the language you want to use for the build tool: javascript
   create public/sass/styles.scss
   create public/js/main.js
   create views/layout.jade
   create views/index.jade
   create views/404.jade
   create app.js
   create config.js
   create routes/index.js
   create package.json
   create bower.json
identical .bowerrc
identical .editorconfig
identical .gitignore
identical .jshintrc
   create gulpfile.js

I'm all done. Running bower install & npm install for you to install the
required dependencies. If this fails, try running the command yourself.
It will then create a new application for you, install all the dependencies, add few pages to your application(home page, 404 not found page, etc.) and give you a directory structure to work on.
This generator creates a very simple structure for us. Explore the many generators available for Express and choose the one that fits you right. Steps to working with all generators is the same. You will need to install a generator, run it using Yeoman; it will ask you some questions and then create a skeleton for your application based on your answers.
ExpressJS - Error Handling
Error handling in Express is done using middleware. But this middleware has special properties. The error handling middleware are defined in the same way as other middleware functions, except that error-handling functions MUST have four arguments instead of three – err, req, res, next. For example, to send a response on any error, we can use −
app.use(function(err, req, res, next) {
   console.error(err.stack);
   res.status(500).send('Something broke!');
});
Till now we were handling errors in the routes itself. The error handling middleware allows us to separate our error logic and send responses accordingly. The next() method we discussed in middleware takes us to next middleware/route handler.
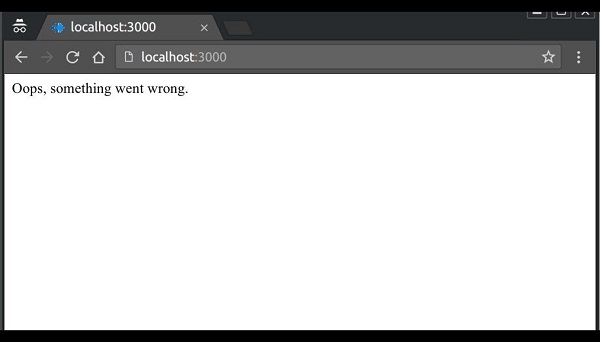
For error handling, we have the next(err) function. A call to this function skips all middleware and matches us to the next error handler for that route. Let us understand this through an example.
var express = require('express');
var app = express();

app.get('/', function(req, res){
   //Create an error and pass it to the next function
   var err = new Error("Something went wrong");
   next(err);
});

/*
 * other route handlers and middleware here
 * ....
 */

//An error handling middleware
app.use(function(err, req, res, next) {
   res.status(500);
   res.send("Oops, something went wrong.")
});

app.listen(3000);
This error handling middleware can be strategically placed after routes or contain conditions to detect error types and respond to the clients accordingly. The above program will display the following output.
ExpressJS - Debugging
Express uses the Debug module to internally log information about route matching, middleware functions, application mode, etc.
To see all internal logs used in Express, set the DEBUG environment variable to Express:* when starting the app −
DEBUG = express:* node index.js
The following output will be displayed.
These logs are very helpful when a component of your app is not functioning right. This verbose output might be a little overwhelming. You can also restrict the DEBUG variable to specific area to be logged. For example, if you wish to restrict the logger to application and router, you can use the following code.
DEBUG = express:application,express:router node index.js
Debug is turned off by default and is automatically turned on in production environment. Debug can also be extended to meet your needs, you can read more about it at its npm page.
ExpressJS - Best Practices
Unlike Django and Rails which have a defined way of doing things, file structure, etc., Express does not follow a defined way. This means you can structure the application the way you like. But as your application grows in size, it is very difficult to maintain it if it doesn't have a well-defined structure. In this chapter, we will look at the generally used directory structures and separation of concerns to build our applications.
First, we will discuss the best practices for creating node and Express applications.
Always begin a node project using npm init.
Always install dependencies with a --save or --save-dev. This will ensure that if you move to a different platform, you can just run npm install to install all dependencies.
Stick with lowercase file names and camelCase variables. If you look at any npm module, its named in lowercase and separated with dashes. Whenever you require these modules, use camelCase.
Don’t push node_modules to your repositories. Instead npm installs everything on development machines.
Use a config file to store variables
Group and isolate routes to their own file. For example, take the CRUD operations in the movies example we saw in the REST API page.
Directory Structure
Let us now discuss the Express’ Directory Structure.
Websites
Express does not have a community defined structure for creating applications. The following is a majorly used project structure for a website.
test-project/
   node_modules/
   config/
      db.js                //Database connection and configuration
      credentials.js       //Passwords/API keys for external services used by your app
      config.js            //Other environment variables
   models/                 //For mongoose schemas
      users.js
      things.js
   routes/                 //All routes for different entities in different files
      users.js
      things.js
   views/
      index.pug
      404.pug
        ...
   public/                 //All static content being served
      images/
      css/
      javascript/
   app.js
   routes.js               //Require all routes in this and then require this file in
   app.js
   package.json
There are other approaches to build websites with Express as well. You can build a website using the MVC design pattern. For more information, you can visit the following links.
https://code.tutsplus.com/tutorials/build-a-complete-mvc-website-with-expressjs--net-34168
and,
https://www.terlici.com/2014/08/25/best-practices-express-structure.html.
RESTful APIs
APIs are simpler to design; they don't need a public or a views directory. Use the following structure to build APIs −
test-project/
   node_modules/
   config/
      db.js                //Database connection and configuration
      credentials.js       //Passwords/API keys for external services used by your app
   models/                 //For mongoose schemas
      users.js
      things.js
   routes/                 //All routes for different entities in different files
      users.js
      things.js
   app.js
   routes.js               //Require all routes in this and then require this file in
   app.js
   package.json
You can also use a yeoman generator to get a similar structure.
ExpressJS - Resources
This chapter lists down the various resources we used for this tutorial.
The most important link is of course the Express API docs − https://expressjs.com/en/4x/api.html
The guides provided on the Express website on different aspects are also quite helpful −
A list of mostly used middleware with Express is available at https://expressjs.com/en/resources/middleware.html
These blogs with Express tips and tricks may prove helpful −
Application structure − https://www.terlici.com/2014/08/25/best-practices-express-structure.html
RESTful APIs −
https://www.thepolyglotdeveloper.com/2015/10/create-a-simple-restful-api-with-node-js/
https://scotch.io/tutorials/build-a-restful-api-using-node-and-express-4
https://pixelhandler.com/posts/develop-a-restful-api-using-nodejs-with-express-and-mongoose
http://cwbuecheler.com/web/tutorials/2014/restful-web-app-node-express-mongodb/
For advanced authentication, use PassportJS − http://passportjs.org