- ASP.NET WP Tutorial
- ASP.NET WP - Home
- ASP.NET WP - Overview
- ASP.NET WP - Environment Setup
- ASP.NET WP - Getting Started
- ASP.NET WP - View Engines
- Project Folder Structure
- ASP.NET WP - Global Pages
- ASP.NET WP - Programming Concepts
- ASP.NET WP - Layouts
- ASP.NET WP - Working with Forms
- ASP.NET WP - Page Object Model
- ASP.NET WP - Database
- ASP.NET WP - Add Data to Database
- ASP.NET WP - Edit Database Data
- ASP.NET WP - Delete Database Data
- ASP.NET WP - WebGrid
- ASP.NET WP - Charts
- ASP.NET WP - Working with Files
- ASP.NET WP - Working with Images
- ASP.NET WP - Working with Videos
- ASP.NET WP - Add Email
- ASP.NET WP - Add Search
- Add Social Networking to the Website
- ASP.NET WP - Caching
- ASP.NET WP - Security
- ASP.NET WP - Publish
- ASP.NET WP Useful Resources
- ASP.NET WP - Quick Guide
- ASP.NET WP - Useful Resources
- ASP.NET WP - Discussion
ASP.NET WP - Edit Database Data
In this chapter, we will be covering how to create a web page in which the user can edit the existing data of the database.
In this procedure, we will create two pages that are similar to the ones we have created for data insertion earlier.
The first page displays the customer list and lets the users select which one they want to be changed.
The second page lets the users actually make the edits and save them.
How to Edit the Existing Data of the Database?
Let’s create a new CSHTML file in the project.
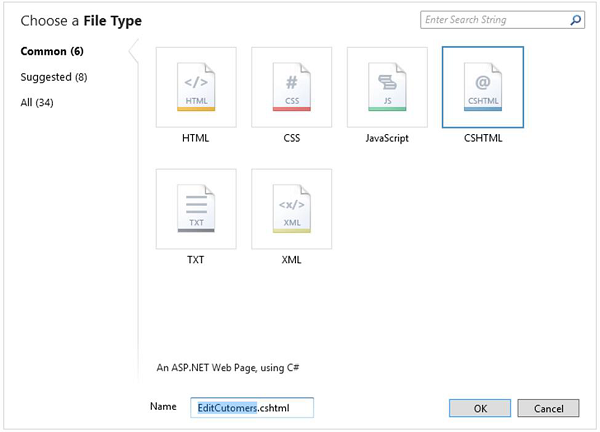
Enter EditCustomers.cshtml in the Name field and click OK.
Now replace the EditCustomers.cshtml file with the following code.
@{
   var db = Database.Open("WebPagesCustomers");
   var selectQueryString = "SELECT * FROM Customers ORDER BY FirstName";
}

<!DOCTYPE html>
<html>
   <head>
      <title>Customers List</title>
      <style>
         table, th, td {
            border: solid 1px #bbbbbb;
            border-collapse: collapse;
            padding: 2px;
         }
      </style>

   </head>
   <body>
      <h1>Customers List</h1>
      <table>
         <thead>
            <tr>
               <th> </th>
               <th>First Name</th>
               <th>Last Name</th>
               <th>Address</th>
            </tr>
         </thead>

         <tbody>
            @foreach(var row in db.Query(selectQueryString)){
               <tr>
                  <td><a href = "@Href("~/UpdateCustomers", row.Id)">Edit</a></td>
                  <td>@row.FirstName</td>
                  <td>@row.LastName</td>
                  <td>@row.Address</td>
               </tr>
            }
         </tbody>
      </table>

   </body>
</html>
The only difference between EditCustomers.cshtml page and the ListCustomers.cshtml page is that it includes an extra column that displays an Edit link.
When you click on that edit link, then it will take you to UpdateCustomer.cshtml page which is not created yet. So we need to create UpdateCustomer.cshtml file and replace it with the following code.
@{
   Validation.RequireField("FirstName", "First Name is required.");
   Validation.RequireField("LastName", "Last Name is required.");
   Validation.RequireField("Address", "Address is required.");

   var FirstName = "";
   var LastName = "";
   var Address = "";
   var CustomerId = UrlData[0];

   if (CustomerId.IsEmpty()) {
      Response.Redirect("~/EditCustomers");
   }
   var db = Database.Open("WebPagesCustomers");

   if (IsPost && Validation.IsValid()) {
      var updateQueryString = "UPDATE Customers SET FirstName = @0, LastName = @1,
         Address = @2 WHERE Id = @3" ;
      FirstName = Request["FirstName"];
      LastName = Request["LastName"];
      Address = Request["Address"];
      db.Execute(updateQueryString, FirstName, LastName, Address, CustomerId);

      // Display the page that lists products.
      Response.Redirect(@Href("~/EditCustomers"));
   } else {
      var selectQueryString = "SELECT * FROM Customers WHERE ID = @0";
      var row = db.QuerySingle(selectQueryString, CustomerId);
      FirstName = row.FirstName;
      LastName = row.LastName;
      Address = row.Address;
   }
}

<!DOCTYPE html>
<html>
   <head>
      <title>Update Customer</title>
      <style type = "text/css">
         label {
            float:left;
            width: 8em;
            text-align: right;
            margin-right: 0.5em;
         }
         fieldset {
            padding: 1em;
            border: 1px solid;
            width: 50em;
         }
         legend {
            padding: 2px 4px;
            border: 1px solid;
            font-weight:bold;
         }
         .validation-summary-errors {
            font-weight:bold;
            color:red;
            font-size: 11pt;
         }
      </style>

   </head>
   <body>
      <h1>Update Customer</h1>
      @Html.ValidationSummary("Errors with your submission:")

      <form method = "post" action = "">
         <fieldset>
            <legend>Update Customer</legend>
            <div>
               <label>First Name:</label>
               <input name = "FirstName" type = "text" size = "50" value = "@FirstName"/>
            </div>

            <div>
               <label>Last Name:</label>
               <input name = "LastName" type = "text" size = "50" value = "@LastName" />
            </div>

            <div>
               <label>Address:</label>
               <input name = "Address" type = "text" size = "50" value = "@Address" />
            </div>

            <div>
               <label> </label>
               <input type = "submit" value = "Save" class = "submit" />
            </div>

         </fieldset>
      </form>

   </body>
</html>
Now let’s run the application and specify the following url − http://localhost:36905/EditCustomers and you will see the following web page.
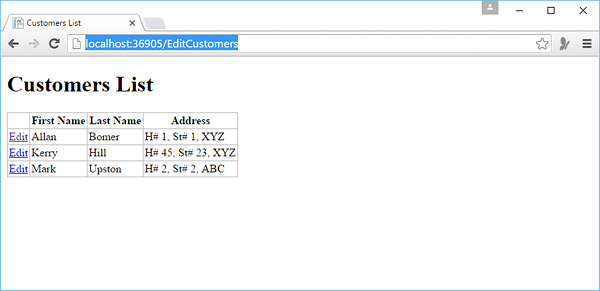
As you can see, it is the same web page as ListCustomer, but it has the Edit Link extra for each record. Now let’s click on the Edit link of any customer, let’s say the first one and you will see the following page.
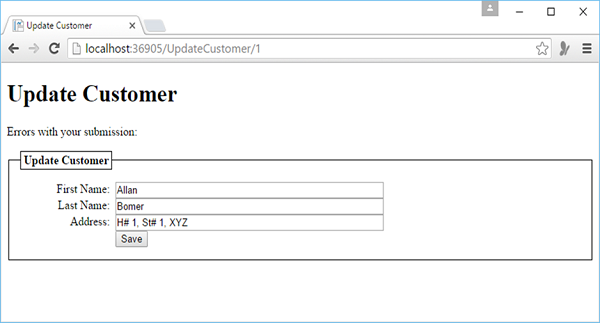
Let’s change the first name from Allan to Steve and click Save.
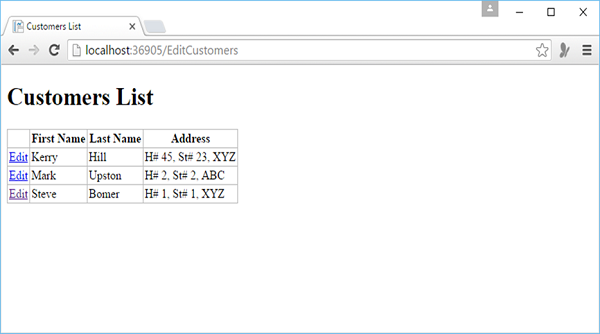
You will see the following page with the updated first name which is now at the end because we have sorted the list according to the First Name.