
- Angular 8 Tutorial
- Angular 8 - Home
- Angular 8 - Introduction
- Angular 8 - Installation
- Creating First Application
- Angular 8 - Architecture
- Angular Components and Templates
- Angular 8 - Data Binding
- Angular 8 - Directives
- Angular 8 - Pipes
- Angular 8 - Reactive Programming
- Services and Dependency Injection
- Angular 8 - Http Client Programming
- Angular 8 - Angular Material
- Routing and Navigation
- Angular 8 - Animations
- Angular 8 - Forms
- Angular 8 - Form Validation
- Authentication and Authorization
- Angular 8 - Web Workers
- Service Workers and PWA
- Angular 8 - Server Side Rendering
- Angular 8 - Internationalization (i18n)
- Angular 8 - Accessibility
- Angular 8 - CLI Commands
- Angular 8 - Testing
- Angular 8 - Ivy Compiler
- Angular 8 - Building with Bazel
- Angular 8 - Backward Compatibility
- Angular 8 - Working Example
- Angular 9 - What’s New?
- Angular 8 Useful Resources
- Angular 8 - Quick Guide
- Angular 8 - Useful Resources
- Angular 8 - Discussion
Angular 8 - Working Example
Here, we will study about the complete step by step working example with regards to Angular 8.
Let us create an Angular application to check our day to day expenses. Let us give ExpenseManager as our choice for our new application.
Create an application
Use below command to create the new application.
cd /path/to/workspace
ng new expense-manager
Here,
new is one of the command of the ng CLI application. It will be used to create new application. It will ask some basic question in order to create new application. It is enough to let the application choose the default choices. Regarding routing question as mentioned below, specify No.
Would you like to add Angular routing? No
Once the basic questions are answered, the ng CLI application create a new Angular application under expense-manager folder.
Let us move into the our newly created application folder.
cd expense-manager
Let us start the application using below comman.
ng serve
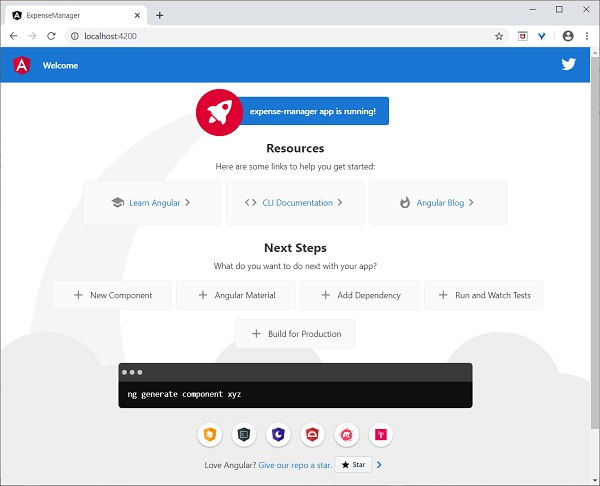
Let us fire up a browser and opens http://localhost:4200. The browser will show the application as shown below −
Let us change the title of the application to better reflect our application. Open src/app/app.component.ts and change the code as specified below −
export class AppComponent {
   title = 'Expense Manager';
}
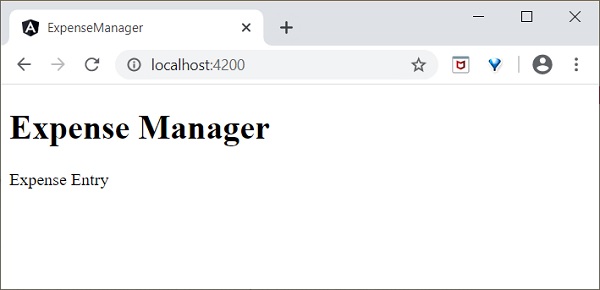
Our final application will be rendered in the browser as shown below −

Add a component
Create a new component using ng generate component command as specified below −
ng generate component expense-entry
Output
The output is as follows −
CREATE src/app/expense-entry/expense-entry.component.html (28 bytes)
CREATE src/app/expense-entry/expense-entry.component.spec.ts (671 bytes)
CREATE src/app/expense-entry/expense-entry.component.ts (296 bytes)
CREATE src/app/expense-entry/expense-entry.component.css (0 bytes)
UPDATE src/app/app.module.ts (431 bytes)
Here,
- ExpenseEntryComponent is created under src/app/expense-entry folder.
- Component class, Template and stylesheet are created.
- AppModule is updated with new component.
Add title property to ExpenseEntryComponent (src/app/expense-entry/expense-entry.component.ts) component.
import { Component, OnInit } from '@angular/core';

@Component({
   selector: 'app-expense-entry',
   templateUrl: './expense-entry.component.html',
   styleUrls: ['./expense-entry.component.css']
})
export class ExpenseEntryComponent implements OnInit {
   title: string;
   constructor() { }

   ngOnInit() {
      this.title = "Expense Entry"
   }
}
Update template, src/app/expense-entry/expense-entry.component.html with below content.
<p>{{ title }}</p>
Open
src/app/app.component.html
and include newly created component.
<h1>{{ title }}</h1>
<app-expense-entry></app-expense-entry>
Here,
app-expense-entry is the selector value and it can be used as regular HTML Tag.
The output of the application is as shown below −
Include bootstrap
Let us include bootstrap into our ExpenseManager application using styles option and change the default template to use bootstrap components.
Open command prompt and go to ExpenseManager application.
cd /go/to/expense-manager
Install bootstrap and JQuery library using below commands
npm install --save bootstrap@4.5.0 jquery@3.5.1
Here,
We have installed JQuery, because, bootstrap uses jquery extensively for advanced components.
Option angular.json and set bootstrap and jquery library path.
{
   "projects": {
      "expense-manager": {
         "architect": {
            "build": {
               "builder":"@angular-devkit/build-angular:browser", "options": {
                  "outputPath": "dist/expense-manager",
                  "index": "src/index.html",
                  "main": "src/main.ts",
                  "polyfills": "src/polyfills.ts",
                  "tsConfig": "tsconfig.app.json",
                  "aot": false,
                  "assets": [
                     "src/favicon.ico",
                     "src/assets"
                  ],
                  "styles": [
                     "./node_modules/bootstrap/dist/css/bootstrap.css", "src/styles.css"
                  ],
                  "scripts": [
                     "./node_modules/jquery/dist/jquery.js", "./node_modules/bootstrap/dist/js/bootstrap.js"
                  ]
               },
            },
         }
   }},
   "defaultProject": "expense-manager"
}
Here,
scripts option is used to include JavaScript library. JavaScript registered through scripts will be available to all Angular components in the application.
Open app.component.html and change the content as specified below
<!-- Navigation -->
<nav class="navbar navbar-expand-lg navbar-dark bg-dark static-top">
   <div class="container">
      <a class="navbar-brand" href="#">{{ title }}</a> <button class="navbar-toggler" type="button" data-toggle="collapse" data-target="#navbarResponsive" aria-controls="navbarResponsive" aria-expanded="false" aria-label="Toggle navigation">
         <span class="navbar-toggler-icon">
         </span>
      </button>
      <div class="collapse navbar-collapse" id="navbarResponsive">
         <ul class="navbar-nav ml-auto">
            <li class="nav-item active">
            <a class="nav-link" href="#">Home
               <span class="sr-only">(current)
               </span>
            </a>
            </li>
            <li class="nav-item">
            <a class="nav-link" href="#">Report</a>
            </li>
            <li class="nav-item">
            <a class="nav-link" href="#">Add Expense</a>
            </li>
            <li class="nav-item">
            <a class="nav-link" href="#">About</a>
            </li>
         </ul>
      </div>
   </div>
</nav>
<app-expense-entry></app-expense-entry>
Here,
Used bootstrap navigation and containers.
Open src/app/expense-entry/expense-entry.component.html and place below content.
<!-- Page Content -->
<div class="container">
   <div class="row">
      <div class="col-lg-12 text-center" style="padding-top: 20px;">
         <div class="container" style="padding-left: 0px; padding-right: 0px;">
            <div class="row">
            <div class="col-sm" style="text-align: left;"> {{ title }}
            </div>
            <div class="col-sm" style="text-align: right;">
               <button type="button" class="btn btn-primary">Edit</button>
            </div>
            </div>
         </div>
         <div class="container box" style="margin-top: 10px;">
         <div class="row">
         <div class="col-2" style="text-align: right;">
            <strong><em>Item:</em></strong>
         </div>
         <div class="col" style="text-align: left;">
            Pizza
         </div>
         </div>
         <div class="row">
         <div class="col-2" style="text-align: right;">
            <strong><em>Amount:</em></strong>
         </div>
         <div class="col" style="text-align: left;">
            20
         </div>
         </div>
         <div class="row">
         <div class="col-2" style="text-align: right;">
            <strong><em>Category:</em></strong>
         </div>
         <div class="col" style="text-align: left;">
            Food
         </div>
         </div>
         <div class="row">
         <div class="col-2" style="text-align: right;">
            <strong><em>Location:</em></strong>
         </div>
         <div class="col" style="text-align: left;">
            Zomato
         </div>
         </div>
         <div class="row">
         <div class="col-2" style="text-align: right;">
            <strong><em>Spend On:</em></strong>
         </div>
         <div class="col" style="text-align: left;">
            June 20, 2020
         </div>
         </div>
      </div>
   </div>
</div>
</div>
Restart the application.
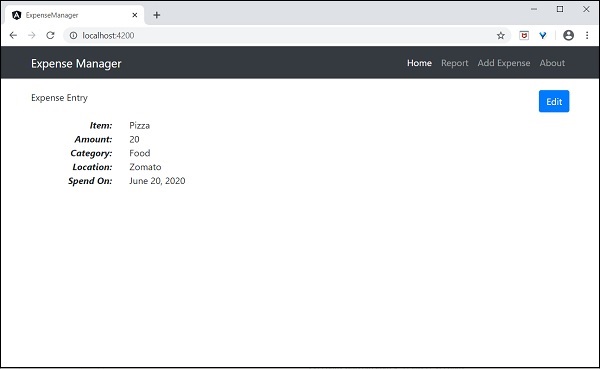
The output of the application is as follows −
We will improve the application to handle dynamic expense entry in next chapter.
Add an interface
Create ExpenseEntry interface (src/app/expense-entry.ts) and add id, amount, category, Location, spendOn and createdOn.
export interface ExpenseEntry {
   id: number;
   item: string;
   amount: number;
   category: string;
   location: string;
   spendOn: Date;
   createdOn: Date;
}
Import ExpenseEntry into ExpenseEntryComponent.
import { ExpenseEntry } from '../expense-entry';
Create a ExpenseEntry object, expenseEntry as shown below −
export class ExpenseEntryComponent implements OnInit {
   title: string;
   expenseEntry: ExpenseEntry;
   constructor() { }

   ngOnInit() {
      this.title = "Expense Entry";

      this.expenseEntry = {

         id: 1,
         item: "Pizza",
         amount: 21,
         category: "Food",
         location: "Zomato",
         spendOn: new Date(2020, 6, 1, 10, 10, 10),
         createdOn: new Date(2020, 6, 1, 10, 10, 10),
      };
   }
}
Update the component template using expenseEntry object, src/app/expense-entry/expense-entry.component.html as specified below −
<!-- Page Content -->
<div class="container">
   <div class="row">
      <div class="col-lg-12 text-center" style="padding-top: 20px;">
         <div class="container" style="padding-left: 0px; padding-right: 0px;">
            <div class="row">
               <div class="col-sm" style="text-align: left;">
                  {{ title }}
               </div>
               <div class="col-sm" style="text-align: right;">
                  <button type="button" class="btn btn-primary">Edit</button>
               </div>
            </div>
         </div>
         <div class="container box" style="margin-top: 10px;">
            <div class="row">
               <div class="col-2" style="text-align: right;">
                  <strong><em>Item:</em></strong>
               </div>
               <div class="col" style="text-align: left;">
                  {{ expenseEntry.item }}
               </div>
            </div>
            <div class="row">
               <div class="col-2" style="text-align: right;">
                  <strong><em>Amount:</em></strong>
               </div>
               <div class="col" style="text-align: left;">
                  {{ expenseEntry.amount }}
               </div>
            </div>
            <div class="row">
               <div class="col-2" style="text-align: right;">
                  <strong><em>Category:</em></strong>
               </div>
               <div class="col" style="text-align: left;">

                  {{ expenseEntry.category }}
               </div>
            </div>
            <div class="row">
               <div class="col-2" style="text-align: right;">
                  <strong><em>Location:</em></strong>
               </div>
               <div class="col" style="text-align: left;">
                  {{ expenseEntry.location }}
               </div>
            </div>
            <div class="row">
               <div class="col-2" style="text-align: right;">
                  <strong><em>Spend On:</em></strong>
               </div>
               <div class="col" style="text-align: left;">
                  {{ expenseEntry.spendOn }}
               </div>
            </div>
         </div>
      </div>
   </div>
</div>
The output of the application is as follows −

Using directives
Let us add a new component in our ExpenseManager application to list the expense entries.
Open command prompt and go to project root folder.
cd /go/to/expense-manager
Start the application.
ng serve
Create a new component, ExpenseEntryListComponent using below command −
ng generate component ExpenseEntryList
Output
The output is as follows −
CREATE src/app/expense-entry-list/expense-entry-list.component.html (33 bytes)
CREATE src/app/expense-entry-list/expense-entry-list.component.spec.ts (700 bytes)
CREATE src/app/expense-entry-list/expense-entry-list.component.ts (315 bytes)
CREATE src/app/expense-entry-list/expense-entry-list.component.css (0 bytes)
UPDATE src/app/app.module.ts (548 bytes)
Here, the command creates the ExpenseEntryList Component and update the necessary code in AppModule.
Import ExpenseEntry into ExpenseEntryListComponent component (src/app/expense-entry-list/expense-entry-list.component)
import { ExpenseEntry } from '../expense-entry';
Add a method, getExpenseEntries() to return list of expense entry (mock items) in ExpenseEntryListComponent (src/app/expense-entry-list/expense-entry-list.component)
getExpenseEntries() : ExpenseEntry[] {
let mockExpenseEntries : ExpenseEntry[] = [
{ id: 1,
item: "Pizza",
amount: Math.floor((Math.random() * 10) + 1),
category: "Food",
location: "Mcdonald",
spendOn: new Date(2020, 4, Math.floor((Math.random() * 30) + 1), 10, 10, 10),
createdOn: new Date(2020, 4, Math.floor((Math.random() * 30) + 1), 10, 10, 10) },
{ id: 1,
item: "Pizza",
amount: Math.floor((Math.random() * 10) + 1),
category: "Food",
location: "KFC",
spendOn: new Date(2020, 4, Math.floor((Math.random() * 30) + 1), 10, 10, 10),
createdOn: new Date(2020, 4, Math.floor((Math.random() * 30) + 1), 10, 10, 10) },
{ id: 1,
item: "Pizza",
amount: Math.floor((Math.random() * 10) + 1),
category: "Food",
location: "KFC",
spendOn: new Date(2020, 4, Math.floor((Math.random() * 30) + 1), 10, 10, 10),
createdOn: new Date(2020, 4, Math.floor((Math.random() * 30) + 1), 10, 10, 10)
},
];
return mockExpenseEntries;
}
Declare a local variable, expenseEntries and load the mock list of expense entries as mentioned below −
title: string;
expenseEntries: ExpenseEntry[];
constructor() { }
ngOnInit() {
   this.title = "Expense Entry List";
   this.expenseEntries = this.getExpenseEntries();
}
Open the template file (src/app/expense-entry-list/expense-entry-list.component.html) and show the mock entries in a table.
<!-- Page Content -->
<div class="container">
   <div class="row">
      <div class="col-lg-12 text-center" style="padding-top: 20px;">
         <div class="container" style="padding-left: 0px; padding-right: 0px;">
            <div class="row">
               <div class="col-sm" style="text-align: left;">
                  {{ title }}
               </div>
               <div class="col-sm" style="text-align: right;">
                  <button type="button" class="btn btn-primary">Edit</button>
               </div>
            </div>
         </div>
         <div class="container box" style="margin-top: 10px;">
            <table class="table table-striped">
               <thead>
                  <tr>
                     <th>Item</th>
                     <th>Amount</th>
                     <th>Category</th>
                     <th>Location</th>
                     <th>Spent On</th>
                  </tr>
               </thead>
               <tbody>
                  <tr *ngFor="let entry of expenseEntries">
                     <th scope="row">{{ entry.item }}</th>
                     <th>{{ entry.amount }}</th>
                     <td>{{ entry.category }}</td>
                     <td>{{ entry.location }}</td>
                     <td>{{ entry.spendOn | date: 'short' }}</td>
                  </tr>
               </tbody>
            </table>
         </div>
      </div>
   </div>
</div>
Here,
Used bootstrap table. table and table-striped will style the table according to Boostrap style standard.
Used ngFor to loop over the expenseEntries and generate table rows.
Open AppComponent template, src/app/app.component.html and include ExpenseEntryListComponent and remove ExpenseEntryComponent as shown below −
...
<app-expense-entry-list></app-expense-entry-list>
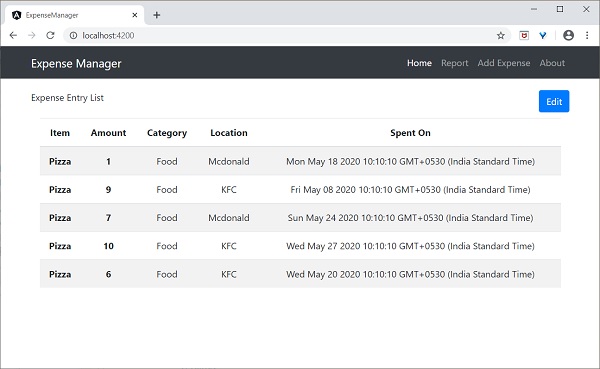
Finally, the output of the application is as shown below.
Use pipes
Let us use the pipe in the our ExpenseManager application
Open ExpenseEntryListComponent’s template, src/app/expense-entry-list/expense-entry-list.component.html and include pipe in entry.spendOn as mentioned below −
<td>{{ entry.spendOn | date: 'short' }}</td>
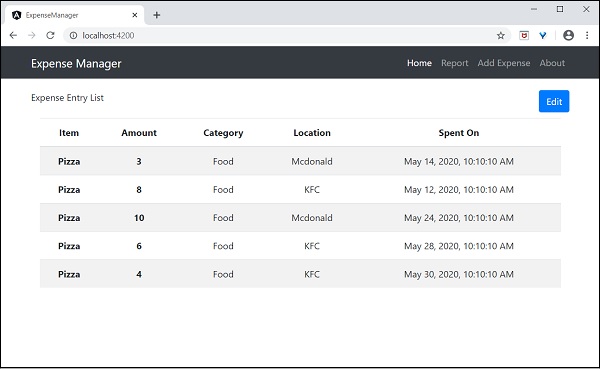
Here, we have used the date pipe to show the spend on date in the short format.
Finally, the output of the application is as shown below −
Add debug service
Run the below command to generate an Angular service, DebugService.
ng g service debug
This will create two Typescript files (debug service & its test) as specified below −
CREATE src/app/debug.service.spec.ts (328 bytes)
CREATE src/app/debug.service.ts (134 bytes)
Let us analyse the content of the DebugService service.
import { Injectable } from '@angular/core'; @Injectable({
   providedIn: 'root'
})
export class DebugService {
   constructor() { }
}
Here,
@Injectable decorator is attached to DebugService class, which enables the DebugService to be used in Angular component of the application.
providerIn option and its value, root enables the DebugService to be used in all component of the application.
Let us add a method, Info, which will print the message into the browser console.
info(message : String) : void {
   console.log(message);
}
Let us initialise the service in the ExpenseEntryListComponent and use it to print message.
import { Component, OnInit } from '@angular/core'; import { ExpenseEntry } from '../expense-entry'; import { DebugService } from '../debug.service'; @Component({
   selector: 'app-expense-entry-list',
   templateUrl: './expense-entry-list.component.html', styleUrls: ['./expense-entry-list.component.css']
})
export class ExpenseEntryListComponent implements OnInit {
   title: string;
   expenseEntries: ExpenseEntry[];
   constructor(private debugService: DebugService) { }
   ngOnInit() {
      this.debugService.info("Expense Entry List
      component initialized");
      this.title = "Expense Entry List";
      this.expenseEntries = this.getExpenseEntries();
   }
   // other coding
}
Here,
DebugService is initialised using constructor parameters. Setting an argument (debugService) of type DebugService will trigger the dependency injection to create a new DebugService object and set it into the ExpenseEntryListComponent component.
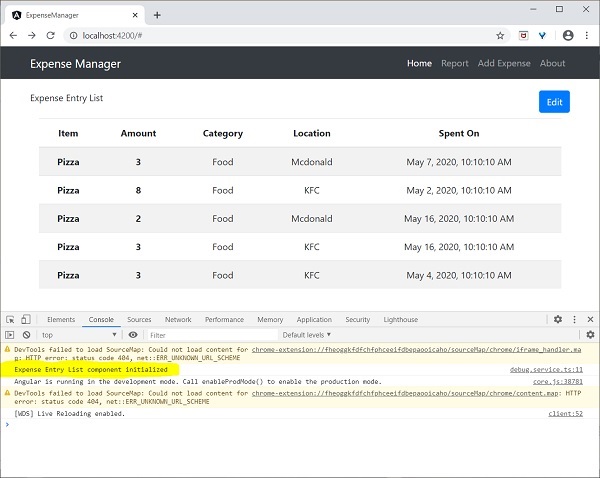
Calling the info method of DebugService in the ngOnInit method prints the message in the browser console.
The result can be viewed using developer tools and it looks similar as shown below −
Let us extend the application to understand the scope of the service.
Let us a create a DebugComponent by using below mentioned command.
ng generate component debug
CREATE src/app/debug/debug.component.html (20 bytes) CREATE src/app/debug/debug.component.spec.ts (621 bytes)
CREATE src/app/debug/debug.component.ts (265 bytes) CREATE src/app/debug/debug.component.css (0 bytes) UPDATE src/app/app.module.ts (392 bytes)
Let us remove the DebugService in the root module.
// src/app/debug.service.ts
import { Injectable } from '@angular/core'; @Injectable()
export class DebugService {
   constructor() {
   }
   info(message : String) : void {
      console.log(message);
   }
}
Register the DebugService under ExpenseEntryListComponent component.
// src/app/expense-entry-list/expense-entry-list.component.ts @Component({
   selector: 'app-expense-entry-list',
   templateUrl: './expense-entry-list.component.html',
   styleUrls: ['./expense-entry-list.component.css']
   providers: [DebugService]
})
Here, we have used providers meta data (ElementInjector) to register the service.
Open DebugComponent (src/app/debug/debug.component.ts) and import DebugService and set an instance in the constructor of the component.
import { Component, OnInit } from '@angular/core'; import { DebugService } from '../debug.service';
@Component({
   selector: 'app-debug',
   templateUrl: './debug.component.html',
   styleUrls: ['./debug.component.css']
})
export class DebugComponent implements OnInit {
   constructor(private debugService: DebugService) { }
   ngOnInit() {
      this.debugService.info("Debug component gets service from Parent");
   }
}
Here, we have not registered DebugService. So, DebugService will not be available if used as parent component. When used inside a parent component, the service may available from parent, if the parent has access to the service.
Open ExpenseEntryListComponent template (src/app/expense-entry-list/expense-entry-list.component.html) and include a content section as shown below:
// existing content
<app-debug></app-debug>
<ng-content></ng-content>
Here, we have included a content section and DebugComponent section.
Let us include the debug component as a content inside the ExpenseEntryListComponent component in the AppComponent template. Open AppComponent template and change app-expense-entry-list as below −
// navigation code
<app-expense-entry-list>
<app-debug></app-debug>
</app-expense-entry-list>
Here, we have included the DebugComponent as content.
Let us check the application and it will show DebugService template at the end of the page as shown below −
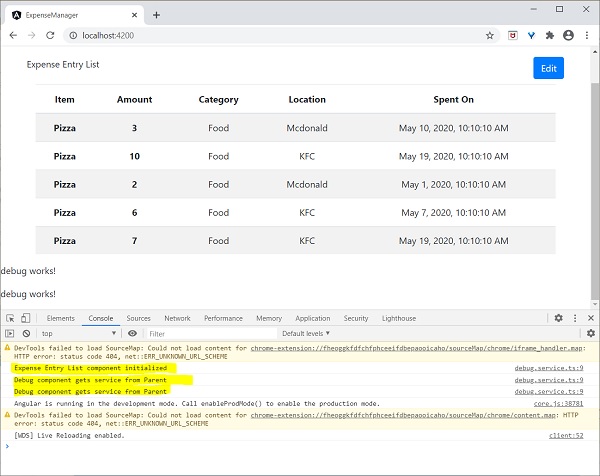
Also, we could able to see two debug information from debug component in the console. This indicate that the debug component gets the service from its parent component.
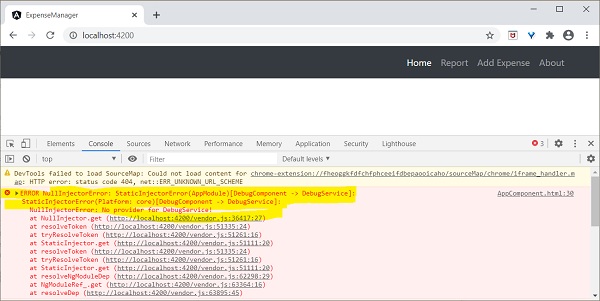
Let us change how the service is injected in the ExpenseEntryListComponent and how it affects the scope of the service. Change providers injector to viewProviders injection. viewProviders does not inject the service into the content child and so, it should fail.
viewProviders: [DebugService]
Check the application and you will see that the one of the debug component (used as content child) throws error as shown below −
Let us remove the debug component in the templates and restore the application.
Open ExpenseEntryListComponent template (src/app/expense-entry-list/expense-entry-list.component.html) and remove below content
<app-debug></app-debug>
<ng-content></ng-content>
Open AppComponent template and change app-expense-entry-list as below −
// navigation code
<app-expense-entry-list>
</app-expense-entry-list>
Change the viewProviders setting to providers in ExpenseEntryListComponent.
providers: [DebugService]
Rerun the application and check the result.
Create expense service
Let us create a new service ExpenseEntryService in our ExpenseManager application to interact with Expense REST API. ExpenseEntryService will get the latest expense entries, insert new expense entries, modify existing expense entries and delete the unwanted expense entries.
Open command prompt and go to project root folder.
cd /go/to/expense-manager
Start the application.
ng serve
Run the below command to generate an Angular service, ExpenseService.
ng generate service ExpenseEntry
This will create two Typescript files (expense entry service & its test) as specified below −
CREATE src/app/expense-entry.service.spec.ts (364 bytes)
CREATE src/app/expense-entry.service.ts (141 bytes)
Open ExpenseEntryService (src/app/expense-entry.service.ts) and import ExpenseEntry, throwError and catchError from rxjs library and import HttpClient, HttpHeaders and HttpErrorResponse from @angular/common/http package.
import { Injectable } from '@angular/core';
import { ExpenseEntry } from './expense-entry'; import { throwError } from 'rxjs';
import { catchError } from 'rxjs/operators';
import { HttpClient, HttpHeaders, HttpErrorResponse } from
'@angular/common/http';
Inject the HttpClient service into our service.
constructor(private httpClient : HttpClient) { }
Create a variable, expenseRestUrl to specify the Expense Rest API endpoints.
private expenseRestUrl = 'http://localhost:8000/api/expense';
Create a variable, httpOptions to set the Http Header option. This will be used during the Http Rest API call by Angular HttpClient service.
private httpOptions = {
   headers: new HttpHeaders( { 'Content-Type': 'application/json' })
};
The complete code is as follows −
import { Injectable } from '@angular/core';
import { ExpenseEntry } from './expense-entry';
import { Observable, throwError } from 'rxjs';
import { catchError, retry } from 'rxjs/operators';
import { HttpClient, HttpHeaders, HttpErrorResponse } from '@angular/common/http';

@Injectable({
   providedIn: 'root'
})
export class ExpenseEntryService {
      private expenseRestUrl = 'api/expense';
      private httpOptions = {
         headers: new HttpHeaders( { 'Content-Type': 'application/json' })
      };

   constructor(
      private httpClient : HttpClient) { }
}
Http programming using HttpClient service
Start the Expense REST API application as shown below −
cd /go/to/expense-rest-api
node .\server.js
Add getExpenseEntries() and httpErrorHandler() method in ExpenseEntryService (src/app/expense-entry.service.ts) service.
getExpenseEntries() : Observable<ExpenseEntry[]> {
   return this.httpClient.get<ExpenseEntry[]>(this.expenseRestUrl, this.httpOptions)
   .pipe(retry(3),catchError(this.httpErrorHandler));
}

getExpenseEntry(id: number) : Observable<ExpenseEntry> {
   return this.httpClient.get<ExpenseEntry>(this.expenseRestUrl + "/" + id, this.httpOptions)
   .pipe(
      retry(3),
      catchError(this.httpErrorHandler)
   );
}

private httpErrorHandler (error: HttpErrorResponse) {
      if (error.error instanceof ErrorEvent) {
      console.error("A client side error occurs. The error message is " + error.message);
      } else {
      console.error(
            "An error happened in server. The HTTP status code is "  + error.status + " and the error returned is " + error.message);
      }

      return throwError("Error occurred. Pleas try again");
}
Here,
getExpenseEntries() calls the get() method using expense end point and also configures the error handler. Also, it configures httpClient to try for maximum of 3 times in case of failure. Finally, it returns the response from server as typed (ExpenseEntry[]) Observable object.
getExpenseEntry is similar to getExpenseEntries() except it passes the id of the ExpenseEntry object and gets ExpenseEntry Observable object.
The complete coding of ExpenseEntryService is as follows −
import { Injectable } from '@angular/core';
import { ExpenseEntry } from './expense-entry';

import { Observable, throwError } from 'rxjs';
import { catchError, retry } from 'rxjs/operators';
import { HttpClient, HttpHeaders, HttpErrorResponse } from '@angular/common/http';

@Injectable({

   providedIn: 'root'
})
export class ExpenseEntryService {
   private expenseRestUrl = 'http://localhost:8000/api/expense';
   private httpOptions = {
      headers: new HttpHeaders( { 'Content-Type': 'application/json' })
   };

   constructor(private httpClient : HttpClient) { }

   getExpenseEntries() : Observable {
      return this.httpClient.get(this.expenseRestUrl, this.httpOptions)
      .pipe(
         retry(3),
         catchError(this.httpErrorHandler)
      );
   }

   getExpenseEntry(id: number) : Observable {
      return this.httpClient.get(this.expenseRestUrl + "/" + id, this.httpOptions)
      .pipe(
         retry(3),
         catchError(this.httpErrorHandler)
      );
   }

   private httpErrorHandler (error: HttpErrorResponse) {
      if (error.error instanceof ErrorEvent) {
         console.error("A client side error occurs. The error message is " + error.message);
      } else {
         console.error(
            "An error happened in server. The HTTP status code is "  + error.status + " and the error returned is " + error.message);
      }

      return throwError("Error occurred. Pleas try again");
   }
}
Open ExpenseEntryListComponent (src-entry-list-entry-list.component.ts) and inject ExpenseEntryService through constructor as specified below:
constructor(private debugService: DebugService, private restService :
ExpenseEntryService ) { }
Change the getExpenseEntries() function. Call getExpenseEntries() method from ExpenseEntryService instead of returning the mock items.
getExpenseItems() {
   this.restService.getExpenseEntries()
      .subscribe( data =− this.expenseEntries = data );
}
The complete ExpenseEntryListComponent coding is as follows −
import { Component, OnInit } from '@angular/core';
import { ExpenseEntry } from '../expense-entry';
import { DebugService } from '../debug.service';
import { ExpenseEntryService } from '../expense-entry.service';

@Component({
   selector: 'app-expense-entry-list',
   templateUrl: './expense-entry-list.component.html',
   styleUrls: ['./expense-entry-list.component.css'],
   providers: [DebugService]
})
export class ExpenseEntryListComponent implements OnInit {
   title: string;
   expenseEntries: ExpenseEntry[];
   constructor(private debugService: DebugService, private restService : ExpenseEntryService ) { }

   ngOnInit() {
      this.debugService.info("Expense Entry List component initialized");
      this.title = "Expense Entry List";

      this.getExpenseItems();
   }

   getExpenseItems() {
      this.restService.getExpenseEntries()
      .subscribe( data => this.expenseEntries = data );
   }
}
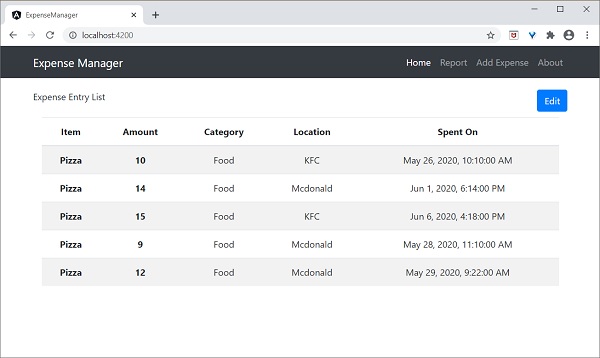
Finally, check the application and you will see the below response.
Add Expense functionality
Let us add a new method, addExpenseEntry() in our ExpenseEntryService to add new expense entry as mentioned below −
addExpenseEntry(expenseEntry: ExpenseEntry): Observable<ExpenseEntry> {
   return this.httpClient.post<ExpenseEntry>(this.expenseRestUrl, expenseEntry, this.httpOptions)
   .pipe(
      retry(3),
      catchError(this.httpErrorHandler)
   );
}
Update expense entry functionality
Let us add a new method, updateExpenseEntry() in our ExpenseEntryService to update existing expense entry as mentioned below:
updateExpenseEntry(expenseEntry: ExpenseEntry): Observable<ExpenseEntry> {
   return this.httpClient.put<ExpenseEntry>(this.expenseRestUrl + "/" + expenseEntry.id, expenseEntry, this.httpOptions)
   .pipe(
      retry(3),
      catchError(this.httpErrorHandler)
   );
}
Delete expense entry functionality
Let us add a new method, deleteExpenseEntry() in our ExpenseEntryService to delete existing expense entry as mentioned below −
deleteExpenseEntry(expenseEntry: ExpenseEntry | number) : Observable<ExpenseEntry> {
   const id = typeof expenseEntry == 'number' ? expenseEntry : expenseEntry.id
   const url = `${this.expenseRestUrl}/${id}`;

   return this.httpClient.delete<ExpenseEntry>(url, this.httpOptions)
   .pipe(
      retry(3),
      catchError(this.httpErrorHandler)
   );
}
Add Routing
Generate routing module using below command, if not done before.
ng generate module app-routing --module app --flat
Output
The output is mentioned below −
CREATE src/app/app-routing.module.ts (196 bytes)
UPDATE src/app/app.module.ts (785 bytes)
Here,
CLI generate AppRoutingModule and then, configures it in AppModule
Update AppRoutingModule (src/app/app.module.ts) as mentioned below −
import { NgModule } from '@angular/core';
import { Routes, RouterModule } from '@angular/router'; import { ExpenseEntryComponent } from './expense-entry/expense-entry.component';
import { ExpenseEntryListComponent } from './expense-entry-list/expense-entry-list.component';
const routes: Routes = [
   { path: 'expenses', component: ExpenseEntryListComponent },
   { path: 'expenses/detail/:id', component: ExpenseEntryComponent },
   { path: '', redirectTo: 'expenses', pathMatch: 'full' }];
@NgModule({
   imports: [RouterModule.forRoot(routes)],
   exports: [RouterModule] })
export class AppRoutingModule { }
Here, we have added route for our expense list and expense details component.
Update AppComponent template (src/app/app.component.html) to include router-outlet and routerLink.
<!-- Navigation -->
<nav class="navbar navbar-expand-lg navbar-dark bg-dark static-top">
<div class="container">
   <a class="navbar-brand" href="#">{{ title }}</a> <button class="navbar-toggler" type="button" data-toggle="collapse" data-target="#navbarResponsive" aria-controls="navbarResponsive" aria-expanded="false" aria-label="Toggle navigation">
      <span class="navbar-toggler-icon"></span>
   </button>
   <div class="collapse navbar-collapse" id="navbarResponsive">
      <ul class="navbar-nav ml-auto">
         <li class="nav-item active">
            <a class="nav-link" href="#">Home
               <span class="sr-only" routerLink="/">(current)</span>
            </a>
         </li>
         <li class="nav-item">
            <a class="nav-link" routerLink="/expenses">Report</a>
         </li>
         <li class="nav-item">
            <a class="nav-link" href="#">Add Expense</a>
         </li>
         <li class="nav-item">
            <a class="nav-link" href="#">About</a>
         </li>
      </ul>
   </div>
</div>
</nav>
<router-outlet></router-outlet>
Open ExpenseEntryListComponent template (src/app/expense-entry-list/expense-entry-list.component.html) and include view option for every expense entries.
<table class="table table-striped">
   <thead>
      <tr>
         <th>Item</th>
         <th>Amount</th>
         <th>Category</th>
         <th>Location</th>
         <th>Spent On</th>
         <th>View</th>
      </tr>
   </thead>
   <tbody>
      <tr *ngFor="let entry of expenseEntries">
         <th scope="row">{{ entry.item }}</th>
         <th>{{ entry.amount }}</th>
         <td>{{ entry.category }}</td>
         <td>{{ entry.location }}</td>
         <td>{{ entry.spendOn | date: 'medium' }}</td>
         <td><a routerLink="../expenses/detail/{{ entry.id }}">View</a></td>
      </tr>
   </tbody>
</table>
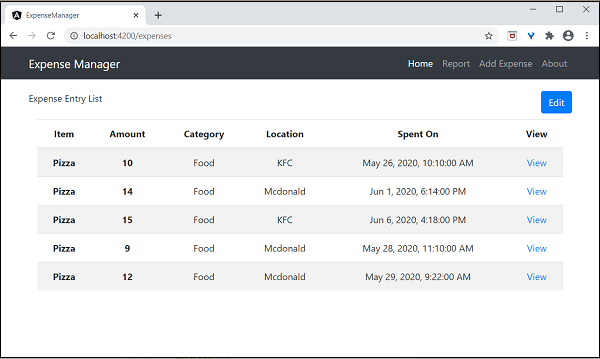
Here, we have updated the expense list table and added a new column to show the view option.
Open ExpenseEntryComponent (src/app/expense-entry/expense-entry.component.ts) and add functionality to fetch the current selected expense entry. It can be done by first getting the id through the paramMap and then, using the getExpenseEntry() method from ExpenseEntryService.
this.expenseEntry$ = this.route.paramMap.pipe(
   switchMap(params => {
      this.selectedId = Number(params.get('id'));
      return
this.restService.getExpenseEntry(this.selectedId); }));
   this.expenseEntry$.subscribe( (data) => this.expenseEntry = data );
Update ExpenseEntryComponent and add option to go to expense list.
goToList() {
   this.router.navigate(['/expenses']);
}
The complete code of ExpenseEntryComponent is as follows −
import { Component, OnInit } from '@angular/core'; import { ExpenseEntry } from '../expense-entry'; import { ExpenseEntryService } from '../expense-entry.service';
import { Router, ActivatedRoute } from '@angular/router';
import { Observable } from 'rxjs';
import { switchMap } from 'rxjs/operators';
@Component({
   selector: 'app-expense-entry',
   templateUrl: './expense-entry.component.html',
   styleUrls: ['./expense-entry.component.css']
})
export class ExpenseEntryComponent implements OnInit {
   title: string;
   expenseEntry$ : Observable<ExpenseEntry>;
   expenseEntry: ExpenseEntry = {} as ExpenseEntry;
   selectedId: number;
   constructor(private restService : ExpenseEntryService, private router : Router, private route :
ActivatedRoute ) { }
   ngOnInit() {
      this.title = "Expense Entry";
   this.expenseEntry$ = this.route.paramMap.pipe(
      switchMap(params => {
         this.selectedId = Number(params.get('id'));
         return
this.restService.getExpenseEntry(this.selectedId); }));
   this.expenseEntry$.subscribe( (data) => this.expenseEntry = data );
   }
   goToList() {
      this.router.navigate(['/expenses']);
   }
}
Open ExpenseEntryComponent (src/app/expense-entry/expense-entry.component.html) template and add a new button to navigate back to expense list page.
<div class="col-sm" style="text-align: right;">
   <button type="button" class="btn btn-primary" (click)="goToList()">Go to List</button>
   <button type="button" class="btn btn-primary">Edit</button>
</div>
Here, we have added Go to List button before Edit button.
Run the application using below command −
ng serve
The final output of the application is as follows −
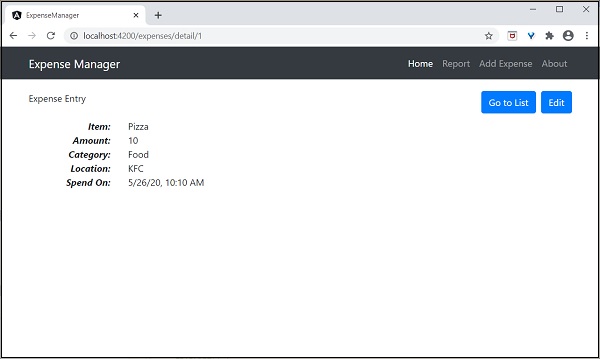
Clicking the view option of the first entry will navigate to details page and show the selected expense entry as shown below −
Enable login and logout feature
Create a new service, AuthService to authenticate the user.
ng generate service auth
CREATE src/app/auth.service.spec.ts (323 bytes)
CREATE src/app/auth.service.ts (133 bytes)
Open AuthService and include below code.
import { Injectable } from '@angular/core';

import { Observable, of } from 'rxjs';
import { tap, delay } from 'rxjs/operators';

@Injectable({
   providedIn: 'root'
})
export class AuthService {

   isUserLoggedIn: boolean = false;

   login(userName: string, password: string): Observable {
      console.log(userName);
      console.log(password);
      this.isUserLoggedIn = userName == 'admin' && password == 'admin';
      localStorage.setItem('isUserLoggedIn', this.isUserLoggedIn ? "true" : "false");

   return of(this.isUserLoggedIn).pipe(
      delay(1000),
      tap(val => {
         console.log("Is User Authentication is successful: " + val);
      })
   );
   }

   logout(): void {
   this.isUserLoggedIn = false;
      localStorage.removeItem('isUserLoggedIn');
   }

   constructor() { }
}
Here,
We have written two methods, login and logout.
The purpose of the login method is to validate the user and if the user successfully validated, it stores the information in localStorage and then returns true.
Authentication validation is that the user name and password should be admin.
We have not used any backend. Instead, we have simulated a delay of 1s using Observables.
The purpose of the logout method is to invalidate the user and removes the information stored in localStorage.
Create a login component using below command −
ng generate component login
CREATE src/app/login/login.component.html (20 bytes)
CREATE src/app/login/login.component.spec.ts (621 bytes)
CREATE src/app/login/login.component.ts (265 bytes)
CREATE src/app/login/login.component.css (0 bytes)
UPDATE src/app/app.module.ts (1207 bytes)
Open LoginComponent and include below code −
import { Component, OnInit } from '@angular/core';

import { FormGroup, FormControl } from '@angular/forms';
import { AuthService } from '../auth.service';
import { Router } from '@angular/router';

@Component({
   selector: 'app-login',
   templateUrl: './login.component.html',
   styleUrls: ['./login.component.css']
})
export class LoginComponent implements OnInit {

   userName: string;
   password: string;
   formData: FormGroup;

   constructor(private authService : AuthService, private router : Router) { }

   ngOnInit() {
      this.formData = new FormGroup({
         userName: new FormControl("admin"),
         password: new FormControl("admin"),
      });
   }

   onClickSubmit(data: any) {
      this.userName = data.userName;
      this.password = data.password;

      console.log("Login page: " + this.userName);
      console.log("Login page: " + this.password);

      this.authService.login(this.userName, this.password)
         .subscribe( data => {
            console.log("Is Login Success: " + data);

           if(data) this.router.navigate(['/expenses']);
      });
   }
}
Here,
Used reactive forms.
Imported AuthService and Router and configured it in constructor.
Created an instance of FormGroup and included two instance of FormControl, one for user name and another for password.
Created a onClickSubmit to validate the user using authService and if successful, navigate to expense list.
Open LoginComponent template and include below template code.
<!-- Page Content -->
<div class="container">
   <div class="row">
      <div class="col-lg-12 text-center" style="padding-top: 20px;">
         <div class="container box" style="margin-top: 10px; padding-left: 0px; padding-right: 0px;">
            <div class="row">
               <div class="col-12" style="text-align: center;">
                                    <form [formGroup]="formData" (ngSubmit)="onClickSubmit(formData.value)"
                                          class="form-signin">
                                    <h2 class="form-signin-heading">Please sign in</h2>
                                    <label for="inputEmail" class="sr-only">Email address</label>
                                    <input type="text" id="username" class="form-control"
                                          formControlName="userName" placeholder="Username" required autofocus>
                                    <label for="inputPassword" class="sr-only">Password</label>
                                    <input type="password" id="inputPassword" class="form-control"
                                          formControlName="password" placeholder="Password" required>
                                    <button class="btn btn-lg btn-primary btn-block" type="submit">Sign in</button>
                                    </form>
               </div>
            </div>
         </div>
      </div>
   </div>
</div>
Here,
Created a reactive form and designed a login form.
Attached the onClickSubmit method to the form submit action.
Open LoginComponent style and include below CSS Code.
.form-signin {
   max-width: 330px;

   padding: 15px;
   margin: 0 auto;
}

input {
   margin-bottom: 20px;
}
Here, some styles are added to design the login form.
Create a logout component using below command −
ng generate component logout
CREATE src/app/logout/logout.component.html (21 bytes)
CREATE src/app/logout/logout.component.spec.ts (628 bytes)
CREATE src/app/logout/logout.component.ts (269 bytes)
CREATE src/app/logout/logout.component.css (0 bytes)
UPDATE src/app/app.module.ts (1368 bytes)
Open LogoutComponent and include below code.
import { Component, OnInit } from '@angular/core';

import { AuthService } from '../auth.service';
import { Router } from '@angular/router';

@Component({
   selector: 'app-logout',
   templateUrl: './logout.component.html',
   styleUrls: ['./logout.component.css']
})
export class LogoutComponent implements OnInit {

   constructor(private authService : AuthService, private router: Router) { }

   ngOnInit() {
      this.authService.logout();
      this.router.navigate(['/']);
   }

}
Here,
- Used logout method of AuthService.
- Once the user is logged out, the page will redirect to home page (/).
Create a guard using below command −
ng generate guard expense
CREATE src/app/expense.guard.spec.ts (364 bytes)
CREATE src/app/expense.guard.ts (459 bytes)
Open ExpenseGuard and include below code −
import { Injectable } from '@angular/core';
import { CanActivate, ActivatedRouteSnapshot, RouterStateSnapshot, Router, UrlTree } from '@angular/router';
import { Observable } from 'rxjs';

import { AuthService } from './auth.service';

@Injectable({
   providedIn: 'root'
})
export class ExpenseGuard implements CanActivate {

   constructor(private authService: AuthService, private router: Router) {}

   canActivate(
   next: ActivatedRouteSnapshot,
   state: RouterStateSnapshot): boolean | UrlTree {
      let url: string = state.url;

          return this.checkLogin(url);
      }

      checkLogin(url: string): true | UrlTree {
         console.log("Url: " + url)
         let val: string = localStorage.getItem('isUserLoggedIn');

         if(val != null && val == "true"){
            if(url == "/login")
               this.router.parseUrl('/expenses');
            else
               return true;
         } else {
            return this.router.parseUrl('/login');
         }
      }
}
Here,
- checkLogin will check whether the localStorage has the user information and if it is available, then it returns true.
- If the user is logged in and goes to login page, it will redirect the user to expenses page
- If the user is not logged in, then the user will be redirected to login page.
Open AppRoutingModule (src/app/app-routing.module.ts) and update below code −
import { NgModule } from '@angular/core';
import { Routes, RouterModule } from '@angular/router';
import { ExpenseEntryComponent } from './expense-entry/expense-entry.component';
import { ExpenseEntryListComponent } from './expense-entry-list/expense-entry-list.component';
import { LoginComponent } from './login/login.component';
import { LogoutComponent } from './logout/logout.component';

import { ExpenseGuard } from './expense.guard';

const routes: Routes = [
   { path: 'login', component: LoginComponent },
   { path: 'logout', component: LogoutComponent },
   { path: 'expenses', component: ExpenseEntryListComponent, canActivate: [ExpenseGuard]},
   { path: 'expenses/detail/:id', component: ExpenseEntryComponent, canActivate: [ExpenseGuard]},
   { path: '', redirectTo: 'expenses', pathMatch: 'full' }
];

@NgModule({
  imports: [RouterModule.forRoot(routes)],
  exports: [RouterModule]
})
export class AppRoutingModule { }
Here,
- Imported LoginComponent and LogoutComponent.
- Imported ExpenseGuard.
- Created two new routes, login and logout to access LoginComponent and LogoutComponent respectively.
- Add new option canActivate for ExpenseEntryComponent and ExpenseEntryListComponent.
Open AppComponent template and add two login and logout link.
<div class="collapse navbar-collapse" id="navbarResponsive">
   <ul class="navbar-nav ml-auto">
      <li class="nav-item active">
         <a class="nav-link" href="#">Home
            <span class="sr-only" routerLink="/">(current)</span>

         </a>
      </li>
      <li class="nav-item">
         <a class="nav-link" routerLink="/expenses">Report</a>
      </li>
      <li class="nav-item">
         <a class="nav-link" href="#">Add Expense</a>
      </li>
      <li class="nav-item">

         <a class="nav-link" href="#">About</a>
      </li>
      <li class="nav-item">
                  <div *ngIf="isUserLoggedIn; else isLogOut">
                        <a class="nav-link" routerLink="/logout">Logout</a>
                  </div>

                  <ng-template #isLogOut>
                              <a class="nav-link" routerLink="/login">Login</a>
                  </ng-template>
      </li>
   </ul>
</div>
Open AppComponent and update below code −
import { Component } from '@angular/core';

import { AuthService } from './auth.service';

@Component({
   selector: 'app-root',
   templateUrl: './app.component.html',
   styleUrls: ['./app.component.css']
})
export class AppComponent {

   title = 'Expense Manager';
   isUserLoggedIn = false;

   constructor(private authService: AuthService) {}

   ngOnInit() {
      let storeData = localStorage.getItem("isUserLoggedIn");
      console.log("StoreData: " + storeData);

      if( storeData != null && storeData == "true")
         this.isUserLoggedIn = true;
      else


         this.isUserLoggedIn = false;
   }
}
Here, we have added the logic to identify the user status so that we can show login / logout functionality.
Open AppModule (src/app/app.module.ts) and configure ReactiveFormsModule
import { ReactiveFormsModule } from '@angular/forms';
imports: [
   ReactiveFormsModule
]
Now, run the application and the application opens the login page.
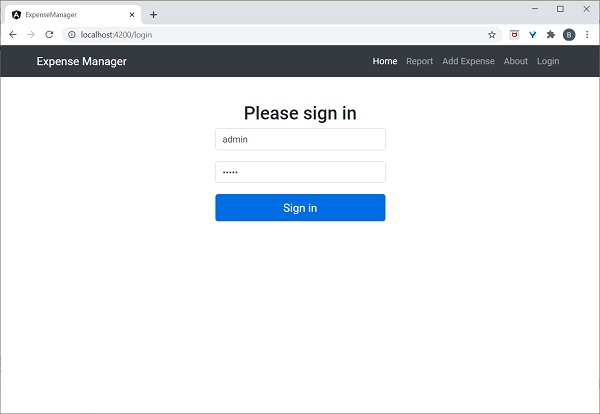
Enter admin and admin as username and password and then, click submit. The application process the login and redirects the user to expense list page as shown below −
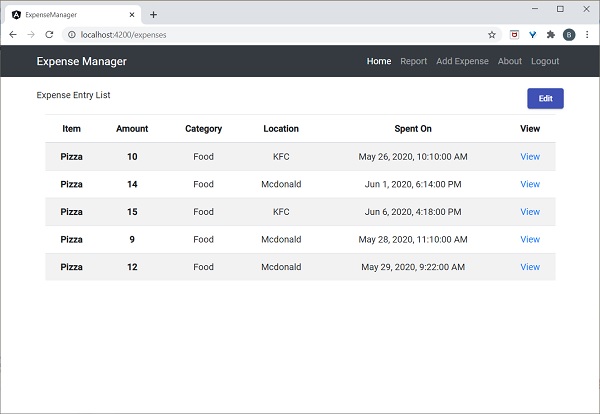
Finally, your can click logout and exit the application.
Add / Edit / Delete Expenses
Add new component, EditEntryComponent to add new expense entry and edit the existing expense entries using below command
ng generate component EditEntry
CREATE src/app/edit-entry/edit-entry.component.html (25 bytes)
CREATE src/app/edit-entry/edit-entry.component.spec.ts (650 bytes)
CREATE src/app/edit-entry/edit-entry.component.ts (284 bytes)
CREATE src/app/edit-entry/edit-entry.component.css (0 bytes)
UPDATE src/app/app.module.ts (1146 bytes)
Update EditEntryComponent with below code −
import { Component, OnInit } from '@angular/core';

import { FormGroup, FormControl, Validators } from '@angular/forms';

import { ExpenseEntry } from '../expense-entry';
import { ExpenseEntryService } from '../expense-entry.service';

import { Router, ActivatedRoute } from '@angular/router';


@Component({
   selector: 'app-edit-entry',
   templateUrl: './edit-entry.component.html',
   styleUrls: ['./edit-entry.component.css']
})
export class EditEntryComponent implements OnInit {
   id: number;
   item: string;
   amount: number;
   category: string;
   location: string;
   spendOn: Date;

   formData: FormGroup;
   selectedId: number;
   expenseEntry: ExpenseEntry;

   constructor(private expenseEntryService : ExpenseEntryService, private router: Router, private route: ActivatedRoute) { }

   ngOnInit() {
      this.formData = new FormGroup({
         id: new FormControl(),
         item: new FormControl('', [Validators.required]),
         amount: new FormControl('', [Validators.required]),
         category: new FormControl(),
         location: new FormControl(),
         spendOn: new FormControl()
      });

      this.selectedId = Number(this.route.snapshot.paramMap.get('id'));

      if(this.selectedId != null && this.selectedId != 0) {
         this.expenseEntryService.getExpenseEntry(this.selectedId)
            .subscribe( (data) =>
               {
                  this.expenseEntry = data;
                  this.formData.controls['id'].setValue(this.expenseEntry.id);
                  this.formData.controls['item'].setValue(this.expenseEntry.item);
                  this.formData.controls['amount'].setValue(this.expenseEntry.amount);
                  this.formData.controls['category'].setValue(this.expenseEntry.category);
                  this.formData.controls['location'].setValue(this.expenseEntry.location);


                  this.formData.controls['spendOn'].setValue(this.expenseEntry.spendOn);
               })
      }


   }

   get itemValue() {
   return this.formData.get('item');
   }

   get amountValue() {
   return this.formData.get('amount');
   }

    onClickSubmit(data: any) {
   console.log('onClickSubmit fired');
   this.id = data.id;
   this.item = data.item;
   this.amount = data.amount;
   this.category = data.category;
   this.location = data.location;
   this.spendOn = data.spendOn;

   let expenseEntry : ExpenseEntry = {
      id: this.id,
       item: this.item,
       amount: this.amount,
       category: this.category,
       location: this.location,
       spendOn: this.spendOn,
       createdOn: new Date(2020, 5, 20)
   }
   console.log(expenseEntry);

      if(expenseEntry.id == null || expenseEntry.id == 0) {
         console.log('add fn fired');
      this.expenseEntryService.addExpenseEntry(expenseEntry)
         .subscribe( data => { console.log(data); this.router.navigate(['/expenses']); });
   } else {
         console.log('edit fn fired');
      this.expenseEntryService.updateExpenseEntry(expenseEntry)
         .subscribe( data => { console.log(data); this.router.navigate(['/expenses']); });
   }
    }
}
Here,
Created a form, formData in the ngOnInit method using FormControl and FormGroup classes with proper validation rules.
Loaded the expense entry to be edited in the ngOnInit method.
Created two methods, itemValue and amountValue to get the item and amount values respectively entered by user for the validation purpose.
Created method, onClickSubmit to save (add / update) the expense entry.
Used Expense service to add and update expense entries.
Update the EditEntryComponent template with expense form as shown below −
<!-- Page Content -->
<div class="container">
   <div class="row">
   <div class="col-lg-12 text-center" style="padding-top: 20px;">
       <div class="container" style="padding-left: 0px; padding-right: 0px;">
       </div>
       <div class="container box" style="margin-top: 10px;">
<form [formGroup]="formData" (ngSubmit)="onClickSubmit(formData.value)" class="form" novalidate>
  <div class="form-group">
    <label for="item">Item</label>
    <input type="hidden" class="form-control" id="id" formControlName="id">
    <input type="text" class="form-control" id="item" formControlName="item">
    <div
   *ngIf="!itemValue?.valid && (itemValue?.dirty ||itemValue?.touched)">
   <div [hidden]="!itemValue.errors.required">
      Item is required
   </div>
   </div>
  </div>
  <div class="form-group">
    <label for="amount">Amount</label>
    <input type="text" class="form-control" id="amount" formControlName="amount">
    <div
   *ngIf="!amountValue?.valid && (amountValue?.dirty ||amountValue?.touched)">
   <div [hidden]="!amountValue.errors.required">
      Amount is required
   </div>
   </div>
  </div>
  <div class="form-group">
    <label for="category">Category</label>
    <select class="form-control" id="category" formControlName="category">
      <option>Food</option>
      <option>Vegetables</option>
      <option>Fruit</option>
      <option>Electronic Item</option>

      <option>Bill</option>
    </select>
  </div>
  <div class="form-group">
    <label for="location">location</label>
    <input type="text" class="form-control" id="location" formControlName="location">
  </div>
  <div class="form-group">
    <label for="spendOn">spendOn</label>
    <input type="text" class="form-control" id="spendOn" formControlName="spendOn">
  </div>
<button class="btn btn-lg btn-primary btn-block" type="submit" [disabled]="!formData.valid">Submit</button>
</form>
       </div>
   </div>
    </div>
</div>
Here,
Created a form and bind it to the form, formData created in the class.
Validated item and amount as required values.
Called onClickSubmit function once validation in successful.
Open EditEntryComponent stylesheet and update below code −
.form {
   max-width: 330px;
   padding: 15px;
   margin: 0 auto;
}

.form label {
   text-align: left;
   width: 100%;
}

input {
   margin-bottom: 20px;
}
Here, we have styled the expense entry form.
Add AboutComponent using below command
ng generate component About
CREATE src/app/about/about.component.html (20 bytes)

CREATE src/app/about/about.component.spec.ts (621 bytes)
CREATE src/app/about/about.component.ts (265 bytes)
CREATE src/app/about/about.component.css (0 bytes)
UPDATE src/app/app.module.ts (1120 bytes)
Open AboutComponent and add title as specified below −
import { Component, OnInit } from '@angular/core';

@Component({
   selector: 'app-about',
   templateUrl: './about.component.html',
   styleUrls: ['./about.component.css']
})
export class AboutComponent implements OnInit {
   title = "About";
   constructor() { }

   ngOnInit() {
   }

}
Open AboutComponent template and updated content as specified below −
<!-- Page Content -->
<div class="container">
   <div class="row">
   <div class="col-lg-12 text-center" style="padding-top: 20px;">
       <div class="container" style="padding-left: 0px; padding-right: 0px;">
      <div class="row">
          <div class="col-sm" style="text-align: left;">
         <h1>{{ title }}</h1>
          </div>
      </div>
       </div>
       <div class="container box" style="margin-top: 10px;">
      <div class="row">
          <div class="col" style="text-align: left;">
         <p>Expense management Application</p>
          </div>
      </div>
       </div>
   </div>
    </div>
</div>
Add routing for add and edit expense entries as specified below
import { NgModule } from '@angular/core';

import { Routes, RouterModule } from '@angular/router';
import { ExpenseEntryComponent } from './expense-entry/expense-entry.component';
import { ExpenseEntryListComponent } from './expense-entry-list/expense-entry-list.component';
import { LoginComponent } from './login/login.component';
import { LogoutComponent } from './logout/logout.component';
import { EditEntryComponent } from './edit-entry/edit-entry.component';
import { AboutComponent } from './about/about.component';

import { ExpenseGuard } from './expense.guard';

const routes: Routes = [
   { path: 'about', component: AboutComponent },
   { path: 'login', component: LoginComponent },
   { path: 'logout', component: LogoutComponent },
   { path: 'expenses', component: ExpenseEntryListComponent, canActivate: [ExpenseGuard]},
   { path: 'expenses/detail/:id', component: ExpenseEntryComponent, canActivate: [ExpenseGuard]},
   { path: 'expenses/add', component: EditEntryComponent, canActivate: [ExpenseGuard]},
   { path: 'expenses/edit/:id', component: EditEntryComponent, canActivate: [ExpenseGuard]},
   { path: '', redirectTo: 'expenses', pathMatch: 'full' }
];

@NgModule({
      imports: [RouterModule.forRoot(routes)],
      exports: [RouterModule]
})
export class AppRoutingModule { }
Here, we have added about, add expense and edit expense routes.
Add Edit and Delete links in ExpenseEntryListComponent template.
<table class="table table-striped">
   <thead>
         <tr>
         <th>Item</th>
         <th>Amount</th>
         <th>Category</th>
         <th>Location</th>
         <th>Spent On</th>
         <th>View</th>
               <th>Edit</th>
               <th>Delete</th>
         </tr>
   </thead>
   <tbody>
      <tr *ngFor="let entry of expenseEntries">

      <th scope="row">{{ entry.item }}</th>
      <th>{{ entry.amount }}</th>
      <td>{{ entry.category }}</td>
      <td>{{ entry.location }}</td>
      <td>{{ entry.spendOn | date: 'medium' }}</td>
      <td><a routerLink="../expenses/detail/{{ entry.id }}">View</a></td>
      <td><a routerLink="../expenses/edit/{{ entry.id }}">Edit</a></td>
      <td><a href="#" (click)="deleteExpenseEntry($event, entry.id)">Delete</a></td>
      </tr>
   </tbody>
</table>
Here, we have included two more columns. One column is used to show edit link and another to show delete link.
Update deleteExpenseEntry method in ExpenseEntryListComponent as shown below
deleteExpenseEntry(evt, id) {
   evt.preventDefault();
   if(confirm("Are you sure to delete the entry?")) {
      this.restService.deleteExpenseEntry(id)
         .subscribe( data => console.log(data) );

      this.getExpenseItems();
   }
}
Here, we have asked to confirm the deletion and it user confirmed, called the deleteExpenseEntry method from expense service to delete the selected expense item.
Change Edit link in the ExpenseEntryListComponent template at the top to Add link as shown below −
<div class="col-sm" style="text-align: right;">
   <button class="btn btn-primary" routerLink="/expenses/add">ADD</button>
   <!-- <button type="button" class="btn btn-primary">Edit</button> -->
</div>
Add Edit link inExpenseEntryComponent template.
<div class="col-sm" style="text-align: right;">
   <button type="button" class="btn btn-primary" (click)="goToList()">Go to List</button>
    <button type="button" class="btn btn-primary" (click)="goToEdit()">Edit</button>
</div>
Open ExpenseEntryComponent and add goToEdit() method as shown below −
goToEdit() {
   this.router.navigate(['/expenses/edit', this.selectedId]);
}
Update navigation links in AppComponenttemplate.
<!-- Navigation -->
<nav class="navbar navbar-expand-lg navbar-dark bg-dark static-top">
   <div class="container">
      <a class="navbar-brand" href="#">{{ title }}</a>
      <button class="navbar-toggler" type="button" data-toggle="collapse" data-target="#navbarResponsive" aria-controls="navbarResponsive" aria-expanded="false" aria-label="Toggle navigation">
         <span class="navbar-toggler-icon"></span>
      </button>
      <div class="collapse navbar-collapse" id="navbarResponsive">
         <ul class="navbar-nav ml-auto">
            <li class="nav-item active">
               <a class="nav-link" href="#">Home
                  <span class="sr-only" routerLink="/">(current)</span>
               </a>
            </li>
            <li class="nav-item">
               <a class="nav-link" routerLink="/expenses/add">Add Expense</a>
            </li>
            <li class="nav-item">
               <a class="nav-link" routerLink="/about">About</a>
            </li>
            <li class="nav-item">
                        <div *ngIf="isUserLoggedIn; else isLogOut">
                              <a class="nav-link" routerLink="/logout">Logout</a>
                        </div>

                        <ng-template #isLogOut>
                                    <a class="nav-link" routerLink="/login">Login</a>
                        </ng-template>
            </li>
         </ul>
      </div>
   </div>
</nav>

<router-outlet></router-outlet>
Here, we have updated the add expense link and about link.
Run the application and the output will be similar as shown below −
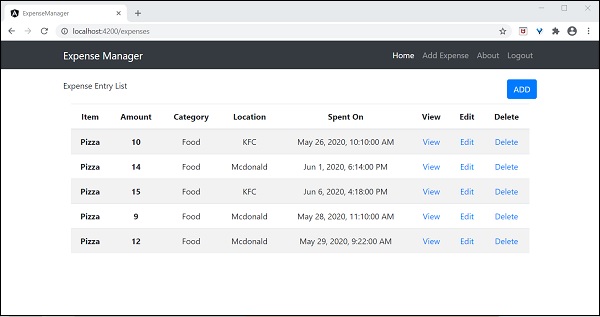
Try to add new expense using Add link in expense list page. The output will be similar as shown below

Fill the form as shown below −
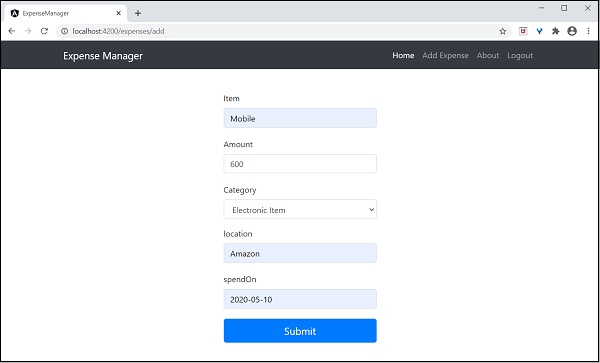
If the data is not filled properly, the validation code will alert as shown below −
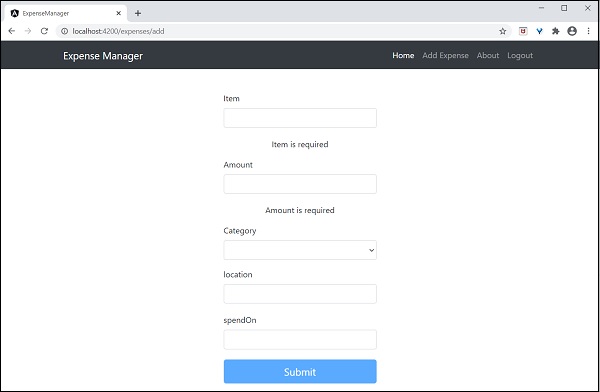
Click Submit. It will trigger the submit event and the data will be saved to the backend and redirected to list page as shown below −
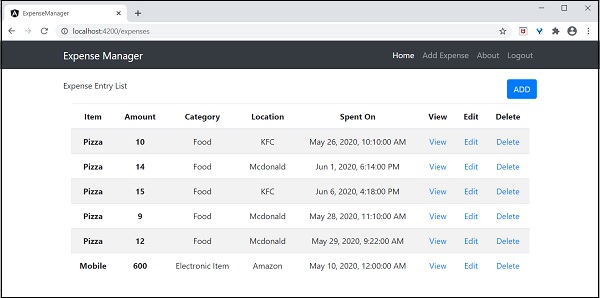
Try to edit existing expense using Edit link in expense list page. The output will be similar as shown below −
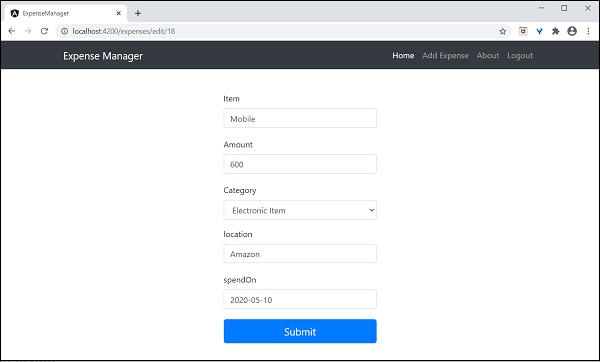
Click Submit. It will trigger the submit event and the data will be saved to the backend and redirected to list page.
To delete an item, click delete link. It will confirm the deletion as shown below −

Finally, we have implemented all features necessary to manage expenses in our application.