- Angular 8 Tutorial
- Angular 8 - Home
- Angular 8 - Introduction
- Angular 8 - Installation
- Creating First Application
- Angular 8 - Architecture
- Angular Components and Templates
- Angular 8 - Data Binding
- Angular 8 - Directives
- Angular 8 - Pipes
- Angular 8 - Reactive Programming
- Services and Dependency Injection
- Angular 8 - Http Client Programming
- Angular 8 - Angular Material
- Routing and Navigation
- Angular 8 - Animations
- Angular 8 - Forms
- Angular 8 - Form Validation
- Authentication and Authorization
- Angular 8 - Web Workers
- Service Workers and PWA
- Angular 8 - Server Side Rendering
- Angular 8 - Internationalization (i18n)
- Angular 8 - Accessibility
- Angular 8 - CLI Commands
- Angular 8 - Testing
- Angular 8 - Ivy Compiler
- Angular 8 - Building with Bazel
- Angular 8 - Backward Compatibility
- Angular 8 - Working Example
- Angular 9 - What’s New?
- Angular 8 Useful Resources
- Angular 8 - Quick Guide
- Angular 8 - Useful Resources
- Angular 8 - Discussion
Angular 8 - Routing and Navigation
Navigation is one of the important aspect in a web application. Even though a single page application (SPA) does not have multiple page concept, it does moves from one view (list of expenses) to another view (expense details). Providing clear and understandable navigation elements decides the success of an application.
Angular provides extensive set of navigation feature to accommodate simple scenario to complex scenario. The process of defining navigation element and the corresponding view is called Routing. Angular provides a separate module, RouterModule to set up the navigation in the Angular application. Let us learn the how to do the routing in Angular application in this chapter.
Configure Routing
Angular CLI provides complete support to setup routing during the application creation process as well as during working an application. Let us create a new application with router enabled using below command −
ng new routing-app --routing
Angular CLI generate a new module, AppRoutingModuele for routing purpose. The generated code is as follows −
import { NgModule } from '@angular/core';
import { Routes, RouterModule } from '@angular/router';


const routes: Routes = [];

@NgModule({
  imports: [RouterModule.forRoot(routes)],
  exports: [RouterModule]
})
export class AppRoutingModule { }
Here,
Imports RouterModule and Routes from @angular/router package.
RouterMoudle provides functionality to configure and execute routing in the application.
Routes is the type used to setup the navigation rules.
Routes is the local variable (of type Routes) used to configure the actual navigation rules of the application.
RouterMoudle.forRoot() method will setup the navigation rules configured in the routes variable.
Angular CLI include the generated AppRoutingModule in AppComponent as mentioned below −
import { BrowserModule } from '@angular/platform-browser';
import { NgModule } from '@angular/core';

import { AppRoutingModule } from './app-routing.module';
import { AppComponent } from './app.component';

@NgModule({
  declarations: [
    AppComponent
  ],
  imports: [
    BrowserModule,
    AppRoutingModule
  ],
  providers: [],
  bootstrap: [AppComponent]
})
export class AppModule { }
Here,
AppComponent imports the AppRoutingModule module using imports meta data.
Angular CLI provides option to set routing in the existing application as well. The general command to include routing in an existing application is as follows −
ng generate module my-module --routing
This will generate new module with routing features enabled. To enable routing feature in the existing module (AppModule), we need to include extra option as specified below −
ng generate module app-routing --module app --flat
Here,
–module app configures the newly created routing module, AppRoutingModule in the AppModule module.
Let us configure the routing module in ExpenseManager application.
Open command prompt and go to project root folder.
cd /go/to/expense-manager
Generate routing module using below command −
ng generate module app-routing --module app --flat
Output
The output is mentioned below −
CREATE src/app/app-routing.module.ts (196 bytes)
UPDATE src/app/app.module.ts (785 bytes)
Here,
CLI generate AppRoutingModule and then, configures it in AppModule
Creating routes
Creating a route is simple and easy. The basic information to create a route is given below −
- Target component to be called.
- The path to access the target component.
The code to create a simple route is mentioned below −
const routes: Routes = [
  { path: 'about', component: AboutComponent },
];
Here,
Routes is the variable in the AppRoutingModule.
about is the path and AboutComponent is the target / destination component. When user requests http://localhost:4200/about url, the path matches with about rule and then AboutComponent will be called.
Accessing routes
Let us learn how to use the configured routes in the application.
Accessing the route is a two step process.
Include router-outlet tag in the root component template.
<router-outlet></router-outlet>
Use routerLink and routerLinkActive property in the required place.
<a routerLink="/about" routerLinkActive="active">First Component</a>
Here,
routerLink set the route to be called using the path.
routerLinkActive set the CSS class to be used when the route is activated.
Sometime, we need to access routing inside the component instead of template. Then, we need to follow below steps −
Inject instance of Router and ActivatedRoute in the corresponding component.
import { Router, ActivatedRoute } from '@angular/router';
constructor(private router: Router, private route: ActivatedRoute)
Here,
Router provides the function to do routing operations.
Route refers the current activate route.
Use router’s navigate function.
this.router.navigate(['about']);
Here,
navigate function expects an array with necessary path information.
Using relative path
Route path is similar to web page URL and it supports relative path as well. To access AboutComponent from another component, say HomePageComponent, simple use .. notation as in web url or folder path.
<a routerLink="../about">Relative Route to about component</a>
To access relative path in the component −
import { NavigationExtras } from '@angular/router';
this.router.navigate(['about'], { relativeTo: this.route });
Here,
relativeTo is available under NavigationExtras class.
Route ordering
Route ordering is very important in a route configuration. If same path is configured multiple times, then the first matched path will get called. If the first match fails due to some reason, then the second match will get called.
Redirect routes
Angular route allows a path to get redirected to another path. redirectTo is the option to set redirection path. The sample route is as follows −
const routes: Routes = [
   { path: '', redirectTo: '/about' },
];
Here,
- redirectTo sets about as the redirection path if the actual path matches empty string.
Wildcard routes
Wildcard route will match any path. It is created using ** and will be used to handle non existing path in the application. Placing the wildcard route at the end of the configuration make it called when other path is not matched.
The sample code is as follows −
const routes: Routes = [
  { path: 'about', component: AboutComponent },
  { path: '',   redirectTo: '/about', pathMatch: 'full' },
  { path: '**', component: PageNotFoundComponent },  // Wildcard route for a 404 page
];
Here,
If a non existent page is called, then the first two route gets failed. But, the final wildcard route will succeed and the PageNotFoundComponent gets called.
Access Route parameters
In Angular, we can attach extra information in the path using parameter. The parameter can be accessed in the component by using paramMap interface. The syntax to create a new parameter in the route is as follows −
const routes: Routes = [
  { path: 'about', component: AboutComponent },
  { path: 'item/:id', component: ItemComponent },
  { path: '',   redirectTo: '/about', pathMatch: 'full' },
  { path: '**', component: PageNotFoundComponent },  // Wildcard route for a 404 page
];
Here, we have attached id in the path. id can be accessed in the ItemComponent using two techniques.
- Using Observable.
- Using snapshot (non-observable option).
Using Observable
Angular provides a special interface, paramMap to access the parameter of the path. parmaMap has following methods −
has(name) − Returns true if the specified name is available in the path (parameter list).
get(name) − Returns the value of the specified name in the path (parameter list).
getAll(name) − Returns the multiple value of the specified name in the path. get() method returns only the first value when multiple values are available.
keys − Returns all parameter available in the path.
Steps to access the parameter using paramMap are as follows −
Import paramMap available in @angular/router package.
Use paramMap in the ngOnInit() to access the parameter and set it to a local variable.
ngOnInit() {
    this.route.paramMap.subscribe(params => {
        this.id = params.get('id);
    });
}
We can use it directly in the rest service using pipe method.
this.item$ = this.route.paramMap.pipe(
    switchMap(params => {
      this.selectedId = Number(params.get('id'));
      return this.service.getItem(this.selectedId);
    })
);
Using snapshot
snapshot is similar to Observable except, it does not support observable and get the parameter value immediately.
let id = this.route.snapshot.paramMap.get('id');
Nested routing
In general, router-outlet will be placed in root component (AppComponent) of the application. But, router-outlet can be used in any component. When router-outlet is used in a component other then root component, the routes for the particular component has to be configured as the children of the parent component. This is called Nested routing.
Let us consider a component, say ItemComponent is configured with router-outlet and has two routerLink as specified below −
<h2>Item Component</h2>
<nav>
   <ul>
      <li><a routerLink="view">View</a></li>
      <li><a routerLink="edit">Edit</a></li>
   </ul>
</nav>
<router-outlet></router-outlet>
The route for the ItemComponent has to be configured as Nested routing as specified below −
const routes: Routes = [
{
   path: 'item',

   component: ItemComponent,
   children: [
   {
      path: 'view',
      component: ItemViewComponent
   },
   {
   path: 'edit',
   component: ItemEditComponent
   }
   ]
}]
Working example
Let us apply the routing concept learned in this chapter in our ExpenseManager application.
Open command prompt and go to project root folder.
cd /go/to/expense-manager
Generate routing module using below command, if not done before.
ng generate module app-routing --module app --flat
Output
The output is as follows −
CREATE src/app/app-routing.module.ts (196 bytes) UPDATE src/app/app.module.ts (785 bytes)
Here,
CLI generate AppRoutingModule and then configures it in AppModule.
Update AppRoutingModule (src/app/app.module.ts) as mentioned below −
import { NgModule } from '@angular/core';
import { Routes, RouterModule } from '@angular/router'; import { ExpenseEntryComponent } from './expense-entry/expense-entry.component';
import { ExpenseEntryListComponent } from './expense-entry-list/expense-entry-list.component';
const routes: Routes = [
   { path: 'expenses', component: ExpenseEntryListComponent },
   { path: 'expenses/detail/:id', component: ExpenseEntryComponent },
   { path: '', redirectTo: 'expenses', pathMatch: 'full' }];
@NgModule({
   imports: [RouterModule.forRoot(routes)],
   exports: [RouterModule] })
export class AppRoutingModule { }
Here, we have added route for our expense list and expense details component.
Update AppComponent template (src/app/app.component.html) to include router-outlet and routerLink.
<!-- Navigation -->
<nav class="navbar navbar-expand-lg navbar-dark bg-dark static-top">
<div class="container">
   <a class="navbar-brand" href="#">{{ title }}</a> <button class="navbar-toggler" type="button" data-toggle="collapse" data-target="#navbarResponsive" aria-controls="navbarResponsive" aria-expanded="false" aria-label="Toggle navigation">
      <span class="navbar-toggler-icon"></span>
   </button>
   <div class="collapse navbar-collapse" id="navbarResponsive">
      <ul class="navbar-nav ml-auto">
         <li class="nav-item active">
            <a class="nav-link" href="#">Home
               <span class="sr-only" routerLink="/">(current)</span>
            </a>
         </li>
         <li class="nav-item">
            <a class="nav-link" routerLink="/expenses">Report</a>
         </li>
         <li class="nav-item">
            <a class="nav-link" href="#">Add Expense</a>
         </li>
         <li class="nav-item">
            <a class="nav-link" href="#">About</a>
         </li>
      </ul>
   </div>
</div>
</nav>
<router-outlet></router-outlet>
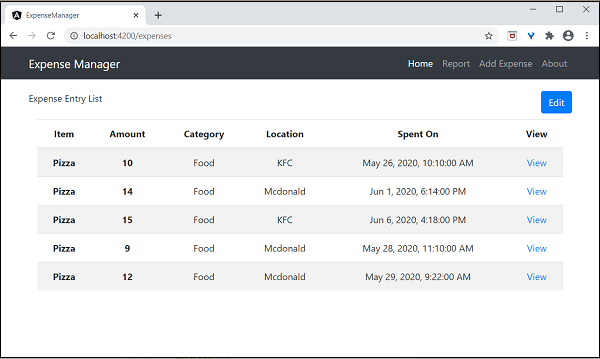
Open ExpenseEntryListComponent template (src/app/expense-entry-list/expense-entry-list.component.html) and include view option for every expense entries.
<table class="table table-striped">
   <thead>
      <tr>
         <th>Item</th>
         <th>Amount</th>
         <th>Category</th>
         <th>Location</th>
         <th>Spent On</th>
         <th>View</th>
      </tr>
   </thead>
   <tbody>
      <tr *ngFor="let entry of expenseEntries">
         <th scope="row">{{ entry.item }}</th>
         <th>{{ entry.amount }}</th>
         <td>{{ entry.category }}</td>
         <td>{{ entry.location }}</td>
         <td>{{ entry.spendOn | date: 'medium' }}</td>
         <td><a routerLink="../expenses/detail/{{ entry.id }}">View</a></td>
      </tr>
   </tbody>
</table>
Here, we have updated the expense list table and added a new column to show the view option.
Open ExpenseEntryComponent (src/app/expense-entry/expense-entry.component.ts) and add functionality to fetch the current selected expense entry. It can be done by first getting the id through the paramMap and then, using the getExpenseEntry() method from ExpenseEntryService.
this.expenseEntry$ = this.route.paramMap.pipe(
   switchMap(params => {
      this.selectedId = Number(params.get('id'));
      return
this.restService.getExpenseEntry(this.selectedId); }));
   this.expenseEntry$.subscribe( (data) => this.expenseEntry = data );
Update ExpenseEntryComponent and add option to go to expense list.
goToList() {
   this.router.navigate(['/expenses']);
}
The complete code of ExpenseEntryComponent is as follows −
import { Component, OnInit } from '@angular/core'; import { ExpenseEntry } from '../expense-entry'; import { ExpenseEntryService } from '../expense-entry.service';
import { Router, ActivatedRoute } from '@angular/router';
import { Observable } from 'rxjs';
import { switchMap } from 'rxjs/operators';
@Component({
   selector: 'app-expense-entry',
   templateUrl: './expense-entry.component.html',
   styleUrls: ['./expense-entry.component.css']
})
export class ExpenseEntryComponent implements OnInit {
   title: string;
   expenseEntry$ : Observable<ExpenseEntry>;
   expenseEntry: ExpenseEntry = {} as ExpenseEntry;
   selectedId: number;
   constructor(private restService : ExpenseEntryService, private router : Router, private route :
ActivatedRoute ) { }
   ngOnInit() {
      this.title = "Expense Entry";
   this.expenseEntry$ = this.route.paramMap.pipe(
      switchMap(params => {
         this.selectedId = Number(params.get('id'));
         return
this.restService.getExpenseEntry(this.selectedId); }));
   this.expenseEntry$.subscribe( (data) => this.expenseEntry = data );
   }
   goToList() {
      this.router.navigate(['/expenses']);
   }
}
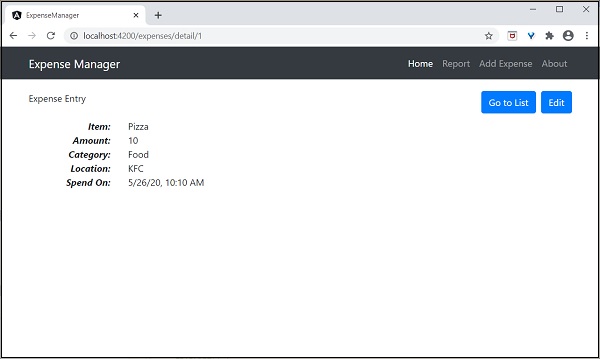
Open ExpenseEntryComponent (src/app/expense-entry/expense-entry.component.html) template and add a new button to navigate back to expense list page.
<div class="col-sm" style="text-align: right;">
   <button type="button" class="btn btn-primary" (click)="goToList()">Go to List</button>
   <button type="button" class="btn btn-primary">Edit</button>
</div>
Here, we have added Go to List button before Edit button.
Run the application using below command −
ng serve
The final output of the application is as follows −
Clicking the view option of the first entry will navigate to details page and show the selected expense entry as shown below −