- Windows Server 2012 - Home
- Overview
- Installation
- Server Roles
- PowerShell
- Remote Management
- Windows Firewall
- Remote Desktop Management
- Resource Monitor
- Active Directory
- DC Accounts
- File System
- Group Managed Service Accounts
- Group Policy Overview
- DHCP Role
- DNS Role
- Primary Zones
- Manage Records
- IIS Overview
- IIS Security
- Hyper-V
- Advanced Configuration
- Configure WSUS Role
- WSUS Policies & Tuning
- Sharing of Files
- File Manager
- Print Server
- Easy Printing
- Configure Print Drivers
- Network Services
- Backup Management
Windows Server 2012 - Quick Guide
Windows Server 2012 - Overview
Windows Server 2012 codenamed Windows Server 8 is the most recent version of the operating system from Microsoft regarding server management. But it is not the last one, as the last one is Windows Server 2016. Officially it was released on August 1st, 2012 and is being sold as a commercial version only.

Improvements in Windows Server 2012
The major Improvements on this version are as follows −
It is ready to be integrated with cloud systems and it still can maintain the classic features of local datacenters as a result Hyper-V Virtualization has new features Hyper-v replicas, it allows you to create virtual machines replications between clusters and storage systems.
The Storage migration virtual disks can be moved to different physical storages, Virtual machine snapshots, virtual machines can be deleted from the Hyper-v and also from the virtual disks and it can be used directly without the need to shut down the virtual machine.
The Core server installation easily switches to GUI installation without the need of reinstallation.
The file server and storage service improvement is that it eliminates identical copies in the same volumes as such and saves space.
The Storage pools and storage spaces allows you to group the hard disks to one or more storage pools then it allows to create virtual disks. It can add other disks to the storage pools and make available to the users without impacting them.
The iSCSI Target Server can offer block storage to other servers and applications on the network using the iSCSI standard.
Active Directory cloning can deploy additional domain controllers by cloning an existing virtual domain controller.
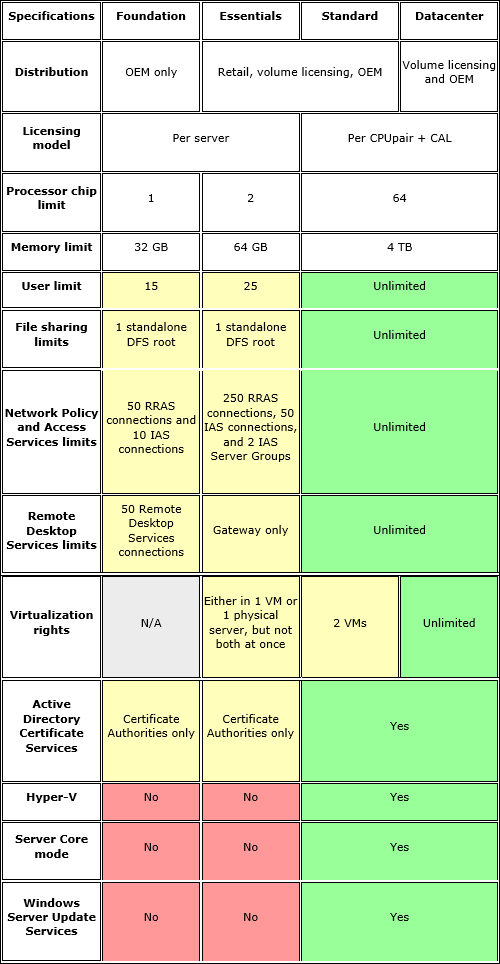
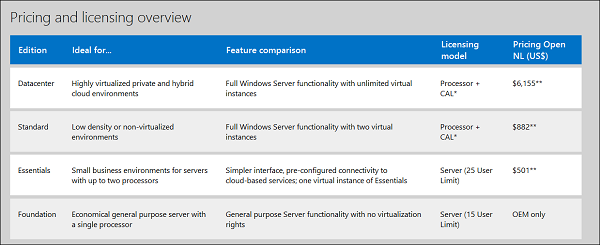
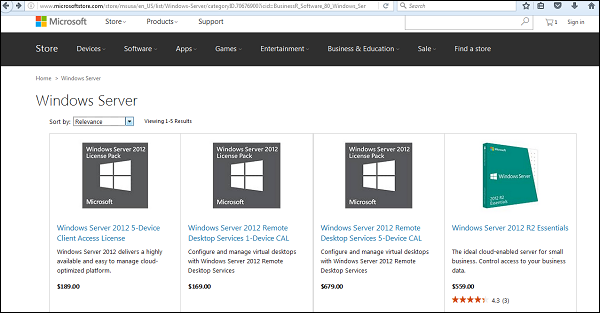
The Windows Server 2012 has four editions: Foundation, Essentials, Standard and Datacenter. Each one of them has their own limitation accept the Datacenter version which is also the most expensive one.
The following table will show what is the right one for your business needs −
For finding out the cost of licensing you can click on the following link − https://azure.microsoft.com/en-us/?ocid=cloudplat_hp
Windows Server 2012 - Installation
In this chapter, we will discuss regarding the requirements and prerequisites of the Windows Server 2012.
System Requirements
Although most of the servers nowadays probably have the necessary requirements for Windows Server 2012. It will certainly be useful to know them in case you want to upgrade from an older system.
The main requirements are −
CPU socket minimum 1.4 GHz (64-bit processor) or faster for single core and Microsoft recommends is 3.1 GHz (64-bit processor) or faster multi-core.
RAM memory minimum is 2GB, but Microsoft recommends 8GB.
160 GB hard disk with a 60 GB system partition space in your hard disk.
One important thing to note here is that the installation process itself will verify your computer hardware and let you know if it qualifies for a Windows Server 2012 installation. If not, then you will need to upgrade your hardware.
Installation
The following steps are to be adhered for the installation of Windows Server 2012.
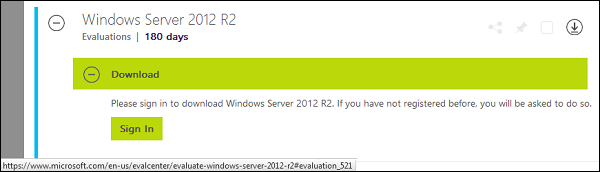
Step 1 − We can download the evaluation ISO of Windows Server 2012 R2 from the following link − https://www.microsoft.com/en-us/evalcenter/evaluate-windows-server-2012-r2
But you will need to sign in first with a Microsoft account like Hotmail for example in order to complete the download and the good thing is that the evaluation period will last for 180 days, so you will have enough time to know if it will be the right product for you or not.
At the end, if you decide to buy the license of your Windows server 2012 R2.
For the Enterprise solution, I would recommend to purchase it via a Microsoft partner that is found in your country.
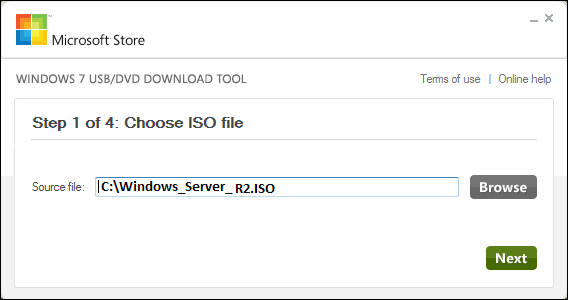
Step 2 − After downloading the ISO of Microsoft, create a boot USB driver which can be created with the Microsoft tool called Windows USB/DVD Download Tool and can be downloaded from the following link − https://windows-7-usb-dvd-download-tool.en.uptodown.com/windows
After downloading the EXE file, open it and select the ISO file location and then click next like in the following screenshot, and wait up to the end when the Boot USB is created.
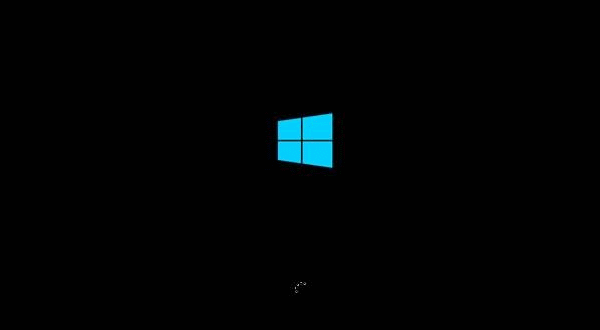
Step 3 − After completing the above given steps, plug-in the USB to the server and wait for a while till it loads the files. This will continue for about a couple of minutes as shown in the following screenshot.
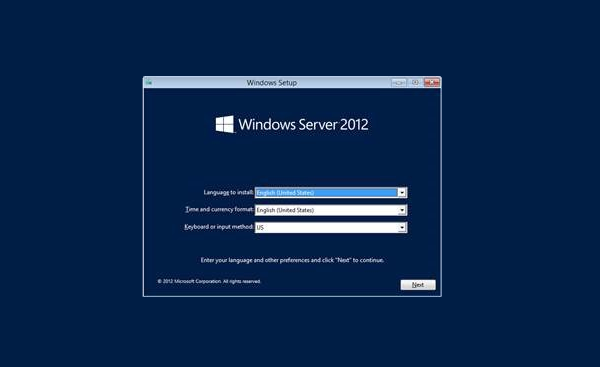
Step 4 − After the files are loaded, you will see the screen of language settings of installation, keyboard, time and currency format. Generally, all the default ones are also good enough to start with. Click Next.
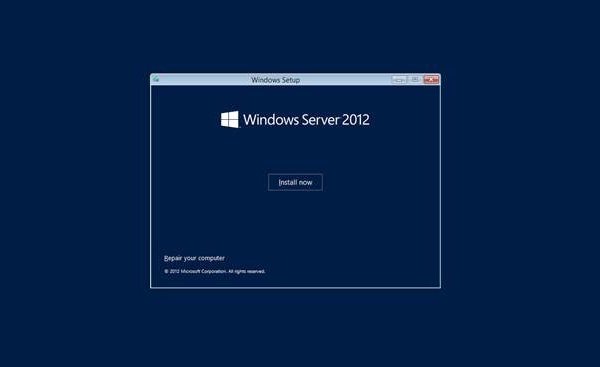
Step 5 − Click Install now.
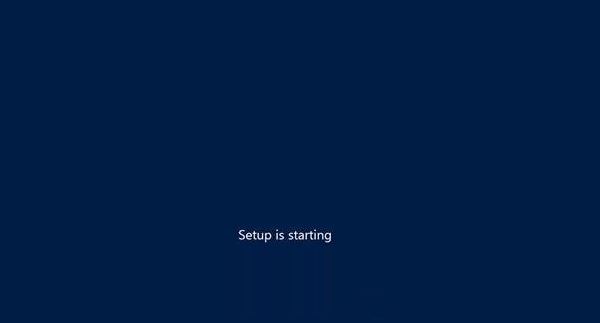
Step 6 − Once you have clicked on Install Now, the setup will start and it will load all the files and the screen will look as shown in the following screenshot.
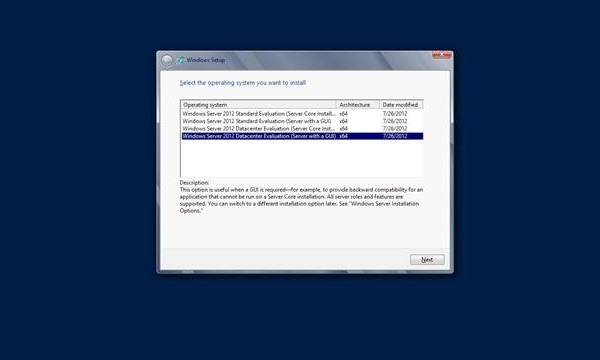
Step 7 − Wait until the files are loaded and then you will see the following screen. Lets select Windows Server 2012 DataCenter Evaluation (Server with GUI) and click Next.
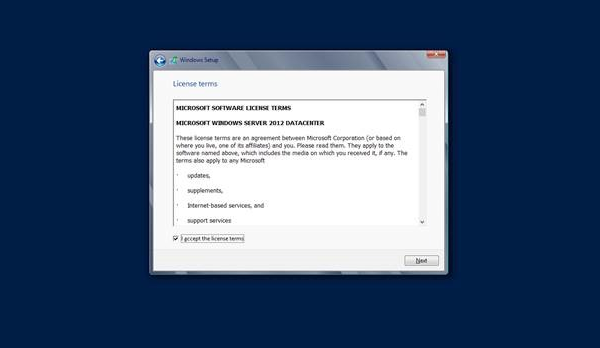
Step 8 − Click I accept the license terms and then click on the Next button as shown in the following screenshot.
Step 9 − The following screen will appear. In Driver Options you can create a new partition, delete or format the Hard disk. After you have done this process then you can select the partition where the Windows server 2012 R2 will be installed in our case we have one partition. Once all this is done, then click on Next.

Step 10 − Lets wait until this process finishes during this time and then the server will reboot.
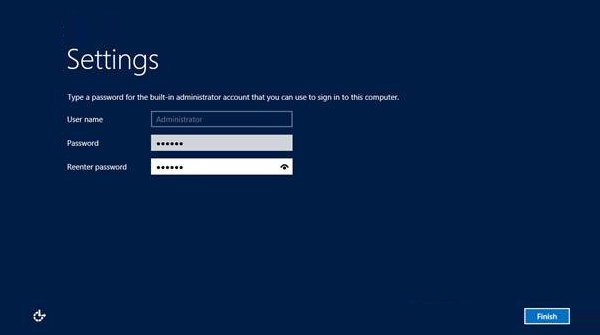
Step 11 − Once the reboot is done the following screen will appear. Set the password for the server and then click on Finish.
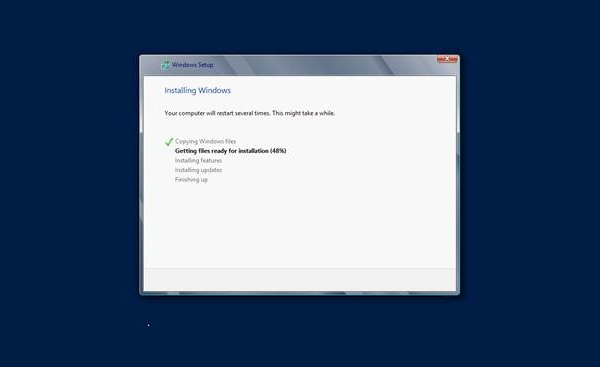
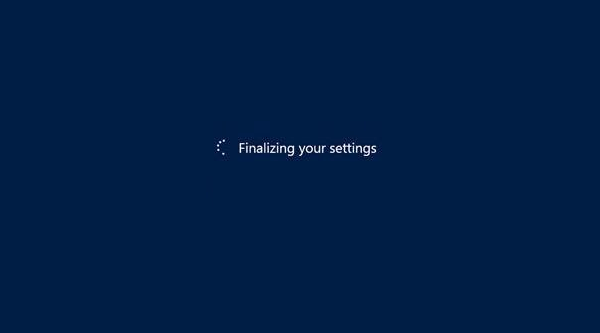
Step 12 − It will take some minutes until the setup finishes completely.
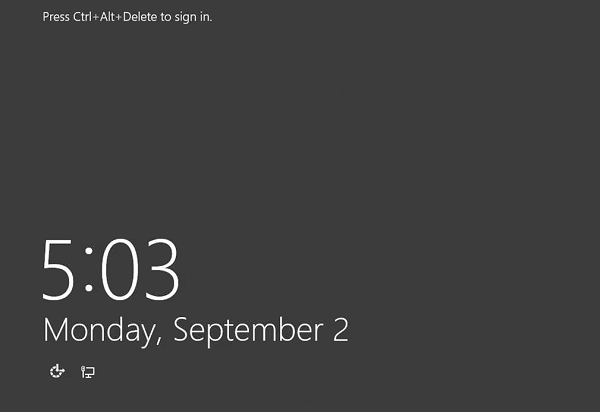
Step 13 − Once all this is done, you have completed the installation process and the following screen will appear.
Congratulations!!!
Windows Server 2012 - Server Roles
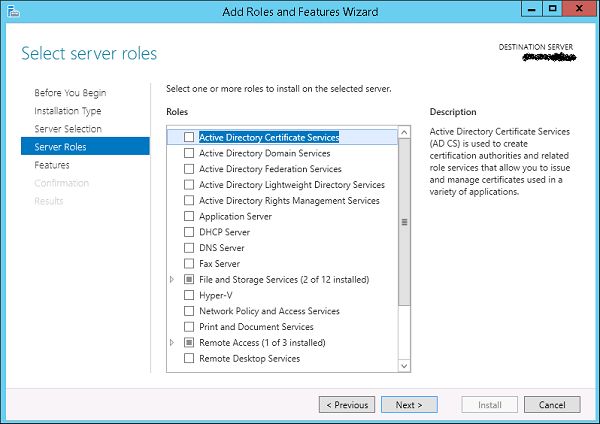
Like the previous version, Windows Server 2012 has the following roles which can be used and in the subsequent chapter, we will see how to install and configure the most important ones.
The following picture shows all the roles. A small reminder! - Roles and Features are the tools that you need to install or activate in order to complete your IT Administration duties, without their installation you cannot do anything.

To add a role in the server we should adhere to the following steps −
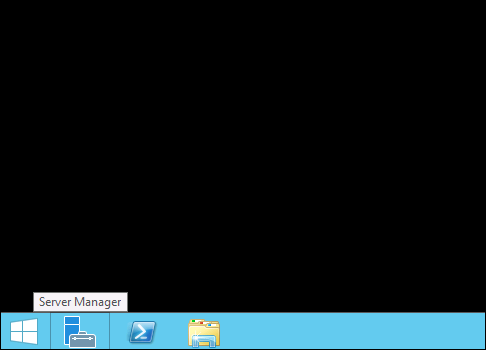
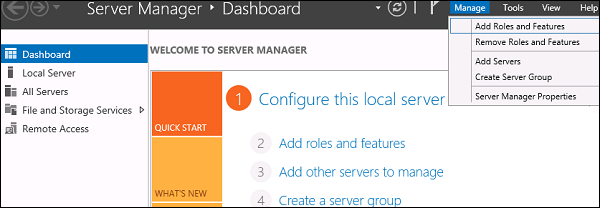
Step 1 − Click with the mouse on Server Manager which is found in the task bar as shown in the following screenshot.
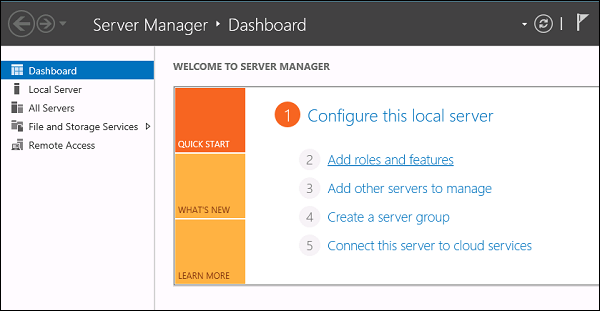
Step 2 − After opening the Server Manager, click on the second option Add roles and features.
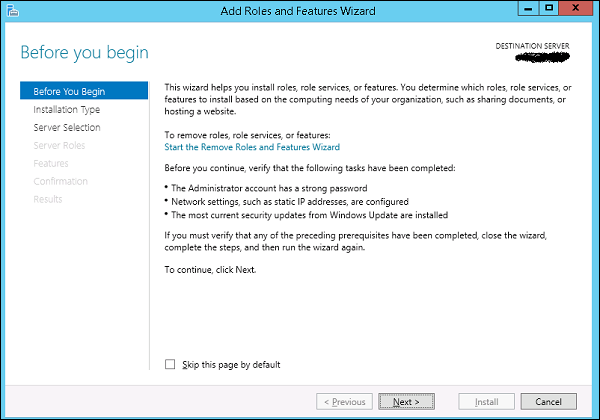
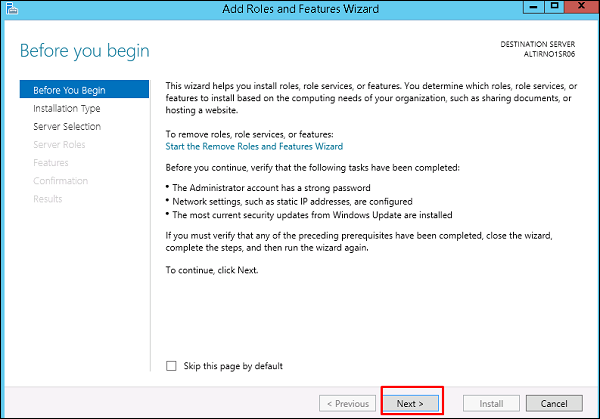
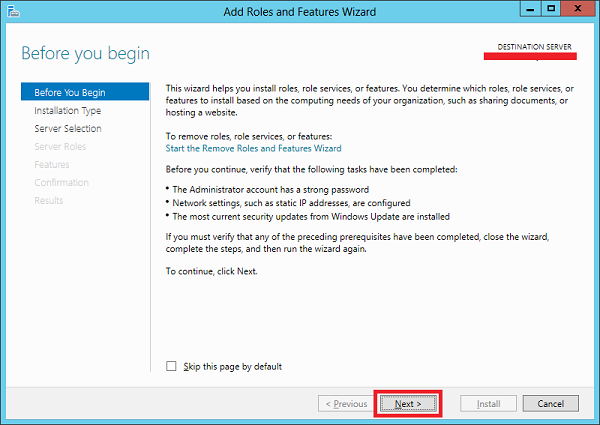
Step 3 − The following screen will appear, then you can Click on the Next button.
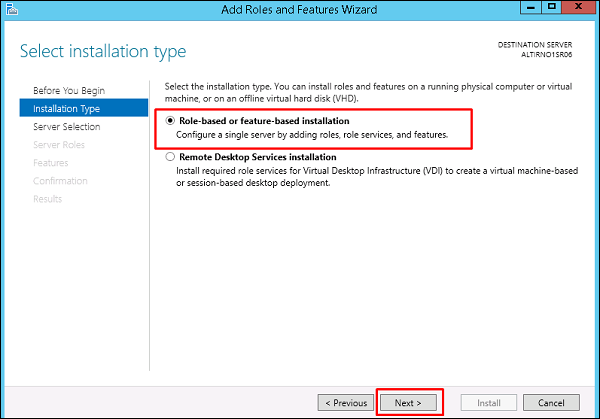
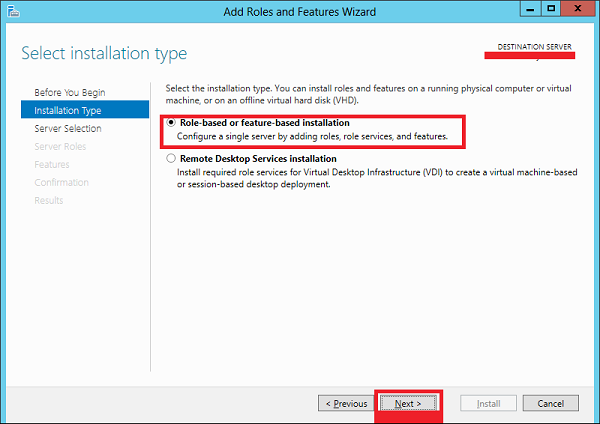
Step 4 − Select the Role-based or feature-based installation and then click on the Next button.

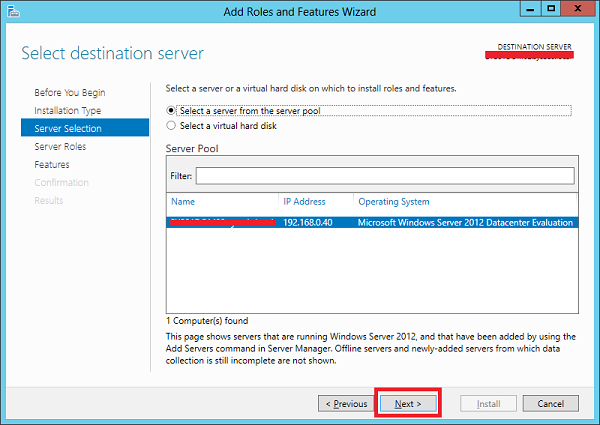
In the next screen that appears, you will have the following two options −
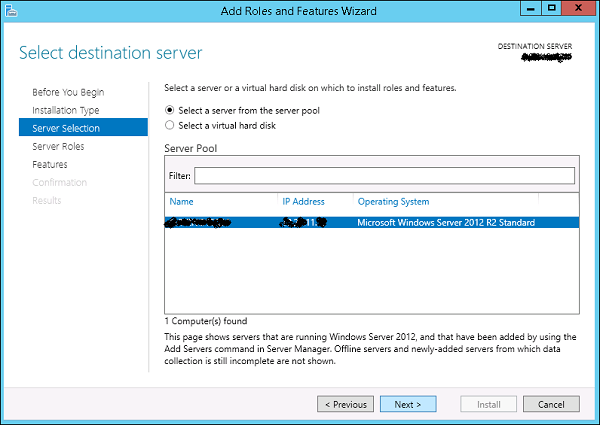
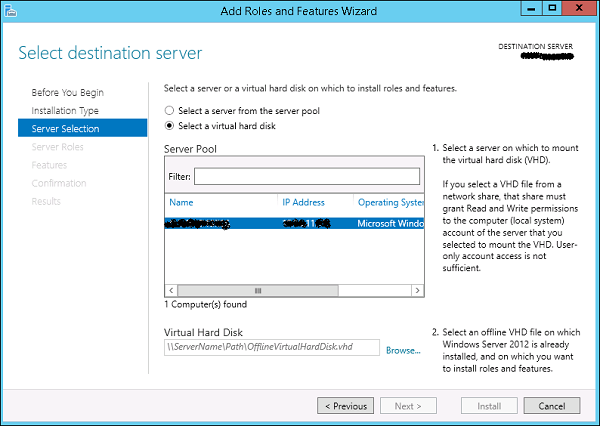
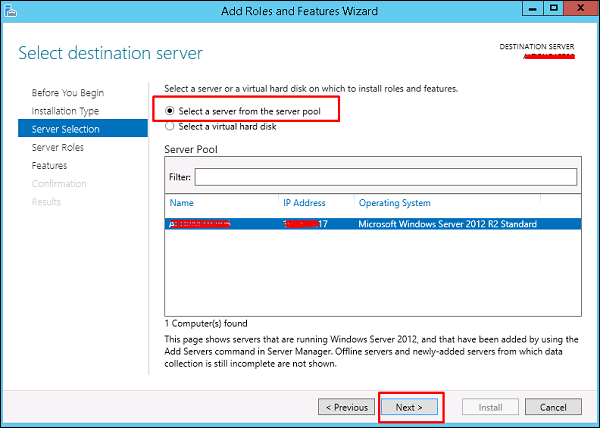
Option 1 − Select a server from the server pool. This option is if you want to install the services in the physical server like being done in the following screenshot.
Option 2 − Select a virtual Hard disk if you want to install the services in a virtual disk that can be somewhere in the network storage. Take a look at the following screenshot for better understanding.
Step 5 − The last step will be to check the service that you want to install, but in the upcoming chapters we will continue this setup for each and every important services.
Windows Server 2012 - PowerShell
Windows PowerShell is a command-line shell and scripting language designed especially for system administration. Its analogue in Linux is called as Bash Scripting. Built on the .NET Framework, Windows PowerShell helps IT professionals to control and automate the administration of the Windows operating system and applications that run on Windows Server environment.
Windows PowerShell commands, called cmdlets, let you manage the computers from the command line. Windows PowerShell providers let you access data stores, such as the Registry and Certificate Store, as easily as you access the file system.
In addition, Windows PowerShell has a rich expression parser and a fully developed scripting language. So in simple words you can complete all the tasks that you do with GUI and much more.
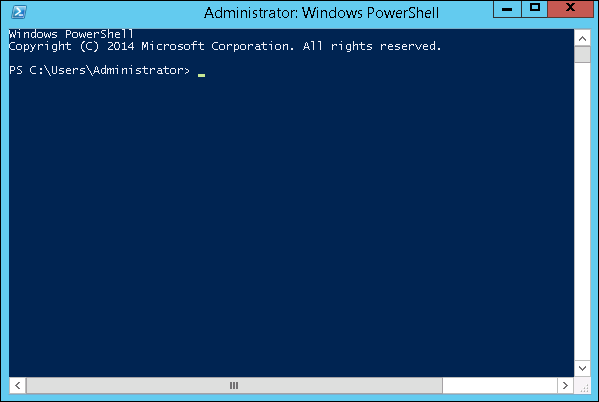
PowerShell Icon can be found in the task bar and in the start menu. Just by clicking on the icon, it will open.
To open it, just click on the icon and then the following screen will open and it means that PowerShell is ready for you to work on.
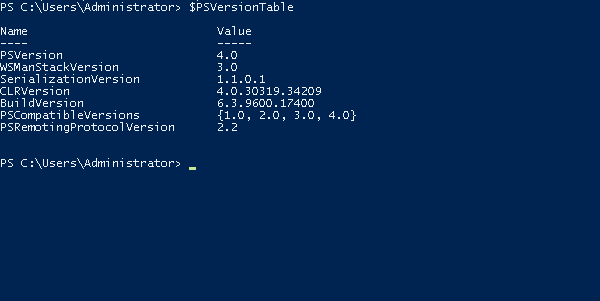
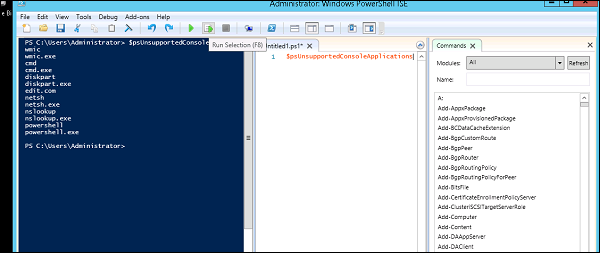
The latest version of PowerShell is 5.0 and to check what is installed in our server we type the following command :$PSVersionTable as shown in the following screenshot and from the screen we also know that we have PSVersion 4.0
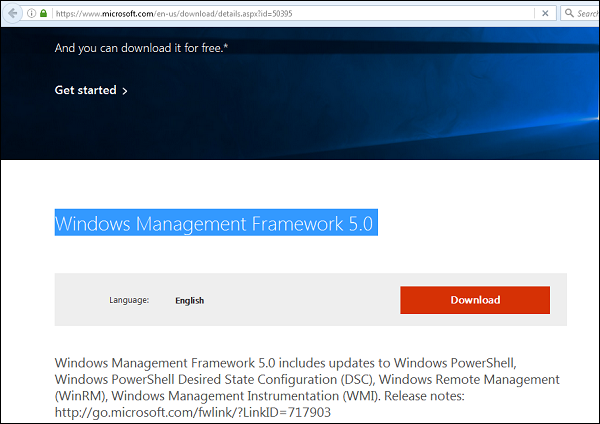
To update with the latest version where it has more Cmdlets we have to download Windows Management Framework 5.0 from the following link − https://www.microsoft.com/en-us/download/details.aspx?id=50395 and install it.
PowerShell ISE
The Windows PowerShell Integrated Scripting Environment (ISE) is a host application for Windows PowerShell. In Windows PowerShell ISE, you can run commands and write, test, and debug scripts in a single Windows-based graphic user interface with multiline editing, tab completion, syntax coloring, selective execution, context-sensitive help, and support for right-to-left languages.
You can use menu items and keyboard shortcuts to perform many of the same tasks that you would perform in the Windows PowerShell console. For example, when you debug a script in the Windows PowerShell ISE, to set a line breakpoint in a script, right-click the line of code, and then click Toggle Breakpoint.
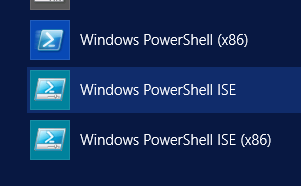
To open it you just go to Start Search and then Type PowerShell as shown in the following screenshot.

Then click on Windows PowerShell ISE. Or click on the downward Arrow as shown in the following screenshot.
It will list all the applications installed on the server and then click on Windows PowerShell ISE.
The following table will be open −
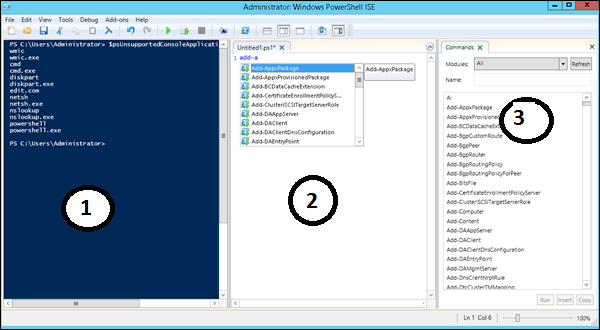
It has three sections, which include The PowerShell Console with number 1, then Scripting File number 2 and the third is the Command Module where you can find the module.
While creating the script you can run directly and see the result like the following example −
PowerShell Basic Commands
There are a lot of PowerShell commands and it is very difficult to put in all these commands in this tutorial, we will focus on some of the most important as well as basic commands of PowerShell.
The first step is to go to the Get-Help command which gives you an explanation about how to give a command and its parameter.

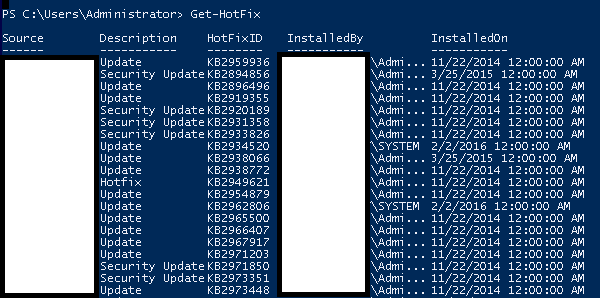
To get the list of Updates −
- Get-HotFix and to install a hot fix as follows
- Get-HotFix -id kb2741530
Remote Management
Remote Management Service is one of the most important part pertaining to administration of Windows Server 2012. Administration of servers is performed through Windows Management Instrumentation. WMI instructions can be sent over network WinRM Remote Management.
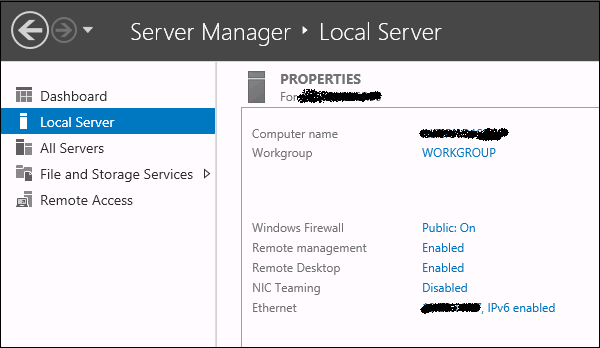
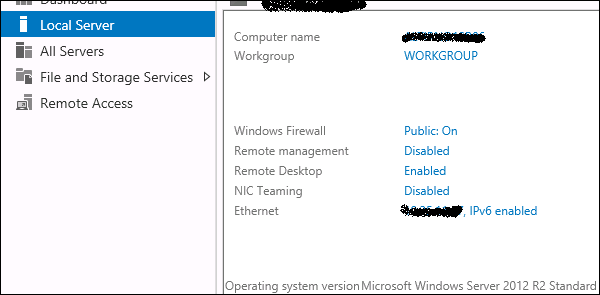
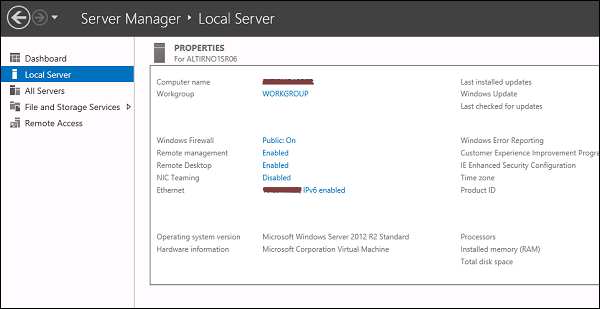
By default this utility is enabled, you can check it by going to Server Manager → then click on Local Server as shown in the following screenshot.
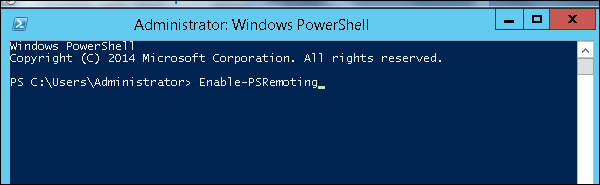
If in case it is disabled, you can enable it by Opening PowerShell and then typing EnablePSRemoting as shown in the screenshot given below.
There is another way to enable it Click on Server Manager → Local Server, then ENABLE Remote management.
Adding a Server for Remote Management
To add other servers for remote management, follow the steps given below −
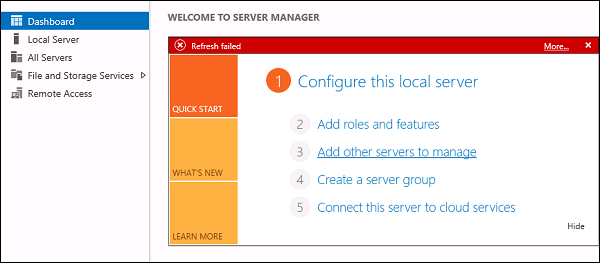
Step 1 − Server Manager → Dashboard → Add other servers to manage.
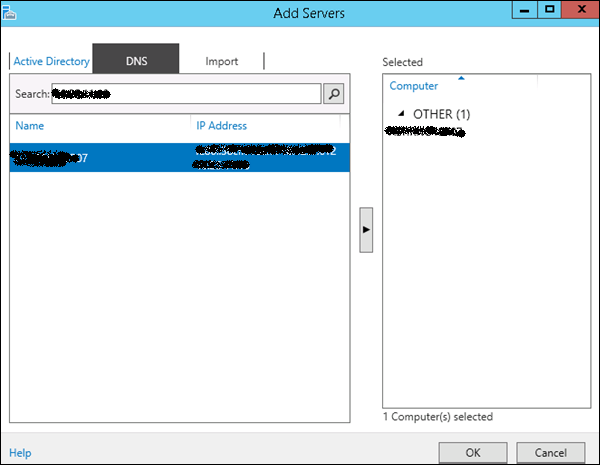
Step 2 − If the servers are joined to the domain, you add the select option Active Directory, in my case they are not joined, so I selected the second option DNS → In the search Box, I added the IP of the server that has to be managed → click on a small arrow → OK.
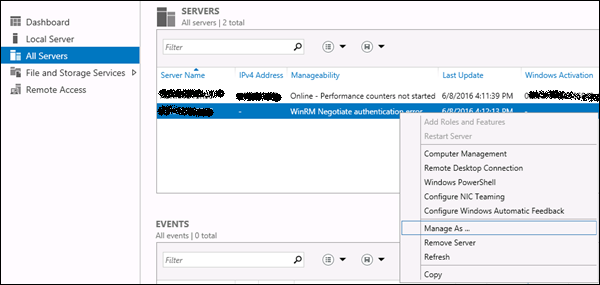
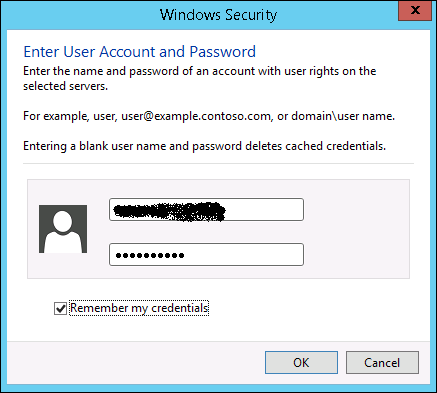
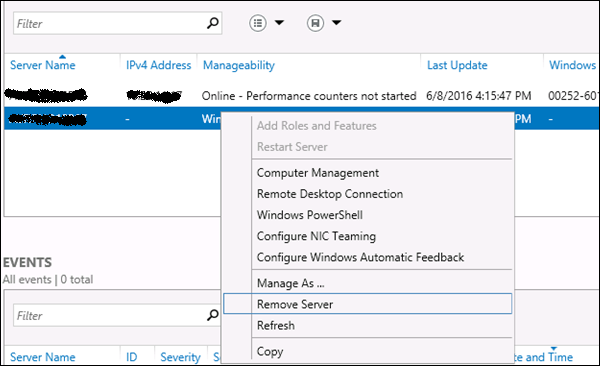
Step 3 − Go to Server Manager → All Servers, you will see the server that you have added. As my server is in the Work Group, I have to right click and click on Manage As as shown in the following screenshot.
Step 4 − Enter the credentials of the remote server as follows and then → OK.
To remove a managed server, Right Click on server → Remove Server.
Windows Server 2012 - Windows Firewall
The Windows Firewall with Advanced Security is a firewall that runs on the Windows Server 2012 and is turned on by default. The Firewall settings within Windows Server 2012 are managed from within the Windows Firewall Microsoft Management Console. To set Firewall settings perform the following steps −
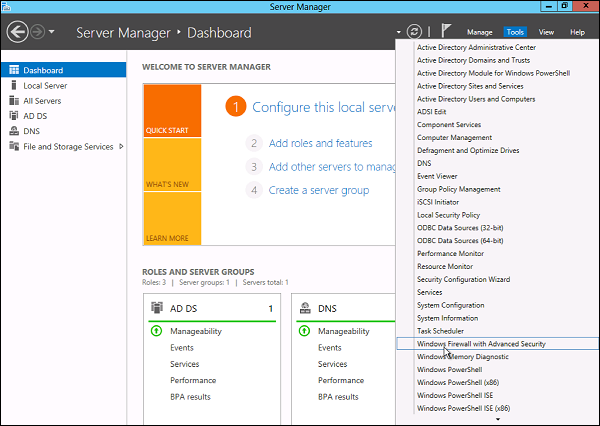
Step 1 − Click on the Server Manager from the task bar → Click the Tools menu and select Windows Firewall with Advanced Security.
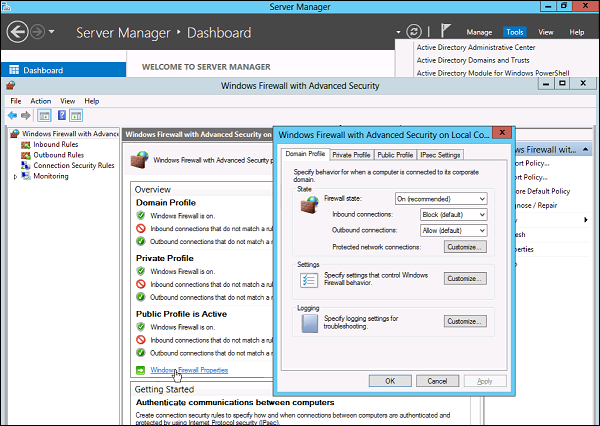
Step 2 − To see the current configuration settings by selecting Windows Firewall Properties from the MMC. This allows access to modify the settings for each of the three firewall profiles, which are Domain, Private and Public and IPsec settings.
Step 3 − Applying custom rules, which will include the following two steps −
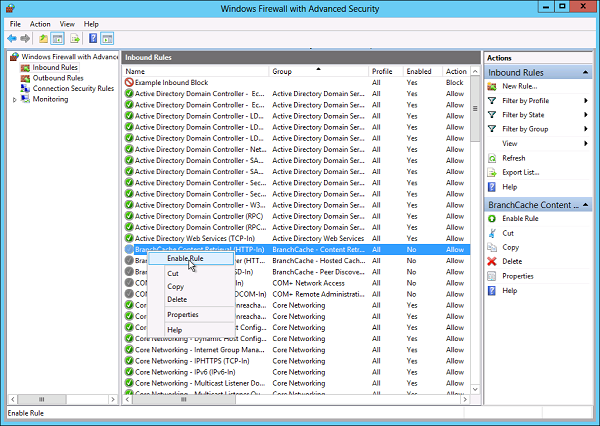
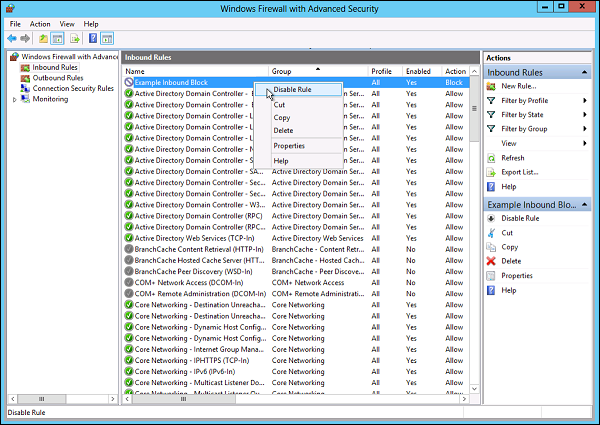
Select either Inbound Rules or Outbound Rules under Windows Firewall with Advanced Security on the left side of the management console. (As you Know outbound traffic is the traffic generated from server towards the internet and inbound traffic is vice versa). The rules that are currently enabled are denoted by green checkbox icon, while disabled rules display a grey checkbox icon.
Right-clicking a rule will allow you toggle enable/disable.
How to Create a New Firewall Rule?
To create a new Firewall Rule, you have to adhere to the following steps −
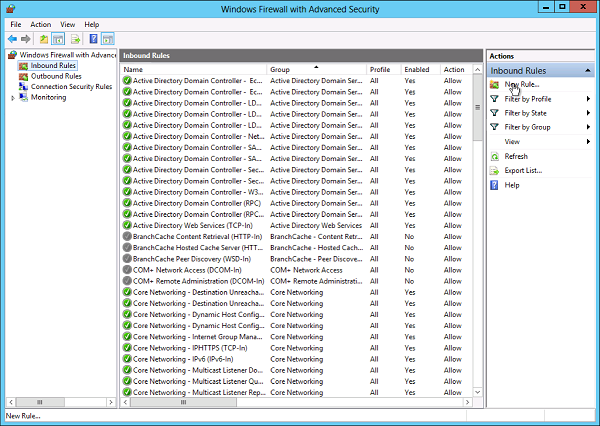
Step 1 − From the right side of either the Inbound Rules or Outbound Rules click New Rule.
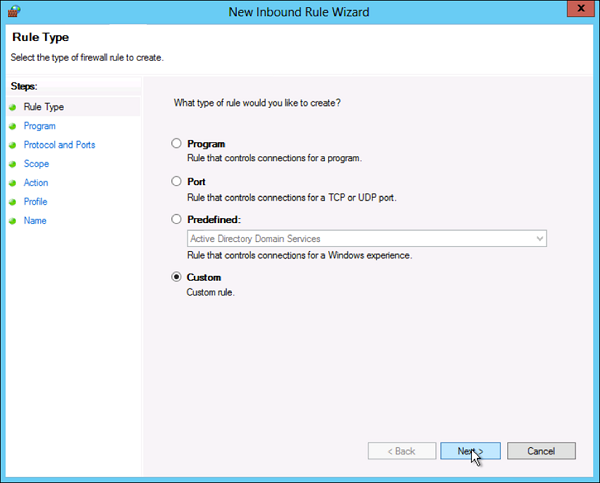
Step 2 − Custom from the Rule Type radial button → click Next.
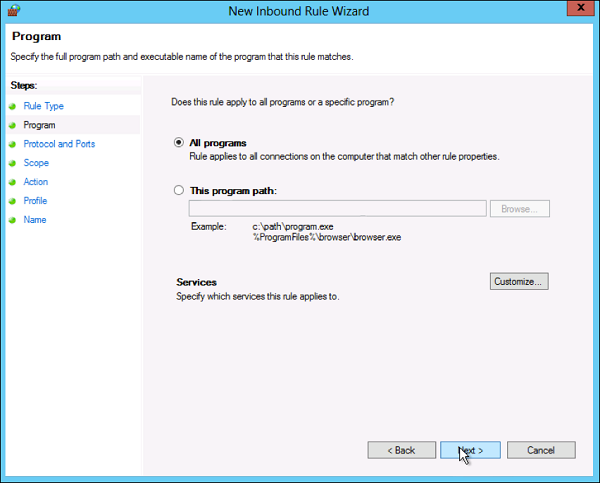
Step 3 − Select the Program association for the Custom Firewall Rule as either All programs or the path to a program → click Next.
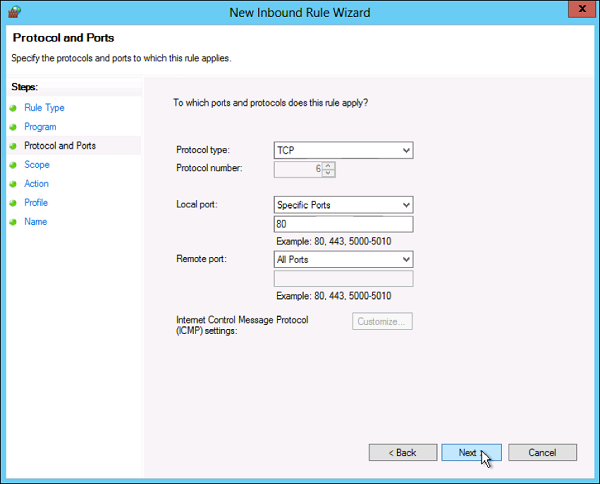
Step 4 − Protocol type field select the protocol type → click Next.
Step 5 − Select an IP address association for both local and remote addresses → click Next.

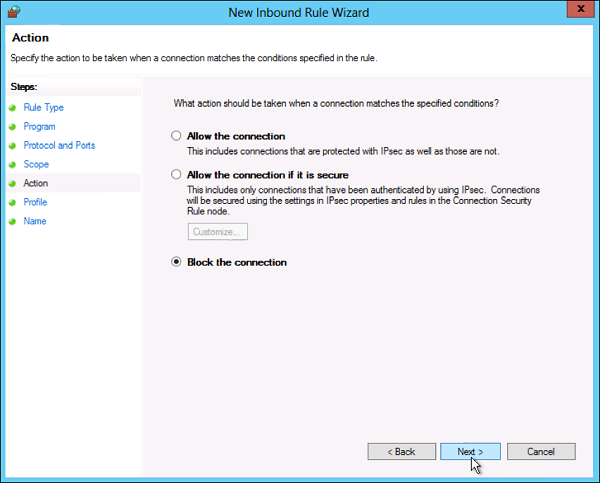
Step 6 − Select an action to take on matching traffic → click Next.
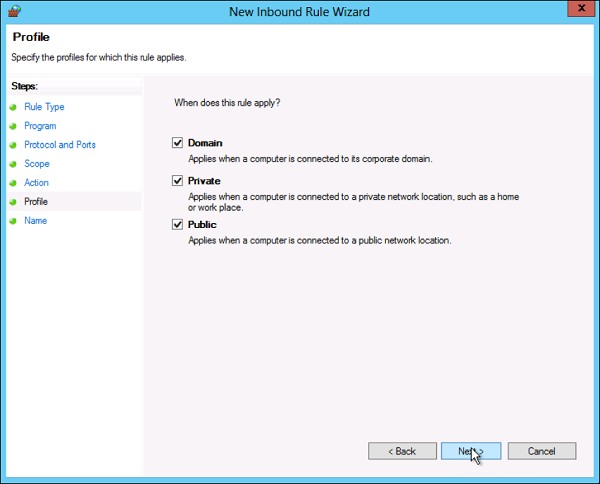
Step 7 − Select the profiles associated with the custom rule → click Next.
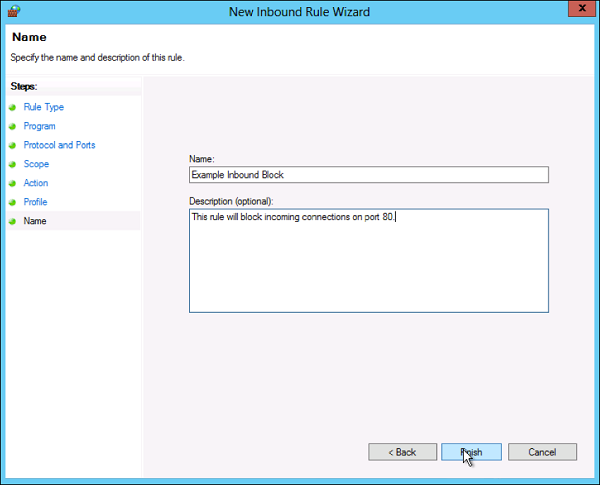
Step 8 − Put a name for your Firewall rule and an optional description → Finish.
Step 9 − The firewall rule can be found on the corresponding Rule tab, either inbound or outbound depending on the type created. To disable or delete the rule find the rule in the MMC, right-click it and select either Disable Rule or Delete.
Remote Desktop Management
In this chapter, we will see how to enable remote desktop application. It is important because this enables us to work remotely on the server. To do this, we have the following two options. For the first option, we have to follow the steps given below.
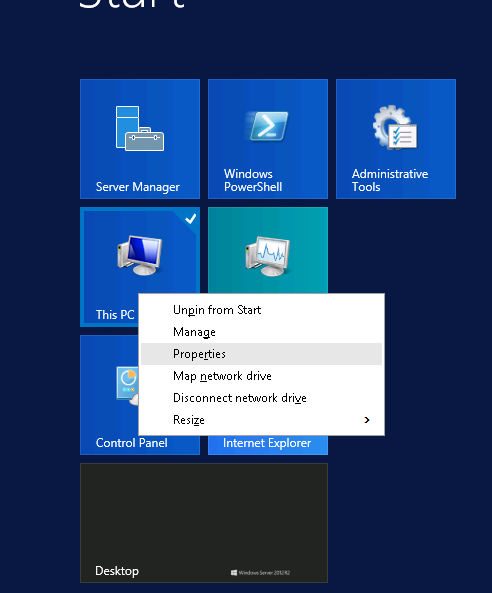
Step 1 − Go to Start → right click This PC → Properties.
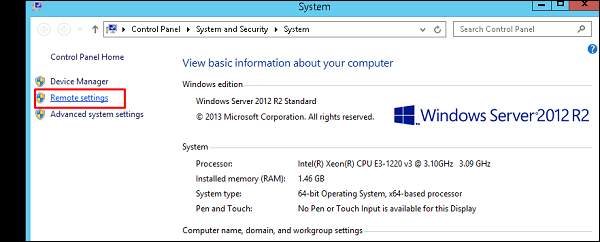
Step 2 − On Left side click Remote Setting.
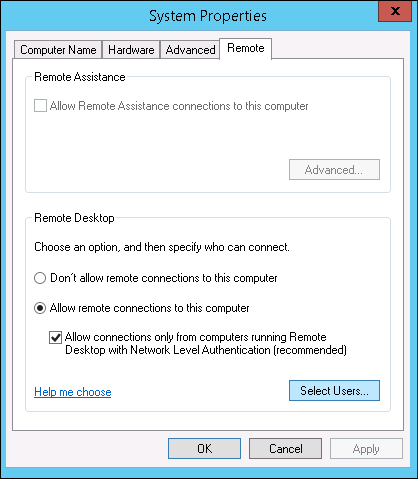
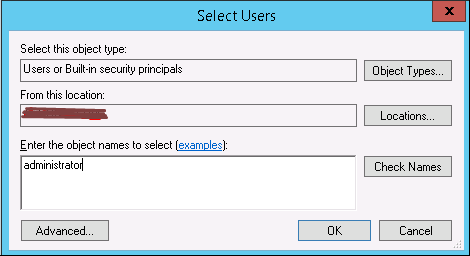
Step 3 − Check radio button Allow Remote connection to this computer and Check box Allow connection only from computers running Remote Desktop with Network Level Authentication (recommended) → click Select Users.
Step 4 − Click Add.
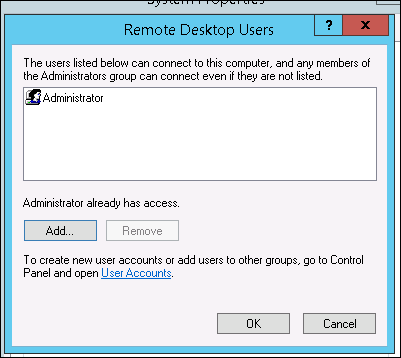
Step 5 − Type user that you want to allow access. In my case, it is administrator → click OK.
For the second option, we need to follow the steps given below.
Step 1 − Click on Server Manage → Local Server → click on Enable or Disable, if it is Disabled.
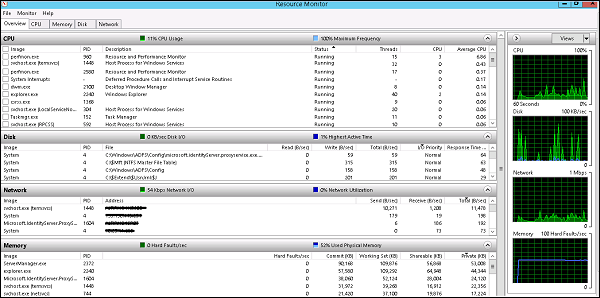
Windows Server 2012 - Resource Monitor
Resource Monitor is a great tool to identify which program/service is using resources like program, applications, network connection and memory usages.
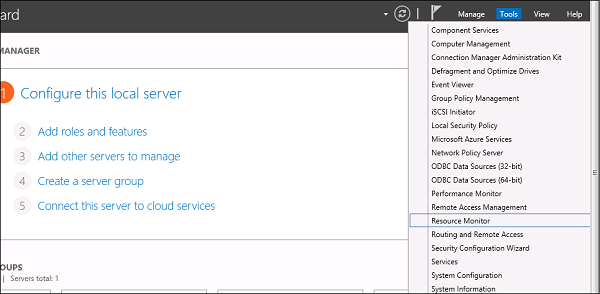
To open Resource Monitor, go to Server Manage → Tools.
Click on Resource Monitor, the First Section is Overview. It tells how much CPU is consuming every application and on the right side of the table, it monitors in real time the chart of CPU usage. The Memory tells how much memory every application is consuming and in the right side of the table it is being monitored in real time in the chart of CPU usage.
The Disk tab splits it by the different hard drives. This will show the current Disk I/O and will show the disk usage per process. The network tab will show the processes and their network bytes sent and received. It will also show the current TCP connections and what ports are currently listening, IDs too.
Windows Server 2012 - Active Directory
In this chapter, we will see how to Install Active Directory in Windows Server 2012 R2. Many of us who have worked with the previous version run DCPROMO.EXE to install it, but in the 2012 version, it is recommended by Microsoft not to use it anymore.
To continue with Installation follow the steps given below.
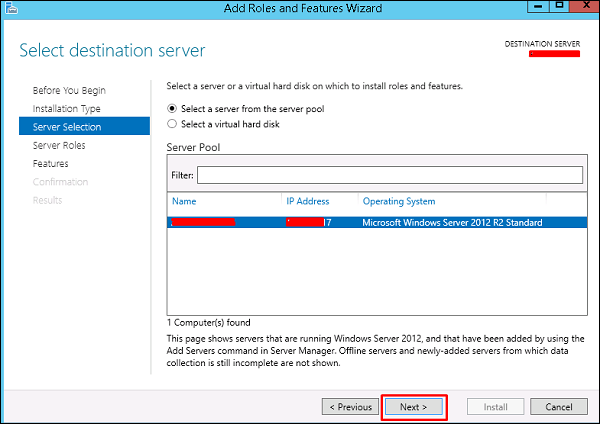
Step 1 − Go to Server Manager → Manage → Add Roles and Feature.
Step 2 − Click the Next button.
Step 3 − As we are installing AAD on this machine, we will select Role-based or featurebased Installation → Next.
Step 4 − Click on Select a server from the server pool, this is the case when it will be installed locally.
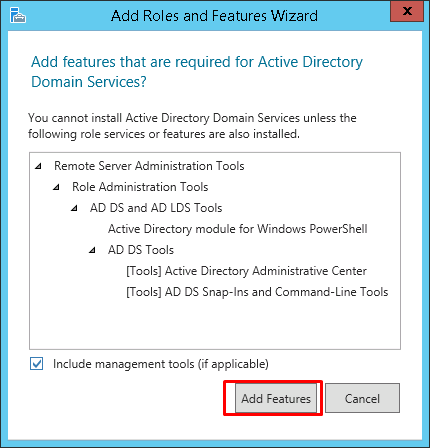
Step 5 − Check mark in the box next to Active Directory Domain Services. A box will be explaining additional roles services or features which are also required to install domain services.
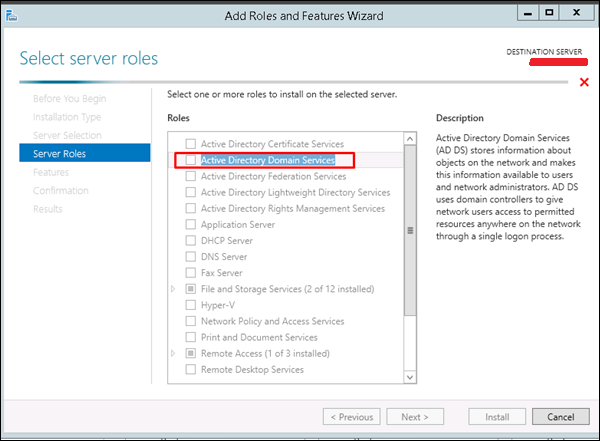
Step 6 − Click Add Features.
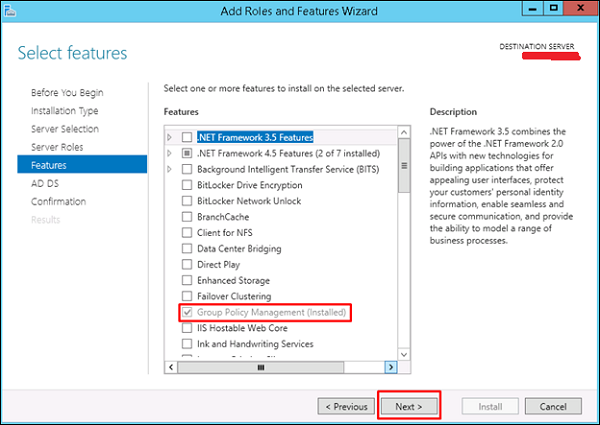
Step 7 − Check Group Policy Management → Next.
Step 8 − Click the Next button.
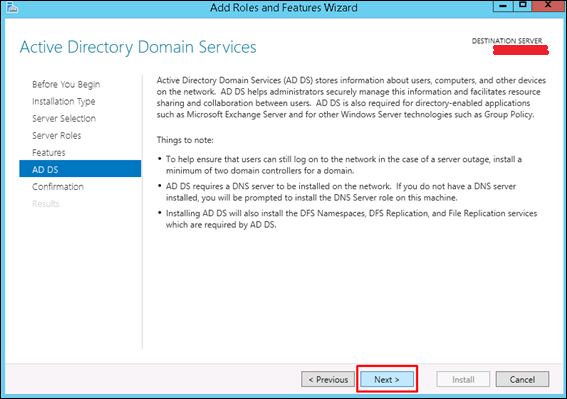
Step 9 − Click Install.
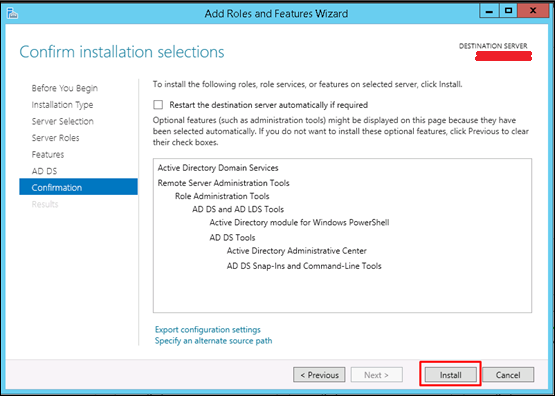
Installation Screen will come up now and you have to wait until installation bar completes.
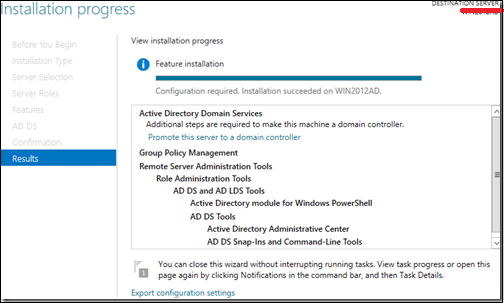
Now that the installation of DC role is finished, you have to configure it for you server.
Step 10 − Click Server Manager → Open the Notifications Pane by selecting the Notifications icon from the top of the Server Manager. From the notification regarding configuring AD DS (Active Directory Domain Services), click Promote this server to a domain controller.
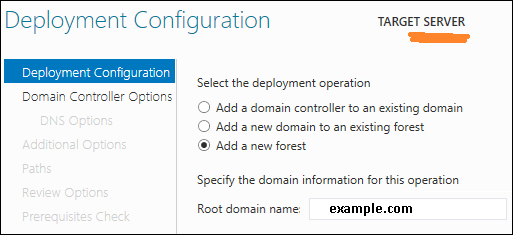
Step 11 − Click Add a new forest → Insert your root domain name into the Root domain name field. In my case, I have put example.com.
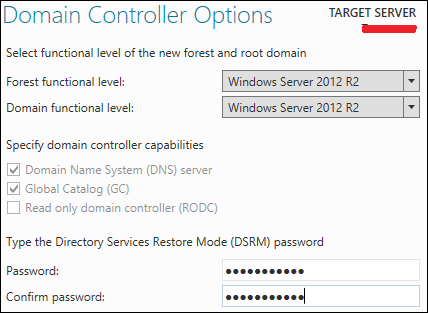
Step 12 − Select a Domain and Forest functional level. Once selected fill in a DSRM password in the provided password fields. The DSRM password is used when booting the Domain Controller into recovery mode.
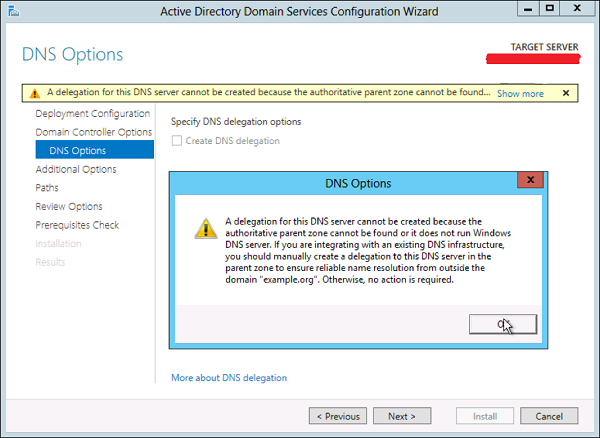
Step 13 − In the next screen which shows up, there is a warning on the DNS Options tab, click OK and then select Next.
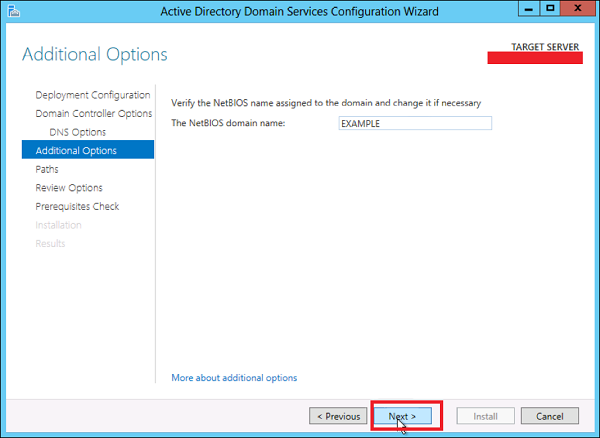
Step 14 − Enter NETBIOS name and click Next.
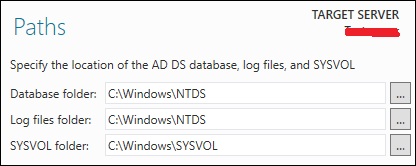
Step 15 − Select location of the SYSVOL, Log files and Database folders and then click Next.
Step 16 − Click Install and wait until it is finished. The server will restart several times.

The installation is now complete.
Windows Server 2012 - DC Accounts
In Windows 2012, creating account OU and group is nearly the same as in the previous versions.
To Create an OU user, please follow the steps given below.
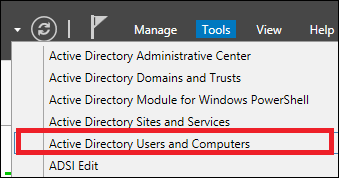
Step 1 − Go to: Server Manager → Tools → Active Directory Users and Computers.
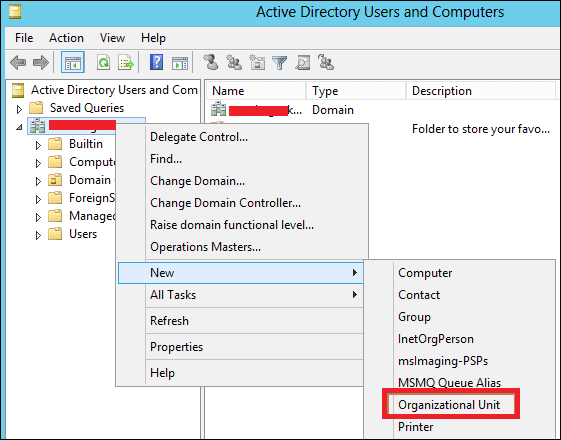
Step 2 − To create an OU named Management. Right-click domain in Active Directory Users and Computers, choose New and click Organizational Unit.
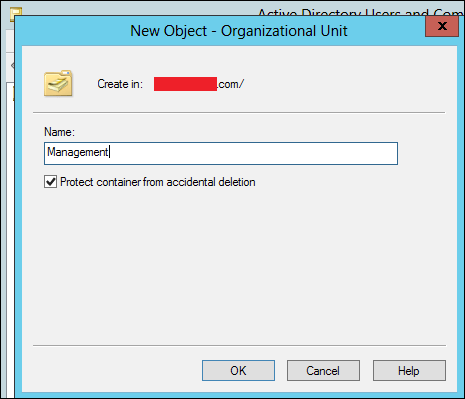
Step 3 − Type Management to name the OU. Check the Protect container from accidental deletion option. This option will protect this object from accidental deletion.
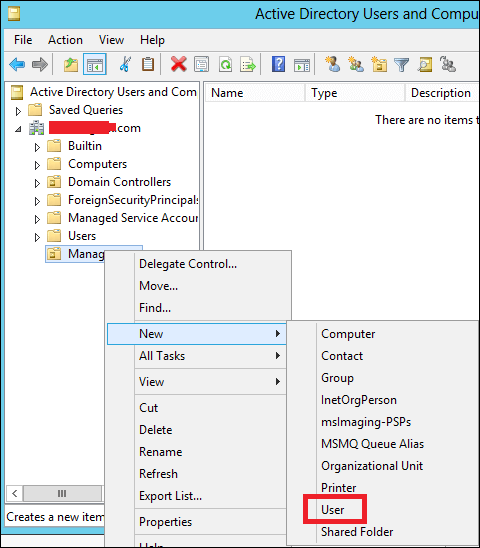
Step 4 − To create a user, Right-click on the Management OU → click New → and then click User.
Step 5 − Complete the field with the data of the users → then click Next.
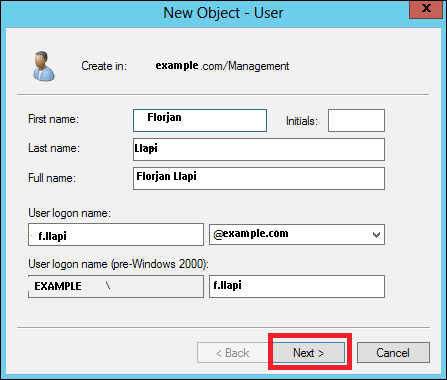
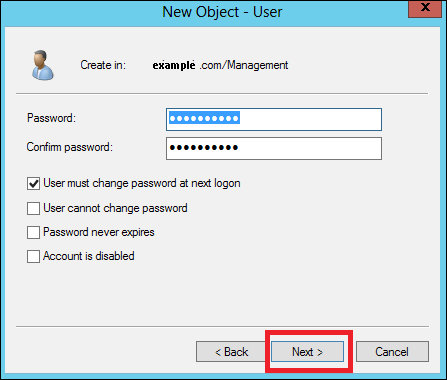
Step 6 − Now type-in the password. Check on the tick box → User must change password at next logon. The user will be forced to change the password when the user logs in → Click Next → and then click Finish.
Windows Server 2012 - File System
In Windows Server 2012 a new file system it is presented with is caller Resilient File System (ReFS).
The key attributes of ReFS include −
Maintaining a high level of data availability and reliability, even when the individual underlying storage devices experience failures.
Providing a full, end-to-end resilient architecture when used in conjunction with Storage Spaces. When used together, ReFS and Storage Spaces provide enhanced resiliency to storage device failures.
The significant functionality included with ReFS is described below −
Integrity − ReFS stores data in a way that protects it from many of the common errors that can normally cause data loss. When ReFS is used in conjunction with a mirror space or a parity space, detected corruption both metadata and user data, when integrity streams are enabled can be automatically repaired using the alternate copy provided by Storage Spaces. In addition, there are Windows PowerShell cmdlets (Get-FileIntegrity and Set-FileIntegrity) that you can use to manage the integrity and disk scrubbing policies.
Availability − ReFS prioritizes the availability of data. Historically, file systems were often susceptible to data corruption that would require the system to be taken offline for repair. With ReFS, if corruption occurs, the repair process is both localized to the area of corruption and performed online, requiring no volume downtime. Although rare, if a volume does become corrupted or you choose not to use it with a mirror space or a parity space, ReFS implements salvage, a feature that removes the corrupt data from the namespace on a live volume and ensures that good data is not adversely affected by non-repairable corrupt data. Because ReFS performs all repair operations online, it does not have an offline chkdsk command.
Scalability − As the amount and size of data that is stored on computers continues to rapidly increase, ReFS is designed to work well with extremely large data sets petabytes and larger without performance impact. ReFS is not only designed to support volume sizes of 2^64 bytes (allowed by Windows stack addresses), but ReFS is also designed to support even larger volume sizes of up to 2^78 bytes using 16 KB cluster sizes. This format also supports 2^64 1-byte file sizes, 2^64 files in a directory and the same number of directories in a volume.
Proactive Error Correction − The integrity capabilities of ReFS are leveraged by a data integrity scanner, which is also known as a scrubber. The integrity scanner periodically scans the volume, identifying latent corruptions and proactively triggering a repair of that corrupt data.
When the metadata for a ReFS directory is corrupted, subfolders and their associated files are automatically recovered. ReFS identifies and recovers the files while ReFS remains online. Unrecoverable corruption of the ReFS directory metadata affects only those files that are in the directory in which the corruption has occurred.
ReFS includes a new registry entry, RefsDisableLastAccessUpdate, which is the equivalent of the previous NtfsDisableLastAccessUpdate registry entry. The new storage command lets in Windows PowerShell are available (Get-FileIntegrity and SetFileIntegrity) for you to manage the integrity and disk scrubbing policies.
Group Managed Service Accounts
The Managed Service Accounts (MSA) was introduced in Windows Server 2008 R2 to automatically manage (change) passwords of service accounts. Using MSA, you can considerably reduce the risk of system accounts running system services being compromised. MSA has one major problem which is the usage of such service account only on one computer. It means that MSA Service Accounts cannot work with cluster or NLB services, which operate simultaneously on multiple servers and use the same account and password. To fix this, Microsoft added the feature of Group Managed Service Accounts (gMSA) to Windows Server 2012.
To create a gMSA, we should follow the steps given below −
Step 1 − Create the KDS Root Key. This is used by the KDS service on DC to generate passwords.
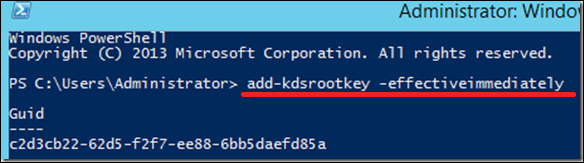
To use the key immediately in the test environment, you can run the PowerShell command −
Add-KdsRootKey EffectiveTime ((get-date).addhours(-10))
To check whether it creates successfully or not, we run the PowerShell command −
Get-KdsRootKey
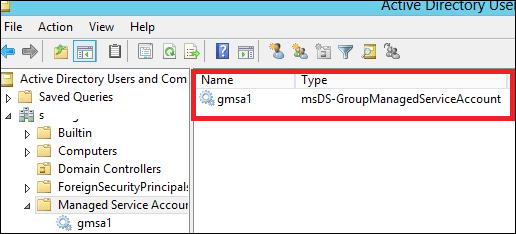
Step 2 − To create and configure gMSA → Open the Powershell terminal and type −
New ADServiceAccount name gmsa1 DNSHostNamedc1.example.com PrincipalsAllowedToRetrieveManagedPassword "gmsa1Group"
In which,
gmsa1 is the name of the gMSA account to be created.
dc1.example.com is the DNS server Name.
gmsa1Group is the active directory group which includes all systems that have to be used. This group should be created before in the Groups.
To check it, Go to → Server Manager → Tools → Active Directory Users and Computers → Managed Service Accounts.
Step 3 − To install gMAs on a server → open PowerShell terminal and type in the following commands −
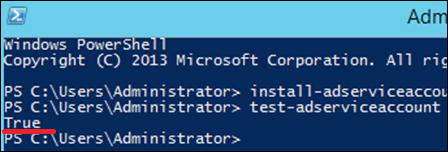
- Install − ADServiceAccount Identity gmsa1
- Test − ADServiceAccount gmsa1
The result should come True after running the second command, as shown in the screenshot given below.
Step 4 − Go to service properties, specify that the service will be run with a gMSA account. In the This account box in the Log on tab type the name of the service account. At the end of the name use symbol $, the password need not to be specified. After the changes are saved, the service has to be restarted.
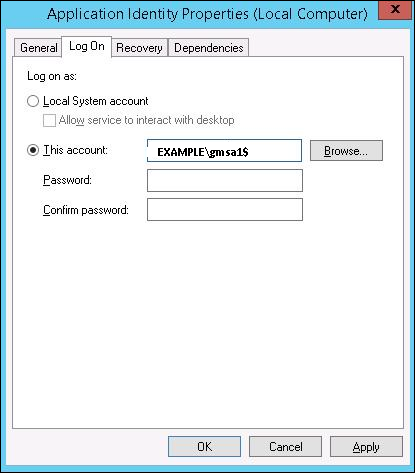
The account will get the Log On as a Service and the password will be retrieved automatically.
Group Policy Overview
The features of Group Policy Management were installed during the DC Role Installation. Many of the management features havent changed as compared to the previous versions of Windows Server. To create a GPO (Group Policy Overview), we need to follow the steps given below.
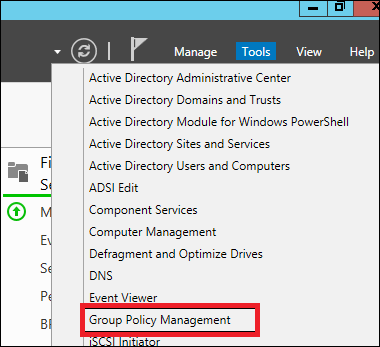
Step 1 − To create a GPO open the Group Policy Management Console (GPMC), go to Server Manager → Tools → Group Policy Management as shown in the screenshot below.
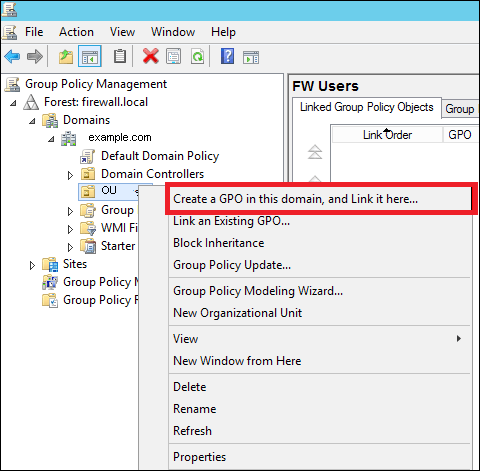
Step 2 − Right-click on an OU → select the first option Create a GPO in this domain and Link it here.
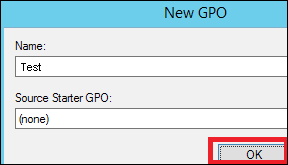
Step 3 − Type the Name for this GPO object → click OK button. We have selected the name as Test GPO.
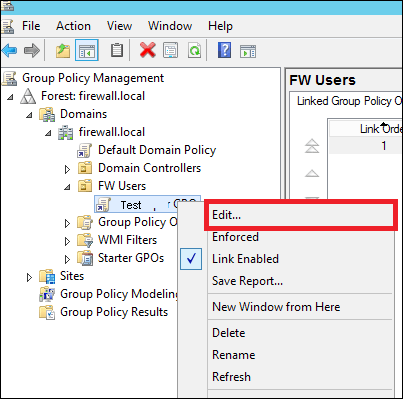
Step 4 − Right-click the GPO object and click Edit.
Windows Server 2012 - DHCP Role
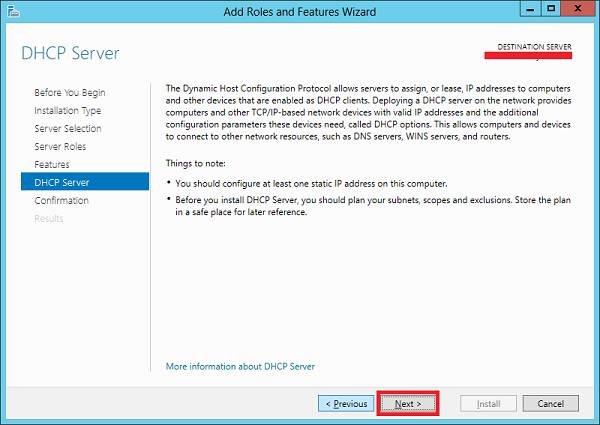
As you know Dynamic Host Configuration Protocol (DHCP) is commonly implemented network services in todays network environments. DHCP is primarily used to automatically distribute IP configuration settings to network clients, eliminating manually configuring hosts on TCP/IP-based networks.
To Install DHCP role, you will have to follow the steps given below.
Step 1 − Go to Server Manager → Manage → Add Roles and Features.

Step 2 − Click Next.
Step 3 − Select the Role-based or feature-based installation option → click Next.
Step 4 − We will install a Local DHCP Role as it will Select a server from the Server Pool → then click Next.
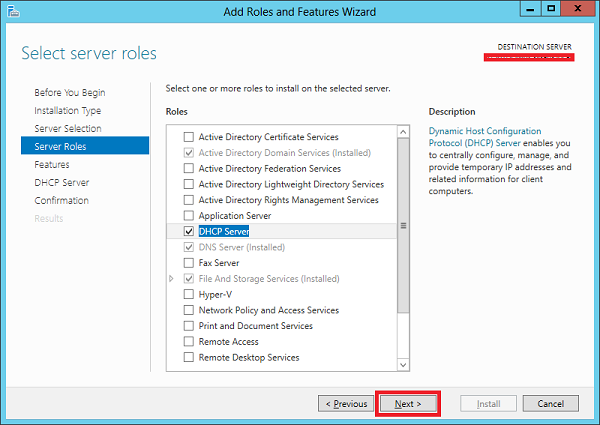
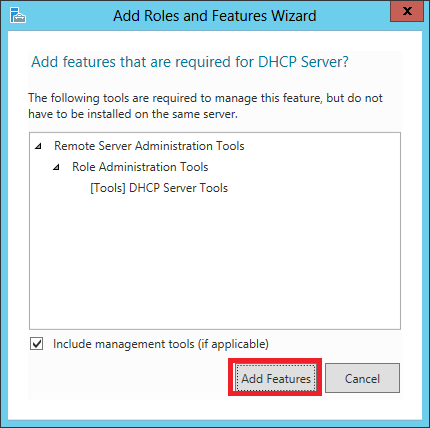
Step 5 − From the Roles lists, check the DHCP Server role → click Add Features on the popup windows as shown in the following screenshots.
Step 6 − Click Next.
Step 7 − Click Next.
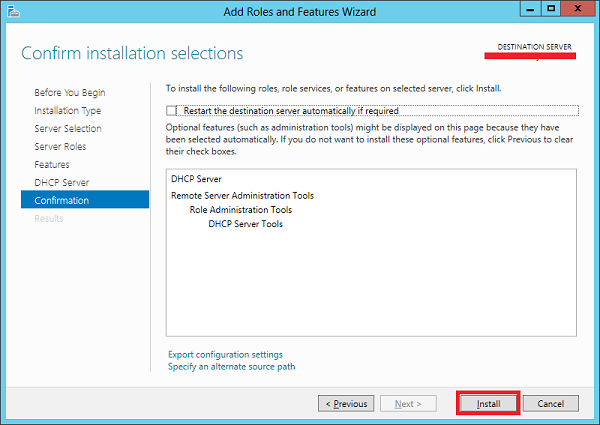
Step 8 − Click Install.
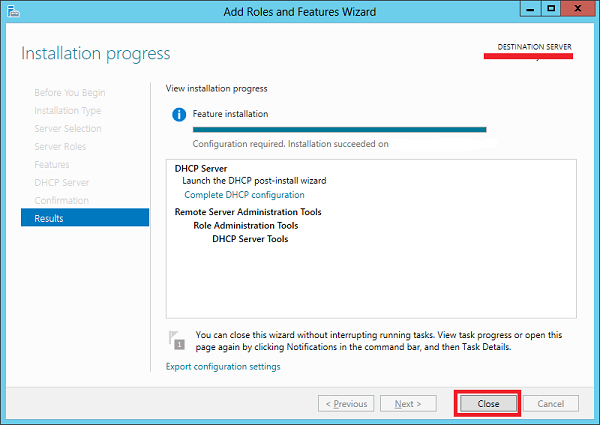
Step 9 − Click Close.
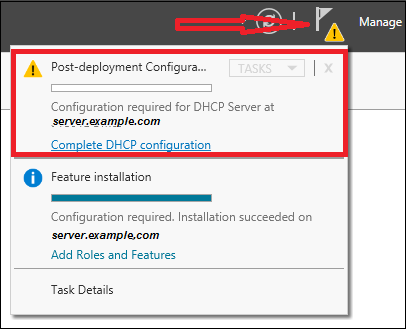
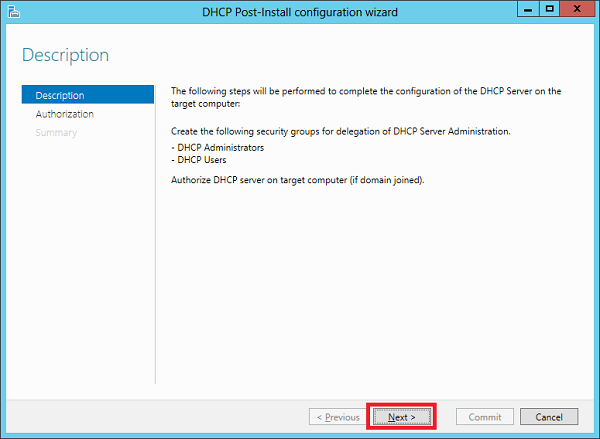
Post-deployment Configuration
In this section, we will see how to do the post-deployment configuration of the DHCP. Please follow the steps given below.
Step 1 − Click on the warning icon and then click on Complete DHCP Configuration.
Step 2 − Click Next.
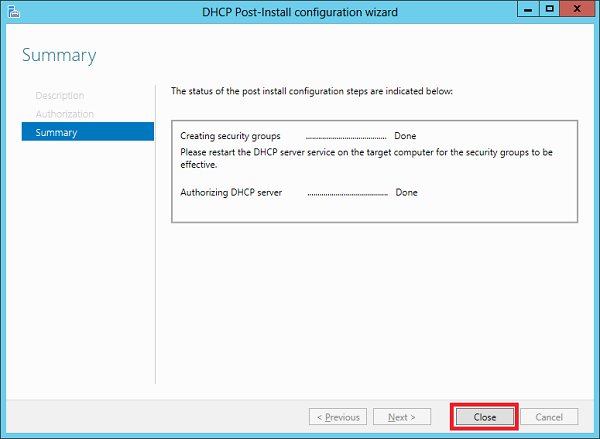
Step 3 − Select a domain user account that has permissions to create objects in the Net Services container in Active directory or a domain admin account → click Next.

Step 4 − Click Close.
Scope Implementation of DHCP
Now we have to configure the service to make it useful for the computers. To do this, we need to follow the steps given below.
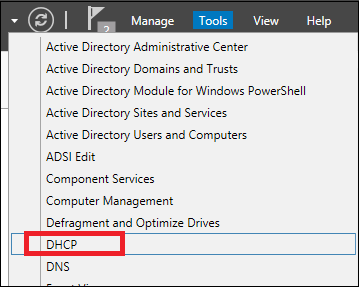
Step 1 − Server Manager screen → Tools → DHCP.
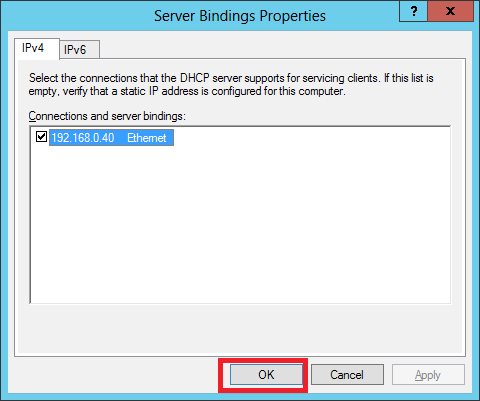
Step 2 − Right-click on the DHCP Server → then click on Add/Remove Bindings
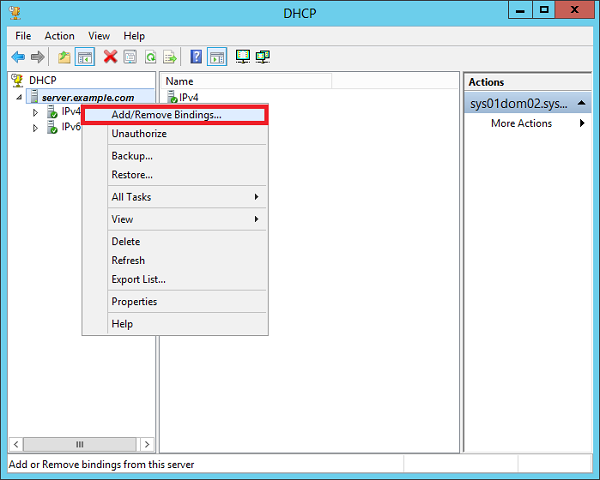
Step 3 − Ensure the static IP address of the server should appear as shown in the following screenshot.
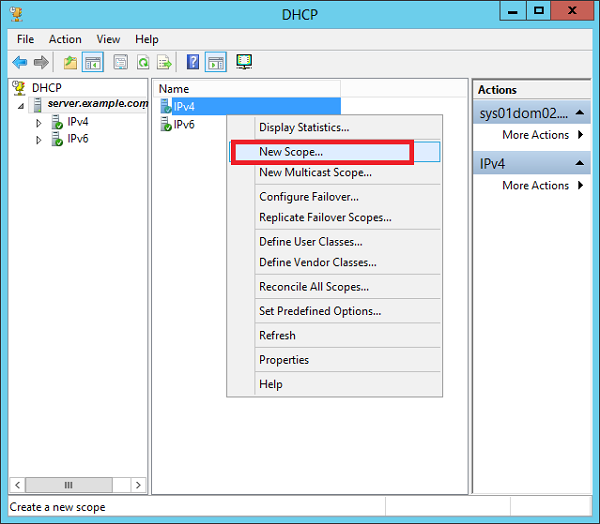
Step 4 − Right-click on IPv4 → Select New Scope.
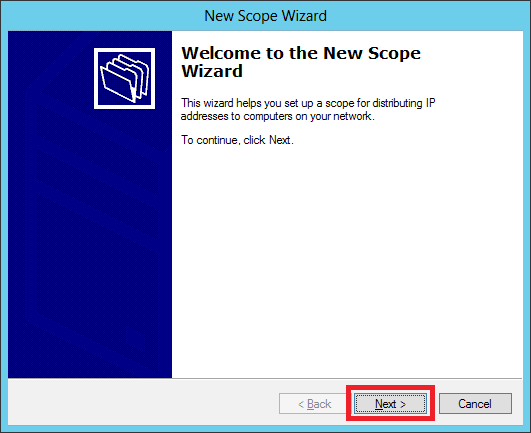
Step 5 − Click Next.
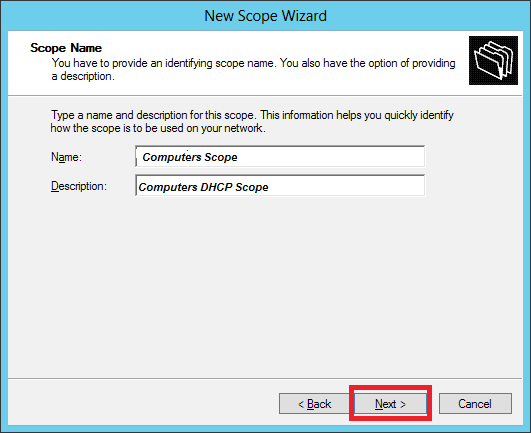
Step 6 − Enter Scope Name and description as shown in the following screenshot and then → Next.
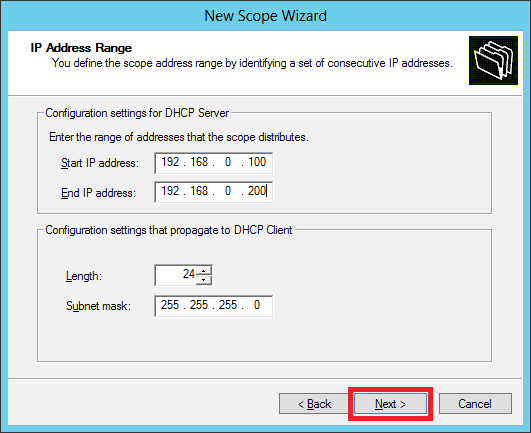
Step 7 − Enter the Start and End IP address, the Subnet mask, leave the Length as default 24 for class C subnet → click Next.
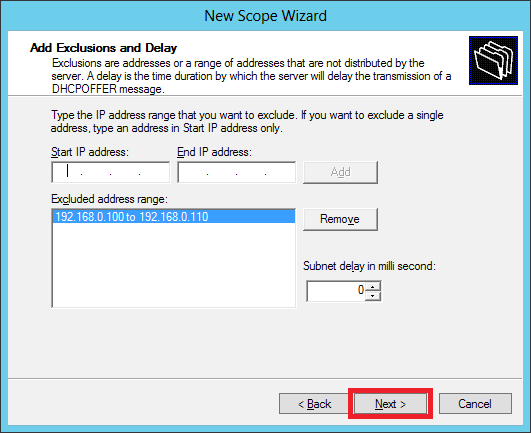
Step 8 − Enter your IP range in the exclusion list. If you have devices on the network that require static IP address and also ensure that the excluded range falls with the Start and End range earlier specified, then → click Next.
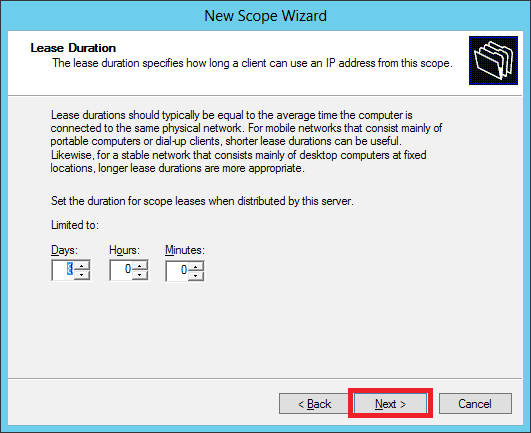
Step 9 − Enter the desired lease duration for the assigned IPs or leave as default → then click Next.
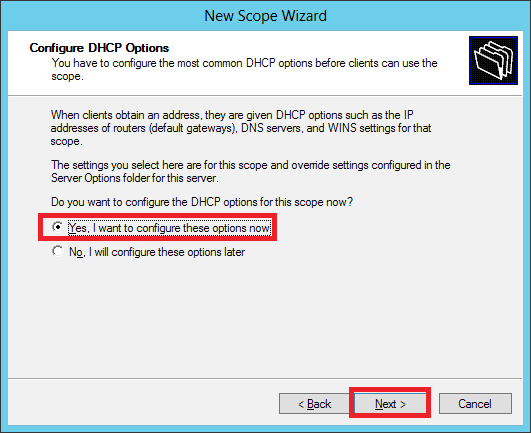
Step 10 − Select → Yes, I want to configure these options now to configure the DHCP options for the new scope → then click on Next.
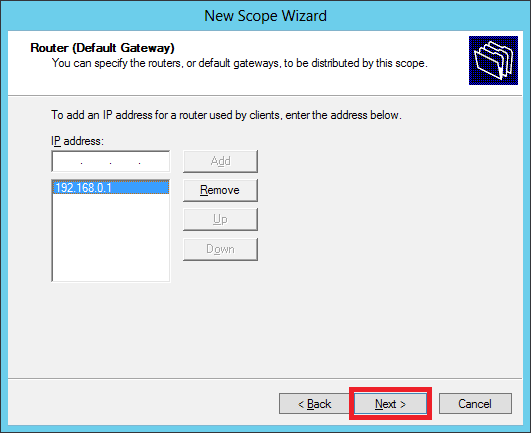
Step 11 − Enter the default gateway which is the IP of your Router → then click Next.
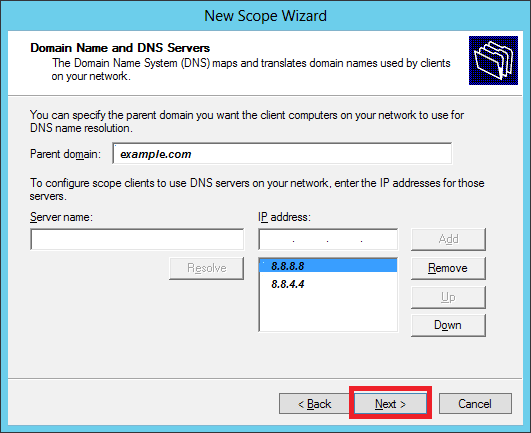
Step 12 − Add DNS IP → click Next (we can put Google DNS or if it is a Domain environment you can put the DC IP there) then click → Next.
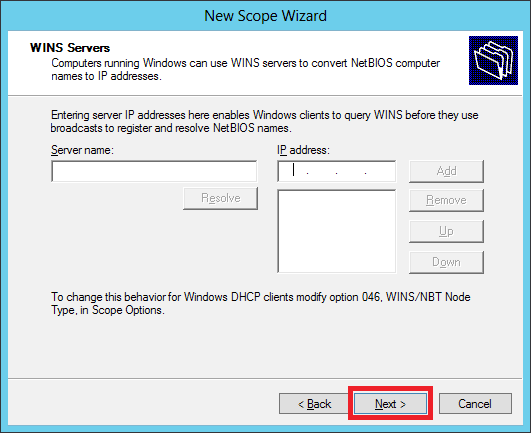
Step 13 − Specify your WINS Server if any and then click → Next.
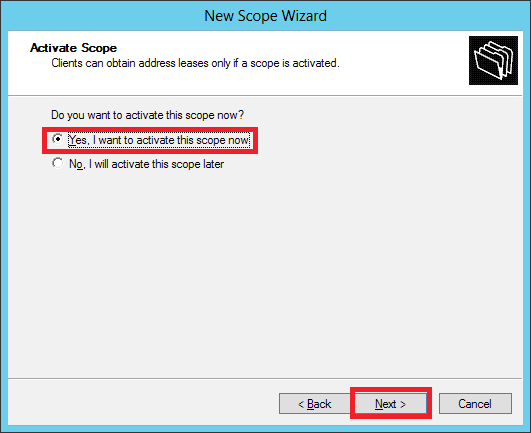
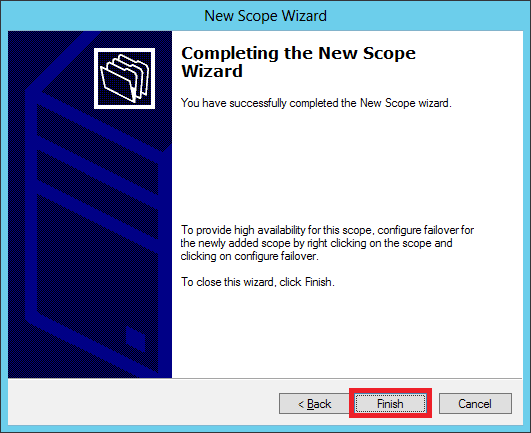
Step 14 − Select Yes, I want to activate this scope now option to activate the scope immediately and then click → Next.
Step 15 − Click Finish.
Windows Server 2012 - DNS Role
DNS Role is one of the most important services in a network with Domain Controllers Environment. It helps us to resolve domain names internally and externally to IP and to have access to the requested service for the respective domain.
Let us now see how to install the DNS Role. For this we need to follow the steps given below.
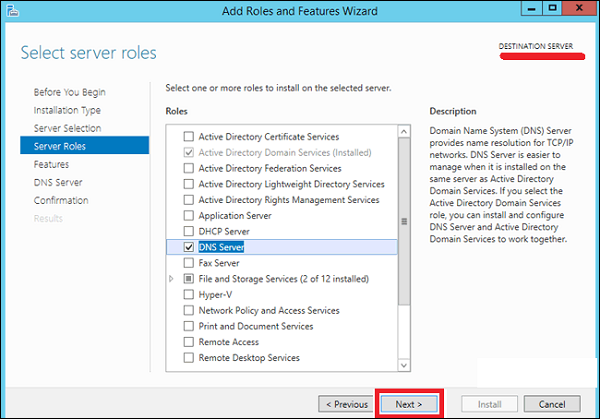
Step 1 − To Install DNS role, go to Server Manager → Manage → Add Roles and Features.

Step 2 − Click Next.

Step 3 − Select the Role-based or feature-based installation option and then click Next.

Step 4 − We will install a Local DNS role as it will select a server from the server pool → and then click Next.

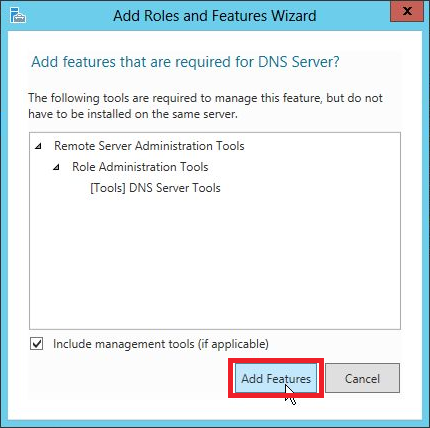
Step 5 − From the Server Roles lists, check the DNS Server role → click Add Features on the popup windows and then click Next.
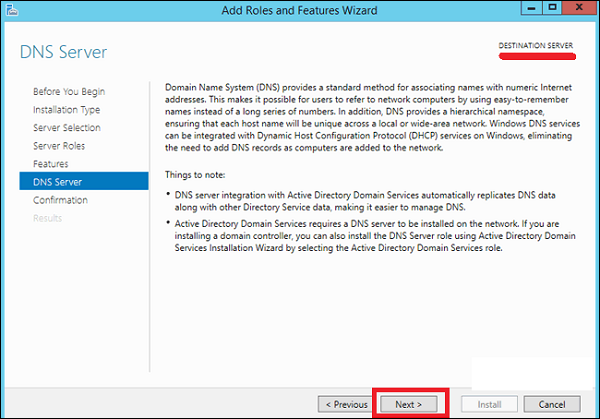
Step 6 − Click Next.
Step 7 − Click Install.
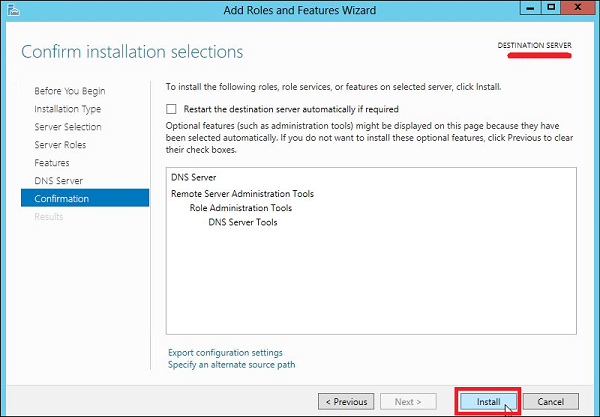
Step 8 − Wait until installation bar is complete.
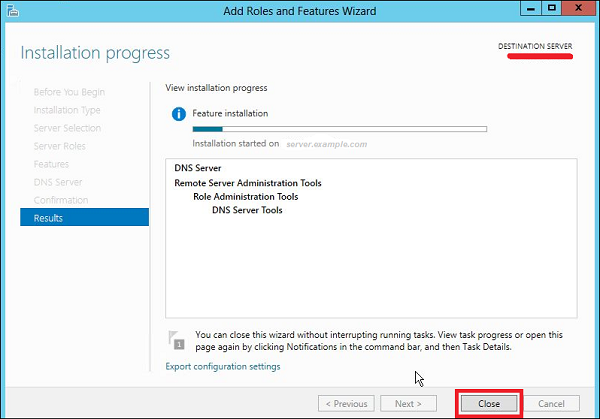
Once the installation is finished, click on Close.
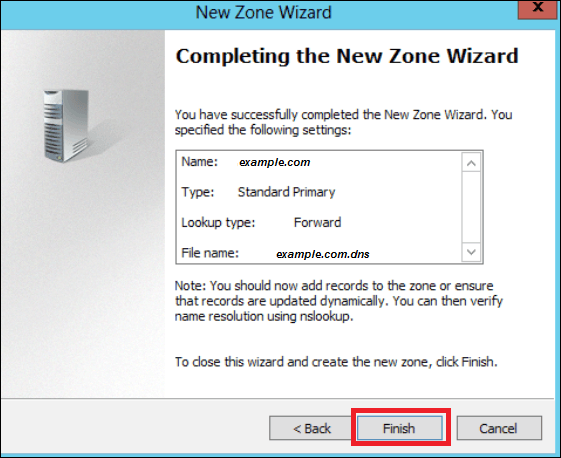
Windows Server 2012 - Primary Zones
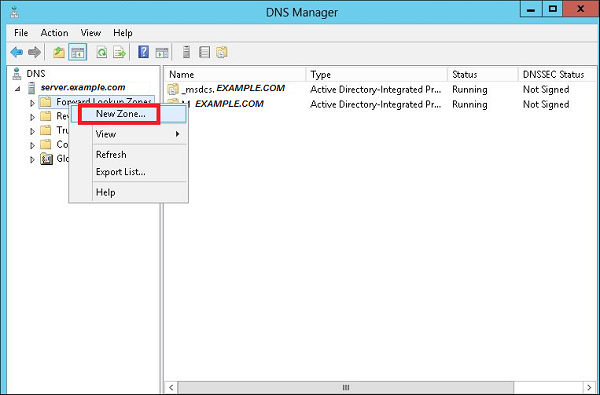
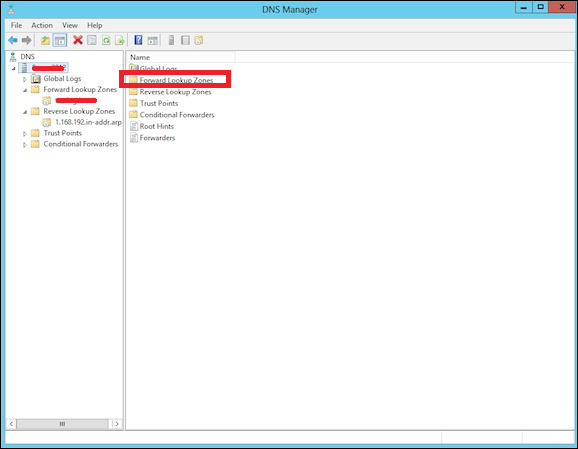
To manage DNS, we have to create a primary Zone because by default, there are no zones in order to manage the records.
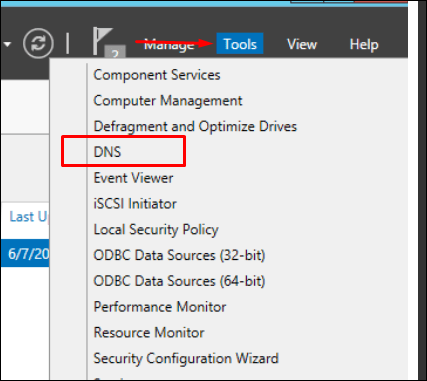
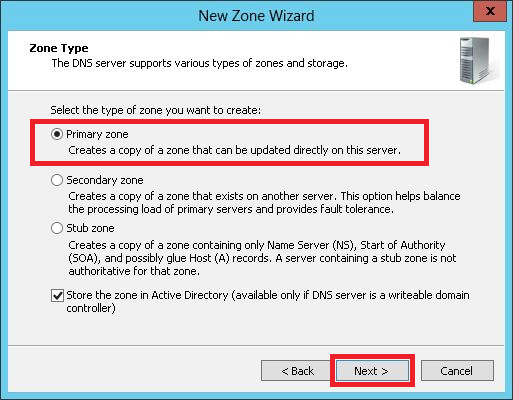
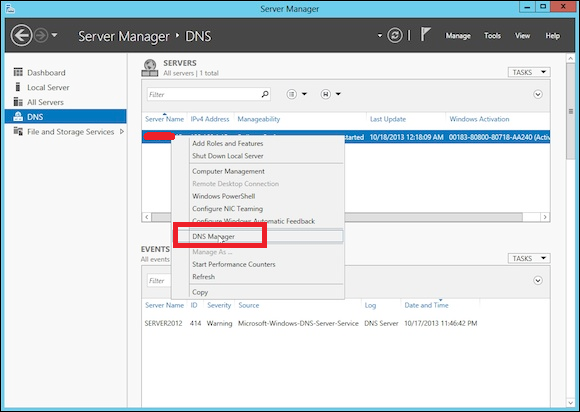
Step 1 − To manage DNS, go to Server Manager → Tools → DNS → Right click on Forward Lookup Zone → New Zone.
Step 2 − Select Primary Zone and then click Next.
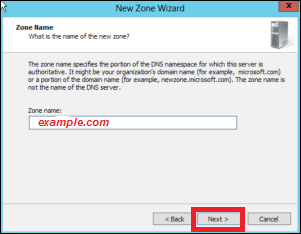
Step 3 − Enter the name of the primary Zone for which you want to manage the records.
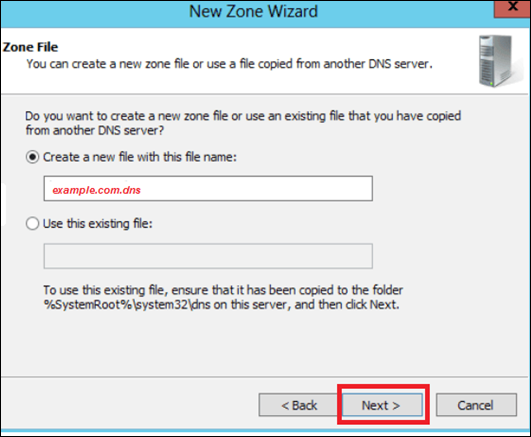
Step 4 − Select Create a new file with this filename option.
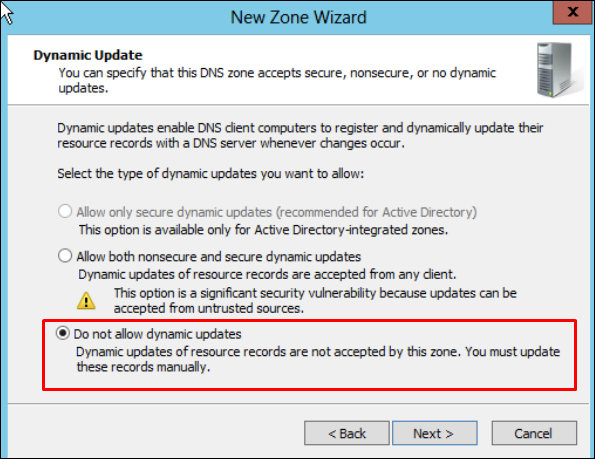
Step 5 − If you want to update the record of this zone manually, you have to select Do not allow dynamic Updates, as shown in the following screenshot.
Step 6 − Click the Finish button.
Windows Server 2012 - Manage Records
As you know, in DNS you can add records according to your need and in Windows server 2012 as well. This doesnt change too much from its earlier version of Windows Server 2008.
To add or manage records, we have to follow the steps given below −
Step 1 − Server Manager → DNS → Right click on the server that has a DNS record, which in our case is local.
Step 2 − Go to Forward Lookup Zone.
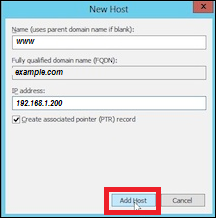
Step 3 − Right Click on the empty Field → New Host (A or AAAA)

Step 4 − Name field and the subdomain name or case is WWW. → IP address we put is 192.168.1.200. So, when we will type-in our browser www.example.com, it will redirect us to 192.168.1.200.
Step 5 − To add a Mail Server Record, we add an MX record and then Right click → New Mail Exchanger as shown in the screenshot given below.
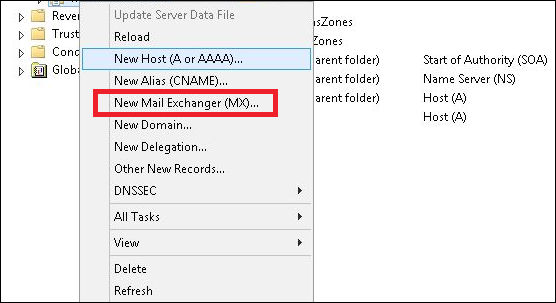
Step 6 − At Fully qualifies domain name(FQDN) of mail server, you enter the name of mail server → then in the Mail server priority, you enter a number. The smaller the number, the higher the priority.
Windows Server 2012 - IIS Overview
The IIS or Internet Information Services role is one of the most important services in Windows Server 2012. It has improved features as compared to its previous versions and it helps us to publish web application or webpages.
Let us now see how to install the IIS Role for which you will have to follow the steps given below.
Step 1 − To Install IIS role, go to Server Manager → then Manage → and then to Add Roles and Features.
Step 2 − Click on Next in the window which pops up.
Step 3 − Select the Role-based or feature-based installation option and then click on Next.
Step 4 − I will install a Local IIS role as it will Select a server from the server pool → then click on Next.
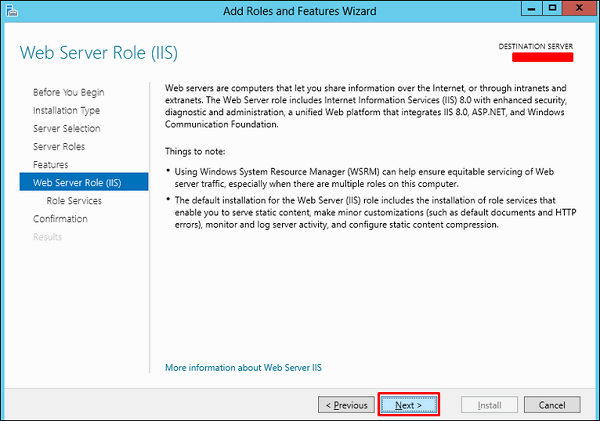
Step 5 − From the Roles lists, check the Web server (IIS) Server role → Next.
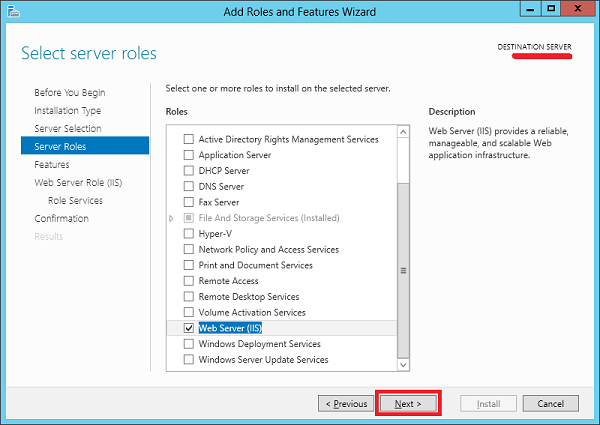
Step 6 − Click Next.
Step 7 − Click Next.
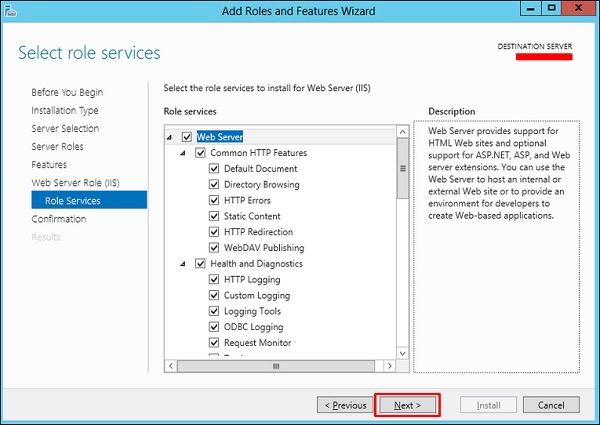
Step 8 − You can choose all the default setting or customize them according to you needs.
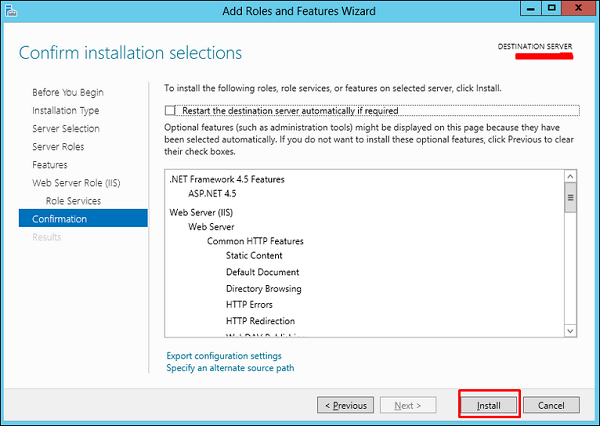
Step 9 − Click Install.
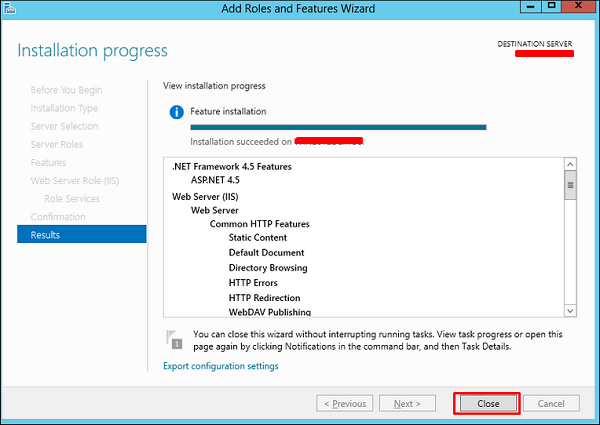
Step 10 − Wait until the Installation Wizard finishes. Once it is done click Close.
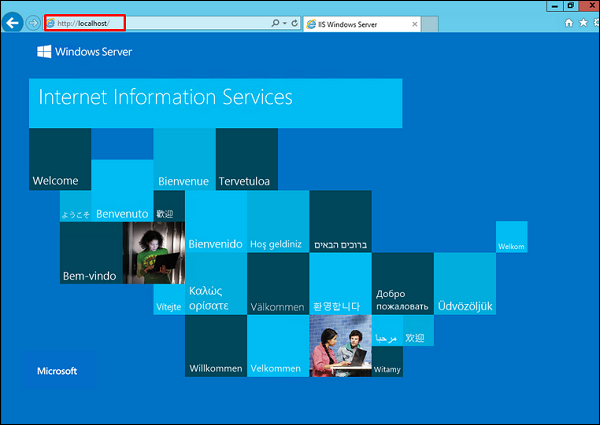
Step 11 − Check if your IIS is installed correctly. This can be done by opening your internet explorer and then typing http://localhost and you should be able to see the following screenshot.
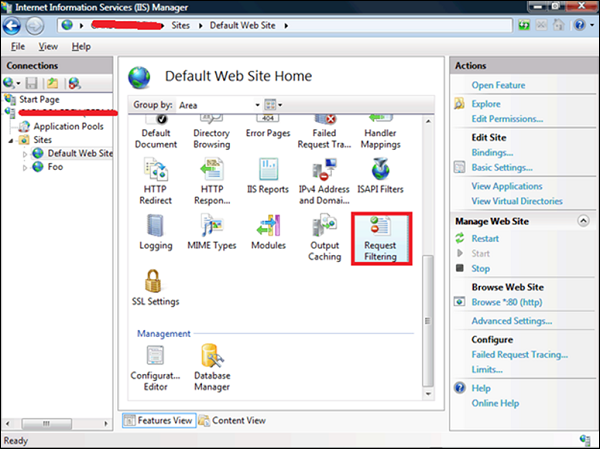
Windows Server 2012 - IIS Security
The IIS (Internet Information Services) is facing internet all the time. So, it is important to follow some rules in order to minimize the risk of being hacked or having any other security issues. The first rule is to take all the updates of the system regularly. The second one is to create different application polls to this, which can be done by following the steps shown below.
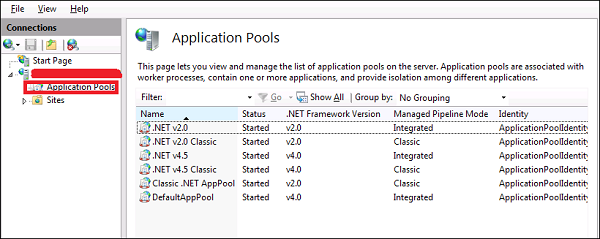
Step 1 − You have to go to: Server Manager → Internet Information Services (IIS) Manager → Application Pulls.
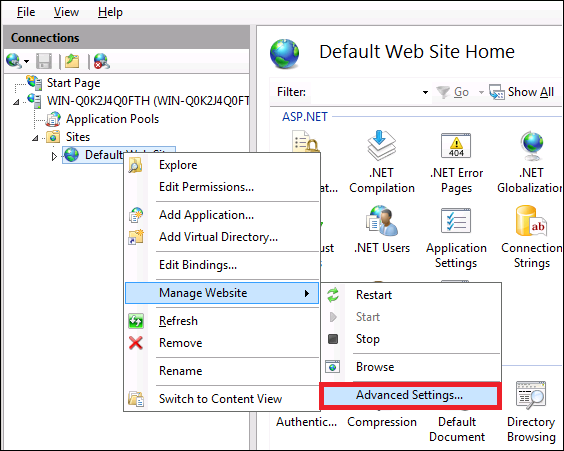
Step 2 − Click Sites → Right Click Default Website → Manage Website → Advance Settings.
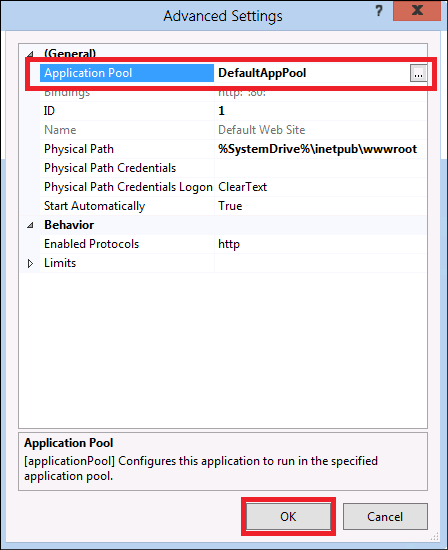
Step 3 − Select the Default Pools.
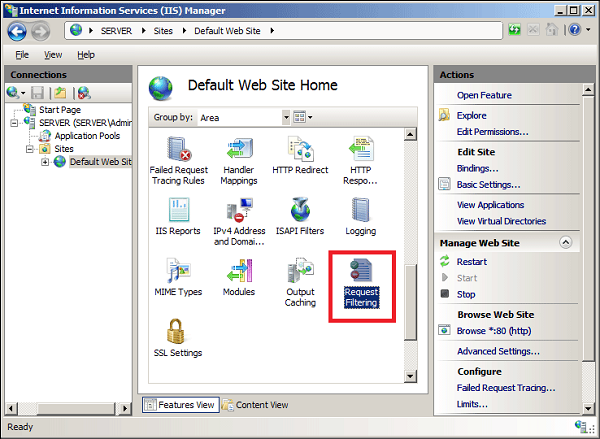
Step 4 − Disable the OPTIONS method, this can be done by following the path Server Manager → Internet Information Services (IIS) Manager → Request Filtering.
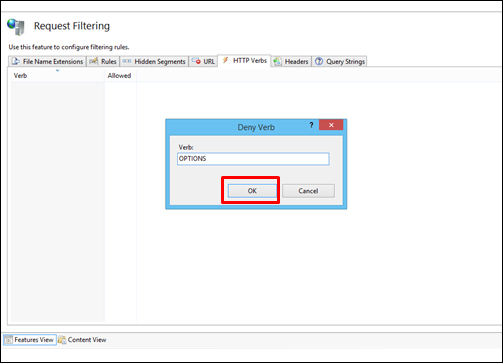
Step 5 − In the action pane, select "Deny Verb" → Insert OPTIONS in the Verb → OK.
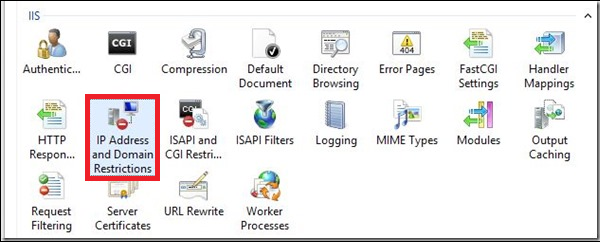
Step 6 − Enable Dynamic IP Restrictions blocks by going to IIS Manager → Double click on "IP Address and Domain Restrictions" → Actions pane.
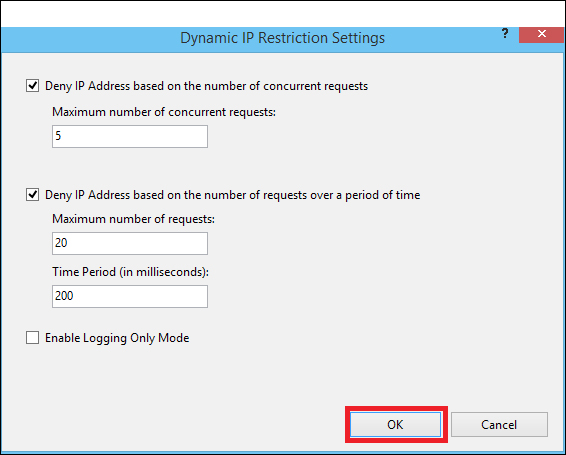
Step 7 − Then select "Edit Dynamic Restriction Settings" → Modify and set the dynamic IP restriction settings according to your needs → press OK.
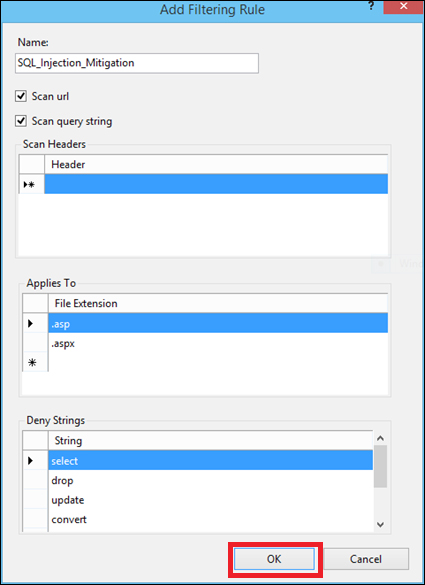
Step 8 − Enable and Configure Request Filtering Rules, to do this IIS Manager → Double click on "Request Filtering" → Change to the Rules tab → Actions Pane.
Step 9 − Then select "Add Filtering Rule" → Set the required rules → Click OK.
Step 10 − Enable logging, to do this we need to follow this path IIS Manager → select the specific site you want to configure → Logging.

Windows Server 2012 - Hyper-V
Virtualization is one of the most important technology feature and Microsoft has invested on this and the responsible role is called as Hyper-V.
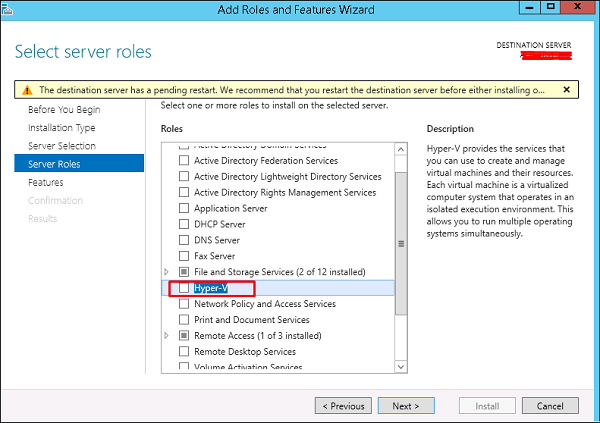
Let us now see how to install the Hyper-V Role, for doing this we should follow the steps given below.
Step 1 − To Install DNS role go to Server Manager → Manage → Add Roles and Features.
Step 2 − Click Next.
Step 3 − Select the Role-based or feature-based installation option → click Next.
Step 4 − I will install a Local Hyper-V role as it will Select a server from the server pool → Next.
Step 5 − From the Roles lists, check the Hyper-V Server role → click Add Features on the popup windows which show up and then → Next.
Step 6 − Click Next.
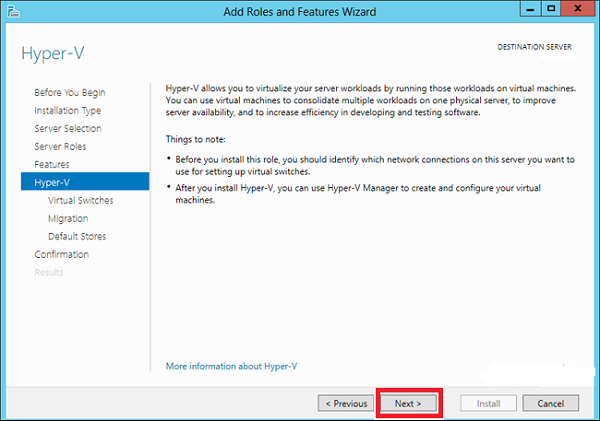
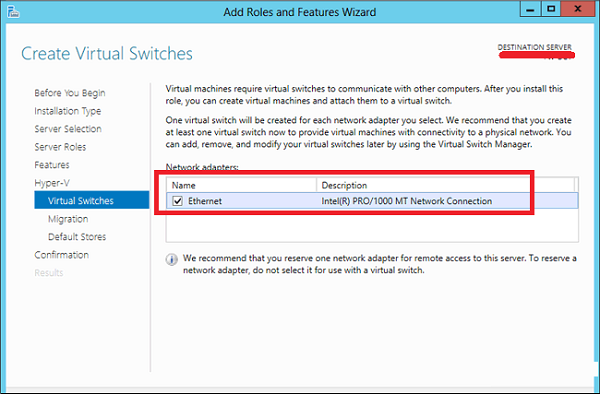
Step 7 − Choose your servers physical network adapters that will take part in the virtualization → Next.
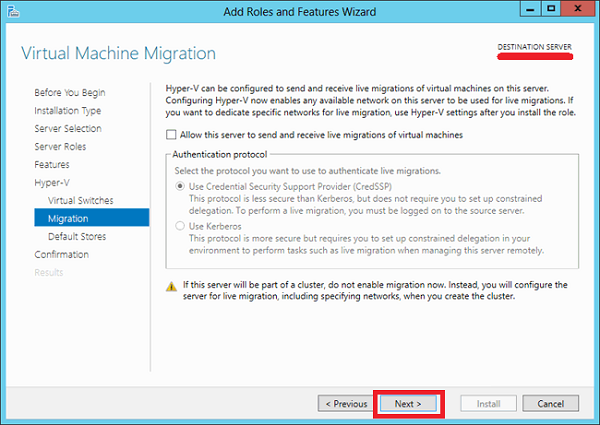
Step 8 − Under Migration, leave the default settings → Next.
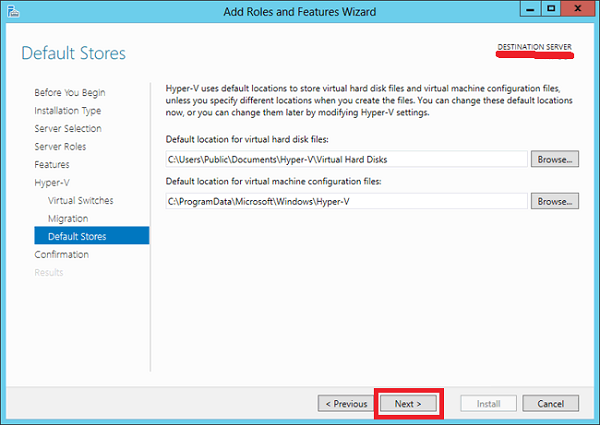
Step 9 − Choose the path where to save the file.
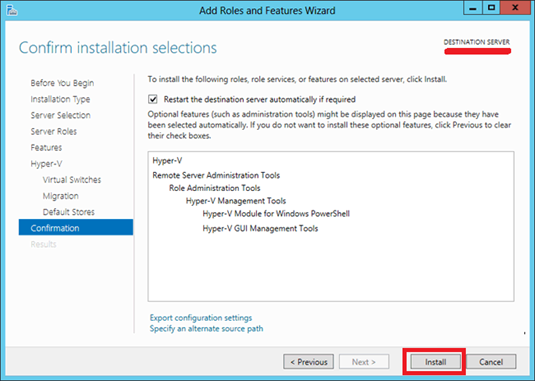
Step 10 − Click Install and wait for the installation bar to finish.
Advanced Configuration
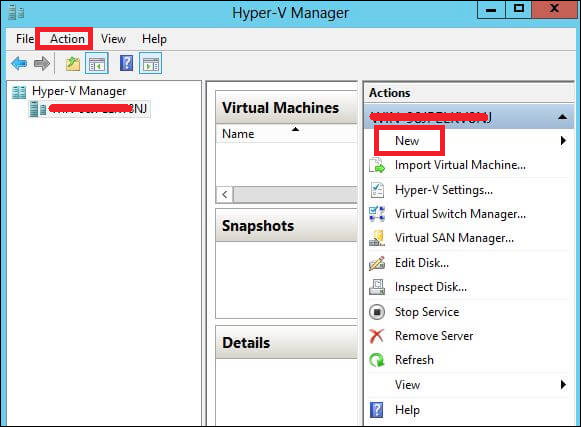
In this chapter, we will see how to create a virtual machine. Firstly, we should open the Hyper-V manager and then follow the steps given below.
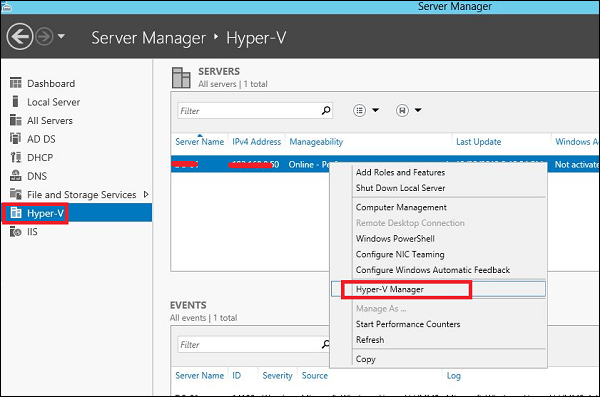
Step 1 − Open Server Manager → and then Click on Hyper-V.
Step 2 − Click New on the Right side Panel or click on Action button in the options as shown in the screenshot below.
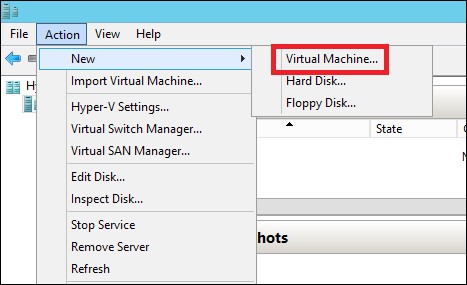
Step 3 − Double Click on the Virtual Machine option as shown in the following screenshot.
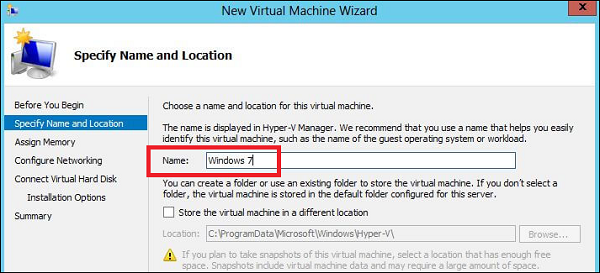
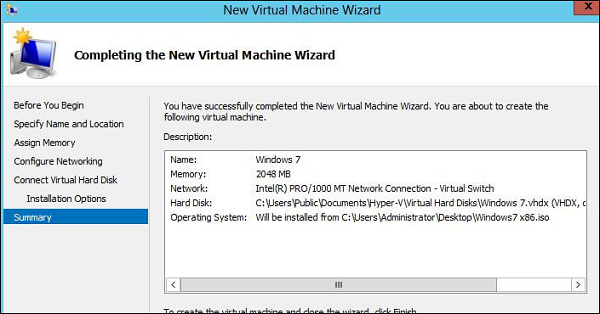
Step 4 − A new table will be open → Type the Name of your new machine and then click Next.
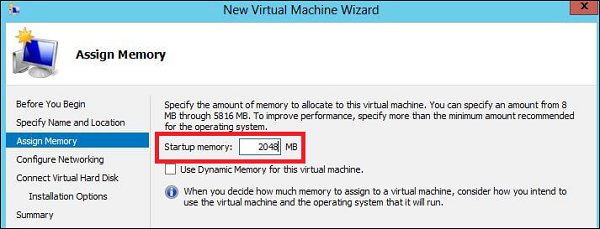
Step 5 − A new table will be open where you must allocate the memory. Keep in mind that you cannot choose more memory than what you have in your system.
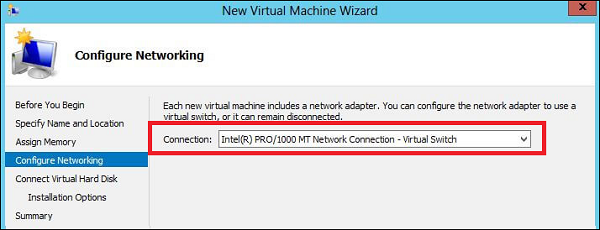
Step 6 − In the Connection dropdown box, choose you physical network adaptor and click Next.
Step 7 − Now it is time to Create a Virtual Hard disk. If you already have one, choose the second option.
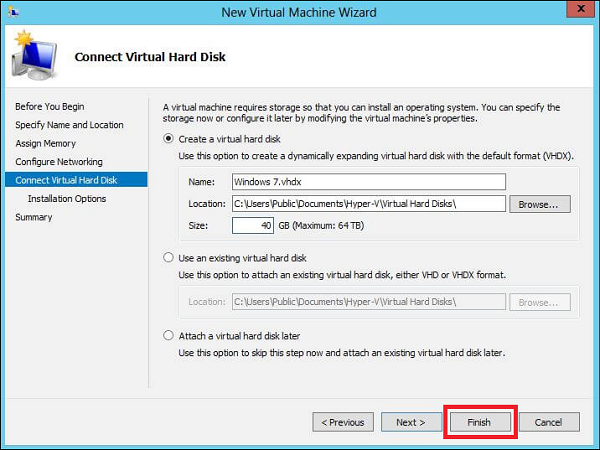
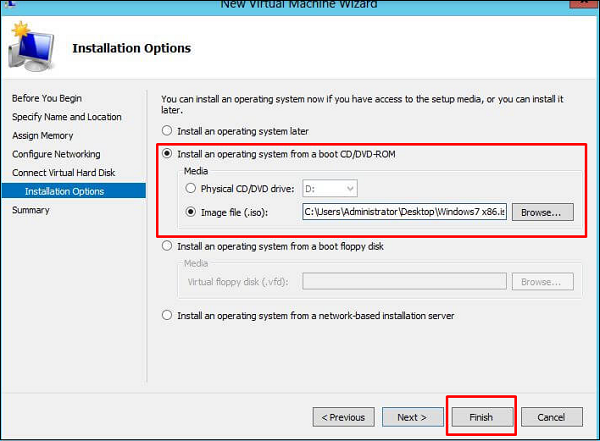
Step 8 − Select the Image of ISO that should be installed and then click Finish.
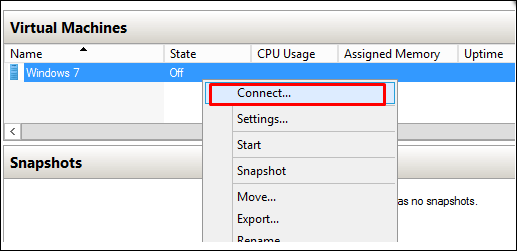
Step 9 − Connect to the Virtual machine. To do so, Right Click on the machine name and then → Connect.
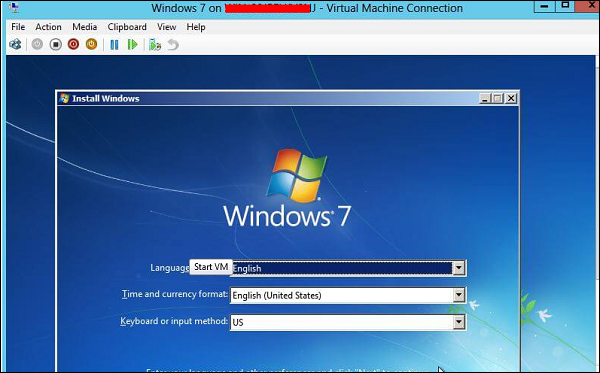
Step 10 − After that, the Installation of your ISO will continue.
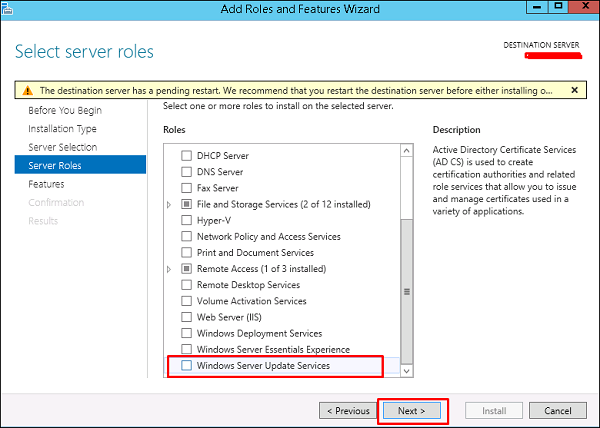
Configure WSUS Role
As you know the WSUS (Windows Server Update Services) is an update service of Microsoft which allows the companies to test updates before installing to live environment.
To install this role, we should follow the steps given below.
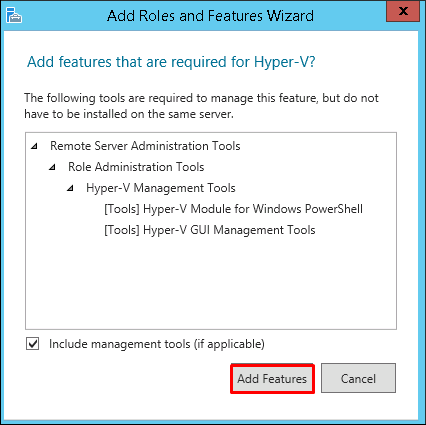
Step 1 − Go to Server Manager → Manage → Add Roles and Feature → Next → Select Role-based or feature-Based-Installation → Select a server from the pool server and then → Next.
Step 2 − Check Windows Server Update Service a pop-up window table will come out → click Add Features then → Next and then again → Next.
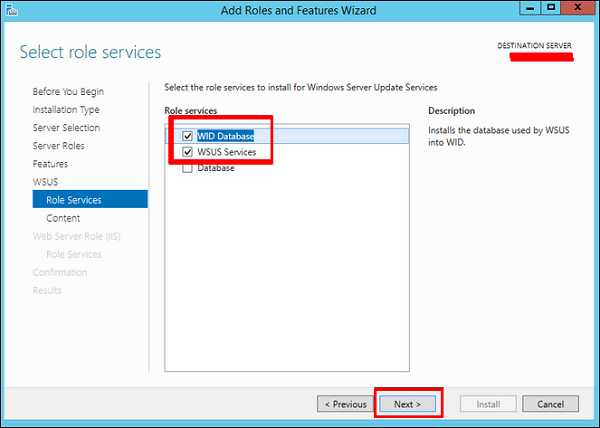
Step 3 − Check box of WID Database and WSUS Services
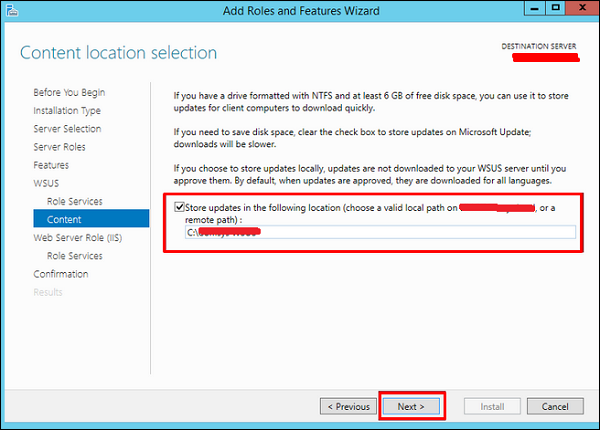
Step 4 − Choose the path for the content. If you have another partition other than C:, then install it there because C: can risk to become full → Next.
Once this is done, you should wait for the installation to finish.
WSUS Policies and Tuning
In this chapter, we will see how to configure WSUS and tune it. The following steps should be followed for configuring it.
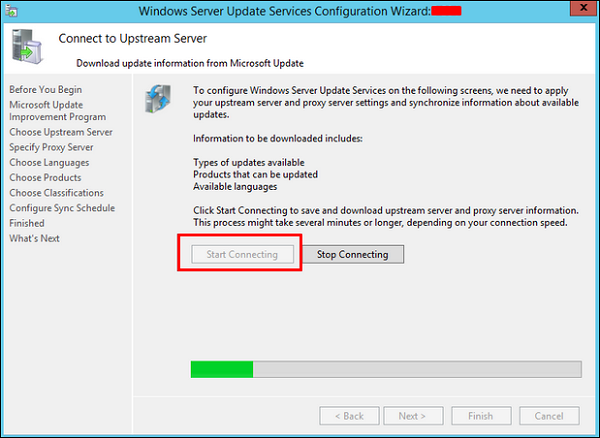
Step 1 − When you open it for the first time, you should do it by going to Server Manager → Tools → Windows Server Update Services, then a Configuration wizard will be opened and then click → Next.

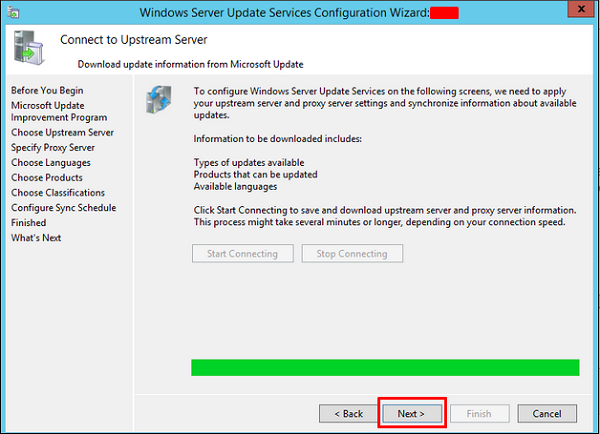
Step 2 − Click Start Connecting → Wait until the green bar is full and then → Next.
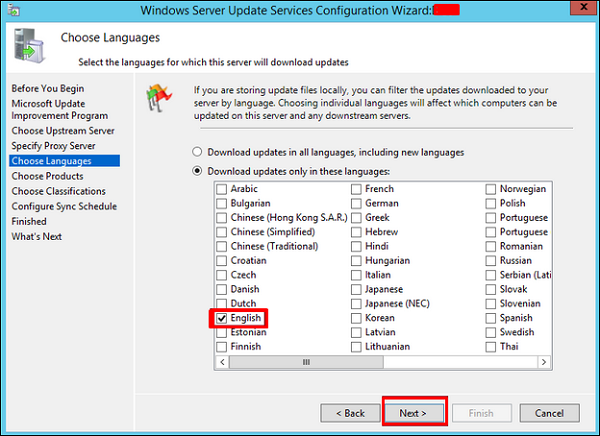
Step 3 − Check the box for which the updates want to be taken, I did for English and then → Next.
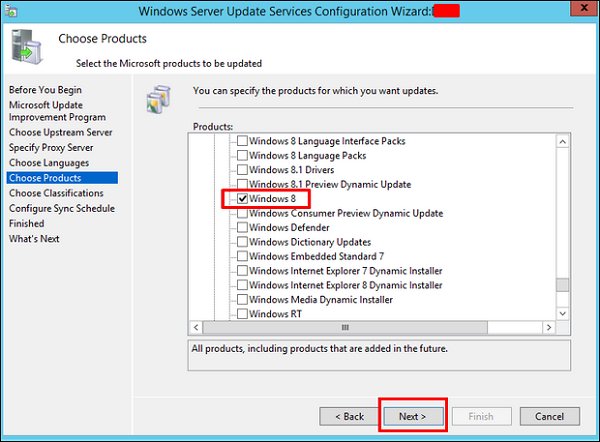
Step 4 − Check the box for all the products which you want to update. It is just for Microsoft products and it is recommended to include all the products related to Microsoft and then → Next.
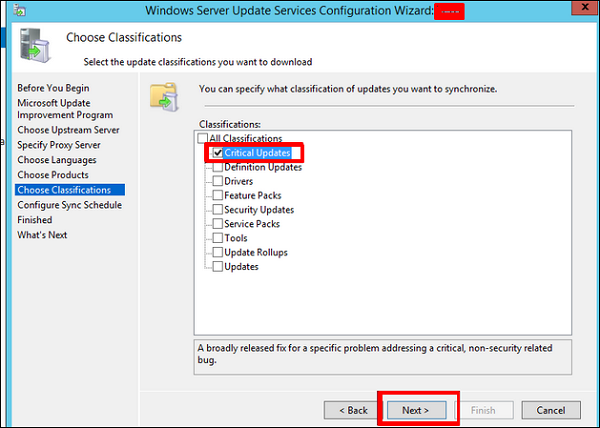
Step 5 − Choose the classification updated to be downloaded, if you have a very good internet speed, then check all the boxes, otherwise just check Critical Updates.
Step 6 − Now we should schedule the updates which I will recommend to do it automatically during night time → Next.

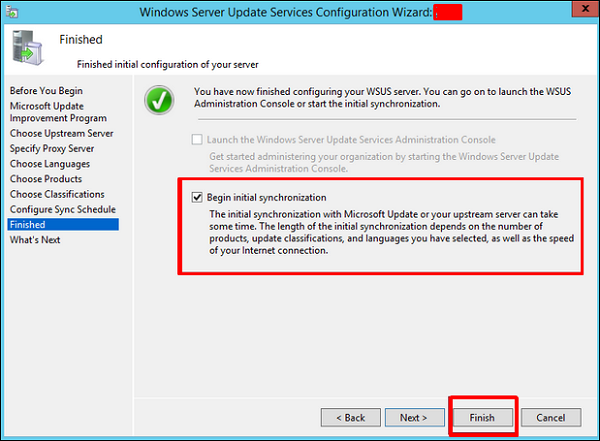
Step 7 − Check Box Begin initial synchronization → Finish.
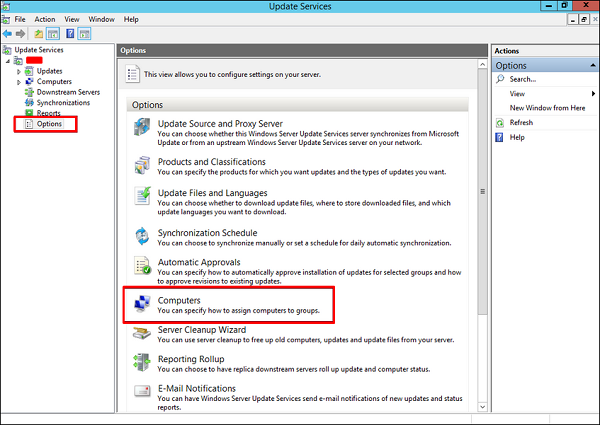
Step 8 − Now the WSUS console will be open and we must add the computer to WSUS. To do this, go to Options → Computers.
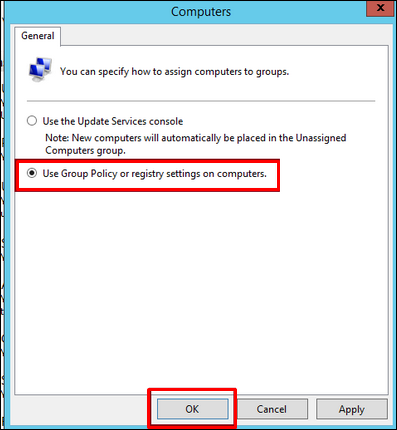
Step 9 − If you have a Domain Controler environment, choose the second option like in my case, otherwise choose the first option and then → OK.
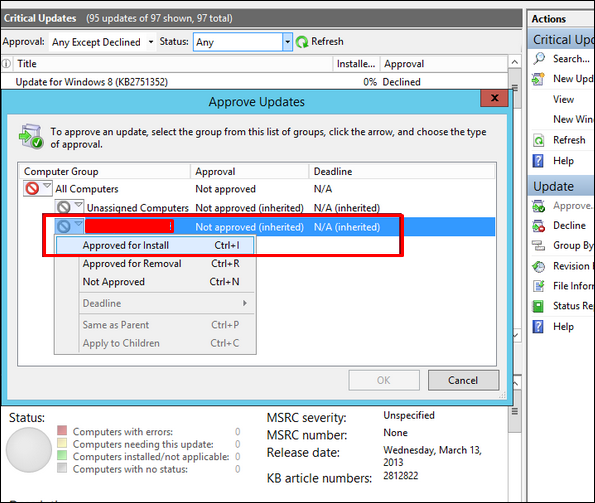
Step 10 − After you have done all this, you should approve updates, which is similar like how it is done in the previous version. To do this Right click on the updates → Approve as shown in the screenshot given below.
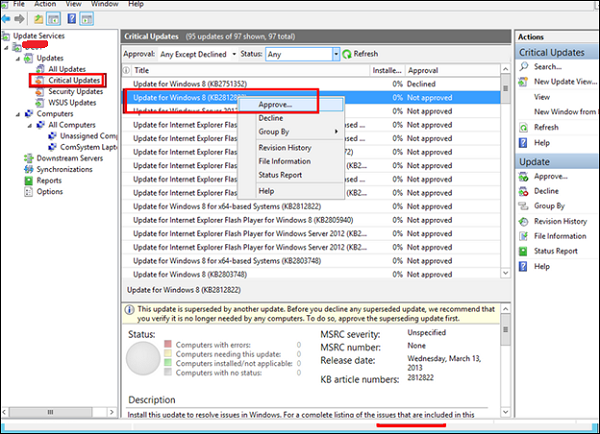
Step 11 − Then you should click Approve for install as shown in the screenshot given below.
Windows Server 2012 - Sharing of Files
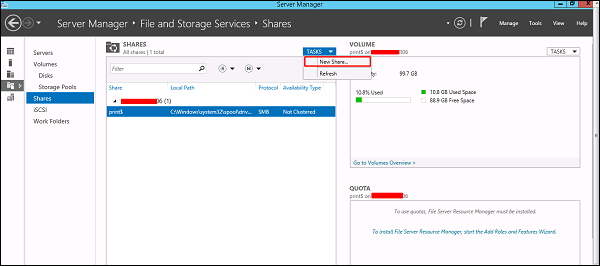
Another important service for Windows Server is Sharing Files and for this purpose the Windows Server 2012 has File and Storage Services, which is found in Server Manager on the left pane as shown in the screenshot given below.
Now let us see how to create a Share in the system with its respective rights. To do this, we should follow the steps given below.
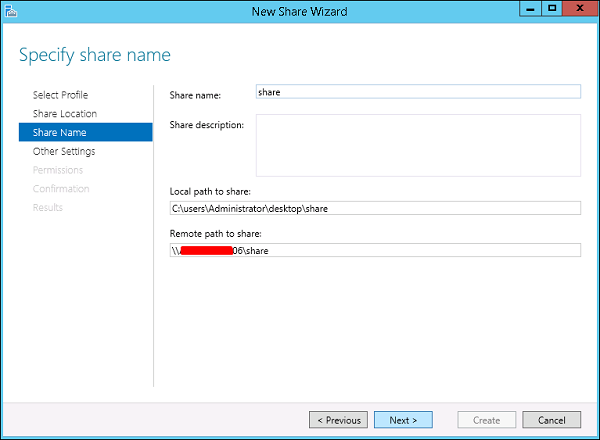
Step 1 − Click Server Manager → then click on File and Storage Services in the Server Manager sidebar → click on Shares → click on the Shares drop-down list → click on New Share.
Step 2 − This will open the New Share Wizard → From here, select a type of share → I will create a very basic SMB share, so click on SMB Share Quick. We can later configure the user rights of this share.

Step 3 − Click Type a custom path → click on Browse button.

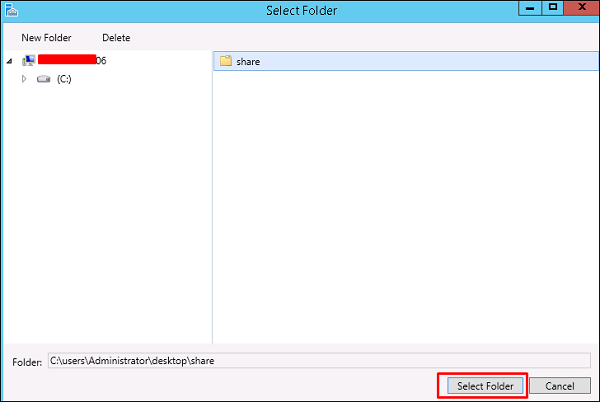
Step 4 − Select the folder that you want to share → Click Select Folder.
Step 5 − Click Next.
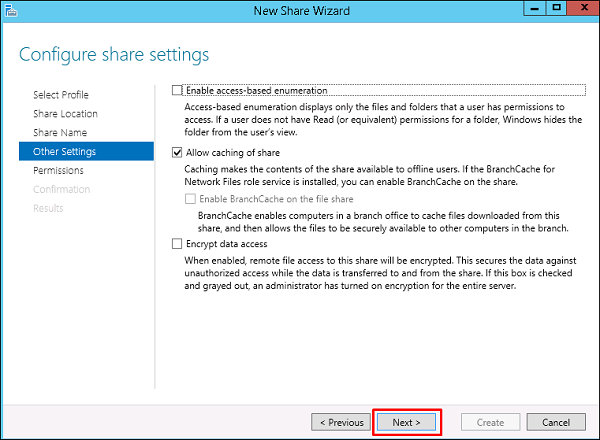
Step 6 − You can choose one of the three options as per your need. The explanations are also mentioned alongside the check boxes, once selected → Next.
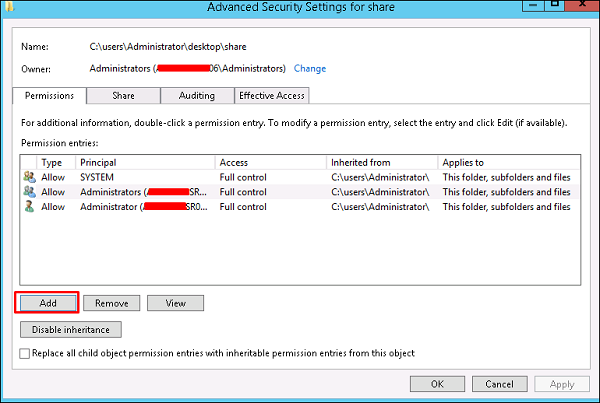
Step 7 − Click on Customize Permissions to authorize the rights that your users need to have.
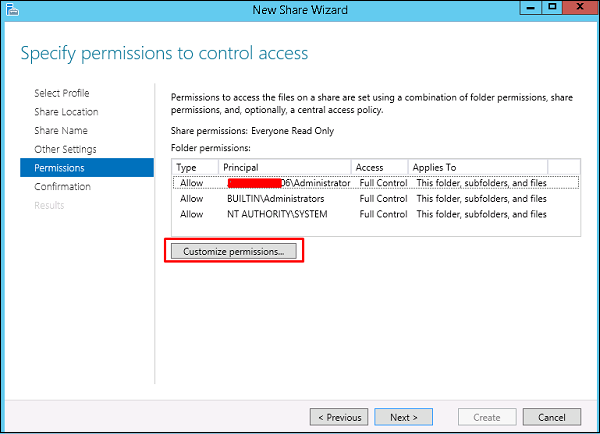
Step 8 − Click on Add if you would like to add other users.
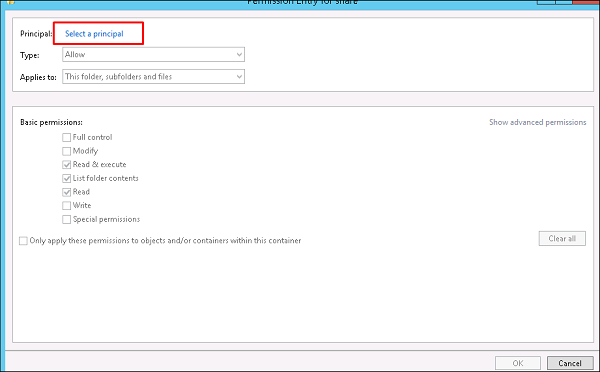
Step 9 − Click on Select a principal.
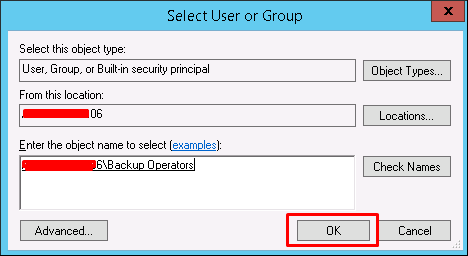
Step 10 − We should give rights that can be done by entering the object name, which is Backup Operator in this case and then → OK.
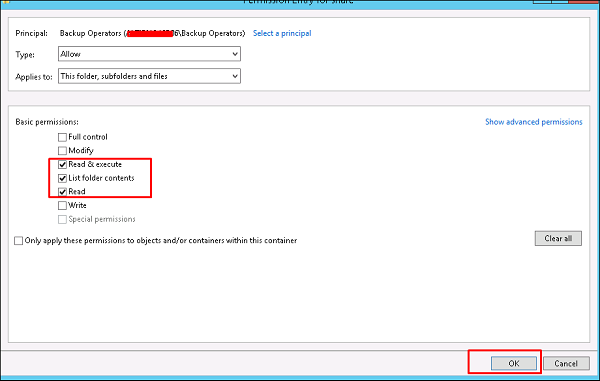
Step 11 − To this user we will give Read\Write rights, for that we will check the respective boxes and then → OK → OK → Next.
Step 12 − Click on Create.

Windows Server 2012 - File Manager
Like its previous versions, the present Windows Server 2012 version has a File Server Resource Manager Role. As you know, this is a role that helps system administrators to manage shared folders in the features link in setting up limits or file extension restrictions. To install it, we should follow the steps given below.
Step 1 − Go to Server Manager → Manage → Add Roles and Features → Next → Check on the Role-based or feature-based installation box → Check on the Select a server from the server pool box → Next.
Then, at the list of the roles find File and Storage Services and expand it. After this, expand the Files and iSCSI Services → Check on the File Server Resource Manager box and then a pop-up window will open.
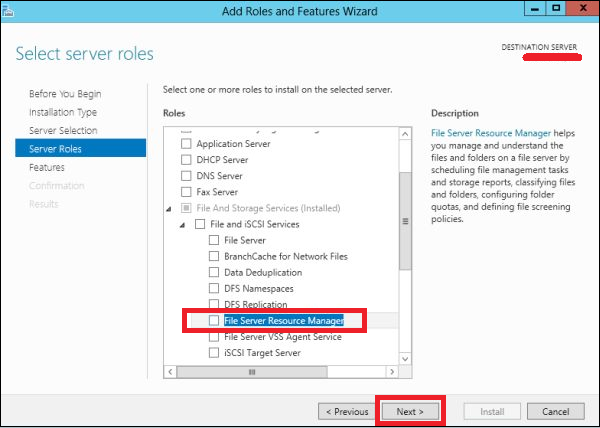
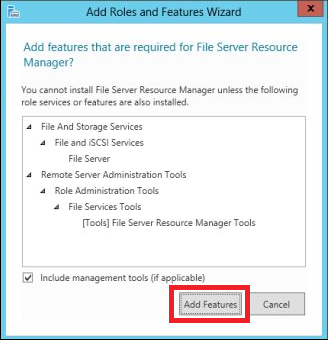
Step 2 − Click on Add features and then → Next.
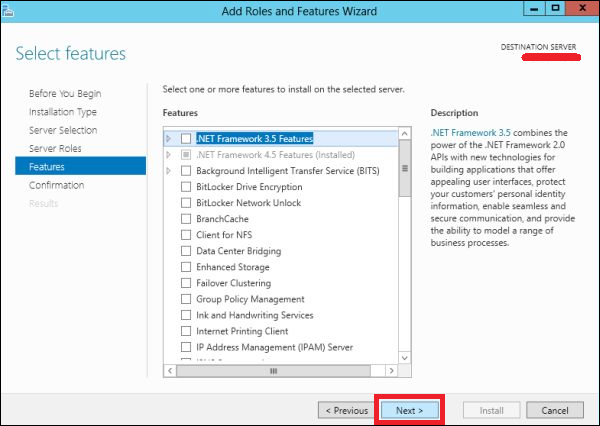
Step 3 − Click the Next button.
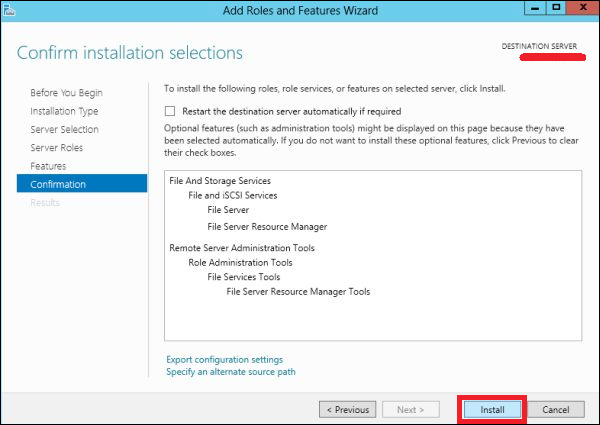
Step 4 − Click the Install button.
Now that we installed the File Server Resource Manager, let us open it by following the path given below.
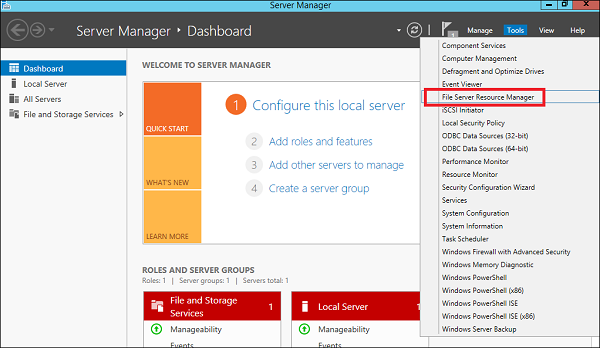
Step 1 − Click on Server Manager → Tools → File Server Resource Manager.
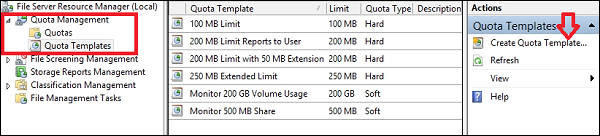
To set quota to a folder, we should follow the steps as below.
Step 2 − On the left panel click on Quota Management → expand Quota Templates → click on Create Quota Template on the right-hand side panel as shown in the screenshot given below.
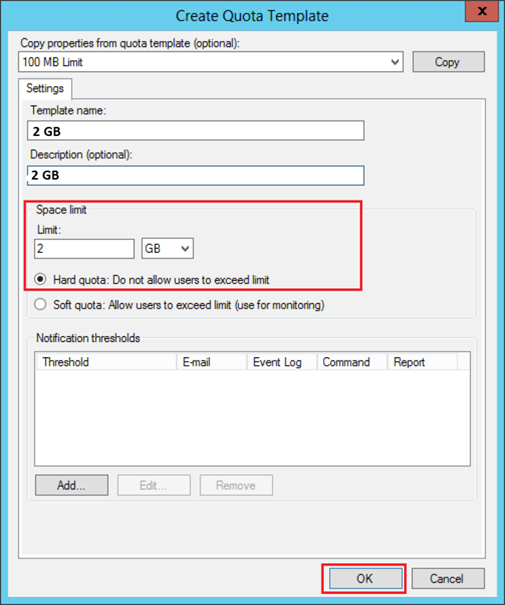
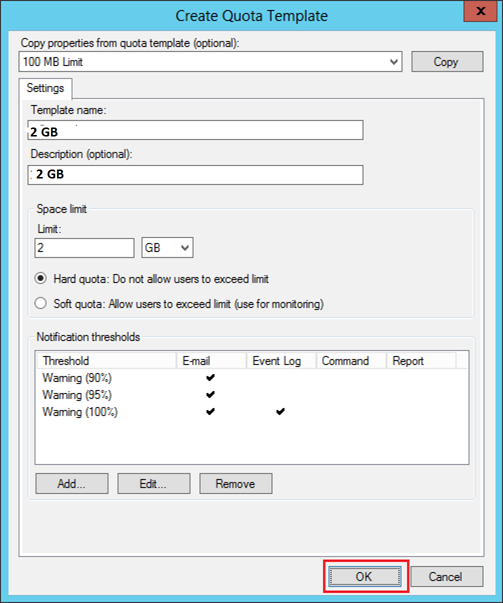
Step 3 − A new table will be opened, where the most important aspect to put is Space Limit depending on the need. Here, we will put 2GB and then → OK.
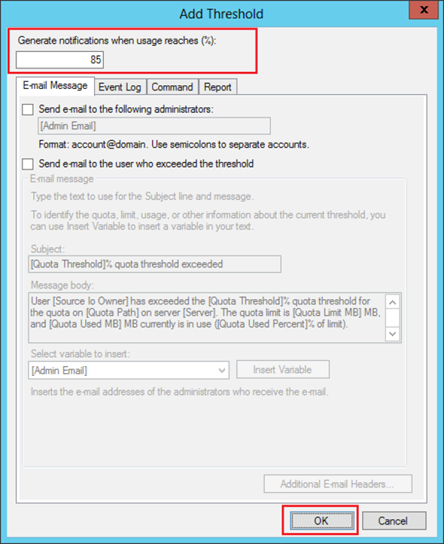
Step 4 − You must put the threshold for it and once the folder reaches the capacity, it will send you a notification where you will have an option to put the email.
Step 5 − Click Ok.
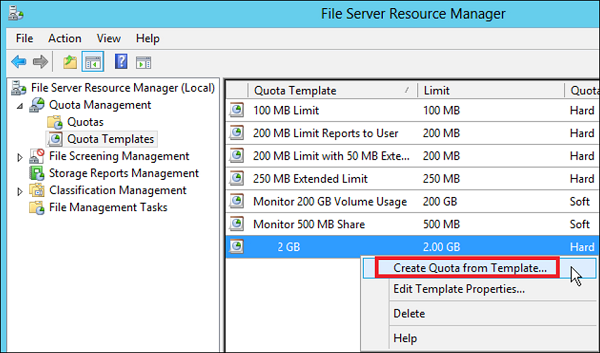
Step 6 − Then to attach this quota to a folder Right Click on the template → click on Create Quota from Template
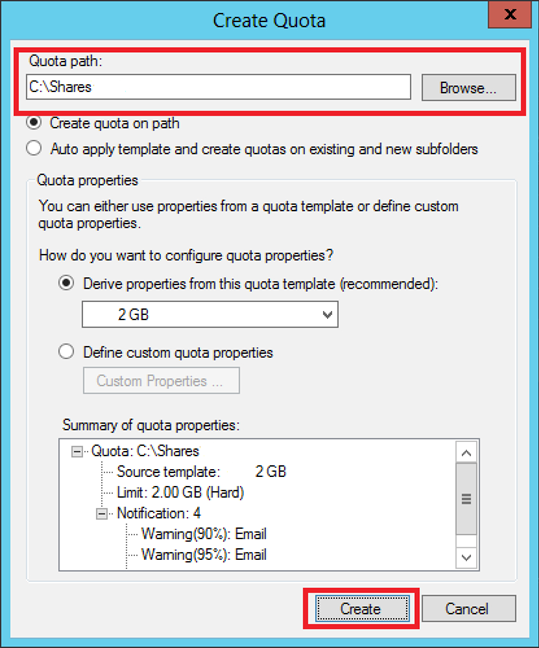
Step 7 − Click on Browse and then select your folder → Create.
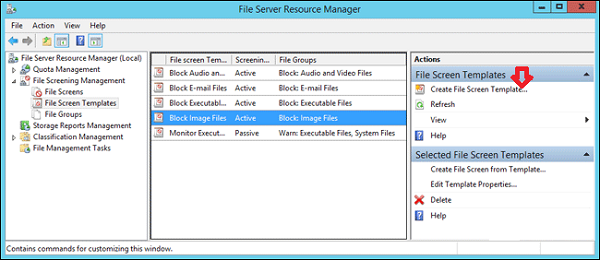
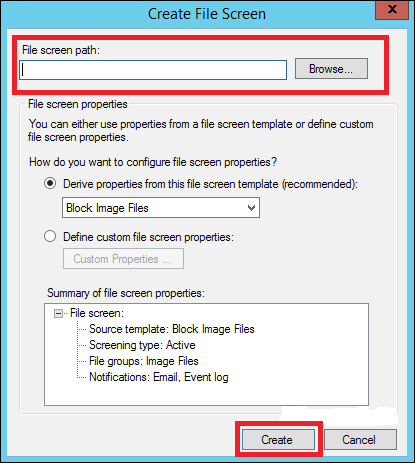
Step 8 − To put a file restriction to your folders, you can go to the left pane File Screening Management → File screening templates → Click on the left panel Create File Screen Template
Step 9 − Click on Browse and find the folder that you want → Create.
Windows Server 2012 - Print Server
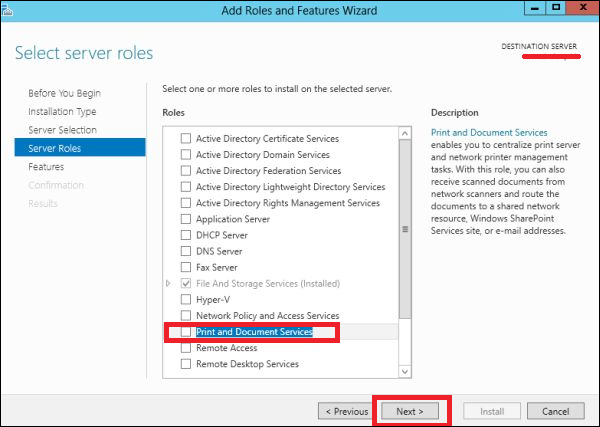
In this chapter, we will see how to install a Print Server which plays some very important roles for the system administrator and the management. We should follow the steps given below.
Step 1 − Go to Server Manager → Manage → Add Roles and Features → Next → Check on the Role-based or feature-based installation box and → Check on Select a server from the server pool and then → Next.
Once it is done then, at the list of the roles find Print and Document Services → A popup window will open.
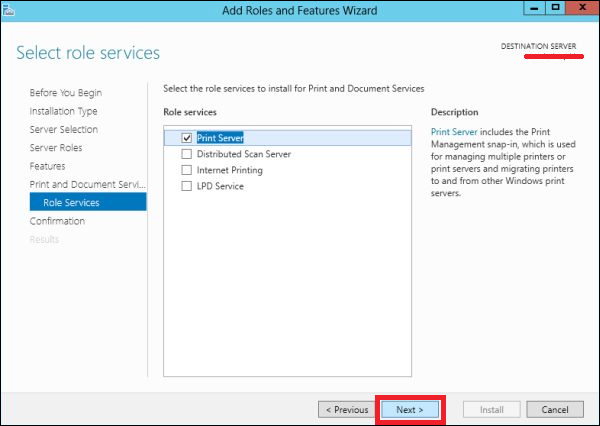
Step 2 − Click on Add features and then → Next → Next → Next.

Step 3 − Check on the Print Server box and → Next.
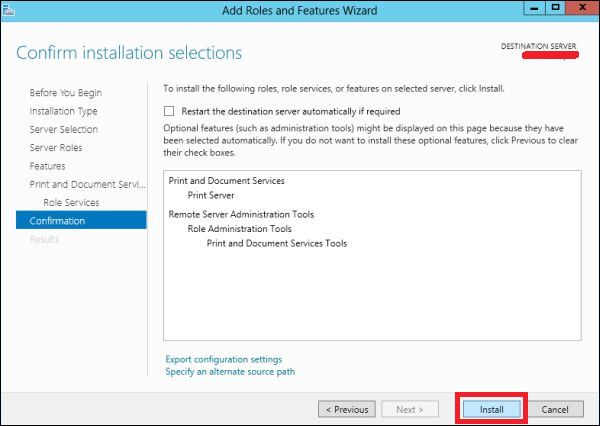
Step 4 − Click Install.
Windows Server 2012 - Easy Printing
Easy Printing is a feature which allows the client that connects via RDS to print over the network. It is installed in Windows server 2012 by default. Easy Printing is basically where the printer device is defined on the client system and a printer is connected directly via the network. All configuration is done via Group Policy Objects.
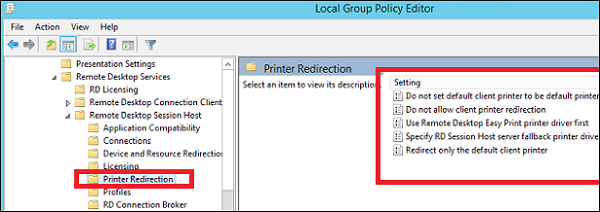
The configuration settings can be found at Computer Configuration Administrative Templates Remote Desktop Services Printer Redirection.
For User Configuration, it will be have the same path Administrative Templates Remote Desktop Services Printer Redirection.
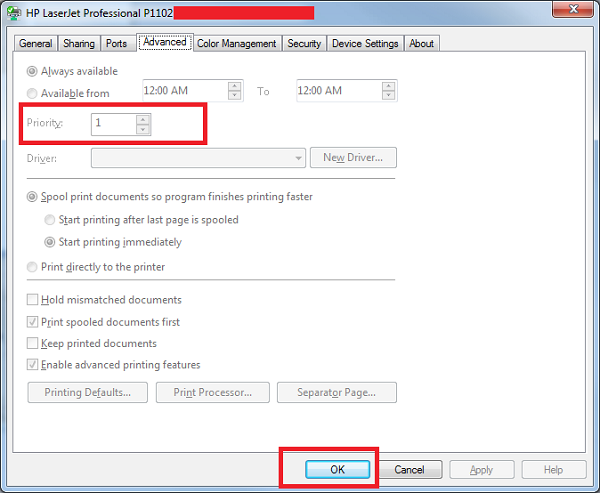
In administration, another important aspect is to set the priority for the printer, so the users have the same printer installer and can print as per their priorities. In this, the users printing with higher priorities overpass the printing will lower priorities.
To do so, you need to add different logical printers and then add then as per the users or departments that have different priorities.
To do this, firstly let us add a printer to the print server by following the steps given below.
Step 1 − Click on Server Manager → Tools → Print Management → then on the left panel click Print Servers → then right click on Printers and → Add Printer.
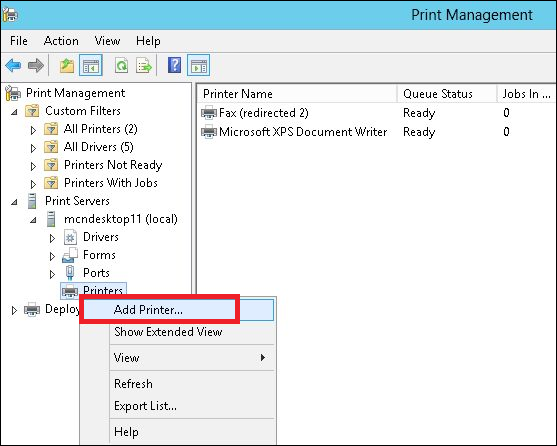
Step 2 − Next, follow the wizard to add the network printer like you do for a normal workstation and at the end this printer will be shown in the Printer Management.
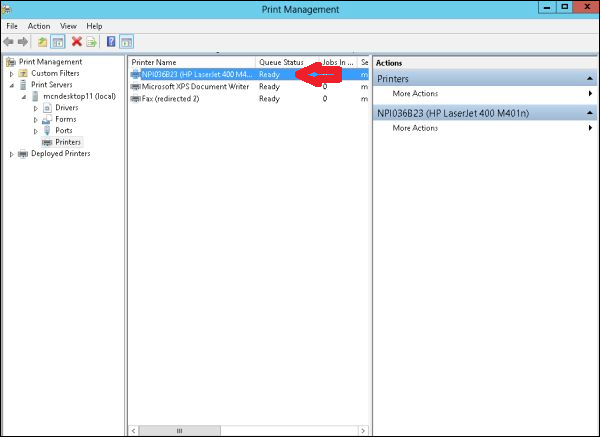
Step 3 − Now that we have installed the printer, we can set the priority on this printer Right click on the printer → Advanced → put a number at Priority from 1-99 → OK.
Configure Print Drivers
If we want to add other additional drivers, so that our clients find them easier to install a printer on their own. We must follow the steps given below −
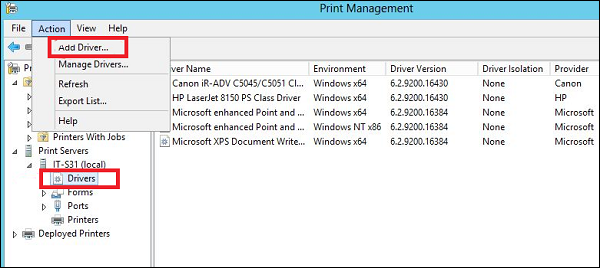
Step 1 − Go to, Server Manager → Tools → Print Manager → Action → Add Driver
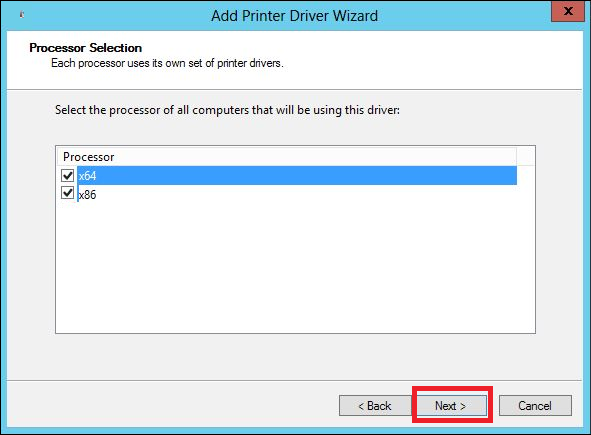
Step 2 − Check both boxes → Next.
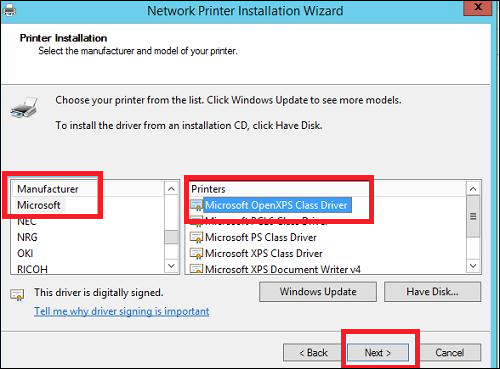
Step 3 − Choose the drivers Path to be installed and then → Next.
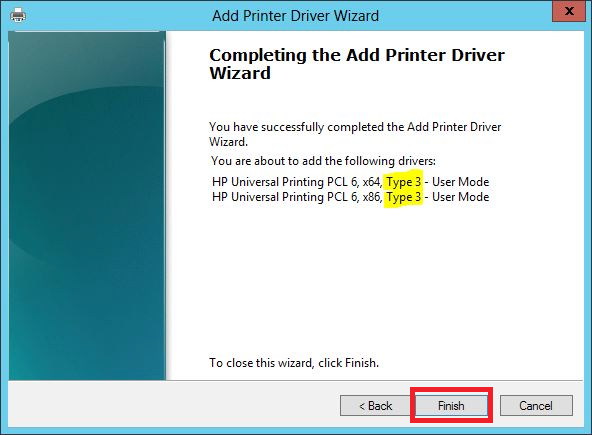
Step 4 − Click the Finish button.
Windows Server 2012 - Network Services
Windows has many network services too and you might already be knowing that it can become a router or a VPN Server too. Let us see how to use the Windows server 2012 as a router by installing the Remote Access role to it.
PS − Server should have 2 network cards One inside the LAN and the other facing the internet.
To add the Remote Access role, we should follow the steps given below.
Step 1 − Go to, Server Manager → Manage → Add Roles and Features → Next → Check Role-based or feature-based installation → Check Select a server from the server pool → Next.
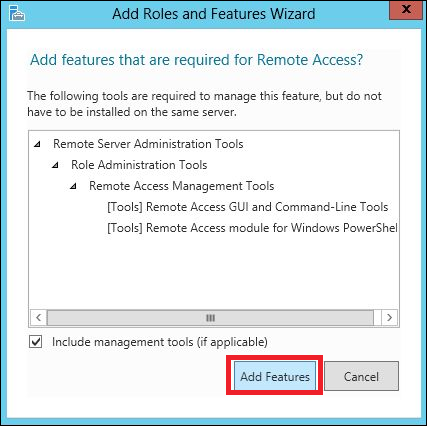
Once all of it is done, then at the list of the roles find Remote Access and check it → A pop-up window will open.
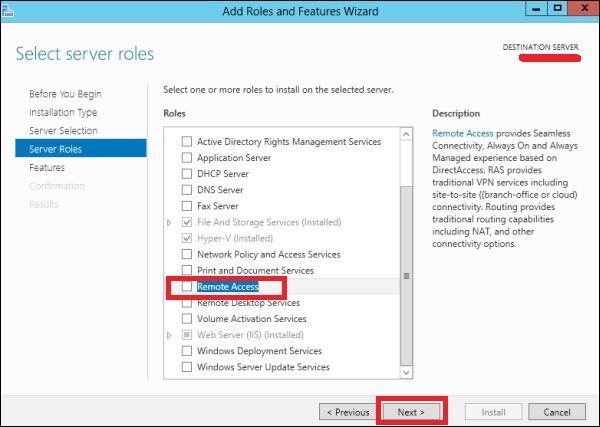
Step 2 − Click Add Features → Next.
Step 3 − Click Next.
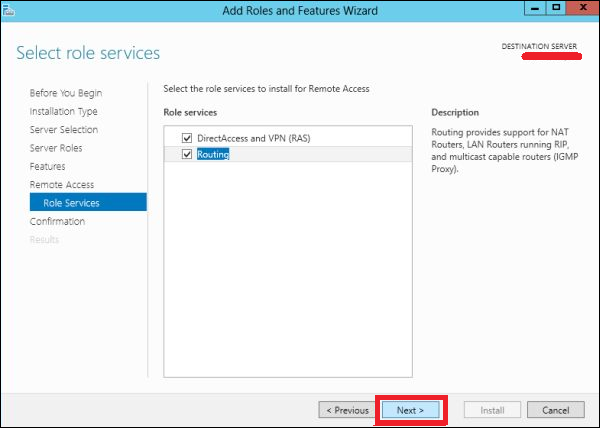
Step 4 − Check on the DirectAccess and VPN(RAS) and Routing check boxes.
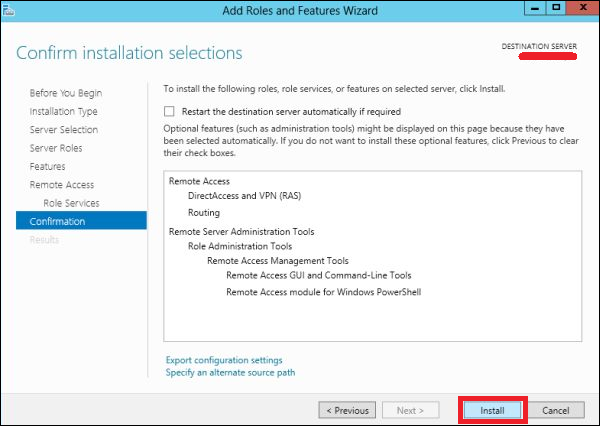
Step 5 − Click Install and wait for it to be installed completely.
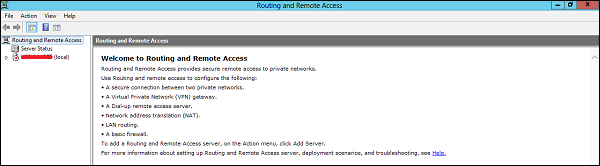
After the installation is done, let us now see the setup of the router. For this, we need to follow the steps given below.
Step 1 − Go to, Server Manager → Tools → Routing and Remote Access.
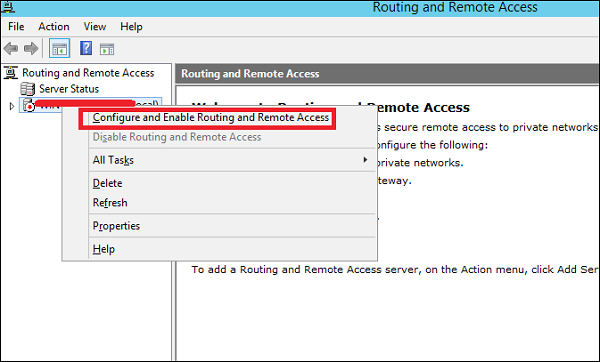
Step 2 − Right click → and then again click on Configure and Enable Routing and Remote Access as shown in the following screenshot.
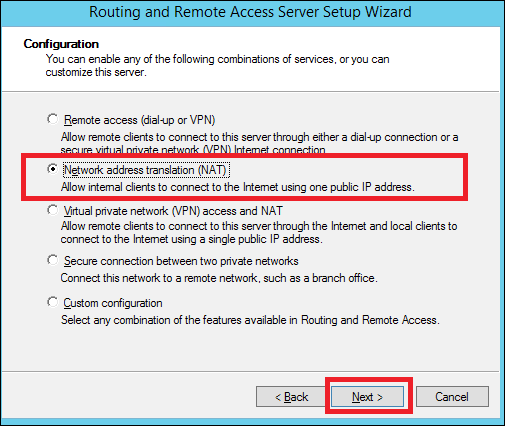
Step 3 − Select the Network address translation (NAT) option → Next.
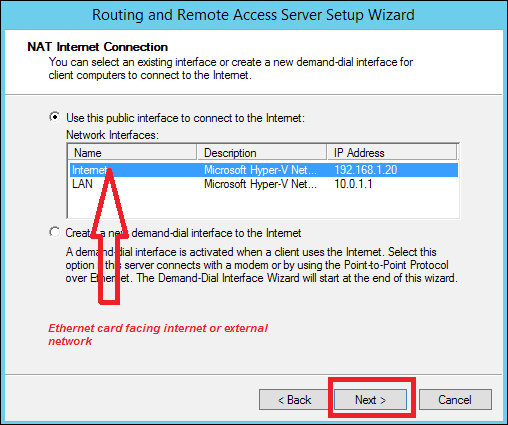
Step 4 − Now choose your Ethernet card that will be facing your internet site as shown in the following image and then → Next.
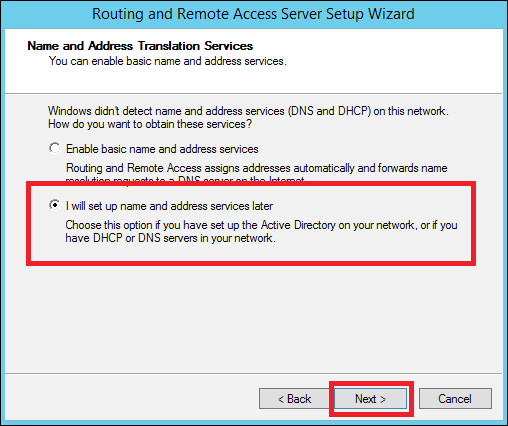
Step 5 − Choose I will set up name and address services later as we have already set up the DHCP and DNS and then → Next.
Step 6 − Click the Finish button.
Now let us see how to make the VPN Setup to allow the employees to connect from home. To do this, we must follow the steps given below.
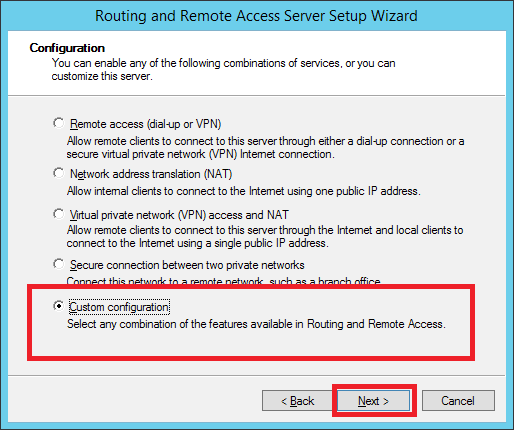
Step 1 − Go to, Server Manager → Tools → Routing and Remote Access → Right click → and then again click on Configure and Enable Routing and Remote Access → Custom Configuration and then → Next.
Step 2 − VPN Access and then → Next.
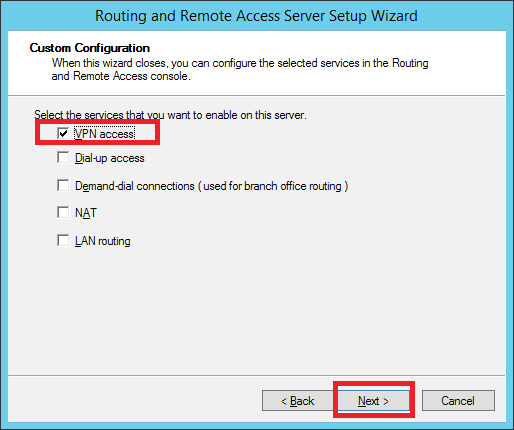
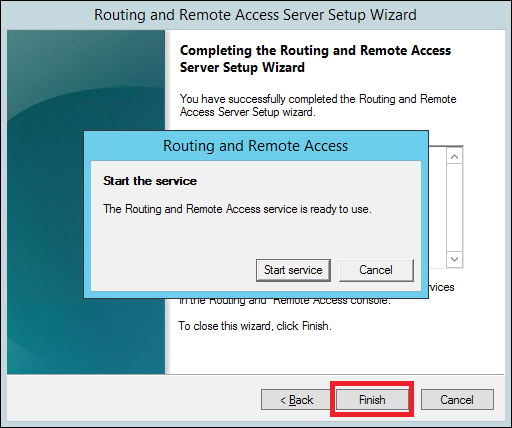
Step 3 − Click the Finish button.
Windows Server 2012 - Backup Management
In this chapter, we will install and configure Backup which does not differ too much from the previous versions.
To Install the backup feature, we should follow the steps given below.
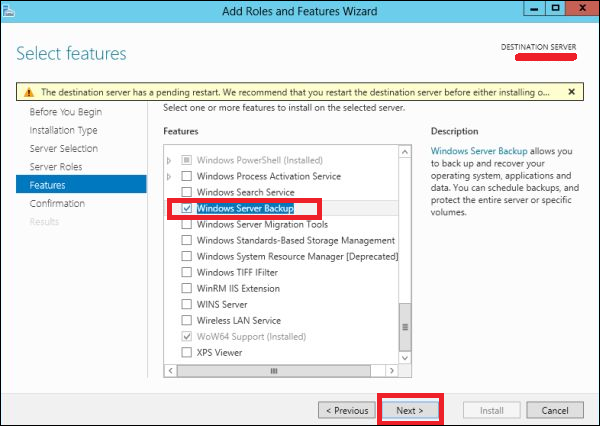
Step 1 − Go to Server Manager → Manage → Add Roles and Features → Next → Check the Role-based or feature-based installation box → then check on the Select a server from the server pool box and then click Next.
Once all this is done, check the Windows Backup Server box and then click on Next as shown in the following screenshot.
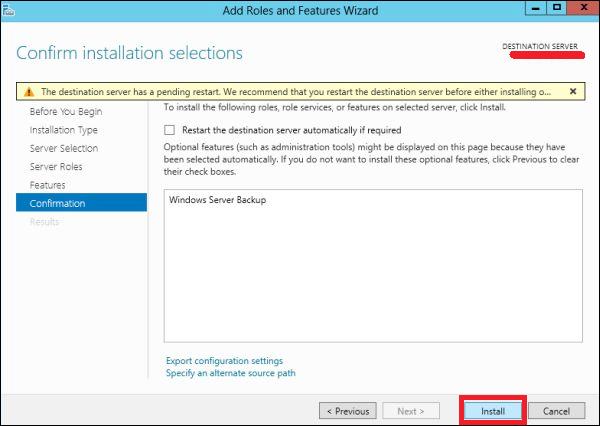
Step 2 − Click Install and then wait for the process to Finish.
Now let us go and Configure the Backup Feature it, for which we should follow the steps given below.
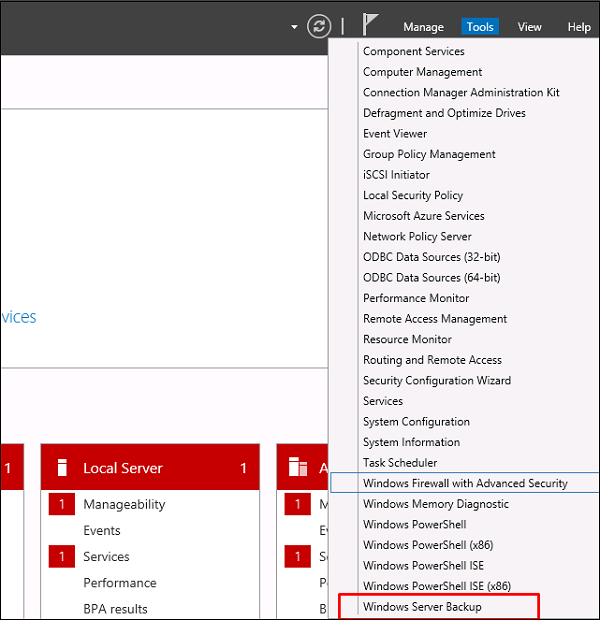
Step 1 − Go to Server Manager → Tools → Windows Server Backup.
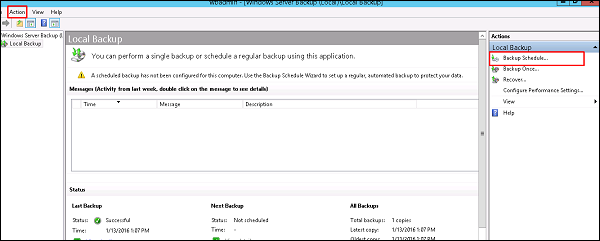
Step 2 − Click on Backup Schedule in the left side panel or click on Action at the top of the screen as shown in the following screenshot.
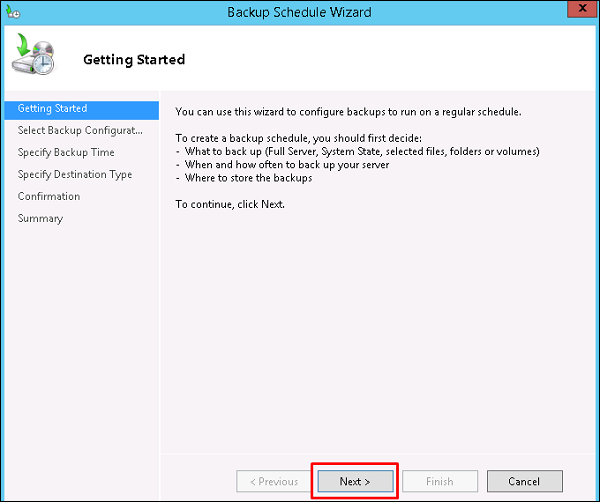
Step 3 − Click Next.
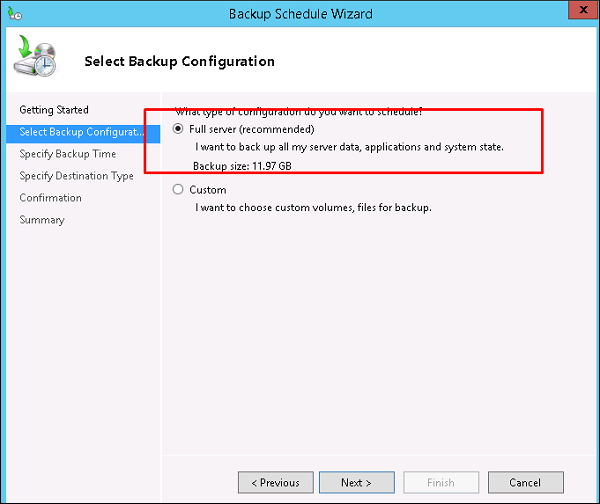
Step 4 − If you want to backup a file or a folder, you can click on custom file, but in this case I want to do a full backup of the server. So, we should click on the first option Full server (recommended) and then click Next.
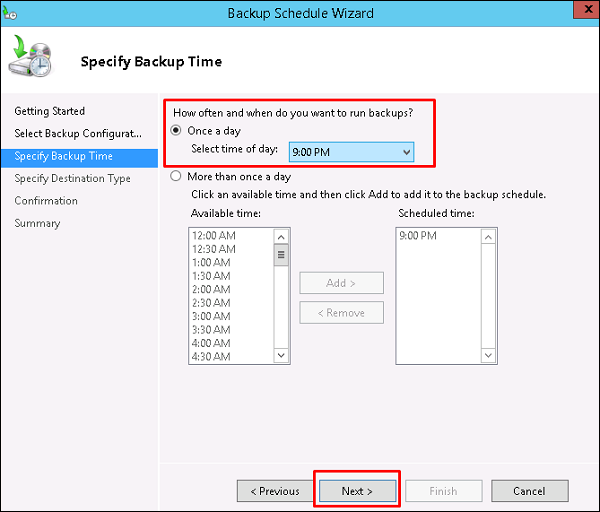
Step 5 − We should do backup once in a day, so we will choose the first option and the appropriate time, which generally is recommended at night → Next.
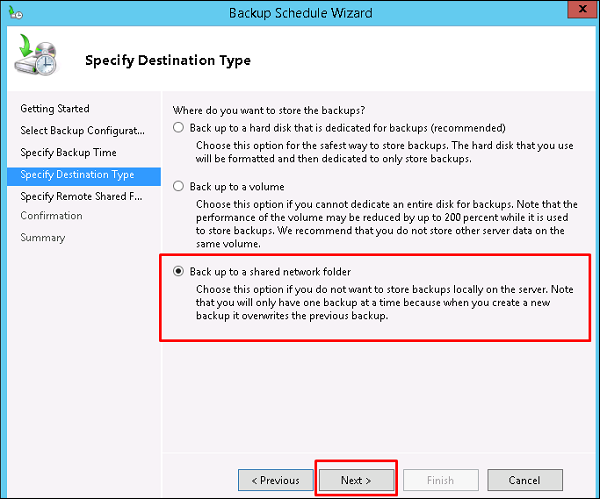
Step 6 − We should not click on the Back Up to a shared network folder option because the backup should be saved somewhere out of the server that is being backed up and then click on Next.
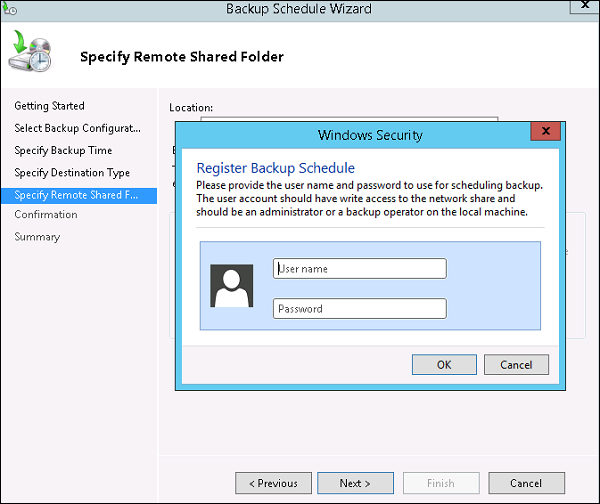
Step 7 − At the location, put the shared folder path and then → Next.

Step 8 − It will pop-up a credentials table asking you for the username and password of the shared folder which you should put here and then click → OK.
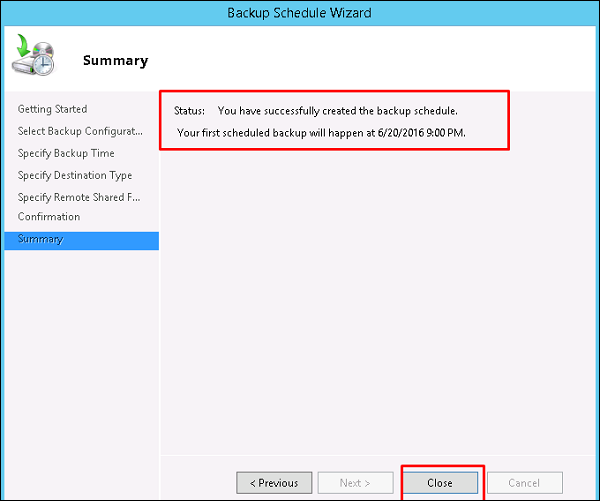
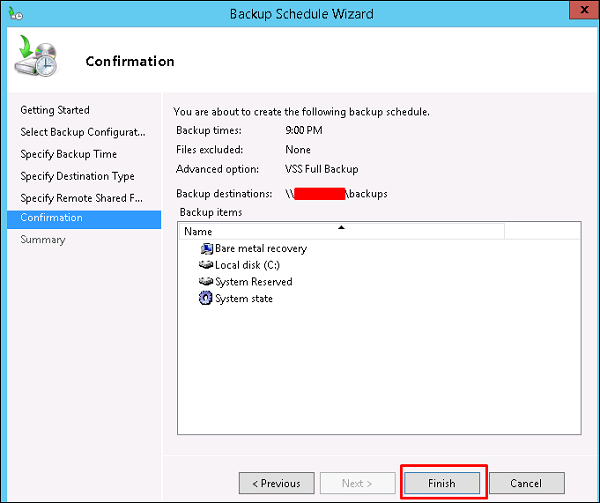
Step 9 − Click the Finish button.
Step 10 − Now you will get a window showing the status if the backup was created successfully or not, which can be seen in the following screenshot.