- Windows Server 2012 - Home
- Overview
- Installation
- Server Roles
- PowerShell
- Remote Management
- Windows Firewall
- Remote Desktop Management
- Resource Monitor
- Active Directory
- DC Accounts
- File System
- Group Managed Service Accounts
- Group Policy Overview
- DHCP Role
- DNS Role
- Primary Zones
- Manage Records
- IIS Overview
- IIS Security
- Hyper-V
- Advanced Configuration
- Configure WSUS Role
- WSUS Policies & Tuning
- Sharing of Files
- File Manager
- Print Server
- Easy Printing
- Configure Print Drivers
- Network Services
- Backup Management
Group Managed Service Accounts
The Managed Service Accounts (MSA) was introduced in Windows Server 2008 R2 to automatically manage (change) passwords of service accounts. Using MSA, you can considerably reduce the risk of system accounts running system services being compromised. MSA has one major problem which is the usage of such service account only on one computer. It means that MSA Service Accounts cannot work with cluster or NLB services, which operate simultaneously on multiple servers and use the same account and password. To fix this, Microsoft added the feature of Group Managed Service Accounts (gMSA) to Windows Server 2012.
To create a gMSA, we should follow the steps given below −
Step 1 − Create the KDS Root Key. This is used by the KDS service on DC to generate passwords.
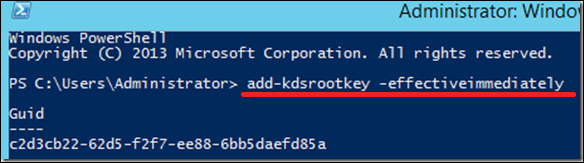
To use the key immediately in the test environment, you can run the PowerShell command −
Add-KdsRootKey EffectiveTime ((get-date).addhours(-10))
To check whether it creates successfully or not, we run the PowerShell command −
Get-KdsRootKey
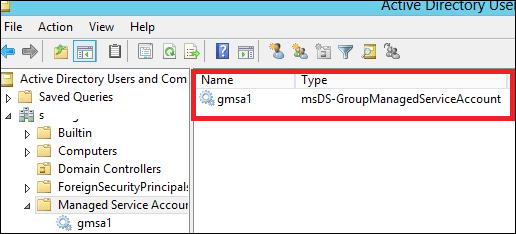
Step 2 − To create and configure gMSA → Open the Powershell terminal and type −
New ADServiceAccount name gmsa1 DNSHostNamedc1.example.com PrincipalsAllowedToRetrieveManagedPassword "gmsa1Group"
In which,
gmsa1 is the name of the gMSA account to be created.
dc1.example.com is the DNS server Name.
gmsa1Group is the active directory group which includes all systems that have to be used. This group should be created before in the Groups.
To check it, Go to → Server Manager → Tools → Active Directory Users and Computers → Managed Service Accounts.
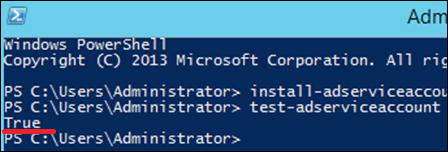
Step 3 − To install gMAs on a server → open PowerShell terminal and type in the following commands −
- Install − ADServiceAccount Identity gmsa1
- Test − ADServiceAccount gmsa1
The result should come True after running the second command, as shown in the screenshot given below.
Step 4 − Go to service properties, specify that the service will be run with a gMSA account. In the This account box in the Log on tab type the name of the service account. At the end of the name use symbol $, the password need not to be specified. After the changes are saved, the service has to be restarted.
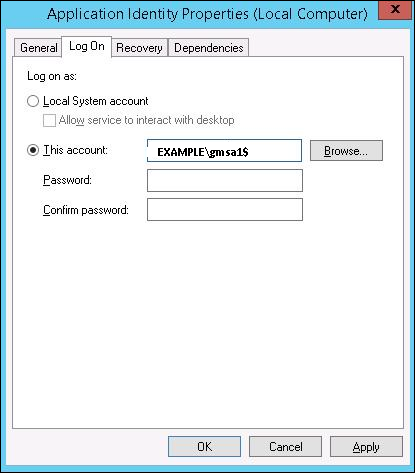
The account will get the Log On as a Service and the password will be retrieved automatically.
