- SAP IDT – Home
- SAP IDT – Overview & User Interface
- SAP IDT – Resources
- SAP IDT – Creating Universe
- SAP IDT – .unv Universe Introduction
- Dealing With Published Universes
- SAP IDT – Projects
- SAP IDT – Managing Connections
- Managing Resources In Repository
- SAP IDT – Data Foundation Layer
- SAP IDT – Building Data Foundation
- SAP IDT – Qualifiers & Owners
- SAP IDT – Joins In Data Foundation
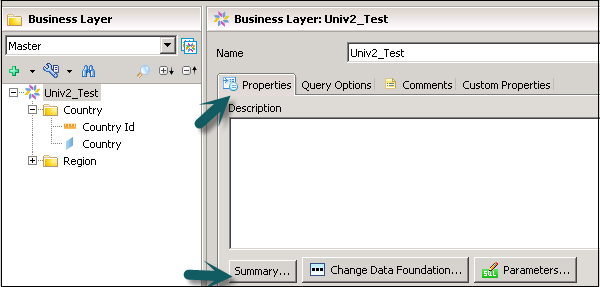
- SAP IDT – Business Layer
- SAP IDT – Business Layer Properties
- SAP IDT – Folders In Business Layer
- SAP IDT – Business Layer View
- Building Query In Query Panel
- Dependency Among Resources
- SAP IDT – Publishing
- SAP IDT – Security
- Running Query Published Universe
- SAP IDT – Format Editor Overview
SAP IDT - Quick Guide
SAP IDT - Overview & User Interface
Information Design Tool (IDT) is a Business Objects design tool that extracts the data from different data sources using an OLAP and Relational connection to create Universes. There are different Universe parameters that can be passed at time of Universe creation.
A Universe is called as logical collection of dimensions and objects that allow business users to analyze the business data. Objects and dimension represent different hierarchies, measures, custom calculations, and attributes.
Universe can be created on the top of relational databases like SQL Server, Oracle or also on top of an InfoCube in SAP Business Warehouse (BW) system. Different types of connections can be created to these data sources like personal connection, shared connection and a public connection. A SQL or MDX statement is generated according to data source respectively - Relational and an OLAP.
A Universe created using an IDT can be used with different reporting tools in Business Objects. When a Universe is published to a central repository, it can be used in the following reporting and dashboard tools −
- SAP Business Objects Web Intelligence (WebI)
- SAP Business Objects Dashboard Designer (Earlier known as Xcelsius)
- SAP Business Objects Crystal Reports
- SAP Business Objects Explorer
Different Components in IDT while Designing a Universe
An OLAP or a Relational connection to data source
Extracting the tables and joins from Relational database or an OLAP cube.
Building a data foundation from extracted tables and joins.
Creating metadata objects from data foundation layer and these objects are managed in Business layer.
Using Universe parameters and to share the resources in Universe.
Publishing a Universe which includes Business layer, Data Foundation and a Universe connection to database
Universe can be published to the central repository to be used by other SAP Business Objects reporting applications.
Security profiles are used to provide access on Universe data and metadata objects.
IDT is primary used by application managers and report developers who wants to create analytical reports on the top of data stored in the different data sources. To create reports on top of Universes, a person needs technical understanding of IDT tool and functional knowledge of Data Warehouse.
SAP IDT - Resources
There are various resources in Information Design Tool that can be used to extract the data from data sources and to create a Universe −
Project
A Project is a local workspace where you store the resources used to build one or more Universes. This is used to manage the local objects, which are used for Universe creation. A single project can contain objects for one or multiple Universe. A local project can contain multiple number of objects like data foundation layer, business foundation, and data source connection, etc.
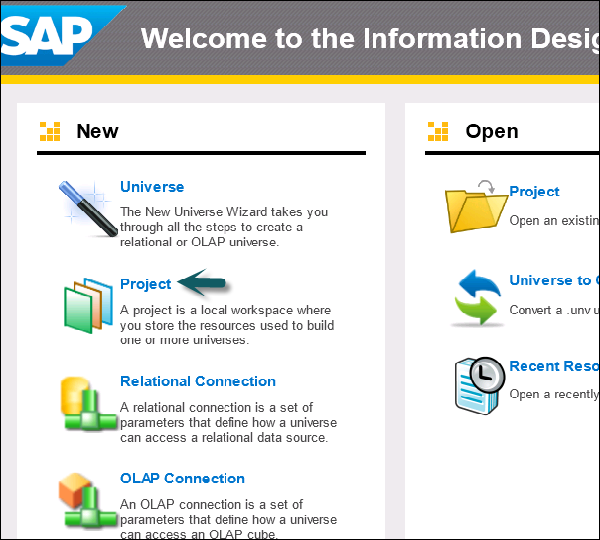
Data Foundation
Data Foundation layer allows you to import tables and joins from different relational databases. All the joins are imported and you can also define derived tables, custom calculations, additional joins, contexts and prompts.

Relational and OLAP Connection
A connection is used to define how data is extracted from a relational or an OLAP data source. A Universe always uses at least one connection to extract the data. You can also build a multisource that extracts data from one or more data sources using multiple connections.
A connection can be saved locally with .cnx file and all Universes created on the top of local connections cant be published to BO repository. To publish a Universe to repository, you should use a secured central connection with .cns file.
.cns- secured Repository connection
.cnx-local unsecured connection. If you use this connection, it will not allow you to publish anything to repository.l
Business Layer
In Business layer, you define measures and dimensions. You can also apply Aggregations like Sum, Count, Avg, Min, Max.
To complete the Universe creation, you need to save the project and then publish the business layer to the repository.
UDT vs IDT
In UDT, a Universe is created with file extension as .unv. In IDT, a Universe file extension is changed to .unx file.
To open unv file in IDT, it cant be directly opened but you can convert unv file to unx file to open in Information Design tool. You cant open an IDT .unx file in Universe Design tool nor you can convert it to unv file.
Universe Design Tool is a single-source enabled tool. However, IDT is a multi-source enabled tool meaning you can extract the data from different data sources while creating a Universe.
| Universe Design Tool (UDT) | Information Design Tool (IDT) |
|---|---|
| Universe file extension- .unv | Universe file extension - .unx |
| You cant open .unx file and also it cant be converted to unv to open in UDT | You can open unv file by converting unv file to unx file extension |
| It is single-source enabled | It is multi-source enabled |
| It cant be directly connected to Dashboard designer and Crystal Reports latest version | It can be directly connected to Dashboard designer and Crystal Reports latest version |
User Interface in IDT
When you retrieve an existing Universe in IDT by connecting to the repository, following are the available interfaces. These are the same when you design a new Universe in Information Design Tool.
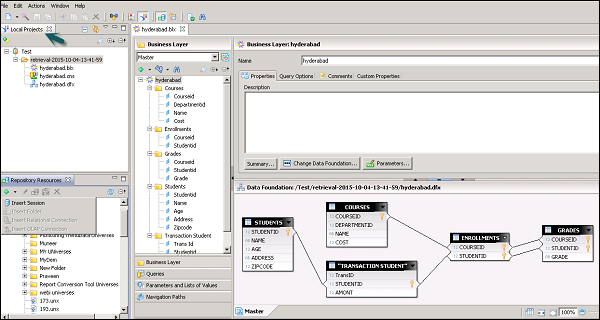
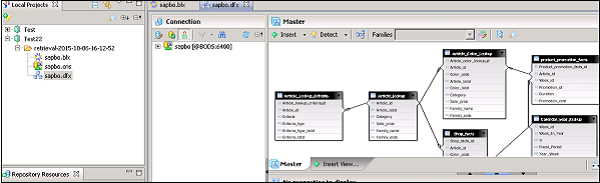
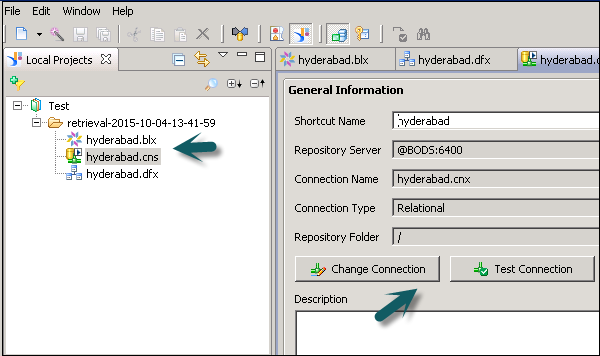
Local Projects
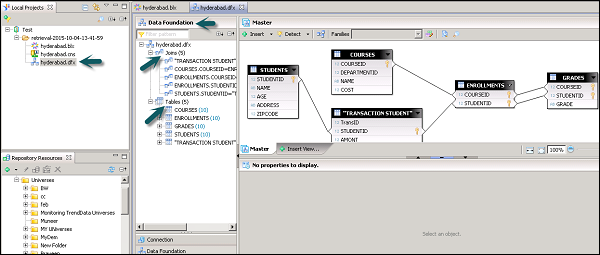
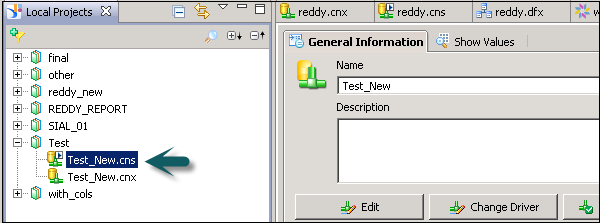
It defines the existing connection in use (.cnx or.cns), Data foundation layer (.dfx) and Business Layer that are local in Universe as shown above.
You can click on each object under Local Projects to see the details and to make any changes. Click on the connection .cns file to see the connection details. Similarly, you can open .dfx or .blx object.

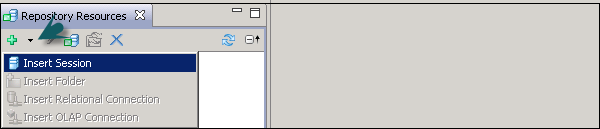
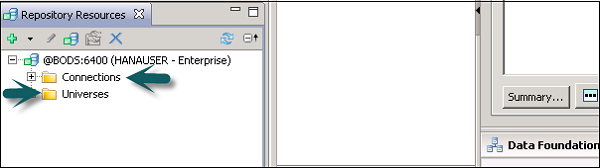
Repository Resources
Once you connect to the Repository, you can retrieve all the objects that are designed and published to that repository.
To insert objects from the Repository, click on + sign and select Insert Session. Enter the system details, the username and password, and you can see all the objects in the Repository.
Business Layer
This layer contains all the classes and objects, you can check dimensions and measures that are defined in a Universe. When you publish the business layer in the repository, this shows the completion of Universe creation.
You can check the summary of Business Layer to see the number of attributes, dimensions, measures, classes, LOVs, etc.
Data Foundation Layer
This layer is used to define data foundation that includes tables from data source, joins, etc.
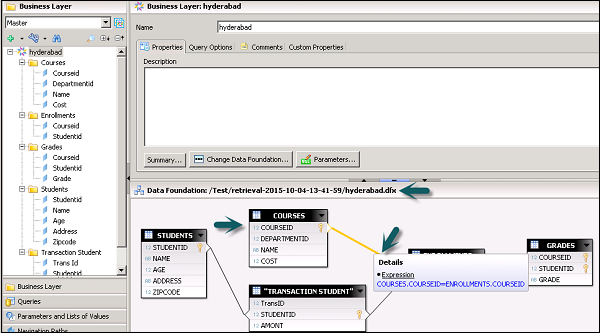
To check the structure of data foundation, you can click on .dfx under local projects and it will take you to Data Foundation layer and its components.
Setting and Resetting Preferences in IDT
You can customize Information Design tool user interface by setting preferences. This can be reset to default using Reset to default display option. To set the preferences in IDT, go to Windows → Preferences.
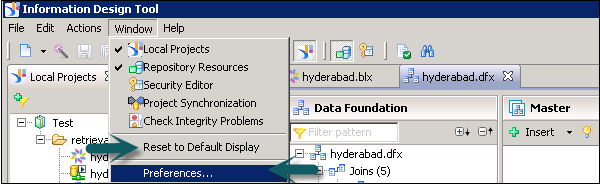
Once you click on Preferences, a new window will open. You can define preferences under General, Help and Information Design Tool preferences.
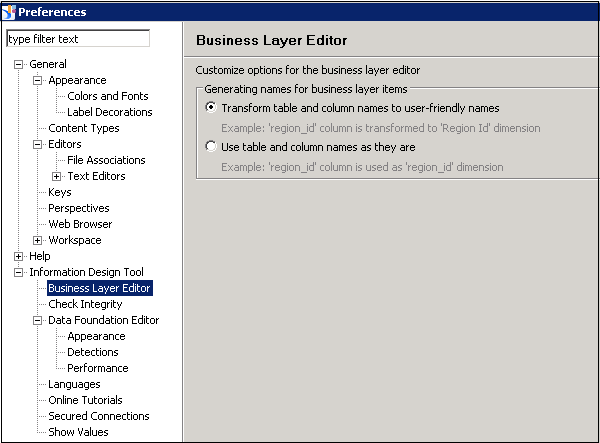
Information Design Tool Preferences
- Business Layer Editor
- Check Integrity
- Data Foundation Editor
- Languages, etc.
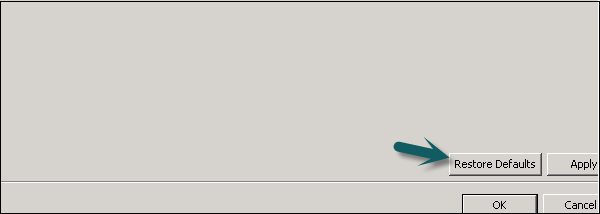
Using Reset to Default display option under Window tab allows you to reset all the values to default or you can also use Restore Default option on Preferences window.
SAP IDT - Creating Universe
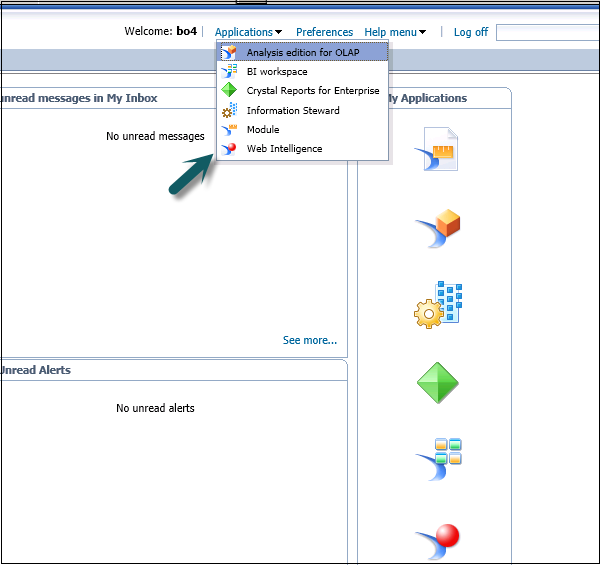
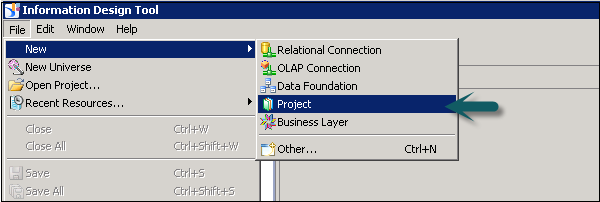
To create a Universe in IDT, go to Start → All Programs → SAP Business Intelligence → SAP Business Objects BI Platform 4 Client Tool.

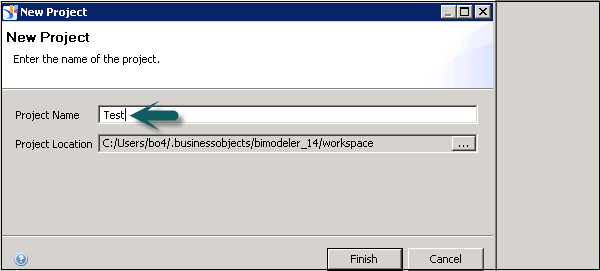
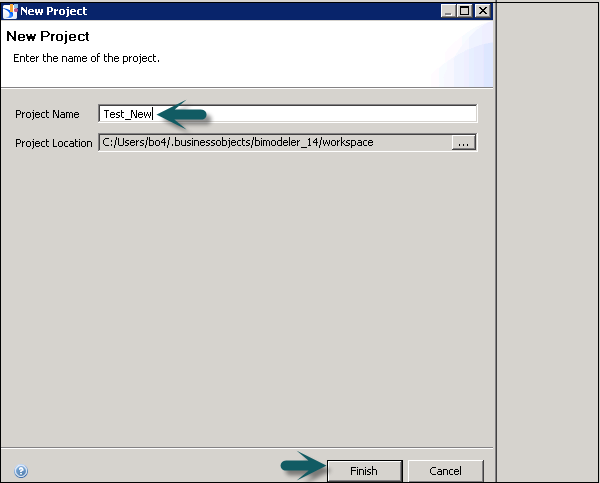
In Information Design Tool, you have to create a New Project. Go to File → New → Project. Enter the Project Name and Click on Finish.
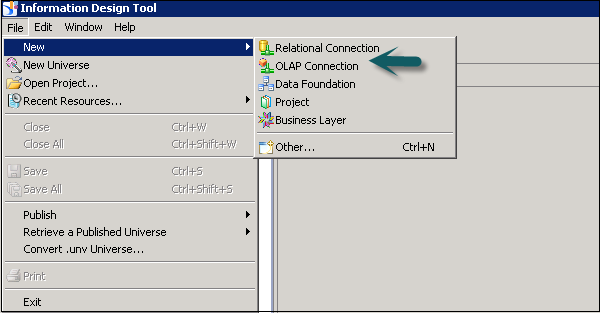
Once the project is created, next is to create an OLAP or Relational connection to connect to a data source. A Relational connection is used to connect to the Database layer to import tables and Joins. An OLAP connection is used to connect to the multidimensional model like an Information View in SAP HANA.
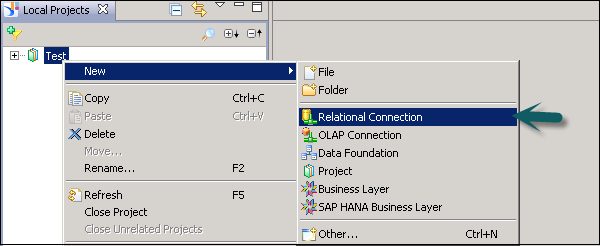
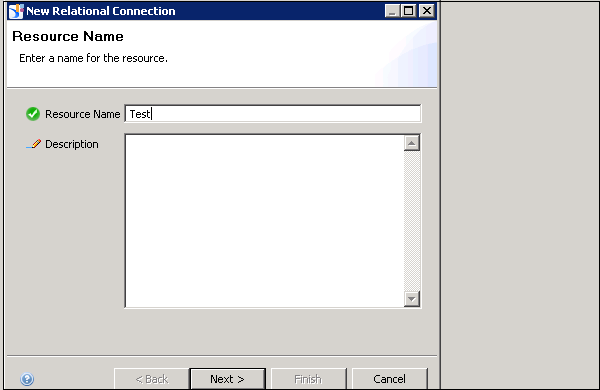
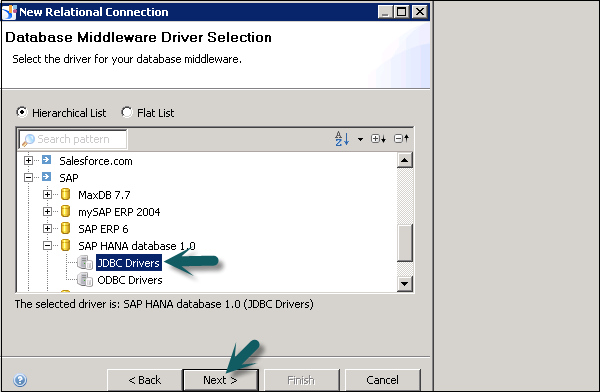
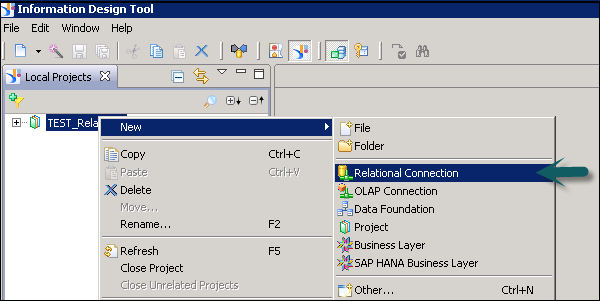
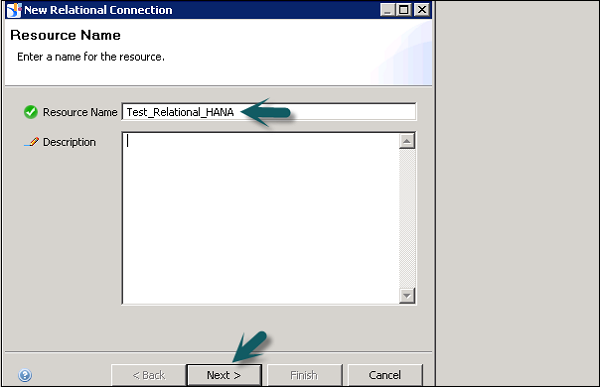
Right-click on Project name → New → Select Relational Connection → Enter connection/resource name → Next.
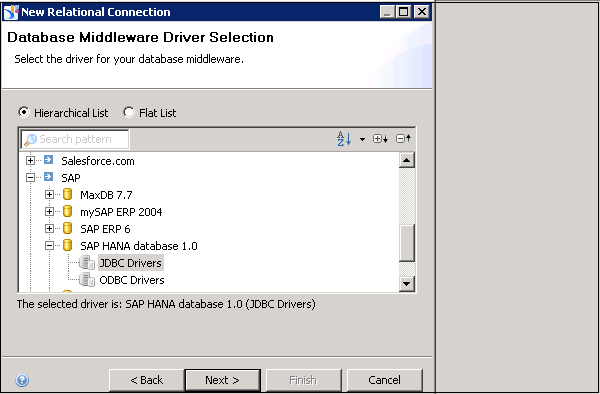
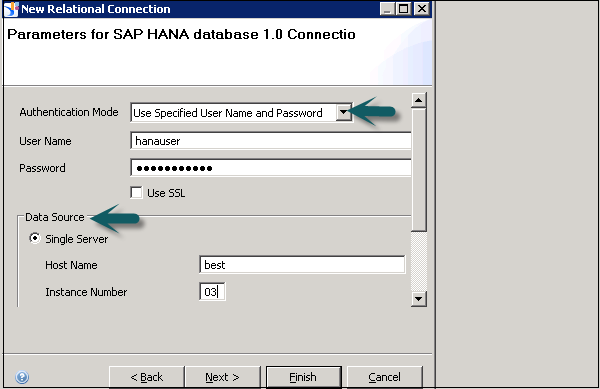
Choose SAP from the list → SAP HANA → Select Drivers JDBC → Next → Enter details.
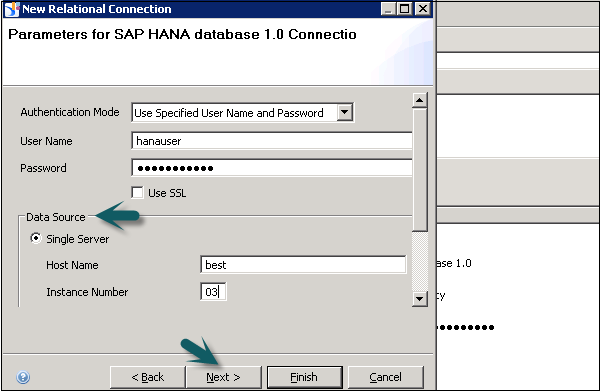
Enter the system details, username, password, and click Next.
Click Finish.
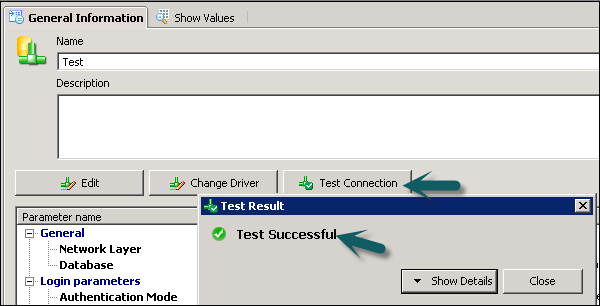
Under General Information → Click on Test Connection → Successful.
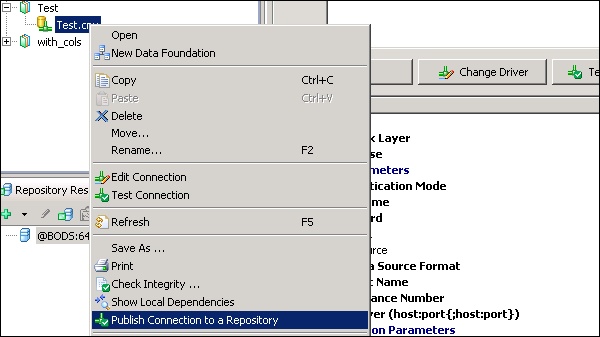
We have to publish this connection to the Repository to make it available for use.
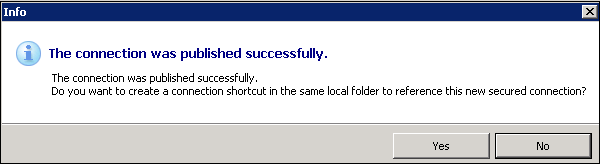
Right-click on the connection name → Publish the connection to the Repository → Enter BO repository password → Click on Connect → Finish → Yes.

Once you click on finish, it will create a secure Repository connection.
.cns − secured Repository connection
.cnx − local unsecured if you use this connection it will not allow you to publish anything to repository.
The next step is to create a Data Foundation Layer on this secure connection.
Right-click on .cns Repository connection → New Data Foundation.

Enter Resource Name and click on Finish. It will show you a list of all available schemas in the database. You can add Tables and Joins from Schema to Data Foundation layer. This can be done by dragging the table or by a double-click. Apply the joins on Dimension and Fact tables to create a logical schema.
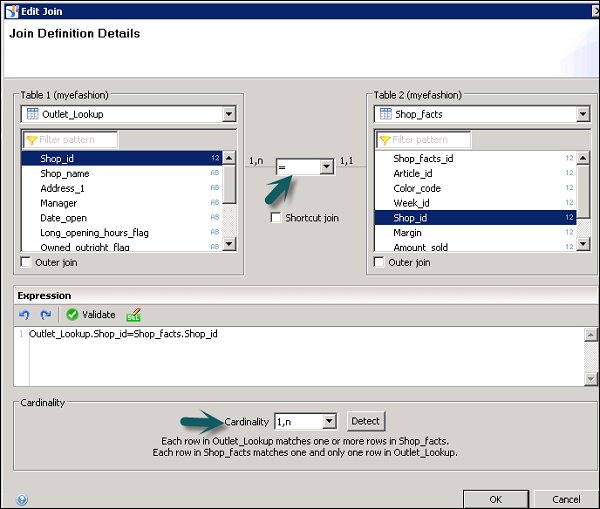
To define a Join, double-click on Join between tables. It will show you both the tables. You can select from different Joins as per data requirement and click on detect Cardinality to define cardinality - 1:1, 1:n, n:n.
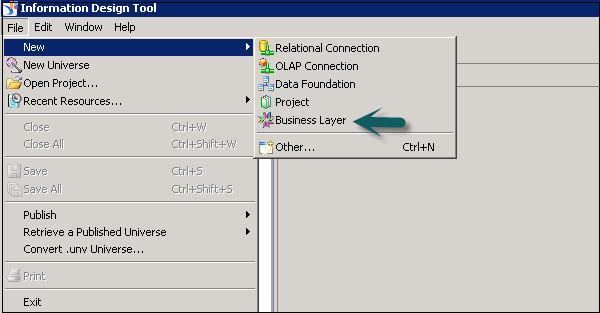
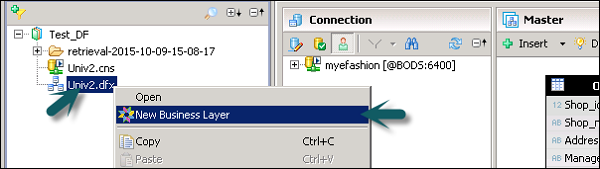
Next is to create a Business Layer on the Data Foundation. Click the Save All icon at the top of the screen. Then, right-click on Data foundation .dfx → New Business Layer.

Enter Resource Name → (Generating Business Layer for Data Foundation) Finish. It will add Business Layer .blx under the Local Project.
It will show a list of all dimensions and measures under Data Foundation. You can define dimensions, measures, aggregation, etc.
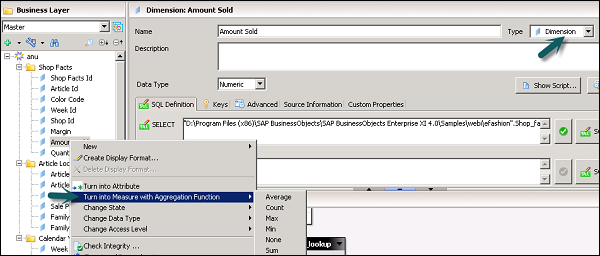
To define an Aggregation, you can select from Projection Function. You can also hide few objects in the report if you want by using the dropdown next to measures and dimension. You can select Hidden for a particular object.

Once you define Business Layer, click Save All icon at the top of the screen as shown in the following screenshot.

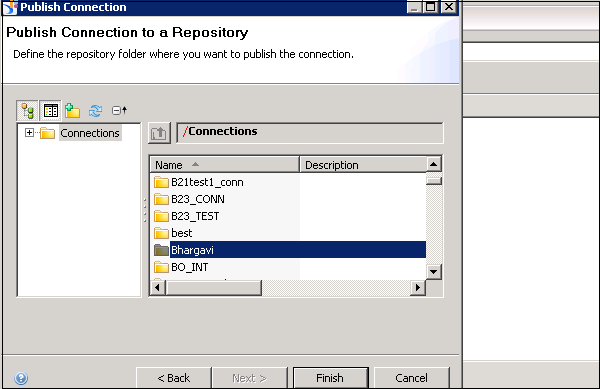
To publish a Universe to the Repository, right-click on .blx → Publish → To a Repository.
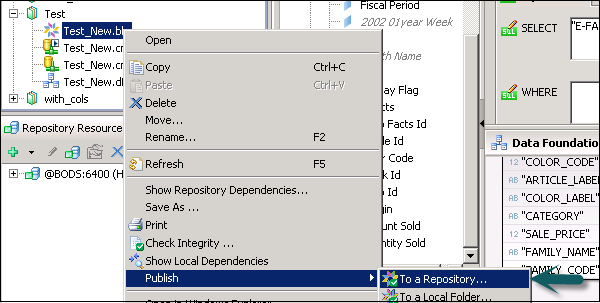
Select Resources → Next → In Publish Universe window, select Next → Select the Repository folder where you want to publish Universe and click Finish.
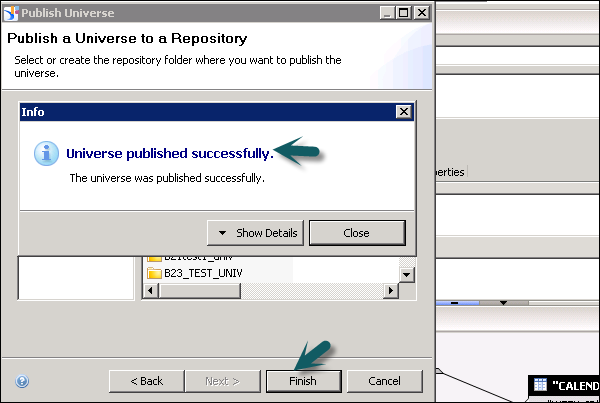
You will get a confirmation that Universe published successfully.
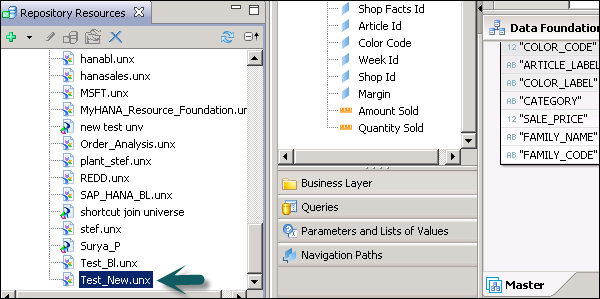
To check the Universe under Repository, go to Repository resources and check for the Universe that has been created.
Creating a Universe on SAP ERP
You can build a universe on SAP ERP by using Data Foundation in IDT. You have to create a relational connection to ERP data source, info sets, SAP queries, and ABAP functions that are treated as tables in the connection.
You can create a single source Data Foundation to support local connections but it doesnt support Joins and calculated columns between the tables inserted from an ERP connection.
To use a calculated column, joins, you need to create a Data foundation that is multi-source-enabled on a secured connection.

When a table is added in Data Foundation layer, the table type of info set, SAP query, or ABAP function is saved as a table property in the data foundation. To add an ABAP Function table, there is one data foundation table created to map the main function.
The table contains input columns for the input parameters of the function. These parameters can be mandatory or optional. To assign a value to mandatory parameters, you need to edit the input columns.
Limitations of Using SAP ERP
When you use measures that contain aggregate functions it cant be used as filters in the Query Panel as the output SQL expression consists of HAVING clause, and it is not supported by the SAP ERP connection. Hence, if a measure is added that contains Aggregation function as filter, it throws an error while refreshing the query.
Creating a Universe on SAP BW
If you want to use SAP BW to design a Universe, you should use a data foundation based on multi-source enabled structure. All the tables and joins in SAP BW are automatically imported to Data Foundation. When a Business Layer is created on Data Foundation, all objects are automatically moved to the Business Layer.
If you dont want to insert tables and joins automatically, you can unselect the Detect tables by going to advance properties while adding connection to Data Foundation.
You can also turn off insertion of Business Layer objects by unchecking the option to automatically create classes and objects when selecting data foundation in New Business Layer.
Creating a Universe on Microsoft Analysis Services
You have to create Business Layer on Microsoft Analysis Services (MAS) and business layer objects are created by default. Following is the mapping of objects in Business Layer −
Dimension − Analysis dimensions are created in the business layer for each dimension in the cube.
Display Folder − Folders are created in the analysis dimension to contain the hierarchies in the display folder.
Hierarchy − For value-based (parent-child) hierarchies, a value-based hierarchy is created in the analysis dimension. The attributes are created in the Attributes folder in the hierarchy.
Attribute Hierarchy − Attribute hierarchies in the cube are created as level-based hierarchies in the analysis dimension.
Named Set − Named sets are created in the related analysis dimension, in the folder Named sets.
Measures and Calculated Measures − Measures and calculated measures are created as measures in the appropriate measure group folder. A measure attribute is created for the formatted value.
Creating a Universe on SAS
You can build a Universe on SAS by using multi-source enabled data foundation and using a secure connection.
Connection to SAS data source are managed by data federation service.
Multilingual Universes
You can also create multilingual Universe in Information Design tool. This allows you to use multilingual solution by using single Universe metadata model.
Following are the steps to use multilingual Universe for report creation −
Step 1 − Use Universe designer to design Universe in source language in IDT.
Step 2 − Use translation management tool to translate the metadata in the data foundation and business layer.
Step 3 − Use report designers to build the reports on the same Universe, which can be displayed in different languages as per user preferences.
Step 4 − Go to Information Design Tool → Preferences → Preferred Viewing Locale determines the language of the metadata and data in the Query Panel.
This can be used if you have support for the following −
Translations are available in the language (metadata).
The connection supports the language parameter (data).
SAP IDT - .unv Universe Introduction
A .unv Universe is created in Universe Designer in SAP Business Objects XI 3 or Universe created using Universe Design tool. It can be converted to unx file in Information Design tool.
Following SAP Business Objects version can create unv files −
Universe Design Tool (UDT)
Universe Design Tool Desktop Edition
Universe created using UDT is stored with a file name .unv in the local folder or in the central repository
To use .unv Universes in IDT, you first need to convert them. You can convert the following unv Universes in Information Design Tool −
Relational Universes created using SAP BusinessObjects 4 UDT tool or Desktop edition
Relational Universes designed in SAP BusinessObjects Enterprise XI3 design tool
Converting .unv Universe in a Repository
Universe file .unv to be converted should be stored in the repository. If the Universe is created with a Design tool earlier than SAP BusinessObjects 4.0, then you should upgrade the Universe using Upgrade management tool.
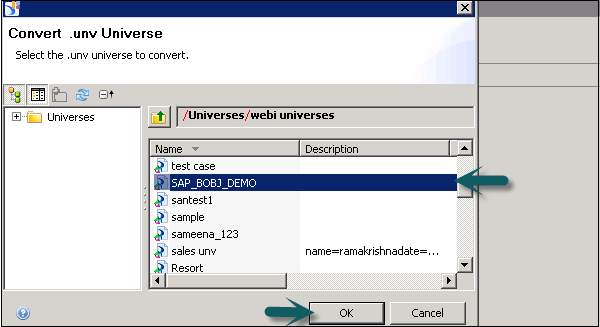
To convert a Universe in IDT, go to File − Convert.
In the next window, you have to select unv file from the repository to convert to unx file. Enter the Repository username and password to connect.
Select Universe from the repository that you want to convert. Click OK.
Select the Destination Repository folder → Browse to select a folder in the repository where you want to save .unx Universe. To create named parameters for prompt, select the checkbox as shown in the following screenshot.
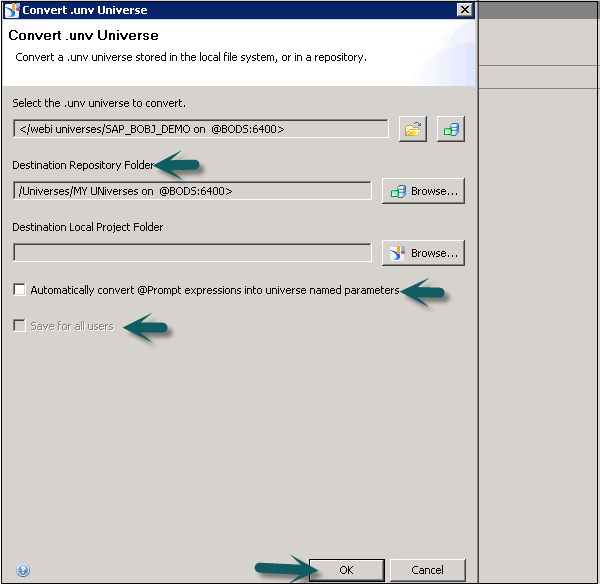
Save for all users option allow all users to open the Universe without entering the Repository password. Click OK to start conversion.
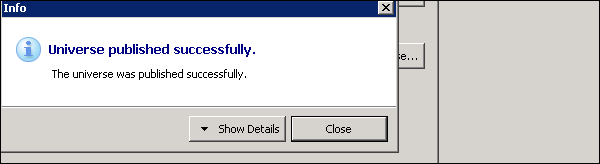
Once you click OK, conversion starts, and you get the following confirmation message.
Converting .unv Universe Locally
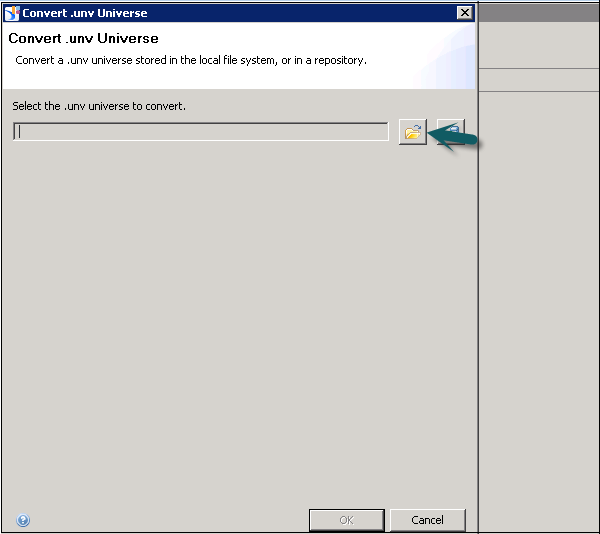
To convert a Universe in IDT, go to File → Convert.

In the next window, you have to select .unv file from the local folder.
Select the Destination Repository folder → Browse to select a folder where you want to save .unx Universe. To create named parameters for prompt, select the checkbox.
You can now publish the business layer to create the .unx universe file. This creates a local universe.
To publish the universe to the repository, continue with the next step. Publish the local connection to a repository.
Edit the data foundation and change the connection to use the secured connection published in the last step. Next is to publish the business layer to the repository.
Integrity Check while Conversion
When you convert .unv Universe, it is recommended to perform an integrity check in IDT. Following error types can be corrected −
Errors on column data types - It includes refreshing the structure in Data Foundation that allows you to fix the data type errors in integrity check.
Errors on Self Joins with Prompts - To use a Join expression with prompts and LOVs, you need to work on Joins in converted Universe.
Features Supported by .unv
When you convert .unv Universe in IDT, the conversion process creates same features in resulted Universe. Following is the list of features that are supported −
| Features in .unv Universe | Features in .unx Universe |
|---|---|
Universe Schema |
These objects are created in Data Foundation −
For Prompts, you need to check integrity in Self Join Context You need to manually restrict the Context definition |
Multilingual Universes |
Language settings, locale settings are converted |
Outline |
All classes and subclasses converted to Folders
|
Query Limits |
Query limits are converted and edited in business layer |
SQL Parameters |
Query, SQL statement and Cartesian product are converted |
Strategies |
Custom strategies are not supported in IDT |
Connections |
Same secured relational connection is used by .unv and .unx Universes. Relational connection can be created in both UDT and IDT and published in the repository. Personal and shared connections are converted to local connections. |
Functions |
Following functions can be converted −
All these functions are supported |
List of Values LOVs |
Named list of values are created in business layer in IDT for dimensions and measures that show LOVs |
SAP IDT - Dealing With Published Universes
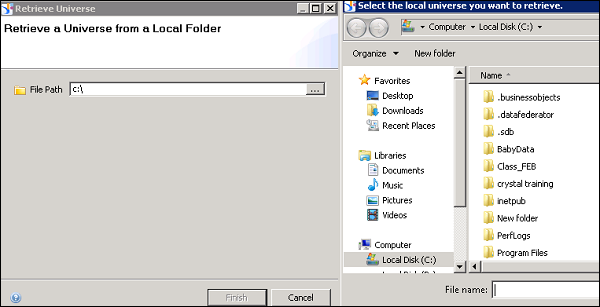
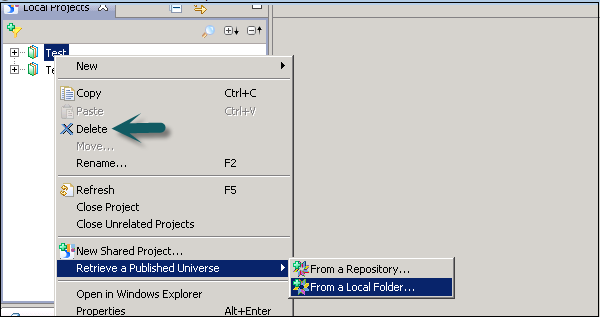
You can retrieve a published Universe from the local file system or from the Repository. To retrieve a Universe from the local file system, you need a local projects view where business layers and referenced resources are saved. In local projects view, right-click project folder, go to Retrieve Universe → from a Local Folder.

Select the Universe you want to retrieve and click Finish.
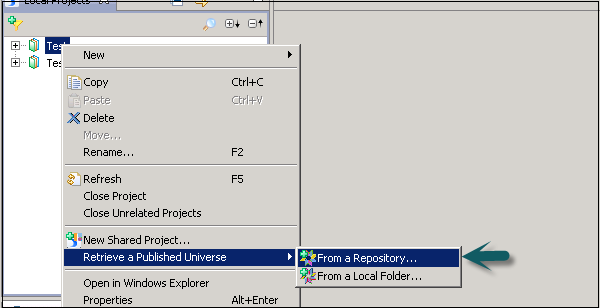
Retrieving a Universe from a Repository
To retrieve a Universe from the local file system, you need a local projects view where business layers and referenced resources are saved. You can retrieve a Universe from a Repository in two ways −
Method 1
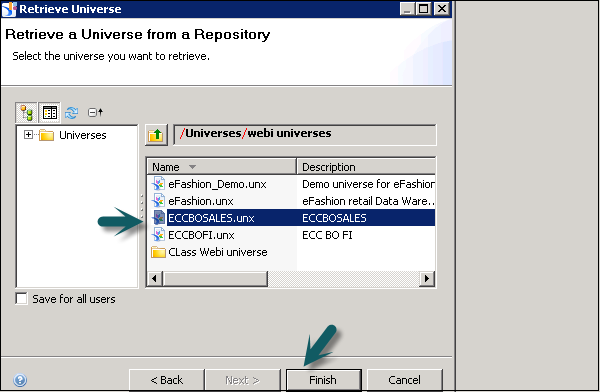
Right-click Local Project folder → Retrieve Universe → From a Repository.
Enter Repository password and click Connect.
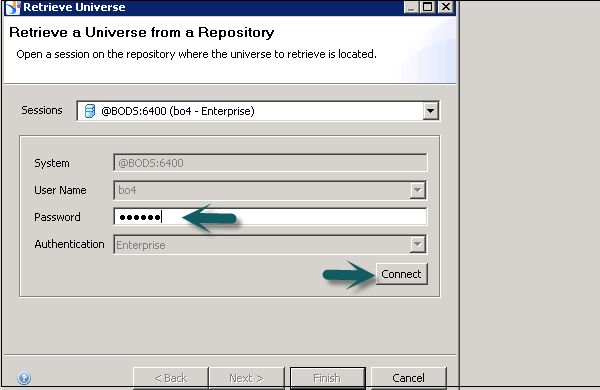
Select the Universe from available folders in Repository and click Finish.
Method 2
Another way is by going to the Repository Resources section and select the Universe you want to retrieve.

Select a Local Project for retrieval and click OK.
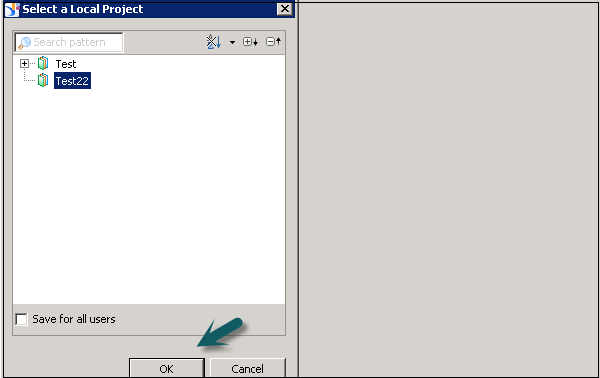
To remove the local security requirement, select the Save for all users option when selecting the Universe in the repository.
SAP IDT - Projects
To design a Universe in IDT, the first step is to create a project in Local Project views. All the resources like Data Foundation and Business layers are managed in a project. You can navigate to local projects and access the resources in the local project using Information Design Tool (IDT).
Once you create a Local Project, resources can be populated under it in different ways −
- You can create new resources using New option.
- Convert .unv Universe created from Universe Design Tool.
- Retrieve a published Universe.
- To edit a resource, you can double-click on a resource under Local Project.
Checking Existing Projects in IDT
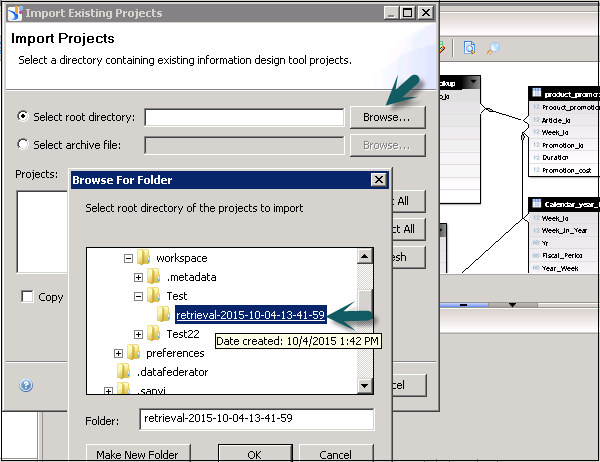
You can open an existing project in IDT. Go to File → Open Project.

A new window will open. You can select from the root directory or from archive file to import an existing project.
To import from the root directory, click on Browse, select the Project you want to import and click OK.
Creating a New Local Project in IDT
To create a new project in IDT, go to File → New → Project.
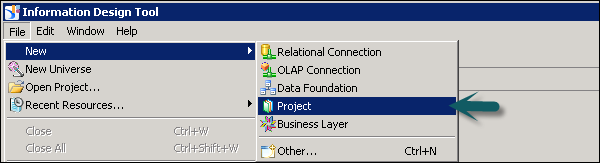
Enter Project Name, location and click Finish.
The project is created under Local Projects views.
Editing an Existing Project
You can also edit an existing project. Open an existing project by going to File → Open Project. You can also open an existing Universe under any Local Project area.
Once you open an existing project, you can go to each object by double clicking the object name under Local Project folder.
Make changes as required and click the Save button.
Deleting a Project in IDT
To delete an existing project, right-click on the project under Local Project area.
To delete a project permanently, you can select Delete project contents on disk option in the "Confirm Project Delete" dialog box.
If you select this option, the deletion is permanent and cannot be undone. Click on Yes to confirm the deletion.
If you did not delete the project contents permanently, you can open the project to make it available.
Project Synchronization
Project synchronization deals with comparing resources in local project views with an associated shared project in the repository. Using project synchronization, you can detect add/delete resources, difference between resources. Based on differences, the local project view and shared resources can be updated.
Under Project synchronization, there are two different panes −
Shared Project Pane
It lists the resources in shared project on the server. If there is a lock icon in the form of resource, it means the resource is locked. Synchronization status lists the status of each resource by comparing resources in shared and local project views.
Different Synchronization Status
Added Locally − A resource is added in the local project but not in the shared project.
Changed Locally − A resource was changed in the local project but not in the shared project.
Deleted Locally − A resource was deleted in the local project but still exists in the shared project.
Added on server − A resource is not in the local project but exists in the shared project.
Changed on server − A resource was changed in the shared project but not in the local project.
Deleted on server − resource exists in the local project but was deleted in the shared project.
Synchronize − Both resources are identical.
List of Resources in Synchronization Status Pane
| Shows all resources. This clears the filters and lists all resources regardless of their status. | |
 |
Shows/Hides the resources with a status Synchronized |
 |
Shows/Hides the resources in the local project that have changed with respect to the server. |
 |
Shows/Hides the resources with a status of Conflicting. |
| Shows/Hides the resources on the server that have changed with respect to the local project |
How to Perform Project Synchronization?
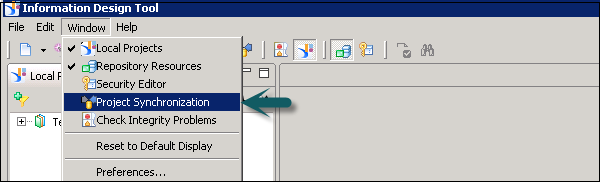
To perform Project Synchronization, go to Windows → Project Synchronization.
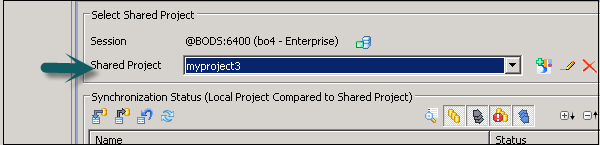
Click Change session to open a session on the repository system where the shared projects are saved.
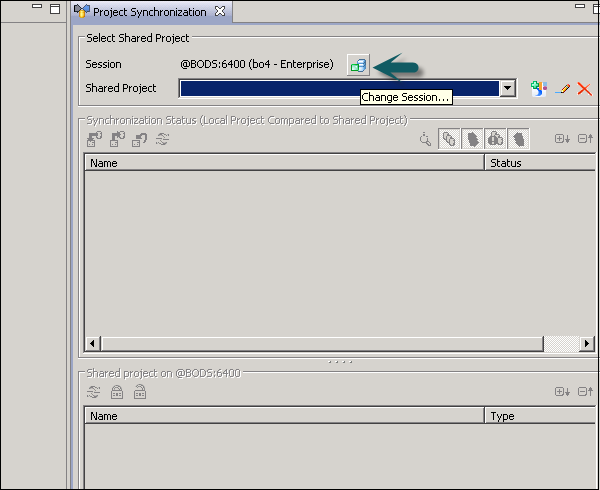
Select a project to synchronize in the shared project list.
Locking a Resource
To lock a resource in Project Synchronization, it should be under shared project. Lock informs other developers that you are working on the resource.
To lock a resource − Select the shared project from shared project list. Expand the project. Select the resource → Right click → Click Lock.

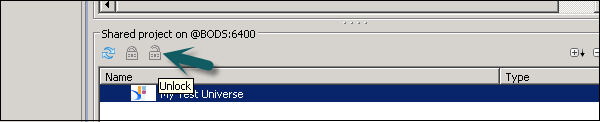
Unlocking a Resource
To unlock a resource, select the resource under Project Synchronization. Right click → Unlock.
Saving Resources in IDT
It is also possible to save any resource in a local project as a report in the local file. To save a resource, right-click on any resource, Save As.
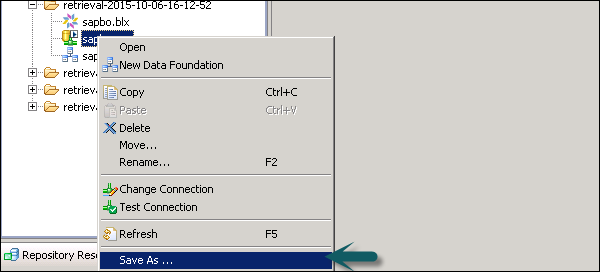
In the Report Location box, enter a file path, file name, and file type for the report. The file type can be .pdf, .html, or .txt.
To browse the local file system to find a file path, click the browse button.
For larger resources (data foundations and business layers), you can select which metadata elements to include in the report in the Metadata Elements box.
Click Generate to create the report.
SAP IDT - Managing Connections
A connection in IDT is used to connect to a relational or an OLAP data source using SAP BusinessObjects reporting tool. It can be a local connection or a connection published in a central repository.
Different Types of Connections Supported in IDT
Following are the types of connections that are supported in IDT −
Relational Connection
This is used to design Data Foundation layer in Information Design tool. You can import tables and joins from data source.
OLAP Connection
Using an OLAP connection, you can design a business layer while creating a Universe. It allows you to connect to multidimensional schema directly and to import them for Universe design. Later, they can be used with SAP Business Objects reporting tool.
BICS Client
To connect to SAP NetWeaver BW, you can use SAP BICS client middleware to provide access to BEx query. Connections in IDT can be locally saved or they can be secured and published in a central repository.
Local connections are saved as .cnx files and they can be accessed by any user who is running IDT. Once you publish the connection to the repository, they are changed to a secured connection.
A secured connection is published into the repository and saved in Connection folder. You can also create secured connections by using Insert Relational and Insert OLAP connection commands from the repository resource view.
Following are the key properties of a secured connection −
Users must be authenticated.
User rights can be defined at the user level to grant or deny access to connections or connection properties.
Secured connections can be used or shared by authenticated users.
Creating a New Connection in IDT Relational
Go to Information Design tool under BI client. To create a new Relational connection, first start with a new project under Local Project view.
Click New → Project → Enter the Project Name → Finish.
Right-click on Project name → New → Relational Connection.
Enter the connection/resource name → click Next.
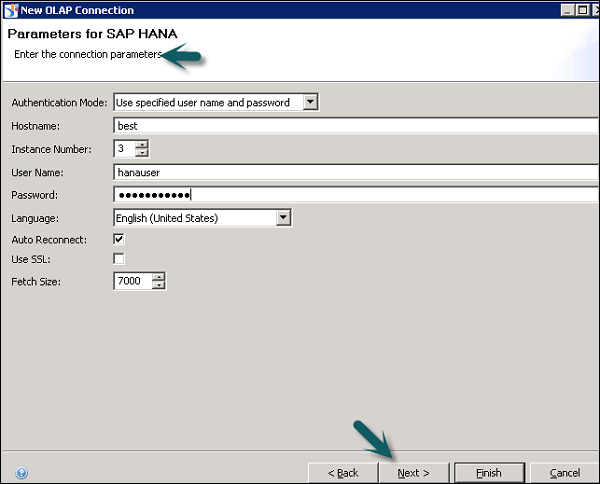
Select the middleware as per data source. You can select SAP or non-SAP as data source and set up a relational connection to the database.
We have selected SAP from the list → SAP HANA → JDBC → click Next.
Enter the Authentication mode, user name and password. Enter the host name and the Instance number and click Next.
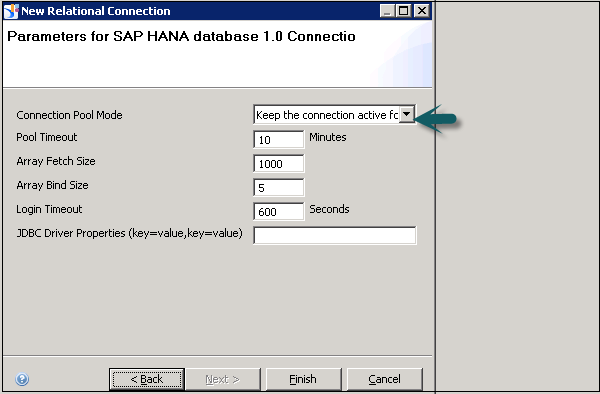
In the next window, you can define connection parameters like - Time out, Array fetch size, Array Bind size, etc. Click Finish.
A Relational connection to source database is created with .cnx file extension. You can click Test Connection.
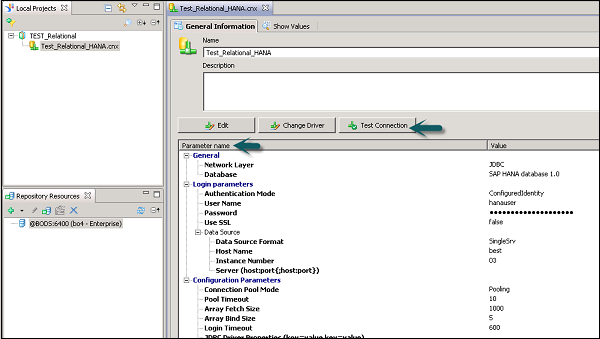
Lower part of Window tells you about connection parameters - Login parameters, configuration parameters, etc.
→ Test Connection → Successful
Similarly, you can create a Relational connection for other data sources.
We have to publish this connection to the Repository to make it available for use.
Right Click on connection name → Publish connection to Repository → Enter BO repository password → Connect → Finish → Yes.
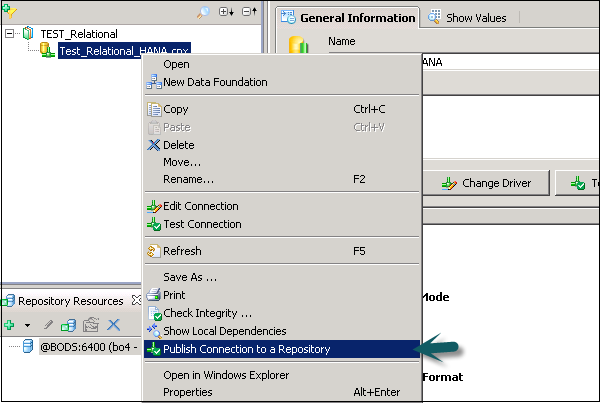
.cns- secured Repository connection
.cnx-local unsecured - If you use this connection it will not allow you to publish anything to the repository.
This shows how a relational connection can be created in the Information Design Tool. To summarize the steps that are involved in creating a connection −
- Enter the name of the connection
- Select the middleware for the target database
- Enter the login parameters to connect to the relational data source
- Configure and customize parameters to optimize the connection and Finish
- To change it to secure, publish the connection to the Repository
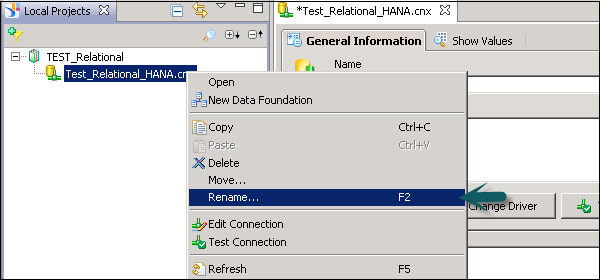
Renaming or Deleting a Connection
To rename or delete a connection, right-click on connection name under Local Projects area.
You can also delete or edit a Relational connection like this.
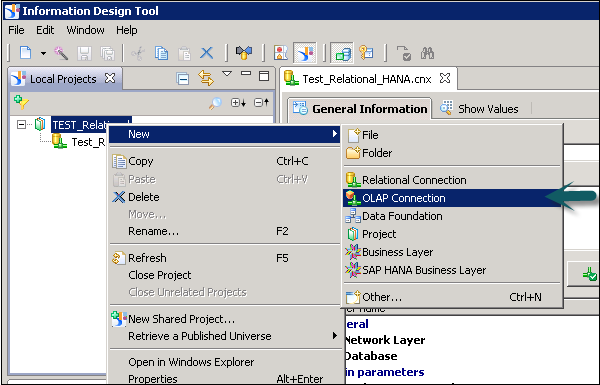
Creating a New Connection in IDT OLAP
An OLAP connection is used to connect to multidimensional view or a data model to design Business Layer in Information Design tool.
To create a new OLAP connection, right-click on Project name → New → OLAP Connection.
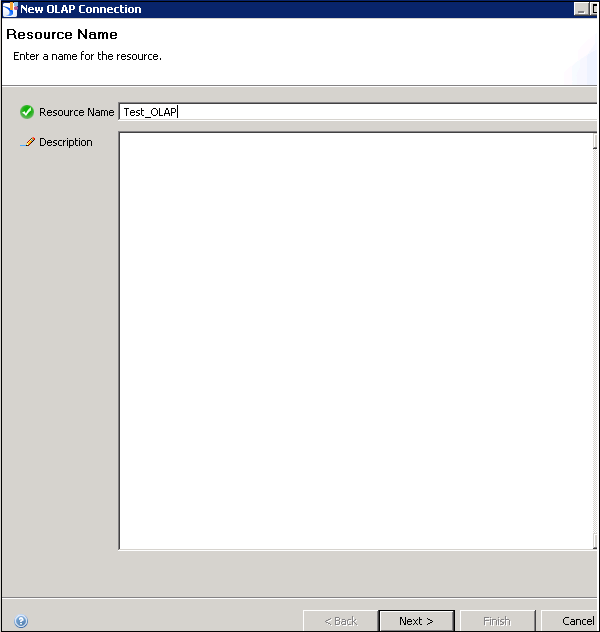
Enter the connection name, description and click Next.
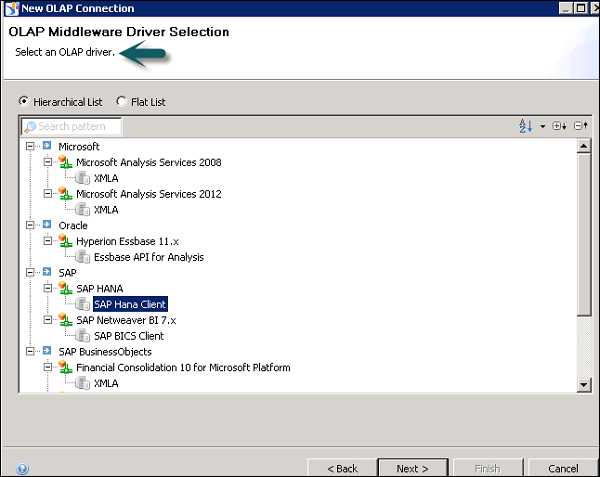
Next, select an OLAP middleware driver. It shows a list of all available OLAP data sources. You can select any of OLAP data source as per requirement.
Note that you dont need to create a Data Foundation, as an OLAP directly hits the Business Layer. You can define dimensions and measures and other properties at Business Layer.
Select the suitable middleware driver to connect to OLAP data source and click Next.
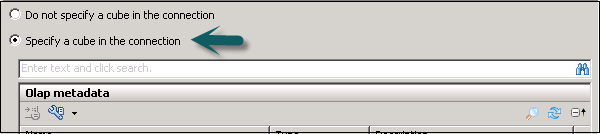
Enter the connection parameters, authentication details, system name, instance number, etc. and click Next.
You can also select a specific cube to connect or all the cubes in the design time repository. If you select a particular cube, then using this OLAP connection you can design Business Layer only on the objects available in that cube.
Click Finish.
Now, you need to publish the connection to the Repository. Right-click on connection → Publish the Connection to the Repository.

Login Parameters for Connection
When you create a relational or an OLAP connection in IDT to connect to any data source, you have to provide login parameters of source database such as Host Name and Instance Number.

Connection Parameters
While creating a connection, you can configure various connection parameters −
Connection Pool Mode − This is used to keep the connection active.
Pool Timeout − When you set the connection pool mode to keep connection active for, length of time in minutes to keep connection open.
Array Fetch Size − This tells the maximum number of rows that can be fetched from the database.
Example − Suppose you enter a value of 25 and you query returns 150 rows so it will be fetched with 6 fetches of 25 rows each.
Array Bind Size − This field is not required for designing Universe in IDT.
Login Timeout − It determines the minutes a connection attempts timeout and an error message is displayed.
There are various custom parameters that can also be defined like ConnectInit, Hint.
Editing a Connection
To edit a connection, double-click on the connection name in Local Project View.
Go to General Information tab → Edit.
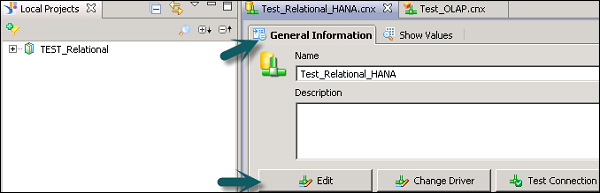
To edit the connection parameters, click Edit button. You can edit the authentication details and connection parameters.
To change the middleware driver, click Change Driver. Select the Driver from the dropdown list.
You can also test the availability of the database server, click Test Connection.
The "Connection Definition" pane shows the information stored about the connection Login parameters, Configuration parameters, etc.
SAP IDT - Managing Resources In Repository
The resources in repository includes Universe and connections published in the repository. Universe folder contains all Universes that are published using Information Design Tool or UDT. The connection folder contains all the connections that are created using IDT or using UDT.
You can perform the following tasks while managing the repository resources −
Managing Secure Connections
You can edit an existing connection.
You can publish a new relational or an OLAP connection in the repository.
You can create a shortcut in the local project from an existing secured connection.
You can delete a secured connection from the repository.
Managing Universe
You can perform integrity check.
You can double click on Universe under local project view to run the query in the query panel.
You can retrieve a Universe under the repository to Local Project View.
You can rename or delete a Universe from the repository.
You can also convert .unv Universe to .unx Universe and save it under Local project or can also publish them to the repository.
Opening and Closing a Session
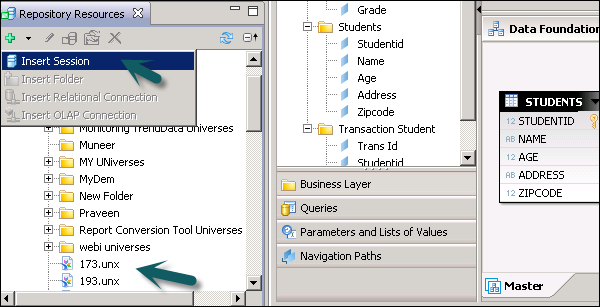
To open a session that is already defined in the repository, you can use the Repository resources view.
Go to the Repository Resources and right-click → Open Session.
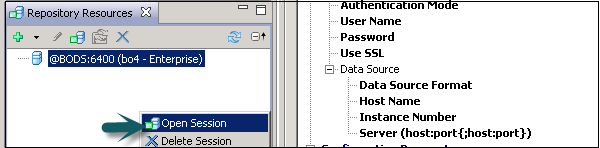
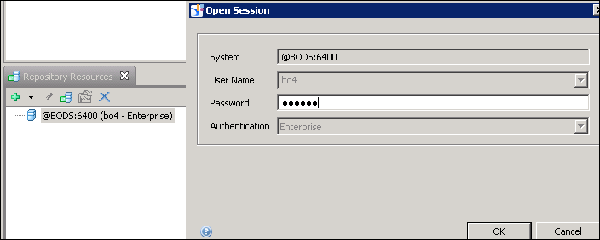
Click OK and the session will be opened under the Repository resources section.
You can also insert a new session, which is not already defined in the Repository resources view. To insert a session, click on + sign.
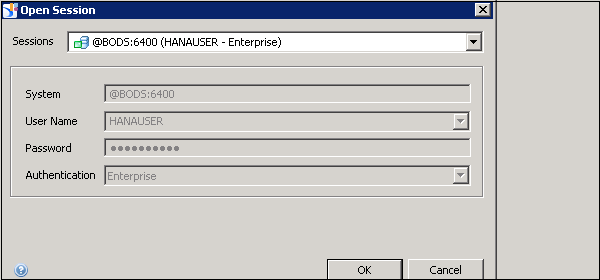
Enter the session details, system, username, password, and authentication. Type → OK
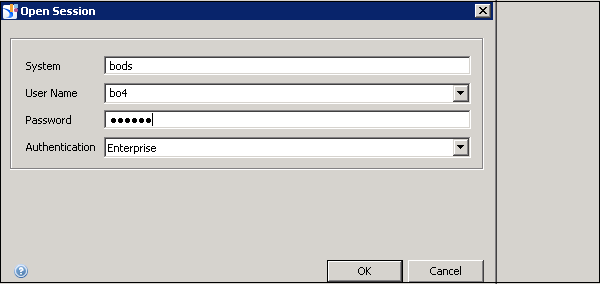
To see list of available objects, click Expand and you can see a list of Universes and Connections inside it.

Closing a Session
When you close Information Design tool, all the active sessions are automatically closed. To close a session individually, right-click on the session name and click Close.

SAP IDT - Data Foundation Layer
A Data Foundation contains one or more tables and joins from one or more relational databases that forms the design of Business Layer. A relational connection is used to design Data Foundation layer. You can add various other objects at Data Foundation that enhances the capabilities like - Derived tables, custom calculations, context, LOVs, etc.
It is also possible to design multiple Business Layers on a single Data Foundation thus allowing you to build multiple Universes on single Data Foundation Layer.
Types of Data Foundation
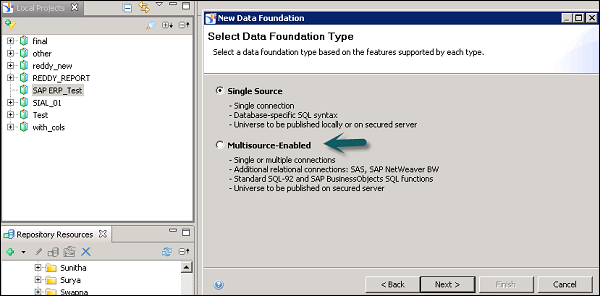
In Information Design Tool, you can build Data Foundation that is Single-source enabled or multi-source enabled.
Single-source Data Foundation supports a single Relational connection. Single Source Data Foundation supports a local or a secured connection so the Universe designed on this can be maintained locally or can be published to the Repository.
Multi-source enabled Data Foundation supports one or more relational connections. Connections can be added when you design the Data Foundation or can be added later. Multi-source enabled Data Foundation is designed on secured connections published in a Repository.
Data Foundation Editor
A Data Foundation editor is divided into multiple panes −
- View Pane
- Properties Pane
- Browsing pane
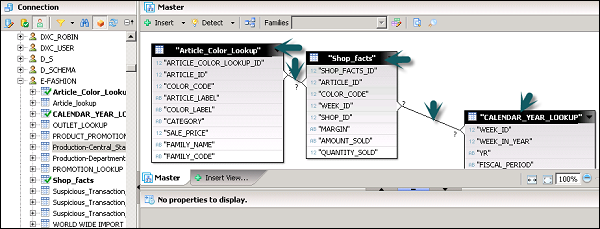
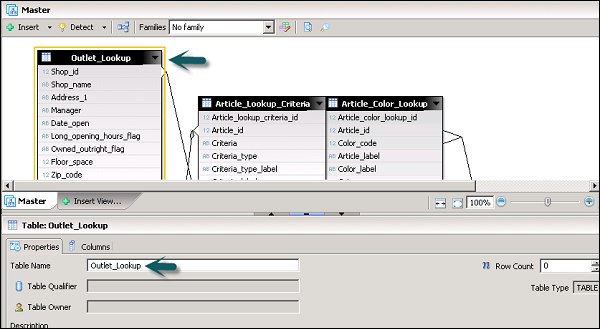
The Data Foundation view pane contains tables and joins. Master contains tables and joins that are connected with each other in a logical manner.
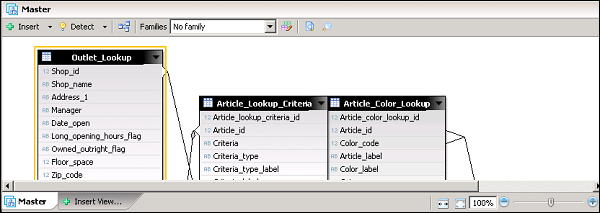
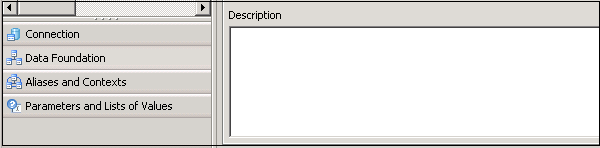
Properties pane defines properties of each object. To check the properties, you have to select any object in the Master tab.
Using the browsing pane, you can work on different elements in data foundation like connections, Data Foundation, Aliases and Contexts, LOVs and parameters.
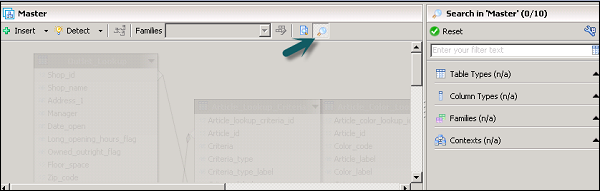
You can also perform a search in Data Foundation. To perform a search, click the ![]() icon.
icon.
SAP IDT - Building Data Foundation
To build a Data Foundation, it can be created on a Local Project view. Right-click under Local Project → New → Data Foundation.
You can select a Single-source enabled or Multi-source enabled. Follow the wizard and select the connections.
Data Foundation is created as .dfx file and it starts the Data Foundation editor. Insert the tables and joins in Data Foundation editor.
Insert Tables from the Connection
In connection pane, open and browse the tables in connection. You can also search the tables in the connection pane. Drag and drop the tables you want to add to Data Foundation master view.
Insert Tables Using Wizard
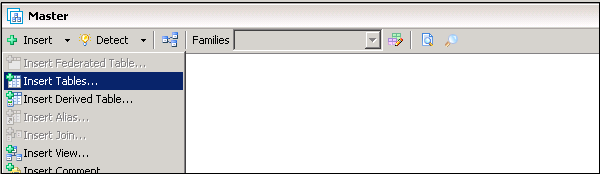
You can also insert tables using Insert + option in Data Foundation tool bar. You can insert tables, joins, keys, derived tables, etc.
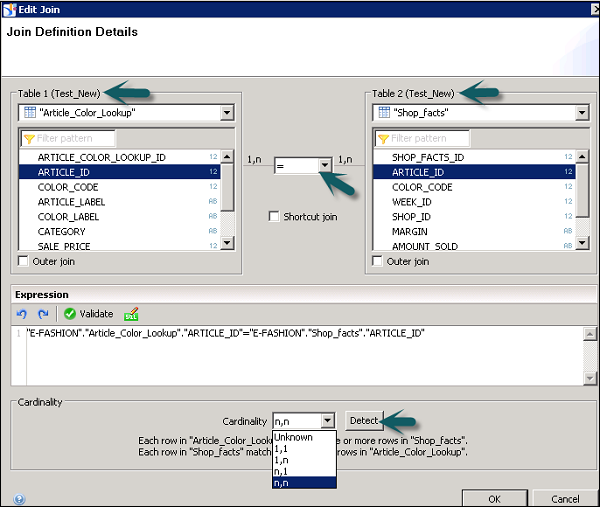
To insert joins in Data Foundation, you can use Insert option in toolbar or you can click on Edit Join to open the dialog box.
Double-click on Join to open edit Join dialog box. Detect option can be used to detect Join between columns.
To define Cardinality, you can use Detect option in the toolbar or you can open Edit Join dialog box.
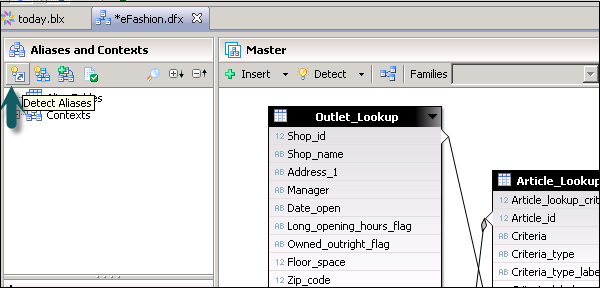
You can add derived tables, alias tables, parameters and prompts, LOVs to be associated with prompts. Under aliases and contexts tab, you can click detect aliases and contexts to detect aliases and contexts automatically.
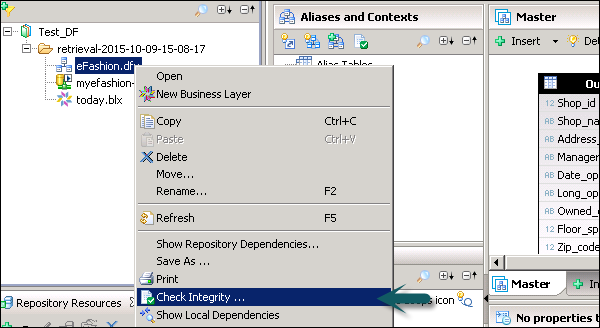
Right-click on .dfx file and select Check Integrity to run an integrity check.
Save the Data Foundation by clicking the Save icon at the top.
Filter and Insert Tables
To filter a table in the connection, select the connection for which you want to filter and insert the tables.
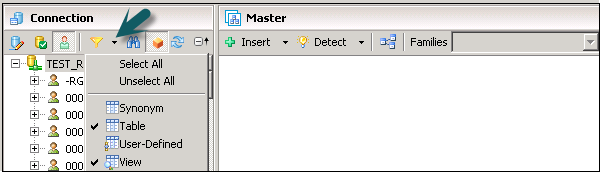
Click on the down arrow mark to select a table type. You can select a particular table type by checking the option.
Select All/Unselect All option is used to select or unselect all the options in the dropdown.
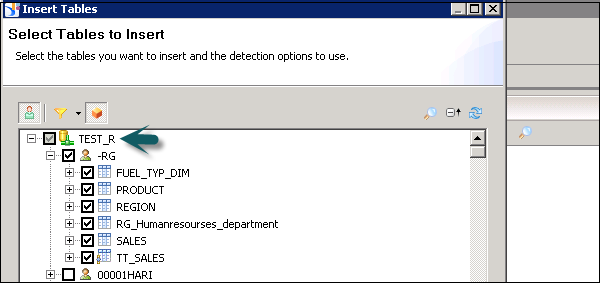
To insert the tables − Select Insert Tables from the Insert menu in the data foundation view. The "Insert Tables" dialog box lists the connections defined in the data foundation.
Expand the connection to see the database tables referenced in the connection.
Editing Table Properties
You can edit the name and description of a table. It is also possible to remove columns from the table display, edit column data types, and change primary keys.
Select the table you want to edit and right-click on the table header → Edit.
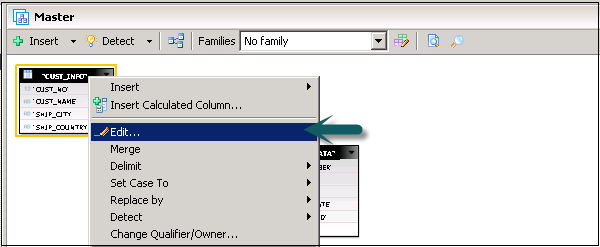
In the next dialog box, you can edit table name, description and properties of column.
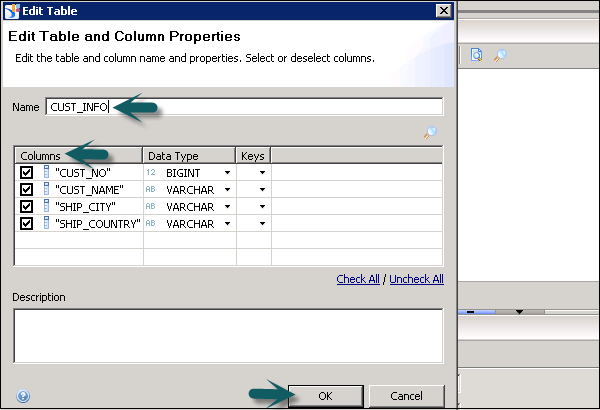
Click OK and the table and column properties will be updated.
Changing Data Types of a Column
To change the datatype of columns in a table, select the table you want to edit and right-click on the table header → Edit.

To edit the data type of a column, click on the arrow mark in front of data type.
Select the data type for each column as per requirement and click OK.
SAP IDT - Qualifiers & Owners
In Data Foundation, you can also change qualifiers and owners name of standard tables. To change the name, go to Data Foundation editor by clicking on .dfx file in Local Project View.
Right-click on the table header in Data Foundation editor → Change Qualifier and Owners.
In the "Change Qualifier/Owner" dialog box, click the browse button in the Qualifier field and select a new qualifier. If the qualifier name is delimited by default, the Delimit option is selected. To override the default delimitation, select or unselect Delimit.
In the "Change Qualifier/Owner" dialog box, click the browse button in the Qualifier field and select a new qualifier. If the qualifier name is delimited by default, the Delimit option is selected. To override the default delimitation, select or unselect Delimit.

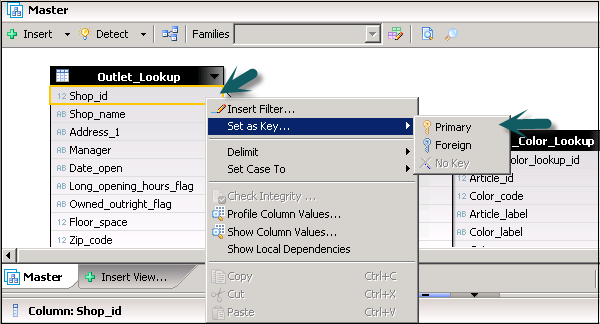
Defining Table Keys
There are two types of keys in a table in Data Foundation layer −
Primary Key − Unique and only one primary key in a table.
Foreign Key − It is used to match a unique value in other table.
To define a key, go to Data Foundation Editor. Select Table → Click Detect → Detect Key.
You can also define a column as primary key or foreign key by selecting the particular column in a table → Right-click → Set as Key → Primary/Foreign Key.
SAP IDT - Joins In Data Foundation
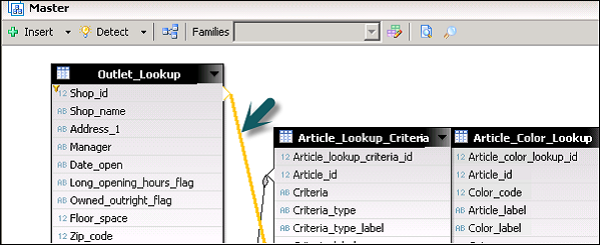
Joins are used to combine tables in Data Foundation. It defines how data is queried in the tables. Joins are defined when you link one column of a table to other column. It is possible to insert Joins manually or to insert automatically by clicking on Detect Join option.
To insert a new Join, go to Insert → Insert Join.
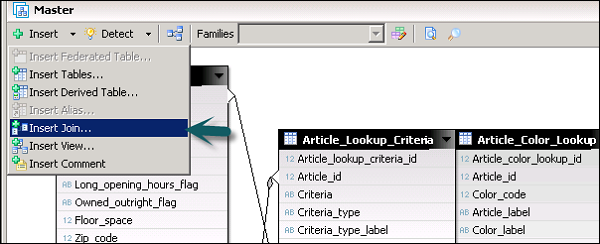
Select Table 1 from the dropdown, Table 2 from the dropdown from all the tables in Data Foundation. Select columns from Table 1 and Table 2 to join. Select the type of Join you want to insert → OK.
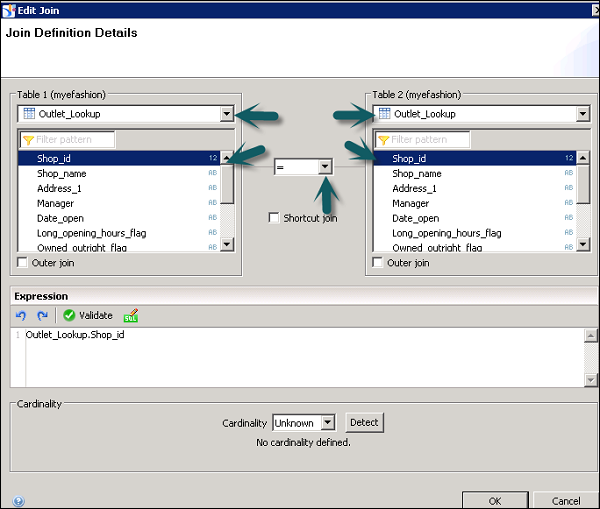
Editing an Existing Join
To edit an existing Join, double-click on Join and it will open Edit Join editor as above.
Derived Tables
A derived table is a virtual table in the data foundation that combines other tables using calculations and functions.
You can use derived tables for the following purposes −
To create a table with columns from other tables. The column definitions can include complex calculations and functions.
To create a single table that combines two or more tables.
To create a table that contains a selection of columns from different tables.
To Insert Derived table, select table header → right click → insert → derived table.

Enter the Unique name and click OK.
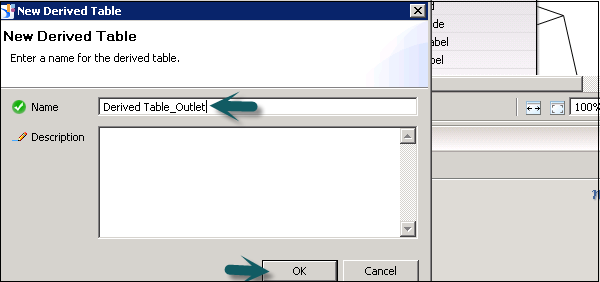
Table Alias
An Alias table is known as reference to a standard table in Data Foundation. The data in Alias table is completely same as the original table.
Alias tables are used to break loops in Join path in Data Foundation layer. An Alias table can also be used to rename a table.
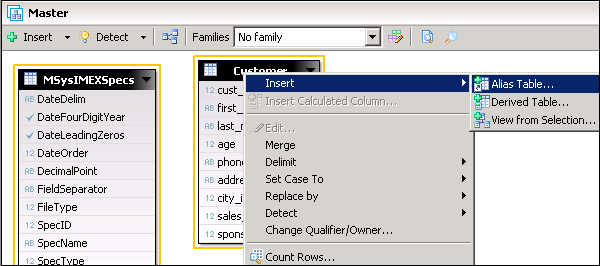
Insert an Alias
To create an Alias table, select the table on which Alias has to be created. Right-click the table header → Insert → Alias table. To create an Alias table on more than one table, use CTRL key to select multiple tables.
Alias is used to break any loop and to handle Fan trap and Chasm trap issues.
Detect an Alias
To detect an Alias, go to Detect under Data Foundation layer.
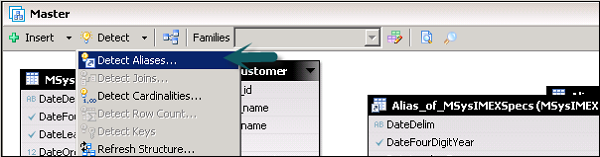
To detect a table alias, the following condition should be met.

Contexts
Contexts are also used to break the loops in Data Foundation when you are not able to break the loop using an Alias table.
When you have multiple fact tables that are connected to a single dimension table, you create a Context for each fact table in this case.
In a context, there are three states defined for a Join −
Included Joins − In a part of the schema that is ambiguous, the context solves the loop by defining a path with the included joins.
Excluded Joins − In a part of the schema that is ambiguous, the excluded joins define the path that context will never take.
Neutral Joins − They are in a part of the schema that is not ambiguous, and are always included in the query path of the context. Any join that is not explicitly included or excluded is neutral.
A Context can be defined manually or by clicking detect Context option.
To detect Context → Open the data foundation editor by double-clicking the data foundation name in the Local Projects View.
From the Aliases and Contexts pane, select the Detect Contexts icon.
The command analyzes the join paths and proposes contexts to resolve any loops that cannot be resolved by alias tables.
Next, open Detect Contexts dialog box, select the contexts you want to insert.
To see the context highlighted in the data foundation view, click the proposed context name. A join that is included in the context is shown by an included icon ![]()
A join that is excluded is shown by the excluded icon ![]() . Click OK to insert the selected contexts into the data foundation.
. Click OK to insert the selected contexts into the data foundation.
SAP IDT - Business Layer
Business Layer in IDT consists of metadata objects like dimensions, measures, attributes, and filter conditions. Business layer can be designed on the top of Data Foundation layer or can be created directly on an Info cube or on a Modeling view in HANA.
When you design a Business Layer, it can be published to the repository or to a local folder. Business layer is used to manage metadata objects before it is published to BI repository.
An Object in Business Layer can have the following three states −
Active − This is default state of an object and objects are available in the query panel.
Hidden − These objects are valid but are hidden in the query panel.
Deprecated − These objects are not valid and hidden.
You can create different type of objects in Business Layer −
Dimension − Dimension represents contextual information in Business layer.
Measure − Measure represents the factual data on which we perform the analysis. These are numerical values where you perform aggregations and calculations.
Attribute − Attribute is defined as an object which is associated with another object to provide more information about the object.
Filter − Filters are used to limit the data that are returned in the query. You can define business filters on dimensions and measures by creating and combining conditions.
While using an OLAP data source, you can find the following objects −
- Hierarchy
- Level
- Named Set
- Calculated member
Building a Relational Business Layer
You can create a Business layer on the top of Data Foundation that already exists under Local Project view.
You can also create a new Business Layer in a Local Project view. Right-click on Project name → New → Business Layer.

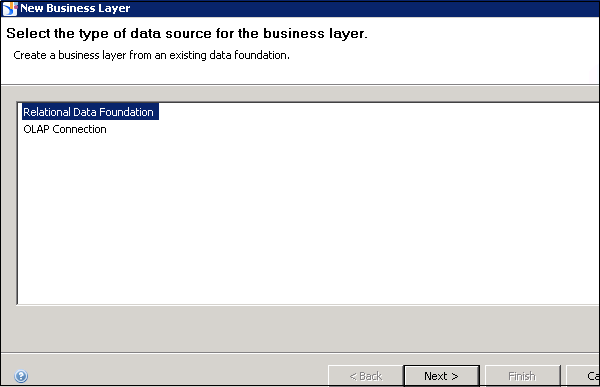
Follow the wizard → Select the type of Data Foundation → Enter Business Layer name and Description → Select Data Foundation (.dfx) → Finish.

It creates .blx file under local project view and automatically opens under Business Layer Editor.
By default, it takes all the objects as dimensions in the business layer. You can define measures manually using Turn into Measures option or using Type option at the top and projection function to define Aggregation.
You can perform various functions in Business layer to improve the functionality of Business layer −
Attributes to provide descriptive information for dimensions
Additional measures
Pre-defined filters (mandatory or optional) that can limit data returned in queries
Parameters with optional prompts
Set SQL options and SQL generation parameters in the business layer properties
Set up aggregate awareness to improve query performance
You can perform an integrity check on Business Layer. Right-click on Business Layer → Check integrity.
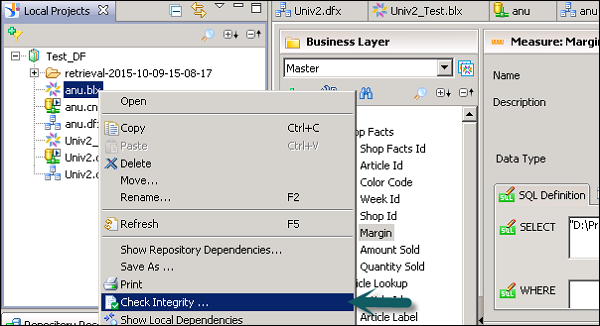
You can select the objects you want to perform integrity check. Click on check integrity. To save the Business layer click the Save icon at the top.
Naming and Data Source for a Business Layer
When you enter a name of a business layer and its description, it defines the name of Universe that is published from Business layer.
To create a Business Layer, you can select two types of data sources: Relational and an OLAP data source.
Relational − The Business Layer is based on a Data Foundation when you use a Relational data source.
OLAP − The Business layer is based on an OLAP cube.

Building an OLAP Business Layer
You can create an OLAP Business Layer in a Local Project view. Right-click on Project name → New → Business Layer.
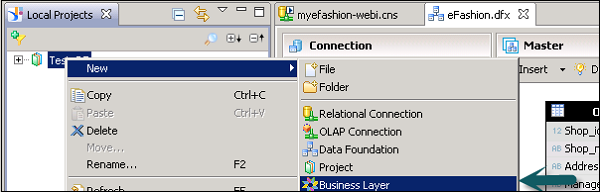
Follow the wizard → Select the type of Data Foundation OLAP → Enter Business Layer name and Description → click Next.
Objects in the business layer are inserted automatically based on the cube. You can add the following functions to enhance the features in Business Layer −
Using analytical dimensions, hierarchies, and attributes
Named sets
Calculated members
Insert measures
Pre-defined filters (mandatory or optional) to limit data returned in queries
Parameters with optional prompts
Lists of values to be associated with a prompt
Business layer views to restrict the objects seen in the Query Panel
You can perform an integrity check and save the business layer by clicking the Save icon at the top.
Business Layer Editor
Business layer editor is used to manage Business layer objects and its properties efficiently. Business Layer editor is divided into three panes −
- Browsing Pane
- Editing Pane
- Data Source Pane

Business Layer browsing pane consists of different elements of Business Layer −
- Business layer
- Queries
- Parameters and LOVs
- Navigation paths
Business layer editing pane allows you to edit the properties of objects that you select in the browsing pane.
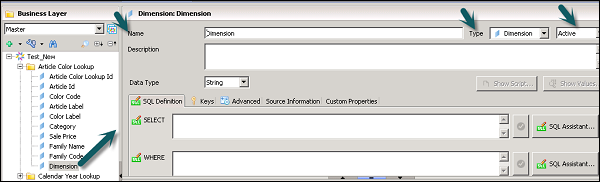
You can define Name of object, description, type and Projection function. You can also check SQL definition, source information, custom properties and advance properties.
The data source pane contains information about Data Foundation or an OALP data source.
SAP IDT - Business Layer Properties
There are different tabs that come under Business Layer Properties.
Properties
It consists of the name of Business layer, description, summary, change data foundation and parameters subtabs.
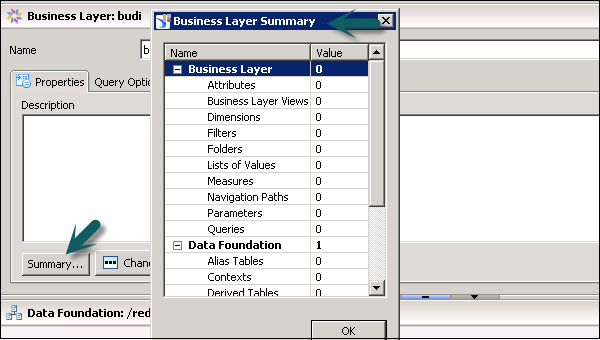
Summary tab gives you summary of all the objects in Business Layer.
Change Data Foundation is used to change the data foundation.
Parameters is used to change the value of query script parameters.
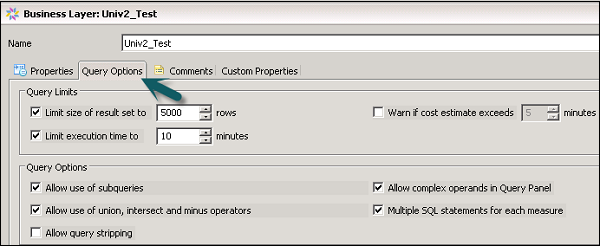
Query Options
This defines query execution properties - limit number of rows, number of minutes to limit the time passed for query execution, etc.
Comments
You can add comments about Business Layer in this tab.
Custom Properties
This is used to add custom property for Business Layer.
Business Layer Objects and Summary
Properties − It consists of name of Business layer, description, summary, change data foundation and parameters subtabs.

You will get Business Layer summary in a new window.
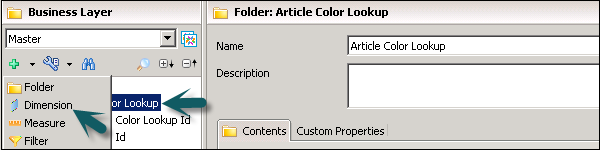
SAP IDT - Folders In Business Layer
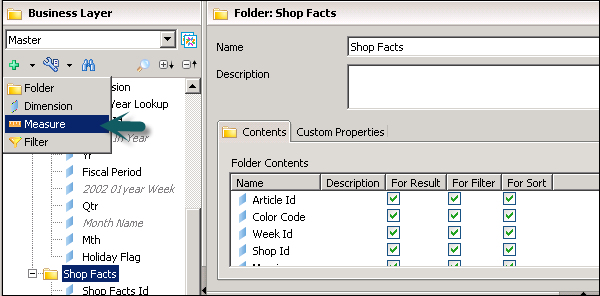
To add a folder in Business Layer, click insert + option and select a folder to insert a folder in Business player.
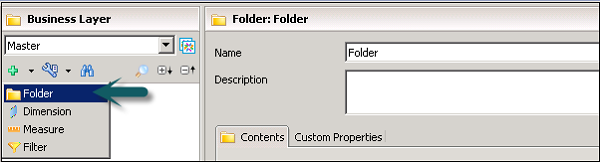
The following properties can be set for this folder as it appears in the query panel.
- Name and Description
- Active State - Active, hidden, Deprecated
- Contents
A list of objects in the folder that lets you define properties that describe what the object is used for in the query (for result, for filter, for sort). You can change the order of the objects in the folder using the up and down arrow keys to the right of the list.
Custom Properties − Optional field
Inserting and Editing Dimensions − You can edit an existing dimension and can also insert a new dimension. To edit an existing dimension, select the dimension in Business Layer.

To insert a new dimension, select the folder in which you want to insert a dimension → click on insert option at the top → Dimension.
It will add a new dimension in the target folder. You can define the properties of an added dimension in Properties pane.
Following are the tabs in the above screenshot −
- Name
- Description
- Data Type
- State
- SQL of OLAP definition
- Keys tab
- Advanced tab
- Source information, etc.
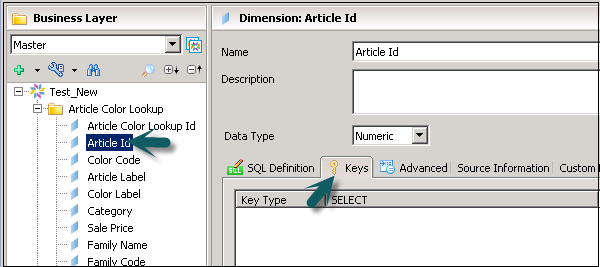
Defining the Keys
This option is available for dimensions that are built on data foundation. To define keys in Business layer, select the dimension in Business layer pane. Under Dimension properties → Keys tab.
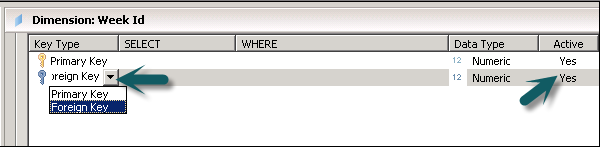
To add a key, scroll down in Keys tab and click on Add key button. You can define one primary key and multiple foreign keys.

To detect existing keys in the database, you can click on detect tab. To change the key type, you can click on the dropdown. To change a key to active, click on active column.
To save the changes, click the Save icon at the top.
Defining the Measures
You can edit an existing measure and can also insert a new measure. To edit an existing measure, select the measure in Business Layer.
To insert a new measure, select the folder in which you want to insert a measure → click the insert option at the top → measure.
It will add a new measure in the target folder. You can define the properties of an added measure in Properties pane. You can define Projection function for the measures. Similarly, you can define attributes in a Business Layer.
Adding Filters
You can edit an existing filter or add a new filter. To insert a new filter, select the folder and click on insert.
Adding Hierarchies
You can insert hierarchies only in OLAP Business Layer. You can edit an existing hierarchy or add a new hierarchy.
To edit an existing hierarchy |
Select the hierarchy |
To insert a hierarchy |
Select the folder or analysis dimension in which you want to insert the hierarchy. To insert a hierarchy at the top level, select the top node (business layer name) in the tree. Click the Insert object icon |
You can define the following properties of a Hierarchy −
- Name and Description
- State - Active, hidden or deprecated
- MDX definition
- Advance tab
- Custom properties
- Source Information
You can define the following objects in a hierarchy in Business Layer −
- Levels
- Attributes
- Named sets
- Calculated members
Defining Named Sets
You can insert Named set only to OLAP Business layer. You can edit an existing named set or add a new named set.
Once a named set is defined, you can define various properties of Named set −
To edit an existing named set |
Select the named set |
To insert a named set |
Select the folder, analysis dimension, or hierarchy in which you want to insert the named set. To insert a named set at the top level, select the top node (business layer name) in the tree. Click the Insert object icon |
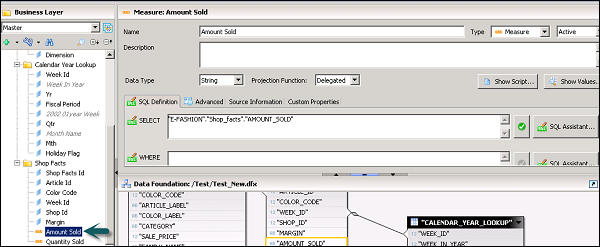
Defining SQL and MDX for an Object
To define SQL/MDX expression of an object in Business layer, select the object. In Object properties pane, select SQL definition tab.

You can enter Select statement directly or click on SQL assistant button to define SQL expression. You can define aggregation for measures like Sum (efashion."Shop_facts"."Amount_sold").
Enter the WHERE statement directly, or click the SQL Assistant button to use the SQL editor to build the statement.
Save the business layer by clicking the Save icon in the main toolbar.
You can edit the MDX expression for objects inserted into the business layer. If you want to edit the definition of a native object (an object generated automatically from the cube when the business layer was created), copy the native object and edit the copy.
Open the business layer in the editor by double-clicking the business layer name in the Local Projects View.
In the Business Layer pane, select the object.
In the object properties pane, select the MDX Definition tab.
Enter the Expression directly, or click the MDX Assistant button to use the MDX editor to build the statement.
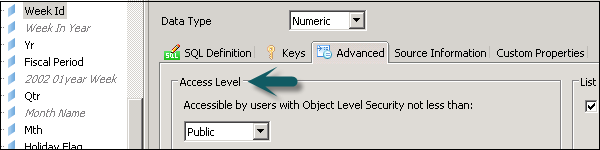
Setting Access Levels
You can define various access levels of an object −
- Private
- Public
- Controlled
- Restricted
- Confidential
When you define an object as public, all users can access the object. If an object is defined as restricted, only those users that are granted access level of restricted or higher can gain access.
To Define Access Level of Objects
Select the object in Business layer for which you want to define the access level. You can use CTRL key to select multiple objects. Right-click on object → Change Access Level.
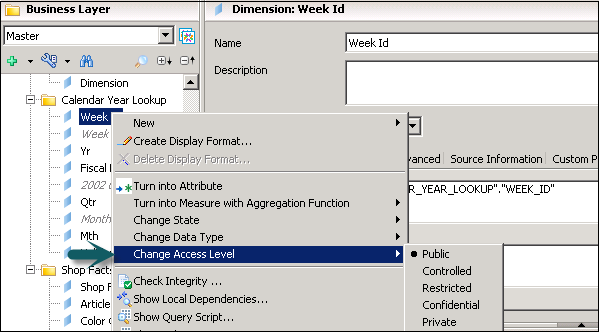
Access level for an object can also be defined in Advanced tab.
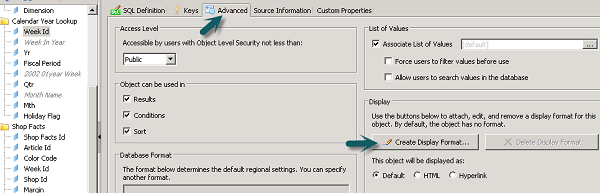
Defining Display Formats for Objects
Display option can be used to create, edit, or remove a display format for an object. By default, the object has no format.
Go to Advanced tab of an object as shown in the following screenshot.
SAP IDT - Business Layer View
It is possible to modify the display of Business layer objects by using Business layer views to restrict the number of objects displayed in the Business Layer pane. Use business layer views to group objects that share a business relationship.
Business layer views can be selected in the Query Panel. You can use business layer views to define security to grant or deny the use of business layer objects to certain users or groups.
Creating Business Layer View
To create or edit Business Layer view, open Business Layer editor by clicking on Business layer in the local project.
Click Manage Business Layer view option in the Business layer view pane.

When the Edit Business Layer view dialog box opens, to add a new view, click on New button. Edit the view name in the Name textbox.
In the Objects in view box, select or clear the checkboxes next to objects in the business layer to include or exclude them from the view.
To work with only the objects already included in the view, select Show selected objects only as shown in the following screenshot.
Enter or edit a description for the view in the Description textbox.
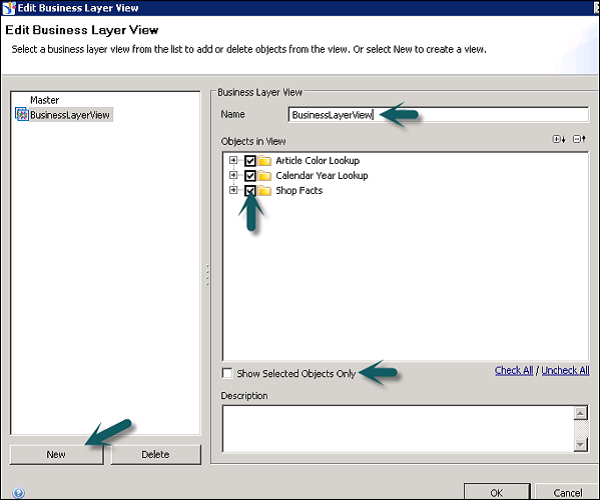
Click OK to save the changes.
Note − You cant change Master view.
Parameters
You can create a parameter in Business Layer or Data Foundation that requires a user input or predefined input value.
A Parameter can have the following input types −
- User input as a response to prompt.
- A predefined fixed value.
Prompt to users |
If selected, the user is prompted to enter a value at run time. If cleared, a pre-defined value is entered at runtime for the parameter. |
prompt Text |
The text for the prompt question or directive if Prompt to users is selected. |
Set Values |
Available when the prompt to users option is unselected. Lets you enter one or more values to be used for the parameter at the run time. |
Data Types |
The data type required for the answer to the prompt. |
Allow multiple values |
If selected, lets the user take multiple values from the list of values. |
Keep last values |
If selected, the last value chosen by the user is kept when the prompt is re-run. |
Index aware prompt |
If selected, the key column is included in the prompt to restrict the values in a list. The key column is not visible to the user. |
Associated list of values |
A list of values to provide values for the prompt. |
Select only from list |
If selected, the user is forced to select a member in the list. |
Select default value |
Lets you select values to be used as default |
Inserting and Editing Parameters
When you define a parameter in Data Foundation, they are directly inherited to business Layer on top of Data foundation. These parameters cant be edited in Business Layer and you have to edit them in Data Foundation.
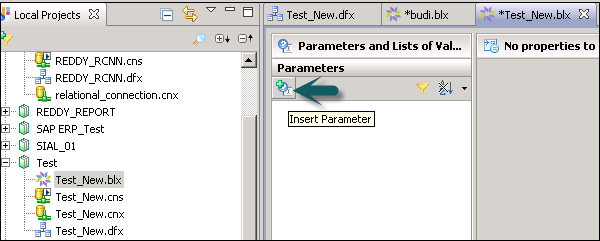
To insert a parameter, click on parameters and LOVs tab in the browsing pane → Click on Insert Parameter icon.
Parameters properties are shown in the right pane. You can use various properties as defined in the previous topic.
To edit an existing parameter, select the parameter from the list and edit it.
LOVs and Properties
Using LOVs, you can select the value of a prompt from the list of values associated with an object. It allows a data set to be restricted to the selected values.
You can use LOVs for an object in Data Foundation or Business Layer. Different types of LOVs can be used.
LOVs based on Business Layer Objects − In this case, LOV is based on other query or on a hierarchy that includes
Static LOVs − It includes List of specified values manually or imported from file.
LOVs based on SQL − It is value return by specific SQL expression.
Inserting and Editing LOVs
To insert or edit an existing LOV, go to Parameters and LOVs tab in the editor. Click on Insert + sign in the LOV pane −

The properties of LOVs appear in the right pane. To edit an existing LOV, click List of Value in the list.
The Properties tab in LOVs properties lets you edit the column properties on LOVs. You can edit the following properties by clicking the property column in the table of properties −
Column Name − You can edit the name of the column.
Key Column − You can select a column to be index aware key.
Data Type − You can select the data type for the column.
Hidden − If you select this option, the column will not be displayed.
Queries in Business Layer
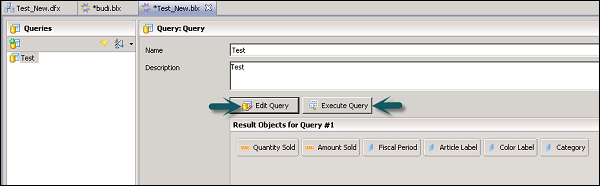
A Query panel is used to create queries and query objects are associated with the Business Layer. These are normally used in IDT to validate the Business layer.
Inserting and Editing a Query
To insert a new query or edit an existing query, click the Query pane in the Business Layer pane.
Click Insert Query to add a new query. This will open the Query panel. You can create a new query or edit an existing query and click OK. Select the objects in Query panel → OK.
Enter the name and description of Query. You can edit the objects in query by clicking Edit query option. To execute the query → Execute Query.
Aggregate Awareness
Using aggregate awareness, you can use pre-aggregated data in tables in the database. It is used to improve query performance by processing less number of rows.
When you add an aggregate aware object in query, the query generator retrieves the data from the table with the highest aggregation level.
For example − Consider a Sales Fact table where sales is aggregated by per month. If your query asks for sales per month, the query generator will retrieve the data from aggregated table.
Setting Up Aggregate Awareness
To use aggregate awareness, first the aggregated table has to be loaded to database and then add the table to Data Foundation.
Define aggregate aware objects. These are the objects in the business layer for which you want queries to use the aggregate tables when possible, instead of performing aggregation using non-aggregate tables.
In the SQL expression for the object, define the SELECT statement to use the @Aggregate_Aware function −
@Aggregate_Aware(sum(aggr_table_1), , sum(aggr_table_n))

Select the object in Business Layer → go to SQL Assistant → under Functions → Aggregate Awareness.

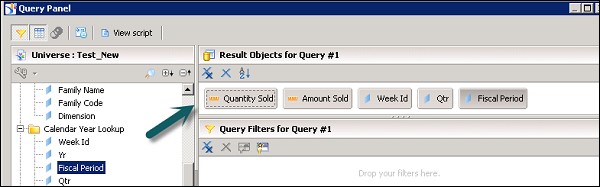
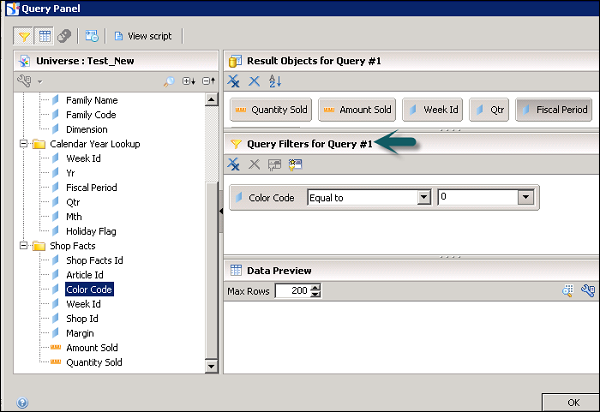
SAP IDT - Building Query In Query Panel
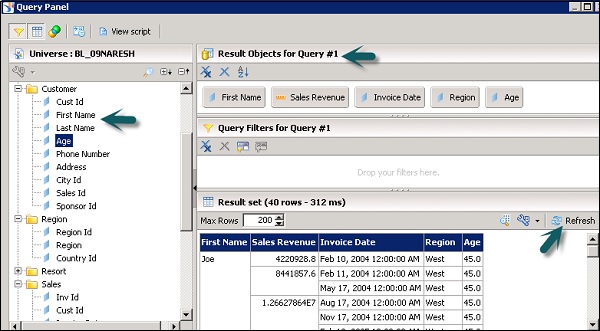
You can use the query panel to create or preview queries on a Business Layer or on top of Universe published in the repository. The query panel allows you to add objects in the query and to preview the query results. A query panel can be opened using the following methods −
Go to Queries → Insert Query.
To select the objects that you want to include in the query, drag objects from the business layer on the right into the Result Objects pane.
For hierarchy result objects, select members to include or exclude in the results. To open the MemberSelector, click the arrow to the right of the hierarchy object name ![]() .
.
To filter the results of the query, drag objects from the business layer into the Filter Objects pane.
Selecting Named Sets
Named set are defined in Business layer while creating Universe. To select members by named set, your hierarchy should define minimum one named set.
Named sets are displayed when you click on metadata under the member selector. If you cant find a named set folder under metadata, it means the hierarchy has no named set.
Selecting Calculated Measures
You can also use calculated measures with hierarchy but hierarchy should have minimum one metadata defined. They are defined in Business layer.
Like named sets, calculated measures are also displayed when you click on metadata under member selectors.
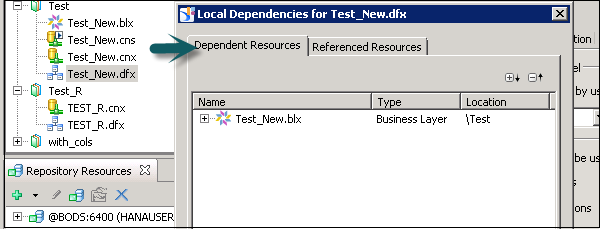
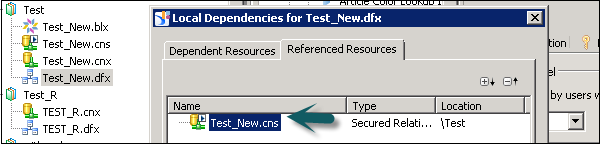
SAP IDT - Dependency Among Resources
In a Universe there can be many objects which are dependent on each other and moving, deleting a resource can impact other resources that depends on that resource.
To check the dependency between different resources, you can select show local dependency. When you select a resource, it displays two tabs - dependent and referenced resources.
The Dependent Resources tab lists resources in the same local project that depend on the selected resource. The Referenced Resources tab lists the resources in the same local project that are referenced by the selected resource.
If you want to check the resources that will be impacted when you change the Data Foundation, you can right-click → Show Local Dependency.
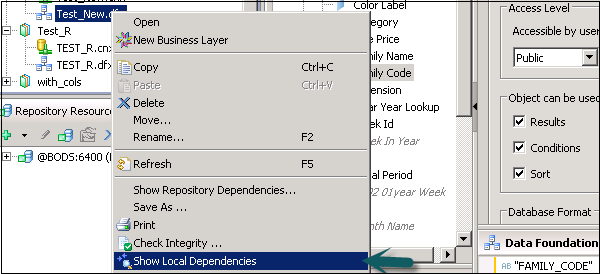
Under Dependent Resource, it will show Business Layer and Referenced resources will show Relational connection.
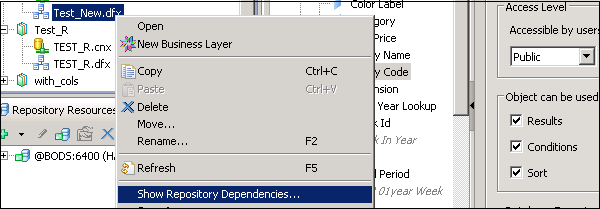
Repository Dependency
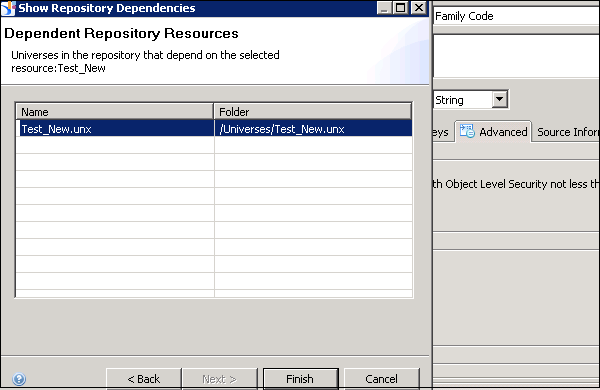
If you want to see dependent resources in the Repository for a particular resource under the local project, right-click and click on show Repository Dependency.
Enter the session details where resources are published and click on log in. It will show you a list of published Universes in the repository that are based on selected resource under the local Project.
SAP IDT - Publishing
When you design a Universe, this is the last step where you can publish your Business Layer to the local file system or the Repository. When you publish a Universe, the publish wizard exports the Business layer, data foundation and connection shortcut, and allows reporting tools and available users to access this Universe.
You can publish a Universe to the local file system. This can include a Business layer based on an OLAP connection or a Business Layer based on Data Foundation with a local connection.
When you publish a Universe to the repository, you implement a security mechanism by publishing on the Central Management Server (CMS). All objects of Universe inherit object level and other security policies defined for CMS.
Publishing a Local Connection
You can publish a local connection to the Repository that is available under the local Project view. When you publish a connection, it changes from local unsecure .cnx connection to .cns secured connection under the repository.
To publish the connection, right-click on .cnx under local project → Publish Connection to a Repository.

When you publish a connection, it is changed to .cns.
Selecting a Folder
When you publish or retrieve a connection, you can select a folder where you want to publish connection.
SAP IDT - Security
Security of a Universe is defined when it is published into the repository. All published universes are available under the Universe folder and all connections are available in the Connection folder. To access a Universe or a connection in the repository, you can use Repository resources.
Security policy on Universe, connections is applied on users and groups created in CMC. In Information Design tool, you can define security policy using Security editor. You can create security profiles in IDT and these profiles are assigned to users and groups.
You can define two types of security profiles in IDT −
Data Security Profile − In data security profile, the security policy is applied on Data Foundation objects and connections.
Business Security Profile − This include objects in Business layer on which the security profile is applied.
Security Editor in IDT
The Security Editor can be viewed in two ways: Using Universe or using users/groups. Select the tab in the Security Editor pane to display the view you want to work with.
The Universes/Profiles tab lets you to do tasks by first selecting a universe in the repository.
The Users/Groups tab lets you to do tasks by first selecting a user or group.
There are three icons in the Users/Groups panel that allows you to display users and groups in different ways −
- Show Users
- Show Groups
- Show Hierarchies

How to Open Security Editor in IDT?
In information design tool toolbar, click the Security Editor icon.
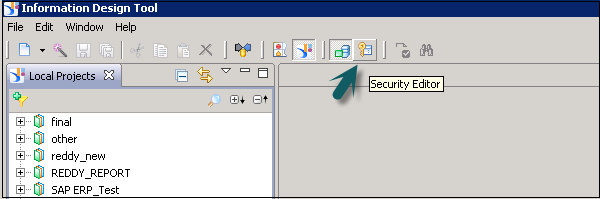
Enter the session details to open in the security editor. If you are not already logged into the selected session, enter the required information.
The Security Editor opens in a new tab.
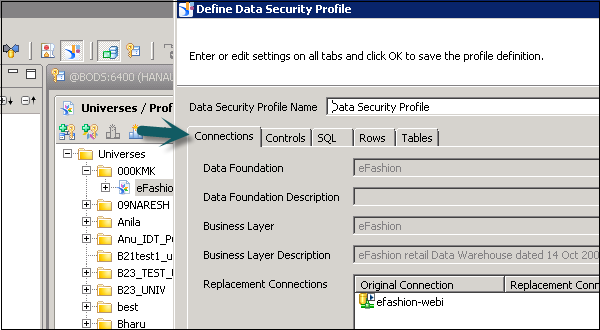
Inserting and Editing Data Security Profiles
Go to Universes/Profiles pane in the Security editor. To insert a new profile, right-click on Universe → Insert Data Security profile.

This will open a new window, you can define data security profile setting in different tabs. When you have defined all of the settings, click OK.
To save the changes to the security settings in the repository, click the save icon in the main toolbar.
When you have defined all of the settings, click OK.
To save the changes to the security settings in the repository, click the save icon in the main toolbar. All Data Security profile settings are applied to Universes created on Data Foundation using Relation connection.
| Connections | Defines Replacement Connections |
| Controls | Defines replacement query timeout and size limits |
| SQL | Defines replacement query options |
| Rows | Defines an SQL WHERE clause to restrict rows returned in the query |
| Tables | Defines replacement tables |
When you define more than one Data Security profile on one Universe, it is also possible to change the Data Security Profile Priority.
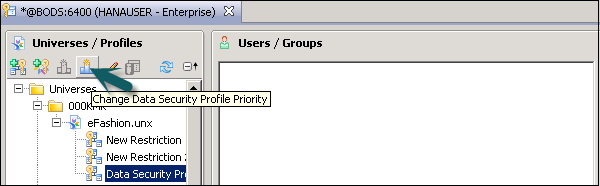
This will open a new window → Change Security profile priority. You can use up/down arrow to change the priority of security profiles.
To save the changes in the repository, click the save icon in the main toolbar.

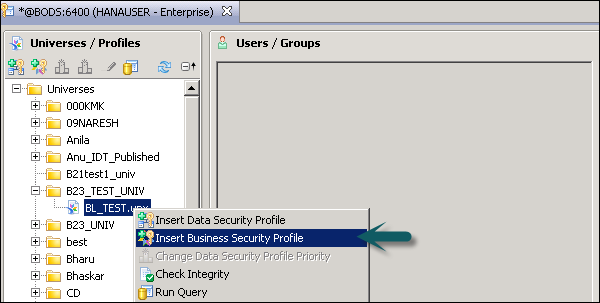
Inserting and Editing a Business Security Profile
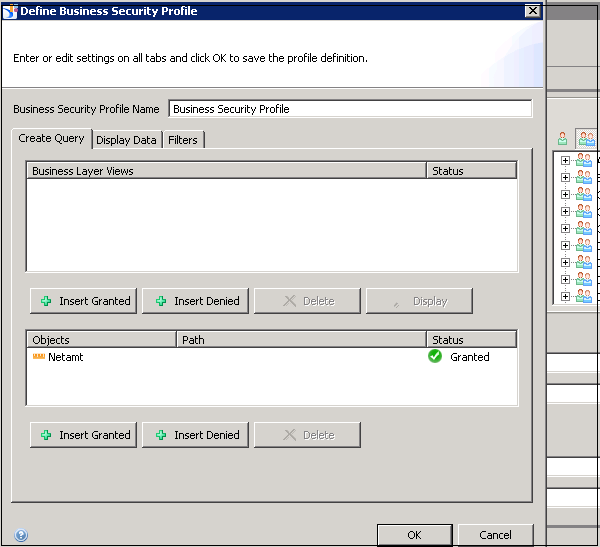
Select a Universe in Universe/Profile pane under the Security Editor. To insert a new Business Security Profile → Right-click → Insert Business Security profile.
You can define security in each tab of Business Security profile. Reset option is used to reset the setting to default. Once the setting is defined, click OK to close the window and Save icon at the top to save the profile.
Create Query |
Defines the universe views and business layer objects available to the user in the query panel Note − Create Query settings secure metadata only. |
Display Data |
Grants or denies access to the data retrieved by objects in the business layer when the user runs a query. |
Filters |
Defines filters using objects in the business layer. |
Running a Query On a Published Universe
You can also run a query on Universe published in the repository. When you run a query on published Universe, security profile defined for Universe will be applied on the query panel.
To run a query on published Universe, go to Repository resources view Select Universe → right-click and Run query.
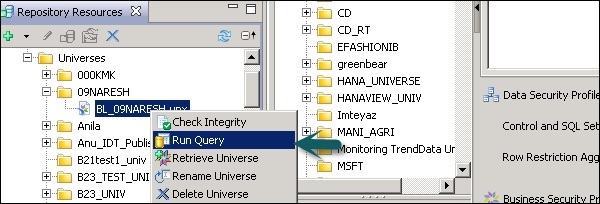
It opens the Query panel, you can add available objects to Result Objects and run query. Data Preview can be used to see the preview of resulted objects → Refresh button.
SAP IDT - Format Editor Overview
Format editor allows you to define display format for date, time, and numeric values. You can create custom formats or can also use default formats for the objects. Custom formats are used when default format doesnt meet the requirement.
Default formats are based on common locale data repository CLDR. You can select from 15 default formats for Date and time, and 4 formats for numeric values.
Custom formats can be created using the format editor. Custom format contains text and tokens. A token is defined as predefined part of date or numeric value.
Date & Time Format Tokens
There are 15 date and time format tokens that are defined using the format editor. Consider the following date and time tokens for category - Day.
| Category | |
| Token | Description |
| Day 01-31 | Day is represented by 2 digits 01-31 |
| Day 1-31 | Day is represented by 1 or 2 digits from 1-31 |
| Day Name | Day Name like Monday, Tuesday |
| Short Day Name | Day Name like Mon, Tue |
| Day of year | Day is represented by 3 digits - 001-366 |
| Day of year 01-366 | Day is represented by 2 or 3 digits - 01-366 |
| Day of year 1-366 | Day is represented by 1, 2, or 3 digits |
| Day of week in a month | Day of the week in month like 2 for 2nd Tuesday of July |
| Uppercase Day Name | Day name in uppercase - Tuesday |
| Lowercase Day Name | Day name in lowercase - Tuesday |
| Capitalized Day Name | Day name starts with capital - Tuesday |
| Uppercase short day name | Day name is represented in short format in uppercase - Mon |
| Lowercase short day name | Day name is represented in short format in lowercase - Mon |
| Capitalized short day name | Starts with capital in short format like - Mon |
Similarly, there can be time tokens for minutes, hour, week, month, quarter, and year format.
Number Format Sections
A number format section can be defined as consists of
- The sign
- The integer value
- Grouping separator
- Decimal separator
- Decimal separator
- Exponential symbol
Consider the following example, which shows how a number can be displayed using different format defined in the editor.
Example − How number -1,234 will be displayed using number tokens?
| Format Defined with Tokens | Preview Display |
|---|---|
| [Sign][#] | -1234 |
| [Neg.start][0][0][0][0][0][Neg.end] | (001234) |
| [sign always][#][dec.sep][0][0] | -1234.00 |
| [sign][#][decimal separator][0][0][E+][0][0][0] | -1.23E+003 |
| Revenue: [Sign always][#][Decimal separator][0][0] | Revenue: 1234.00 |
| [Boolean] | True |
You can use different list of number format tokens like sign, digit, separators, exponents, percent, and Boolean.
