- SAP IDT – Home
- SAP IDT – Overview & User Interface
- SAP IDT – Resources
- SAP IDT – Creating Universe
- SAP IDT – .unv Universe Introduction
- Dealing With Published Universes
- SAP IDT – Projects
- SAP IDT – Managing Connections
- Managing Resources In Repository
- SAP IDT – Data Foundation Layer
- SAP IDT – Building Data Foundation
- SAP IDT – Qualifiers & Owners
- SAP IDT – Joins In Data Foundation
- SAP IDT – Business Layer
- SAP IDT – Business Layer Properties
- SAP IDT – Folders In Business Layer
- SAP IDT – Business Layer View
- Building Query In Query Panel
- Dependency Among Resources
- SAP IDT – Publishing
- SAP IDT – Security
- Running Query Published Universe
- SAP IDT – Format Editor Overview
SAP IDT - Creating Universe
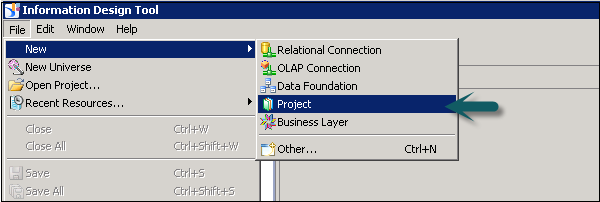
To create a Universe in IDT, go to Start → All Programs → SAP Business Intelligence → SAP Business Objects BI Platform 4 Client Tool.

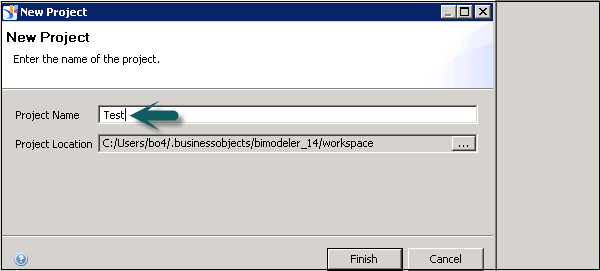
In Information Design Tool, you have to create a New Project. Go to File → New → Project. Enter the Project Name and Click on Finish.
Once the project is created, next is to create an OLAP or Relational connection to connect to a data source. A Relational connection is used to connect to the Database layer to import tables and Joins. An OLAP connection is used to connect to the multidimensional model like an Information View in SAP HANA.
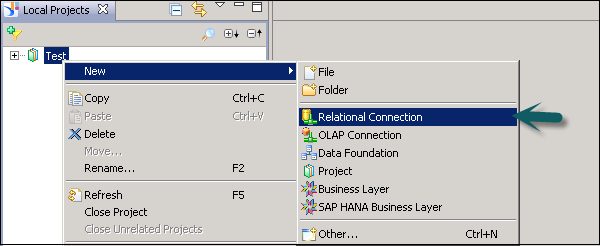
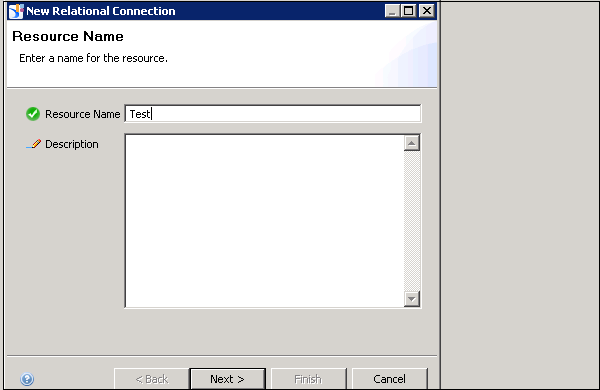
Right-click on Project name → New → Select Relational Connection → Enter connection/resource name → Next.
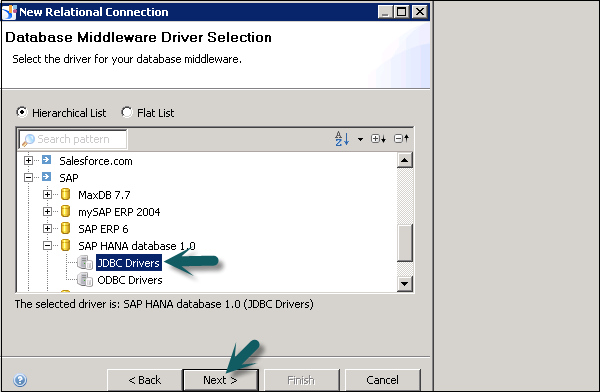
Choose SAP from the list → SAP HANA → Select Drivers JDBC → Next → Enter details.
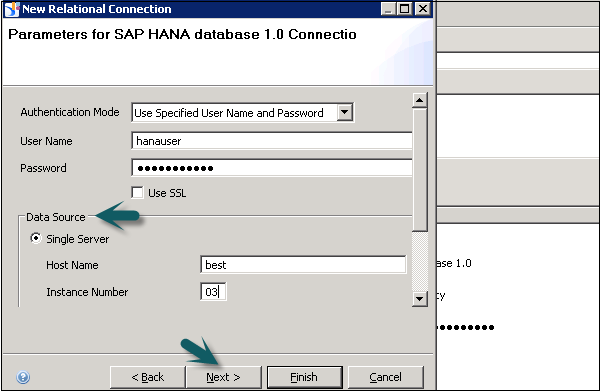
Enter the system details, username, password, and click Next.
Click Finish.
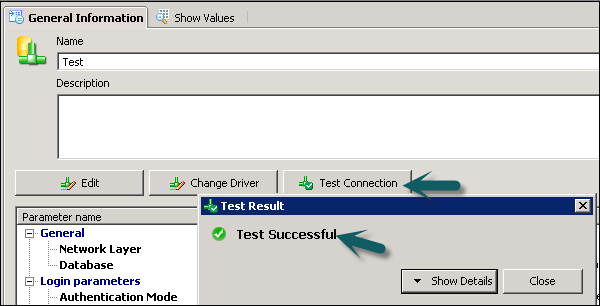
Under General Information → Click on Test Connection → Successful.
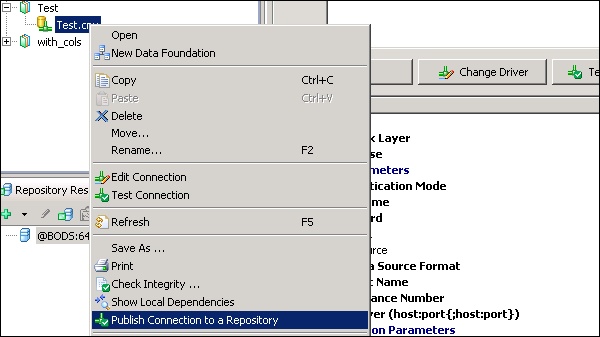
We have to publish this connection to the Repository to make it available for use.
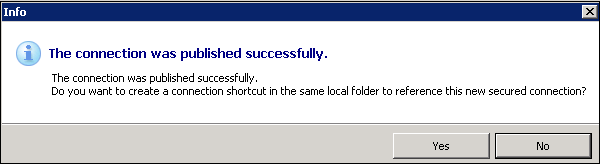
Right-click on the connection name → Publish the connection to the Repository → Enter BO repository password → Click on Connect → Finish → Yes.

Once you click on finish, it will create a secure Repository connection.
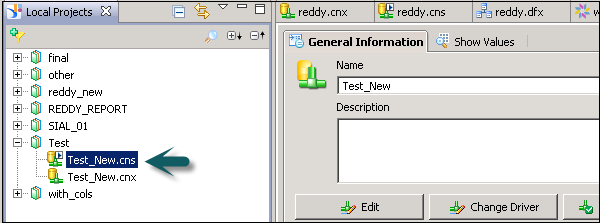
.cns − secured Repository connection
.cnx − local unsecured if you use this connection it will not allow you to publish anything to repository.
The next step is to create a Data Foundation Layer on this secure connection.
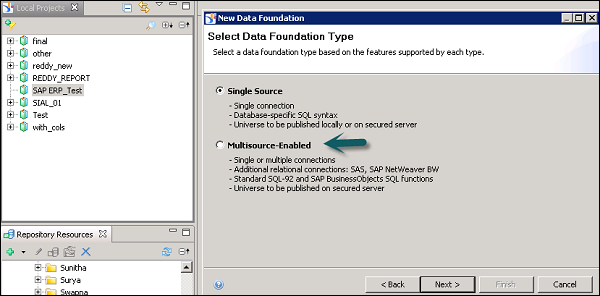
Right-click on .cns Repository connection → New Data Foundation.

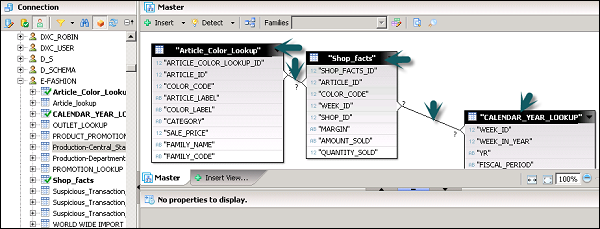
Enter Resource Name and click on Finish. It will show you a list of all available schemas in the database. You can add Tables and Joins from Schema to Data Foundation layer. This can be done by dragging the table or by a double-click. Apply the joins on Dimension and Fact tables to create a logical schema.
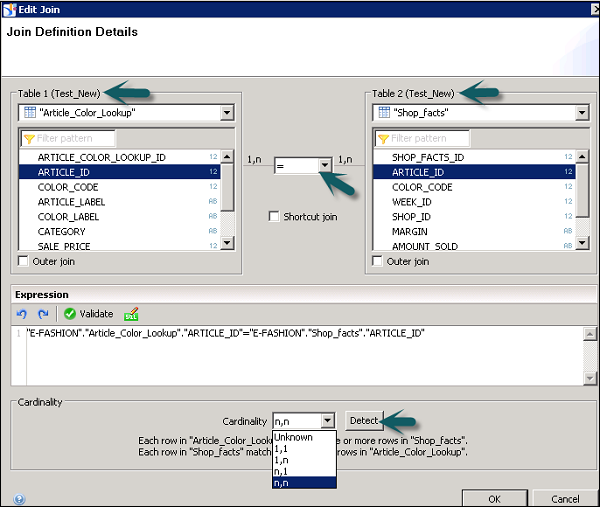
To define a Join, double-click on Join between tables. It will show you both the tables. You can select from different Joins as per data requirement and click on detect Cardinality to define cardinality - 1:1, 1:n, n:n.
Next is to create a Business Layer on the Data Foundation. Click the Save All icon at the top of the screen. Then, right-click on Data foundation .dfx → New Business Layer.

Enter Resource Name → (Generating Business Layer for Data Foundation) Finish. It will add Business Layer .blx under the Local Project.
It will show a list of all dimensions and measures under Data Foundation. You can define dimensions, measures, aggregation, etc.
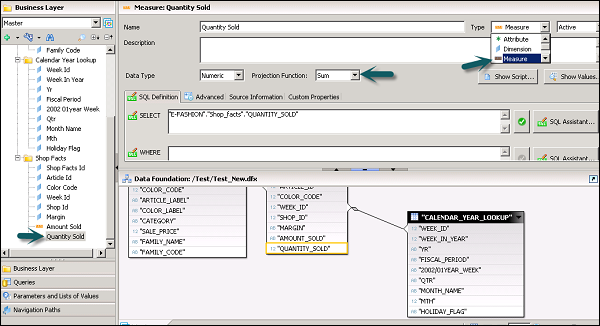
To define an Aggregation, you can select from Projection Function. You can also hide few objects in the report if you want by using the dropdown next to measures and dimension. You can select Hidden for a particular object.

Once you define Business Layer, click Save All icon at the top of the screen as shown in the following screenshot.

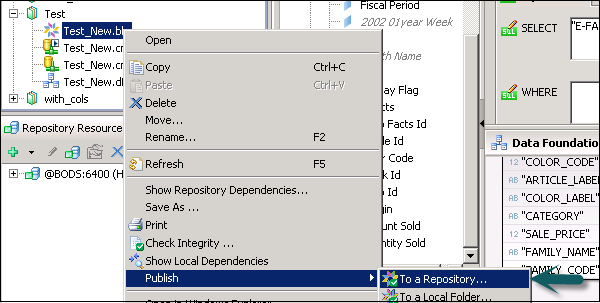
To publish a Universe to the Repository, right-click on .blx → Publish → To a Repository.
Select Resources → Next → In Publish Universe window, select Next → Select the Repository folder where you want to publish Universe and click Finish.
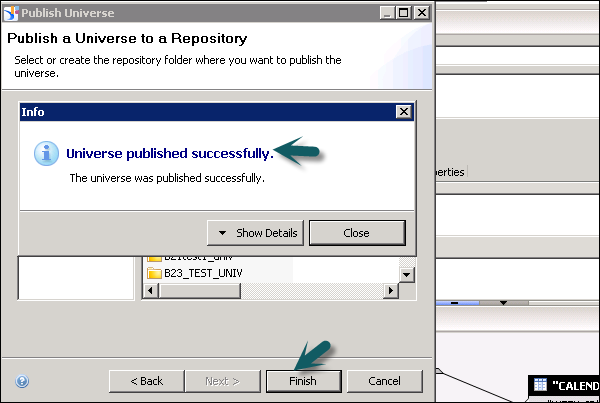
You will get a confirmation that Universe published successfully.
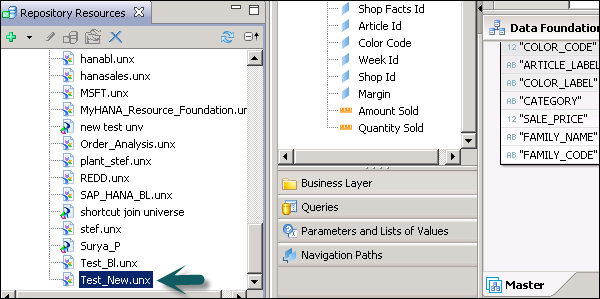
To check the Universe under Repository, go to Repository resources and check for the Universe that has been created.
Creating a Universe on SAP ERP
You can build a universe on SAP ERP by using Data Foundation in IDT. You have to create a relational connection to ERP data source, info sets, SAP queries, and ABAP functions that are treated as tables in the connection.
You can create a single source Data Foundation to support local connections but it doesnt support Joins and calculated columns between the tables inserted from an ERP connection.
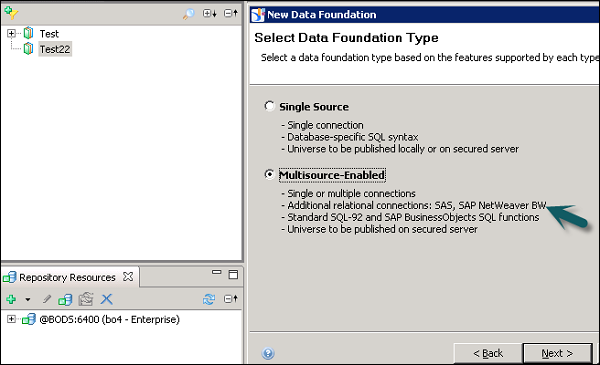
To use a calculated column, joins, you need to create a Data foundation that is multi-source-enabled on a secured connection.
When a table is added in Data Foundation layer, the table type of info set, SAP query, or ABAP function is saved as a table property in the data foundation. To add an ABAP Function table, there is one data foundation table created to map the main function.
The table contains input columns for the input parameters of the function. These parameters can be mandatory or optional. To assign a value to mandatory parameters, you need to edit the input columns.
Limitations of Using SAP ERP
When you use measures that contain aggregate functions it cant be used as filters in the Query Panel as the output SQL expression consists of HAVING clause, and it is not supported by the SAP ERP connection. Hence, if a measure is added that contains Aggregation function as filter, it throws an error while refreshing the query.
Creating a Universe on SAP BW
If you want to use SAP BW to design a Universe, you should use a data foundation based on multi-source enabled structure. All the tables and joins in SAP BW are automatically imported to Data Foundation. When a Business Layer is created on Data Foundation, all objects are automatically moved to the Business Layer.
If you dont want to insert tables and joins automatically, you can unselect the Detect tables by going to advance properties while adding connection to Data Foundation.
You can also turn off insertion of Business Layer objects by unchecking the option to automatically create classes and objects when selecting data foundation in New Business Layer.
Creating a Universe on Microsoft Analysis Services
You have to create Business Layer on Microsoft Analysis Services (MAS) and business layer objects are created by default. Following is the mapping of objects in Business Layer −
Dimension − Analysis dimensions are created in the business layer for each dimension in the cube.
Display Folder − Folders are created in the analysis dimension to contain the hierarchies in the display folder.
Hierarchy − For value-based (parent-child) hierarchies, a value-based hierarchy is created in the analysis dimension. The attributes are created in the Attributes folder in the hierarchy.
Attribute Hierarchy − Attribute hierarchies in the cube are created as level-based hierarchies in the analysis dimension.
Named Set − Named sets are created in the related analysis dimension, in the folder Named sets.
Measures and Calculated Measures − Measures and calculated measures are created as measures in the appropriate measure group folder. A measure attribute is created for the formatted value.
Creating a Universe on SAS
You can build a Universe on SAS by using multi-source enabled data foundation and using a secure connection.
Connection to SAS data source are managed by data federation service.
Multilingual Universes
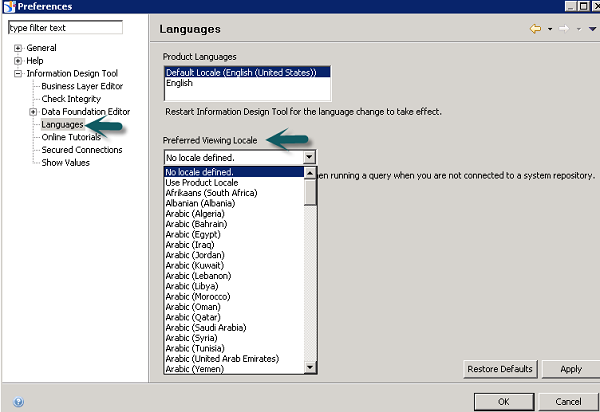
You can also create multilingual Universe in Information Design tool. This allows you to use multilingual solution by using single Universe metadata model.
Following are the steps to use multilingual Universe for report creation −
Step 1 − Use Universe designer to design Universe in source language in IDT.
Step 2 − Use translation management tool to translate the metadata in the data foundation and business layer.
Step 3 − Use report designers to build the reports on the same Universe, which can be displayed in different languages as per user preferences.
Step 4 − Go to Information Design Tool → Preferences → Preferred Viewing Locale determines the language of the metadata and data in the Query Panel.
This can be used if you have support for the following −
Translations are available in the language (metadata).
The connection supports the language parameter (data).
