- SAP HR - Introduction
- SAP HR - Maintaining Relationships
- SAP HR - Time Constraints
- SAP HR - Maintaining Infotypes
- Personal Administration
- SAP HR - Personnel Administration
- SAP HR - Master Data
- SAP HR - Infotypes
- SAP HR - Personnel Actions
- SAP HR - Changing Infotypes
- Time Management
- SAP HR - Time Management
- SAP HR - Work Schedules
- SAP HR - Public Holiday Calendar
- SAP HR - Attendance Absences
- Benefits
- SAP HR - Benefits
- Payroll
- SAP HR - Payroll Management
- SAP HR - Basic Pay Infotypes
- Primary and Secondary Wage Types
- SAP HR - Payroll Process
- SAP HR - Gross Pay
- SAP HR - Payroll Cycle
- SAP HR - Universal Work List
- SAP HR Useful Resources
- SAP HR - Quick Guide
- SAP HR - Useful Resources
- SAP HR - Discussion
SAP HR - Time Constraints
Time constraints are used to determine how the object type exists and how they will be updated in the HR system.
You can also define time constraints for object types in Organization management to have a suitable system. You need not to keep orphan object types in the system.
- O - O → Time Constraint 1
- O - S → Time Constraint 2
- O - K → Time Constraint 3
- S - O → Time Constraint 4
- S - P → Time Constraint 5
There are three types of time constraints −
Time Constraint 1 is mandatory for a record to exist in the HR system and can exist one at any point of time.
Time Constraint 2 is not mandatory for a record but only one exists at any point of time.
Time Constraint 3 is not mandatory for a record and can have many at any point of time.
Assigning Time Constraints to a relation
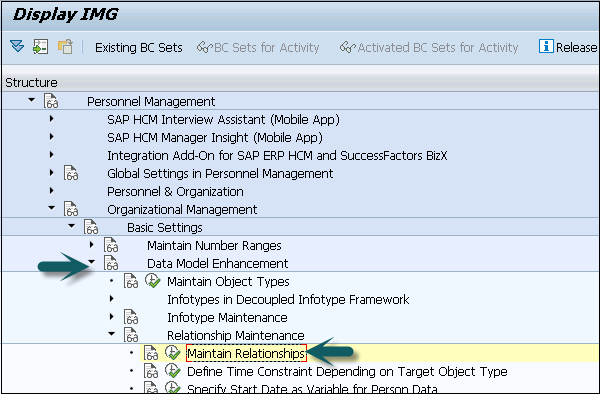
Step 1 − To assign time constraints to a relation, you have to use −
SPRO → IMG → Personnel Management → Organizational Management → Basic Settings → Data model enhancement → Relationship Maintenance → Maintain Relationships → Execute
Step 2 − In the left pane, go to the Time constraint tab as shown in the image given below −
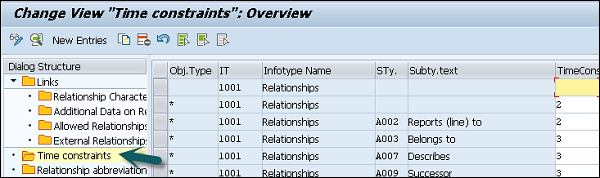
You can assign appropriate time constraints to the given relationship.
Infotypes reactions as per time constraints −
Time Constraint 1 − Record must have no gaps, no overlapping. If you select this Time Constraint, there should not be any gaps nor overlapping. This TC is generally used for Infotypes like, 0001, 0008, 0009 etc. where there is only one valid record.
Time Constraint 2 − This TC includes those records that can include gaps but there should be no overlapping. If you select this TC, it means that you can have gaps but NO overlapping. Consider an example of the marital status of an employee. The employee has a spouse but a gap can occur in case he is divorced.
Time Constraint 3 − This TC includes records that can have gaps and can exist multiple times. For example, Infotype IT0014 can have multiple records in that particular Infotype at the same time with overlapping.
Maintaining Personnel Actions
In SAP HR system, personnel actions are performed for all the Infotypes that require data to be entered in the HR system. Common Infotypes that require a personnel action are hiring a new employee, termination of an employee, etc.
Step 1 − To perform a Personnel action, use T-Code: PA 40 or go to SPRO → IMG → Personnel Management → Personnel Administration → Customizing Procedures → Actions.
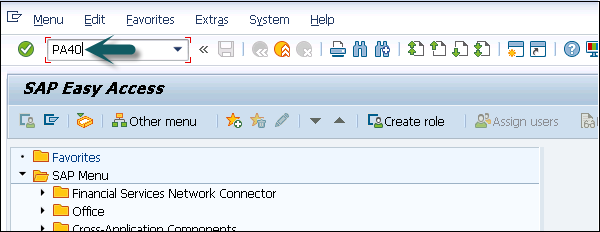
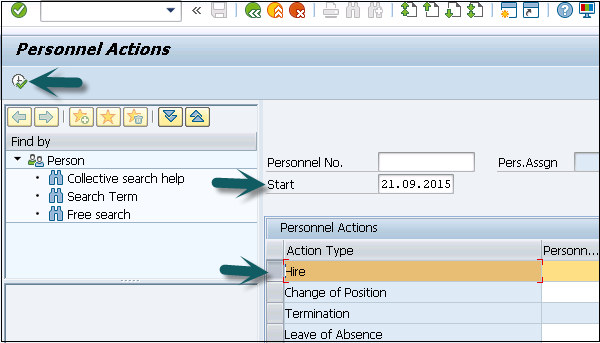
Step 2 − A new window Personnel Actions opens.
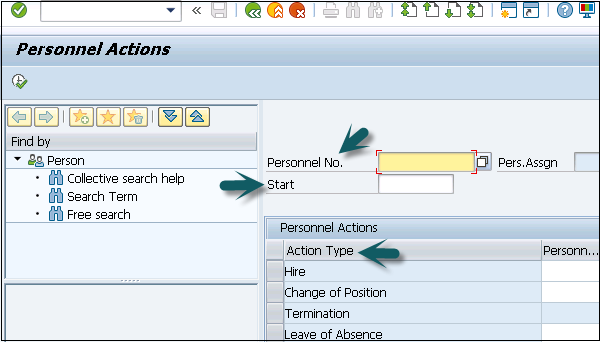
The screen consists of the following fields −
Personnel No − This field has an employees personnel number. When a new employee is hired, it is generated automatically by the system.
Start − This field shows the start date of the personnel action.
Action Type − In this field, you have to select the action type that needs to be performed.
Example
Let us understand how a new employee is hired in SAP HR system.
Step 1 − Enter the hiring date as shown below.
Step 2 − From Action type, select Hire.
Step 3 − Click the Execute button given on top.
A new window will open. Enter details like Reason for action, Personnel area, Employee group and sub group, etc. and click the Save icon at the top.
