- SAP HR - Introduction
- SAP HR - Maintaining Relationships
- SAP HR - Time Constraints
- SAP HR - Maintaining Infotypes
- Personal Administration
- SAP HR - Personnel Administration
- SAP HR - Master Data
- SAP HR - Infotypes
- SAP HR - Personnel Actions
- SAP HR - Changing Infotypes
- Time Management
- SAP HR - Time Management
- SAP HR - Work Schedules
- SAP HR - Public Holiday Calendar
- SAP HR - Attendance Absences
- Benefits
- SAP HR - Benefits
- Payroll
- SAP HR - Payroll Management
- SAP HR - Basic Pay Infotypes
- Primary and Secondary Wage Types
- SAP HR - Payroll Process
- SAP HR - Gross Pay
- SAP HR - Payroll Cycle
- SAP HR - Universal Work List
- SAP HR Useful Resources
- SAP HR - Quick Guide
- SAP HR - Useful Resources
- SAP HR - Discussion
SAP HR - Changing Infotypes
As SAP provides various Infotypes that are grouped together for different information groups. Sometimes you need to modify the standard Infotypes as per business requirement.
Customization of Infotypes can be done by hiding standard Infotypes fields as per business requirement or you can also add custom Infotype fields in the structure.
Following are the fields that can be used to configure the Infotype screen −
| Field | Field Name | Field Length |
|---|---|---|
| Subtype | SUBTY | Up to 4 characters |
| Company code | BUKRS | 4 characters |
| Screen number | DYNNR | 4 characters |
| Payroll area | ABKRS | 2 characters |
| Employee group | PERSG | 1 character |
| Country grouping | MOLGA | 2 characters |
| Personnel area | WERKS | 4 characters |
| Employee subgroup | PERSK | 2 characters |
These are fields, which are used to maintain the screen layout and are maintained using the T-code: PE04.
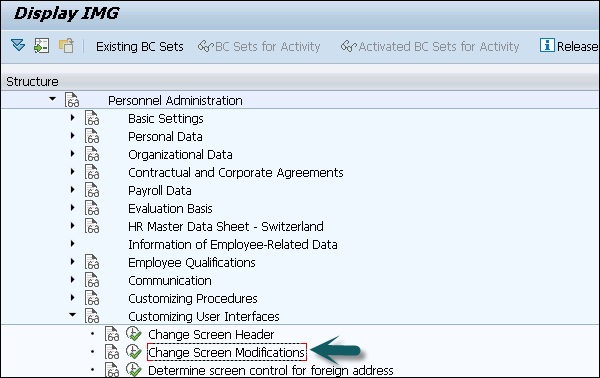
Step 1 − Go to SPRO → IMG → Personnel Management → Personnel Administration → Customizing User Interface → Change Screen Modifications → Execute.
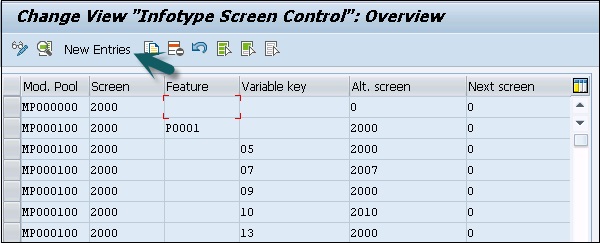
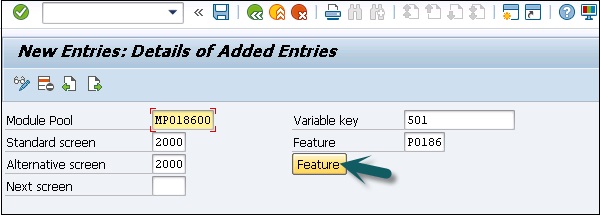
Step 2 − In the next window, you will see all Infotype screen controls like Mod. Pool, Screen, Feature, Variable key, etc. To create a new control, click the tab New Entries.
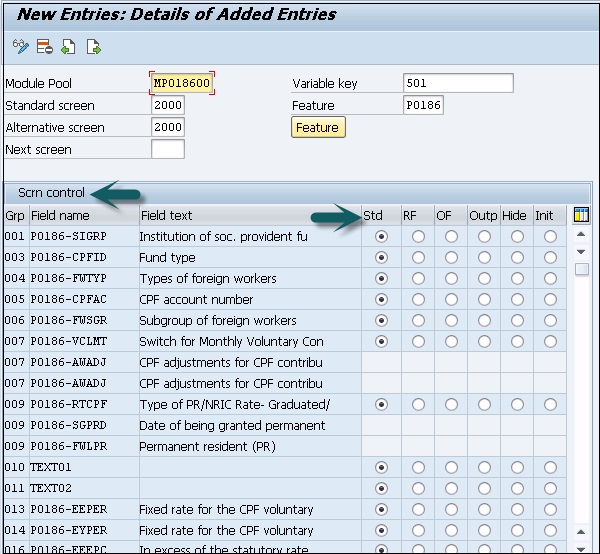
Step 3 − In the new window, enter the values as shown below and press the ENTER key.

Important
Module Pool is MPxxxx00, xxxx represents Infotype no.
Variable key is what is returned by your feature.
Standard Screen will be always 2000.
Feature will be Pxxxx, where xxxx is your Infotype no.
Once you press ENTER, it will show you all the fields of this Infotype. In screen control, you will see five radio buttons against each entry. These radio buttons include −
Std means Standard setting − When you select this option, the field characteristics correspond to the standard setting.
RF means Required field − Select this check box to define the screen field as a required field.
OF means Optional field − Select this option to define the field as an optional field.
Outp means not ready for input − This can be selected to mark the field. It is an output field only and is not used for input.
Hide means hiding a field − This option is selected to hide the screen field.
Init means hide and Initialize − If this option is selected, the screen field is hidden.
Step 4 − To save this setting click the Save icon at the top.

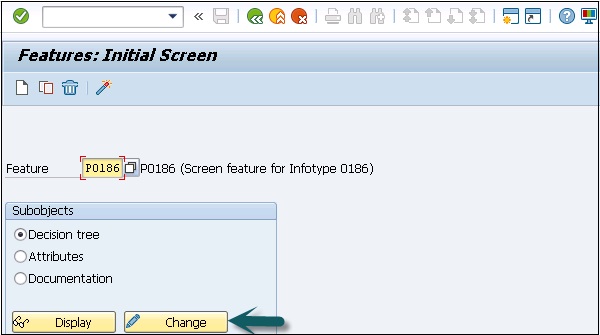
Step 5 − Click the Feature button; you can add values for subtypes.
Step 6 − This will take you to the initial screen of Features. Click Change to change the values.
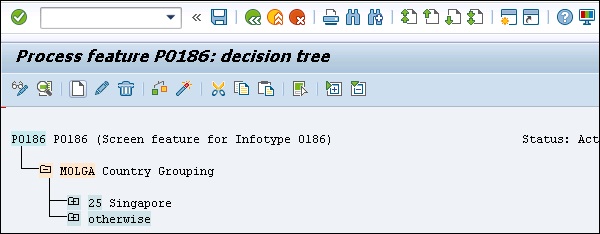
Step 7 − To create a new subtype node, click Create.
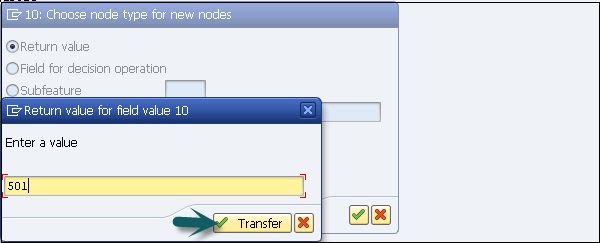
Step 8 − Select the subtype and click Create. Select the Return Value and press ENTER.
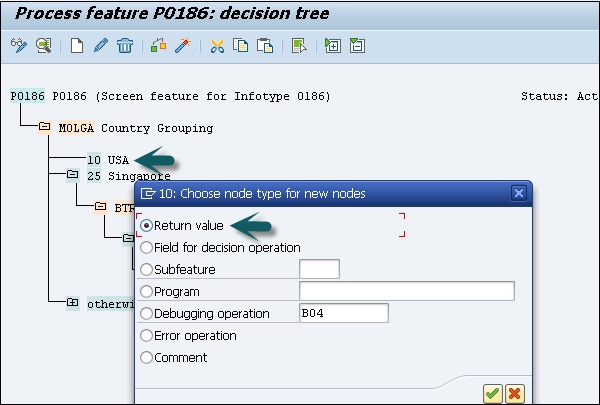
Step 9 − Enter the Return value as Variable key -501 and click Transfer.
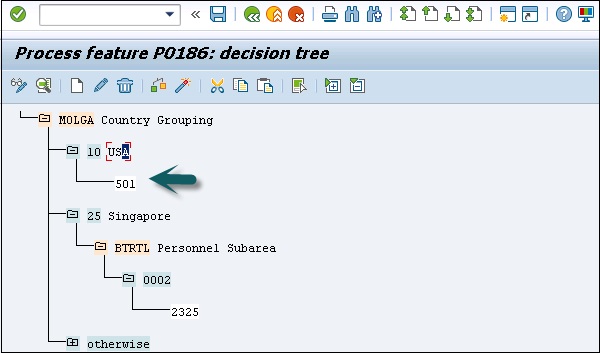
Step 10 − Click Save and press the activate icon at the top.
Integration with Time & Payroll
The integration between time management and payroll is performed through time evaluation. It allows you to determine the wages of an employee using time-wage types determined by time evaluation.
The time wage types in tables ZL, ALP, and C1 (Cluster B2) represent the interface between time evaluation(TM) and payroll.
ZL − Contains wage types
C1 − Contains data for cost account assignment
ALP − Contains the specifications on a different rate of payment
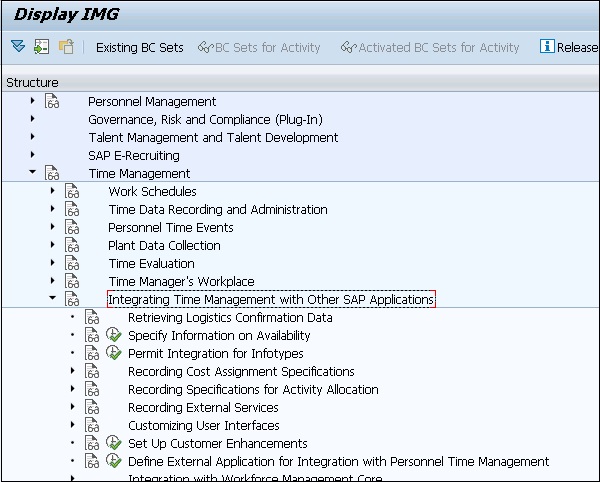
The integration of TM with other components can be found in the following IMG path.
SPRO → IMG → Time Management → Integrating Time Management with other SAP Applications.