- Copilot Studio - Home
- Build Your First Copilot
- Copilot Studio - Free Trial
- Power CAT Copilot Studio Kit
- Copilot Studio - Custom Entities
- Copilot Studio - Trigger Phrases
- Copilot Studio - Adaptive Cards
- Classic Bot vs Modern Copilot
- Copilot Studio - Power Automate Flow
- Share Your Copilot-built
Share Your Copilot-built
Collaboration is key when building a Copilot. In Copilot Studio, the sharing process is very easy and efficient but highly secure, ensuring that only the right people gain access to your Copilot builds. In this tutorial chapter, you will see how to integrate your builds with other developers, whether you're collaborating with internal team members or external partners. This guide covers every step, from permissions setup to secure sharing practices.
Understanding Security Features in Copilot Studio
Microsoft Copilot Studio holds a very advanced security system which includes role-based access control with powerful encryption for handling data vulnerability.
Role-Based Access Control
When you provide access to your Copilots to any other developer, the access permissions are based on the roles. This means that the users can be assigned access according to their work and responsibilities. These roles typically include −
- Viewer − With this access, the user can view the Copilot but cannot make modifications.
- Editor − Here, the user can modify the Copilot but cannot manage its settings.
- Owner − Full control, including the ability to share and manage permissions.
Data Encryption and Security
Microsoft Copilot Studio uses Microsofts enterprise-grade encryption to secure Copilot builds and their shared access. This ensures that data is safe even when shared externally.
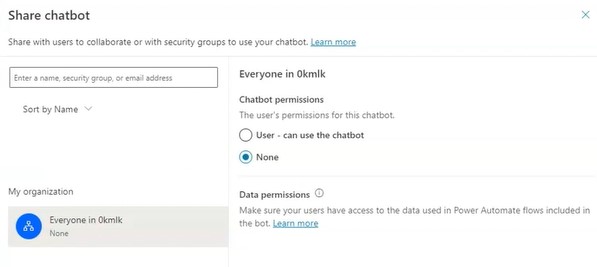
Setting Permissions for Sharing Built Copilots
One of the most crucial aspects of sharing a Copilot is configuring the correct permissions. This not only controls who can view or edit the Copilot but also determines who can further share or modify the settings.
Steps to Configure Permissions
- Open Copilot Studio and navigate to the dashboard.
- Select the Copilot you wish to share.
- Click on the Settings or Permissions tab.
- In the Permissions section, assign users to roles: Viewer, Editor, or Owner.
- customise permissions for each role if necessary, by selecting Custom Permissions.
- Once all roles and permissions are set, click Apply to save the settings.
Example − If youre working with a data analyst team, you may want them to have Editor permissions to adjust the Copilots logic but restrict them from sharing or deleting the build.
Sharing a Built Copilot Among Team Members
Sharing a Copilot within your organisation is a straightforward process but comes with fine-grained control to ensure the right people get the appropriate level of access.
Steps to Share Copilot with Team Members
- Navigate to the Copilot's Settings: From your dashboard, click on the Copilot you want to share.
- Click on the "Share" Option: This may also appear as Manage Access depending on your Studio version.
- Add Team Members: Input the team members email address or username from your directory.
- Select whether they should be Viewers, Editors, or Owners.
- Choose to send an email or in-app notification to alert them of the shared access.
- Click "Share" to complete the process.
Example − This is applicable when you're working on an AI-enhanced chatbot and you want to share the build with your data scientists and assign them Editor roles, so they can tweak the bots ML models.
Sharing Copilot with External Organizations
When you need to collaborate with external vendors or partners, Microsoft Copilot Studio allows for secure external sharing.

Steps for External Sharing
- Open the settings for the specific Copilot you want to share.
- Under the Sharing Options section, toggle the option to allow External Sharing.
- Enter the external user’s email. If they belong to another organisation, ensure their domain is approved for sharing.
- Just as with internal team members, assign them Viewer, Editor, or Owner roles.
- Ensure that external users have limited access to sensitive data or advanced settings, depending on the need.
- Once satisfied with the setup, send them an invitation to collaborate.
Tracking and Auditing Shared Copilots
Tracking who accesses your Copilot is essential, especially in high-security environments. Copilot Studio provides robust auditing features to monitor every action taken on shared Copilots.
- Access the Audit Logs − You can track the logs by navigating to the Admin Panel and clicking on Audit Logs.
- Review Activity − Look for any activity related to the shared Copilot, such as login attempts, file changes, or permission modifications.
- Set Up Alerts − Configuring alerts can be really helpful to you so that you will be notified of unusual activity, such as failed login attempts or unauthorised data access.
- Generate Reports − Download activity logs periodically for internal audits.
Revoking Access or Modifying Permissions
Sometimes you may need to revoke access or downgrade someones permissions. This could be because a project ends, or someone no longer requires the same level of access.
Steps to Revoke or Change Permissions
- Navigate to the Copilots settings where you previously managed access.
- Find the user or organisation whose access you want to modify or revoke.
- Either lower their role (e.g., from Editor to Viewer) or remove their access entirely.
- After making adjustments, save the settings.
- Finally, you can send a notification informing them that their access has been altered.
If you want to give access to a user who only needs it temporarily, you can use the time-limited access feature. This will automatically revoke their permissions after a set period.
Best Practices for Sharing Built Copilots
To ensure your Copilot remains secure when shared, follow these best practices −
- Limit External Sharing − Only share Copilots with external users if absolutely necessary.
- Use Role-Based Access − You must ensure that you give only the required permissions to other users to complete their tasks, keeping it as minimal as possible.
- Regular Audits − Also conduct periodic reviews of the shared Copilots audit logs to spot unauthorised access.
- Access Reviews − Regularly review users' roles to ensure their access remains appropriate as their job duties evolve.
Sharing your built Copilot in Microsoft Copilot Studio is a powerful feature, enabling collaboration while maintaining strict security controls. With role-based access, auditing capabilities, and detailed permission settings, you can confidently share your builds with both internal teams and external organisations, knowing your data and configurations are secure.
