- Copilot Studio - Home
- Build Your First Copilot
- Copilot Studio - Free Trial
- Power CAT Copilot Studio Kit
- Copilot Studio - Custom Entities
- Copilot Studio - Trigger Phrases
- Copilot Studio - Adaptive Cards
- Classic Bot vs Modern Copilot
- Copilot Studio - Power Automate Flow
- Share Your Copilot-built
Build Your First Copilot in Microsoft Copilot Studio
We have seen the impact of AI in todays IT sector as it is something you cannot ignore. The real power of AI assistants and tools like Microsoft Copilot Studio is available for all developers and IT enthusiasts who are planning to make something big. It all depends on who truly understands Microsoft Copilot Studios capabilities and uses it for the perfect start. Therefore, it is highly important to harness all the AI capabilities provided by Microsoft.
In this tutorial chapter, we will see how to build your first Copilot and the step-by-step guide to kickstart your Microsoft Copilot Studio journey.
Prerequisites
Before you get started, ensure that you have the following tools and accounts in place −
- Microsoft 365 Developer Account − Set up a developer environment in Microsoft 365. If you do not have a subscription, you can start with the demo version of Copilot Studio.
- Azure Subscription − Necessary for integrating Azure OpenAI services.
- Power Platform − For building workflow automation.
- GitHub Account − This is for version control and code management, especially if you're using GitHub Copilot.
- Basic Skills − Familiarity with REST APIs, JSON, and Power Automate will be helpful.
To explore further, set up your Microsoft Graph and Azure OpenAI resources before moving on to design your Copilot.
Step-by-step Guide for Microsoft Copilot Studio
Heres a step-by-step guide to getting started with Microsoft Copilot Studio −
Step 1: Login Using Credentials
You can sign up with your Microsoft work account and visit Copilot Studio to get started.
If you want to explore the very latest version of Microsoft Copilot Studio where you can get all the important and new features, visit the preview version of Copilot Studio.

Step 2: The Interface
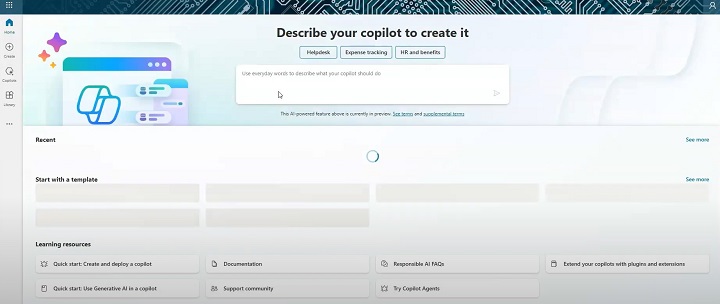
- The user-friendly interface consists of many sub-sections to help you out with making your own Copilots.
- In the first section, you can write different prompts to start with.
- If you have previously made any Copilot, you can see it in the Recent section.
- Or else you can start with the different templates mentioned below.
- Additionally, Microsoft also provides many learning resources in this interface all along with documentation and FAQs.
- If you want to change the theme of the Studio, you can change it from Settings > General > Dark mode.

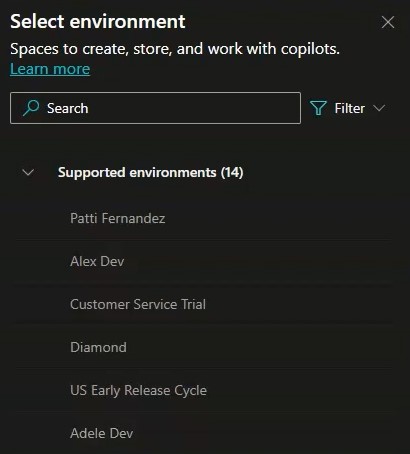
Step 3: Setting Up the Environment
Setting up the environment is crucial for ensuring that your Copilot has access to the tools and services it needs. You can change the environment from the supported environments tab.
Step 4: Create Your First Copilot
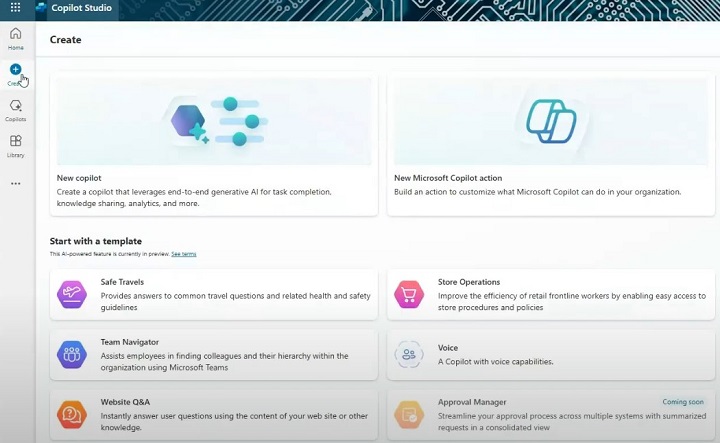
You can start with any template given below, but for simplicity, we will be starting with a Copilot from scratch.
- Go to the Create icon on the left bar and hit Create
- Choose New Copilot to get started with and give it some name such that it represents its functionality. (e.g., Sales Assistant Copilot).
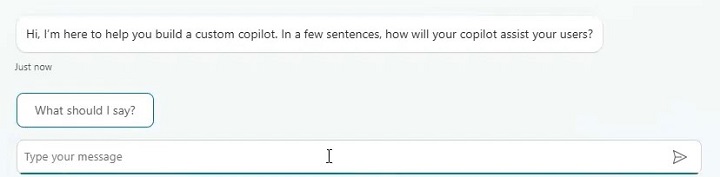
Once you start creating your Copilot, you will see a screen where you can provide prompts. Basically, it creates your Copilot using Copilot (provide suggestions through prompts).
Step 5: Start Providing Customisations
- In the box below, you can give as much information as possible so that your Copilot or your custom chatbot will answer all the user questions.
- Start by writing prompts like Create a Copilot for my organisation's website, which provides services to maintain and create business platforms, with marketing and ads run.
- Copilot will ask more regarding this prompt like the tone of answers, language preferences, organisation size, etc. and you just have to provide all the information.
- Once you have configured all the settings, you can hit Create on the top right to create your first Copilot.
Step 6: Add Actions and Build Topics
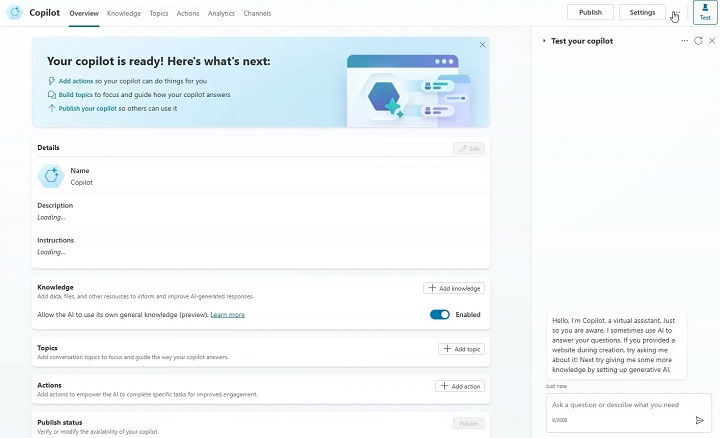
Here, you can provide additional details to your Copilot like description, instructions of writing, custom icons, etc. Further, you must provide knowledge to your Copilot bot.
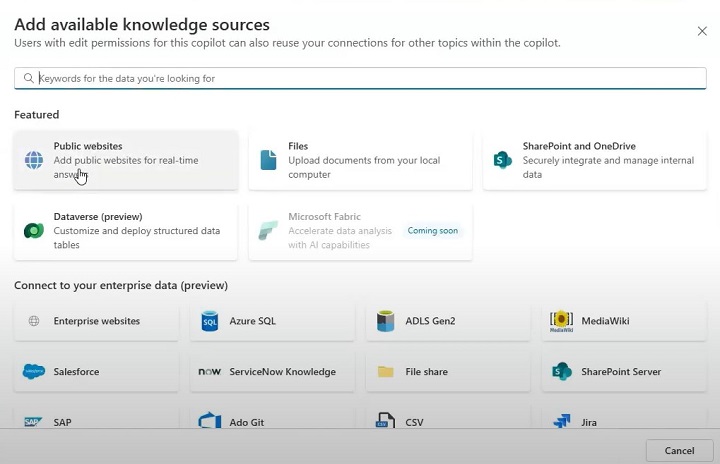
1. Add Knowledge and Resources
Click on the add knowledge button and a pop-up opens, which inputs different resources like your organisation's website, any files to put up with, etc.
You can connect your Copilot with SharePoint or OneDrive also, and your enterprise data integration with many options provided.
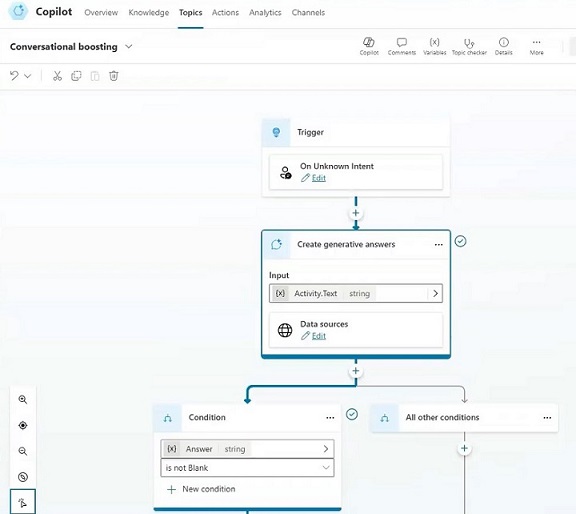
2. Add Topics
Topics are kind of a boilerplate which serves pre-defined functions that work in the starting part, ending part and multiple sections for the middle part of any conversation with your Copilot.
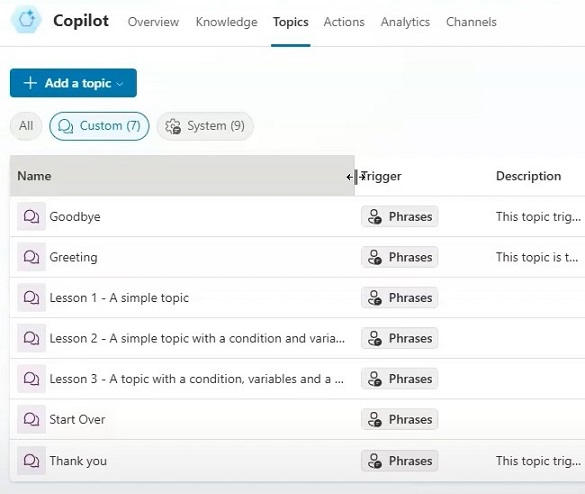
- For example, once any user starts using your Copilot, he/she will get suggestions with custom greetings, and get a template of what you are providing them.
- For the end, you can also put custom topics for Thankyou or Goodbyes.
- This page also shows the generated output for the questions asked to your Copilot bot.
- Here, you can see the source from where the Copilot is getting all the information about that particular answer generated.
3. Add Actions
Here you can provide any specific actions or custom answer to some predefined questions asked by the users. Also you can integrate your Power Automate here to get all the automations and customisations possible.

4. Analytics Page
This page shows the Power BI integration of your Copilot Studio which lets you know all the analytics and usage of your built Copilot.
5. Channels Page
In this page, you can link your Copilot to any available platform like Teams, Facebook, Slack, etc. and also you can publish your Copilot on the Demp Website provided by the Copilot Studio itself.
Step 7: Publish Your Copilot
- Once done with all the customisations, you can hit the publish button on the top right to activate your Copilot. If you make any changes again, you must click publish again to save.
- Several other settings like languages, voice assist, entities, Generative AI, etc. needs to be done before final publish.
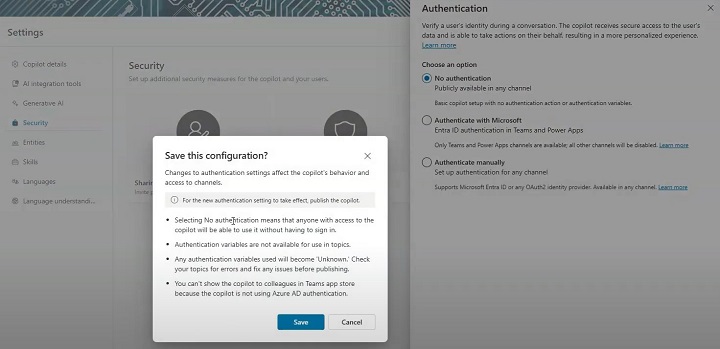
- You can set authentication configuration for access of your Copilot to anyone using it.
Step 8: Publish Your Copilot on the Demo Website
After making your Copilot, you can publish it directly on a demo website.
- Go to your Copilot > Channels > Demo Website. Here you need to insert information regarding your demo website like the welcome message, conservation starters, etc. and then you are ready with your website accessing your Copilot.
- If you find any error regarding your Copilot chat, make sure you publish the changes to Copilot again and it will handle the error.
Step 9: Testing and Debugging
Once the logic and AI capabilities are in place, its time to rigorously test your Copilot.
- Use the built-in simulators in Copilot Studio to run initial tests. Input different commands to see how the Copilot reacts.
- For example, if a user asks to "schedule a meeting with Dev," ensure that the workflow accesses calendar data, checks availability, and generates a confirmation.
Conclusion
Building your own Copilot using Microsoft Copilot Studio is an exciting journey into the future of AI-driven automation. By setting up the right environment, defining clear workflows, integrating AI, and carefully testing and deploying your Copilot, youll not only streamline processes but also empower users with a personalised AI assistant tailored to your organisations needs. Remember to continuously monitor and refine your Copilot to ensure it grows along with your business.
