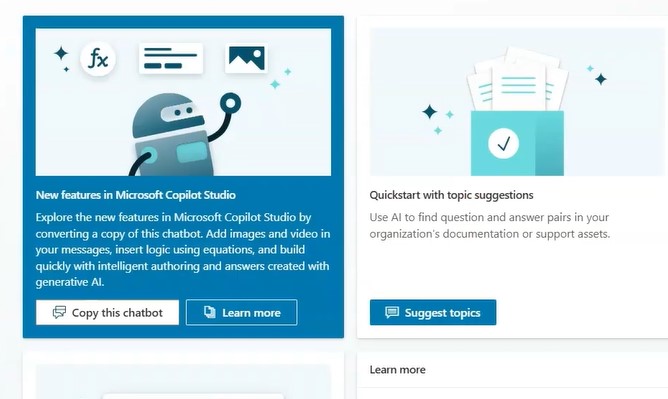
- Copilot Studio - Home
- Build Your First Copilot
- Copilot Studio - Free Trial
- Power CAT Copilot Studio Kit
- Copilot Studio - Custom Entities
- Copilot Studio - Trigger Phrases
- Copilot Studio - Adaptive Cards
- Classic Bot vs Modern Copilot
- Copilot Studio - Power Automate Flow
- Share Your Copilot-built
Microsoft Copilot Studio - Quick Guide
Build Your First Copilot in Microsoft Copilot Studio
We have seen the impact of AI in todays IT sector as it is something you cannot ignore. The real power of AI assistants and tools like Microsoft Copilot Studio is available for all developers and IT enthusiasts who are planning to make something big. It all depends on who truly understands Microsoft Copilot Studios capabilities and uses it for the perfect start. Therefore, it is highly important to harness all the AI capabilities provided by Microsoft.
In this tutorial chapter, we will see how to build your first Copilot and the step-by-step guide to kickstart your Microsoft Copilot Studio journey.
Prerequisites
Before you get started, ensure that you have the following tools and accounts in place −
- Microsoft 365 Developer Account − Set up a developer environment in Microsoft 365. If you do not have a subscription, you can start with the demo version of Copilot Studio.
- Azure Subscription − Necessary for integrating Azure OpenAI services.
- Power Platform − For building workflow automation.
- GitHub Account − This is for version control and code management, especially if you're using GitHub Copilot.
- Basic Skills − Familiarity with REST APIs, JSON, and Power Automate will be helpful.
To explore further, set up your Microsoft Graph and Azure OpenAI resources before moving on to design your Copilot.
Step-by-step Guide for Microsoft Copilot Studio
Heres a step-by-step guide to getting started with Microsoft Copilot Studio −
Step 1: Login Using Credentials
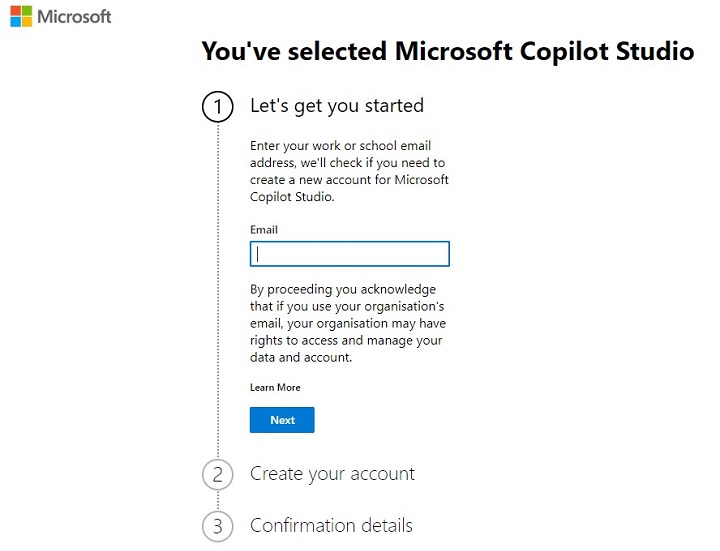
You can sign up with your Microsoft work account and visit Copilot Studio to get started.
If you want to explore the very latest version of Microsoft Copilot Studio where you can get all the important and new features, visit the preview version of Copilot Studio.

Step 2: The Interface
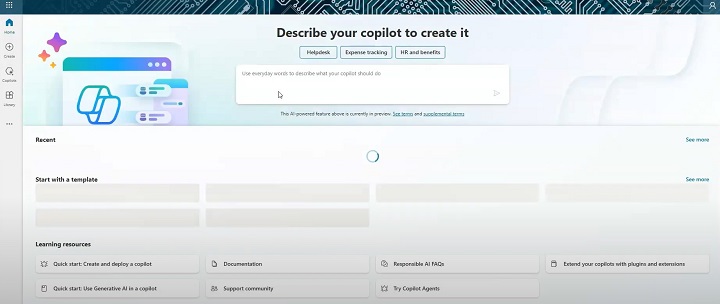
- The user-friendly interface consists of many sub-sections to help you out with making your own Copilots.
- In the first section, you can write different prompts to start with.
- If you have previously made any Copilot, you can see it in the Recent section.
- Or else you can start with the different templates mentioned below.
- Additionally, Microsoft also provides many learning resources in this interface all along with documentation and FAQs.
- If you want to change the theme of the Studio, you can change it from Settings > General > Dark mode.

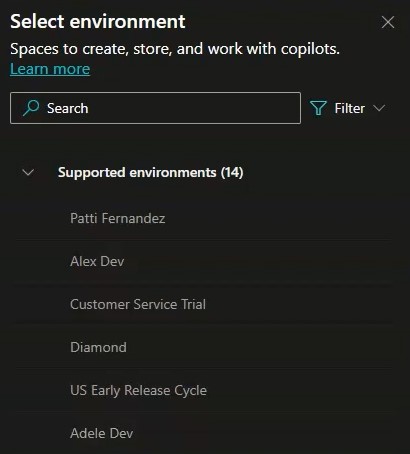
Step 3: Setting Up the Environment
Setting up the environment is crucial for ensuring that your Copilot has access to the tools and services it needs. You can change the environment from the supported environments tab.
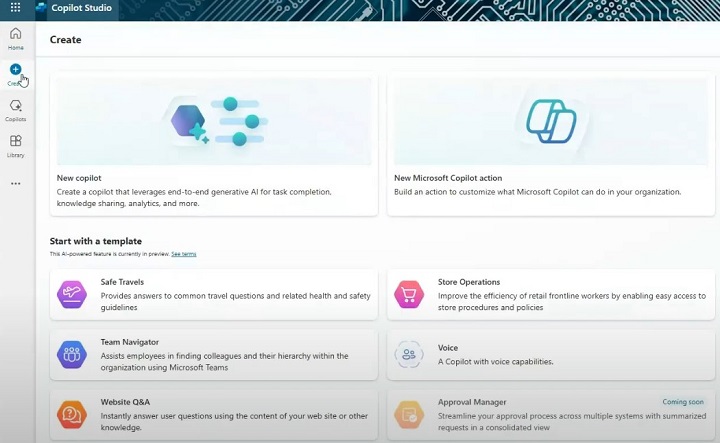
Step 4: Create Your First Copilot
You can start with any template given below, but for simplicity, we will be starting with a Copilot from scratch.
- Go to the Create icon on the left bar and hit Create
- Choose New Copilot to get started with and give it some name such that it represents its functionality. (e.g., Sales Assistant Copilot).
Once you start creating your Copilot, you will see a screen where you can provide prompts. Basically, it creates your Copilot using Copilot (provide suggestions through prompts).
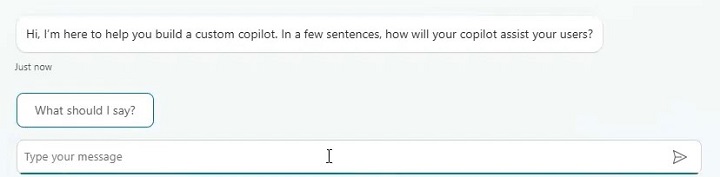
Step 5: Start Providing Customisations
- In the box below, you can give as much information as possible so that your Copilot or your custom chatbot will answer all the user questions.
- Start by writing prompts like Create a Copilot for my organisation's website, which provides services to maintain and create business platforms, with marketing and ads run.
- Copilot will ask more regarding this prompt like the tone of answers, language preferences, organisation size, etc. and you just have to provide all the information.
- Once you have configured all the settings, you can hit Create on the top right to create your first Copilot.
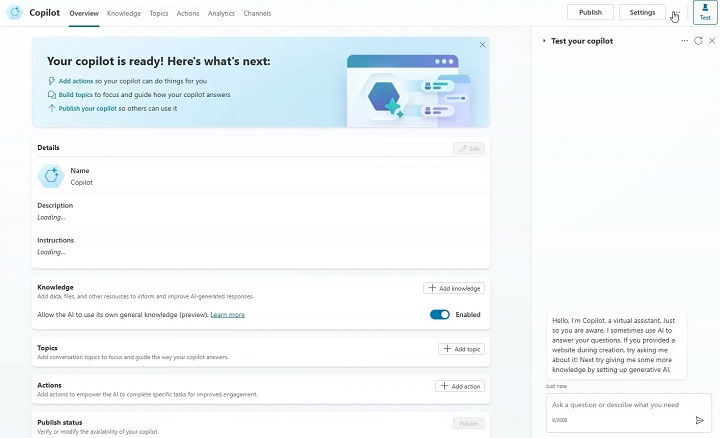
Step 6: Add Actions and Build Topics
Here, you can provide additional details to your Copilot like description, instructions of writing, custom icons, etc. Further, you must provide knowledge to your Copilot bot.
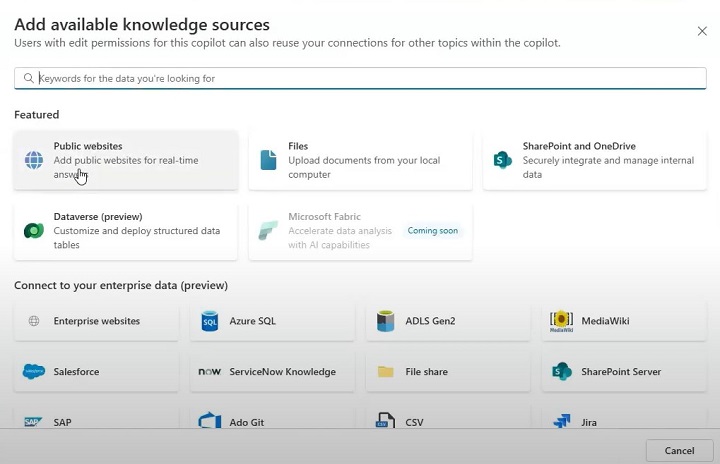
1. Add Knowledge and Resources
Click on the add knowledge button and a pop-up opens, which inputs different resources like your organisation's website, any files to put up with, etc.
You can connect your Copilot with SharePoint or OneDrive also, and your enterprise data integration with many options provided.
2. Add Topics
Topics are kind of a boilerplate which serves pre-defined functions that work in the starting part, ending part and multiple sections for the middle part of any conversation with your Copilot.
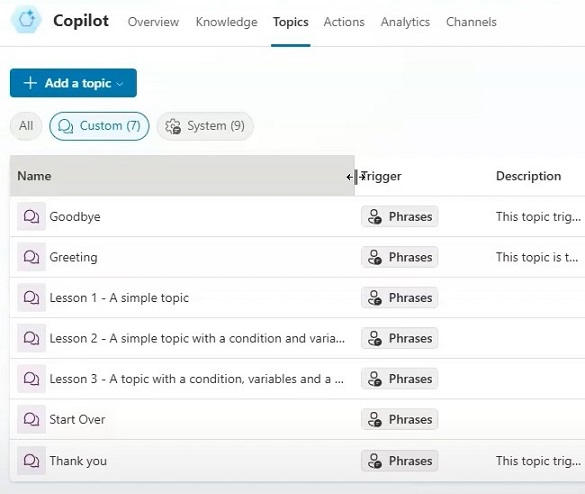
- For example, once any user starts using your Copilot, he/she will get suggestions with custom greetings, and get a template of what you are providing them.
- For the end, you can also put custom topics for Thankyou or Goodbyes.
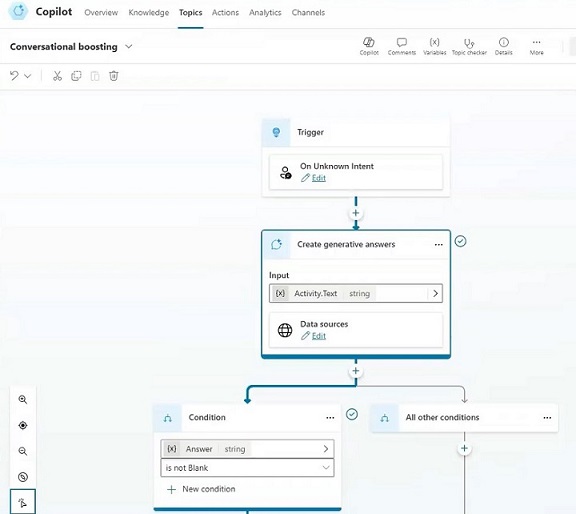
- This page also shows the generated output for the questions asked to your Copilot bot.
- Here, you can see the source from where the Copilot is getting all the information about that particular answer generated.
3. Add Actions
Here you can provide any specific actions or custom answer to some predefined questions asked by the users. Also you can integrate your Power Automate here to get all the automations and customisations possible.

4. Analytics Page
This page shows the Power BI integration of your Copilot Studio which lets you know all the analytics and usage of your built Copilot.
5. Channels Page
In this page, you can link your Copilot to any available platform like Teams, Facebook, Slack, etc. and also you can publish your Copilot on the Demp Website provided by the Copilot Studio itself.
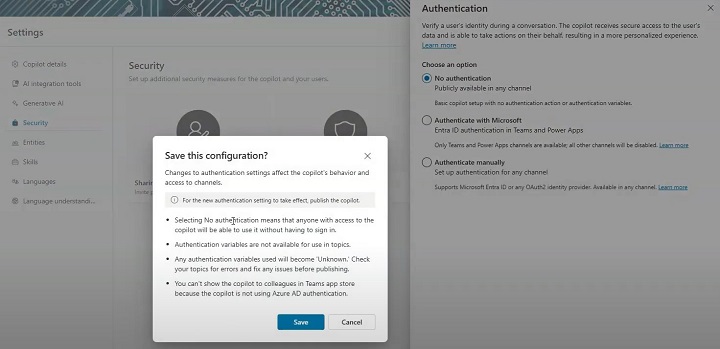
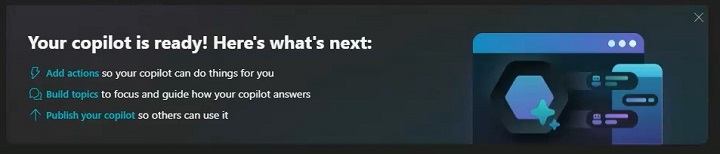
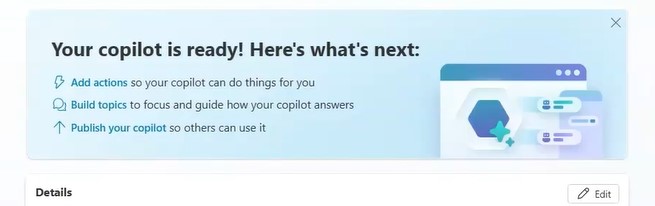
Step 7: Publish Your Copilot
- Once done with all the customisations, you can hit the publish button on the top right to activate your Copilot. If you make any changes again, you must click publish again to save.
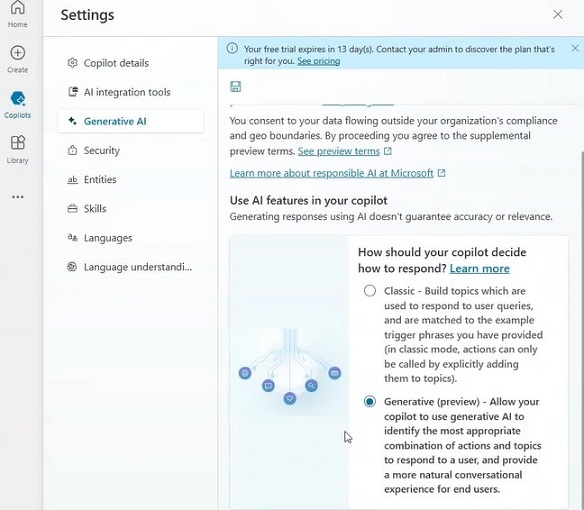
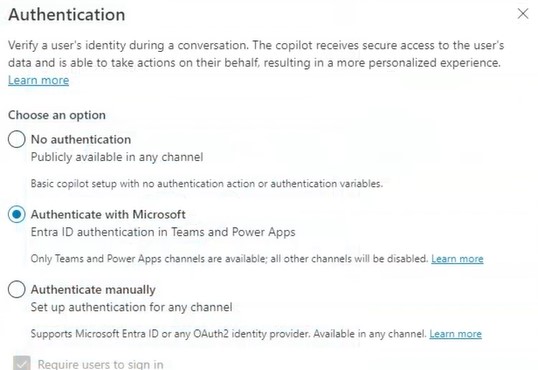
- Several other settings like languages, voice assist, entities, Generative AI, etc. needs to be done before final publish.
- You can set authentication configuration for access of your Copilot to anyone using it.
Step 8: Publish Your Copilot on the Demo Website
After making your Copilot, you can publish it directly on a demo website.
- Go to your Copilot > Channels > Demo Website. Here you need to insert information regarding your demo website like the welcome message, conservation starters, etc. and then you are ready with your website accessing your Copilot.
- If you find any error regarding your Copilot chat, make sure you publish the changes to Copilot again and it will handle the error.
Step 9: Testing and Debugging
Once the logic and AI capabilities are in place, its time to rigorously test your Copilot.
- Use the built-in simulators in Copilot Studio to run initial tests. Input different commands to see how the Copilot reacts.
- For example, if a user asks to "schedule a meeting with Dev," ensure that the workflow accesses calendar data, checks availability, and generates a confirmation.
Conclusion
Building your own Copilot using Microsoft Copilot Studio is an exciting journey into the future of AI-driven automation. By setting up the right environment, defining clear workflows, integrating AI, and carefully testing and deploying your Copilot, youll not only streamline processes but also empower users with a personalised AI assistant tailored to your organisations needs. Remember to continuously monitor and refine your Copilot to ensure it grows along with your business.
Microsoft Copilot Studio - Free Trial
We all look at the real power of Copilot Studio, it comes with a price which offers you full automation, collaboration and boosting productivity to the next level. But if you want to experience the initial version before fully committing, it's a great idea to start with the free trial available. Here, we will see the steps to access the free trial offered by Microsoft Copilot Studio.
What is a Free Trial in Copilot Studio?
The free trial in Microsoft Copilot Studio allows customers to enjoy lots of those capabilities firsthand, enabling a knowledgeable selection before moving to a paid plan. Microsoft Copilot Studio integrates with Microsoft 365 and enhances productivity through its AI-powered features assisting. You can perform tasks like rigorous content creation, automating repetitive tasks, and optimising workflows throughout teams.
Prerequisites to Start the Free Trial
There are a few prerequisites you need to ensure. It's good to check before getting into a free trial, so that you can get a smooth experience.
1. Microsoft Account
You'll need a valid Microsoft 365 account to start the Copilot Studio trial. If you do not have one, visit the Microsoft Account Creation Page.
2. Eligible Subscription Plans
Some subscription plans come with free access to Copilot Studio. Users subscribed to the following Microsoft 365 plans are eligible to start a free trial −
- Microsoft 365 Business Standard
- Microsoft 365 Business Premium
- Microsoft 365 Enterprise Plans (E3, E5)
You can view the full list of subscription plans and their benefits here.
3. System Requirements
Ensure your device meets the minimum system requirements for using Microsoft Copilot Studio −
- Operating System − Windows 10/11 or macOS 10.14 and later
- RAM − 8 GB (recommended)
- Storage − 20 GB available space
- Compatible browsers − Microsoft Edge, Google Chrome (latest versions)
4. Browser Requirements
Using the right browser is essential for an optimal experience. Copilot Studio works best on modern browsers like Microsoft Edge or Google Chrome.
Steps to Start the Free Trial
Now that youve ensured the prerequisites are in place, heres how to begin your free trial of Microsoft Copilot Studio −
Step 1: Navigate to the Copilot Studio Page
- Go to the official Copilot Studio Free Trial Page.
- Find the sign-up section for the trial.
- You can also access this from the Microsoft 365 dashboard under the Copilot Studio section.
Step 2: Sign In or Create an Account
- Sign in directly and access the demo version if you have a Microsoft 365 account. Or else set up your account in the Microsoft accounts portal.
- Once logged in, you will be directed to the free trial setup page.
Step 3: Apply for the Free Trial
- Fill out the necessary details like your name, email, etc. to start the trial.
- This process requires only a few minutes and then you will receive a confirmation email, in your given account regarding the free trial.
Step 4: Setting Up Copilot Studio
- You can start the setup of your Microsoft Copilot Studio with our Copilot Setup Guide.
- If you have a 365 plan in your same email ID, then it shows all those applications inside your Copilot interface.
- Also, theres a very good guide provided by Microsoft, for setting up your customizations and other documentation.
Features Available in the Free Trial
During your trial period, you may have to get entry to numerous key capabilities that supply a glimpse into Copilot Studios full potential −
1. AI-Powered Assistance
Experiment with AI-powered equipment that can automate repetitive tasks and offer many tips and suggestions for better productivity.
2. Collaboration Tools
Use the built-in collaboration capabilities to decorate teamwork throughout initiatives. Whether you are working in real-time with colleagues or coordinating throughout departments, the tool makes it less difficult to live aligned.
3. Limited-Time Features
Some top-class functions like many superior automation alternatives, can be available for the duration of the trial only. However, they will be restricted as soon as the trial ends unless you upgrade to a paid plan.
Free Trial Limitations
While the free trial is robust, there are some limitations to keep in mind −
- Trial Duration − The free trial typically lasts 30 days. Be sure to explore all features within this time.
- Restricted Features − A few advanced features may have limited access during the trial, such as certain data integration tools or project management add-ons.
Common Issues and Troubleshooting
If you encounter any difficulties while signing up or using the free trial, here are a few common solutions −
- Sign-In Issues − Ensure that your browser is updated and compatible. Clear your cache if you face problems logging in.
- Free Trial Not Activating − Double-check that your Microsoft 365 subscription is eligible for the trial. Visit the support page for more help.
For further assistance, you can reach out to the Microsoft Support Team.
Next Steps After the Free Trial
Once your free trial ends, youll have the option to −
- Upgrade to a Paid Plan − You can upgrade to a paid plan in order to continue using all the features of Copilot Studio. You can see the pricing here.
- Retain Work Done − Ensure that any work or projects youve started are saved or exported before the trial ends, so you dont lose progress.
Starting a free trial of Copilot Studio is an awesome way to discover its progressive features and experience. By following the simple steps above, youll be capable of setting up your trial in minutes.
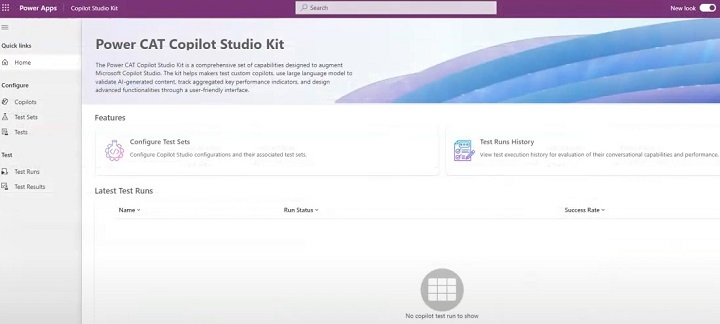
Power CAT Copilot Studio Kit
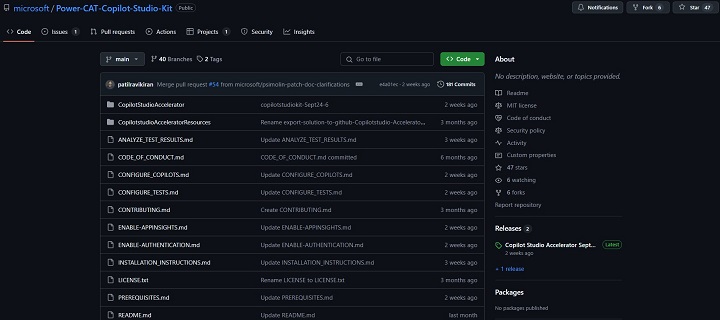
For Microsoft Copilot users, the Power CAT Copilot Studio Kit is an essential tool that provides a set of resources, templates and guides to accelerate the development of custom Copilots. In this tutorial, we will see what Power CAT Copilot Studio Kit is and the steps to integrate it with your Copilot Studio.
The Power CAT Copilot Studio Kit, available on GitHub, is a vital resource designed by Microsoft to empower developers and citizen developers in building custom Copilots using the Power Platform. The kit provides tools, templates, and connectors, allowing users to accelerate the development process by leveraging AI capabilities within the Microsoft ecosystem.

Source: https://github.com/microsoft/Power-CAT-Copilot-Studio-Kit?tab=readme-ov-file
What is the Power CAT Studio Kit?
The Power CAT (Customer Advisory Team) Studio Kit is a set of open-source resources that help Power Platform users integrate AI and Copilot features into their applications. You can access the kit here. The kit includes −
- Sample Projects − There are many sample projects and pre-built templates available for you to make custom Copilots.
- Connectors − Also there are many tools available for integrating Power Apps, Power Automate, Power Virtual Agents, and other services with your Copilot Studio.
- AI Models − Templates use AI models for many use cases in order to integrate with your project.
- Automation Workflows − Custom automation is also there, which saves you a lot of time by preparing automation for repetitive tasks.
By integrating this kit, you can build more intelligent and responsive applications and AI-driven smart Copilots.
Prerequisites for Using the Power CAT Studio Kit
- Microsoft 365 Subscription − Essential for accessing Power Apps, Power Automate, and other platform services.
- Power Platform Environment − Ensure that your Power Platform environment is set up and configured.
- Azure Subscription − Required for hosting any external services and connecting to AI models or data.
- Access to Copilot Studio − You need access to Microsoft Copilot Studio to develop and manage your custom Copilots.
- Git Installed − To clone and manage the Power CAT Studio Kit repository.
Steps to Integrating Power CAT Studio Kit
Here's a streamlined process to guide you through −
Step 1: Clone the Power CAT Studio Kit Repository
First, you need to clone the repository to your local machine to access all the templates and tools −
- Open a terminal or Git Bash on your system.
- Run the following command to clone the repository.
git clone https://github.com/microsoft/Power-CAT-Copilot-Studio-Kit.git
After cloning, navigate to the cloned directory.
cd Power-CAT-Copilot-Studio-Kit
Step 2: Understanding the Structure of the Kit
Once you have the repository, familiarise yourself with its core components −
- /Samples − This folder contains several pre-built sample projects, such as custom AI-driven Copilots for specific tasks.
- /Connectors − Includes API connectors for services like Power BI, SharePoint, and Azure.
- /Workflows − Pre-configured workflows that can be imported into Power Automate.
- /AI Models − This folder includes templates for integrating with machine learning models hosted on Azure.
Here, each of the folders has a README file that explains the purpose of the resources and how to use them effectively.
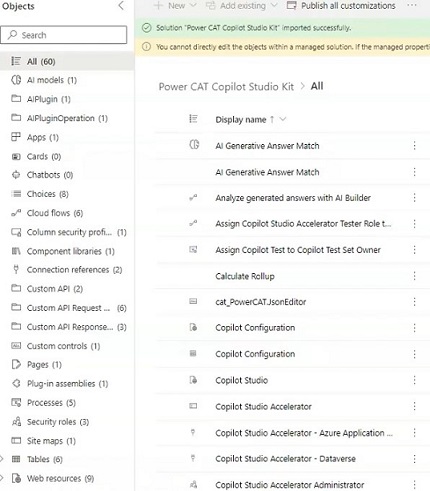
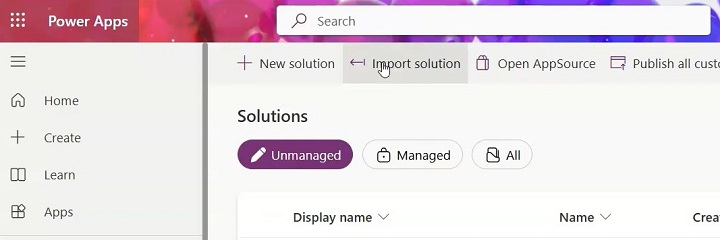
Step 3: Importing Sample Projects into Power Platform
- Log in to Power Apps − Login with your Microsoft 365 credentials by navigating to the Power Apps option in Copilot Studio.
- Create a New App − Select Create > Canvas App from the Power Apps dashboard.
- Import Sample Files − You can directly Import the .msapp or .zip files from the /Samples folder of the Studio Kit to Power Apps. For example, if you're using the Expense Tracking Copilot sample, upload the files corresponding to this project.
- Customise the App − Once the app is uploaded, you can modify it according to your needs. You can integrate AI capabilities, like predictive analytics, using the connectors and workflows provided in the Studio Kit.
Step 4: Setting Up Environment Variables and API Connectors
The sample projects may require environment variables for API connections or credentials. To set these up −
- Navigate to Settings − In Power Apps, go to the app settings and locate the Environment Variables section.
- Set API Credentials − For example, if you're integrating a Power BI dashboard, set your Power BI Workspace ID and API Key in the environment variables.
- Configure API Connectors − Use the connectors provided in the Studio Kit for Power Automate, SharePoint, or external APIs (e.g., Azure Cognitive Services) by following the instructions in the /Connectors folder.
Step 5: Creating Workflows with Power Automate
The Power CAT Studio Kit also includes pre-built workflows designed for Power Automate. To integrate these −
- Open Power Automate
- Upload the .zip files from the /Workflows.
- Here, you can modify the workflows to automate processes in your Copilot. For example, you could automate approval requests or notifications triggered by Copilot interactions.
- Once you customise the workflow, link it with your Power Apps or Power Virtual Agents.
Step 6: Integrating AI Models
To integrate AI capabilities into your Copilots, the Studio Kit provides templates for connecting to AI models.
- Use the connectors provided to link your Copilot to Azure Cognitive Services for AI-driven power tools, such as text analytics or predictive analysis.
- If you have custom models, follow the instructions in the /AI Models folder to integrate them with Power Platform tools. Set up Azure Machine Learning and link it with Power BI or Power Apps to create intelligent insights within your apps.
Step 7: Testing and Validating the Copilot
After completing the integration of sample projects, connectors, workflows, and AI models, it's essential to test the Copilot −
- Run the App − In Power Apps, run the Copilot to ensure that it functions as expected.
- Check API Connections − Validate that all API calls (e.g., Power BI, SharePoint) are successful.
- Test Automation − Ensure that workflows in Power Automate trigger as intended and that tasks are being automated efficiently.
- AI Predictions − If you're using AI models, verify the accuracy of predictions and insights generated by the Copilot.
Step 8: Deploying the Copilot
Once testing is complete, you can deploy the app to your production environment −
- Publish the App − In Power Apps, select Publish to make the Copilot available to end-users.
- Deploy Connectors and Workflows − Ensure that all API connectors and workflows are also deployed to the appropriate environments in Power Automate.
- Monitor Performance − Use Power Platform's built-in analytics tools or Azure Monitor to track the performance and usage of your custom Copilot.
The Power CAT Copilot Studio Kit offers a robust foundation for developing and integrating AI-driven Copilots within the Power Platform. By following the steps outlined above, you can quickly integrate sample projects, API connectors, and workflows, into your Power Apps and automate complex processes using Power Automate.
Microsoft Copilot Studio - Custom Entities
Entities are the backbone of any chatbot or intelligent assistant such as Microsoft Copilot Studio. But what are Entities? An entity is an information unit that can represent real-world subjects or objects like any specific colour or style, country name, continent, postcode, personal information, email, date and time, etc. One thing you need to understand is the Entity is different in Microsoft Power Apps where it represents data or say a table. But here, in Microsoft Copilot Studio, it is completely different and distinct from the terminology used in Power Apps.
Here, we will see how entities can be highly crucial for the Microsoft Copilot Studio in order to increase conversation with a chatbot or increase context awareness. We will see different kinds of entities, their types, custom entities, and their testing.
What are Prebuilt Entities?
Now, lets say you are making a personal chatbot which takes information from the users. Some of the entity examples are
- Username
- Location
- Passport number
- Tax number
- Medicare number
- City, etc.
To capture this information, your chatbot needs to understand if the user who has given an input is email or not. It must recognize the email pattern correctly. Therefore, here comes the prebuilt entities that are predefined by Copilot Studio and can recognize common types of data such as dates, email addresses, and numbers. These entities save time by handling standard data formats, which you dont need to configure manually.
Steps to Access and Use Prebuilt Entities
Follow the below steps to access and use prebuilt entities −
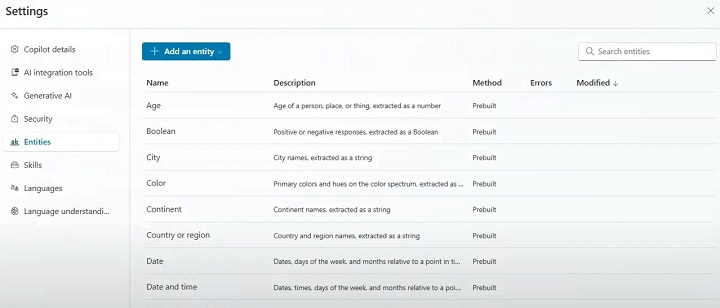
1. Navigate to the Entities Tab −
- Log into Microsoft Copilot Studio and go to Settings > Entities.
2. Browse the Prebuilt List −
- Youll see a list of prebuilt entities like Date, Time, Email, and PhoneNumber. Choose the entity you want to use in your bot conversation.
3. Select and Implement −
- Once selected, integrate the entity by mapping it to your bots prompts. For example, if you want your bot to capture the user's email, insert the prebuilt Email entity in the conversation flow.
4. Test Integration −
- After implementing the entity, use the test chat feature to check if the bot correctly captures and processes the data.
Lets Build Some Custom Entities
Custom entities allow you to define domain-specific data that the bot needs to recognize. For example, in an e-commerce chatbot, you might need to create custom entities for product categories, brands, or item IDs.
Steps to Create Custom Entities
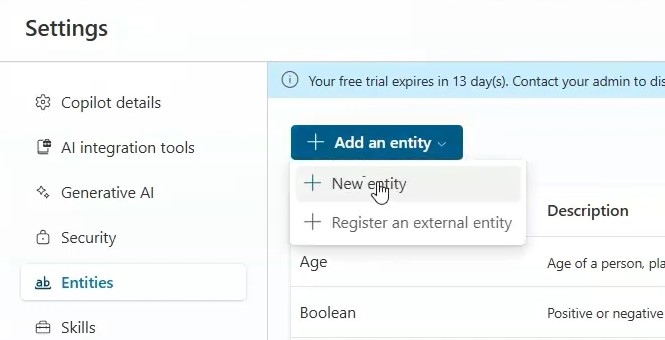
- Go to the 'Entities' Tab and under it, click on the button that says "Create New Entity."
- Name the custom entity based on the information you want it to capture (e.g., ProductID, CustomerName). Choose the entity type, such as text or number.
- If the entity can have multiple variations (e.g., the product can be referred to by different names), list all of its related synonyms to improve recognition accuracy.
- After defining your custom entity, map it to the relevant conversation prompt. For instance, if you created a ProductID entity, use it when the bot asks users for a product number.
- Do the final testing where you need to check the entity's behaviour in the chatbot flow. If the bot doesn’t recognize certain variations, go back and adjust the synonyms or modify the data type by providing new test cases.
Also with the smart matching feature on, you can freely write logic without worrying about grammar errors.

Example
Lets say you want a custom entity to capture "ProductID" in an e-commerce chatbot −
- Name − ProductID
- Type − Text
- Synonyms − Include variations like Item number, SKU, or even shorthand terms that users might input.
What Are Closed List Entities?
Closed list entities represent a predefined set of acceptable values. These are particularly useful when you want to constrain user inputs to specific values, such as a list of product categories, regions, or departments.
Steps to Create Closed List Entities
Create New Entity −
- In the "Entities" tab in your Copilot Studio, click "Create New Entity" and select the option for a "Closed List" entity.
- Add acceptable values for the entity, along with synonyms or related terms for each value. For example, for a ProductCategory entity, you might define values like Electronics, Furniture, Clothing, and so on.
- Use this entity when asking users to choose from specific options in the conversation. The bot will now expect input matching one of the predefined list values.
- Interact with the bot and provide variations of the closed list values to ensure proper recognition.

Example
For a bot in a retail environment, creating a ProductCategory entity could include −
- Electronics (Synonyms: Gadgets, Devices)
- Clothing (Synonyms: Apparel, Wearables)
- Groceries (Synonyms: Food, Consumables)
This will make sure you not only accept input from a predetermined list but handle synonyms efficiently.
How Do Regex Entities Work?
Regex (regular expression) entities allow for the recognition of more complex patterns, like alphanumeric codes or specific formats such as order numbers or postal codes. They are perfect for capturing structured inputs.
Steps to Create Regex Entities
Create a New Entity −
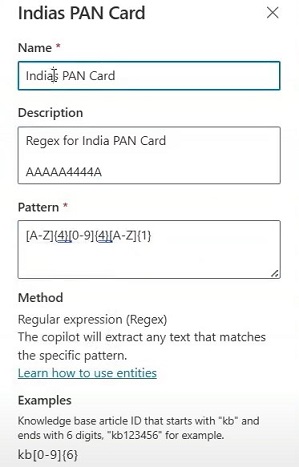
- Click "Create New Entity" and select "RegEx" as the entity type.
- Input the regex pattern. For instance, to capture a 10-digit order number, use the pattern \d{10}. This pattern ensures that only inputs with exactly 10 digits.
- Use this regex entity in a prompt where structured data is expected, like an order ID or tracking number.
- During testing, input both valid and invalid data to ensure the bot recognizes inputs that match the regex pattern while rejecting incorrect formats.
Example
For an order tracking bot, you could create a OrderID regex entity using the pattern −
- Pattern − \d{10} (for a 10-digit order number)
- Example user input − My order number is 1234567890.
Why We Need To Use Entities in Conversation?
Entities are most powerful when integrated into the conversation flow. Because the whole chatbot is based on the Entities and Entity detection algorithms, where it must recognize the users input automatically.
Every time you ask something to ChatGPT or any personal Copilot chatbot, they will understand everything using entities. Our task is to fine-tune those entities so that we can make custom inputs for the users. Hence, allowing the bot to dynamically respond based on the users input.
Steps to Integrate Entities into Conversations
- Select Conversation Step − Identify the point in the conversation where the entity will be used. For example, when asking for an email or product ID, ensure that the correct entity is selected.
- Add the Entity − In the conversation editor, choose the relevant entity (e.g., Email, ProductID) from the drop-down list. This tells the bot to expect data that matches this entity.
- Slot Filling − Enable slot filling to ensure the conversation continues only once the necessary entity has been captured.
- Test Conversation Flow − Interact with the.
Example
A bot asking for a product inquiry might have the following conversation −
- Chatbot − "Please enter your Product ID."
- User − "12345"
- Chatbot − (Captures the ProductID entity and continues the conversation).
What Is Slot Filling?
Slot filling is a crucial mechanism for ensuring that specific data is collected from the user. Without the necessary data (or "slot"), the bot will prompt the user until the information is provided.
Steps
- In the conversation flow, specify which entities are required. For example, Name, Email, and ProductID might be required before proceeding with an order inquiry.
- If the user doesn’t provide the required data, the bot will automatically ask for the missing entity.
- Ensure that the bot only proceeds once all required slots are filled.
Example
In a customer support scenario −
- Chatbot − "What is your name?"
- User − (skips input)
- Chatbot − "Please provide your name to continue.
Testing and Validating Entities
Testing is critical to ensure that entities are properly recognized and processed by your bot. Use the built-in testing tools in Copilot Studio to verify the performance of each entity in your conversation flow.
Steps for Testing Entities
- Use the "Test Chat" feature in Copilot Studio to simulate conversations and see how the bot responds to user inputs.
- Test the bot with various inputs to ensure entities are being captured accurately. Adjust the entity configurations as needed.
- Before deploying your bot, conduct thorough testing in different scenarios to ensure it handles user inputs correctly.
By knowing about these different types of entities with slot filling, you can ensure that your AI Microsoft Copilot Studio-made chatbot captures all the necessary data from users, resulting in more fluid and engaging conversations.
Microsoft Copilot Studio - Trigger Phrases
In todays world where we have powerful automation tools like Microsoft Copilot Studio, trigger phrases play a highly important role in the interaction between the users and the application. In Copilot Studio, trigger phrases serve as the command mechanism that initiates predefined workflows, providing a seamless and efficient way to perform various tasks.
In this tutorial chapter, we will see different trigger phrases, their usage, working and how to set your own trigger phrase in Microsoft Copilot Studio.
What Are Trigger Phrases?
Trigger phrases are specific keywords or short sentences that activate predefined actions or workflows within Copilot Studio. These phrases are designed to make workflows more intuitive, allowing users to start actions by simply typing or speaking certain phrases.
For example, if you want to set up a trigger phrase for generating some report, you can use the phrase Generate daily report. That will automatically pull all the necessary data from the Copilot Studio workflow and produce a report. This saves your time and you do not have to manually create a report.
Why Use Trigger Phrases?
Basically, a trigger phrase helps your Copilot chatbot to understand more about inputs given by users in the same context but asked differently or in a different phrase. Trigger phrases improve workflow efficiency by allowing users to interact with complex systems in a simple, natural manner.
Whether it's automating a sales pipeline, generating reports, or executing repetitive tasks, trigger phrases reduce tedious work and allow users to focus on higher-value output.
List of Common Trigger Phrases
The following is a list of common trigger phrases in Microsoft Copilot Studio −
| Trigger Phrases | Description |
|---|---|
| Phrases | Starts the topic when the copilot receives a message matching topic trigger phrases. |
| Message Received | Starts the topic every time a message is received from the user. |
| Activity Received | Starts the topic when the copilot receives an activity including a message or event. |
| Event Received | Respond to custom client events. |
| Redirect | It starts the topic when it is redirected from another topic. |
| Inactivity | This is for the topic after a period of inactivity from the user. |
| Conversation Update Received | It is based on conversation changes from a client like adding or removing users or channels. |
| Invoke Received | Respond to advance inputs (e.g. Button click in Teams). |
| On Unknown Intent | If none of the topics matches and (If gen AI is enabled). |
To streamline the process, here are some commonly used trigger phrases you can implement −
General Use Cases −
- "Create a repor"
- "Schedule a meeting"
- "Update project status"
- "Send a reminder"
Customer Service −
- "Create support ticket"
- "Log customer feedback"
- "Assign case to agent"
Sales & Marketing −
- "Follow up with a lead"
- "Send email campaign"
- "Update CRM status"
The key here is to ensure that these phrases align with your workflow objectives, making interaction intuitive for the user.
Setting Up Multiple Trigger Phrases
Microsoft Copilot Studio gives you the ability to assign multiple trigger phrases at once to a single workflow, making it flexible and user-friendly. This can be useful when users might use different terminology for the same task.
For instance −
- "Generate daily report"
- "Create todays report"
- "Show daily analytics"
A thing to note here is multiple trigger phrases can trigger the same workflow, giving users the freedom to interact with the system naturally, without needing to remember exact commands.
How to Define Multiple Trigger Phrases?
- Navigate to the Trigger Phrase settings in your workflow.
- Enter your primary phrase (e.g., "Generate daily report").
- Add more trigger phrases using the Add Phrase button. For example, add phrases like "Create todays analytics report" or "Show daily summary" to capture different user intents.
- Save the configuration.
By adding variations, you ensure that the workflow can be triggered through different yet related commands, enhancing usability.
Steps to Set Up Trigger Phrases in Copilot Studio
Lets walk through a demo where we set up trigger phrases to automate a daily report-generation task. Follow these steps precisely −
Step 1 − Log in to your Microsoft Copilot Studio.
Step 2 − Go to your existing Copilot if you have already created it. Or else, you can create a new Copilot using the New > Copilot.
Step 3 − In the dashboard where you created Copilot, you can see the Topics section on the top horizontal bar, click on it.

Step 4 − In the Topics, you can see the Trigger Phrases. If you haven't created any phrase, then hit Topics > Trigger > Phrases > edit, and you can add your trigger phrases.
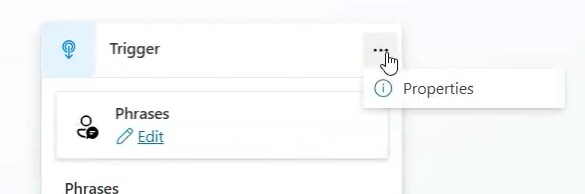
Step 5 − You can configure properties by selecting properties from the three dots in the top corner of the trigger window.
For example, you want to create a menu for any restaurant, and your copilot must understand every user input as a user may input different names for the same dish that he/she wants to get info about. Hence you must define all trigger phrases of that dish as possible.

Step 6 − You can also change the trigger, in order to create some creative triggers like what to do in case of inactivity or when a message is not received, etc. Select Trigger > Phrases > Change Trigger.

For example, here is the inactivity trigger phrase where you can send a message or raise a poll, etc. using the options available.

Step 7 − Save and publish the topic after it is done. You can edit the properties of each trigger with different options provided for more customisations. Remember to save every time you update something.

Best Practices for Trigger Phrases
- Keep Them Short & Relevant − The simpler and more intuitive the trigger phrases, the better. Long or complicated phrases can confuse users.
- Avoid Conflicts − If two workflows have similar trigger phrases, Copilot might have difficulty determining which action to execute. Make sure each phrase is unique to its workflow.
- Regularly Review & Update − Over time, workflows evolve, and so should your trigger phrases. Regularly check in to make sure the phrases are still relevant and user-friendly.
- No Redirection − Do not use triggers for redirecting mid-conversation. Also, do not worry about capitalisation of words or their spelling or plural forms.
- Use Contextual Variations − Add variations of phrases based on common user terminology. For instance, using both Create report and Generate report ensures the workflow can be accessed easily, regardless of user preference.
Trigger phrases are an essential tool in Microsoft Copilot Studio, allowing users to initiate workflows effortlessly and naturally. Fine-tuning your copilot model can be really efficient with the proper use of correct trigger phrases.
Microsoft Copilot Studio - Adaptive Cards
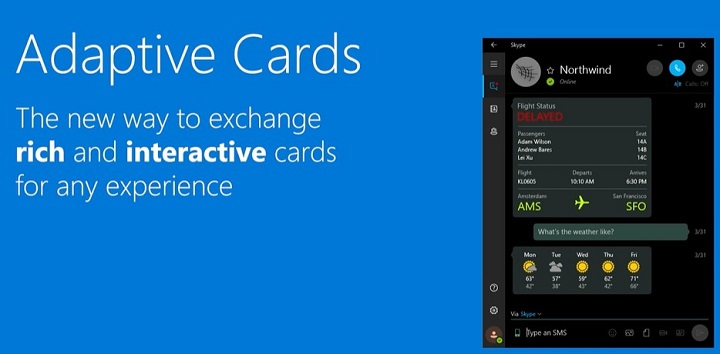
For all the Microsoft Copilot Studio users, the work has become easier for you. If you want to develop custom output for the chatbot, whenever any user interacts with it, you just need to use the pre-built templates. You can also build your custom templates with images to show in the output of your chatbot response. But what are these templates? These are called the Adaptive Cards, which are highly powerful and adaptive JSON-based cards that will allow you to create custom UI elements.
In this tutorial, we will see how these adaptive cards work and how to integrate them with your Copilots to create custom dynamic responses.
Why There Is a Need for Adaptive Cards?

Adaptive cards help you to create a highly dynamic user-friendly UI interface for your Copilot, including elements like buttons, form fields, images, text, etc. which makes your Copilot look fantastic from the first user interaction. These cards are nothing but JSON snippets which can adapt any Microsoft applications UI interface.
For example, some pre-built adaptive cards follow the theme of Microsoft Teams if they are used for it. On the other hand, that same card will adapt itself to any other Microsoft application like Excel or PowerBI.
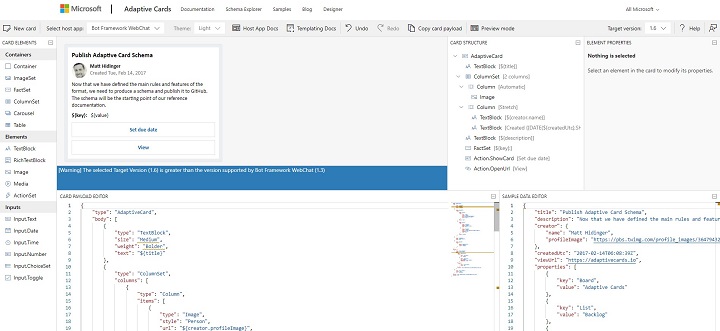
Moreover, you can build your custom cards in real-time by visiting the Adaptive Cards. You can start pasting your logo, any image, or insert elements like buttons, icons, etc. by drag and drop method. Finally, you just have to copy the JSON code and paste it into your Copilot environment.
Prerequisites for Using Adaptive Cards
Before we begin, ensure you have the following −
- Access to Copilot Studio.
- A basic understanding of JSON format.
- Familiarity with Copilot Studios topics and trigger phrases.
- Optional an account with Adaptive Cards Designer for faster prototyping.
A Step-by-Step Guide for Adapting Adaptive Cards
Step 1: Designing the Adaptive Card
Here, you dont need to write the whole JSON code for developing adaptive cards. Heres how you can create your first adaptive card −
Choose a Template or Start Fresh
- Visit the Adaptive Cards Designer.
- You can either choose from pre-built templates (like forms or announcements) or start from scratch by selecting "New Card."
Add Components to Your Card
- Text − Drag a "TextBlock" component to add text.
- Images − You can use the "Image" component to display images or directly paste your copied image onto a card. After that, you can also set the URL property to point to an image source like https://example.com/image.png.
- Input Fields − Adding user input options like text boxes (Input.Text), date pickers (Input.Date), or multiple-choice options (Input.ChoiceSet).
For example, to create a simple feedback form, you might add a TextBlock for instructions, followed by an Input.Text for the users feedback.
Preview Your Design
Once the components are in place, the Designers Preview Panel shows you what the Adaptive Card will look like when rendered in a chatbot. This live preview helps adjust the layout and content.
Copy the JSON
When satisfied, click on the Copy JSON button. This JSON structure defines the card and can be used directly in Microsoft Copilot Studio.
Step 2: Creating a Topic in Microsoft Copilot Studio
With your Adaptive Card JSON ready, the next step is to integrate it into Copilot Studio.
1. Open Copilot Studio
Log in to Copilot Studio and navigate to the Topics section where youll create or modify topics that represent conversational flows.
2. Create a New Topic

- Click on New Topic to create a Phrase.
- Give your topic a clear and descriptive name, such as User Survey.
3. Define Trigger Phrases
Trigger phrases activate the topic. For example, for a feedback form, you might use phrases like −
- "Give feedback"
- "Provide survey"
- "I have commented"
Add several trigger phrases to ensure your chatbot can recognize various ways users might request this action.
Step 3: Integrating the Adaptive Card in Copilot Studio
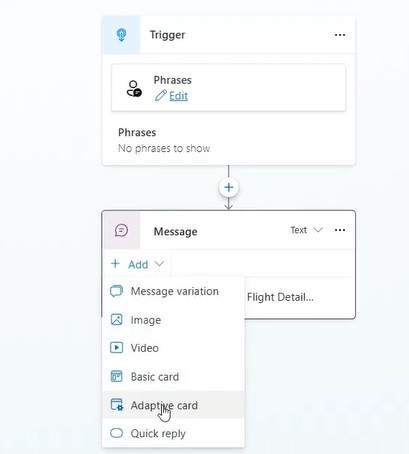
1. Add the Adaptive Card
Within the topic editor, locate the "Add Adaptive Card" option. Youll see a space where you can paste your JSON.
2. Paste the JSON
Paste the JSON that you copied from the Adaptive Cards Designer. Make sure the syntax is correctmismatched brackets or missing commas can cause issues. A well-formed JSON looks like this −
{
   "type": "AdaptiveCard",
   "body": [
      {
         "type": "TextBlock",
         "text": "Please provide your feedback:"
      },
      {
         "type": "Input.Text",
         "id": "feedbackText",
         "placeholder": "Type your feedback here"
      },
      {
         "type": "Action.Submit",
         "title": "Submit"
      }
   ],
   "version": "1.3"
}
3. Test the Card
Before moving forward, click on the "Test" button to simulate the chatbots response when a user triggers this topic. This is a good time to confirm that the card renders correctly and inputs work as expected.
Step 4: Customising the Adaptive Card for User Interaction
Adaptive Cards are not static. You can enrich their functionality with input fields and dynamic responses based on user interactions.
1. Adding Input Fields
Modify the JSON to include input fields for text, choices, or dates. Heres an example of a ChoiceSet for a feedback form −
{
   "type": "Input.ChoiceSet",
   "id": "feedbackType",
   "value": "1",
   "choices": [
      {
         "title": "Bug Report",
         "value": "1"
      },
      {
         "title": "Feature Request",
         "value": "2"
      }
   ]
}
This allows users to choose between different feedback types, such as bug reports or feature requests.
2. Adding Action Buttons
You can add action buttons to your Adaptive Card that trigger events when clicked, such as submitting the form or opening an external link −
{
   "type": "Action.OpenUrl",
   "title": "Learn More",
   "url": "https://example.com"
}
For form submission, use: {
   "type": "Action.Submit",
   "title": "Submit"
}
3. Integrating Variables
If you want to make the card dynamic, you can insert variables from Copilot Studio into your Adaptive Card. For example, you can greet a user by their name −
{
   "type": "TextBlock",
   "text": "Hello, ${username}!"
}
Step 5: Handling Responses from Adaptive Cards
Once users interact with the Adaptive Card, youll want to handle their input in a meaningful way.
1. Action Handlers
After users submit a form or make a selection, you can configure Microsoft Copilot Studio to respond accordingly −
- Redirect them to a confirmation message.
- Trigger another topic.
- Send the input to an API endpoint for processing.
For example, after a feedback form submission, you might redirect the user to a thank-you message −
{
   "type": "TextBlock",
   "text": "Thank you for your feedback!"
}
Step 6: Testing and Publishing the Adaptive Card
1. Preview the Entire Flow
Microsoft Copilot Studio offers a preview mode that allows you to simulate the entire user interaction. Test the flow thoroughly to ensure that the card renders, inputs are processed, and responses are correct.
2. Publish Your Bot
Once satisfied with the design and functionality, click on the Publish button to make your chatbot live. Your Adaptive Card is now integrated and ready to interact with real users!
Advanced Features of Adaptive Cards
Adaptive Cards offer a range of advanced features to make your chatbot even more interactive −
Conditional Elements − You can hide or show components based on user actions, such as displaying additional options only if a user selects a specific choice.
Actionable Cards − Besides submitting forms, Adaptive Cards can trigger workflows, connect with external services, and more.
For more on conditional elements, check out the official documentation.
Best Practices for Designing Adaptive Cards
Version − Make sure you have the version on your Copilot that matches that of your JSON builder. If not, then you can change the Target Version inside the Adaptive Cards website to match the Bot Framework WebChat.

Simplicity is Key − While Adaptive Cards can be feature-rich, avoid overwhelming users with too many inputs or complex designs.
Mobile Optimization − Test the card on both desktop and mobile platforms to ensure responsiveness.
Validate JSON − Always validate your JSON to avoid errors during integration. Use the JSON Validator.
Following these easy steps, you can easily develop custom card responses for your chatbot, making the user interface more advanced and interactive. It's all up to your creativity, and how you want to design your bot framework.
Classic Bot vs Modern Copilot
Continuing the powerful capabilities of Microsoft Copilot Studio, here comes two of the most powerful approaches to making your chatbot framework, i.e. Classic Bot and Modern Copilots. Both these have minor differences and great use according to your framework.
In this tutorial chapter, we will see the distinctions between these two types of bots, how they work, the extensions they support and a detailed comparison of their capabilities. By the end, you will have a clear idea to decide the perfect approach for your project.
What is a Classic Bot in Copilot Studio?
A Classic Bot in Microsoft Copilot Studio is built around rule-based, predefined logic. These bots operate on decision trees, using fixed paths to guide conversations. Classic bots are reliable for simple, repetitive tasks like handling FAQs, basic customer support, or preprogrammed interactions.
Steps for Creating a Classic Bot
- Open Microsoft Copilot Studio and click on the Create Classic Bot option.
- Select from available Prebuilt Templates like Customer Support or FAQ Bot.
- Define Intents and Utterances −
- Intents are actions the bot needs to respond to, such as "Place an Order" or "Get Weather Info".
- Utterances are examples of what users might say to trigger those intentions.
- Set Response Patterns for each intent: Fixed responses based on decision trees.
- Test the bot in the built-in test environment by providing different user inputs and verify the responses match the programmed rules.
Example
If a user asks What is my account balance?, a Classic Bot can return a predefined response, such as Your balance is $1000, based on a fixed rule.
What is Modern Copilot in Copilot Studio?
Unlike Classic Bots, the Modern Copilot takes a machine-learning-driven approach to conversations. Modern Copilots are highly trained on the dataset available to Microsoft with its powerful ML models and AI algorithms which support real-time learning, and context-driven adaptability. They are powered by Microsoft Graph, allowing deep integration with user data and services.
Steps for Creating a Modern Copilot
- Open Microsoft Copilot Studio and navigate to the Create Modern Copilot section.
- Choose the Custom Entities and Machine Learning Models for Contextual Conversations.
- Define flexible conversation paths by allowing the Copilot to dynamically interpret user inputs using natural language processing (NLP).
- Add Context Management for personalised responses based on user data.
- Test the Modern Copilot using the live testing environment with a wide range of inputs to see how the AI adapts and evolves.
- Monitor and tweak responses using AI feedback loops to improve accuracy over time.
Example
When asked "Whats my next meeting?", a Modern Copilot can pull data from the users calendar using Microsoft Graph, offering real-time, personalised responses.
A Modern Copilot can handle a vague request like "Schedule my weekly report", interpret the context, and respond with personalised details based on the user's past interactions or calendar.
One of the main differences between a Copilot and a Classic Bot is the Generative AI feature, which is only available in Modern Copilot.
Real-Life Scenario Based on Classic Bot and Modern Copilot
1. Classic Bot in Action
- User − Sarah, an online banking customer.
- Scenario − Sarah needs to check her account balance and wants to find out the nearest branch of her bank for an in-person visit. She uses her banks customer service chat feature, powered by a Classic Bot.
- Initiation − Sarah opens the banks website and clicks on the chat icon.
User Input − Sarah types, "I need to check my balance".
Classic Bot Response − The Classic Bot has a predefined rule for this query. It checks for specific keywords like balance and responds with −
- "Please enter your account number or log in to your account to view your balance".
User Verification − Sarah enters her account number.
Classic Bot Response − The bot provides a static, predefined response −
- "Your current balance is $5000".
Additional Request − Sarah then asks, "Where is the nearest branch?"
Classic Bot Decision Tree − The bot follows its programmed path and asks Sarah for her zip code. Sarah replies with her zip code.
- Based on the input, the bot fetches a predefined list of branch locations and displays: The nearest branch is at 1234 Main Street, and it is open from 9 AM to 5 PM.
Hence, we can say that the Classic Bot is efficient in handling repetitive, straightforward queries like checking account balances or providing branch details. It operates within a fixed, rule-based framework, making it reliable but limited to predefined interactions.
Sarahs interaction could have been smoother if she needed more dynamic help. For example, if she wanted personalised advice on her account activity or assistance in scheduling a meeting, the bot wouldnt have been able to handle it efficiently without custom rules added for every possible interaction.
2. Modern Copilot in Action
- User − Sam, an employee working remotely.
- Scenario − Sam is working from home and needs to schedule a meeting with his team, pull relevant files from his companys SharePoint, and receive a summary of the last meetings notes. He uses a Modern Copilot integrated into his companys workflow system.
- Initiation − Sam opens his companys internal collaboration app that has the Modern Copilot embedded.
User Input − Sam types, "Schedule a meeting with my team for tomorrow at 10 AM".
Copilot Response − The Modern Copilot, using its natural language processing (NLP) capabilities, interprets Sams request. It connects to Sams calendar via Microsoft Graph and sends out meeting invitations to the team.
- "Your meeting with the team has been scheduled for tomorrow at 10 AM".
User Input − Sam follows up with, Can you pull up the latest project files from SharePoint?
Copilot Action − The Copilot dynamically connects to SharePoint, searches for files related to the ongoing project, and retrieves them in real-time.
- Here are the latest project files from SharePoint: [File1.pdf], [File2.docx]
User Input − Sam then asks, "Give me a summary of the last meetings notes".
Copilot Response − The Modern Copilot pulls the relevant meeting notes from OneNote, processes them using its AI capabilities, and returns a concise summary.
- "Here's a summary of the last meeting: Project Alpha is on track, with a deadline of next Friday".
After completing these tasks, the Copilot updates its knowledge base, learning from Sams preferences and context to offer even more efficient responses in future interactions. Hence, it dynamically processes information, adapting to Sams needs in real-time without requiring predefined rules for each specific action.
Key Differences Between Classic Bot and Modern Copilot
The following table highlights major differences between the Classic Bot and Model Copilot −
| Aspect | Classic Bot | Modern Copilot |
|---|---|---|
| Technology | Rule-based, decision-tree-driven | AI-driven, powered by machine learning and NLP |
| Based On | Power Virtual Agents | New Copilot functionality |
| Generative AI | - | Yes |
| Interface | Old | Modern |
| AI Capabilities | Very Limited | Fully Integrated with AI |
| Solution Management | Uses Topic component | Uses Topic V2 component |
| Plugin Support | - | Yes |
| Interaction Style | Limited to predefined responses and rigid workflows | Dynamic, adaptive, and context-aware interactions |
| Learning Ability | No learning capability; operates solely on predefined rules | Continuous learning through adaptive AI and user behaviour |
| Integration with External Systems | Limited integration, usually requires custom connectors | Deep integration with platforms like Microsoft Graph, SharePoint, OneDrive, etc. |
| Response Flexibility | Fixed responses for specific queries | Real-time, context-sensitive responses |
| Natural Language Understanding (NLU) | Minimal or none | Advanced natural language processing (NLP) |
| Handling Complex Queries | Poor, requires manual escalation | Excellent, can process and resolve complex multi-step requests |
| Context Awareness | Lacks the ability to maintain conversation context | Maintains and builds context over the course of interaction |
| Personalisation | No personalisation; same responses for all users | Tailored responses based on user preferences and history |
| Task Automation | Simple task automation with limited functionality | Advanced task automation with dynamic workflows |
| Scalability | Requires manual rule updates to scale | Scales automatically through AI and ML without manual intervention |
| Data Processing | Minimal; handles only predefined inputs | Real-time data processing from integrated systems |
| Training & Maintenance | Requires continuous manual updates | Self-learning; minimal manual maintenance |
| Error Handling | Follows rigid error paths; often leads to dead ends | Adaptive; offers alternative solutions and recommendations |
| User Experience | Static, repetitive interactions | Fluid, engaging, and personalised experience |
| Context Retention Across Sessions | No session memory; each conversation starts afresh | Retains user context and preferences across sessions |
| Deployment Flexibility | Requires custom deployment on specific platforms | Can be deployed across various environments with ease |
| Migration | Possible | N/A |
| Topics | Manual topic creation | Topic created through Copilots Generative AI |
| Triggers | Just trigger phrases | Supports multiple trigger phrases |
| Event | - | Send event, Send activity, Send HTTP request, Log custom telemetry event. |
In conclusion, both the Classic Bots and Modern Copilots have their own strengths and use cases. If you're looking for simplicity and predictability, Classic Bots may be the way to go. However, if adaptability, real-time learning, and integration with modern data sources are what you need, Modern Copilot is your best bet. Both approaches allow you to build robust conversational agents in Microsoft Copilot Studio, but the choice ultimately depends on your project's complexity and requirements.
Power Automate Flow
Power Automate has become a highly powerful tool in automating several tasks across all Microsoft platforms available. How about connecting those automations with your Microsoft Copilot Studio? You can have access to all your automation flows to collaborate with your chatbot framework and your whole working environment just levels up fantastically. But how to integrate Power Automate with your Copilot Studio?
Here, we will be exploring two different methods to integrate Power Automate within Copilot Studio, and comparing which method will be the best for your environment.
What is Power Automate?
Power Automate is a key tool that automates repetitive workflows by linking various applications and services. It is a cloud-based service by Microsoft that allows users to automate workflows between apps, enabling easier automation of routine tasks.
Whether it's sending automatic notifications, syncing data, or managing approvals, Power Automate enhances productivity by connecting different services like Outlook, SharePoint, Teams, and third-party apps.
You can see the Power Automate documentation here.
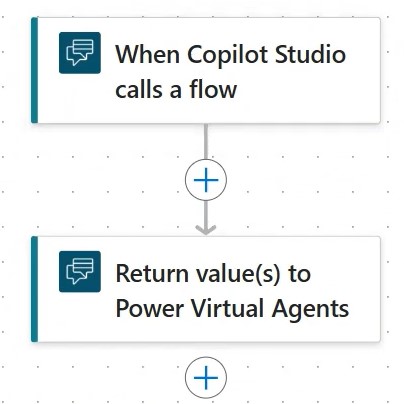
Method 1: Connecting Power Automate Flow from Inside Copilot Studio
This older method allows users to create and connect Power Automate Flows directly within Copilot Flows. What you need to do is directly accessing Power Automate from within Microsoft Copilot Studios interface. You may not get all the features of Power Automate but you can easily generate a flow for the beginning. Here's a step-by-step guide on how to do it −
Steps to Integrate Power Automate
- Open Microsoft Copilot Studio.
- Open your pre-build Copilot or you can make one.
- Inside the Copilot, navigate to the Flows section.
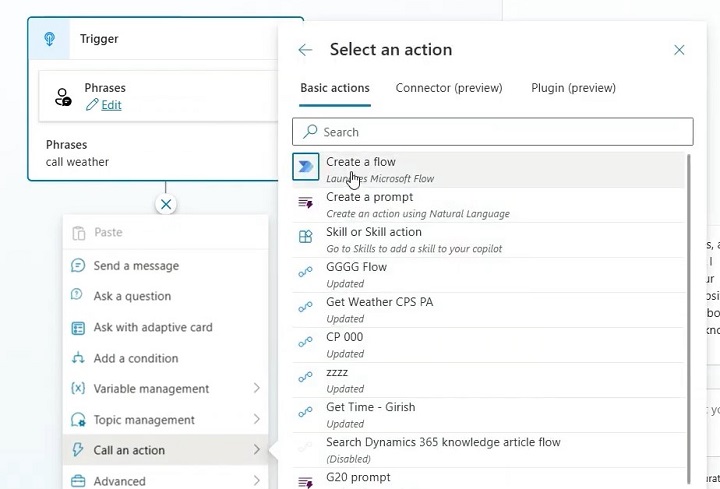
- Create a New Copilot Flow: Select the option to create a new flow within Copilot Studio.
- Click Add a Power Automate Flow.
- Once inside the flow editor, choose Power Automate from the list of available automation tools.
- Define triggers and actions inside Copilot Studio using Power Automate's built-in connectors.
- Select a trigger (e.g., an event in Microsoft Teams or SharePoint) and configure the action (e.g., send an approval request or sync data).
- Test the flow directly within Copilot Studio by simulating user inputs and responses.
- Validate that the automation performs as expected and make any necessary adjustments.
Limitations of the This Method
- Restricted design capabilities compared to building the flow directly in Power Automate.
- Limited flexibility and UI options.
- Example: Automating approval workflows directly in Copilot without much customisation beyond built-in templates.
Method 2: Create a Flow Separately in Power Automate, Then Import to Copilot Studio
This modern method is more flexible and allows you to leverage Power Automates full feature set, creating a flow externally and then importing it into Microsoft Copilot Studio. This method provides a modernised UI and greater customisation options.
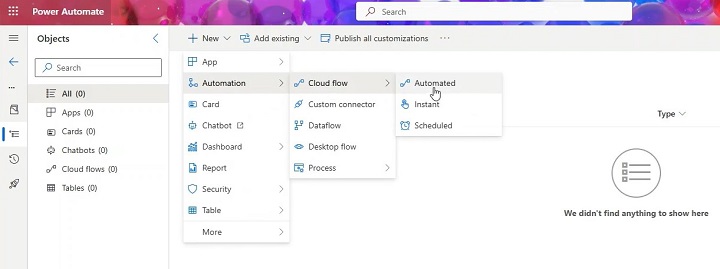
Steps for Creating a Flow in Power Automate (Separately)
- Log into your Power Automate portal with your Microsoft account
- Inside it, create a New Flow:
- Choose the type of flow based on your requirement (e.g., automated, instant, scheduled). Let's choose an Automated Flow for now.
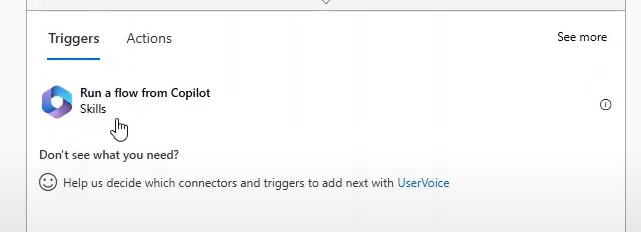
- You must select a trigger that starts the flow. This can be receiving an email in Outlook or a new file added to SharePoint, you must select the trigger accordingly.
- Once a trigger is selected, configure actions like sending an email, updating a record, or generating a notification.
- You can use conditions, loops, and approvals to enhance the flow.
- Before integrating it with Microsoft Copilot Studio, test the flow inside Power Automate to ensure it functions correctly.
- Go to the Test section and run the flow using sample data.

Steps for Importing the Built Flow to Copilot Studio
- Open Copilot Studio
- Go to your Copilot where you want to integrate Power Flow
- Open Copilot and navigate to the Flows section.
- Select the option to Import an Existing Power Automate Flow.
- In Copilot Studio, find the Import Flow button.
- Now select the Power Automate Flow you created earlier.
- Configure it by linking it to the Copilot inputs and outputs. For instance, you can have a customer query trigger the flow or a chatbot response initiate an action.
- Run a live test of the imported Power Automate Flow to ensure it operates as expected within Copilot Studio.
- Verify that Copilot can trigger the flow and process the automation seamlessly.

Advantages of This Approach
- Allows for more flexibility and customisation.
- Leverages Power Automates full range of connectors, including custom-built flows.
- Provides a modern UI and a more user-friendly design for managing automation.
- Example: An advanced data-syncing workflow between SharePoint and Dynamics 365 that triggers automatic notifications and records updates inside Copilot Studio.
Comparison Between Both the Methods
The following table highlights the major differences between these methods −
| Feature | Create Flow in Copilot Studio | Import Flow from Power Automate |
|---|---|---|
| Design Flexibility | Limited to In-Copilot connectors | Full access to Power Automate features |
| UI | Basic and restricted | Modern and highly customisable |
| Integration | Direct but limited | Advanced and flexible |
| Triggers & Actions | Standard actions available | Full range of Power Automate triggers |
| Customisation | Minimal customisation | Fully customisable with conditional logic |
| Testing & Debugging | Basic testing within Copilot | Advanced testing within Power Automate |
Use Cases of Power Automate Flows in Copilot Studio
Integrating Power Automate with Copilot Studio opens up a range of automation possibilities. Some examples include −
- Automated Approvals − A user submits a request via Copilot, and Power Automate sends approval requests to the manager.
- Notifications − Automatically notify teams of key events triggered within Copilot, such as new customer queries.
- Data Syncing − Sync user input from Copilot into SharePoint or Dynamics 365, ensuring seamless data consistency.
Connecting Power Automate with Microsoft Copilot Studio brings immense power to your workflows, allowing the automation of complex processes with minimal effort. The second method offers greater flexibility, customisation, and a better UI experience, making it the recommended approach for most users. Whichever method you choose, Power Automate helps streamline processes, saving time and effort across the board.
Share Your Copilot-built
Collaboration is key when building a Copilot. In Copilot Studio, the sharing process is very easy and efficient but highly secure, ensuring that only the right people gain access to your Copilot builds. In this tutorial chapter, you will see how to integrate your builds with other developers, whether you're collaborating with internal team members or external partners. This guide covers every step, from permissions setup to secure sharing practices.
Understanding Security Features in Copilot Studio
Microsoft Copilot Studio holds a very advanced security system which includes role-based access control with powerful encryption for handling data vulnerability.
Role-Based Access Control
When you provide access to your Copilots to any other developer, the access permissions are based on the roles. This means that the users can be assigned access according to their work and responsibilities. These roles typically include −
- Viewer − With this access, the user can view the Copilot but cannot make modifications.
- Editor − Here, the user can modify the Copilot but cannot manage its settings.
- Owner − Full control, including the ability to share and manage permissions.
Data Encryption and Security
Microsoft Copilot Studio uses Microsofts enterprise-grade encryption to secure Copilot builds and their shared access. This ensures that data is safe even when shared externally.
Setting Permissions for Sharing Built Copilots
One of the most crucial aspects of sharing a Copilot is configuring the correct permissions. This not only controls who can view or edit the Copilot but also determines who can further share or modify the settings.
Steps to Configure Permissions
- Open Copilot Studio and navigate to the dashboard.
- Select the Copilot you wish to share.
- Click on the Settings or Permissions tab.
- In the Permissions section, assign users to roles: Viewer, Editor, or Owner.
- customise permissions for each role if necessary, by selecting Custom Permissions.
- Once all roles and permissions are set, click Apply to save the settings.
Example − If youre working with a data analyst team, you may want them to have Editor permissions to adjust the Copilots logic but restrict them from sharing or deleting the build.
Sharing a Built Copilot Among Team Members
Sharing a Copilot within your organisation is a straightforward process but comes with fine-grained control to ensure the right people get the appropriate level of access.
Steps to Share Copilot with Team Members
- Navigate to the Copilot's Settings: From your dashboard, click on the Copilot you want to share.
- Click on the "Share" Option: This may also appear as Manage Access depending on your Studio version.
- Add Team Members: Input the team members email address or username from your directory.
- Select whether they should be Viewers, Editors, or Owners.
- Choose to send an email or in-app notification to alert them of the shared access.
- Click "Share" to complete the process.
Example − This is applicable when you're working on an AI-enhanced chatbot and you want to share the build with your data scientists and assign them Editor roles, so they can tweak the bots ML models.
Sharing Copilot with External Organizations
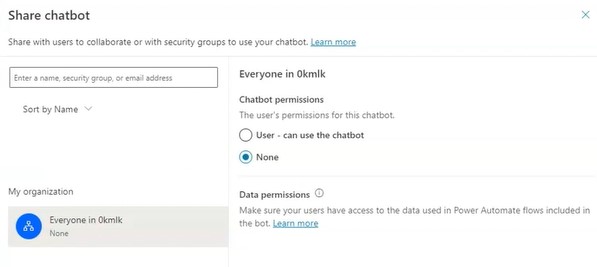
When you need to collaborate with external vendors or partners, Microsoft Copilot Studio allows for secure external sharing.

Steps for External Sharing
- Open the settings for the specific Copilot you want to share.
- Under the Sharing Options section, toggle the option to allow External Sharing.
- Enter the external user’s email. If they belong to another organisation, ensure their domain is approved for sharing.
- Just as with internal team members, assign them Viewer, Editor, or Owner roles.
- Ensure that external users have limited access to sensitive data or advanced settings, depending on the need.
- Once satisfied with the setup, send them an invitation to collaborate.
Tracking and Auditing Shared Copilots
Tracking who accesses your Copilot is essential, especially in high-security environments. Copilot Studio provides robust auditing features to monitor every action taken on shared Copilots.
- Access the Audit Logs − You can track the logs by navigating to the Admin Panel and clicking on Audit Logs.
- Review Activity − Look for any activity related to the shared Copilot, such as login attempts, file changes, or permission modifications.
- Set Up Alerts − Configuring alerts can be really helpful to you so that you will be notified of unusual activity, such as failed login attempts or unauthorised data access.
- Generate Reports − Download activity logs periodically for internal audits.
Revoking Access or Modifying Permissions
Sometimes you may need to revoke access or downgrade someones permissions. This could be because a project ends, or someone no longer requires the same level of access.
Steps to Revoke or Change Permissions
- Navigate to the Copilots settings where you previously managed access.
- Find the user or organisation whose access you want to modify or revoke.
- Either lower their role (e.g., from Editor to Viewer) or remove their access entirely.
- After making adjustments, save the settings.
- Finally, you can send a notification informing them that their access has been altered.
If you want to give access to a user who only needs it temporarily, you can use the time-limited access feature. This will automatically revoke their permissions after a set period.
Best Practices for Sharing Built Copilots
To ensure your Copilot remains secure when shared, follow these best practices −
- Limit External Sharing − Only share Copilots with external users if absolutely necessary.
- Use Role-Based Access − You must ensure that you give only the required permissions to other users to complete their tasks, keeping it as minimal as possible.
- Regular Audits − Also conduct periodic reviews of the shared Copilots audit logs to spot unauthorised access.
- Access Reviews − Regularly review users' roles to ensure their access remains appropriate as their job duties evolve.
Sharing your built Copilot in Microsoft Copilot Studio is a powerful feature, enabling collaboration while maintaining strict security controls. With role-based access, auditing capabilities, and detailed permission settings, you can confidently share your builds with both internal teams and external organisations, knowing your data and configurations are secure.
