- Copilot Studio - Home
- Build Your First Copilot
- Copilot Studio - Free Trial
- Power CAT Copilot Studio Kit
- Copilot Studio - Custom Entities
- Copilot Studio - Trigger Phrases
- Copilot Studio - Adaptive Cards
- Classic Bot vs Modern Copilot
- Copilot Studio - Power Automate Flow
- Share Your Copilot-built
Microsoft Copilot Studio - Custom Entities
Entities are the backbone of any chatbot or intelligent assistant such as Microsoft Copilot Studio. But what are Entities? An entity is an information unit that can represent real-world subjects or objects like any specific colour or style, country name, continent, postcode, personal information, email, date and time, etc. One thing you need to understand is the Entity is different in Microsoft Power Apps where it represents data or say a table. But here, in Microsoft Copilot Studio, it is completely different and distinct from the terminology used in Power Apps.
Here, we will see how entities can be highly crucial for the Microsoft Copilot Studio in order to increase conversation with a chatbot or increase context awareness. We will see different kinds of entities, their types, custom entities, and their testing.
What are Prebuilt Entities?
Now, lets say you are making a personal chatbot which takes information from the users. Some of the entity examples are
- Username
- Location
- Passport number
- Tax number
- Medicare number
- City, etc.
To capture this information, your chatbot needs to understand if the user who has given an input is email or not. It must recognize the email pattern correctly. Therefore, here comes the prebuilt entities that are predefined by Copilot Studio and can recognize common types of data such as dates, email addresses, and numbers. These entities save time by handling standard data formats, which you dont need to configure manually.
Steps to Access and Use Prebuilt Entities
Follow the below steps to access and use prebuilt entities −
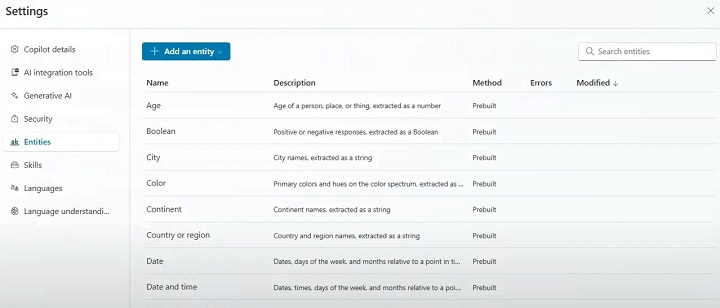
1. Navigate to the Entities Tab −
- Log into Microsoft Copilot Studio and go to Settings > Entities.
2. Browse the Prebuilt List −
- Youll see a list of prebuilt entities like Date, Time, Email, and PhoneNumber. Choose the entity you want to use in your bot conversation.
3. Select and Implement −
- Once selected, integrate the entity by mapping it to your bots prompts. For example, if you want your bot to capture the user's email, insert the prebuilt Email entity in the conversation flow.
4. Test Integration −
- After implementing the entity, use the test chat feature to check if the bot correctly captures and processes the data.
Lets Build Some Custom Entities
Custom entities allow you to define domain-specific data that the bot needs to recognize. For example, in an e-commerce chatbot, you might need to create custom entities for product categories, brands, or item IDs.
Steps to Create Custom Entities
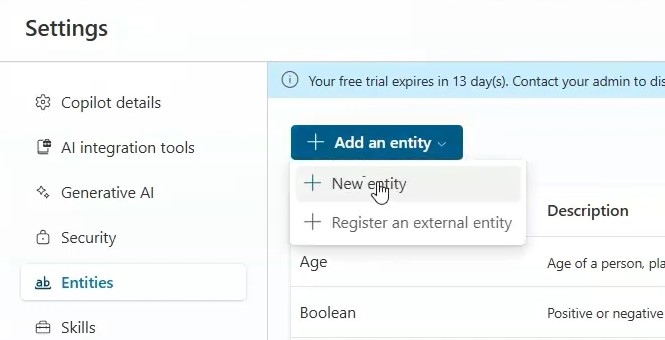
- Go to the 'Entities' Tab and under it, click on the button that says "Create New Entity."
- Name the custom entity based on the information you want it to capture (e.g., ProductID, CustomerName). Choose the entity type, such as text or number.
- If the entity can have multiple variations (e.g., the product can be referred to by different names), list all of its related synonyms to improve recognition accuracy.
- After defining your custom entity, map it to the relevant conversation prompt. For instance, if you created a ProductID entity, use it when the bot asks users for a product number.
- Do the final testing where you need to check the entity's behaviour in the chatbot flow. If the bot doesn’t recognize certain variations, go back and adjust the synonyms or modify the data type by providing new test cases.
Also with the smart matching feature on, you can freely write logic without worrying about grammar errors.

Example
Lets say you want a custom entity to capture "ProductID" in an e-commerce chatbot −
- Name − ProductID
- Type − Text
- Synonyms − Include variations like Item number, SKU, or even shorthand terms that users might input.
What Are Closed List Entities?
Closed list entities represent a predefined set of acceptable values. These are particularly useful when you want to constrain user inputs to specific values, such as a list of product categories, regions, or departments.
Steps to Create Closed List Entities
Create New Entity −
- In the "Entities" tab in your Copilot Studio, click "Create New Entity" and select the option for a "Closed List" entity.
- Add acceptable values for the entity, along with synonyms or related terms for each value. For example, for a ProductCategory entity, you might define values like Electronics, Furniture, Clothing, and so on.
- Use this entity when asking users to choose from specific options in the conversation. The bot will now expect input matching one of the predefined list values.
- Interact with the bot and provide variations of the closed list values to ensure proper recognition.

Example
For a bot in a retail environment, creating a ProductCategory entity could include −
- Electronics (Synonyms: Gadgets, Devices)
- Clothing (Synonyms: Apparel, Wearables)
- Groceries (Synonyms: Food, Consumables)
This will make sure you not only accept input from a predetermined list but handle synonyms efficiently.
How Do Regex Entities Work?
Regex (regular expression) entities allow for the recognition of more complex patterns, like alphanumeric codes or specific formats such as order numbers or postal codes. They are perfect for capturing structured inputs.
Steps to Create Regex Entities
Create a New Entity −
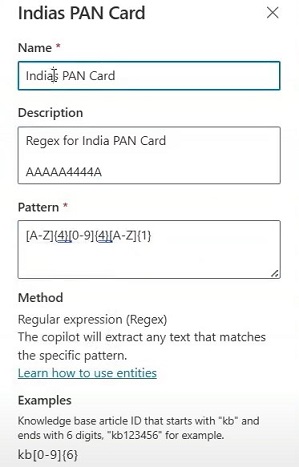
- Click "Create New Entity" and select "RegEx" as the entity type.
- Input the regex pattern. For instance, to capture a 10-digit order number, use the pattern \d{10}. This pattern ensures that only inputs with exactly 10 digits.
- Use this regex entity in a prompt where structured data is expected, like an order ID or tracking number.
- During testing, input both valid and invalid data to ensure the bot recognizes inputs that match the regex pattern while rejecting incorrect formats.
Example
For an order tracking bot, you could create a OrderID regex entity using the pattern −
- Pattern − \d{10} (for a 10-digit order number)
- Example user input − My order number is 1234567890.
Why We Need To Use Entities in Conversation?
Entities are most powerful when integrated into the conversation flow. Because the whole chatbot is based on the Entities and Entity detection algorithms, where it must recognize the users input automatically.
Every time you ask something to ChatGPT or any personal Copilot chatbot, they will understand everything using entities. Our task is to fine-tune those entities so that we can make custom inputs for the users. Hence, allowing the bot to dynamically respond based on the users input.
Steps to Integrate Entities into Conversations
- Select Conversation Step − Identify the point in the conversation where the entity will be used. For example, when asking for an email or product ID, ensure that the correct entity is selected.
- Add the Entity − In the conversation editor, choose the relevant entity (e.g., Email, ProductID) from the drop-down list. This tells the bot to expect data that matches this entity.
- Slot Filling − Enable slot filling to ensure the conversation continues only once the necessary entity has been captured.
- Test Conversation Flow − Interact with the.
Example
A bot asking for a product inquiry might have the following conversation −
- Chatbot − "Please enter your Product ID."
- User − "12345"
- Chatbot − (Captures the ProductID entity and continues the conversation).
What Is Slot Filling?
Slot filling is a crucial mechanism for ensuring that specific data is collected from the user. Without the necessary data (or "slot"), the bot will prompt the user until the information is provided.
Steps
- In the conversation flow, specify which entities are required. For example, Name, Email, and ProductID might be required before proceeding with an order inquiry.
- If the user doesn’t provide the required data, the bot will automatically ask for the missing entity.
- Ensure that the bot only proceeds once all required slots are filled.
Example
In a customer support scenario −
- Chatbot − "What is your name?"
- User − (skips input)
- Chatbot − "Please provide your name to continue.
Testing and Validating Entities
Testing is critical to ensure that entities are properly recognized and processed by your bot. Use the built-in testing tools in Copilot Studio to verify the performance of each entity in your conversation flow.
Steps for Testing Entities
- Use the "Test Chat" feature in Copilot Studio to simulate conversations and see how the bot responds to user inputs.
- Test the bot with various inputs to ensure entities are being captured accurately. Adjust the entity configurations as needed.
- Before deploying your bot, conduct thorough testing in different scenarios to ensure it handles user inputs correctly.
By knowing about these different types of entities with slot filling, you can ensure that your AI Microsoft Copilot Studio-made chatbot captures all the necessary data from users, resulting in more fluid and engaging conversations.
