
Article Categories
- All Categories
-
 Data Structure
-
 Networking
-
 RDBMS
RDBMS
-
 Operating System
-
 Java
Java
-
 MS Excel
-
 iOS
iOS
-
 HTML
HTML
-
 CSS
CSS
-
 Android
-
 Python
-
 C Programming
-
 C++
C++
-
 C#
C#
-
 MongoDB
-
 MySQL
MySQL
-
 Javascript
-
 PHP
PHP
-
 Economics & Finance
How to Export Multiple Columns into Individual Text Files in Excel
Excel is a powerful spreadsheet program developed by Microsoft. It is widely used for organizing, analyzing, and manipulating data in various industries and professions. To export multiple columns into individual text files in Excel, you can use VBA (Visual Basic for Applications) macros.
Here's an example of how you can do it:
Step 1
Press Alt + F11 to open the Visual Basic Editor in Excel.
Insert a new module by clicking on "Insert" and selecting "Module."
In the module window, paste the following code:
Sub ExportColumnsToTextFiles()
   Dim ws As Worksheet
   Dim col As Range
   Dim cell As Range
   Dim outputPath As String

   ' Set the output path where the text files will be saved
   outputPath = "E:\Assignments\3rd Assignments\How to export multiple columns
into individual text files in Excel\Output"

   ' Set the worksheet containing the columns you want to export
   Set ws = ThisWorkbook.Worksheets("Sheet1")

   ' Set the range of columns you want to export (change the range as needed)
   Set col = ws.Range("A:B")

   ' Loop through each column
   For Each cell In col.Columns
      ' Get the last row in the column with data
      Dim lastRow As Long
      lastRow = ws.Cells(ws.Rows.Count, cell.Column).End(xlUp).Row

      ' Check if the column has data
      If lastRow > 1 Then
         ' Create a new text file
         Open outputPath & cell.Column & ".txt" For Output As #1

         ' Loop through each cell in the column up to the last row and write
its value to the text file
         For Each c In ws.Range(ws.Cells(1, cell.Column), ws.Cells(lastRow,
cell.Column))
             Print #1, c.Value
          Next c

          ' Close the text file
          Close #1
      End If
   Next cell

   MsgBox "Columns exported to individual text files."
End Sub

Step 2
Modify the outputPath variable to specify the folder where you want to save the text files. Make sure to include the trailing backslash ().
Modify the Set ws = ThisWorkbook.Worksheets("Sheet1") line to specify the worksheet containing the columns you want to export. Replace "Sheet1" with the name of your worksheet.
Modify the Set col = ws.Range("A:B") line to specify the range of columns you want to export. In this example, columns A to B are selected. Adjust the range as needed.
Close the Visual Basic Editor.
Step 3
Run the macro by pressing Alt + F8, selecting "ExportColumnsToTextFiles," and clicking "Run."
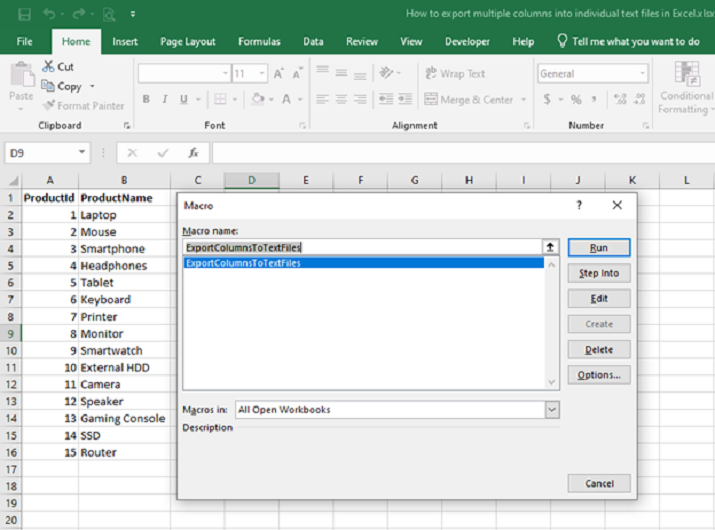
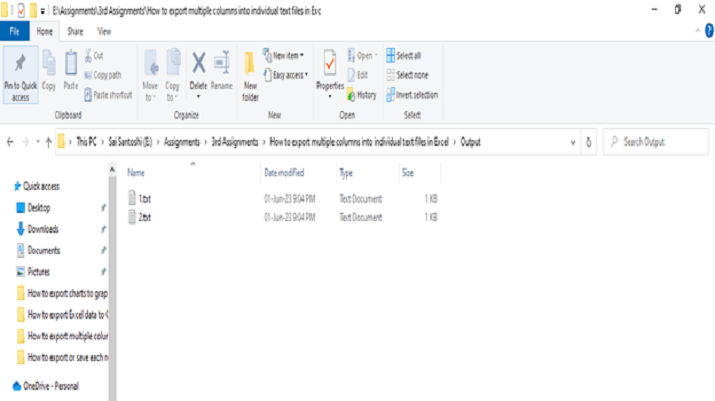
The macro will export each column into an individual text file named after the column number. The text files will be saved in the specified output folder.
Conclusion
The provided VBA code allows you to export multiple columns into individual text files in Excel. By specifying the output path, worksheet, and range of columns, the code loops through each column, determines the last row with data, and exports the column's values up to that row into a separate text file. The corrected version ensures that the loop runs correctly and avoids continuous looping. This solution enables efficient extraction of columnar data, facilitating further analysis or use of the data in external applications.

2K+ Views
