
Article Categories
- All Categories
-
 Data Structure
-
 Networking
-
 RDBMS
RDBMS
-
 Operating System
-
 Java
Java
-
 MS Excel
-
 iOS
iOS
-
 HTML
HTML
-
 CSS
CSS
-
 Android
-
 Python
-
 C Programming
-
 C++
C++
-
 C#
C#
-
 MongoDB
-
 MySQL
MySQL
-
 Javascript
-
 PHP
PHP
-
 Economics & Finance
How to Group or Ungroup Worksheets in Excel?
Grouping sheet in excel is a good feature. By using this feature users can use the data of multiple sheets simultaneously. This feature will save lots of user time. This feature allows users to properly structure the data with the header names mentioned in the column. Once, the user work of the grouped sheet is completed, then the user should need to ungroup the grouped sheets. This will help user to avoid confusion and ambiguities. Let?s go through the below-provided article to understand the use and application of grouped and ungrouped worksheets.
Advantages of the Grouped Worksheet
Writing formulas and modifying multiple sheets at the same time is easy and possible.
Applying formatting at the same time is possible.
Correcting typing mistakes is possible for multiple sheets.
Performing operations such as copy, move, or delete becomes easy.
Grouped sheets can be easily checked, by checking the background of the sheet numbers. If the provided sheets are of white background then these sheets are considered as grouped sheets.
To Show you Some Examples
Example 1
Step 1
To group multiple spreadsheets of a single worksheet. Simply open a spreadsheet file and consider the data and then click on the below-given sheet name as shown in below image.

Step 2
After that press the "CTRL" key and select all the sheets the user wants to combine. For this example, let?s group sheets 1, 2, and 3. After selection, simply release the "Ctrl" key. After the selection, the grouped sheets will appear with a "white" background. Consider the below-given image for reference:
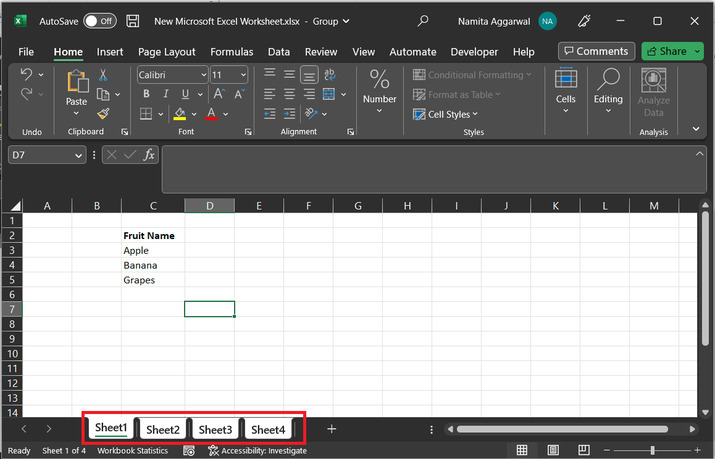
Hence, sheets 1, 2, and 3 are grouped.
Ungrouping of the sheet is important as it allows the user to hide and unhide the selection of rows, or columns safely. It will allow the user to change only the sheet, according to the requirement, extra changes can be made only when the user applies them to another sheet. It is important to ungroup the grouped sheet to save the user from data ambiguity. To make the term "ungroup" easier, it can be defined as the process of releasing the grouped sheets.
Example 2
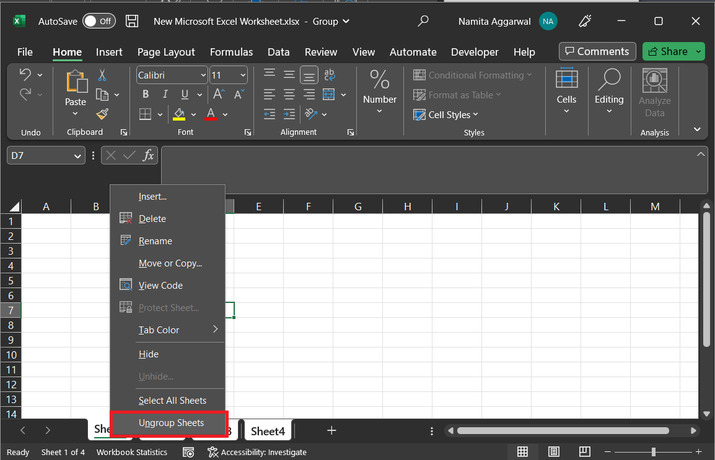
Method 1: To ungroup the sheets:
Step 1
Simply right-click on any grouped sheet. Here, "Sheet2" is used, and click on "ungroup". As given below:
Step 2
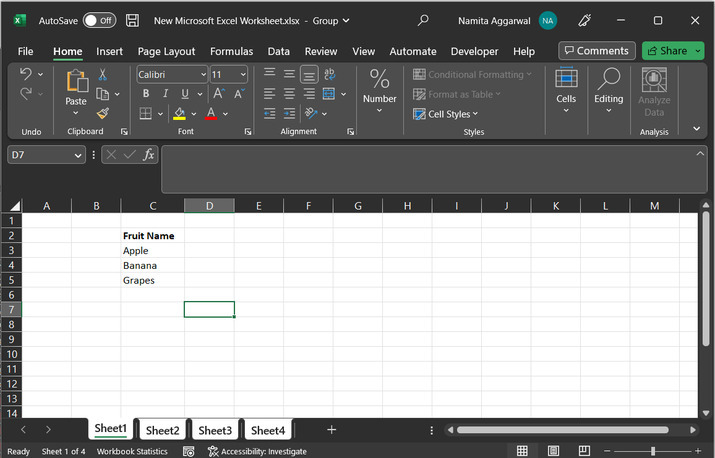
This will ungroup all the grouped sheets, and the sheet will appear normally, as they appear before grouping.

Example 3
Method 2: Ungrouping sheets
Step 1
Consider the below given grouped sheets:
Step 2
Press the Ctrl key and click on grouped sheet number to ungroup the sheet. For this case, user needs to click on "sheet1", "sheet2", and "sheet3". This will ungroup all the sheets and make them look normal, as they were before grouping.
Conclusion
This article provides a simple illustration by using 3 examples. The first example guides the user about how to group and ungroup multiple sheets in excel. Whereas, examples 2, and 3 will guide the user to ungroup the data. Example 2 will allow the user to use the options provided by the MS excel application. while example 3 is a manual way to ungroup the grouped sheets.

489 Views
