 Data Structure
 Networking
 RDBMS
RDBMS Operating System
 Java
Java MS Excel
 iOS
iOS HTML
HTML CSS
CSS Android
 Python
 C Programming
 C++
C++ C#
C# MongoDB
 MySQL
MySQL Javascript
 PHP
PHP
- Selected Reading
- UPSC IAS Exams Notes
- Developer's Best Practices
- Questions and Answers
- Effective Resume Writing
- HR Interview Questions
- Computer Glossary
- Who is Who
How to group autocomplete options in Material UI?
In this article, we will examine how Material UI, a wellliked library for creating user interfaces for React applications, groups autocomplete options. A key component of the Material UI is the Autocomplete component, which facilitates faster data entry by providing suggestions as user's type. Although using autocomplete by default offers a seamless user experience, there are some circumstances in which grouping the autocomplete options can improve the presentation and organization of suggestions.
Let us quickly go over the fundamental organization of the Material UI's Autocomplete component before looking at how to group options. As users type into the input field, the Autocomplete component uses a variety of options to suggest words. Each option typically consists of an object with two properties: label (the text that will appear in the suggestions list) and value (the actual value of the option). The onChange event gives users access to an option's value when they choose it.
Grouping Options in Material UI
We can use the groupBy prop to group options in the Material UI's Autocomplete component. This prop takes a callback function that determines how the options should be grouped. The group label to which the option belongs should be returned by the callback after receiving the option as a parameter.
Props used
options This prop equips the Autocomplete component with an array of options to display. Each option possesses a label property, specifying the text representation for the option.
groupBy The function associated with this prop defines the grouping criteria for the options. By processing the selection, the function yields the group label for that particular selection. The options are thus categorized based on the values returned by this function.
RenderGroup This prop empowers the customization of group headers. By receiving an object with key, group, and child properties, the function returns a React element representing the group header.
Syntax
<Autocomplete
   id="grouped-demo"
   options={options.sort((a, b) => -b.firstLetter.localeCompare(a.firstLetter))}
   groupBy={(option) => option.firstLetter}
   getOptionLabel={(option) => option.title}
   sx={{ width: 300 }}
   renderInput={(params) => <TextField {...params} label="With categories" />}
/>
Example
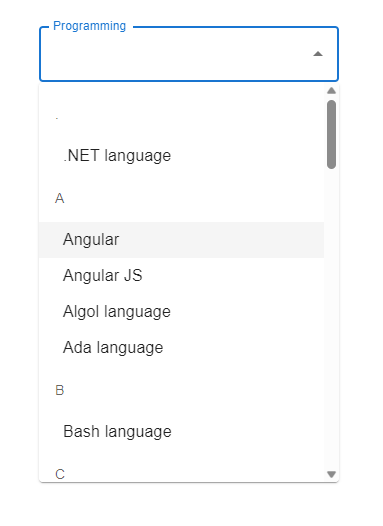
In this example, we present an Autocomplete component allowing users to explore and select programming languages from a predefined list. The options are grouped based on the first letter of each language, enhancing the accessibility and visual coherence of the choices. The options array is formed by mapping through the data array and extracting the first letter and label of each language. The groupBy prop in the Autocomplete component facilitates grouping the options by their first letters.
The renderInput prop customizes the input field's appearance, providing a TextField with the label "Programming." As users type, the Autocomplete filters options and displays the matching ones, neatly arranged by their first letter. The intuitive input field enables users to effortlessly choose a language, enhancing the overall user experience when confronted with an array of possibilities.
import React, { useState } from 'react';
import Autocomplete from '@mui/material/Autocomplete';
import TextField from '@mui/material/TextField';

export default function App() {

   const options = data.map((option) => {
      const firstLetter = option.label[0].toUpperCase();
      return {
         firstLetter: /[0-9]/.test(firstLetter) ? '0-9' : firstLetter,
         ...option,
      };
   });

   return (
      <div
         style={{
            display: "flex",
            marginTop: 40,
            flexDirection: 'column',
            alignItems: "center",
            justifyContent: "center",
         }}>
         <Autocomplete
            id="grouped-demo"
            options={options.sort((a, b) => -b.firstLetter.localeCompare(a.firstLetter))}
            groupBy={(option) => option.firstLetter}
            getOptionLabel={(option) => option.label}
            sx={{ width: 300 }}
            renderInput={(params) => <TextField {...params} label="Programming" />}
         />
      </div>
   );
}

const data = [
   { label: "Java language" },
   { label: "Python language" },
   { label: "C++ language" },
   { label: "C language" },
   { label: "Go language" },
   { label: "JavaScript language" },
   { label: "SQL" },
   { label: "MySQL" },
   { label: "HTML" },
   { label: "CSS" },
   { label: "Nextjs " },
   { label: "ReactJS " },
   { label: "VueJS " },
   { label: "Angular " },
   { label: "Angular JS " },
   { label: "PHP language" },
   { label: "R language" },
   { label: "Objective C language" },
   { label: "Cobol language" },
   { label: "Perl language" },
   { label: "Pascal language" },
   { label: "LISP language" },
   { label: "Fortran language" },
   { label: "Swift language" },
   { label: "Ruby language" },
   { label: "Algol language" },
   { label: "Scala language" },
   { label: "Rust language" },
   { label: "TypeScript language" },
   { label: "Dart language" },
   { label: "Matlab language" },
   { label: "Ada language" },
   { label: ".NET language" },
   { label: "Bash language" },
];
Output

Customizing the Grouped Autocomplete
Further personalizing the grouped Autocomplete is made possible through Material UI's versatile features. By utilizing the renderTags prop, one can modify the visual representation of group labels and even add additional chip components for multiselection of data items.
Syntax
<Autocomplete
   id="grouped-demo"
   options={options.sort((a, b) => -b.firstLetter.localeCompare(a.firstLetter))}
   groupBy={(option) => option.firstLetter}
   getOptionLabel={(option) => option.title}
   sx={{ width: 300 }}
   renderInput={(params) => <TextField {...params} label="With categories" />}
   renderTags={(params) => (
      ?
   )}
/>
To exercise greater control over how groups are rendered, the custom renderGroup prop can be employed. This prop is implemented as a function taking an object with two fields
group A string representing the group name.
children A collection of list items belonging to the group.
Example
import React from 'react';
import Autocomplete from '@mui/material/Autocomplete';
import TextField from '@mui/material/TextField';
import { Chip } from '@mui/material';

export default function App() {
   const data = [
      { label: "Java language" },
      { label: "Python language" },
      { label: "C++ language" },
      { label: "C language" },
      { label: "Go language" },
      { label: "JavaScript language" },
      { label: "SQL" },
      { label: "MySQL" },
      { label: "HTML" },
      { label: "CSS" },
      { label: "Nextjs " },
      { label: "ReactJS " },
      { label: "VueJS " },
      { label: "Angular " },
      { label: "Angular JS " },
      { label: "PHP language" },
      { label: "R language" },
      { label: "Objective C language" },
      { label: "Cobol language" },
      { label: "Perl language" },
      { label: "Pascal language" },
      { label: "LISP language" },
      { label: "Fortran language" },
      { label: "Swift language" },
      { label: "Ruby language" },
      { label: "Algol language" },
      { label: "Scala language" },
      { label: "Rust language" },
      { label: "TypeScript language" },
      { label: "Dart language" },
      { label: "Matlab language" },
      { label: "Ada language" },
      { label: ".NET language" },
      { label: "Bash language" },
   ];

   const options = data.map((option) => {
      const firstLetter = option.label[0].toUpperCase();
      return {
         firstLetter: /[0-9]/.test(firstLetter) ? '0-9' : firstLetter,
         ...option,
      };
   });

   return (
      <div
         style={{
            display: "flex",
            marginTop: 40,
            flexDirection: 'column',
            alignItems: "center",
            justifyContent: "center",
         }}>
         <Autocomplete
            multiple // Allow multiple selections
            id="grouped-demo"
            options={options.sort((a, b) => -b.firstLetter.localeCompare(a.firstLetter))}
            groupBy={(option) => option.firstLetter}
            getOptionLabel={(option) => option.label}
            sx={{ width: 300 }}
            renderInput={(params) => <TextField {...params} label="Programming" />}
            renderTags={(value, getTagProps) =>
               value.map((options, index) => (
                  <Chip
                     label={options.label}
                     {...getTagProps({ index })}
                  />
               ))
            }
         />
      </div>
   );
}
Output

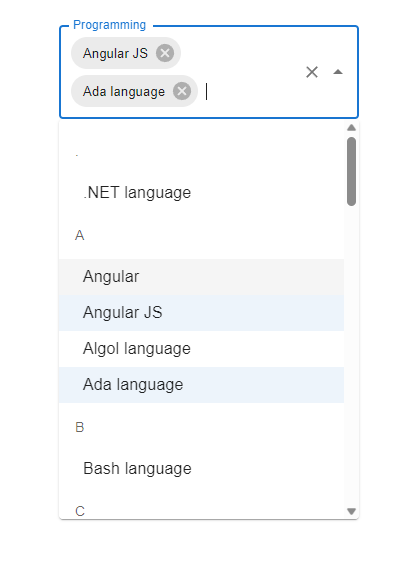
With the added "multiple" prop, users can now select multiple options, represented as chips, from the Autocomplete dropdown. The renderTags prop is utilized to customize the appearance of the selected options, presenting them as visually appealing chips using the MaterialUI Chip component.
This featurerich Autocomplete dropdown empowers users to make multiple selections from a vast array of programming languages, showcased as delightful chips above the input field. This is particularly useful when multiple items need selection from an extensive list of choices, elevating the user experience significantly.
Conclusion
To sum up, organizing autocomplete options into logical categories in Material UI can significantly enhance the user experience. This makes it easier to find and choose desired options, especially when faced with a long list of options. You can effectively group options based on pertinent criteria by utilizing the groupBy prop, which will result in a more organized and userfriendly interface for React applications. Additionally, you can modify the grouped Autocomplete to fit the specific needs and design of your application thanks to Material UI's flexibility and customization options.

