
Article Categories
- All Categories
-
 Data Structure
-
 Networking
-
 RDBMS
RDBMS
-
 Operating System
-
 Java
Java
-
 MS Excel
-
 iOS
iOS
-
 HTML
HTML
-
 CSS
CSS
-
 Android
-
 Python
-
 C Programming
-
 C++
C++
-
 C#
C#
-
 MongoDB
-
 MySQL
MySQL
-
 Javascript
-
 PHP
PHP
-
 Economics & Finance
How to Generate and Configure a Self-Signed TSL/SSL Certificate for Nginx on Ubuntu 16.04
In this article, we will learn how to generate and configure a self-signed SSL/TSL certificates for Nginx on Ubuntu 16.04. TSL is transport layer security with predecessor SSL (Secure Sockets Layer) which is used to protect the normal traffic in encrypted packets, where the traffic transfers from server to the client and will not be intercepted by the outside intruders. The certificate will also help the users to verify the identity of the sites they visited are correct.
Self-signed certificates can be used if we don’t have any proper domain name associated with the site or the server instances.
Prerequisites
In accomplishing this demo we needed the below requirements.
- A non-root user with sudo permission on the machine.
- Nginx Web server installed.
Installing the OpenSSL Packages on the Server
We needed to install the OpenSSL packages on the server, below is the command to install the SSL on the Ubuntu 16.04
$ sudo apt-get install openssl
<strong>Output: </strong>Reading package lists... Done
Building dependency tree
Reading state information... Done
The following packages were automatically installed and are no longer required:
libyaml-0-2 python-crypto python-ecdsa python-jinja2 python-markupsafe python-paramiko python-pkg-resources python-setuptools python-six python-yaml sshpass
Use 'sudo apt autoremove' to remove them.
Suggested packages:
ca-certificates
The following NEW packages will be installed:
openssl
0 upgraded, 1 newly installed, 0 to remove and 13 not upgraded.
Need to get 491 kB of archives.
After this operation, 956 kB of additional disk space will be used.
Get:1 http://in.archive.ubuntu.com/ubuntu xenial-updates/main amd64 openssl amd64 1.0.2g-1ubuntu4.1 [491 kB]
Fetched 491 kB in 1s (283 kB/s)
Selecting previously unselected package openssl.
(Reading database ... 92688 files and directories currently installed.)
Preparing to unpack .../openssl_1.0.2g-1ubuntu4.1_amd64.deb ...
Unpacking openssl (1.0.2g-1ubuntu4.1) ...
Processing triggers for man-db (2.7.5-1) ...
Setting up openssl (1.0.2g-1ubuntu4.1) ..
Creating the Self-Signed SSL Certificates
SSL will work using the combinations of a public and private key where the SSL key will be on the server to encrypt the data sent to the clients accessing the server. The SSL will be shared with public or clients whoever is requesting the contents and will be used to decrypt the data associated with SSL key.
Below is the command to create a self-signed certificate and key pair with the OpenSSL.
$sudo openssl req -x509 -nodes -days 365 -newkeyrsa:2048 -keyout /etc/ssl/private/nginx-demosite.key -out /etc/ssl/certs/nginx-demosite.crt
<strong>Output:</strong>
Generating a 2048 bit RSA private key
...................
...................
..........+++ .....
...+++
writing new private key to '/etc/ssl/private/nginx-demosite.key'
----- You are about to be asked to enter information that will be incorporated into your certificate request.
What you are about to enter is what is called a Distinguished Name or a DN.
There are quite a few fields but you can leave some blank For some fields there will be a default value,
If you enter '.', the field will be left blank. -----
Country Name (2 letter code) [AU]:IN
State or Province Name (full name) [Some-State]:TELENGANA
Locality Name (eg, city) []:HYDERABAD
Organization Name (eg, company) [Internet Widgits Pty Ltd]:demosite.com
Organizational Unit Name (eg, section) []:demo
Common Name (e.g. server FQDN or YOUR name) []: demosite
Email Address []:admin@demosite.com
As the above command will generate both key files with a certificate, it will ask some information related to the certificate which we will be generating.
Below is the explanation for the options that we used in the above command –
openssl - > This is a command line tool to create the certificates and keys.
-req - > X.509 is a public key infrastructure standard for the SSL the ‘req’ is the sub command which allows to specify the standards for the SSL, the –x509 specifies that we want to generate self-signed certificate instead of generating the certificate signed.
-nodes - > As we want to read the Nginx to read the certificate file with our any password or user interventions, if we don’t use this command the it will ask for a passphrase.
-days 35 -> This will set the validity of the certificate for one year.
-newkey rsa:2048 - > This option specifies that we will generate a new certificate and key with 2048 bit encryption.
-keyout -> This will tell the OpenSSL to place private key which is generated.
-out -> This will tell the OpenSSL to place the certificate file which is generated.
After we generate the SSL key, we will harden the SSL certificate with Diffie-Hellman group.
Below is the command to harden the SSL certificates.
$sudo openssl dhparam -out /etc/ssl/certs/dhparam.pem 2048
<strong>Output: </strong>Generating DH parameters, 2048 bit long safe prime, generator 2
This is going to take a long time
.................................................+.+...............+.......................................................
........................+.......................................................................+..........................
......................+......................................... ..........................................................
...........................................................................................................................
.....................................................+..............+.......+..........+.................................+.
..................................................................................+.................................+.....+
......................+...............................+...................................................................................................................................................+............................................................................................................+.......................................................................................................+.....................+............................................................... ….
Configuring the Nginx with Self-signed SSL Certificates
As all the certificates and keys are generated and kept at /etc/ssl directory, we needed to modify the Nginx configuration files to use those generated files.
We need to change few configurations, which we need to adjust in configuration files.
Snippet with SSL which contains our SSL certificate and key files
$ sudo vi /etc/nginx/snippets/selfsigned.conf
Output: ssl_certificate /etc/ssl/certs/nginx-demosite.crt; ssl_certificate_key /etc/ssl/private/nginx-demosite.key;
Snippet contains the strong SSL settings which can be used with any certificate globally in further configurations.
$ sudo vi /etc/nginx/snippets/ssl-params.conf
Output:
ssl_protocols TLSv1 TLSv1.1 TLSv1.2;
ssl_prefer_server_ciphers on;
ssl_ciphers "EECDH+AESGCM:EDH+AESGCM:AES256+EECDH:AES256+EDH";
ssl_ecdh_curve secp384r1;
ssl_session_cache shared:SSL:10m;
ssl_session_tickets off;
ssl_stapling on;
ssl_stapling_verify on;
resolver 8.8.8.8 8.8.4.4 valid=300s;
resolver_timeout 5s;
# Disable preloading HSTS for now. You can use the commented out header line that includes
# the "preload" directive if you understand the implications.
#add_header Strict-Transport-Security "max-age=63072000; includeSubdomains; preload";
add_header Strict-Transport-Security "max-age=63072000; includeSubdomains";
add_header X-Frame-Options DENY;
add_header X-Content-Type-Options nosniff;
ssl_dhparam /etc/ssl/certs/dhparam.pem;
Adjust the Nginx server blocks to handle the SSL requests.
As all the snippets are ready, we will now enable the SSL in the Nginx configuration file.
$ sudo vi /etc/nginx/sites-available/default-ssl
<strong>Output:
</strong>server {
   listen 443 ssl http2 default_server;
   listen [::]:443 ssl http2 default_server;
   server_name IP addrres or demositename;
   include snippets/self-signed.conf;
   include snippets/ssl-params.conf;
   location / {
      # First attempt to serve request as file, then
      # as directory, then fall back to displaying a 404.
      try_files $uri $uri/ =404;
   }
}
Applying the Nginx Changes on the Server
As we have changed the configuration of the Nginx and added the snippets, we will test the nginx configuration file.
Below is the command to check the syntax errors for the Nginx.
$ sudo nginx –t
<strong>Output:
</strong>nginx: [warn] "ssl_stapling" ignored, issuer certificate not found
nginx: the configuration file /etc/nginx/nginx.conf syntax is ok
nginx: configuration file /etc/nginx/nginx.conf test is successful
All the Nginx configuration seems to be correct and we will now restart the Nginx so that the configuration will be applied on the server.
$ sudo systemclt restart nginx.
Configuring the Firewall to Allow SSL
Below is the command to check the firewall status
$ sudo ufw status
<strong>Output:
</strong>Status: active
To Action From
-- ------ ----
Nginx HTTP ALLOW Anywhere
OpenSSH ALLOW Anywhere
Nginx HTTP (v6) ALLOW Anywhere (v6)
OpenSSH (v6) ALLOW Anywhere (v6)
First, we will list the all the profiles available with the firewall. Below is the list of commands to list the application profiles.
$ sudo ufw app list
<strong>Output:
</strong>Available applications:
Nginx Full
Nginx HTTP
Nginx HTTPS
OpenSSH
As “Nginx Full” profile is not allowed, we will allow the “Nginx Full” and delete the “Nginx HTTP” from the firewall and we will check the status of the firewall after us all the “Nginx Full” profile.
$ sudo ufw allow 'Nginx Full'
Rule added
Rule added (v6)

$ sudo ufw delete allow 'Nginx HTTP'
Rule deleted
Rule deleted (v6)

$ sudo ufw status
<strong>Output:
</strong>Status: active
To Action From
-- ------ ----
OpenSSH ALLOW Anywhere
Nginx Full ALLOW Anywhere
OpenSSH (v6) ALLOW Anywhere (v6)
Nginx Full (v6) ALLOW Anywhere (v6)
Testing the Nginx Configuration with Encryption
Open any browser and try to access the server using the IP address of the system with https://IP-Address .
https://ip-address-or-dns-name
Once we access the site, we will see a warning message which says the certificate is not valid as this is self-signed.
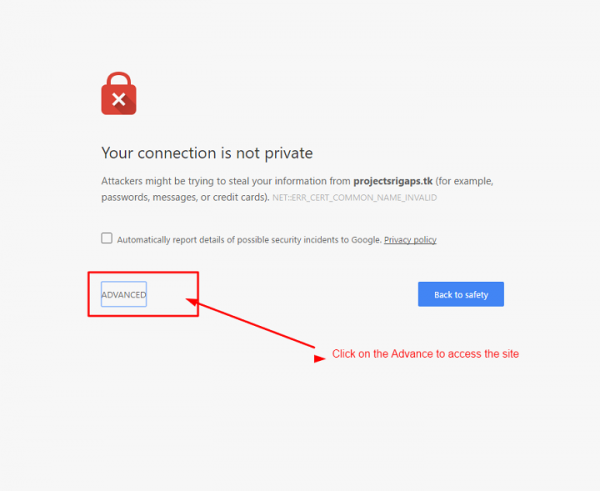
We needed to click on the ADVANCED to proceed as the SSL is not Digitally signed.
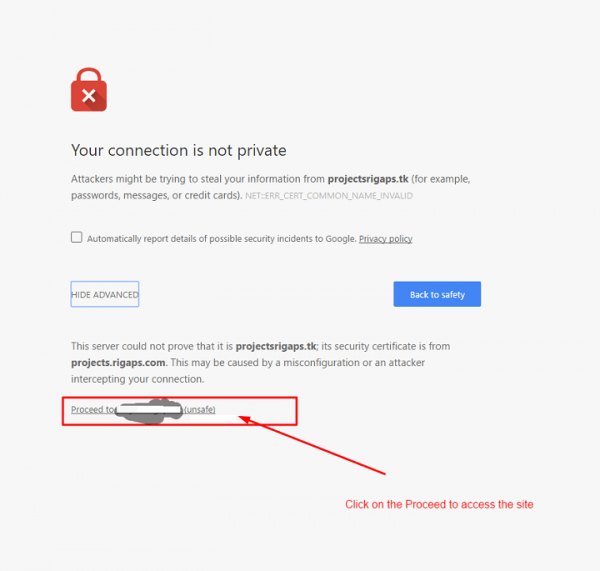
Click on the Proceed to (unsafe) to access the site.
After this setup, we are able to create our own Self-signed SSL / TSL certificate and configure the Nginx to use the SSL configuration, and we can also use strong encryption for clients to connect and serve the requests securely which will prevent the intruders to access the data.

718 Views
