
Article Categories
- All Categories
-
 Data Structure
-
 Networking
-
 RDBMS
RDBMS
-
 Operating System
-
 Java
Java
-
 MS Excel
-
 iOS
iOS
-
 HTML
HTML
-
 CSS
CSS
-
 Android
-
 Python
-
 C Programming
-
 C++
C++
-
 C#
C#
-
 MongoDB
-
 MySQL
MySQL
-
 Javascript
-
 PHP
PHP
-
 Economics & Finance
How to Setup and Configure Postfix on Ubuntu 16.04
In this article we will learn about how to set up Postfix on Ubuntu 16.04, Postfix is a very popular open-source MTA (Mail Transfer Agent) which can be used to relay the emails on Ubuntu Linux systems, most of the public mail servers over the real world use the postfix only.
Prerequisites
To complete this demo we needed the following
- A machine with Ubuntu 16.04 installed and a non-root user with sudo permissions on the machine.
- A (FQDN) fully Qualified Domain Name points to the machine.
- We assume the Domain FQDN mail.mydomain.com
Installing the Postfix
As Postfix is available with Ubuntu default repository we can directly go for installation.
Before we start the installation, we will first update the using the below command with apt-get.
$ sudo apt-get update
Now we will install postfix with the below command.
$ sudo apt-get install postfix
Output:
Reading package lists... Done
Building dependency tree
Reading state information... Done
The following additional packages will be installed: ssl-cert
Suggested packages:
procmail postfix-mysql postfix-pgsql postfix-ldap postfix-pcre sasl2-bin dovecot-common
postfix-cdb mail-reader postfix-doc openssl-blacklist
The following NEW packages will be installed:
postfix ssl-cert
0 upgraded, 2 newly installed, 0 to remove and 19 not upgraded.
Need to get 1,169 kB of archives.
After this operation, 3,759 kB of additional disk space will be used.
Do you want to continue? [Y/n] y
Get:1 <a href="http://in.archive.ubuntu.com/ubuntu" rel="nofollow noopener noreferrer" target="_blank">http://in.archive.ubuntu.com/ubuntu</a> xenial/main amd64 ssl-cert all 1.0.37 [16.9 kB]
Get:2 <a href="http://in.archive.ubuntu.com/ubuntu" rel="nofollow noopener noreferrer" target="_blank">http://in.archive.ubuntu.com/ubuntu</a> xenial/main amd64 postfix amd64 3.1.0-3 [1,152 kB]
Fetched 1,169 kB in 2s (434 kB/s)
Preconfiguring packages ...
Selecting previously unselected package ssl-cert.
(Reading database ... 59373 files and directories currently installed.)
Preparing to unpack .../ssl-cert_1.0.37_all.deb ...
Unpacking ssl-cert (1.0.37) ...
Selecting previously unselected package postfix.
Preparing to unpack .../postfix_3.1.0-3_amd64.deb ...
Unpacking postfix (3.1.0-3) ...
Processing triggers for man-db (2.7.5-1) ...
Processing triggers for libc-bin (2.23-0ubuntu3) ...
Processing triggers for systemd (229-4ubuntu7) ...
…
…
…
/etc/aliases does not exist, creating it.
WARNING: /etc/aliases exists, but does not have a root alias.
Postfix is now set up with a default configuration. If you need to make
changes, edit
/etc/postfix/main.cf (and others) as needed. To view Postfix configuration
values, see postconf(1).
After modifying main.cf, be sure to run '/etc/init.d/postfix reload'.
Running newaliases
Processing triggers for libc-bin (2.23-0ubuntu3) ...
Processing triggers for systemd (229-4ubuntu7) ...
Processing triggers for ureadahead (0.100.0-19) ...
Processing triggers for ufw (0.35-0ubuntu2) ...
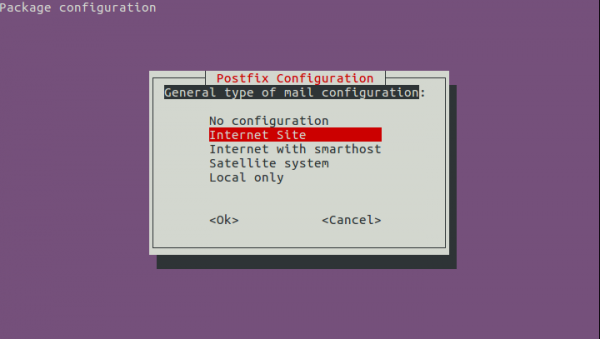
Once the installation is started it will ask for the following.
General type of mail configuration. we have to select the Internet site.
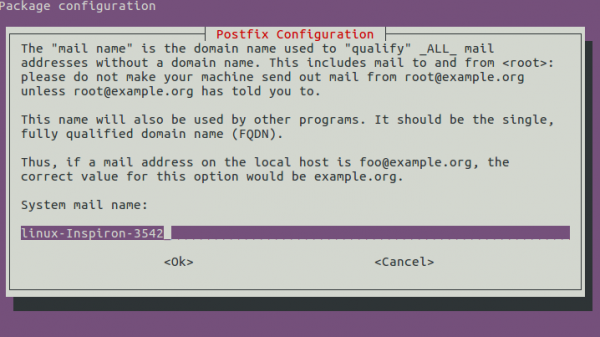
Enter the domain name which we want to use with the postfix, System mail name (Ex mail.mydomain.com).
Once the installation is completed, we will check whether the services started or not to confirm we will run the below command.
$ netstat –ntlp
netstat -ntlp
Active Internet connections (only servers)
Proto    Recv-Q    Send-Q    Local Address    Foreign Address    State    PID/Program name
tcp          0          0    0.0.0.0:22          0.0.0.0:*       LISTEN    4212/sshd
tcp          0          0    0.0.0.0:25          0.0.0.0:*       LISTEN    5747/master
tcp6         0          0    :::22                :::*          LISTEN     4212/sshd
tcp6         0          0    :::25                :::*           LISTEN    5747/master
We should see that port 25 is open.
The postfix configuration is at the location /etc/postfix/main.cf
$ sudo vi /etc/postfix/main.cf
Output:
# See /usr/share/postfix/main.cf.dist for a commented, more complete version
# Debian specific: Specifying a file name will cause the first
# line of that file to be used as the name. The Debian default
# is /etc/mailname.
#myorigin = /etc/mailname
smtpd_banner = $myhostname ESMTP $mail_name (Ubuntu)
biff = no
# appending .domain is the MUA's job.
append_dot_mydomain = no
# Uncomment the next line to generate "delayed mail" warnings
#delay_warning_time = 4h
readme_directory = no
# TLS parameters
smtpd_tls_cert_file=/etc/ssl/certs/ssl-cert-snakeoil.pem
smtpd_tls_key_file=/etc/ssl/private/ssl-cert-snakeoil.key
smtpd_use_tls=yes
smtpd_tls_session_cache_database = btree:${data_directory}/smtpd_scache
smtp_tls_session_cache_database = btree:${data_directory}/smtp_scache
# See /usr/share/doc/postfix/TLS_README.gz in the postfix-doc package for
# information on enabling SSL in the smtp client.
smtpd_relay_restrictions = permit_mynetworks permit_sasl_authenticated defer_unauth_destination
myhostname = ubuntu16.mydomain.com
alias_maps = hash:/etc/aliases
alias_database = hash:/etc/aliases
myorigin = /etc/mailname
mydestination = $myhostname, mail.mydomain.com, localhost.mydomain.com, , localhost
relayhost =
mynetworks = 127.0.0.0/8 [::ffff:127.0.0.0]/104 [::1]/128
mailbox_size_limit = 0
recipient_delimiter = +
inet_interfaces = all
inet_protocols = all
Explanation of the settings are below
- General type of mail configuration?: Internet Site
- System mail name: mydomain.com (not mail.mydomain.com)
- Root and postmaster mail recipient: root
- Other destinations to accept mail for: $myhostname, mydomain.com, mail.mydomain.com, localhost.mydomain.com, localhost
- Force synchronous updates on mail queue?: No
- Local networks: 127.0.0.0/8 [::ffff:127.0.0.0]/104 [::1]/128
- Mailbox size limit: 0
- Local address extension character: +
- Internet protocols to use: all
If you want to reconfigure any time we can use the below command to make changes in the postfix configuration.
$ sudo dpkg-reconfigure postfix
Mapping Mail Boxes to the Linux Accounts.
We have to edit the virtual map files to map the mailboxes to the local Linux accounts, for that we needed to edit the below file.
$ sudo nano /etc/postfix/virtual
For example, if we want to accept the mails for noreply@mydomain.com and admin@mydomain.com we needed to add the below lines to the /etc/postfix/virtual file.
roreply@mydomain.com ubuntu
admin@mydomain.com ubuntu
Once the we add the setting to the configuration file we needed to apply these changes with the below command
$ sudo postmap /etc/postfix/virtual
After applying the settings we needed to restart the postfix services.
$ sudo systemctl restart postfix.
Configuring the Environment to set the Mail location
Before we start to install the mail client, we need to make sure that Mail environment is configured correctly. We have to set the variables in a few locations /etc/bash.bashrc and /etc/profile.d to make sure that user has the configured for Mail.
$ echo 'export MAIL=~/Maildir' | sudo tee -a /etc/bash.bashrc | sudo tee -a /etc/profile.d/mail.sh
Once the setting are configured we needed to load these settings to the current session.
$ source /etc/profile.d/mail.sh
Setup and Configured Mail Client
By default the mail client is not installed, we needed to install the mail client with the following command –
$ apt install mailutils –y
Sending Mail using the Client Tool
To test the mail, we will login as a root and send email to the ‘ubuntu’ user for that, we can use the below command –
# echo "test " | mail -s 'Test email subject line' ubuntu@mail.mydomain.com
To verify the email we have sent the email from root to ubuntu user on the local system
$ mail
Output:
"/var/mail/ubuntu": 2 messages 2 new
>N 1 Mail Delivery Syst Wed Oct 19 09:44 67/2299 Undelivered Mail Returned to Sender
N 2 root Wed Oct 19 09:45 12/490
? 2
Return-Path: <root@ubuntu16.example.com>
X-Original-To: ubuntu@ubuntu16.example.com
Delivered-To: ubuntu@ubuntu16.example.com
Received: by ubuntu16.example.com (Postfix, from userid 0)
id 5C631FF732; Wed, 19 Oct 2016 09:45:30 +0530 (IST)
To: <test@ubuntu16.example.com>,<ubuntu@ubuntu16.example.com>
X-Mailer: mail (GNU Mailutils 2.99.99)
Message-Id: <20161019041530.5C631FF732@ubuntu16.example.com>
Date: Wed, 19 Oct 2016 09:45:30 +0530 (IST)
From: root@ubuntu16.example.com (root)
test
?
You now see that we can receive emails from the root user.
In the above article, we have learned how to setup and configure a Postfix MTA (Mail Transport Agent) on Ubuntu 16.04, which can be used to send emails, using the above configuration we have the basic mail functionality to get started.

876 Views
