
Article Categories
- All Categories
-
 Data Structure
-
 Networking
-
 RDBMS
RDBMS
-
 Operating System
-
 Java
Java
-
 MS Excel
-
 iOS
iOS
-
 HTML
HTML
-
 CSS
CSS
-
 Android
-
 Python
-
 C Programming
-
 C++
C++
-
 C#
C#
-
 MongoDB
-
 MySQL
MySQL
-
 Javascript
-
 PHP
PHP
-
 Economics & Finance
How To Configure and Setup Ghost on Ubuntu 16.04
In this article, we will learn how to setup and Configure Ghost on Ubuntu 16.04. Ghost os a light-weight and open-source blogging programs which can be used easily and can be customizable, also have many more themes to use.
Pre-Requisites
In this setup, we need the following –
- Ubuntu 16.04 installed server machine.
- A non-root user with Sudo permissions on the machine.
- Nginx web server installed on the server.
Ghost Installation on Ubuntu 16.04
We will install the ghost using the Ghosts official repository which is hosted on GitHub.
First, we will get the latest version of the Ghost using the bellow command.
$ wget https://ghost.org/zip/ghost-latest.zip
<strong>Output:</strong>
   --2017-05-18 12:06:25-- https://ghost.org/zip/ghost-latest.zip
Resolving ghost.org (ghost.org)... 104.16.32.191, 104.16.34.191, 104.16.33.191, ...
Connecting to ghost.org (ghost.org)|104.16.32.191|:443... connected.
HTTP request sent, awaiting response... 301 Moved Permanently
Location: /zip/ghost-latest.zip/ [following]
   --2017-05-18 12:06:27-- https://ghost.org/zip/ghost-latest.zip/
Reusing existing connection to ghost.or
g:443.
HTTP request sent, awaiting response... 302 Found
Location: https://github.com/TryGhost/Ghost/releases/download/0.11.9/Ghost-0.11.9.zip [following]
   --2017-05-18 12:06:28-- https://github.com/TryGhost/Ghost/releases/download/0.11.9/Ghost-0.11.9.zip
Resolving github.com (github.com)... 192.30.253.113, 192.30.253.112
Connecting to github.com (github.com)|192.30.253.113|:443... connected.
HTTP request sent, awaiting response... 302 Found
Location: https://github-cloud.s3.amazonaws.com/releases/9852918/d047ce0e-3a8d-1 1e7-937c-58bc76a5c547.zip?X-Amz-Algorithm=AWS4-HMAC-SHA256&X-Amz-Credential=AKIA ISTNZFOVBIJMK3TQ%2F20170518%2Fus-east-1%2Fs3%2Faws4_request&X-Amz-Date=20170518T       063630Z&X-Amz-Expires=300&X-Amz-Signature=495ca36c4d81720b86bef7f49c9a99720aab30 cdcd8f7e0c62350e48a7a417cb&X-Amz-SignedHeaders=host&actor_id=0&response-content- disposition=attachment%3B%20filename%3DGhost-0.11.9.zip&response-content-type=ap       plication%2Foctet-stream [following]
   --2017-05-18 12:06:31-- https://github-cloud.s3.amazonaws.com/releases/9852918/ d047ce0e-3a8d-11e7-937c-58bc76a5c547.zip?X-Amz-Algorithm=AWS4-HMAC-SHA256&X-Amz- Credential=AKIAISTNZFOVBIJMK3TQ%2F20170518%2Fus-east-1%2Fs3%2Faws4_request&X-Amz -         Date=20170518T063630Z&X-Amz-Expires=300&X-Amz-Signature=495ca36c4d81720b86bef7f 49c9a99720aab30cdcd8f7e0c62350e48a7a417cb&X-Amz-SignedHeaders=host&actor_id=0&re sponse-content-disposition=attachment%3B%20filename%3DGhost-0.11.9.zip&response-       content-type=application%2Foctet-stream
Resolving github-cloud.s3.amazonaws.com (github-cloud.s3.amazonaws.com)... 52.21       6.65.72
Connecting to github-cloud.s3.amazonaws.com (github-cloud.s3.amazonaws.com)|52.2       16.65.72|:443... connected.
HTTP request sent, awaiting response... 200 OK
Length: 4219850 (4.0M) [application/octet-stream]
Saving to: ‘ghost-latest.zip’
ghost-latest.zip.1          100%[======================================>] 4.02M 1.26MB/s    in 3.2s
2017-05-18 12:10:14 (1.26 MB/s) - ‘ghost-latest.zip’ saved [4219850/4219850]
Once the package is download we will unzip the downloaded file using the bellow command, to the /var/www/ghost folder on the server.
$ sudo unzip -d /var/www/ghost ghost-latest.zip
Once the files are extracted from the package file, we will switch to the /var/www/ghost folder and install the ghost dependencies which are needed for production using the npm command line tool.
Below is the command to install the Ghost and dependencies which are required for the production environment.
$ sudo npm install --production
<strong>Output:</strong>
[ ...............] | cloneCurrentTree: sill cloneCurrentTree Finishing
npm WARN lifecycle ghost@0.11.9~preinstall: cannot run in wd %s %s (wd=%s) ghost@0.11.9 node core/server/utils/npm/preinstall.js /var/www/ghost
> dtrace-provider@0.8.1 install /var/www/ghost/node_modules/gscan/node_modules/ghost-ignition/node_modules/bunyan/node_modules/dtrace-provider
> node scripts/install.js
> sqlite3@3.1.8 install /var/www/ghost/node_modules/sqlite3
> node-pre-gyp install --fallback-to-build
[sqlite3] Success: "/var/www/ghost/node_modules/sqlite3/lib/binding/node-v48-linux-x64/node_sqlite3.node" is installed via remote
> jsonpath@0.2.11 postinstall /var/www/ghost/node_modules/jsonpath
> node lib/aesprim.js > generated/aesprim-browser.js
ghost@0.11.9 /var/www/ghost
….
….
   | | `-- ms@0.7.3
   | +-- form-data@2.1.4
   | | +-- asynckit@0.4.0
   | | +-- combined-stream@1.0.5
   | | | `-- delayed-stream@1.0.0
   | | `-- mime-types@2.1.15
   | | `-- mime-db@1.27.0
   | +-- formidable@1.1.1
   | +-- methods@1.1.2
   | +-- mime@1.3.6
   | `-- readable-stream@2.2.9
   | +-- buffer-shims@1.0.0
   | +-- core-util-is@1.0.2
   | +-- inherits@2.0.3
   | +-- isarray@1.0.0
   | +-- process-nextick-args@1.0.7
   | +-- string_decoder@1.0.0
   | `-- util-deprecate@1.0.2
   +-- unidecode@0.1.8
   +-- uuid@3.0.0
   +-- validator@6.3.0
   +-- vary@1.1.1
   +-- xml@1.0.1
   `-- xtend@4.0.1
Configuring the Ghost
After we install the dependencies, we need to modify the Ghost configuration file which is located at /var/www/ghost. The configuration is not located but, the Ghost installation included the configuration file with the name config.example.js, which we will use for the configuration at this time.
First, we will copy the file to /var/www/ghost folder as config.js, below is the command to copy the configuration file.
$ sudo cp config.example.js config.js
Once we copy the example file to config.js we will edit the configuration file according to our environment.
$ sudo vi config.js
Here, we will edit the config which is needed to change the URL for the Ghost server, if we don’t change the URL then the links on the blog will be taken to the default URL my-ghost-blog.com. so we need to change the value of the “url −” we can use the domain name or the IP address of the server, as this is a demo we will use only IP address in real time we will use the domain name of the blog.
<strong>Output:</strong>
// # Ghost Configuration
// Setup your Ghost install for various [environments](http://support.ghost.org/config/#about-environments).
// Ghost runs in `development` mode by default. Full documentation can be found at http://support.ghost.org/config/var path = require('path'),config;
config = {
   // ### Production
   // When running Ghost in the wild, use the production environment.
   // Configure your URL and mail settings here
   production: {
      url: '<span style="color: #ff0000;">http://192.168.1.123</span>',
      mail: {
<span style="color: #ff0000;">         transport: 'SMTP',</span>
<span style="color: #ff0000;">         options: {</span>
<span style="color: #ff0000;">            service: 'Gmail',</span>
<span style="color: #ff0000;">            auth: {</span>
<span style="color: #ff0000;">               user: 'youremail@gmail.com',</span>
<span style="color: #ff0000;">               pass: 'yourpassword'</span>
<span style="color: #ff0000;">            }</span>
<span style="color: #ff0000;">         }</span>
<span style="color: #ff0000;">      },</span>
   database: {
      client: 'sqlite3',
      connection: {
         filename: path.join(__dirname, '/content/data/ghost.db')
      },
      debug: false
   },
   server: {
      host: '127.0.0.1',
      port: '2368'
   }
},
…
…
Here my setup is in the local I had used the IP address of my machine.
Next, we will configure for the email notifications, this is necessary if we need to support for the password recovery for the Ghost users or any update notifications for the users. Save the configuration file and exit from the vi editor.
Start the Ghost with the below command
$ sudo npm start –production
<strong>Output:</strong>
> ghost@0.11.9 start /var/www/ghost
> node index
WARNING: Ghost is attempting to use a direct method to send an email.It is recommended that you explicitly configure an email service.
Help and documentation can be found at http://support.ghost.org/mail.
Migrations: Creating tables...
Migrations: Creating table: posts
Migrations: Creating table: users
Migrations: Creating table: roles
Migrations: Creating table: roles_users
Migrations: Creating table: permissions
Migrations: Creating table: permissions_users
Migrations: Creating table: permissions_roles
Migrations: Creating table: permissions_apps
Migrations: Creating table: settings
Migrations: Creating table: tags
Migrations: Creating table: posts_tags
Migrations: Creating table: apps
Migrations: Creating table: app_settings
Migrations: Creating table: app_fields
Migrations: Creating table: clients
Migrations: Creating table: client_trusted_domains
Migrations: Creating table: accesstokens
Migrations: Creating table: refreshtokens
Migrations: Creating table: subscribers
Migrations: Running fixture populations
Migrations: Creating owner
Ghost is running in production...
Your blog is now available on http://192.168.1.123
Ctrl+C to shut down
Configuring the Nginx to Proxy the Web Requests to Ghost
As a default, the Ghost will run on the port 2368 we needed to configure the Nginx to allow the connection on port 80 and access the Ghost without adding 2368 at the domain or IP address.
Stop the Ghost by press CTRL+C.
Now change the directory to /etc/nginx.
$ cd /etc/nginx.
Remove the default Nginx configuration which is in the sites-enabled/default.
$ sudo rm sites-enabled/default
Create a new configuration file called ghost in /etc/nginx/sites-available/.
$ sudo nano /etc/nginx/sites-available/ghost
Place the bellow configuration and change the your-domain-name.
$ vi /etc/nginx/sites-available/ghost
server {
   listen 80;
   server_name <span style="color: #ff0000;">192.168.1.123</span>; # Your-IP-Address
   location / {
      proxy_set_header HOST $host;
      proxy_set_header X-Forwarded-Proto $scheme;
      proxy_set_header X-Real-IP $remote_addr;
      proxy_set_header X-Forwarded-For $proxy_add_x_forwarded_for;
      proxy_pass http://127.0.0.1:2368;
   }
}
Save the file and exits from the editor.
We needed to enable the configuration by creating the symlink of the host file in /etc/nginx/sites-enabled folder.
$ sudo ln -s /etc/nginx/sites-available/ghost /etc/nginx/sites-enabled/ghost
Now restart the Nginx to make the changes apply.
$ sudo service nginx restart
Once we restart the Nginx we will access the Blog site for initial setup.
We can access the Blog by access http://your_ip_address of the server, but for the initial setup we needed to access the Blog using the bellow URL− http://your_ip_address/ghost.
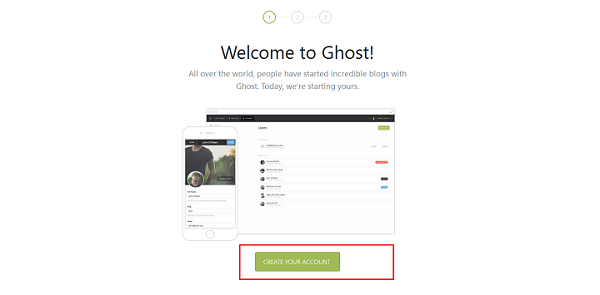
As an administrator of the Blog, we needed to create an account on the blog so that we can mange, invite the users to the blog. Click on Create your Account.
Here in the next page will provide the Administrator email id, Full name, password and Title for the Blog.
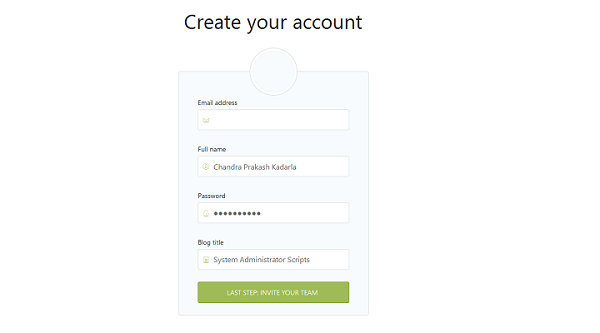
Next, we will invite some people to the Blog.
The welcome screen looks like this.
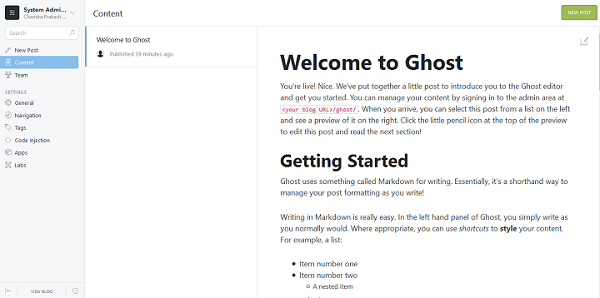
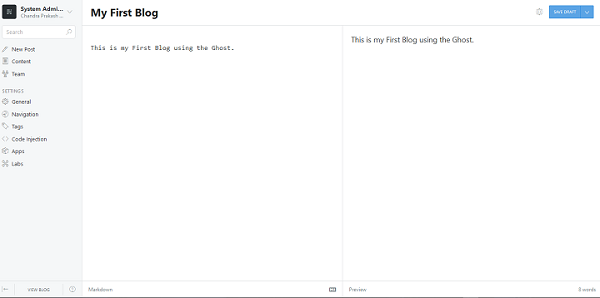
Now we will write the blog by clicking on the new Blog, Click on New post.
Once we edit the Post we will publish by clicking on the list of Save Draft and Click on Publish.
We can now access the Blog using the URL− http://your_ip_address.
The Ghost Blog looks like this.

In this article we have learned how to setup and configure the Ghost, Ghost is a blogger site application which can be used very easily, also we have learned how to create our first blog using the Ghost blogging software please explore the options as we can do a lot of things on the Ghost.

422 Views
