
Article Categories
- All Categories
-
 Data Structure
-
 Networking
-
 RDBMS
RDBMS
-
 Operating System
-
 Java
Java
-
 MS Excel
-
 iOS
iOS
-
 HTML
HTML
-
 CSS
CSS
-
 Android
-
 Python
-
 C Programming
-
 C++
C++
-
 C#
C#
-
 MongoDB
-
 MySQL
MySQL
-
 Javascript
-
 PHP
PHP
-
 Economics & Finance
nginx ssl certificate installation in linux
This article will help you to generate self-signed SSL certificate in Linux which allows you to configure SSL certificates for Nginx which is used to wrap the normal traffic into protected traffic, encrypted traffic. Using this server can send the data to the client without the concerned that data can be intercepted by outside persons.
Guidelines for Installation
Before we do anything, we have to install certain packages
Login to the server via terminal and install
# yum install mod_ssl
opensslResolving Dependencies
--> Running transaction check
---> Package mod_ssl.x86_64 1:2.2.15-47.el6.centos.1 will be updated
---> Package mod_ssl.x86_64 1:2.2.15-47.el6.centos.3 will be an update
--> Processing Dependency: httpd = 2.2.15-47.el6.centos.3 for package: 1:mod_ssl-2.2.15-47.el6.centos.3.x86_64
---> Package openssl.x86_64 0:1.0.1e-42.el6_7.1 will be updated
--> Processing Dependency: openssl = 1.0.1e-42.el6_7.1 for package: openssl-devel-1.0.1e-42.el6_7.1.x86_64
---> Package openssl.x86_64 0:1.0.1e-42.el6_7.4 will be an update
--> Running transaction check
---> Package httpd.x86_64 0:2.2.15-47.el6.centos.1 will be updated
---> Package httpd.x86_64 0:2.2.15-47.el6.centos.3 will be an update
--> Processing Dependency: httpd-tools = 2.2.15-47.el6.centos.3 for package: httpd-2.2.15-47.el6.centos.3.x86_64
---> Package openssl-devel.x86_64 0:1.0.1e-42.el6_7.1 will be updated
---> Package openssl-devel.x86_64 0:1.0.1e-42.el6_7.4 will be an update
--> Running transaction check
---> Package httpd-tools.x86_64 0:2.2.15-47.el6.centos.1 will be updated
---> Package httpd-tools.x86_64 0:2.2.15-47.el6.centos.3 will be an update
--> Finished Dependency Resolution
Dependencies Resolved
==========================================================================================================================================
Package Arch Version Repository Size
==========================================================================================================================================
Updating:
mod_ssl x86_64 1:2.2.15-47.el6.centos.3 updates 95 k
openssl x86_64 1.0.1e-42.el6_7.4 updates 1.5 M
Updating for dependencies:
httpd x86_64 2.2.15-47.el6.centos.3 updates 831 k
httpd-tools x86_64 2.2.15-47.el6.centos.3 updates 77 k
openssl-devel x86_64 1.0.1e-42.el6_7.4 updates 1.2 M
<span style="line-height: 1.5;">Transaction Summary
</span>==========================================================================================================================================
Upgrade 5 Package(s)
Total download size: 3.7 M
Is this ok [y/N]: y
Downloading Packages:
(1/5): httpd-2.2.15-47.el6.centos.3.x86_64.rpm | 831 kB 00:00
(2/5): httpd-tools-2.2.15-47.el6.centos.3.x86_64.rpm | 77 kB 00:00
(3/5): mod_ssl-2.2.15-47.el6.centos.3.x86_64.rpm | 95 kB 00:00
(4/5): openssl-1.0.1e-42.el6_7.4.x86_64.rpm | 1.5 MB 00:00
(5/5): openssl-devel-1.0.1e-42.el6_7.4.x86_64.rpm | 1.2 MB 00:00
------------------------------------------------------------------------------------------------------------------------------------------
Total 529 kB/s | 3.7 MB 00:07
Running rpm_check_debug
Running Transaction Test
Transaction Test Succeeded
Running Transaction
Updating : openssl-1.0.1e-42.el6_7.4.x86_64 1/5
Updating : httpd-tools-2.2.15-47.el6.centos.3.x86_64 2/5
Updating : httpd-2.2.15-47.el6.centos.3.x86_64 3/5
Updating : 1:mod_ssl-2.2.15-47.el6.centos.3.x86_64 4/5
Updating :openssl-devel-1.0.1e-42.el6_7.4.x86_64 5/5
Updated:
mod_ssl.x86_64 1:2.2.15-47.el6.centos.3 openssl.x86_64 0:1.0.1e-42.el6_7.4
Dependency Updated:
httpd.x86_64 0:2.2.15-47.el6.centos.3 httpd-tools.x86_64 0:2.2.15-47.el6.centos.3 openssl-devel.x86_64 0:1.0.1e-42.el6_7.4
Complete!
Generating Key Files
To generate the SSL certificate files, we need to run this command
This will begin the process of generating two files: the Private-Key file for the decryption of your SSL Certificate, and a certificate signing request (CSR) file used to apply for your SSL Certificate.
When you are prompted for the Common Name (domain name), enter the fully qualified domain name for the site you are securing. If you are generating an Nginx CSR for a Wildcard SSL Certificate make sure your common name starts with an asterisk (e.g. *.example.com).
After that, you will be prompted for your organizational information, beginning with geographic information. There may be default information which might be set already.
# openssl req -new -newkey rsa:2048 -nodes -keyout your_domain_name.key -out your_domain_name.csr
Generating a 2048 bit RSA private key
..................+++
........................+++
writing new private key to 'your_domain_name.key'
-----
You are about to be asked to enter information that will be incorporated
into your certificate request.
What you are about to enter is what is called a Distinguished Name or a DN.
There are quite a few fields but you can leave some blank
For some fields there will be a default value,
If you enter '.', the field will be left blank.
-----
Country Name (2 letter code) [XX]:IN
State or Province Name (full name) []:TELENGANA
Locality Name (eg, city) [Default City]:HYDERABAD
Organization Name (eg, company) [Default Company Ltd]:domain_name.com
Organizational Unit Name (eg, section) []:HYDERABAD
Common Name (eg, your name or your server's hostname) []:domain_name.com
Email Address []:server@ domain_name.com
Please enter the following 'extra' attributes
to be sent with your certificate request
A challenge password []:test
An optional company name []:test
Your .csr file will be created.
Save (backup) the generated .key file as it will be required later when installing your SSL certificate in Nginx.
Copy the generated certificate files for your_domain_name.key and your_domain_name.csr files to /etc/ssl/domainname
# mkdir -p /etc/ssl/domain_name
# cp your_domain_name.* /etc/ssl/domain_name
Edit the Nginx Virtual Hosts File
Now open your Nginx virtual host file for the website you are securing. If you need your site to be accessible through both secure (https) and non-secure (http) connections, you will need a server module for each type of connection. Make a copy of the existing non-secure server module and paste it below the original. Then add the lines in bold below −
# vi /etc/nginx/conf.d/virtual.conf
server {
   listen 443;
   ssl on;
   ssl_certificate /etc/ssl/your_domain_name.pem; (or bundle.crt)
   ssl_certificate_key /etc/ssl/your_domain_name.key;
   server_name your.domain.com;
   access_log /var/log/nginx/nginx.vhost.access.log;
   error_log /var/log/nginx/nginx.vhost.error.log;
   location / {
      root /home/www/public_html/your.domain.com/public/;
      index index.html;
   }
}
Adjust the File Names to Match your Certificate Files
ssl_certificate should be your primary certificate combined with the intermediate certificate that you made in the previous step (e.g. your_domain_name.crt).
ssl_certificate_key should be the key file generated when you create the CSR.
Restart Nginx
Run the below command to restart Nginx to apply the changes in the configuration file.
# sudo /etc/init.d/nginx restart
Once we restart the Nginx services, we can now access the site and check if it is SSL certified.
Also, we can observe that, https is visible in green as shown below screenshot.

If we want to see the details of the certificate, then Click on the https which is in Green and click on the details.
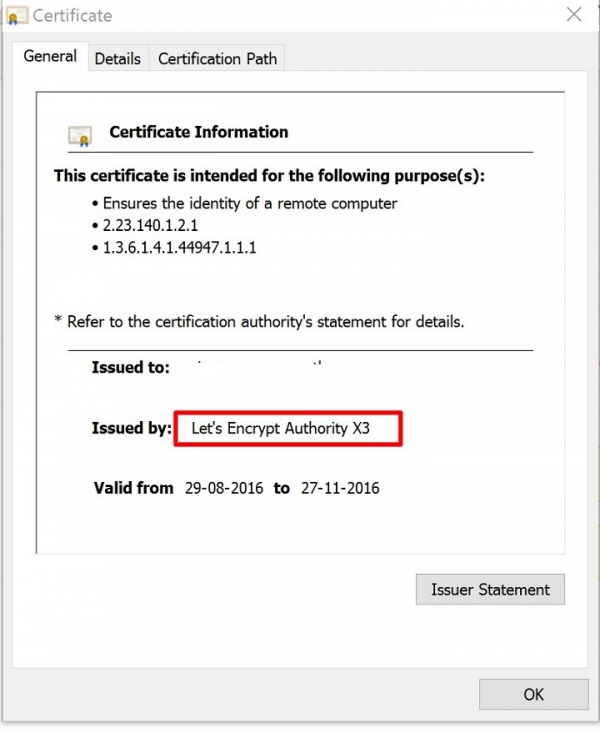
Now we can see the Certificate information, and the Issues by as LetsEncrypt Authority.
In the above article, we have now learned about – “How to get the SSL Certificate from Let’s Encrypt” which is a digitally signed SSL certificate (provided for free) and is used as a certificate to secure a site on the Nginx Web Server.

501 Views
