
Article Categories
- All Categories
-
 Data Structure
-
 Networking
-
 RDBMS
RDBMS
-
 Operating System
-
 Java
Java
-
 MS Excel
-
 iOS
iOS
-
 HTML
HTML
-
 CSS
CSS
-
 Android
-
 Python
-
 C Programming
-
 C++
C++
-
 C#
C#
-
 MongoDB
-
 MySQL
MySQL
-
 Javascript
-
 PHP
PHP
-
 Economics & Finance
How To Display Images From A Range Of File Paths In Excel?
Adding images to your Excel worksheets can be a fantastic way to improve them, whether you're doing reports, presentations, or just graphically organising your data. Although importing photographs from a file path is natively supported by Excel, doing so might be laborious and time?consuming if you need to display a lot of images.
In this tutorial, we'll look at a method for quickly and easily showing many photographs from a variety of file directories in Excel. In order to automate the image presentation and help you save significant time and effort, we will make use of Excel's built?in capabilities, such as formulae and macros.
Display Images From A Range Of File Paths In Excel
Here, we will first create a VBA module and then run it to complete the task. So let us see a simple process to learn how you can display images from a range of file paths in Excel.
Step 1
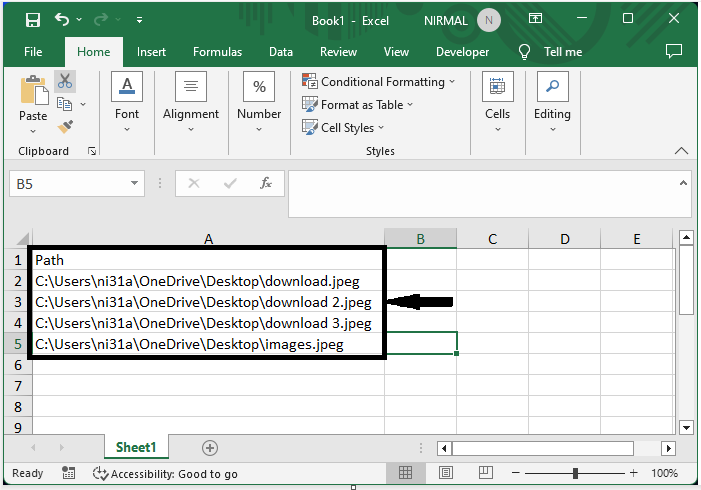
Consider an Excel sheet where you have a list of file paths similar to the below image.
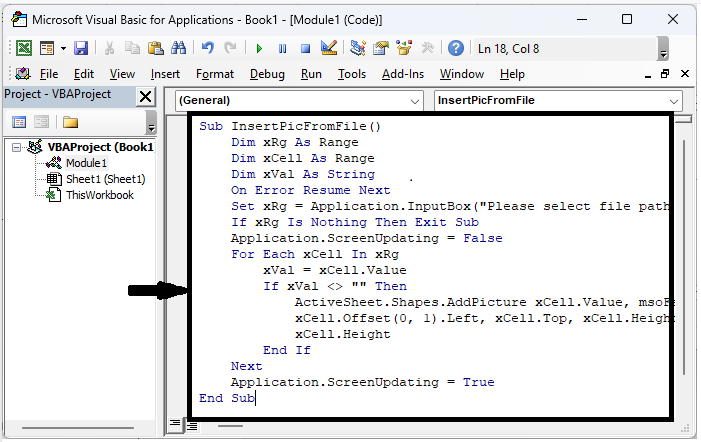
First, right?click on the sheet name and select "View Code" to open the VBA application. then click on "Insert" and select "Module.
Right click > View code > Insert > Module.
Step 2
Then copy the below code into the text box.
Code
Sub InsertPicFromFile()
   Dim xRg As Range
   Dim xCell As Range
   Dim xVal As String
   On Error Resume Next
   Set xRg = Application.InputBox("Please select file path cells:", "Display images path", Selection.Address, , , , , 8)
   If xRg Is Nothing Then Exit Sub
   Application.ScreenUpdating = False
   For Each xCell In xRg
      xVal = xCell.Value
      If xVal <> "" Then
         ActiveSheet.Shapes.AddPicture xCell.Value, msoFalse, msoTrue, _
         xCell.Offset(0, 1).Left, xCell.Top, xCell.Height, _
         xCell.Height
      End If
   Next
   Application.ScreenUpdating = True
End Sub
Step 3
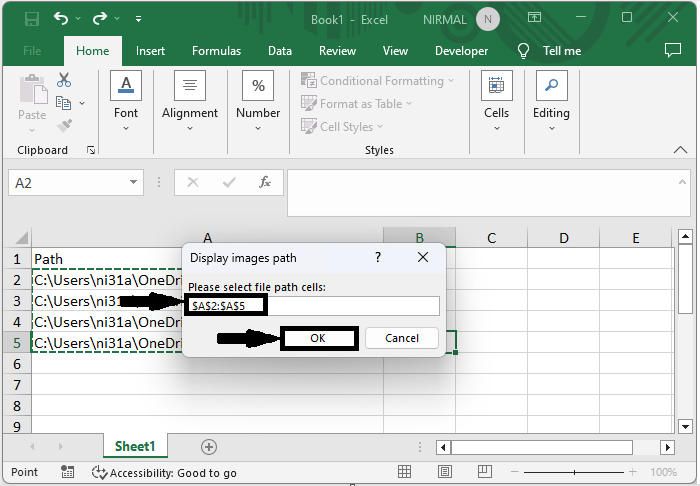
Then save the sheet as a macro?enabled template, click F5, select the range of cells in the prompt, and click OK to complete the task.
Save > F5 > Select cells > Ok.
Conclusion
In this tutorial, we have used a simple example to demonstrate how you can display images from a range of file paths in Excel to highlight a particular set of data.

3K+ Views
