 Data Structure
 Networking
 RDBMS
RDBMS Operating System
 Java
Java MS Excel
 iOS
iOS HTML
HTML CSS
CSS Android
 Python
 C Programming
 C++
C++ C#
C# MongoDB
 MySQL
MySQL Javascript
 PHP
PHP
- Selected Reading
- UPSC IAS Exams Notes
- Developer's Best Practices
- Questions and Answers
- Effective Resume Writing
- HR Interview Questions
- Computer Glossary
- Who is Who
How to Create Dialog with Custom Layout in Android?
A custom format in Android alludes to the capacity to make and utilise a unique client interface (UI) plan for a discourse. By default, Android provides pre-defined discourse formats for common usage cases. In any case, with custom formats, designers can plan and characterise their own discourse UI by indicating the format components, styling, and interactions. Custom formats permit total control over the appearance and usefulness of the discourse. Designers can make outwardly engaging and intelligent dialogues customised to particular prerequisites and plan inclinations. This adaptability empowers the consideration of complex UI components, such as content areas, buttons, pictures, and more, upgrading the client encounter and giving a more personalised and cohesive app interface.
Methods Used
Manual implementation
Manual Implementation
Within the setting of making an exchange with a custom format in Android, manual implementation alludes to the method of physically characterising and making the dialogue's format and behaviour utilising programming methods. Rather than depending on predefined exchange layouts given by the Android system, designers have full control over planning the dialogue's client interface by specifying the format components, styling, and usefulness. Manual usage includes composing code to make and expand the custom format, handle the user intuitively, and oversee the dialogue's lifecycle. This approach gives adaptability and customization choices, permitting designers to make one-of-a-kind and custom-fitted discourse encounters that adjust to their app's plan and necessities.
Algorithm
Begin the application.
Initialise the fundamental factors and information structures for the dialogue.
Create a custom-formatted XML record that characterises the appearance and structure of the dialogue.
Create a modern occurrence of the Exchange class.
Set the custom format for the discourse utilising the setContentView() strategy, passing the format asset ID.
Configure the dialogue's appearance and behaviour, such as setting the title, buttons, or other properties.
Implement usefulness to handle client intuition inside the exchange, such as button clicks or input validation.
Register audience members or callbacks to capture client activities and react accordingly.
Show the exchange utilising the appear() method.
Test the application to guarantee the customs exchange is shown accurately and in the capacity intended.
Optimise the code for execution and memory utilisation, considering components like effective format rendering or asset management.
Handle any potential mistakes or special cases smoothly to provide a smooth client experience.
Finalise the application, conduct careful testing, and make fundamental alterations based on client input or bug reports.
Example
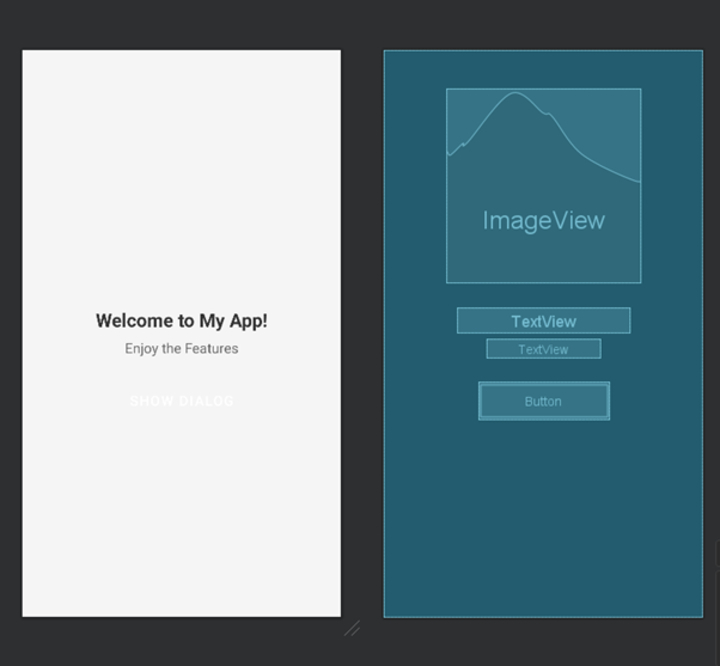
XML Program
<?xml version="1.0" encoding="utf-8"?>
<androidx.constraintlayout.widget.ConstraintLayout
   xmlns:android="http://schemas.android.com/apk/res/android"
   xmlns:app="http://schemas.android.com/apk/res-auto"
   xmlns:tools="http://schemas.android.com/tools"
   android:layout_width="match_parent"
   android:layout_height="match_parent"
   android:background="#F5F5F5"
   tools:context=".MainActivity">

   <ImageView
      android:id="@+id/imageView2"
      android:layout_width="250dp"
      android:layout_height="250dp"
      android:src="@drawable/rati_img"
      android:layout_marginTop="50dp"
      app:layout_constraintTop_toTopOf="parent"
      app:layout_constraintStart_toStartOf="parent"
      app:layout_constraintEnd_toEndOf="parent" />

   <TextView
      android:id="@+id/titleTextView"
      android:layout_width="wrap_content"
      android:layout_height="wrap_content"
      android:text="Welcome to My App!"
      android:textColor="#333333"
      android:textSize="24sp"
      android:textStyle="bold"
      app:layout_constraintTop_toBottomOf="@+id/imageView2"
      app:layout_constraintStart_toStartOf="parent"
      app:layout_constraintEnd_toEndOf="parent"
      app:layout_constraintHorizontal_bias="0.5"
      android:layout_marginTop="32dp" />

   <TextView
      android:id="@+id/subtitleTextView"
      android:layout_width="wrap_content"
      android:layout_height="wrap_content"
      android:text="Enjoy the Features"
      android:textColor="#666666"
      android:textSize="18sp"
      app:layout_constraintTop_toBottomOf="@+id/titleTextView"
      app:layout_constraintStart_toStartOf="parent"
      app:layout_constraintEnd_toEndOf="parent"
      app:layout_constraintHorizontal_bias="0.5"
      android:layout_marginTop="8dp" />

   <Button
      android:id="@+id/dialogBtn"
      android:layout_width="wrap_content"
      android:layout_height="wrap_content"
      android:text="Show Dialog"
      android:textColor="#FFFFFF"
      android:textSize="18sp"
      android:background="@drawable/button_background"
      app:layout_constraintTop_toBottomOf="@+id/subtitleTextView"
      app:layout_constraintStart_toStartOf="parent"
      app:layout_constraintEnd_toEndOf="parent"
      android:layout_marginTop="32dp" />

</androidx.constraintlayout.widget.ConstraintLayout>
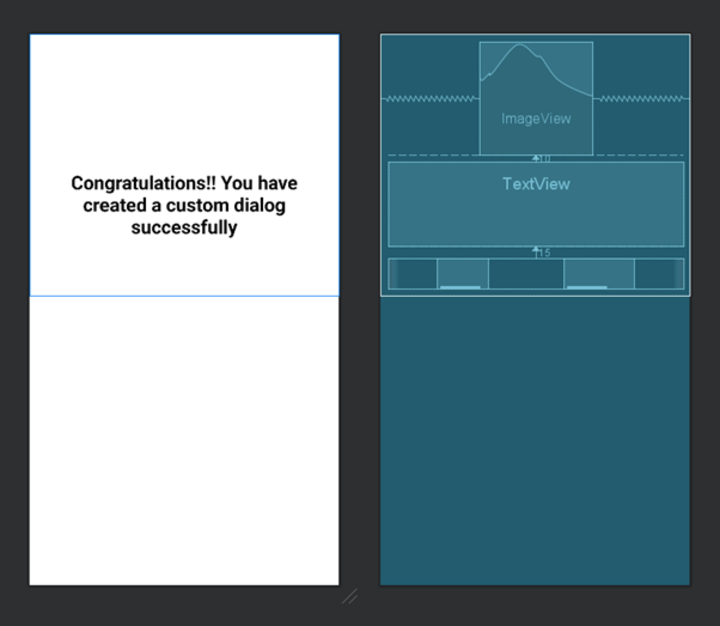
XML Program
<?xml version="1.0" encoding="utf-8"?>
<RelativeLayout
   xmlns:android="http://schemas.android.com/apk/res/android"
   xmlns:tools="http://schemas.android.com/tools"
   android:layout_width="match_parent"
   android:layout_height="wrap_content"
   android:padding="10dp">

   <ImageView
      android:id="@+id/imageView"
      android:layout_width="150dp"
      android:layout_height="150dp"
      android:layout_centerHorizontal="true"
      android:src="@drawable/success" />

   <TextView
      android:id="@+id/textview"
      android:layout_width="match_parent"
      android:layout_height="112dp"
      android:layout_marginTop="10dp"
      android:padding="10dp"
      android:layout_below="@id/imageView"
      android:text="Congratulations!! You have created a custom dialog successfully"
      android:textAlignment="center"
      android:textSize="25sp"
      android:textStyle="bold"
      android:background="@drawable/dialog_background"
      android:textColor="#000000"/>

   <LinearLayout
      android:layout_width="match_parent"
      android:layout_height="wrap_content"
      android:layout_below="@id/textview"
      android:layout_marginTop="15dp"
      android:gravity="center">

      <TextView
         android:id="@+id/okay_text"
         android:layout_width="wrap_content"
         android:layout_height="wrap_content"
         android:text="Okay"
         android:textStyle="bold"
         android:textColor="#FFFFFF"
         android:textSize="30sp"
         android:layout_marginEnd="50dp"
         android:background="@drawable/button_background"/>

      <TextView
         android:id="@+id/cancel_text"
         android:layout_width="wrap_content"
         android:layout_height="wrap_content"
         android:text="Cancel"
         android:textStyle="bold"
         android:textColor="#FFFFFF"
         android:textSize="30sp"
         android:layout_marginStart="50dp"
         android:background="@drawable/button_background"/>

   </LinearLayout>

</RelativeLayout>
Java Program
import androidx.appcompat.app.AppCompatActivity;
import android.app.Dialog;
import android.os.Bundle;
import android.view.View;
import android.view.ViewGroup;
import android.widget.Button;
import android.widget.TextView;
import android.widget.Toast;

public class MainActivity extends AppCompatActivity {

   Button showDialogButton;
   TextView okayText, cancelText;

   @Override
   protected void onCreate(Bundle savedInstanceState) {
      super.onCreate(savedInstanceState);
      setContentView(R.layout.activity_main);

      // Find the button in the XML layout
      showDialogButton = findViewById(R.id.dialogBtn);

      // Create a new Dialog
      final Dialog dialog = new Dialog(MainActivity.this);

      // Set a click listener for the showDialogButton
      showDialogButton.setOnClickListener(new View.OnClickListener() {
         @Override
         public void onClick(View v) {
            // Set the content view of the dialog to the dialog_layout XML
            dialog.setContentView(R.layout.dialog_layout);

            // Set the layout parameters for the dialog window
            dialog.getWindow().setLayout(ViewGroup.LayoutParams.MATCH_PARENT, ViewGroup.LayoutParams.WRAP_CONTENT);

            // Make the dialog non-cancelable
            dialog.setCancelable(false);

            // Set window animation for the dialog
            dialog.getWindow().getAttributes().windowAnimations = R.style.animation;

            // Find the TextViews in the dialog layout
            okayText = dialog.findViewById(R.id.okay_text);
            cancelText = dialog.findViewById(R.id.cancel_text);

            // Set a click listener for the "Okay" TextView
            okayText.setOnClickListener(new View.OnClickListener() {
               @Override
               public void onClick(View v) {
                  // Dismiss the dialog
                  dialog.dismiss();
                  // Display a toast message for "Okay" click
                  Toast.makeText(MainActivity.this, "Okay clicked", Toast.LENGTH_SHORT).show();
               }
            });

            // Set a click listener for the "Cancel" TextView
            cancelText.setOnClickListener(new View.OnClickListener() {
               @Override
               public void onClick(View v) {
                  // Dismiss the dialog
                   dialog.dismiss();
                  // Display a toast message for "Cancel" click
                  Toast.makeText(MainActivity.this, "Cancel clicked", Toast.LENGTH_SHORT).show();
               }
            });

            // Show the dialog
            dialog.show();
         }
      });
   }
}
Output


Conclusion
This article is about making an exchange with a custom format in Android. It clarifies how designers can plan and execute their claim client interface (UI) for a discourse by indicating format components, styling, and intuitiveness. The article examines the concept of custom formats and manual execution and gives a step-by-step calculation to form an exchange with a custom format. It also incorporates test XML and Java code scraps to illustrate the method. By following this direct, designers can make outwardly engaging and intelligent dialogues custom-made to their app's plan and necessities, improving client involvement and the overall app interface.

