
Article Categories
- All Categories
-
 Data Structure
-
 Networking
-
 RDBMS
RDBMS
-
 Operating System
-
 Java
Java
-
 MS Excel
-
 iOS
iOS
-
 HTML
HTML
-
 CSS
CSS
-
 Android
-
 Python
-
 C Programming
-
 C++
C++
-
 C#
C#
-
 MongoDB
-
 MySQL
MySQL
-
 Javascript
-
 PHP
PHP
-
 Economics & Finance
How to create a custom navigation drawer in Android?
This example demonstrate about How to resize Image in Android App.
Step 1 − Create a new project in Android Studio, go to File ⇒ New Project and fill all required details to create a new project.
Step 2 − Add the following code to res/layout/activity_main.xml.
<? xml version= "1.0" encoding= "utf-8" ?>
<android.support.v4.widget.DrawerLayout
   xmlns: android = "http://schemas.android.com/apk/res/android"
   xmlns: app = "http://schemas.android.com/apk/res-auto"
   xmlns: tools = "http://schemas.android.com/tools"
   android :id= "@+id/drawer_layout"
   android :layout_width= "match_parent"
   android :layout_height= "match_parent"
   android :fitsSystemWindows= "true"
   tools :openDrawer= "start" >
   <include
      layout= "@layout/app_bar_main"
      android :layout_width= "match_parent"
      android :layout_height= "match_parent" />
   <android.support.design.widget.NavigationView
      android :id= "@+id/nav_view"
      android :layout_width= "wrap_content"
      android :layout_height= "match_parent"
      android :layout_gravity= "start"
      android :fitsSystemWindows= "true"
      app :headerLayout= "@layout/nav_header_main"
      app :menu= "@menu/activity_main_drawer" />
</android.support.v4.widget.DrawerLayout>
Step 3 − Add the following code to res/layout/nav_header_main.xml.
<? xml version= "1.0" encoding= "utf-8" ?>
<LinearLayout xmlns: android = "http://schemas.android.com/apk/res/android"
   xmlns: app = "http://schemas.android.com/apk/res-auto"
   android :layout_width= "match_parent"
   android :layout_height= "@dimen/nav_header_height"
   android :background= "@drawable/side_nav_bar"
   android :gravity= "bottom"
   android :orientation= "vertical"
   android :paddingLeft= "@dimen/activity_horizontal_margin"
   android :paddingTop= "@dimen/activity_vertical_margin"
   android :paddingRight= "@dimen/activity_horizontal_margin"
   android :paddingBottom= "@dimen/activity_vertical_margin"
   android :theme= "@style/ThemeOverlay.AppCompat.Dark" >
   <ImageView
      android :id= "@+id/imageView"
      android :layout_width= "wrap_content"
      android :layout_height= "wrap_content"
      android :contentDescription= "@string/nav_header_desc"
      android :paddingTop= "@dimen/nav_header_vertical_spacing"
      app :srcCompat= "@mipmap/ic_launcher_round" />
   <TextView
      android :layout_width= "match_parent"
      android :layout_height= "wrap_content"
      android :paddingTop= "@dimen/nav_header_vertical_spacing"
      android :text= "@string/nav_header_title"
      android :textAppearance= "@style/TextAppearance.AppCompat.Body1" />
   <TextView
      android :id= "@+id/textView"
      android :layout_width= "wrap_content"
      android :layout_height= "wrap_content"
      android :text= "@string/nav_header_subtitle" />
</LinearLayout>
Step 4 − Add the following code to res/layout/app_bar_main.xml.
<? xml version= "1.0" encoding= "utf-8" ?>
<android.support.design.widget.CoordinatorLayout
   xmlns: android = "http://schemas.android.com/apk/res/android"
   xmlns: app = "http://schemas.android.com/apk/res-auto"
   xmlns: tools = "http://schemas.android.com/tools"
   android :layout_width= "match_parent"
   android :layout_height= "match_parent"
   tools :context= ".MainActivity" >
   <android.support.design.widget.AppBarLayout
      android :layout_width= "match_parent"
      android :layout_height= "wrap_content"
      android :theme= "@style/AppTheme.AppBarOverlay" >
   <android.support.v7.widget.Toolbar
      android :id= "@+id/toolbar"
      android :layout_width= "match_parent"
      android :layout_height= "?attr/actionBarSize"
      android :background= "?attr/colorPrimary"
      app :popupTheme= "@style/AppTheme.PopupOverlay" />
   </android.support.design.widget.AppBarLayout>
   <include layout= "@layout/content_main" />
   <android.support.design.widget.FloatingActionButton
      android :id= "@+id/fab"
      android :layout_width= "wrap_content"
      android :layout_height= "wrap_content"
      android :layout_gravity= "bottom|end"
      android :layout_margin= "@dimen/fab_margin"
      app :srcCompat= "@android:drawable/ic_dialog_email" />
</android.support.design.widget.CoordinatorLayout>
Step 5 − Add the following code to res/layout/content_main.xml.
<? xml version= "1.0" encoding= "utf-8" ?>
<android.support.constraint.ConstraintLayout
   xmlns: android = "http://schemas.android.com/apk/res/android"
   xmlns: app = "http://schemas.android.com/apk/res-auto"
   xmlns: tools = "http://schemas.android.com/tools"
   android :layout_width= "match_parent"
   android :layout_height= "match_parent"
   app :layout_behavior= "@string/appbar_scrolling_view_behavior"
   tools :context= ".MainActivity"
   tools :showIn= "@layout/app_bar_main" >
</android.support.constraint.ConstraintLayout>
Step 6 − Add the following code to res/menu/activity_main_drawer.xml.
<? xml version= "1.0" encoding= "utf-8" ?>
<menu xmlns: android = "http://schemas.android.com/apk/res/android"
   xmlns: tools = "http://schemas.android.com/tools"
   tools :showIn= "navigation_view" >
   <group android :checkableBehavior= "single" >
      <item
         android :id= "@+id/nav_camera"
         android :icon= "@drawable/ic_menu_camera"
         android :title= "Import" />
      <item
         android :id= "@+id/nav_gallery"
         android :icon= "@drawable/ic_menu_gallery"
         android :title= "Gallery" />
      <item
         android :id= "@+id/nav_slideshow"
         android :icon= "@drawable/ic_menu_slideshow"
         android :title= "Slideshow" />
      <item
         android :id= "@+id/nav_manage"
         android :icon= "@drawable/ic_menu_manage"
         android :title= "Tools" />
   </group>
   <item android :title= "Communicate" >
      <menu>
         <item
            android :id= "@+id/nav_share"
            android :icon= "@drawable/ic_menu_share"
            android :title= "Share" />
         <item
            android :id= "@+id/nav_send"
            android :icon= "@drawable/ic_menu_send"
            android :title= "Send" />
      </menu>
   </item>
</menu>
Step 7 − Add the following code to src/MainActivity.java
package app.tutorialspoint.com.sample ;
import android.os.Bundle ;
import android.support.annotation. NonNull ;
import android.support.design.widget.FloatingActionButton ;
import android.support.design.widget.Snackbar ;
import android.view.View ;
import android.support.design.widget.NavigationView ;
import android.support.v4.view.GravityCompat ;
import android.support.v4.widget.DrawerLayout ;
import android.support.v7.app.ActionBarDrawerToggle ;
import android.support.v7.app.AppCompatActivity ;
import android.support.v7.widget.Toolbar ;
import android.view.Menu ;
import android.view.MenuItem ;
public class MainActivity extends AppCompatActivity
implements NavigationView.OnNavigationItemSelectedListener {
   @Override
   protected void onCreate (Bundle savedInstanceState) {
      super .onCreate(savedInstanceState) ;
      setContentView(R.layout. activity_main ) ;
      Toolbar toolbar = findViewById(R.id. toolbar ) ;
      setSupportActionBar(toolbar) ;
      FloatingActionButton fab = findViewById(R.id. fab ) ;
      fab.setOnClickListener( new View.OnClickListener() {
         @Override
         public void onClick (View view) {
            Snackbar. make (view , "Replace with your own action" ,
            Snackbar. LENGTH_LONG )
            .setAction( "Action" , null ).show() ;
         }
      }) ;
      DrawerLayout drawer = findViewById(R.id. drawer_layout ) ;
      ActionBarDrawerToggle toggle = new ActionBarDrawerToggle(
      this, drawer , toolbar , R.string. navigation_drawer_open ,
      R.string. navigation_drawer_close ) ;
      drawer.addDrawerListener(toggle) ;
      toggle.syncState() ;
      NavigationView navigationView = findViewById(R.id. nav_view ) ;
      navigationView.setNavigationItemSelectedListener( this ) ;
   }
   @Override
   public void onBackPressed () {
      DrawerLayout drawer = findViewById(R.id. drawer_layout ) ;
      if (drawer.isDrawerOpen(GravityCompat. START )) {
         drawer.closeDrawer(GravityCompat. START ) ;
      } else {
         super .onBackPressed() ;
      }
   }
   @Override
   public boolean onCreateOptionsMenu (Menu menu) {
      // Inflate the menu; this adds items to the action bar if it is present.
      getMenuInflater().inflate(R.menu. main , menu) ;
      return true;
   }
   @Override
   public boolean onOptionsItemSelected (MenuItem item) {
      int id = item.getItemId() ;
      if (id == R.id. action_settings ) {
         return true;
      }
      return super .onOptionsItemSelected(item) ;
   }
   @SuppressWarnings ( "StatementWithEmptyBody" )
   @Override
   public boolean onNavigationItemSelected ( @NonNull MenuItem item) {
      // Handle navigation view item clicks here.
      int id = item.getItemId() ;
      if (id == R.id. nav_camera ) {
         // Handle the camera action
      } else if (id == R.id. nav_gallery ) {
      } else if (id == R.id. nav_slideshow ) {
         } else if (id == R.id. nav_manage ) {
         } else if (id == R.id. nav_share ) {
         } else if (id == R.id. nav_send ) {
      }
      DrawerLayout drawer = findViewById(R.id. drawer_layout ) ;
      drawer.closeDrawer(GravityCompat. START ) ;
      return true;
   }
}
Step 8 − Add the following code to androidManifest.xml
<? xml version= "1.0" encoding= "utf-8" ?>
<manifest xmlns: android = "http://schemas.android.com/apk/res/android"
   package= "app.tutorialspoint.com.sample" >
   <application
      android :allowBackup= "true"
      android :icon= "@mipmap/ic_launcher"
      android :label= "@string/app_name"
      android :roundIcon= "@mipmap/ic_launcher_round"
      android :supportsRtl= "true"
      android :theme= "@style/AppTheme" >
      <activity
         android :name= ".MainActivity"
         android :theme= "@style/AppTheme.NoActionBar" >
         <intent-filter>
            <action android :name= "android.intent.action.MAIN" />
            <category android :name= "android.intent.category.LAUNCHER" />
         </intent-filter>
      </activity>
   </application>
</manifest>
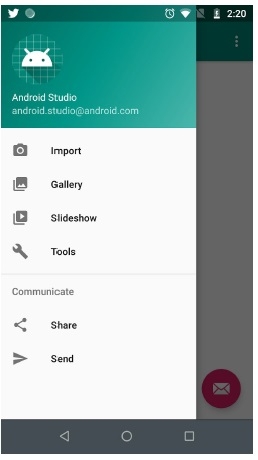
Let's try to run your application. I assume you have connected your actual Android Mobile device with your computer. To run the app from android studio, open one of your project's activity files and click Run ![]() icon from the toolbar. Select your mobile device as an option and then check your mobile device which will display your default screen –
icon from the toolbar. Select your mobile device as an option and then check your mobile device which will display your default screen –

6K+ Views
