 Data Structure
 Networking
 RDBMS
RDBMS Operating System
 Java
Java MS Excel
 iOS
iOS HTML
HTML CSS
CSS Android
 Python
 C Programming
 C++
C++ C#
C# MongoDB
 MySQL
MySQL Javascript
 PHP
PHP
- Selected Reading
- UPSC IAS Exams Notes
- Developer's Best Practices
- Questions and Answers
- Effective Resume Writing
- HR Interview Questions
- Computer Glossary
- Who is Who
How to Create an App in Django?
Django is a Python web framework. Developers can use Django to develop web applications rapidly, and the Django framework contains multiple libraries and tools to improve the web development experience.
The Django project contains various features, such as automatic admin interface integration, built-in form handling, URL and user request handling, etc., and one of them is Django App.
In the Django project, the app is a module that contains templates, URLs, models, views, etc. So, the app is a module in large projects which we can resuse in other projects. Furthermore, the app makes it easy to manage the code of larger projects of Django.
In this tutorial, we will learn to create an App in the Django project and customize the app.
Users should follow the steps below to start creating from a Django project to a Django app.
Step 1 ? Make sure you have Python installed on your local computer. After that, to install Django on the computer, run the below command.
pip install Django
Step 2 ? Now, open the terminal and go to the project directory. After that, enter the below command in the terminal to start a new project. Here, the project name is ?django_demo'.
django-admin startproject djanog_demo
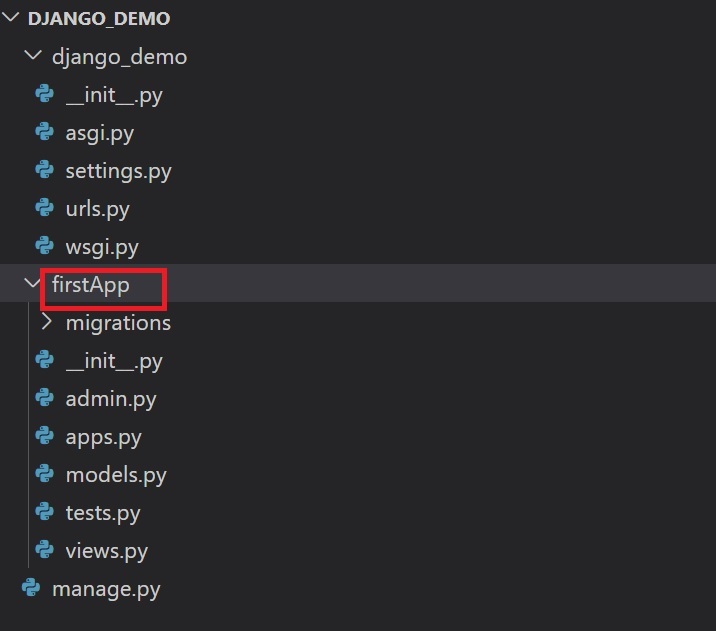
Step 3 ? Next, create an app in the project. Users can use any of the commands below to create an app called ?firstApp' in the project. Ensure you run the below command in the directory containing the manage.py file.
django-admin startapp firstApp
or
python manage.py startapp myapp
Users can observe in the image below how the app is created, and how the project structure looks.

Step 4 ? The Django project already contains some installed apps. Whenever we create a new app in the project, we must add an app name inside the installed apps.
Go to the settings.py file, and replace the ?INSTALLED_APPS' array with the below array. Here, we added the ?firstApp' in the array.
INSTALLED_APPS = [
   'django.contrib.admin',
   'django.contrib.auth',
   'django.contrib.contenttypes',
   'django.contrib.sessions',
   'django.contrib.messages',
   'django.contrib.staticfiles',
   'firstApp',

]
Step 5 ? Next, we require to set up the URLs for our app. Developers require to go to the URLs.py file inside the django_test folder and replace the current code of the file with the below code.
from django.contrib import admin
from django.urls import path, include

urlpatterns = [
   path('admin/', admin.site.urls),
   # here, firstApp is a app name
   path('', include("firstApp.urls")),
]
In the above step, we have specified that if users make a GET request on the home page, they use the URLs of the firstApp. So, we require to create routes for the firstApp.
Step 6 ? Inside the firstApp folder, create a urls.py file, and add the below code in the file.
from django.urls import path
from . import views
urlpatterns=[
   path('',views.home)
]
The above code will call the ?home' views whenever users visit the home route.
Step 7 ? Now, we will add the ?home' view inside the views.py file. Here, users need to add the below code inside the firstApp -> views.py file.
from django.http import HttpResponse

# Create your views here.
def home(request):
   return HttpResponse("<h1>Hello Django Developers! Your app is working fine. </h1>")
Step 8 ? Now, it's time to run our project. Open the terminal in the directory containing the manage.py file, and run the below command.
python manage.py runserver
The above command will start the server, and users can access the application on the localhost. Users can observe the below output in the web page.

Developers successfully learned to create an app in Django. Developers can also create multiple applications in the Django project, but they need to set up proper URLs for every application and need to add an app inside the ?INSTALLED_APPS' array inside the ?settings.py' file.
Developers can create multiple applications when they want to provide different functionalities to different users. For example, we can develop a project to manage the banking system. After that, we can create two apps inside that. One allows users to handle their bank account, and another app allows employees to handle the user's account.

