
Article Categories
- All Categories
-
 Data Structure
-
 Networking
-
 RDBMS
RDBMS
-
 Operating System
-
 Java
Java
-
 MS Excel
-
 iOS
iOS
-
 HTML
HTML
-
 CSS
CSS
-
 Android
-
 Python
-
 C Programming
-
 C++
C++
-
 C#
C#
-
 MongoDB
-
 MySQL
MySQL
-
 Javascript
-
 PHP
PHP
-
 Economics & Finance
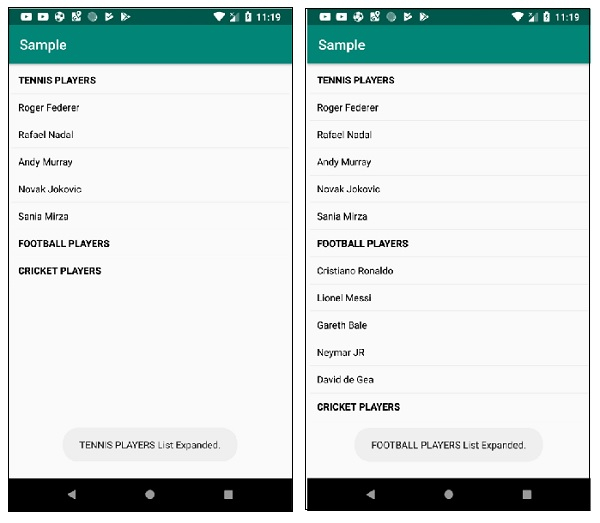
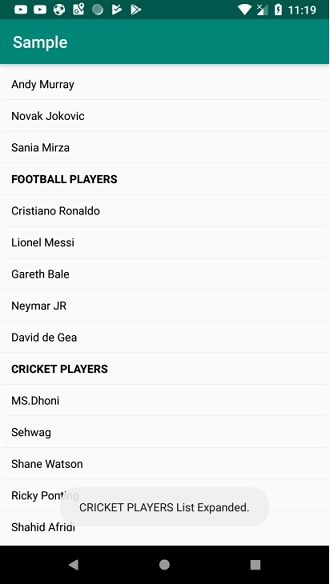
How to create a multilevel ListView in an Android app?
This example demonstrates how do I create a multilevel listView in android.
Step 1 − Create a new project in Android Studio, go to File ⇒ New Project and fill all required details to create a new project.
Step 2 − Add the following code to res/layout/activity_main.xml.
<?xml version="1.0" encoding="utf-8"?>
<RelativeLayout xmlns:android="http://schemas.android.com/apk/res/android"
   xmlns:tools="http://schemas.android.com/tools"
   android:layout_width="match_parent"
   android:padding="4dp"
   android:layout_height="match_parent"
   tools:context=".MainActivity">
   <ExpandableListView
      android:id="@+id/expendableList"
      android:layout_width="match_parent"
      android:layout_height="match_parent"
      android:divider="@android:color/background_light"
      android:dividerHeight="0.5dp"/>
</RelativeLayout>
Step 3 − Add the following code to src/MainActivity.java
import androidx.appcompat.app.AppCompatActivity;
import android.os.Bundle;
import android.view.View;
import android.widget.ExpandableListAdapter;
import android.widget.ExpandableListView;
import android.widget.Toast;
import java.util.ArrayList;
import java.util.HashMap;
import java.util.List;
public class MainActivity extends AppCompatActivity {
   ExpandableListView expandableListView;
   ExpandableListAdapter expandableListAdapter;
   List<String>expandableListTitle;
   HashMap<String, List<String>> expandableListDetail;
   @Override
   protected void onCreate(Bundle savedInstanceState) {
      super.onCreate(savedInstanceState);
      setContentView(R.layout.activity_main);
      expandableListView = findViewById(R.id.expendableList);
      expandableListDetail = ExpandableListData.getData();
      expandableListTitle = new ArrayList<>(expandableListDetail.keySet());
      expandableListAdapter = new CustomExpandableListAdapter(this, expandableListTitle, expandableListDetail);
      expandableListView.setAdapter(expandableListAdapter);
      expandableListView.setOnGroupExpandListener(new ExpandableListView.OnGroupExpandListener() {
         @Override
         public void onGroupExpand(int groupPosition) {
         Toast.makeText(getApplicationContext(), expandableListTitle.get(groupPosition)
            + " List Expanded.", Toast.LENGTH_SHORT).show();
      }
   });
   expandableListView.setOnGroupCollapseListener(new ExpandableListView.OnGroupCollapseListener() {
      @Override
      public void onGroupCollapse(int groupPosition) {
         Toast.makeText(getApplicationContext(), expandableListTitle.get(groupPosition) + " List Collapsed.",
            Toast.LENGTH_SHORT).show();
      }
   });
   expandableListView.setOnChildClickListener(new ExpandableListView.OnChildClickListener() {
      @Override
      public boolean onChildClick(ExpandableListView parent, View v, int groupPosition, int childPosition, long id) {
            Toast.makeText( getApplicationContext(), expandableListTitle.get(groupPosition) + "
               -> " + expandableListDetail.get( expandableListTitle.get(groupPosition)).get( childPosition), Toast.LENGTH_SHORT ).show();
            return false;
         }
      });
   }
}
Step 4 − Create a java class (ExpandableListData.java) and the following code
import java.util.ArrayList;
import java.util.HashMap;
import java.util.List;
class ExpandableListData {
   static HashMap<String, List<String>> getData() {
      HashMap<String, List<String>> expandableListDetail = new HashMap<>();
      List<String> myFavCricketPlayers = new ArrayList<>();
      myFavCricketPlayers.add("MS.Dhoni");
      myFavCricketPlayers.add("Sehwag");
      myFavCricketPlayers.add("Shane Watson");
      myFavCricketPlayers.add("Ricky Ponting");
      myFavCricketPlayers.add("Shahid Afridi");
      List<String> myFavFootballPlayers = new ArrayList<String>();
      myFavFootballPlayers.add("Cristiano Ronaldo");
      myFavFootballPlayers.add("Lionel Messi");
      myFavFootballPlayers.add("Gareth Bale");
      myFavFootballPlayers.add("Neymar JR");
      myFavFootballPlayers.add("David de Gea");
      List<String> myFavTennisPlayers = new ArrayList<String>();
      myFavTennisPlayers.add("Roger Federer");
      myFavTennisPlayers.add("Rafael Nadal");
      myFavTennisPlayers.add("Andy Murray");
      myFavTennisPlayers.add("Novak Jokovic");
      myFavTennisPlayers.add("Sania Mirza");
      expandableListDetail.put("CRICKET PLAYERS", myFavCricketPlayers);
      expandableListDetail.put("FOOTBALL PLAYERS", myFavFootballPlayers);
      expandableListDetail.put("TENNIS PLAYERS", myFavTennisPlayers);
      return expandableListDetail;
   }
}
Step 5 − Create a java class (CustomExpandableListAdapter.java) and the following code
package app.com.sample;
import android.content.Context;
import android.graphics.Typeface;
import android.view.LayoutInflater;
import android.view.View;
import android.view.ViewGroup;
import android.widget.BaseExpandableListAdapter;
import android.widget.TextView;
import java.util.HashMap;
import java.util.List;
import java.util.Objects;
class CustomExpandableListAdapter extends BaseExpandableListAdapter {
   private Context context;
   private List<String> expandableListTitle;
   private HashMap<String, List<String>> expandableListDetail;
   CustomExpandableListAdapter(Context context, List<String> expandableListTitle, HashMap<String, List<String>> expandableListDetail) {
      this.context = context;
      this.expandableListTitle = expandableListTitle;
      this.expandableListDetail = expandableListDetail;
   }
   @Override
   public Object getChild(int listPosition, int expandedListPosition) {
      return
      Objects.requireNonNull(this.expandableListDetail.get(this.expandableListTitle.get(list Position))).get(expandedListPosition);
   }
   @Override
   public long getChildId(int listPosition, int expandedListPosition) {
      return expandedListPosition;
   }
   @Override
   public View getChildView(int listPosition, final int expandedListPosition, boolean isLastChild, View convertView, ViewGroup parent) {
      final String expandedListText = (String) getChild(listPosition, expandedListPosition);
      if (convertView == null) {
         LayoutInflater layoutInflater = (LayoutInflater) this.context.getSystemService(Context.LAYOUT_INFLATER_SERVICE);
         convertView = Objects.requireNonNull(layoutInflater).inflate(R.layout.list_row, null);
      }
      TextView textView = convertView.findViewById(R.id.listTitle);
      textView.setText(expandedListText);
      return convertView;
   }
   @Override
   public int getChildrenCount(int listPosition) {
      return
      this.expandableListDetail.get(this.expandableListTitle.get(listPosition)).size();
   }
   @Override
   public Object getGroup(int listPosition) {
      return this.expandableListTitle.get(listPosition);
   }
   @Override
   public int getGroupCount() {
      return this.expandableListTitle.size();
   }
   @Override
   public long getGroupId(int listPosition) {
      return listPosition;
   }
   @Override
   public View getGroupView(int listPosition, boolean isExpanded, View convertView, ViewGroup parent) {
      String listTitle = (String) getGroup(listPosition);
      if (convertView == null) {
         LayoutInflater layoutInflater = (LayoutInflater) this.context. getSystemService(Context.LAYOUT_INFLATER_SERVICE);
         convertView = Objects.requireNonNull(layoutInflater).inflate(R.layout.list_row, null);
      }
      TextView listTitleTextView = convertView.findViewById(R.id.listTitle);
      listTitleTextView.setTypeface(null, Typeface.BOLD);
      listTitleTextView.setText(listTitle);
      return convertView;
   }
   @Override
   public boolean hasStableIds() {
      return false;
   }
   @Override
   public boolean isChildSelectable(int listPosition, int expandedListPosition) {
      return true;
   }
}
Step 6 − Create a layout resource file(list_row.xml) and add the following code −
<?xml version="1.0" encoding="utf-8"?>
<LinearLayout xmlns:android="http://schemas.android.com/apk/res/android"
   android:orientation="vertical" android:layout_width="match_parent"
   android:layout_height="match_parent">
   <TextView
      android:id="@+id/listTitle"
      android:layout_width="fill_parent"
      android:layout_height="wrap_content"
      android:padding="10dp"
      android:textColor="@android:color/black" />
</LinearLayout>
Step 7 − Add the following code to androidManifest.xml
<?xml version="1.0" encoding="utf-8"?>
<manifest xmlns:android="http://schemas.android.com/apk/res/android" package="app.com.sample">
   <application
      android:allowBackup="true"
      android:icon="@mipmap/ic_launcher"
      android:label="@string/app_name"
      android:roundIcon="@mipmap/ic_launcher_round"
      android:supportsRtl="true"
      android:theme="@style/AppTheme">
         <activity android:name=".MainActivity">
            <intent-filter>
               <action android:name="android.intent.action.MAIN" />
               <category android:name="android.intent.category.LAUNCHER" />
            </intent-filter>
      </activity>
   </application>
</manifest>
Let's try to run your application. I assume you have connected your actual Android Mobile device with your computer. To run the app from the android studio, open one of your project's activity files and click Run ![]() icon from the toolbar. Select your mobile device as an option and then check your mobile device which will display your default screen −
icon from the toolbar. Select your mobile device as an option and then check your mobile device which will display your default screen −
Click here to download the project code.

707 Views
