 Data Structure
 Networking
 RDBMS
RDBMS Operating System
 Java
Java MS Excel
 iOS
iOS HTML
HTML CSS
CSS Android
 Python
 C Programming
 C++
C++ C#
C# MongoDB
 MySQL
MySQL Javascript
 PHP
PHP
- Selected Reading
- UPSC IAS Exams Notes
- Developer's Best Practices
- Questions and Answers
- Effective Resume Writing
- HR Interview Questions
- Computer Glossary
- Who is Who
How to compute Hu-Moments of an image in OpenCV Python?
The Hu-Moments can be found using the cv2.HuMoments() function. It returns seven moments invariant to translation, rotation and scale. Seventh moment is skew-invariant.
To compute the Hu-Moments, we need to first find the image. The image moments are computed for an object using the contour of the object. So, first, we detect the contour of the object and then apply cv2.moments() function to compute the moments.
Syntax
The following syntax is used for this function ?
M = cv2.moments(cnt)
cv2.HuMoments(M)
Here,
cnt ? It is a numpy array of the contour points of an object in the image.
M ? The image moments computed above.
Steps
You can use the following steps to compute the Hu-Moments in an image ?
Import the required library. In all the following Python examples, the required Python library is OpenCV. Make sure you have already installed it.
import cv2
Read the input image using cv2.imread() and convert it to grayscale.
img = cv2.imread('shape.png')
gray = cv2.cvtColor(img, cv2.COLOR_BGR2GRAY)
Apply thresholding on the grayscale image to create a binary image.
ret,thresh = cv2.threshold(gray,150,255,0)
Find the contours in the image using cv2.findContours() function.
contours, _ = cv2.findContours(thresh, cv2.RETR_TREE,cv2.CHAIN_APPROX_SIMPLE)
Find the moments of the contours using cv2.moments(cnt) function.
cnt = contours[0]
M = cv2.moments(cnt)
Find the Hu-Moments using cv2.HuMoments(M) function for a particular contour.
Hm = cv2.HuMoments(M)
Draw the contours on the input image.
cv2.drawContours(img, [cnt], -1, (0,255,255), 3)
Print the Hu-Moments and display the image with the drawn contours.
print("Hu-Moments of first contour:\n", Hm)
cv2.imshow(Hu-Moments", img)
cv2.waitKey(0)
cv2.destroyAllWindows()
Let's have a look at some examples for a better understanding.
We will use the following image as the Input File in the examples below.

Example 1
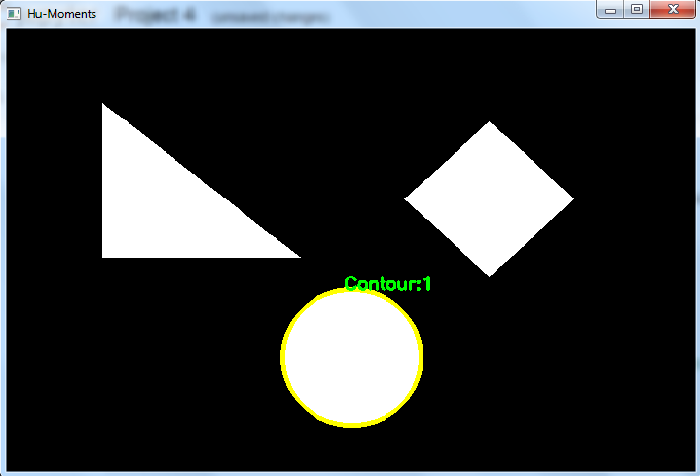
In the Python program below, we detect the contours in the image and find the Hu-Moments for the first contour. We also draw the first contour on the image.
# import the required libraries
import cv2

# Read the input image
img = cv2.imread('shape.png')

# Convert the input image to grayscale
gray = cv2.cvtColor(img, cv2.COLOR_BGR2GRAY)

# apply thresholding on gray image
ret,thresh = cv2.threshold(gray,150,255,0)

# Find the contours in the image
contours,hierarchy = cv2.findContours(thresh, cv2.RETR_TREE,cv2.CHAIN_APPROX_SIMPLE)
print("Number of Contours detected:",len(contours))

# Find the moments of first contour
cnt = contours[0]
M = cv2.moments(cnt)
Hm = cv2.HuMoments(M)

# Draw the contour
cv2.drawContours(img, [cnt], -1, (0,255,255), 3)
x1, y1 = cnt[0,0]
cv2.putText(img, 'Contour:1', (x1, y1), cv2.FONT_HERSHEY_SIMPLEX, 0.6, (0, 255, 0), 2)

# print the moments of the first contour
print("Hu-Moments of first contour:\n", Hm)
cv2.imshow("Hu-Moments", img)
cv2.waitKey(0)
cv2.destroyAllWindows()
Output
When you execute the above code it will produce the following output ?
Number of Contours detected: 3
Hu-Moments of first contour:
   [[ 1.59307685e-01]
   [ 4.69721864e-05]
   [ 1.89651880e-10]
   [ 8.95011994e-14]
   [ 2.03401550e-25]
   [ 4.24017740e-16]
   [-3.07567885e-25]]
And we get the following output window, showing the first detected contour in the image ?

Example 2
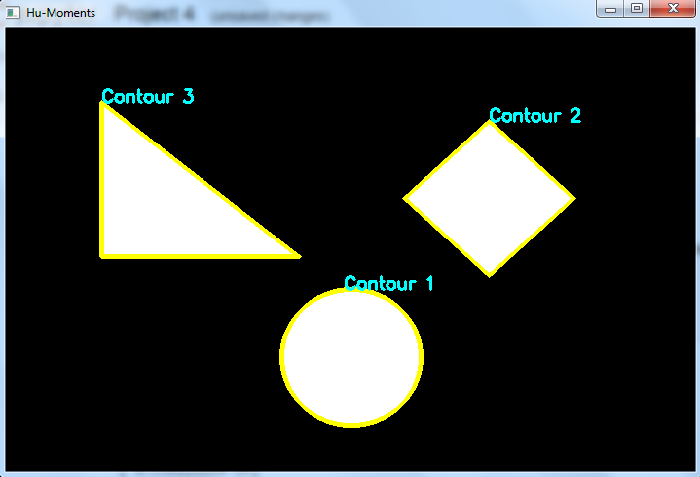
In the Python program below, we detect the contours in the image and find the Hu-Moments for the all contours. We also draw all the contours on the image.
import cv2
import numpy as np

img = cv2.imread('shape.png')
gray = cv2.cvtColor(img, cv2.COLOR_BGR2GRAY)
ret,thresh = cv2.threshold(gray,170,255,0)
contours,hierarchy = cv2.findContours(thresh, cv2.RETR_TREE,cv2.CHAIN_APPROX_SIMPLE)
print("Number of contours detected:",len(contours))

# compute HuMoments for all the contours detected in the image
for i, cnt in enumerate(contours):
   x,y = cnt[0,0]
   moments = cv2.moments(cnt)
   hm = cv2.HuMoments(moments)
   cv2.drawContours(img, [cnt], -1, (0,255,255), 3)
   cv2.putText(img, f'Contour {i+1}', (x, y), cv2.FONT_HERSHEY_SIMPLEX, 0.6, (255, 255, 0), 2)
   print(f"\nHuMoments for Contour {i+1}:\n", hm)

cv2.imshow("Hu-Moments", img)
cv2.waitKey(0)
cv2.destroyAllWindows()
Output
When you execute the above code it will produce the following output ?
Number of contours detected: 3
HuMoments for Contour 1:
   [[ 1.59307685e-01]
   [ 4.69721864e-05]
   [ 1.89651880e-10]
   [ 8.95011994e-14]
   [ 2.03401550e-25]
   [ 4.24017740e-16]
   [-3.07567885e-25]]
HuMoments for Contour 2:
   [[ 1.67576439e-01]
   [ 3.03541843e-04]
   [ 2.96933966e-10]
   [ 8.49276231e-12]
   [-3.47095391e-22]
   [ 2.67821989e-14]
   [ 2.47818355e-22]]
HuMoments for Contour 3:
   [[2.29748674e-01]
   [1.57527336e-02]
   [5.92081089e-03]
   [4.77994195e-04]
   [4.24175667e-07]
   [1.65030169e-05]
   [6.83150707e-07]]
And we get the following output window, showing the detected contours in the image ?


