- GitLab - Introduction
- GitLab - Installation
- GitLab - Git Commands
- GitLab - SSH Key Setup
- GitLab - Create Project
- GitLab - Fork a Project
- GitLab - Create a Branch
- GitLab - Add a File
- GitLab - Rebase Operation
- GitLab - Squashing Commits
- GitLab Users and Groups
- GitLab - Adding Users
- GitLab - Create Groups
- GitLab - Remove Users
- GitLab - User Permissions
- GitLab Issue Tracker
- GitLab - Create Issue
- GitLab - Merge Requests
- GitLab - Referencing Issues
- GitLab - Milestones
- GitLab - Wiki Pages
- GitLab Instance Management
- GitLab - Create Backup
- GitLab - Restore Backup
- GitLab - Import Repository
- GitLab Continuous Integration
- GitLab CI - Introduction
- GitLab - CI/CD
- GitLab - CI/CD Variables
- GitLab CI - Permissions
- Configuring GitLab Runners
- GitLab CI - Advanced usage of CI
- GitLab CI - Cycle Analytics
- GitLab CI - Container Registry
GitLab CI - Environment Setup
Description
GitLab CI (Continuous Integration) service is a part of GitLab which manages the project and user interface and allows unit tests on every commit and indicates with warning message when there is a unsuccessful of build.
The environment setup for GitLab CI includes following requirements −
Software Requirements
- Ubuntu 12.0.x or Debian/Linux
- Ruby 1.9.3+
- GitLab 6.3+
- MySQL or PostgreSQL
Hardware Requirements
- CPU: 2 cores
- Memory: 2GB
Installing Dependencies
Step 1 − First, login to your GitLab server using SSH (Secure Shell).
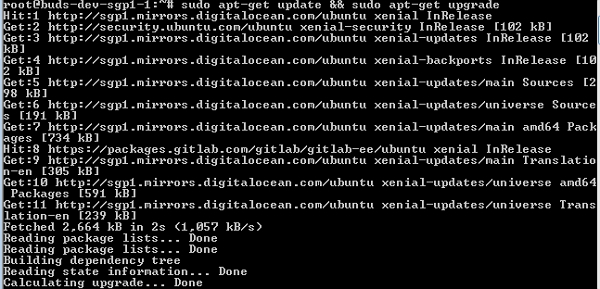
Step 2 − Verify whether system is up to date or not by using below command −
$ sudo apt-get update && sudo apt-get upgrade
Step 3 − Next, install the required dependencies −
sudo apt-get install wget curl gcc checkinstall libxml2-dev
sudo apt-get install libxslt-dev libcurl4-openssl-dev
sudo apt-get install libreadline6-dev libc6-dev libssl-dev
sudo apt-get install libmysql++-dev make build-essential
zlib1g-dev
sudo apt-get install openssh-server git-core libyaml-dev
sudo apt-get install redis-server postfix libpq-dev libicudev
Step 4 − Now, install the Ruby by creating a directory under /tmp folder −
mkdir /tmp/ruby && cd /tmp/ruby
Step 5 − Install the Ruby package with the below command −
curl --progress http://cache.ruby-lang.org/pub/ruby/2.0/ruby-2.0.0-p353.tar.bz2 | tar xj
cd ruby-2.0.0-p353
./configure disable-install-rdoc && make && sudo make install
Step 6 − After installing the Ruby, install the package manager for Ruby −
sudo gem install bundler no-ri -no-rdoc

Step 7 − Now create a new user to run the GitLab CI service instead of running as root user. (For security reasons, we are creating new user) −
sudo adduser disabled-login gecos 'GitLab CI' gitlab_ci
Step 8 − Install the PostgreSQL to run GitLab CI −
sudo apt-get install postgresql postgresql-client libpq-dev
Step 9 − Now, login to PostgreSQL −
sudo u postgres psql d template1
Step 10 − Create a new user and database in PostgreSQL and give the privileges to the user −
template1 = # CREATE USER gitlab_ci;
template1 = # CREATE DATABASE gitlab_ci_production OWNER gitlab_ci;

Step 11 − After installing all the dependencies, you can exit from the PostgreSQL as shown below −
template1 = # \q

