- FuelPHP - Home
- FuelPHP - Introduction
- FuelPHP - Installation
- FuelPHP - Architecture Overview
- FuelPHP - Simple Web Application
- FuelPHP - Configuration
- FuelPHP - Controllers
- FuelPHP - Routing
- FuelPHP - Requests & Response
- FuelPHP - Views
- FuelPHP - Presenters
- FuelPHP - Models & Database
- FuelPHP - Form Programming
- FuelPHP - Validation
- Advanced Form Programming
- FuelPHP - File Uploading
- FuelPHP - Ajax
- FuelPHP - HMVC Request
- FuelPHP - Themes
- FuelPHP - Modules
- FuelPHP - Packages
- Cookie & Session Management
- FuelPHP - Events
- FuelPHP - Email Management
- FuelPHP - Profiler
- Error Handling & Debugging
- FuelPHP - Unit Testing
- Complete Working Example
- FuelPHP Useful Resources
- FuelPHP - Quick Guide
- FuelPHP - Useful Resources
- FuelPHP - Discussion
FuelPHP - Quick Guide
FuelPHP - Introduction
FuelPHP is an open source web application framework. It is written in PHP 5.3 and implements HMVC pattern. HMVC is Hierarchical Model-View-Controller framework that allows to sub-request the controller, which returns the partial page such as comments, menus, etc., instead of the complete page as in normal MVC.
FuelPHP is created with a desire to incorporate best practices from frameworks such as CodeIgniter and Kohana with improvements and ideas of its own. FuelPHP database migration tool and scaffolding functionalities are inspired by the popular Ruby on Rails framework.
FuelPHP leverages the power of command line through a utility called "Oil". The utility is designed to help speed up development, increase efficiency, testing, debugging, and HTML support.
FuelPHP is purely an object-oriented approach. Its architecture is based on the idea of modularity. Applications can be divided into modules and every component can be extended or replaced without rewriting a single line of code. Fuel supports any template parser such as Smarty, Twig, PHPTal, etc. for parsing views.
FuelPHP community is large and active with over 300 contributors. Its large community regularly creates and improves packages and extensions. The main objective of FuelPHP framework is to provide flexibility and compatibility. It is fast, easy to learn, and a complete solution for developing web applications.
What makes FuelPHP one of the premier frameworks used by PHP developers is that the new version of FuelPHP is reverse-compatible with its older versions because of its stable API. It is extremely flexible.
Packages and modules make it easy and simple to reuse an existing code in a systematic way. FuelPHP offers maximum performance through a small library. Its interactive debugging allows to easily eliminate the errors in development. Also, its clean and stable code makes programming easier.
FuelPHP - Features
FuelPHP offers lot of features to create a full-fledged web application. It provides flexible components, simple configuration, easy-to-use ORM, REST based application development mode, etc. Following are some of the salient features −
- Flexible and community driven web framework
- Easy to configure and use
- FuelPHP is extremely portable, works on almost any server
- Flexible URI routing system
- FuelPHP provides RESTful API development support
- Lightweight ORM model
- Input filtering and prevents SQL injection
- Secure authentication and authorization framework
- Code reusable and easier to maintain
- Autoloading classes, Session management, and Exception handling.
FuelPHP - Advantages
FuelPHP is an elegant HMVC PHP 5.3 framework that provides a set of components for building web applications with the following advantages −
Modular structure − Fuel doesnt force you to use modules or an HMVC file structure. If you want to use, the process is quite easy to integrate. FuelPHP apps are created in a modular structure and becomes easier for developers with clear benefits.
HMVC pattern − The most important feature of this framework is HMVC (Hierarchical Model View Controller) which makes it easy to access or use any properties, class methods, functions, files at higher level.
Secure hashing function − FuelPHP supports strong cryptography tools and password hashing techniques. It handles encryption, decryption, and hashing using the powerful PHPSecLib.
Scaffolding functionality − Scaffolding is a meta-programming method for building database operations. Fuels scaffolding is pretty easy. It allows you to get a basic CRUD application with very simple steps.
The following popular products use FuelPHP Framework −
Matic Technology − Global provider of offshore custom software development solutions. At Matic Technologies, they provide all the best possible solutions through FuelPHP according to the requirements of the client.
Kroobe − Kroobe is a social networking classifieds company. Fuel offers extremely low development costs and services to Kroobe team to achieve efficient solution.
FuelPHP - Installation
This chapter explains how to install FuelPHP framework on your machine. FuelPHP installation is very simple and easy. You have two methods to create FuelPHP applications −
The first method is Command line installation using FuelPHP tool called Oil.
The second method is Composer based installation. FuelPHP uses Composer, both for installation and for package dependencies, so make sure the composer is installed locally before continuing the process.
Lets go through each of the methods one by one in detail in the subsequent sections.
System Requirements
Before moving to installation, the following system requirements have to be satisfied.
Web server (Any of the following)
- WAMP (Windows)
- Microsoft IIS (Windows)
- LAMP (Linux)
- MAMP (Macintosh)
- XAMP (Multi-platform)
- Nginx (Multi-platform)
- PHP in-built development web server (Multi-platform)
Browser support (Any of the following)
- IE (Internet Explorer 8+)
- Firefox
- Google Chrome
- Safari
PHP compatibility − PHP 5.3 or later. To get the maximum benefit, use the latest version.
Let us use PHP's in-built development web server for this tutorial. The built-in development web server is easy to start as well as quite adequate to understand the basics of FuelPHP web application without getting into the complexity of the world of web server and configurations.
Command Line Installation
The command line installation of FuelPHP is very easy and takes maximum of five minutes.
Install Oil Package
Oil is a special package/command provided by FuelPHP framework to do lot of tasks needed in the development of FuelPHP application including installation, development, and testing the application.
To install the Oil package, open up a shell and run the following command −
sudo curl https://get.fuelphp.com/oil | sh
The command uses curl to download and install the oil package. The command will show result similar to the following information and finally install the oil package.
 % Total    % Received % Xferd  Average Speed   Time    Time     Time  Current
                                 Dload  Upload   Total   Spent    Left  Speed
100   479  100   479    0     0    353      0  0:00:01  0:00:01 --:--:--   353
Create a New Project
To create a new project using Oil, use the following command −
oil create <project_name>
Lets create a new project named HelloWorld using the following command.
oil create HelloWorld
Now, you can see response similar to the following and finally create a simple skeleton FuelPHP application.
composer create-project fuel/fuel HelloWorld
Installing fuel/fuel (1.8.0.1)
   - Installing fuel/fuel (1.8.0.1)
      Loading from cache

Created project in HelloWorld

Loading composer repositories with package information
Updating dependencies (including require-dev)
   - Installing composer/installers (v1.3.0)
      Loading from cache
   - Installing fuelphp/upload (2.0.6)
      Loading from cache
   - Installing michelf/php-markdown (1.4.0)
      Loading from cache
   - Installing psr/log (1.0.2)
      Loading from cache
   - Installing monolog/monolog (1.18.2)
      Loading from cache
   - Installing phpseclib/phpseclib (2.0.0)
      Loading from cache
   - Installing fuel/core (1.8.0.4)
      Loading from cache
   - Installing fuel/auth (1.8.0.4)
      Loading from cache
   - Installing fuel/email (1.8.0.4)
      Loading from cache
   - Installing fuel/oil (1.8.0.4)
      Loading from cache
   - Installing fuel/orm (1.8.0.1)
      Loading from cache
   - Installing fuel/parser (1.8.0.4)
      Loading from cache
   - Installing fuel/docs (1.8.0.4)
      Loading from cache
   .
   .
   Writing lock file
   Generating autoload files
Oil Version
To test whether Oil is available and to check the version, use the following command −
$ cd HelloWorld
$ php oil -v
The above command produces the following result −
Fuel: 1.8 running in "development" mode
Oil Help Command
To obtain Oils basic help documentation, use the following command −
$ php oil help
The above command will show the help documentation similar to the following result −
Usage:
   php oil [cell|console|generate|package|refine|help|server|test]
Runtime options:
   -f, [--force]    # Overwrite files that already exist
   -s, [--skip]     # Skip files that already exist
   -q, [--quiet]    # Supress status output
   -t, [--speak]    # Speak errors in a robot voice
Description:
   The 'oil' command can be used in several ways to facilitate quick development, help
   with testing your application and for running Tasks.
Environment:
   If you want to specify a specific environment oil has to run in, overload the
   environment variable on the commandline: FUEL_ENV=staging php oil <commands>
More information:
   You can pass the parameter "help" to each of the defined command to get
   information about that specific command: php oil package help
Documentation:
   http://docs.fuelphp.com/packages/oil/intro.html
As of now, you have an idea of how to install Fuel using Oil. Lets go through the composer based installation in the next section.
Composer-based Installation
The following command is used to install FuelPHP using Composer.
$ composer create-project fuel/fuel --prefer-dist.
Git Repository Clones
To install the latest development version as local git repository clones, use the following command.
$ composer create-project fuel/fuel:dev-1.9/develop --prefer-source.
Running the Application
Move to the project directory public folder, run the application using the production server with the following command.
$ cd path/to/HelloWorld/public
$ php -S localhost:8080 index.php
It produces the following response.
PHP 5.5.31 Development Server started at Sun May 21 12:26:10 2017
Listening on http://localhost:8080
Document root is /Users/workspace/php-fuel/HelloWorld/public
Press Ctrl-C to quit.
Now, request the URL, http://localhost:8080 and it will produce the following result.
Result
This is the simplest way to run FuelPHP application in the development environment. If you create your application in this way in the production environment, you will face security issues. The recommended way is setting up a virtual host configuration. It is explained for apache web server in the next section.
Setting Up a Virtual Host
It is more secure way to access FuelPHP application. To set up a virtual host, you need to link apache virtual host file to your application. In case of intranet application, redirect system host file URL to virtual host.
Virtual Host File
Open the virtual host and add the following changes.
<VirtualHost *:80>
   ServerName hello.app
   DocumentRoot /path/to/public
   SetEnv FUEL_ENV development

   <Directory /path/to/public>
      DirectoryIndex index.php
      AllowOverride All
      Order allow,deny
      Allow from all
   </Directory>
</VirtualHost>
System Host File
Now, add a host entry to your machine using the following command.
sudo vi /etc/hosts
Then, add the following line to the end of the file.
127.0.0.1 hello.app
To make all the changes available, restart your Apache server and request the url, http://hello.app. It produces the FuelPHP home page.
FuelPHP - Architecture Overview
FuelPHP is based on battle tested Model-View-Controller architecture along with HMVC (Hierarchical MVC) support. While MVC provides flexible and layered application development, HMVC goes one step further to enable widgetization of the web application.
The strength of FuelPHP is that it does not enforce specific ways to develop an application. It just provides a simple and easy-to-use standard structure. Developers are free to use the pre-defined set of functionality provided by FuelPHP or modify it whenever needed. All the features provided by FuelPHP including the core feature can be changed according to the requirement of the application.
Model
Model is the business entity of the application. Controller and View exchange data in the form of Model. Model enables uniform representation of our business data. It enables the database layer to interact with the web application layer in the standard way and provides an option to select, save, edit, and delete our database entities.
Controller
A typical MVC application starts from a Controller. Once a user sends a request to the FuelPHP web application, the application gathers all the information about the request and sends it to the Controller. Controller does the required business logic of the requested page and then calls the relevant View along with the processed data in the form of Models.
View
View is the presentation layer of the MVC application. View decides how to show the Model to the user. It supports simple data rendering to the advanced layout, which enables the website to normalize the design across all the pages. View also provides theming support, which enables quick design change across the application.
Presenter
Presenter is a special feature provided by FuelPHP. It is the glue between Controller and View. Controller can share some of its low level responsibility such as retrieving model from database, generating data for the view, etc. Controller calls Presenter instead of View, which in turn calls View. Presenter enables pure separation of business logic and presentation layer.
Hierarchical MVC
FuelPHP provides an option to call one controller from another controller, similar to the request from the client (browser). If any controller calls another controller, the called controller will return the response to the calling controller instead of rendering it to the client (browser). This enables widgetization of the web application. For example, the comment section can be showed as a stand-alone page as well as a sub-section of the main (blog) page.
Module
One of the salient features of FuelPHP is that a section of the web application can be converted into modules, which can be shared among the different application. For example, a blog module created for an application can be reused in another application by just copying the module code from source application to target application.
Note that creating a new module is as simple as developing the main application. The structure is similar to the main application with the only exception that the module should be coding a separate folder.
Package
FuelPHP provides an option to organize the code into a single unit called Package. A package can contain one or more functionality needed for the web application. For example, a database component such as ORM, email, etc., can be organized into a package and used whenever needed.
A Package is different from a Module in the sense that the Package does not contain any web pages or partial web pages. Package can be used in FuelPHP as well as any other PHP framework.
Workflow
The workflow of the FuelPHP is simple and easy to understand. It is depicted in the following diagram.
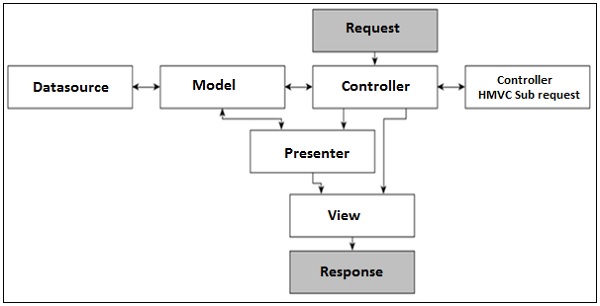
User sends a request to the application.
Controller receives the request and gathers information by interacting with the model, which in turn interacts with the database.
Controller gathers information by interacting with other controller by sending a subrequest to the other controllers.
Controller sends the retrieved model to the view, which in turn generates the presentation and sends it to the client as a response.
In some cases, the controller may pass the control to the presenter. In that case, the presenter gathers information from the model and sends it to the client. Here, the presenter does not perform any business logic, except retrieve the model from the database.
FuelPHP - Simple Web Application
In this chapter, we will see how to create a simple application in FuelPHP framework. As discussed earlier, you know how to create a new project in Fuel. We can take an example of Employee details.
Lets start by creating a project named Employee using the following command.
oil create employee
After executing the command, an employee project is created with the following file structure −
employee
 CHANGELOG.md
 composer.json
 composer.lock
 composer.phar
 CONTRIBUTING.md
 fuel
    app
       bootstrap.php
       cache
       classes
       config
       lang
       logs
       migrations
       modules
       tasks
       tests
       themes
       tmp
       vendor
       views
    core
       base56.php
       base.php
       bootstrap.php
       bootstrap_phpunit.php
       classes
       composer.json
       config
       CONTRIBUTING.md
       lang
       phpunit.xml
       tasks
       tests
       vendor
       views
    packages
       auth
       email
       oil
       orm
       parser
    vendor
        autoload.php
        composer
        fuelphp
        michelf
        monolog
        phpseclib
        psr
 LICENSE.md
 oil
 public
    assets
       css
       fonts
       img
       js
    favicon.ico
    index.php
    web.config
 README.md
 TESTING.md
42 directories, 21 files
Structure of the Application
FuelPHP framework provides a well-organized application structure. Let us check some of the important files and folders of the application.
fuel − Contains all the PHP files.
public − Contains all the assets which are directly accessed through the browser such as JavaScript, CSS, images, etc.
oil − An executable used to run command line tasks such as generating code or interactive debugging within your application. It's optional.
fuel/app/ − Contains all application-specific PHP files. It contains Models, Views, and Controllers.
fuel/core/ − This is where Fuel framework itself lives.
fuel/packages/ − Contains all fuel packages. By default, fuel will contain three packages: oil, auth, and orm. These packages will not be loaded unless you require them.
fuel/app/config/ − Contains all application-related configuration files. The main application configuration file, config.php file is located here.
fuel/app/classes/ − Contains all the application specific MVC based PHP files. It contains controllers, models, helper classes, libraries, etc.
fuel/app/classes/controller/ − Controllers are placed here.
fuel/app/classes/model/ − Models are placed here.
fuel/app/views/ − Contains view files. There are no specific naming conventions for views.
Add a Controller
As discussed earlier, FuelPHP is based on the Model-View-Controller (MVC) development pattern. MVC is a software approach that separates application logic from presentation. In MVC pattern, the controller plays an important role and every webpage in an application needs to be handled by a controller. By default, controllers are located in fuel/app/classes/controller/ folder. You can create your own Controller class here.
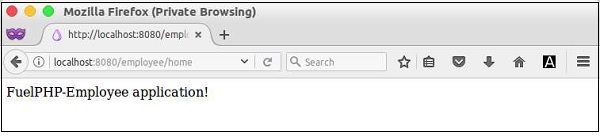
Move to the location fuel/app/classes/controller/ and create employee.php file. To create a new controller, just extend the Controller class provided by FuelPHP, defined as follows.
employee.php
<?php
   class Controller_Employee extends Controller {
      public function action_home() {

         // functionality of the home page
         echo "FuelPHP-Employee application!";
      }
   }
Now, we have created an Employee Controller and added a public method, action_home, which prints a simple text.
Routing
Routing resolves the web page URI into specific controller and action. Every webpage in a FuelPHP application should go through routing before the actual execution of the controller. By default, each controller can be resolved using the following URI pattern.
<controller>/<action>
Where,
controller is the name of the controller minus namespace, employee
action is the name of the method minus action_ keyword, home
The newly created controller can be accessed by http://localhost:8080/employee/home and it will produce the following result.
Result
FuelPHP - Configuration
In this chapter, we will understand how to configure a FuelPHP application. By default, configuration files are stored inside the fuel/app/config folder. The application's main configuration is fuel/app/config/config.php. The configuration is specified using PHP's associated array.
Overview
By default, all default configuration files are defined in fuel/core/config folder. To override a default configuration, add the corresponding key in the /fuel/app/config/config.php file and modify the value. We can use dot-notation to simplify multi-dimensional array. For example, the following configurations serve the same purpose (load specified packages).
array("always_load" => array("packages" => array( ... ) ) );
always_load.packages = array( ... );
Configuration can be grouped by purpose and specified using different files such as db.php for database configuration, package.php for package management, etc.
Type of Configuration Format
FuelPHP is quite flexible and provides different format to specify the configuration. The default configuration format is PHP using php array. The other options are −
INI − Simple text-based configuration supported by many softwares including PHP language itself.
[group]
key = value
YAML − Easy to understand, indentation based, and human readable configuration management.
group:
   key: value
JSON − Easy to understand and most used file format by the developers.
{
   "group" :
   {
      "key": "value"
   }
}
Memcached − Stores the configuration in a memcached server. The memcached server details can be specified in the main configuration file, fuel/app/config/config.php using config.memcached entry.
DB − Stores the configuration in RDBMS System. The table structure of the configuration table is as follows.
CREATE TABLE IF NOT EXISTS `config` (
   `identifier` char(100) NOT NULL,
   `config` longtext NOT NULL,
   `hash` char(13) NOT NULL,
   PRIMARY KEY (`identifier`)
)
The database and table details can be specified in the configuration file using config.database and config.table_name entries.
Environment
Environment enables FuelPHP to work in different modes by loading different configuration. FuelPHP supports the following environment.
Development − \Fuel::DEVELOPMENT sets the development mode
Production − \Fuel::PRODUCTION sets the production mode
Test − \Fuel::TEST sets the testing mode
Staging − \Fuel::STAGING sets the staging mode
FuelPHP also supports the creation of a new environment. This will enable every developer to have his/her own configuration setting and they can enable it while coding and testing the application. The configuration of a specific environment can be added by simply creating a folder with the environment name (example: test) and placing the configuration file inside the newly created folder, shown as follows.
.  config.php
 db.php
 development
    db.php
 production
    db.php
 routes.php
 staging
    db.php
 test
     db.php
4 directories, 7 files
Set Your Environment
There are three ways to set up your environment.
Option 1 − Set environment with web server's environment variables. Add the following code in the virtual host section in httpd.conf file of Apache web server. It can be added in .htaccess file as well.
SetEnv FUEL_ENV production
Option 2 − Set environment with FuelPHP bootstrap file, /fuel/app/bootstrap.php
Fuel::$env = (isset($_SERVER['FUEL_ENV']
Option 3 − Set Environment using Oil
$ env FUEL_ENV = production php oil -v
It produces the following result.
Fuel: 1.8 running in "production" mode
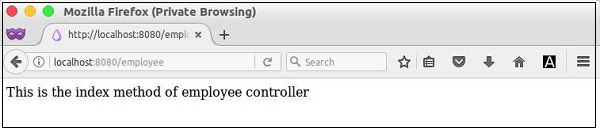
FuelPHP - Controllers
Controllers are responsible for handling each request that comes into FuelPHP application. According to FuelPHP, controllers are located at fuel/app/classes/controller/. Let's first create an Employee Controller.
employee.php
<?php
   class Controller_Employee extends Controller {
      public function action_home() {
         echo "FuelPHP-Employee application!";
      }

      public function action_index() {
         echo "This is the index method of employee controller";
      }
   }
Controller Methods
Controllers process a web request by using one of its action_ methods. We can create as many action_ methods depending on the requirement of the application. The default action_ method is action_index. action_index method can be called by any one of the following URLs.
http://localhost:8080/employee/index
http://localhost:8080/employee/
Result
Let us create a new action method, action_show in our employee application.
<?php
class Controller_Employee extends Controller {
public function action_home() {
echo "FuelPHP-Employee application!";
}
public function action_index() {
echo "This is the index method of employee controller";
}
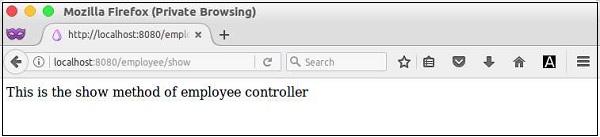
public function action_show() {
echo "This is the show method of employee controller";
}
}
action_show method can be called using the following URL.
http://localhost:8080/home/show
Result
before( ) Method
We can create a method, before in our controller. This method will be executed before each and every action_ method invocation. It will not be called if that method turns out not to exist. This method helps us write common actions such as login checking, default data fetching, etc.
Let us create a before method and print a simple text message.
public function before() {
   echo "This message comes from <em>before()</em> method</br>";
}
Index page with before action

Show page with before action

after( ) Method
after() method is similar to before() method but executed after the action_ method is called. after() method takes response as an input and returns the response object.
public function after($response) {
   if ( ! $response instanceof Response) {
      $response = \Response::forge($response, $this->response_status);
   }
   return $response;
}
If the input is NULL or not response object, then create a new Response object using Response's forge method and return it. We will learn Response class in detail in the subsequent chapters.
Extending Controllers
We can extend one controller from another controller. Following is the basic syntax.
class Controller_Employee extends Controller_Welcome {
   // controller methods
}
This will help in sharing methods.
Generate Controller
Fuel has the option to generate controller using Oil command. Following is the syntax.
Syntax
oil g controller <controller-name>
Example
oil g controller sample
After executing the above command, you will see the following response.
Result
Creating view: /path/to/project/fuel/app/views/template.php
Creating view: /path/to/project/fuel/app/views/sample/index.php
Creating controller: /path/to/project/fuel/app/classes/controller/sample.php
Type of Controllers
FuelPHP provides different type of controller for various purpose. They are as follows −
- Base controller
- Template controller
- Rest controller
- Hybrid controller
Base Controller
Controller is the base controller for all the different types of controllers available in FuelPHP. It provides all the basic functionalities needed to process a web request. It supports Request, Response, Session, etc. We will be using it in all examples unless otherwise specified.
Template Controller
A Template Controller is an extension of the base controller. It has template support, predefined before() and after() methods. Basically, it can be used to wrap your view in a layout with a header, footer, sidebar, etc. To create a template controller, we need to extend the Controller_Template class. By default, all methods of a class that extends Controller_Template need to use the template.
It is defined as follows.
class Controller_Employee extends Controller_Template {
   public function action_index() {
      // add methods
   }
}
We will discuss more about template controller in Views chapter.
Rest Controller
A Rest Controller is an extension of the Base Controller. It has pre-defined support for REST API programming. This will allow you to build APIs with ease.
To create rest controller, you need to extend the Controller_Rest class. It is defined as follows.
class Controller_Employee extends Controller_Rest {
   public function action_index() {
      // add methods
   }
}
We will discuss more about rest controller in Ajax chapter.
Hybrid Controller
The hybrid controller performs the functionality of both the REST controller and the Template controller in a single base controller.
FuelPHP - Routing
Routing maps request an URI to a specific controller's method. In this chapter, we will discuss the concept of routing in FuelPHP in detail.
Configuration
Routes configuration file is located at fuel/app/config/routes.php. The default routes.php file is defined as follows −
<?php
   return array (
      '_root_'  => 'welcome/index',   // The default route
      '_404_'   => 'welcome/404',     // The main 404 route
      'hello(/:name)?' => array('welcome/hello', 'name' => 'hello'),
   );
Here, _root_ is the predefined default route, which will be matched when the application is requested with root path, / e.g. http://localhost:8080/. The value of the _root_ is the controller and the action to be resolved when it is matched. welcome/index resolves to Controller_Welcome controller and action_index action method. Similarly, we have the following reserved routes.
root − The default route when no URI is specified.
403 − It throws when HttpNoAccessException is found.
404 − It returns when the page is not found.
500 − It throws when HttpServerErrorException is found.
Simple Routing
The route is compared to the request URI. If a match is found, the request is routed to the URI. Simple routing is described as follows,
return array (
   'about'  => 'site/about',
   'login' => 'employee/login',
);
Here, about matches http://localhost:8080/about and resolves the controller, Controller_Site and action method, action_about
login matches http://localhost:8080/login and resolves the controller, Controller_Login and action method, action_login
Advanced Routing
You can include any regex into your routes. Fuel supports the following advanced routing features −
:any − This matches anything from that point on in the URI, does not match nothing
:everything − Like :any, but also matches nothing
:segment − This matches only 1 segment in the URI, but that segment can be anything
:num − This matches any numbers
:alpha − This matches any alpha characters, including UTF-8
:alnum − This matches any alphanumeric characters, including UTF-8
For example, the following route matches URI http://localhost:8080/hello/FuelPHP and resolves controller, Controller_Welcome, and action action_hello
'hello(/:name)?' => array('welcome/hello', 'name' => 'hello'),
The corresponding action method in Controller_Welcome is as follows,
public function action_hello() {
   $this->name = Request::active()->param('name', 'World');
   $message = "Hello, " . $this->name;
   echo $message;
}
Here, we have used Request class to get the name parameter from the URL. If the name is not found, then we are using World as default value. We will learn the Request class in the Request and Response chapter.
Result

HTTP Method Action
FuelPHP supports routes to match HTTP method prefixed actions. Following is the basic syntax.
class Controller_Employee extends Controller {
   public function get_index() {
      // called when the HTTP method is GET.
   }
   public function post_index(){
      // called when the HTTP method is POST.
   }
}
We can route your URLs to controllers and actions based on the HTTP verb in the configuration file as follows.
return array (
   // Routes GET /employee to /employee/all and POST /employee to /employee/create
   employee => array(array('GET', new Route(employee/all')), array('POST',
      new Route(employee/create'))),
);
FuelPHP - Requests & Response
HTTP request and HTTP response play an important role in any web application. We need to get the complete details of the http request to process it properly. Once processed, we need to send the processed data to the client through http response.
FuelPHP provides excellent Request and Response class to read and write HTTP request and HTTP response respectively. Let us learn about both Request and Response class in this chapter.
Request
In a typical web application, the application need to parse the details of the current request. Request class provides simple methods to parse the current request to be processed by the application. Request also provides an option to create a new request by acting as a http client.
Creating a new request enables the application to request other part of the application or entirely another application and show the result. Let us learn how to parse the incoming request in this chapter and learn how to create a new request in HMVC Request chapter.
Parsing a Request
Request class provides three methods to get the details of the http request. They are as follows,
active − It is a static method, which returns the current active http request.
$currentRequest = Request::active();
param It returns the value of the specified parameter. It contains two arguments. The first argument is the parameter name and the second argument is the value to return, if the parameter is not available in the current http request.
$param = Request::active()->param('employee_name', 'none');
params It is same as param except it returns all the parameters as an array.
$params = Request::active()->params();
Example
Let us create a simple form and process the form using request class.
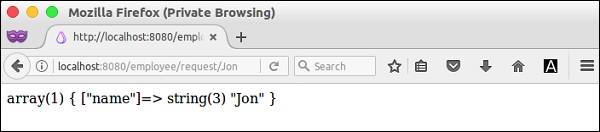
Step 1 − Create a new action, action_request in the employee controller.
public function action_request() {
}
Step 2 − Call the request methods to get all the parameters of the current request.
public function action_request() {
   $params = Request::active()->params();
}
Step 3 − Dump the fetched parameter array.
public function action_request() {
   $params = Request::active()->params();
   echo dump($params);
}
Step 4 − Change the routing to include the parameters in the route configuration file, fuel/app/config/routes.php
'employee/request(/:name)?' => array('employee/request', 'name' => 'name'),
Now, requesting the new action, http://localhost:8080/employee/request/Jon, it will show the following response.
Response
Response class provides options to create a http response. By default, we don't need to use a response class directly in most situations. Instead, we use View (which we will learn in the next chapter) to create http response. View hides the http response from the developer and sends the response to the client using underlying Response class. In an advanced situation, we use Response class directly and create a complete http response.
Creating a Response
Response consists of headers and body. The main header is http status code. Http status code are standard codes defined in the HTTP protocol to describe the response. For example, a status code, 200 means the request is success.
Response class provides three arguments to create the http response,
$body − body of the http response
$status_code − status code of the http response
$headers − optional headers as array
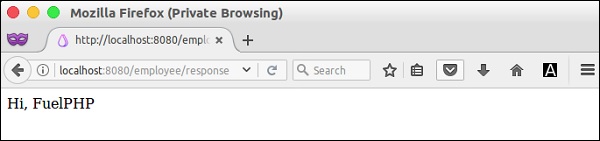
$body = "Hi, FuelPHP";
$headers = array (
   'Content-Type' => 'text/html',
);
$response = new Response($body, 200, $headers);
Let us create a new action, action_response in the employee controller as follows.
public function action_response() {
   $body = "Hi, FuelPHP";
   $headers = array ('Content-Type' => 'text/html',);
   $response = new Response($body, 200, $headers);

   return $response;
}
Result
Methods
Response class provides a lot of methods to manipulate http responses. They are as follows,
forge − It is the same as response class constructor as seen above.
return Response::forge("Hi, FuelPHP", 404);
redirect − It provides option to redirecting to a URL instead of sending a response. It contains the following arguments,
a.url − destination url b. method - redirection methods. location (default) and refresh c. redirect_code - http status code. The default value is 302.
// use a URL
Response::redirect('http://some-domain/index', 'refresh');

// or use a relative URI
Response::redirect('employee/list');
redirect_back − It is similar to redirect method except it redirects to the previous page. We can specify the redirection page, if no back page is available.
// If there is no back page, go to the employee list page
Response::redirect_back('/employee/list', 'refresh');
set_status − It provides an option to set the http status code.
$response = new Response();
$response->set_status(404);
set_header − It provides an option to set the http headers.
$response = new Response();
$response->set_header('Content-Type', 'application/pdf');

// replace previous value using third arguments
$response->set_header('Content-Type', 'application/pdf', 'text/plain');
set_headers − It is same as set_header except it provides an option to set multiple headers using array.
$response = new Response();
$response->set_headers (array
   'Content-Type' => 'application/pdf',
   'Pragma' => 'no-cache',
));
get_header − It enables to get the previous set header details.
$response = new Response();
$response->set_header('Pragma', 'no-cache');

// returns 'no-cache'
$header = $response->get_header('Pragma');

// returns array('Pragma' => 'no-cache')
$header = $response->get_header();
body − It provides an option to set the body of the http response.
$response = new Response();
$response->body('Hi, FuelPHP');

// returns 'Hi, FuelPHP'
$body = $response->body();
send_headers − It sends the headers to the requested client. FuelPHP uses this method to send the response to the client. Normally, we don't need to use this method.
$response->send_headers();
send − Same as send_headers except headers may be restricted in the http response.
// send the headers as well
$response->send(true);

// only send the body
$response->send(false);
$response->send();
FuelPHP - Views
View is the presentation layer of the MVC application. It separates the application logic from the presentation logic. When a controller needs to generate HTML, CSS, or any other content then, it forwards the task to the view engine.
FuelPHP provides a simple and flexible class, View with all the necessary features of a view engine. View class supports rendering of view file. View file is a HTML page with embedded PHP instructions. Variables of the view file can be set using View class as PHP array and referenced in the view file using the array's key. Let us check some of the important methods of View class.
forge
Purpose − Creates a new View object
Parameter − Following are the parameters
$file − Path of the view file relative to the views folder, fuel/app/views
$data − Array of values
$filter − Sets auto encoding, defaults to settings in the main configuration file
Returns − Instance of the view
For Example,
$view = View::forge ('path/to/view', array(
   'title' => "Show employee,
   'employees' => $employees,
));
auto_filter
Purpose − Set whether to encode the data or not
Parameter − Following is the parameter
$filter − true / false
Returns − Current view object
For example,
$view->auto_filter();
$view = $view->auto_filter(false);
set_filename
Purpose − Allows to set or change the view file.
Parameter − Following is the parameter -
$file − Path to view file relative to views folder, fuel/app/views
Returns − Current View object
For Example,
$view = new View();
$view>set_filename('path/to/view');
set
Purpose − Set the value of one or more variable
Parameter − Following are the parameters
$key − Variable name or array of values
$value − Value / null
$filter − Encoding setting, true / false
Returns − Current view object
For Example,
$view = new View();
$view->set(array('name' => 'Jon'));
set_global
set_global is similar to set, except that it applies to all the views and the variables are accessible by all views. This is a static method.
View::set_global('name', 'Jon', false);
set_safe
Purpose − Set the value of one or more variables with safe encoding on.
Parameter − Following are the parameters −
$key − Variable name or array of values
$value − Value / null
Returns − Current view object
For Example,
$view = new View();
$view->set_safe(array('name' => 'Jon'), null);
get
Purpose − Get the value of one or more variables
Parameter − Following are the parameters
$key − Variable name
$default − Default value to be returned if the key is not found
Returns − Value of the input key
For Example,
$view = new View();
$name = $view>get('name');  // name = 'Jon'
render
Purpose − Render the view files into string by merging it with the local and global variables
Parameter − Following are the parameters −
$file − The view filename
Returns − The rendered view file as string
For example,
$html = View::forge()->render('/path/to/view');
Create a View
To understand the views, let us modify the action method, action_show of controller, Controller_Employee.
employee.php
<?php
   class Controller_Employee extends Controller {
      public function action_show() {
         return View::forge('employee/show');
      }
   }
Now create a folder employee in views directory, located at fuel/app/views. Then, create a file show.php inside employee folder and add the following code.
show.php
<h3> My first view </h3>
Now, request the url http://localhost:8080/employee/show and it produces the following result.

Passing Data to View
We can pass data to the views using View methods as discussed earlier. Following is a simple example.
employee.php
class Controller_Employee extends Controller {
   public function action_show() {
      $data = array(); //stores variables going to views
      $data['name'] = Jon;
      $data[job] = Designer;

      //assign the view to browser output
      return View::forge('employee/show', $data);
   }
}
Now, add the changes in the view file.
show.php
<html>
   <body>
      Hello, <?php echo $name; ?>.
      Your job is, <?php echo $job; ?>.
   </body>
</html>
After requesting the URL, it will display the name and the job as follows −

View Filter
Views use output encoding to pass anything you want. If you want to pass unfiltered data, we can use the set method.
employee.php
class Controller_Employee extends Controller {
   public function action_show() {
      $view = \View::forge('employee/show');
      $view->set('name', 'Jon', true);
      $view->set('job', '<em>Designer</em>', false);
      return $view;
   }
}
After requesting the URL, it will display the job details in emphasis style, as follows.

Nested Views
FuelPHP support nested views. In nested views, a view can contain one or more view. To set the views in another view, we can use render method as follows.
employee.php
class Controller_Employee extends Controller {
   public function action_nestedview() {

      //assign variables
      $data = array();
      $data['title'] = 'Home';
      $data['name'] = 'Jon';
      $data['job'] = 'Designer';
      $views = array();
      $views['head'] = View::forge('head', $data)->render();
      $views['content'] = View::forge('employee/show', $data)->render();
      return View::forge('layout', $views, false)->render();
   }
}
fuel/app/views/layout.php
<html>
   <head>
      <?php echo $head; ?>
   </head>

   <body>
      <?php echo $content; ?>
   </body>
</html>
fuel/app/views/head.php
<title>
   <?php echo $title; ?>
</title>
fuel/app/views/employee/show.php
Hello, <?php echo $name; ?>.
Your job is, <?php echo $job; ?>.
After requesting the URL, http://localhost:8080/employee/nestedview and checking the source view, it gives the following code.
<html>
   <head>
      <title>Home</title>
   </head>

   <body>
      Hello, Jon.
      Your job is, Designer.
   </body>
</html>
Template Controller
FuelPHP provides a controller, Controller_Template with built-in layout concept. The layout concept is done using before() and after() method of Controller. To use the template controller, we need to extend the controller using Controller_Template instead of Controller. While using after() / before() method, we need to call parent::before and parent::after, otherwise, the template breaks.
<?php
   class Controller_Test extends Controller_Template {
      public function before() {
         parent::before();
         // do stuff
      }

      public function after($response) {
         $response = parent::after($response);

         // do stuff
         return $response;
      }
   }
template.php
It is a default template file in Fuel. The template file is used to call JS, CSS, HTML, and call view partials. It is located at fuel/app/views/. Templates are used to wrap your view in a layout with a header, footer, sidebar, etc. We can change default template using $template variable in the action method as follows.
fuel/app/classes/controller/test.php
<?php
   class Controller_Test extends Controller_Template {
      public $template = 'template_test';
      public function action_index() {
         $this->template->title = 'Example Page';
         $this->template->content = View::forge('test/index');
      }
   }
fuel/app/views/template_test.php
<!DOCTYPE html>
<html>
   <head>
      <meta charset = "utf-8">
      <title><?php echo $title; ?></title>
      <?php echo Asset::css('bootstrap.css'); ?>
   </head>

   <body>
      <div>
         <?php echo $content; ?>
      </div>
   </body>
</html>
fuel/app/views/test/index.php
<h3>My Test page</h3>
Now, request the URL http://localhost:8080/test and it produces the following result.
Result
<!DOCTYPE html>
<html>
   <head>
      <meta charset = "utf-8">
      <title>Example Page</title>
      <link type = "text/css" rel = "stylesheet"
         href = "http://localhost:8080/assets/css/bootstrap.css?1464964766" />
   </head>

   <body>
      <div>
         <h3>My Test page</h3>
      </div>
   </body>
</html>
Generate View Page
You can generate a view page using Fuel's Oil console. Following is the basic syntax.
oil g controller <controller-name> <page1> <page2> ..
To generate an admin controller with home and login pages, use the following command.
oil g controller admin home login
Result
Creating view: /path/to/app/fuel/app/views/admin/home.php
Creating view: /path/to/app/fuel/app/views/admin/login.php
Creating controller: /path/to/app/fuel/app/classes/controller/admin.php
FuelPHP - Presenters
FuelPHP provides an additional layer after the controller to generate views. Once the controller processes the input and is done with the business logic, it sends the control to the Presenter, which takes care of the extra logic such as fetching data from the database, setting view data, etc., and then, calls the View object.
We can render the views using the Presenter class as follows −
fuel/app/classes/controller/employee.php
public Controller_Employee extends Controller {
   public function action_welcome() {
      return Presenter::forge('employee/hello');
   }
}
The default location of presenter class is fuel/app/classes/presenter/. Following is a simple example.
fuel/app/classes/presenter/employee/hello.php
<?php
   class Presenter_Employee_Hello extends Presenter {
      public function view() {
         $this->name = Request::active()->param('name', 'World');
      }
   }
The view file of the above presenter class resolves to employee/hello.php relative to the views folder, which is as specified.
fuel/app/views/employee/hello.php
<h3>Hi, <?php echo $name; ?></h3>
Finally, change the route to match the employee's welcome action, shown as follows −
fuel/app/config/routes.php
'employee/hello(/:name)?' => array('employee/welcome', 'name' => 'hello'),
Now, requesting the URL, http://localhost:8080/employee/hello/Jon renders the following result.
Result

FuelPHP - Models & Database
Model plays an important role in FuelPHP web framework. It represents the business entities of the application. They are either provided by customers or fetched from backend database, manipulated according to the business rules and persisted back into the database. Let us learn about models and how they interact with back-end system in this chapter.
Creating a Model
In FuelPHP, model is simply plain PHP class extending built-in Model class. By default, models may be prefixed with Model_ similar to controllers and should be placed in fuel/app/classes/model/ folder. Let us create a basic employee model and extend it as we proceed.
fuel/app/classes/model/employee.php
<?php
   namespace Model;

   class Model_Employee extends \Model {
      public static function fetchAll() {
         // Code to fetch employee from database
      }
   }
Access a Model
Once a model is defined, it can be freely used in any controller just by including it in the controller as follows.
use \Model\Employee;

class Controller_Employee extends Controller {
   public function action_index() {
      $employees = Employee::fetchAll();
   }
}
Database Overview
FuelPHP provides its own database abstraction layer to fetch data from the database. It provides both basic as well as advanced ORM based tool. The basic toolkit consists of DB, DBUtil and Query_Builer based classes. The advanced toolkit is Orm. Orm toolkit is derived from the base toolkit and bundled as a separate package.
Database Configuration
FuelPHP separates the database settings from the main configuration file and the file is fuel/app/config/db.php. It supports a separate setting for each environment. Currently, FuelPHP supports MySQL, MySQLi, and PDO drivers. The sample setting is as follows −
<?php
   return array (
      'development' => array (
         'type'           => 'mysqli',
         'connection'     => array (
            'hostname'    => 'localhost',
            'port'        => '3306',
            'database'    => 'tutorialspoint_fueldb',
            'username'    => 'root',
            'password'    => 'password',
            'persistent'  => false,
            'compress'    => false,
         ),

         'identifier'     => '`',
         'table_prefix'   => '',
         'charset'        => 'utf8',
         'enable_cache'   => true,
         'profiling'      => false,
         'readonly'       => false,
      ),
   )
DB-based Toolkit
The DB class is the simplest option to access database from the application. It provides options to build the database query, execute it against the target database, and finally fetch the result. The DB class interacts with the following classes and provides a comprehensive database API.
Database_Connection − Singleton and main class to interact with the database
Database_Query − Base, concrete class to execute the SQL query and fetch result
Database_Query_Builder − Base, abstract class to build SQL query
Database_Query_Builder_Join − Class to build SQL joins
Database_Query_Builder_Where − Abstract class to build SQL query conditions
Database_Query_Builder_Select − Concrete class to build SQL select query
Database_Query_Builder_Insert − Abstract class to build SQL insert query
Database_Query_Builder_Update − Abstract class to build SQL update query
Database_Query_Builder_Delete − Abstract class to build SQL delete query
The following diagram depicts the relationship between classes and the methods provided by the classes.

DB API
Let us learn the most important methods available in the DB class in this section.
instance
Purpose − Creates and returns the new Database_Connection instance.
Parameter −
$db − Database connection name defined in configuration file, optional.
Returns − Returns the Database_Connection object
For example,
$db = DB::instance();
$db = DB::instance('test');
query
Purpose − Prepare the provided SQL statement and returns the Database_Query object, which can be used to insert, update, delete, or fetch the data from the database.
Parameter −
$query − SQL statement, may contain placeholders;
$type − SQL type, optional (DB::SELECT, DB::INSERT, DB::UPDATE and DB::DELETE)
Returns − Returns the Database_Query object
For example,
$query = DB::query('SELECT * FROM 'employees'');
last_query
Purpose − To get the last executed query
Parameter − None
Returns − Returns the last executed query
For example,
$employees = DB::Select('Select * from 'employee'');
$sql = DB::last_query();
select
Purpose − Generate the select part of the query
Parameter −
$columns − List of the database column names
Returns − Returns the Database_Query_Builder_Select object
For example,
$query = DB::select();              // Select *
$query = DB::select('id', 'name'); // Select id, name
select_array (DB)
It is similar to select except we can send columns as array.
$query = DB::select_array(array('id', 'name')); // Select id, name
insert
Purpose − Generate the insert part of the query
Parameter −
$table_name − name of the database table;
$columns − array of table columns
Returns − Returns the Database_Query_Builder_Insert object
For example,
$query = DB::insert('employee');  // Insert into employee
$query = DB::insert('employee', array('id', 'name')); // Insert into employee (id, name)
update
Purpose − Generate the update part of the query
Parameter −
$table_name − name of the database table
Returns − Returns the Database_Query_Builder_Update object
For example,
$query = DB::update('employee'); // update `employee`
delete
Purpose − Generate the delete part of the query
Parameter −
$table_name − name of the database table
Returns − Returns the Database_Query_Builder_Delete object
For Example
$query = DB::delete('employee'); // delete from 'employee'
Query API
Database_Query provides an option to set database connection, execute the query, and fetch the result as associative array or object. Let us see the methods provided by Database_Query class.
set_connection
Purpose − To set the database (database connection details) against which to execute the query
Parameter − $db - database connection name
Returns − Returns the Database_Query object
For example,
$query = DB::query('DELETE * FROM employee', DB::DELETE);
$query->set_connection('2nd-db');
param
Purpose − To set the value of the parameter defined in the Query object
Parameter −
$param − parameter name;
$value − value of the parameter
Returns − Returns the Database_Query object
For example,
// set some variables
$table = 'employee';
$id = 1;
$name = 'Jon';

// don't use
$query = DB::query('SELECT * FROM '.$table.'. WHERE id = '.$id.' AND name = "'.$name.'"');

// but use
$query = DB::query('SELECT * FROM :tablename WHERE id = :id AND name = :name');
$query->param('tablename', 'employee');
$query->param('id', $id);
$query->param('name', $name);
Similar Methods
parameters is a similar object except it provides option to give multiple value at once.
$query->parameters (array(
   'tablename' => $table,
   'id' => $id,
   'name' => $name
});
bind
Purpose − To set a variable to the parameter defined in the Query object
Parameter −
$param − parameter name
$var − the variable to bind the parameter to
Returns − Returns the Database_Query object
For example,
// bind a query parameter
$table = 'employee';
$query = DB::query('DELETE * FROM :tablename', DB::DELETE);
$query->bind('tablename', $table);

// update the variable
$table = 'employee_salary';

// DELETE * FROM `employee_salary`;
$sql = $query->compile();
compile
Purpose − To compile the query object defined into SQL query
Parameter −
$db − connection string, optional
Returns −
For example,
// assign a value to a query parameter
$table = 'employee';
$query = DB::query('DELETE * FROM :tablename', DB::DELETE);
$query->param('tablename', $table);

// compile the query, returns: DELETE * FROM employee
$sql = $query->compile();
execute
Purpose − To execute the query defined in the Query object and return the result
Parameter −
$db − database connection name
Returns − Returns the result
For example,
// assign a value to a query parameter
$table = 'employee';
$query = DB::query('DELETE * FROM :tablename', DB::DELETE);
$query->param('tablename', $table);

// execute the query
$query->execute();
as_assoc
Purpose − To set return type as associative array instead of objects
Parameter − None
Returns − Returns the current object
For example,
$query = DB::query('SELECT * FROM employee', DB::SELECT);
$result = $query->as_assoc()->execute();
foreach ($result as $row) {
   echo $row['id'];
}
as_object
Purpose − To set return type as object instead of associative array
Parameter − None
Returns − Returns the current object
For example,
$query = DB::query('SELECT * FROM employee', DB::SELECT);
$result = $query->as_object()->execute();
foreach ($result as $row) {
   echo $row->id;
}

// have ORM model objects return instead
$result = $query->as_object('Model_Employee')->execute();
Query Builder API
Query builder (Query_Builder) based classes provide options to build SQL queries dynamically. It has four classes, each one to select (Query_Builder_Select), insert (Query_Builder_Insert), update (Query_Builder_Update) and delete (Query_Builder_Delete) queries. These classes are derived from Query_Builder_Where class (option to generate conditions), which itself is derived from Query_Builder, base of all classes.
Let us look at the methods provided by Query_Builder class.
select
Purpose − To generate the columns of select queries.
Parameter −
$columns − list of columns, optional
Returns − Returns the current instance
For example,
$query = DB::select('name')  // select `name`
$query = DB::select(array('first_name', 'name')) // select `first_name` as `name`
from
Purpose − To generate the table details of select queries
Parameter −
$tables − list of tables
Returns − Returns the current instance
For example,
$query = DB::select('name')->from('employee') // select `name` from `employee`
where
Purpose − To generate the conditions of select, insert and update queries
Parameters −
$column − column name or array ($column, $alias);
$op − logic operators, =, !=, IN, BETWEEN and LIKE, optional;
$value − column value
Returns − Returns the current instance
For example,
$query = DB::select('name')->from('employee')
$query = $query->where('name', '=', 'Jon');
// select `name` from `employee` where `name` = `Jon`;
Similar Methods
The similar methods are where_open(), and_where_open(), or_where_open(), where_close(), and_where_close(), or_where_close(). They are similar to where() methods except that they add extra keywords and brackets around conditions. Following is a sample code.
$query = DB::select('*')->from('employee');
$query->where('email', 'like', '%@gmail.com');
$query->or_where_open();
$query->where('name', 'Jon');
$query->and_where('surname', 'Peter');
$query->or_where_close();
// SELECT * FROM `employee` WHERE `email` LIKE "%gmail.com" OR
   (`name` = "Jon" AND `surname` = "Peter")
join
Purpose − To generate the table joins of select queries
Parameters −
$table − table name or array($table, $alias);
$type − join type (LEFT, RIGHT, INNER, etc.,)
Returns − Returns the current instance
Example
$query = DB::select('name')->from('employee')->join('employee_salary')
// select `name` from `employee` JOIN `employee_salary`
on
Purpose − To generate the condition of joins in select queries
Parameters −
$c1 − table name or table name with alias in array;
$op − logical operator;
$c2 − table name or table name with alias in array
Returns − Returns the current instance
For example,
$query = DB::select('name')->from('employee')->join('employee_salary')
$query = $query->on('employee.employee_id', '=', 'employee_salary.employee_id')
// select `name` from `employee` JOIN `employee_salary` on
// `employee.employee_id` = `employee_salary.employee_id`
Similar Methods
The related methods are and_on() and or_on(). They are similar to on() except that they add extra keyword and brackets around joins.
group_by
Purpose − To generate group by queries
Parameter − $columns − Column name by which to group the result
Returns − Returns the current instance
For example,
$query = DB::select('name')->from('employee')
$query = $query->group_by('name');
// select `name` from `employee` group by `name`
having
Purpose − To generate the group by conditions of SQL queries
Parameter − $column − column name or array( $column, $alias ); $op − logic operators, =, !=, IN, BETWEEN and LIKE, optional; $value − column value
Returns − Returns the current instance
Example
$query = DB::select('name')->from('employee')
$query = $query->group_by('name');
$query = $query->having('name', '!=', 'Jon');
// select `name` from `employee` group by `name` having `name` != `Jon`
Similar Methods
The similar methods are having_open(), and_having_open(), or_having_open(), having_close(), and_having_close(), or_having_close(). They are similar to having() methods except that they add extra keywords and brackets around conditions.
reset
Purpose − To reset the query
Parameter − None
Returns − Returns the current instance
For example,
$query = DB::select('name')->from('employee')
$query->reset()
$query = DB::select('name')->from('employee_salary')
// select `name` from `employee_salary`
DBUtil class
DBUtil class provides an option to manage and perform routine database operations. Some of the important methods are as follows −
- set_connection - Sets the default connection
DBUtil::set_connection('new_database');
- create_database - Creates a database.
DBUtil::create_database('my_database');
- drop_database - Drops a database.
DBUtil::drop_database('my_database');
- table_exists - Checks if a given table exists.
if(DBUtil::table_exists('my_table')) {
   // Table exists
} else {
   // Table does NOT exist, create it!
}
- drop_table - Drops a table.
DBUtil::drop_table('my_table');
- create_table - Creates a table.
\DBUtil::create_table (
   'users',
   array (
      'id' => array('type' => 'int', 'auto_increment' => true),
      'name' => array('type' => 'text'),
   ),
);
Orm Toolkit
FuelPHP provides advanced database layer using ORM concept based on the popular Active record pattern. The toolkit is included in the application but not configured by default. It is bundled as a package and the package name is orm. We can add the following configuration in the main configuration file, fuel/app/config/config.php to load the orm toolkit.
'always_load' => array (
   'packages' => array (
      'orm',
   ),
),
Creating Models
Orm provides base model class Orm\Model. We need to extend our models with the orm model to use the ORM features. Following is a sample code.
class Model_Employee extends Orm\Model {}
Configuration
Orm provides a set of settings to configure the model to use the ORM features. They are as follows −
connection − Set a static _connection property in the model to specify the connection name.
class Model_Employee extends Orm\Model {
   protected static $_connection = "production";
}
table name − Set a static _table_name property in the model to specify the table name of the backend table.
class Model_Employee extends Orm\Model {
   protected static $_table_name = 'employee';
}
primary key − Set a static _primary_key property in the model to specify the primary key of the backend table.
class Model_Employee extends Orm\Model {
   protected static $_primary_key = array('id');
}
Columns − Set a static _properties property in the model to specify the columns of the backend table. It supports data_type, label, validation, form elememts, etc.
class Model_Employee extends Orm\Model {
   protected static $_properties = array (
      'id',
      'name' => array (
         'data_type' => 'varchar',
         'label' => 'Employee Name',
         'validation' => array (
            'required',
            'min_length' => array(3),
            'max_length' > array(80)
         ),

         'form' => array (
            'type' => 'text'
         ),
      ),

      'age' => array (
         'data_type' => 'int',
         'label' => 'Employee Age',
         'validation' => array (
            'required',
         ),

         'form' => array (
            'type' => 'text'
         ),
      ),
   );
}
Conditions − Set a static _conditions property to set the conditions and order by options.
class Model_Employee extends Orm\Model {
   protected static $_conditions = array (
      'order_by' => array('id' => 'desc'),
      'where' => array (
         array('is_active', > true),
      ),
   );
}
Observers − Orm provides observer based event system to add behavior to specific events. To add a behavior, first set a _observers property in the model. Then, define the behavior as a class and set it in the _observers property along with events. If no event is specified, the behavior will be invoked for all events. We can specify multiple behavior as well.
class Model_Employee {
   protected static $_observers = array (
      'example',  // will call Observer_Example class for all events
      'Orm\\Observer_CreatedOn' => array (
         'events' => array('before_insert'),
         // will only call Orm\Observer_CreatedOn at before_insert event
      )
   );
}
Create
Once we configure the model, we can start using the methods straightaway. Orm provides a save method to save the object into the database. We can set the data using configured properties as follows −
// option 1
$new = new Model_Employee();
$new->name = 'Jon';
$new->save();

// option 2, use forge instead of new
$new = Model_Employee::forge();
$new->name = 'Jon';
$new->save();

// option 3, use array for properties
$props = array('name' => 'Jon');
$new = Model_Employee::forge($props);
$new>save();
Read
Orm provides a method, find to get fetch the data from the database and bind into the object. find method works depending on the input parameter. Let us look at the different options −
by primary key − Specifying the primary key returns the record by matching the primary key of the configured table.
$employee = Model_Employee::find(1);
first / last record − Specifying first or last will fetch the first record or the last record respectively. We can pass the order by option as well.
$entry = Model_Employee::find('first');
$entry = Model_Article::find('last', array('order_by' => 'id'));
All − Specifying all will fetch all the records from the configured table. We can specify order by option as well as conditions.
$entry = Model_Employee::find('all');
$entry = Model_Article::find ('all', array (
   'where' => array (
      array ('name', 'Jon'),
   ),
   'order_by' => array ('id' => 'desc'),
));
We can use Query API of basic database toolkit along with model for advanced search option as follows.
$query = Model_Employee::query()->where('category_id', 1)->order_by('date', 'desc');
$number_of_employees = $query->count();
$latest_employee = $query->max('id');
$young_employee = $query->min('age');
$newest_employee = $query->get_one();
$employees = $query->limit(15)->get();
Update
Updating the model is the same as creating, except instead of creating a new model just fetch the model to be updated using the find method, update the property and then call the save method as follows.
$entry = Model_Employee:find(4);
$entry->name = 'Peter';
$entry->save();
Delete
Orm provides a delete method to delete the model. Just fetch the object and call the delete method.
$entry = Model_Employee:find(4);
$entry->delete();
Working Example
Let's create a working example in this chapter to understand the model and database.
Create a Database
Create a new database in MySQL server, using the following command.
create database tutorialspoint_fueldb
Then, create a table inside the database using the following command.
create table employee(id int primary key, name varchar(20), age int not null);
Configure the Database
Let us configure the database using database configuration file, *fuel/app/config/db.php. Add the following changes to connect MySQL server.
<?php
   return array (
      'development' => array (
         'type'           => 'mysqli',
         'connection'     => array (
            'hostname'       => 'localhost',
            'port'           => '3306',
            'database'       => 'tutorialspoint_fueldb',
            'username'       => 'root',
            'password'       => 'pass',
            'persistent'     => false,
            'compress'       => false,
         ),

         'identifier'     => '`',
         'table_prefix'   => '',
         'charset'        => 'utf8',
         'enable_cache'   => true,
         'profiling'      => false,
         'readonly'       => false,
      ),

      'production' => array (
         'type'           => 'mysqli',
         'connection'     => array (
            'hostname'       => 'localhost',
            'port'           => '3306',
            'database'       => 'tutorialspoint_fueldb',
            'username'       => 'root',
            'password'       => 'pass',
            'persistent'     => false,
            'compress'       => false,
         ),

         'identifier'     => '`',
         'table_prefix'   => '',
         'charset'        => 'utf8',
         'enable_cache'   => true,
         'profiling'      => false,
         'readonly'       => false,
      ),
   );
Include ORM Package
Update the main configuration file, fuel/app/config/config.php to include ORM package by adding the following configuration.
'always_load' => array (
   'packages' => array (
      'orm'
   ),
),
Now, ORM is enabled in your application
Create Employee Model
Create a new model, Employee under the model folder fuel/app/classes/model. It is defined as follows.
Employee.php
<?php
   class Model_Employee extends Orm\Model {
      protected static $_connection = 'production';
      protected static $_table_name = 'employee';
      protected static $_primary_key = array('id');
      protected static $_properties = array (
         'id',
         'name' => array (
            'data_type' => 'varchar',
            'label' => 'Employee Name',
            'form' => array (
               'type' => 'text'
            ),
         ),

         'age' => array (
            'data_type' => 'int',
            'label' => 'Employee Age',
            'form' => array (
               'type' => 'text'
            ),
         ),
      );
   }
Create Action
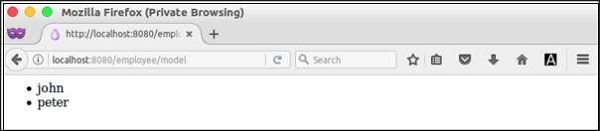
Create new action, action_model in Employee controller located at fuel/app/classes/controller/employee.php as follows.
class Controller_Employee extends Controller {
   public function action_model() {

      // db based sql command to delete all employees
      $query = db::query('delete from `employee`');
      $query->execute('production');

      // orm based query to add new employees
      $model = new model_employee();
      $model->name = "john";
      $model->age = 25;
      $model->save();
      $model = new model_employee();
      $model->name = "peter";
      $model->age = 20;
      $model->save();

      // orm based query to fetch all employee data
      $data = array();
      $data['emps'] = model_employee::find('all');
      return response::forge(view::forge('employee/model', $data));
   }
}
Create View
Now, create a view file model.php located at fuel/app/views/employee. Add the following changes in the file.
<ul>
   <?php
      foreach($emps as $emp) {
   ?>
   <li><?php echo $emp['name']; ?></li>

   <?php
   }
   ?>
</ul>
Now, request the URL, http://localhost:8080/employee/model and it will produce the following result.
Result
FuelPHP - Form Programming
FuelPHP provides three classes, Form Fieldset,, and Input,, to perform Form programming.
Form class provides an option to create all HTML forms elements.
Fieldset class provides an option to create html element through higher level methods, integrating the models and validation.
Input class provides an option to parse the data submitted through html forms as well as http parameters, server variables, and user agents.
In this chapter, let us learn Form programming in FuelPHP.
Form
As discussed earlier, Form class provides methods to create html form elements and the important methods are as follows −
open()
open() is used to create a new form. It provides the following two parameters −
$attributes − attributes of form tag as array or just the action URL as string.
$hidden − array of hidden field name and their values.
echo Form::open('/employee/add');
echo Form::open(array('action' => '/employee/add', 'method' => 'post'));
close()
close() simply closes the form.
echo Form::close();
input()
input() creates html input element. It has the following three parameters,
$field − name of the input element
$value − value of the input element
$attributes − attributes of input element as array
echo Form::input('name', 'jon', array('style' => 'border: 20px;'));
label element
label creates html label element. It has the following three parameters,
$label − label to show
$id − associated form element id
$attributes − attributes of label element as array
echo Form::label('Employee Name', 'employee_name');
hidden
hidden is similar to input method, except it sets the type of the input element to hidden.
password
password is similar to input method, except it sets the type of the input element to password.
radio
radio is similar to input method, except it sets the type of the input element to radio. It has the following four parameters,
$field − name of the input element
$value − value of the input element
$checked − whether the item is checked or not (true / false)
$attributes − attributes of input element as array
echo Form::label('Male', 'gender');
echo Form::radio('gender', 'Male', true);
echo Form::label('Female', 'gender');
echo Form::radio('gender', 'Female');
checkbox
checkbox is similar to input method, except it sets the type of the input element to checkbox. It has the following four parameters,
$field − name of the input element
$value − value of the input element
$checked − whether the item is checked or not (true / false)
$attributes − attributes of input element as array
echo Form::label('Male', 'gender');
echo Form::checkbox('gender', 'Male', true);
echo Form::label('Female', 'gender');
echo Form::checkbox('gender', 'Female');
file
file is similar to input method, except it sets the type of the input element to file.
textarea
textarea creates html textarea element. It has the following three parameters,
$field − name of the textarea element
$value − value of the textarea element
$attributes − attributes of textarea element as array
echo Form::textarea ('description', 'original data (value)', array ('rows' => 6,
      'cols' => 8));
select
select creates an HTML select element. It has the following four parameters −
$field − name of the select element
$values − initial selection values
$options − options as array. Options may be grouped using nested array
$attributes − attributes of input element as array
echo Form::select (
   'country',
   'none',
   array (
      'none'  => 'None',
      'asia'  => array (
         'in' > 'India',
         'cn' => 'China'
      ),

      'us' => 'United States'
   )
);
submit
submit is similar to input method, except it sets the type of the input element to submit.
button
button creates html button element. It has the following three parameters,
$field − name of the button element
$value − value of the button element
$attributes − attributes of button element as array
echo Form::button('emp_submit', 'Submit');
reset
reset is similar to input method, except it sets the type of the input element to reset.
fieldset_open
fieldset_open creates html field set and legend elements. It has the following two parameters −
attributes − attributes of fieldset element as array
legend − name of the legend to create
// returns <fieldset class = "example-class" id = "example-id">
<legend>
   Custom Legend
</legend>

echo Form::fieldset_open (array (
   'class'  => 'example-class',
   'id'     => 'exampleid',
   'legend' => 'Custom Legend'
));
fieldset_close
fieldset_close creates the HTML field set close tag.
// returns </fieldset>
echo Form::fieldset_close();
Input Class
Input class provides methods to read all request data along with form details. Some of the important methods are as follows −
uri
uri returns the current URI of the request
// request: http://localhost:8080/employee/welcome
echo Input::uri(); // return /employee/welcome
method
method returns the HTTP method used in the request
echo Input::method() // "POST"
get
get enables to read $_GET variables. It has the following two parameters,
$index − index of the $_GET array
$default − default value, if index is not found.
echo Input::get('age', '20'); // returns $_GET['age']
post
post enables to read $_POST variables. It has the following two parameters,
$index − index of the $_POST array
$default − default value, if index is not found
echo Input::get('age', '20'); // returns $_POST['age']
param
param enables to fetch item from either $_GET, $_POST, $_PUT, or $_DELETE variables. It has the following two parameters,
$index − index of the array
$default − default value, if index is not found
If no parameter is specified, it will return all items.
echo Input::param('age', '20'); // returns $_POST['age']
file
file enables to read $_FILE variables. It has the following two parameters,
$index − index of the $_POST array
$default − default value, if index is not found
echo Input::file();
is_ajax
is_ajax returns true, if the request is made through AJAX.
echo Input::is_ajax() // return false
protocol
protocol returns the HTTP protocol used in the request.
echo Input::protocol() // returns "HTTP"
ip
ip returns the IP address through which the request is made.
echo Input::ip() // returns "84.45.34.24" (Public IP Address)
real_ip
real_ip tries to return the real IP address (if the client is behind proxy) through which the request is made.
echo Input::real_ip() // returns "10.76.12.1" (local private IP Address)
server
server enables to read $_SERVER variables. It has the following two parameters,
$index − index of the $_POST array
$default − default value, if index is not found.
echo Input::server('HTTP_HOST'); // returns localhost:8080
referrer
referrer returns the referrer from $_SERVER variable. It is a shortcut method to get the http referrer of the current request.
user_agent
user_agent returns the user agent from $_SERVER variable. It is a shortcut method to get the http user agent of the current request.
query_string
query_string returns the query string from $_SERVER variable. It is a shortcut method to get the query string of the current request.
headers
headers return the specific or all headers. It has the following two parameters −
$index − name of the HTTP headers
$default − default value, if index is not found.
echo Input::headers('Content-Type'); // returns "text/html"
extension
extension returns the URI extension of the current request.
// Example URL: http://localhost/test/
echo Input::extension();  // NULL

// Example URL: http://localhost/test.html
echo Input::extension();  // 'html'
Working Example
Lets create a simple form to add new employee using Form and Input class.
Create form
Create new action, get_add in the employee controller as follows.
public function get_add() {
   return Response::forge(View::forge('employee/add'));
}
Now, add view for the action, fuel/app/views/employee/add.php as follows.
<!DOCTYPE html>
<html lang = "en">
   <head>
      <title>Employee :: add page</title>
      <meta charset = "utf-8">
      <meta name = "viewport" content = "width = device-width, initial-scale = 1">
      <?php echo Asset::css('bootstrap.css'); ?>
   </head>

   <body>
      <div class = "container">
         <?php
            echo Form::open(array('action' => 'employee/add', 'method' => 'post'));
         ?>

         <div class = "form-group">
            <?php
               echo Form::label('Employee name:', 'name');
               echo Form::input('name', '', array('class' => 'form-control'));
            ?>
         </div>

         <div class = "form-group">
            <?php
               echo Form::label('Employee age:', 'age');
               echo Form::input('age', '', array('class' => 'form-control'));
            ?>
         </div>

         <?php echo Form::button('frmbutton', 'Submit', array(
            'class' => 'btn btn-default'));
         ?>

         <?php
            echo Form::close();
         ?>
      </div>
   </body>

</html>
Here, we have used bootstrap to design the form. FuelPHP provides full support for bootstrap components. Now, requesting the page, http://localhost:8080/employee/add will show the following form.
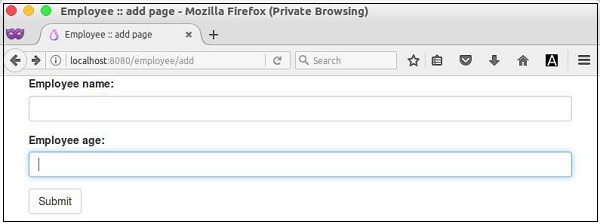
Process Form
Create new action, post_add to process the form and add the employee data entered by the user into the database in the employee controller as follows.
public function post_add() {
   $name = Input::post('name');
   $age = Input::post('age');
   $model = new model_employee();
   $model->name = $name;
   $model->age = $age;
   $model->save();
   Response::redirect('employee/list');
}
Here, we have been redirected to employee list page, once the user entered data is saved into the database. Next, we will create the employee list page.
List Employee
Create new action, action_list to list the employee in the database as follows.
public function action_list() {
   $data = array();
   $data['emps'] = model_employee::find('all');
   return Response::forge(view::forge('employee/list', $data));
}
Create new view, fuel/app/views/employee/list for the above action as follows.
<ul>
   <?php
      foreach($emps as $emp) {
   ?>
   <li><?php echo $emp['name']; ?></li>
   <?php
   }
   ?>
</ul>
Check the Form
Now, request the URL, http://localhost:8080/employee/add, enter some employee data as shown in the following screenshot and submit the form.
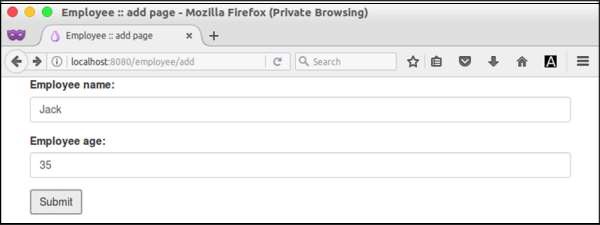
Then, it shows all the employees (including newly added one) available in the database as follows −
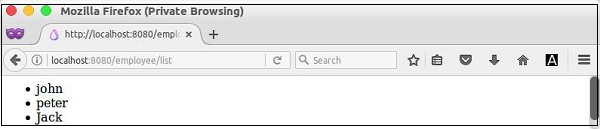
FuelPHP - Validation
Validation is one of the frequent and most repeated tasks in a web application. The user enters the required data in the form and submits it. Then, the web application needs to validate the data before processing the data. For example, the user enters the employee data and the post_action needs to validate before saving it into the database. FuelPHP provides a really simple class, Validation for this purpose.
In FuelPHP, the concept of validation is very simple and it provides various methods through Validation class to properly validate the form. Following is the workflow of the validation,
Step 1 − Create new Validation object using forge method.
$val = Validation::forge();
Step 2 − Add the fields which needs to be validated using add method.
$val->add('name', 'Employee name');
Step 3 − Set the validation rules for the added fields using add_rule method.
$val->add('name', 'Employee name')->add_rule('required');
$val->add('age', 'Employee age')->add_rule('required')
   ->add_rule('numeric_min', 20)
   ->add_rule('numeric_max', 30);
Step 4 − Call the run method to validate the data.
// run validation on just post
if ($val->run()) {
   // success
} else {
   // falier
}
Step 5 − Use validated and error to get the valid and invalid fields respectively.
$vars = $val->validated();
$vars = $val->error();
Rules
FuelPHP contains a lot of rules to validate, and also provides an option to create new rules. The rules supported by the Validation class are as follows,
required − Value to be entered
required_with − Set another field as a companion field. If the field is set, then companion fields need to be set as well
match_value − Set the value to be matched with the field's value
match_pattern − Set the value to be matched as a regular expression with the field's value
match_field − Set another field's value as value to be matched with the field's value
match_collection − Set the value to be matched as collection with field's value
min_length − Set the minimum length of the field's value
max_length − Set the maximum length of the field's value
exact_length − Set the exact length of the field's value
valid_date − Set the field's value to a valid date
valid_email − Set the field's value to a valid email
valid_emails − Set the field's value to valid emails, separated by comma
valid_url − Set the field's value to a valid URL
valid_ip − Set the field's value to a valid IP
numeric_min − Set the minimum value of the field's value
numeric_max − Set the maximum value of the field's value
numeric_between − Set the minimum and maximum value of the field's value
valid_string − Similar to regex but simpler
$val->add('username', 'User name')->add_rule('valid_string', array('alpha, dots');
Here, alpha refers to alphabetical characters and dots refer to (.). The valid string is only the string which contains alphabetical character and (.). The other options are uppercase, lowercase, specials, numeric, spaces, etc.
Working Example
We can update the add employee feature to include validation. Just update the post_add method of the employee controller as follows.
public function post_add() {
   $val = Validation::forge();
   $val->add('name', 'Employee name')->add_rule('required');
   $val->add('age', 'Employee age')->add_rule('required')
      ->add_rule('numeric_min', 20)
      ->add_rule('numeric_max', 30);

   if ($val->run()) {
      $name = Input::post('name');
      $age = Input::post('age');
      $model = new model_employee();
      $model->name = $name;
      $model->age = $age;
      $model->save();
      Response::redirect('employee/list');
   } else {
      Response::redirect('employee/add');
   }
}
Here, we have specified the name and age as the required fields. The age needs to be between 20 and 30. If both rules are valid, then the employee data will be saved and redirected to employee list page. Otherwise, employee data will be rejected and redirected to add employee page.
FuelPHP - Advanced Form Programming
FuelPHP provides an advanced form programming through Fieldset and Fieldset_Field classes. Fieldset provides an object-oriented way to create a form. It has complete support for models. It has built-in support for client-side and server-side validation as well. To create a full-fledged form, it is enough to create a model with proper form and validation setting. Let us learn about Fieldset class and how to create a form using it in this chapter.
Fieldset
Fieldset is a collection of Fieldset_Field objects. Fieldset_Field defines the individual entry of a form such as firstname, lastname, etc. along with validations. Fieldset class has methods to add/edit/remove fields. It has options to identify the fields defined in a model and create the fields from the given model. Fieldset uses Form and Validation classes in the background to do the real work. Let us see some of the important methods of the Fieldset class.
forge
forge creates a new Fieldset instance. It has the following two parameters −
$name − identifier for the fieldset
$config − configuration array. Possible options are validation_instance and form_instance. validation_instance can have Validation object and form_instance can have Form object.
$employee_form = Fieldset::forge('employee');
instance
instance returns the previously created Fieldset instance by identifier.
$employee_form = Fieldset::instance('employee');
get_name
Gets the identifier of the fieldset instance.
$employee_form = Fieldset::forge('employee');
$name = $employee_form->get_name();
add
add creates a new Fieldset_Field instance and add it to the current fieldset. It contains the following four parameters,
$name − name of the field
$label − label for the field
$attributes − HTML tag attributes
$rules − validation rules
$employee_field = $employee_form-> add (
   'employee_lastname',
   'Lastname',
   array ('class' => 'pretty_input')
);

// with validation rules
$employee_form->add (
   'email', 'E-mail',
   array('type' => 'email', 'class' => 'pretty_input'),
   array('required', 'valid_email')
);
add_before
add_before is similar to add, except it has one extra parameter to specify the field before which the newly created field will be added.
$employee_form->add_before (
   'employee_firstname',
   'Firstname',
   array ('class' => 'pretty_input'),
   array(),
   'employee_lastname'
);
delete
delete deletes the specified field from the fieldset.
$employee_form->delete('employee_firstname');
field
field gets either all the fields or the specified one from the fieldset.
$fields = $employee_form->field();
$lastname_field = $employee_form->field('employee_lastname');
build
build is alias for $this->form()->build(). Generates the HTML markup of the form.
$employee_form->build(Uri::create('employee/add'));
enable
enable re-enables a field that has been previously disabled.
$employee_form->enable('employee_firstname');
disable
disable allows to disable a field in the fieldset from being build.
$employee_form->disable('employee_firstname');
form
form returns the Form instance of the current fieldset.
$form = employee_form->form();
add_model
add_model adds the model's field into the fieldset. It has the following three parameters,
$class − class name
$instance − instance of the class to populate the fields with value
$method − name of the method in the class. This method is used to add fields into the fieldset. Orm\Model has the required method. The default method name is set_form_fields.
$employee_form = Fieldset::forge('employee');
$employee_form->add_model('Model_Employee');
populate
populate sets the initial value of the fields in fieldset using model instance.
$emp = new Model_Employee();
$emp->name = "Jon";
$employee_form->populate($emp);
repopulate
repopulate is same as populate, except it repopulates the fields in the fieldset.
validation
validation gets the validation instance of the current fieldset.
$validation = $employee_form->validation();
validated
Alias for $this->validation()->validated().
input
Alias for $this->validation()->input().
error
Alias for $this->validation()->error().
show_errors
Alias for $this->validation()->show_errors().
Working Example
Lets create an advanced form to add new employee in our sample employee application using Fieldset class.
Update Model
Update the employee model with necessary validation rules and add a validation observer as follows.
<?php
   class Model_Employee extends Orm\Model {
      protected static $_connection = 'production';
      protected static $_table_name = 'employee';
      protected static $_primary_key = array('id');

      protected static $_properties = array (
         'id',
         'name' => array (
            'data_type' => 'varchar',
            'label' => 'Employee Name',
            'validation' => array (
               'required',
               'min_length' => array(3),
               'max_length' => array(80)
            ),
            'form' => array (
               'type' => 'text'
            ),
         ),
         'age' => array (
            'data_type' => 'int',
            'label' => 'Employee Age',
            'validation' => array (
               'required',
            ),
            'form' => array ('type' => 'text' ),
         ),
      );

      // Just add the Observer, and define the required event
      protected static $_observers = array('Orm\\Observer_Validation' => array (
         'events' => array('before_save')));
   }
Here, we have defined the validation rules for name and age fields and added a new observer to perform server side validation before saving the model into the database. The same validation rule will create necessary input validation attributes as well in the form.
Create Form
Create new action, action_advancedform in the employee controller as follows.
public function action_advancedform() {

   // create a new fieldset and add employee model
   $fieldset = Fieldset::forge('employee')->add_model('Model_Employee');

   // get form from fieldset
   $form = $fieldset->form();

   // add submit button to the form
   $form->add('Submit', '', array('type' => 'submit', 'value' => 'Submit'));

   // build the form  and set the current page as action
   $formHtml = $fieldset->build(Uri::create('employee/advancedform'));

   // set form in data
   $data = array();
   $data['form'] = $formHtml;
   return Response::forge(View::forge('employee/advancedform', $data, false));
}
Here, we have created the form using fieldset and send the form to the view. Next, add view for the action, fuel/app/views/employee/advancedform.php as follows.
<!DOCTYPE html>
<html lang = "en">

   <head>
      <title>Employee :: add page</title>
      <meta charset = "utf-8">
      <meta name = "viewport" content = "width = device-width, initial-scale = 1">
      <?php echo Asset::css('bootstrap.css'); ?>

      <style>
         table {
            width: 90%;
         }
         table tr {
            width: 90%
         }
         table tr td {
            width: 50%
         }
         input[type = text], select {
            width: 100%;
            padding: 12px 20px;
            margin: 8px 0;
            display: inline-block;
            border: 1px solid #ccc;
            border-radius: 4px;
            box-sizing: border-box;
         }
         input[type = submit] {
            width: 100%;
            background-color: #3c3c3c;
            color: white;
            padding: 14px 20px;
            margin: 8px 0;
            border: none;
            border-radius: 4px;
            cursor: pointer;
         }
         div {
            border-radius: 5px;
            background-color: #f2f2f2;
            padding: 20px;
         }
      </style>
   </head>

   <body>
      <div class = "container">
         <?php
            if(isset($errors)) {
               echo $errors;
            }
            echo $form;
         ?>
      </div>
   </body>

</html>
Now, requesting the page http://localhost:8080/employee/add will show the following form.
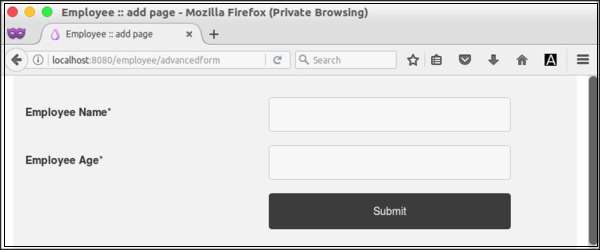
Process Form
Update the action method, action_advancedform to process the form and add the employee data entered by the user into the database in the employee controller as follows.
public function action_advancedform() {

   // create a new fieldset and add employee model
   $fieldset = Fieldset::forge('employee')->add_model('Model_Employee');

   // get form from fieldset
   $form = $fieldset->form();

   // add submit button to the form
   $form->add('Submit', '', array('type' => 'submit', 'value' => 'Submit'));

   // build the form  and set the current page as action
   $formHtml = $fieldset->build(Uri::create('employee/advancedform'));

   if (Input::param() != array()) {
      try {
         $article = Model_Employee::forge();
         $article->name = Input::param('name');
         $article->url = Input::param('age');
         $article->save();
         Response::redirect('employee/list');

      }
      catch (Orm\ValidationFailed $e) {
         $view = View::forge('employee/advancedform');
         $view->set('form', $formHtml, false);
         $view->set('errors', $e->getMessage(), false);
      }
   }

   return Response::forge($view);
}
Here, we have been redirected to employee list page, once the user entered data is validated and saved into the database. Otherwise, we will be shown the form again.
Create the Form
Now, request the URL, http://localhost:8080/employee/add and enter some employee data and submit the form. If the data is not provided, then the form will prompt the user to enter the data as shown in the following screenshot.
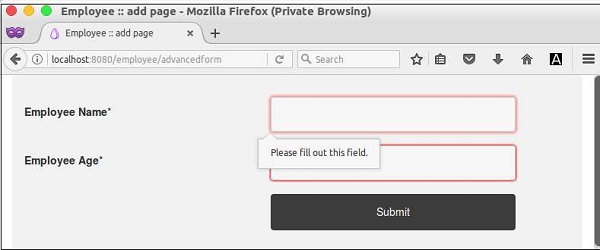
If the user bypasses the client side validation, then the server will validate the form and show an error as shown in the following screenshot.
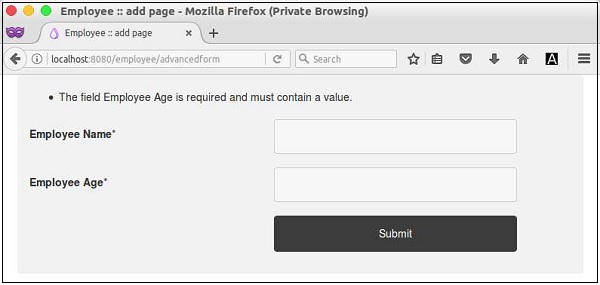
If the data passed the client and server side validation, then the employee data will be saved into the database and the page gets redirected to list page.
FuelPHP - File Uploading
File uploading is one of the most commonly used features in form programming. FuelPHP provides a special class, Upload to handle uploading of files. Let us learn how to upload a file using Upload class in this chapter.
Configuration
Upload class can be configured using separate configuration file, fuel/app/config/upload.php. The important configuration entries are as follows −
max_size − Set the maximum size of the file to be uploaded. 0 refers unlimited upload size
ext_whitelist − Set allowed file extensions
ext_blacklist − Set disallowed file extensions
type_whitelist − Set allowed file types. For example, text for mime type text/plain
type_blacklist − Set disallowed file types
mime_whitelist − Set allowed mime file types. For example, text/plain
mime_blacklist − Set disallowed mime file types
prefix − String to prefix in the filename while saving the uploaded file to the server
suffix − String to suffix in the filename while saving the uploaded file to the server
extension − Extension of the uploaded file to be set
create_path − Whether to create the file path, if not available
overwrite − Whether to overwrite the existing file while saving the uploaded file
auto_rename − Whether to rename the file by adding a sequence number while saving the uploaded file
randomize − Whether to create a random 32-character name to save the uploaded file
Upload Methods
Upload class provides options to process and save the file uploaded by the users. Every processed file (before saving) will have the following information in the result array.
field − Name of the form field
name − Name of the file uploaded
type − Type of the file as defined by the browser
mimetype − Type of the file as defined by Upload class
file − Fully qualified name of the temporary location of the uploaded file
filename − Filename of the uploaded file
extension − Extension of the file uploaded
size − Size of the file uploaded in bytes
errors − Array of error having error code and message
error − Whether to set array errors with why the upload fails (in case of failure in upload)
Once the files are saved in the server, the result array will have the following information as well.
saved_to − Fully qualified path where the uploaded file was saved
saved_as − Name of the file that was saved
errors − Updated error array
Now, let us see the method of Upload class.
is_valid
is_valid returns true, if any valid file is uploaded by the user.
// do we have any uploaded files to save?
if (Upload::is_valid()) {
   // process
}
get_files
get_files return all the uploaded files as multi-dimensional array. If an index/name of the form's file input is specified, then it will return the uploaded file related to the specified file input only.
foreach(Upload::get_files() as $file) {
   // do something with the file info
}
if ( Upload::get_files(0)) {
   // do something
}
get_errors
get_errors returns an array of errors, if there is a failure to upload one or more files. If an index/name of the form's file input name is specified, then it will return the error related to the specified file input only.
foreach(Upload::get_errors() as $file) {
   // do something with the file info
}
if (Upload::get_errors('myimage')) {
   // do something
}
Process
process refers to the actual process of gathering information about the uploaded file. We can supply a new custom configuration using array. If no configuration is specified, then it will use the configuration defined in fuel/app/config/upload.php
Upload::process (array(
   'auto_rename' => false,
   'overwrite'   => true
));
save
save refers to the actual process of saving all the validated files in a proper location. We can specify the index to save only that particular entry.
Upload::save();
Upload::save(0);
Upload::save(0, 3);
Working Example
Let us create a new controller, Controller_Upload in our employee sample to test the upload functionality.
Step 1 − Create a file, fuel/app/classes/controller/upload.php. Create upload controller.
<?php
   class Controller_Upload extends Controller {
   }
Step 2 − Create a new action get_upload.
<?php
   class Controller_Upload extends Controller {
      public function get_index() {
         return \View::forge("upload/index");
      }
   }
Step 3 − Create a new view for the action created.
<!DOCTYPE html>
<html>
   <body>

      <form action = "/upload/index" method = "post" enctype = "multipart/form-data">
         Select image to upload:
         <input type = "file" name = "fileToUpload" id = "fileToUpload">
         <input type = "submit" value = "Upload Image" name = "submit">
      </form>

   </body>
</html>
Step 4 − Create a new action post_action to process the uploaded file.
<?php
   class Controller_Upload extends Controller {
      public function get_index() {
         return \View::forge("upload/index");
      }
      public function post_index(){
         $config = array(
            'path' => DOCROOT.'files',
            'randomize' => true,
            'ext_whitelist' => array('img', 'jpg', 'jpeg', 'gif', 'png'),
         );
         Upload::process($config);
         // if there are any valid files

         if (Upload::is_valid()) {
            Upload::save();
            echo "success";
         } else {
            // and process any errors
            foreach (Upload::get_errors() as $file) {
               echo var_dump($file);
            }
         }
      }
   }
Finally, run the application by requesting the url, http://localhost:8080/upload/index and try to upload file.
Result
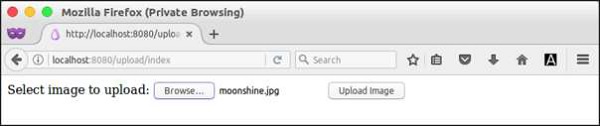
FuelPHP - Ajax
AJAX is a modern technology in web programming. It provides options to send and receive data in a webpage asynchronously, without refreshing the page. Let us learn about FuelPHP AJAX programming in this chapter.
FuelPHP framework provides options to identity whether the request type is AJAX or not. Input class has a method, is_ajax() for this purpose. If an AJAX request is made, Input::is_ajax method returns true, otherwise false.
This method is used to handle an AJAX request properly on the server side.
if (Input::is_ajax()) {
   // Ajax request
} else {
   // Normal request
}
We can use json_encode to return the JSON response. We can combine these two methods to create a simple and clean AJAX based web application.
Working Example
Let us add a new page, ajax/index in employee application and try to fetch the employee information asynchronously.
Step 1 − Create a new controller, Controller_Ajax at fuel/app/classes/controller/ajax.php.
<?php
   class Controller_Ajax extends Controller {
   }
Step 2 − Create a new action, action_index as follows.
<?php
   class Controller_Ajax extends Controller {
      public function action_index() {
         $emps = model_employee::find('all');
         $data = array();
         $i = 0;

         foreach($emps as $emp) {
            $data[$i] = array();
            $data[$i]['name'] = $emp['name'];
            $data[$i]['age'] = $emp['age'];
            $i = $i + 1;
         }
         if(\Input::is_ajax()) {
            echo json_encode($data);
         } else {
            return \View::forge("ajax/index");
         }
      }
   }
Here, if the request is AJAX, we fetch student information, encode it as JSON, and return it. Otherwise, we just render the corresponding view.
Step 3 − Create corresponding view file, fuel/app/views/ajax/index.php as follows.
<html>
   <head>
      <script language = "javascript" src = "/assets/js/jquery-3.2.1.min.js"></script>

      <style>
         .table { border-collapse: collapse; }
         .table th, td {
            border-bottom: 1px solid #ddd;
            width: 250px;
            text-align: left;
            align: left;
         }
      </style>
   </head>

   <body>
      <a id = "loademployee" href = "#">Load employee information</a>
      </br>
      </br>

      <table class = "table">
         <tbody id = "employee">
         </tbody>
      </table>

      <script language = "javascript">
         $(document).ready(function() {
            $("#loademployee").on("click", function(event) {
               $.ajax ({
                  url:        '/ajax/index',
                  type:       'POST',
                  dataType:   'json',
                  async:      true,

                  success: function(data, status) {
                     var e = $('<tr><th>Name</th><th>Age</th></tr>');
                     $('#employee').html('');
                     $('#employee').append(e);

                     for(i = 0; i < data.length; i++) {
                        employee = data[i];
                        var e = $('<tr><td id = "name"></td><td id = "age"></td></tr>');
                        $('#name', e).html(employee['name']);
                        $('#age', e).html(employee['age']);
                        $('#employee').append(e);
                     }
                  },

                  error : function(xhr, textStatus, errorThrown) {
                     alert('Ajax request failed.');
                  }
               });
            });
         });
      </script>
   </body>

</html>
Here, we have created an anchor tag (id: loademployee) to load the employee information using AJAX call. The AJAX call is done using JQuery. Event attached to loademployee tag activates when a user clicks it. Then, it will fetch the employee information using AJAX call and generate the required HTML code dynamically.
Step 4 − Run the application.
Finally, run the application, http://localhost:8000/ajax/index and click the Load employee information anchor tab.
Result
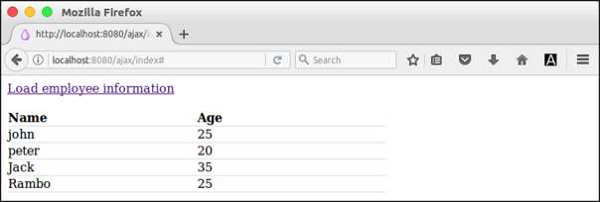
FuelPHP - HMVC Request
FuelPHP provides an excellent feature to request an action inside the same application using Request class. This is called HMVC Request. It enables to reuse the controller logic.
Creating a HMVC Request
Creating a HMVC request is as simple as creating a request object with the required URL and call the execute method as follows.
$list = Request::forge('employee/list/')->execute();
echo $list;

$employee = Request::forge('employee/show/1')->execute(array('id' => '1'));
echo $employee;
Working Example
Let us create a new controller, Controller_HMVC to test the HMVC feature. Create a file, fuel/app/classes/controller/hmvc.php and place the following code.
<?php
   class Controller_HMVC extends Controller {
      public function action_index() {
         echo Request::forge('employee/list')->execute();
      }
   }
Here, we have just called the employee/list page through HMVC request and shown the result.
Result
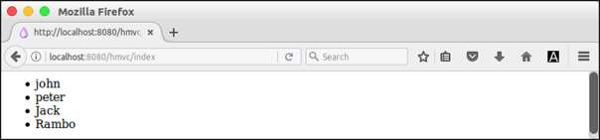
FuelPHP - Themes
Themes are used to enable multiple look and feel for the application. It provides option for the user/developer to change the look and feel of the application without disturbing the functionality of the application. An application can have one or more themes. Each theme lives in its own folder. Let us learn how to create themes in this chapter.
Theme Configuration
FuelPHP provides a separate configuration file for themes, fuel/app/config/themes.php. All theme related settings are configured in this file. Some of the main theme settings are as follows −
active − Name of the active theme
fallback − Name of the fallback theme, if active theme is not found
paths − Array of the path to search and find themes
assets_folder − Normally, assets need to be inside DOCPATH so that it will be accessible through web. It refers to the asset folder for the themes inside the DOCPATH
view_ext − Extension of the theme's view file
info_file_name − File having extended information about themes
require_info_file − Whether to require the theme information file, info_file_name
use_modules − Whether to use current module or not
Simple configuration for the theme file is as follows.
<?php
   return array (
      'active' => 'tpthemes',
      'fallback' => 'tpthemes',
      'paths' => array (
         APPPATH.'themes',
      ),
      'assets_folder' => 'assets',
      'view_ext' => '.html',
      'require_info_file' => false,
      'info_file_name' => 'themeinfo.php',
      'use_modules' => false,
   );
Here we have set,
- The name of the active and fallback theme as tpthemes
- The path of the theme folder as fuel/app/themes/
- The path of the asset folder as /public/assets/tpthemes/
Theme Class
Once the configuration is done, we can use the class, Theme provided by FuelPHP to do the functionality of the theme. Let us know about the methods available in the Theme class in this chapter.
instance
instance method enables to create a new theme. It has the following two parameters,
$name − Name of the theme (optional)
$config − Theme configuration array (same as seen in configuration section)
Both parameters are optional. If no parameter is specified, it tries to get the default theme from the configuration file. If the theme name is specified, it tries to get the other settings from the configuration file. If configuration is specified as well, then it will use the user specified setting instead of setting from the configuration file.
$theme = \Theme::instance();
$theme = \Theme::instance('tpthemes');
$theme = \Theme::instance ('mytheme', array (
   'active' => 'mytheme', 'view_ext' => '.php'));
forge
forge is similar to instance, except it only has configuration array.
$theme = \Theme::forge (array(
   'active'   => 'tpthemes',
   'fallback' => 'tpthemes',
   'view_ext' => '.php',
));
view
view method uses the View::forge() in the background. Both API are similar except view method searches the view file in the themes folder, fuel/app/themes/tpthemes/ instead of fuel/app/views/ folder.
$theme = \Theme::instance();
$view = $theme->view('template/index');
// *fuel/app/themes/tpthemes/template/index.php
presenter
presenter method uses the Presenter::forge() in the background. Both API are similar except presenter method searches the view file in the themes folder, fuel/app/themes/tpthemes/ instead of fuel/app/views/ folder.
$theme = \Theme::instance();
$presenter = $theme->presenter('template/index');
asset_path
asset_path method returns the path to the asset requested relative to the currently selected theme.
$theme = \Theme::instance();

// public/assets/tpthemes/css/style.css
$style = \Html::css($theme->asset_path('css/style.css'));
add_path
add_path method allows to add a theme path at runtime.
$theme = \Theme::instance();
$theme->add_path(DOCROOT.'newthemes');
add_paths
add_paths method allows to add multiple theme path at runtime.
$theme = \Theme::instance();
$theme->add_path(DOCROOT.'newthemes');
active
active method allows to set the active theme.
$theme = \Theme::instance();
$active = $theme->active('newtheme');
fallback
fallback method allows to set the fallback theme.
$theme = \Theme::instance();
$fallback = $theme->fallback('custom');
get_template
get_template method will return the View instance of the currently loaded theme template.
$theme = \Theme::instance();
$theme->get_template()->set('body', 'Theme can change the look and feel of your app');
set_template
set_template method allows to set the theme template for the page.
$theme = \Theme::instance();
$theme->set_template('layouts/index')->set('body', 'set theme template');
find
find returns true, if the path to the theme is found, otherwise it returns false.
$theme = \Theme::instance();
$path = $theme->find('newtheme')
all
all method returns an array of all themes in all theme paths.
$theme = \Theme::instance();
$themes = $theme->all();
get_info
get_info method returns a specific variable from the theme info array. If no theme is specified, the info array of the active theme is used.
$theme = \Theme::instance();
$var = $theme->get_info('color', 'green', 'newtheme');
Here, the method get the color is defined in newtheme. If it is not defined, then it will use green as the default color.
set_info
set_info method sets a variable in the active or fallback theme.
$theme->set_info('color', 'green', 'fallback');
set_partial
set_partial method allows to set a view partial for a named section of your page template. Usually, it is done via HMVC call.
$theme = \Theme::instance();
$theme->set_template('layouts/homepage');
$theme->set_partial('navbar', 'homepage/navbar');
get_partial
get_partial method allows to get the view instance of a previously set partial in a named section of your page template.
$theme = \Theme::instance();
$theme->set_partial('sidebar', 'partials/menu');
$theme->get_partial('sidebar', 'partials/menu')->set('class', 'menu green');
Working Example
Let us add theme support in our employee application.
Step 1 − Add new theme configuration file, fuel/app/config/theme.php with the following content.
<?php
   return array (
      'active' => 'tpthemes',
      'fallback' => 'tpthemes',
      'paths' => array (APPPATH.'themes', ),
      'assets_folder' => 'assets',
      'view_ext' => '.html',
      'require_info_file' => false,
      'info_file_name' => 'themeinfo.php',
      'use_modules' => false,
   );
Step 2 − Add new asset folder, public/assets/tpthemes/css for the theme, tpthemes.
cd /go/to/app/root/path
mkdir -p public/assets/tpthemes/css
Step 3 − Download the latest bootstrap and place the bootstrap.min.css under public/assets/tpthemes/css
Step 4 − Add new folder, tpthemes under fuel/app/themes folder.
cd /go/to/app/root/path
mkdir -p fuel/app/themes/tpthemes
Step 5 − Add new layout template, bootstrap.html under fuel/app/themes/tpthemes/layout/ and add the following code.
<!DOCTYPE html>
<html lang = "en">
   <head>
      <title>Theme example</title>
      <meta charset = "utf-8">
      <meta name = "viewport" content = "width = device-width, initial-scale = 1">
      <!-- Bootstrap core CSS -->
      <?php echo \Theme::instance()->asset->css('bootstrap.min.css'); ?>
   </head>

   <body>
      <?php echo $header; ?>
      <div class = "container">
         <div class = "row">
            <div class = "col-sm-12">
               <?php echo $content; ?>
            </div>
         </div>
      </div>
   </body>

</html>
Here, we have used theme instance and asset method to get the path of the bootstrap file. We have defined two variables, header and content. header is defined to set the header details dynamically. content is defined to set the actual content of the page dynamically.
Step 6 − Add new header template, header.php at fuel/app/themes/tpthemes/partials as follows.
<div class = "jumbotron text-center">
   <h1>Theme support in fuelphp</h1>
   <p>bootstrap based template</p>
</div>
Step 7 − Create a new controller, ThemeSample at fuel/app/classes/controller/themesample.php and action at action_index as follows.
<?php
   class Controller_ThemeSample extends \Controller {
      public function before() {
         $this->theme = \Theme::instance();
         $this->theme->set_template('layouts/bootstrap');
         $header = $this->theme->view('partials/header');
         $this->theme->get_template()->set('header', $header);
      }
      public function action_index() {
         $content = $this->theme
         ->view('themesample/index')
         ->set('message', 'This data comes from action page');
         $this->theme
         ->get_template()
         ->set('content', $content);
      }
      public function after($response) {
         if (empty($response) or  ! $response instanceof Response) {
            $response = \Response::forge(\Theme::instance()->render());
         }
         return parent::after($response);
      }
   }
Here, we have used before and after method to do the initialization of the theme using methods of Theme class. Some of the methods used are instance, get_template, set_template, and view.
Step 8 − Finally, add view for the index action, index.php at fuel/app/themes/tpthemes/themesample as follows.
<p>The data comes from *fuel/app/themes/tpthemes/themesample/index.html* file.</p>
<p>
   <?php echo $message; ?>
</p>
Here, we have defined one variable, message, which needs to be set dynamically in the controller.
We have created a new theme, tpthemes and used it in ThemeSample controller. Let us now check the result by requesting the URL, http://localhost:8080/themesample/index. The result is as follows.
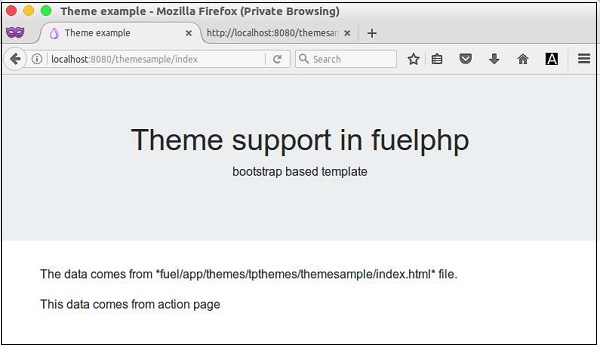
FuelPHP - Modules
Module is a great way to write reusable web functionalities such as blog, album, chat, etc. Module does not disturb the other code in the web application. It lives in its own folder and silently provides its functionality. Modules are simply the same controller, models, and views except that they are grouped, configured, and placed in a special folder. Usually, a module typically resides within the application's sub-directory named modules located at fuel/app/modules.
Module Configuration
We can define the modules path in the main application configuration file, fuel/app/config/config.php as follows.
'module_paths' => array (
   path/to.modules'.DS,              // path to application modules
   path/to....DS.'globalmods'.DS    // path to our global modules
),
Module Namespace
In FuelPHP, every module has its own PHP namespace. Setting separate namespace fixes the name clashes. For example, an employee module can be set under namespace, EmployeeModule as follows.
<?php
   namespace Employeemodule;

   class Controller_Employee {
      //code here
   }
Module must be named identical to the folder name of the module.
Module Structure
We can create a module by creating a folder name defined in the configuration. The folders name determines the name of the module, and the name of the namespace for the classes in the module.
The structure of the module is as follows −
- classes
- controller
- model
- view
- config
- lang
- tasks
- views
Module can have its own configuration files. It is very useful in the routing setup and it does not disturb the original configuration of the application. Another important concept is that, the module class can be reused by loading the module in the always_load configuration section as follows.
'always_load => array (
   'modules' => array('employeemodule'),
),
Also, modules can be loaded and used instantly without configuring as follows.
Module::load('employeemodule');
\Employeemodule\Myclass::mymethod('params');
FuelPHP - Packages
Packages are similar to modules in code reuse but differs in the following ways,
- It does not map to the web URLs
- It is not approachable through HMVC requests
In short, packages are not direct web functionalities such as blog, album, etc. Instead, it is a library of functions grouped together such as email processing, document creation, chart creation, authentication, etc. which aids in faster development of the web application.
Creating Packages
To create a package, first we need to arrange our source code specified as follows.
/fuel
   /packages
      /package (root directory of package)
         /bootstrap.php
      /classes
         /our.php
      /classes.php
         /here.php
      /config
         /config.php
         /and_so_on
The structure of the package has two package specific files, config.php and bootstrap.php files. The purpose of the configuration file is to group the configuration of the package under the package folder itself without disturbing the main application. The purpose of the bootstrap file is to set the namespace so that the autoloader loads it properly.
Some ways to set the namespace is as follows,
Autoloader::add_namespace('Mypackage', __DIR__.'/classes/');
Autoloader::add_core_namespace('Mypackage');
Autoloader::add_core_namespace('Mypackage', true);
Autoloader::add_classes (array(
   'Mypackage\\Classname' => __DIR__.'/classes/classname.php',
   'Mypackage\\Anotherclass' => __DIR__.'/classes/anotherclass.php',
));
Once the bootstrap file is properly configured and packages are loaded into the application, we can use it as follows.
$instance = new Myclass;
$instance = new Mynamespace\Myclass;
Installing Packages
Packages are usually placed under fuel/packages directory. By default, the following packages are installed,
auth − Authentication package
email − Email package
oil − Fuel's command, oil package
orm − ORM package
parser − Markdown parser package
To install a new package, following are the two options,
Option 1 − Manual installation - download and install
To manually install the package, first download the package from the author's website. Unpack it and place it under fuel/packages/ folder.
Option 2 − Automatic method using oil command
FuelPHP provides an automated way of installing the packages hosted in github. Use the following command to install the package, mytestpackage.
php oil package install mytestpackage
It clones the package source code using git client and moves it to fuel/packages folder. If git client is not available, then we can use direct command argument to direct the command to download and install the packages as follows.
php oil package install mytestpackage --direct
Using Packages
Packages can be used in the application once it is loaded into the application. There are two ways to load the packages into the application.
Option 1 − Through Package class
FuelPHP provides a class, Package to load, unload, and check the availability of the packages through load, unload, and loaded methods, respectively. load method has two parameters. The first parameter, $package is the name of the package and second parameter, path is the path of the package. The second parameter is optional, if the package is installed in fuel/packages folder.
// load the orm package
Package::load('orm');

// load the parser package from a specific directory
Package::load('parser', '/path/to/packages/dir/');

// load the non-existent package
Package::load('awesome'); // Throws a PackageNotFoundException
Option 2 − Through configuration file
To load a package permanently, just add the package under always_load configuration entry in the main configuration file, fuel/app/config/config.php. To load email package, use the following syntax.
'always_load' => array (
   'packages' => array (
      'email',
   ),
),
Once packages are loaded into the application, we can use it as follows.
$instance = new Myclass;
$instance = new Mynamespace\Myclass;
FuelPHP - Cookie & Session Management
Cookie provides client side data storage and it supports only a small amount of data. Usually, it is 2KB per domain and it depends on the browser. Session provides server side data storage and it supports a large amount of data. Let us go through how to create cookie and session in FuelPHP web application.
Cookies
FuelPHP provides a Cookie class to create a cookie item. Cookie class is used to create, assign, and delete cookies.
Configure Cookie
The Cookie class can be configured globally through the main application configuration file, located at fuel/app/config/config.php. It is defined as follows.
'cookie' => array (

   //Number of seconds before the cookie expires
   'expiration'  => 0,

   //Restrict the path that the cookie is available to
   'path'        => '/',

   //Restrict the domain that the cookie is available to
   'domain'      => null,

   // Only transmit cookies over secure connections
   'secure'      => false,

   // Only transmit cookies over HTTP, disabling Javascript access
   'http_only'   => false,
),
Methods
Cookie class provides methods to create, access, and delete a cookie item. They are as follows −
set()
set method is used to create a Cookie variable. It contains the following arguments,
$name − The key in the $_COOKIE array.
$value − The value of the cookie.
$expiration − Number of seconds the cookie should last for.
$path − The path on the server in which the cookie will be available on.
$domain − The domain that the cookie is available to.
$secure − Set to true if you only want to transmit cookies over secure connections.
$httponly − Allow only transmit of cookies over HTTP, disabling JavaScript access.
Cookie::set('theme', 'green');
get()
The get method is used to read a Cookie variable. It contains the following arguments,
$name − The key in the $_COOKIE array.
$value − The value to return if the key is not available i the $_COOKIE array.
Cookie::get('theme');
delete()
The delete method is used to delete a Cookie variable. It contains the following arguments,
$name − The key in the $_COOKIE array.
$value − The value of the cookie.
$domain − The domain that the cookie is available to.
$secure − Set to true if you only want to transmit cookies over secure connections.
$httponly − Allow only to transmit cookies over HTTP, disabling JavaScript access.
Cookie::delete('theme');
Session
FuelPHP provides class, Session to maintain state of the application.
Configure Session
Session class can be configured through the special configuration file, fuel/core/config/session.php. Some of the important configuration entries are as follows −
auto_initialize − Initialize the session automatically.
driver − Name of the session driver. Session is implemented using driver and the possible options are cookie, db, memcached, redis, and file. The default driver is cookie.
match_ip − Check the client IP.
match_ua − Check the client user agent.
expiration_time − Session time out value in seconds.
rotation_time − Time to renew the session.
Session Methods
Session class provides methods to manipulate the session data. They are as follows,
instance()
The instance method returns a default or a specific instance, which is identified by name.
$session = Session::instance();            // default instance
$session = Session::instance('myseesion'); // specific instance
set()
The set method is used to assign a Session variable.
Session::set('userid', $userid);
get()
The get method allows you to retrieve the stored variables from the session.
$userid = Session::get('userid');
delete()
The delete method allows you to delete a stored session variable.
Session::delete('userid');
create()
The create method allows you to create a new session. If a session is already present, it will be destroyed and a new session is created.
Session::create();
destroy()
The destroy method is used to destroy an existing session.
Session::destroy();
read()
The read method allows you to read a session.
Session::read();
write()
The write method allows you to write the session.
Session::write();
key()
The key method allows you retrieve elements of the session key. The value of the key is unique.
$session_id = Session::key('session_id');
FuelPHP - Events
An event is an action or occurrence recognized by the program that may be handled by the program itself. For example, we may define an action or event named my_fuel_event and then do some work whenever the event, my_fuel_event is called. FuelPHP provides class, Event to work with the events in the application.
System Events
FuelPHP defined some of the event through which we can do some work whenever the defined events are called or fired by the application. This help is changing the behavior of the FuelPHP without changing the FuelPHP's core code files. The pre-defined events are as follows −
app_created − This event will be triggered after the FuelPHP framework has been initialized.
request_created − This event will be triggered after a new Request object has been forged.
request_started − This event will be triggered when execution of a request is requested.
controller_started − This event will be triggered before the controllers before() method is called.
controller_finished − This event will be triggered after the controllers after() method has been called and the response is received.
response_created − This event will be triggered after a new Response object has been forged.
request_finished − This event will be triggered when execution of a Request is complete and a response is received.
shutdown − This event will be triggered after the main request has been processed and the output has been sent.
We can handle the events in the special configuration file, fuel/app/config/events.php as follows −
<?php
   return array (
      'fuelphp' => array (
         'app_created' => function() {
            // After FuelPHP initialised
         },
         'request_created' => function() {
            // After Request forged
         },
         'request_started' => function() {
            // Request is requested
         },
         'controller_started' => function() {
            // Before controllers before() method called
         },
         'controller_finished' => function() {
            // After controllers after() method called
         },
         'response_created' => function() {
            // After Response forged
         },
         'request_finished' => function() {
            // Request is complete and Response received
         },
         'shutdown' => function() {
            // Output has been send out
         },
      ),
   );
Event Methods
Event class provides methods to register, unregister, and fire events. They are as follows,
register()
The register method allows files to register an object that will be run when the trigger method is called.
$my_event_code = function() {
   echo 'my event';
}
Event::register('my_event', $my_event_code);
unregister()
The unregister method allows the files to unregister an object that would be run when the trigger method is called.
Event::unregister('my_event', $my_event_code);
trigger()
The trigger method is used to trigger or activate callbacks that are associated through the register method.
Event::trigger('my_event');
has_events()
The has_events method is available so you can check if a particular registered event has triggers.
Event::has_events('my_event');
forge()
The forge returns a new event object.
$event = Event::forge();
instance()
The instance returns a new event object singleton.
$event = Event::instance('event_instance');
FuelPHP - Email Management
Email functionality is the most requested feature in a web framework. FuelPHP provides an elegant email class bundled as a package. It is used to send simple plain text email as well as advanced rich text email with multiple attachments. It supports the following features - Plain-text mails, HTML mails, attachments, and inline attachments.
Configuration
To enable email functionality in the application, we need to just load the email package as specified below in the main configuration file, fuel/app/config/config.php.
'always_load' => array (
   'packages' => array (
      'email',
   ),
),
Another option is to load the email package, the controller itself as follows.
\Package::load('email');
The email setting can be done in the main configuration file and some of the important options are as follows,
driver − Email driver such as smtp
is_html − Whether to send mail as HTML content or not
priority − Priority of the email
smtp.host − SMTP server host
smtp.port − SMTP server port
smtp.username − SMTP server username
smtp.password − SMTP server password
smtp.timeout − SMTP timeout
smtp.starttls − Whether the SMTP server needs STARTTLS command
Email API
Following are the API provided by the email and email driver class.
forge
Purpose: To create an instance of email driver. It creates the driver based on the configuration or input it receives. Email driver provides features to create and send mail. Some of the possible email drivers are smtp, sendmail, mailgun, and mandrill.
Parameter − None or array of configuration details
Returns − Returns the Email_Driver object
For example,
$email = \Email::forge();
$email = \Email::forge (array(
   'driver' => 'smtp',
));
body
Purpose − To set the message body
Parameter − $body - message body
Returns − Returns the current instance
For example,
$email = \Email::forge();
$email->body('Body message');

//or pass it a View
$email->body(\View::forge('my/view', $data);
alt_body
Purpose − To set the alternative message body
Parameter − $alt_body - alternative message body
Returns − Returns the current instance
For example,
$email = \Email::forge();
$email->alt_body('Body message');

//or pass it a View
$email->alt_body(\View::forge('my/view', $data);
priority
Purpose − To set the mail's priority
Parameter −
$priority − value of the priority. The options are −
a. \Email::P_LOWEST
* \Email::P_LOW
* \Email::P_NORMAL
* \Email::P_HIGH
* \Email::P_HIGHEST
Returns − Returns the current instance
For example,
$email = \Email::forge();
$email->priority(\Email::P_HIGHEST);
html_body
Purpose − To set the message body in HTML format
Parameter −
$html − message body in HTML;
generate_alt − whether to generate alternative message;
auto_attach − whether to embed the image or not
Returns − Returns the current instance
For example,
$email = \Email::forge();

// Do generate the alt body, but don't auto attach images.
$email->html_body(\View::forge('welcome/email', $data), true, false);
from
Purpose − To set the from address
Parameters −
$from − from email address;
$name − Name of the sender
Returns − Returns the current instance
For example,
$email = \Email::forge();
$email->from('test@test.com', 'My Name');
subject
Purpose − To set the subject of the message
Parameter − $subject - subject of the email message
Returns − Returns the current instance
For example,
$email = \Email::forge();
$email->subject('Suject of the mail message');
to
Purpose − To set the receiver email address
Parameters −
$email − email address or array of email address;
$name − receiver name
Returns − Returns the current instance
For example,
$email = \Email::forge();
$email->to('test@test.com', 'My Dear Name');
$email->to (array(
   'test@test.com',
   'test@test.com' => 'My Dear friend',
));
header
Purpose − To set custom header to the email message
Parameters −
$header − header type or array of header;
$value − value of the header
Returns − Returns the current instance
For example,
$email = \Email::forge();
$email->header('X-SMTPAP', 'XXXXXXXX');
$email>reply_to (array(
   'X-SMTPAP'  => 'XXXXXX',
   'X-SMTPAP2' > 'XXXXXA',
));
attach
Purpose − To attach a file to the email message
Parameters−
$file − file path;
$inline − whether to attach the file inline or not;
$cid − content identifier;
$mime − MIME type of the attachment file;
$name − attachment file name override
Returns − Returns the current instance
For example,
$email = \Email::forge();
$email>attach(DOCROOT.'attachments/sample_attachment.pdf');
send
Purpose − To send the mail.
Parameter −
$validate − whether to validate the email addresses
Returns − true or false
For example,
$email = \Email::forge();
try{
$email->send();
} catch(\EmailSendingFailedException $e) {
// The driver could not send the mail.
} catch(\EmailValidationFailedException $e) {
// One or more email addresses failed validation.
}
Working Email Sample
Let us use the API learned in the previous chapter and create a simple code to send a message. Following is the simplest code to send a message.
$email = Email::forge();
$email->from('someone@gmail.com', 'person1');
$email->to('anotherone@gmail.com', 'person2');
$email->subject('Add something');
$email->body('contents of mail'); $email->send();
FuelPHP - Profiler
Profiler is one of the important tools to analyze and improve the performance of the application. FuelPHP provides an excellent profiler to profile the application. Let us learn about the profile in FuelPHP in this chapter.
Enable Profiling
Profiling is disabled by default. To enable profiling, set the attribute profiling to true in the main configuration file, fuel/app/config/config.php as follows.
'profiling' => true,
Now, profiling is enabled in the application. Once profiling in enabled, all requested pages will show an extra tab at the bottom of the page with profiling information as shown in the following screenshot.
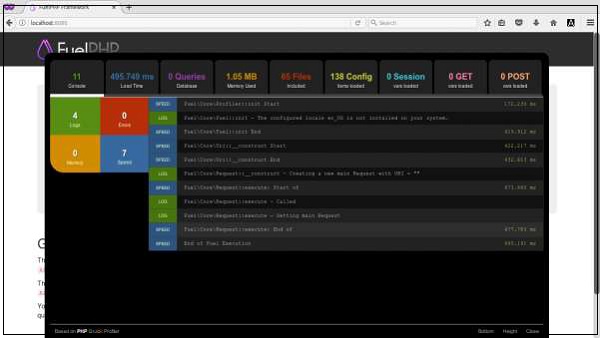
Profiler Information
The Profiler has a tabbed interface and it consists of the following data,
Console − Provides information about errors, log entries, memory usage, or execution timings.
Load time − Shows request load time.
Database − The number of queries executed and the execution time.
Memory − Total memory used for the request.
Files − Shows all PHP files.
Config − Configuration contents at the end of the request.
Session − Session contents at the end of the request.
GET − The contents of the $_GET array.
POST − The contents of the $_POST array.
Profiler Class
The profiler class is used to add your profiling information. It implements a customized version of PHPQuickProfiler (PQP). Profiler contains a collection of javaScript variables to control the initial state of the Profiler.
Profiler class supports the following methods −
mark()
mark method will add a speed marker to the profiler. It shows the load time.
Profiler::mark('my custom code');
mark_memory()
*mark_memory* method adds a memory marker to the profiler. If no input is specified, the memory usage at that point of time is logged. If we specify the variable and a label for the variable as shown below, then it will show the memory usage of the variable and label it using the specified label.
mark_memory($this, 'My Employee Controller memory usage');
console()
The console method will simply add a log entry to the profiler.
Profiler::console('log entry');
FuelPHP - Error Handling & Debugging
FuelPHP provides an excellent support for handling the errors and debugging the application. Let us understand error handling and debugging in this chapter.
Error Handling
FuelPHP error handling is based on exceptions. FuelPHP provides PhpErrorException exception for all old php errors. FuelPHP raises PhpErrorException whenever an error in the PHP code is encountered. FuelPHP also makes it easy to display custom error pages for various HTTP status codes.
File Not Found Error
FuelPHP provides a new exception class, HttpNotFoundException to handle the unknown requests. Sometimes, we may encounter the request which may not be handled. At that time, we can just throw the HttpNotFoundException.
By default, a default page is configured for HttpNotFoundException in the routes configuration file, fuel/app/config/routes.php using 400 entry. Whenever HttpNotFoundException is raised, the request will get redirected to 400 page.
'_404_' => 'welcome/404', // The main 404 route
Internal Errors
FuelPHP provides a new exception class, HttpServerErrorException to handle all server errors. Sometimes, we may not be able to process the given request due to internal errors. At that time, we can just throw the HttpServerErrorException.
By default, a default page is configured for HttpServerErrorException in the routes configuration file, fuel/app/config/routes.php using 500 entry. Whenever HttpServerErrorException is raised, the request will get redirected to 500 page.
'_500_' => 'welcome/500', // The main 500 route
This page will log the error, show the will formatted error in the page and occasionally send a notification to the system administrator.
Access Violation Errors
FuelPHP provides a new exception class, HttpNoAccessException to handle the access violations. Sometimes, we may not be able to process the request due to access restriction. At that time, we can just throw the HttpNoAccessException.
By default, a default page is configured for HttpNoAccessException in the routes configuration file, fuel/app/config/routes.php using 403 entry. Whenever HttpNoAccessException is raised, the request will get redirected to 403 page.
'_403_' => 'welcome/403', // The main 403 route
This page will show the access violation information.
Debugging
Debugging is one of the most frequent activities developing an application. FuelPHP provides a simple class, Debug to handle the debugging activity of the application. Let us learn the Debug class and its methods in this chapter.
Debug Class
Debug class provides utility methods to show the detailed information of variables, objects, array, etc. Debug class provides the following methods,
dump
The dump method returns multiple mixed values to the browser in a formatted structured way.
Debug::dump($var1, $var2);
backtrace()
backtrace shows the detailed information about the current execution of code. It shows the PHP file information, current line, and all its previous actions.
Debug::backtrace();
classes()
Returns a list of all classes.
Debug::classes();
interfaces()
Returns a list of all interface classes.
Debug::interfaces();
includes()
Returns a list of all included files currently loaded at the runtime.
Debug::includes();
functions()
Returns a list of all functions.
Debug::functions();
constants()
Returns a list of all constants.
Debug::constants();
extensions()
Returns a list of all extensions.
Debug::extensions();
headers()
Returns a list of all HTTP headers.
Debug::headers();
phpini()
Prints a list of the configuration settings read from php.ini file.
Debug::phpini();
FuelPHP - Unit Testing
Unit testing is an essential process in developing large projects. Unit tests help to automate the testing of the applications components at every stage of development. It alerts when the component of the application is not working according to the business specification of the project. Unit testing can be done manually but is often automated.
PHPUnit
FuelPHP framework integrates with the PHPUnit testing framework. To write a unit test for the FuelPHP framework, we need to set up the PHPUnit. If PHPUnit is not installed, then download and install it. We can confirm the availability of PHPUnit in our system using the following command.
phpunit --version
If PHPUnit is available, you will see the result similar to the following.
PHPUnit 5.1.3 by Sebastian Bergmann and contributors.
Creating Unit Tests
The standard location provided by FuelPHP to write unit test is fuel/app/tests. We can write the unit test for controller, model, view and presenters in separate folders. Let us write a unit test to validate the Model_Employee object.
Step 1 − Create a folder, model under fuel/app/tests folder.
Step 2 − Create a file, employee.php under fuel/app/tests/model/ folder.
Step 3 − Create a new test class, Test_Model_Employee by extending TestCase class provided of PHPUnit.
Step 4 − Write a method, testInstanceOfEmployee() to asset the employee object creation using assertInstanceOf() method provided by PHPUnit's TestCase class.
Following is the complete code −
<?php
class Test_Model_Employee extends TestCase {
public function testInstanceOfEmployee() {
$this->assertInstanceOf(Model_Employee::class, new Model_Employee());
}
}
Creating a Test Group
FuelPHP provides an option to create a group of test cases. Creating a group is as simple as adding docblock attribute, @group. Let us include our test case inside the MyTest group.
<?php
/**
* @group MyTest
*/
class Test_Model_Employee extends TestCase {
public function testInstanceOfEmployee() {
$this->assertInstanceOf(Model_Employee::class, new Model_Employee());
}
}
Run Test
To run all the test in the directory, use the following command.
$ php oil test
To run a specific group of tests, use the following command.
$ php oil test --group = MyTest
After executing the command, you will receive the following response.
Tests Running...This may take a few moments.
PHPUnit 5.1.3 by Sebastian Bergmann and contributors.
1 / 1 (100%).
Time: 123 ms, Memory: 8.00Mb
OK (1 test, 1 assertion)
FuelPHP - Complete Working Example
In this chapter, we will learn how to create a complete MVC based BookStore application in FuelPHP.
step 1: Create a project
Create a new project named BookStore in FuelPHP using the following command.
oil create bookstore
step 2: Create a layout
Create a new layout for our application. Create a file, layout.php at location fuel/app/views/layout.php. The code is as follows,
fuel/app/views/layout.php
<!DOCTYPE html>
<html lang = "en">
<head>
<meta charset = "utf-8">
<meta http-equiv = "X-UA-Compatible" content = "IE = edge">
<meta name = "viewport" content = "width = device-width, initial-scale = 1">
<title><?php echo $title; ?></title>
<!-- Bootstrap core CSS -->
<link href = "/assets/css/bootstrap.min.css" rel = "stylesheet">
<script src = "https://ajax.googleapis.com/ajax/libs/jquery/3.2.1/jquery.min.js">
</script>
<script src = "/assets/js/bootstrap.min.js"></script>
</head>
<body>
<nav class = "navbar navbar-inverse navbar-fixed-top">
<div class = "container">
<div class = "navbar-header">
<button type = "button" class = "navbar-toggle collapsed"
datatoggle = "collapse" data-target = "#navbar"
aria-expanded = "false" ariacontrols = "navbar">
<span class= "sr-only">Toggle navigation</span>
<span class = "icon-bar"></span>
<span class = "icon-bar"></span>
<span class = "icon-bar"></span>
</button>
<a class = "navbar-brand" href = "#">FuelPHP Sample</a>
</div>
<div id = "navbar" class = "collapse navbar-collapse">
<ul class = "nav navbar-nav">
<li class = "active"><a href = "/book/index">Home</a></li>
<li><a href = "/book/add">Add book</a></li>
</ul>
</div><!--/.nav-collapse -->
</div>
</nav>
<div class = "container">
<div class = "starter-template" style = "padding: 50px 0 0 0;">
<?php echo $content; ?>
</div>
</div><!-- /.container -->
</body>
</html>
Here, we are using bootstrap template. FuelPHP has first class support for bootstrap templates. We have created two variables, title and content. title is used to specify the current page's title and content is used to specify the current page details.
step 3: Create a Controller
Create a new controller, Controller_Book to show, add, edit, and delete the book. Create a new file, fuel/app/classes/controller/book.php and place the following code.
fuel/app/classes/controller/book.php
<?php
class Controller_Book extends Controller_Template {
public $template = 'layout';
public function action_index() {
// Create the view object
$view = View::forge('book/index');
// set the template variables
$this->template->title = "Book index page";
$this->template->content = $view;
}
}
Here, we have created the book controller by inheriting template controller and set the default template as fuel/app/views/layout.php.
step 4: Create the index view
Create a folder, book in views directory under fuel/app/views folder. Then, create a file index.php inside the book folder and add the following code,
fuel/app/views/index.php
<h3>index page</h3>
As of now, we have created a basic book controller.
step 5: Modify the default route
Update the default route to set the home page of the application to book controller. Open the default routing configuration file, fuel/app/config/routes.php and change it as follows.
fuel/app/config/routes.php
<?php
return array (
'_root_' => 'book/index', // The default route
'_404_' => 'welcome/404', // The main 404 route
'hello(/:name)?' => array('welcome/hello', 'name' => 'hello'),
);
Now, requesting the URL, http://localhost:8080/ will return the index page of the book controller as follows,
step 6: Create database
Create a new database in MySQL server, using the following command,
create database tutorialspoint_bookdb
Then, create a table inside the database using the following command,
CREATE TABLE book ( id INT PRIMARY KEY AUTO_INCREMENT, title VARCHAR(80) NOT NULL, author VARCHAR(80) NOT NULL, price DECIMAL(10, 2) NOT NULL );
Insert some sample record into the table using the following SQL statement.
INSERT
INTO
book(title,
author,
price)
VALUES(
'The C Programming Language',
'Dennie Ritchie',
25.00
),(
'The C++ Programming Language',
'Bjarne Stroustrup',
80.00
),(
'C Primer Plus (5th Edition)',
'Stephen Prata',
45.00
),('Modern PHP', 'Josh Lockhart', 10.00),(
'Learning PHP, MySQL & JavaScript, 4th Edition',
'Robin Nixon',
30.00
)
step 7: Configure database
Configure the database using database configuration file, db.php located at fuel/app/config.
fuel/app/config/db.php
<?php
return array (
'development' => array (
'type' => 'mysqli',
'connection' => array (
'hostname' => 'localhost',
'port' => '3306',
'database' => 'tutorialspoint_bookdb',
'username' => 'root',
'password' => 'password',
'persistent' => false,
'compress' => false,
),
'identifier' => '`',
'table_prefix' => '',
'charset' => 'utf8',
'enable_cache' => true,
'profiling' => false,
'readonly' => false,
),
'production' => array (
'type' => 'mysqli',
'connection' => array (
'hostname' => 'localhost',
'port' => '3306',
'database' => 'tutorialspoint_bookdb',
'username' => 'root',
'password' => 'password',
'persistent' => false,
'compress' => false,
),
'identifier' => '`',
'table_prefix' => '',
'charset' => 'utf8',
'enable_cache' => true,
'profiling' => false,
'readonly' => false,
),
);
step 8: Include Orm package
Update the main configuration file to include ORM package. It is located at fuel/app/config/.
fuel/app/config/config.php
'always_load' => array (
'packages' => array (
'orm'
),
),
step 9: Create a model
Create a book model in book.php located at fuel/app/classes/model. It is defined as follows −
fuel/app/classes/model/book.php
<?php
class Model_Book extends Orm\Model {
protected static $_connection = 'production';
protected static $_table_name = 'book';
protected static $_primary_key = array('id');
protected static $_properties = array (
'id',
'title' => array (
'data_type' => 'varchar',
'label' => 'Book title',
'validation' => array (
'required',
'min_length' => array(3),
'max_length' => array(80)
),
'form' => array (
'type' => 'text'
),
),
'author' => array (
'data_type' => 'varchar',
'label' => 'Book author',
'validation' => array (
'required',
),
'form' => array (
'type' => 'text'
),
),
'price' => array (
'data_type' => 'decimal',
'label' => 'Book price',
'validation' => array (
'required',
),
'form' => array (
'type' => 'text'
),
),
);
protected static $_observers = array('Orm\\Observer_Validation' => array (
'events' => array('before_save')
));
}
Here, we have specified the database details as properties of the model. It has validation details as well.
step 10: Display books
Update the index action in book controller to list the available books in the database.
fuel/app/classes/controller/book.php
<?php
class Controller_Book extends Controller_Template {
public $template = 'layout';
public function action_index() {
// Create the view object
$view = View::forge('book/index');
// fetch the book from database and set it to the view
$books = Model_Book::find('all');
$view->set('books', $books);
// set the template variables
$this->template->title = "Book index page";
$this->template->content = $view;
}
}
Here, we have used the orm to fetch the book details from the database and then passed the book details to views.
step 11: Update index view
Update the view file index.php located at fuel/app/views/book. The complete updated code is as follows,
fuel/app/views/book/index.php
<table class = "table">
<thead>
<tr>
<th>#</th>
<th>Title</th>
<th>Author</th>
<th>Price</th>
<th></th>
</tr>
</thead>
<tbody>
<?php
foreach($books as $book) {
?>
<tr>
<td><?php echo $book['id']; ?></td>
<td><?php echo $book['title']; ?></td>
<td><?php echo $book['author']; ?></td>
<td><?php echo $book['price']; ?></td>
<td>
<a href = "/book/edit/<?php echo $book['id']; ?>">Edit</a>
<a href = "/book/delete/<?php echo $book['id']; ?>">Delete</a>
</td>
</tr>
<?php
}
?>
</tbody>
</table>
<ul>
</ul>
Now, requesting the URL, http://localhost:8080/ will show the page as follows −
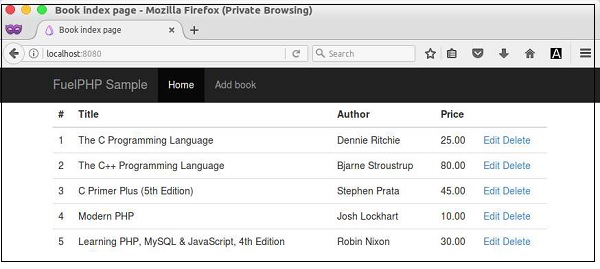
step 12: Create action to add book
Create the functionality to add a new book into the bookstore. Create a new action, action_add in the book controller as follows,
public function action_add() {
// create a new fieldset and add book model
$fieldset = Fieldset::forge('book')->add_model('Model_Book');
// get form from fieldset
$form = $fieldset->form();
// add submit button to the form
$form->add('Submit', '', array('type' => 'submit', 'value' => 'Submit'));
// build the form and set the current page as action
$formHtml = $fieldset->build(Uri::create('book/add'));
$view = View::forge('book/add');
$view->set('form', $formHtml, false);
if (Input::param() != array()) {
try {
$book = Model_Book::forge();
$book->title = Input::param('title');
$book->author = Input::param('author');
$book->price = Input::param('price');
$book->save();
Response::redirect('book');
} catch (Orm\ValidationFailed $e) {
$view->set('errors', $e->getMessage(), false);
}
}
$this->template->title = "Book add page";
$this->template->content = $view; }
Here the following two processes are being performed,
Building the book form to add book using Fieldset methods and Book model.
Processing the book form, when the user enters the book information and submitted back the form. It can be found by checking the Input::param() method for any submitted data. Processing the form involves the following steps −
Gather the book information.
Validate the book information. We have already set the validation to be called before save method. If the validation fails, it will throw Orm\ValidationFailed exception.
Store the book information into the database.
Redirect the user to index page on success. Otherwise, show the form again.
We are doing both, showing the form as well as processing the form in the same action. When the user calls the action for the first time, it will show the form. When the user enters the book information and submits the data, then it will process the form.
step 13: Create the view for add book action
Create the view for add book action. Create a new file, fuel/app/views/book/add.php and enter the following code,
<style>
#form table {
width: 90%;
}
#form table tr {
width: 90%
}
#form table tr td {
width: 50%
}
#form input[type = text], select {
width: 100%;
padding: 12px 20px;
margin: 8px 0;
display: inline-block;
border: 1px solid #ccc;
border-radius: 4px;
box-sizing: border-box;
}
#form input[type = submit] {
width: 100%;
background-color: #3c3c3c;
color: white;
padding: 14px 20px;
margin: 8px 0;
border: none;
border-radius: 4px;
cursor: pointer;
}
#form div {
border-radius: 5px;
background-color: #f2f2f2;
padding: 20px;
}
</style>
<div id = "form">
<h2>Book form</h2>
<?php
if(isset($errors)) {
echo $errors;
}
echo $form;
?>
</div>
Here, we are just showing the form created in the action method. In addition, we are showing the errors, if any.
step 14: Checking the add book action
Requesting the url, http://localhost:8080/book/add or clicking the Add book navigation link, will show the form as follows,
Form
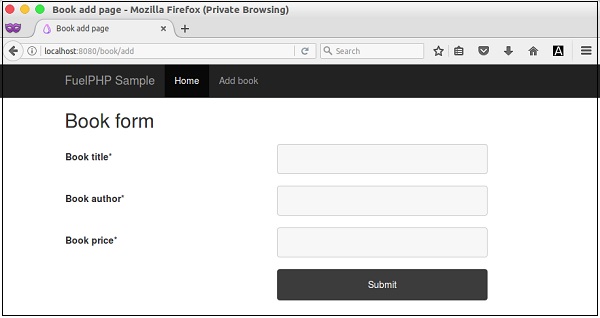
Form with data
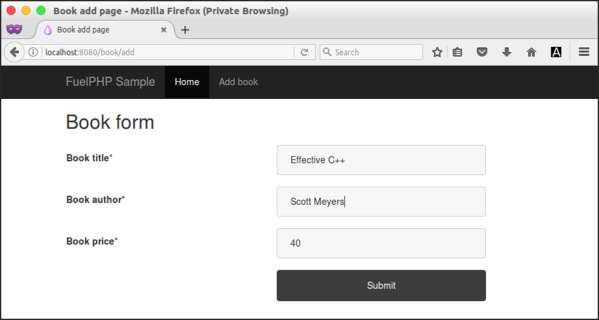
After entering the book information and submitting the page, the book information will be stored into the database and the page gets redirected to index page as follows.
Book list with newly added book
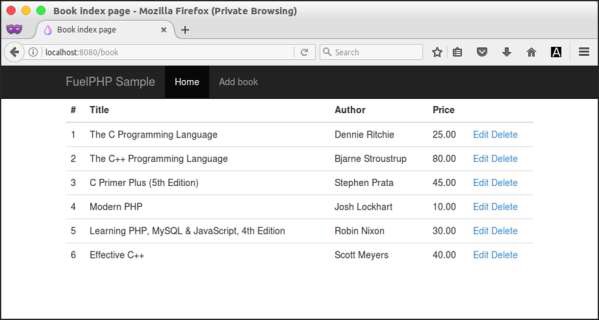
step 15: Creating action to edit book
Create the functionality to edit and update the existing book information. Create a new action, action_edit in the book controller as follows.
public function action_edit($id = false) {
if(!($book = Model_Book::find($id))) {
throw new HttpNotFoundException();
}
// create a new fieldset and add book model
$fieldset = Fieldset::forge('book')->add_model('Model_Book');
$fieldset->populate($book);
// get form from fieldset
$form = $fieldset->form();
// add submit button to the form
$form->add('Submit', '', array('type' => 'submit', 'value' => 'Submit'));
// build the form and set the current page as action
$formHtml = $fieldset->build(Uri::create('book/edit/' . $id));
$view = View::forge('book/add');
$view->set('form', $formHtml, false);
if (Input::param() != array()) {
try {
$book->title = Input::param('title');
$book->author = Input::param('author');
$book->price = Input::param('price');
$book->save();
Response::redirect('book');
} catch (Orm\ValidationFailed $e) {
$view->set('errors', $e->getMessage(), false);
}
}
$this->template->title = "Book edit page";
$this->template->content = $view;
}
It is similar to add action, except it searches the requested book by id before processing the page. If any book information is found in the database, it will proceed and show the book information in the form. Otherwise, it will throw file not found exception and exit.
step 16: Create the view for edit action
Create the view for edit book action. Here, we are using the same view used for add action.
step 17: Checking the edit book action.
Click the edit link of any book in the book listing page, it will show the corresponding book form as follows −
Form with book details
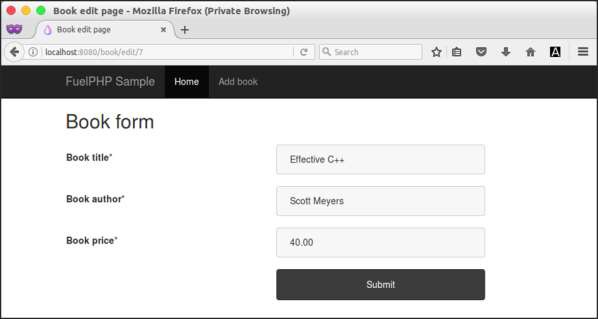
step 18: Create action to delete book
Create the functionality to delete book from the bookstore. Create a new action, action_delete in the book controller as follows,
public function action_delete($id = null) {
if ( ! ($book = Model_Book::find($id))) {
throw new HttpNotFoundException();
} else {
$book->delete();
}
Response::redirect('book');
}
Here, we are checking for the existence of book in the database using the supplied book id. If the book is found, then it is deleted and redirected to index page. Otherwise, a page not found information will be shown.
step 19: Checking the delete action
Check the delete action by clicking the delete link in the book listing page. It will delete the requested book and then again be redirected to the index page.
Finally, all the functionalities to add, edit, delete, and list the book information is created.
FuelPHP is simple, flexible, scalable, and easily configurable compared to other MVC based PHP frameworks. It provides all the features of the modern MVC framework. It can be used as is or can be changed completely to suit our needs. Above all, it is a great choice for web development.
