- FuelPHP - Home
- FuelPHP - Introduction
- FuelPHP - Installation
- FuelPHP - Architecture Overview
- FuelPHP - Simple Web Application
- FuelPHP - Configuration
- FuelPHP - Controllers
- FuelPHP - Routing
- FuelPHP - Requests & Response
- FuelPHP - Views
- FuelPHP - Presenters
- FuelPHP - Models & Database
- FuelPHP - Form Programming
- FuelPHP - Validation
- Advanced Form Programming
- FuelPHP - File Uploading
- FuelPHP - Ajax
- FuelPHP - HMVC Request
- FuelPHP - Themes
- FuelPHP - Modules
- FuelPHP - Packages
- Cookie & Session Management
- FuelPHP - Events
- FuelPHP - Email Management
- FuelPHP - Profiler
- Error Handling & Debugging
- FuelPHP - Unit Testing
- Complete Working Example
- FuelPHP Useful Resources
- FuelPHP - Quick Guide
- FuelPHP - Useful Resources
- FuelPHP - Discussion
FuelPHP - File Uploading
File uploading is one of the most commonly used features in form programming. FuelPHP provides a special class, Upload to handle uploading of files. Let us learn how to upload a file using Upload class in this chapter.
Configuration
Upload class can be configured using separate configuration file, fuel/app/config/upload.php. The important configuration entries are as follows −
max_size − Set the maximum size of the file to be uploaded. 0 refers unlimited upload size
ext_whitelist − Set allowed file extensions
ext_blacklist − Set disallowed file extensions
type_whitelist − Set allowed file types. For example, text for mime type text/plain
type_blacklist − Set disallowed file types
mime_whitelist − Set allowed mime file types. For example, text/plain
mime_blacklist − Set disallowed mime file types
prefix − String to prefix in the filename while saving the uploaded file to the server
suffix − String to suffix in the filename while saving the uploaded file to the server
extension − Extension of the uploaded file to be set
create_path − Whether to create the file path, if not available
overwrite − Whether to overwrite the existing file while saving the uploaded file
auto_rename − Whether to rename the file by adding a sequence number while saving the uploaded file
randomize − Whether to create a random 32-character name to save the uploaded file
Upload Methods
Upload class provides options to process and save the file uploaded by the users. Every processed file (before saving) will have the following information in the result array.
field − Name of the form field
name − Name of the file uploaded
type − Type of the file as defined by the browser
mimetype − Type of the file as defined by Upload class
file − Fully qualified name of the temporary location of the uploaded file
filename − Filename of the uploaded file
extension − Extension of the file uploaded
size − Size of the file uploaded in bytes
errors − Array of error having error code and message
error − Whether to set array errors with why the upload fails (in case of failure in upload)
Once the files are saved in the server, the result array will have the following information as well.
saved_to − Fully qualified path where the uploaded file was saved
saved_as − Name of the file that was saved
errors − Updated error array
Now, let us see the method of Upload class.
is_valid
is_valid returns true, if any valid file is uploaded by the user.
// do we have any uploaded files to save?
if (Upload::is_valid()) {
   // process
}
get_files
get_files return all the uploaded files as multi-dimensional array. If an index/name of the form's file input is specified, then it will return the uploaded file related to the specified file input only.
foreach(Upload::get_files() as $file) {
   // do something with the file info
}
if ( Upload::get_files(0)) {
   // do something
}
get_errors
get_errors returns an array of errors, if there is a failure to upload one or more files. If an index/name of the form's file input name is specified, then it will return the error related to the specified file input only.
foreach(Upload::get_errors() as $file) {
   // do something with the file info
}
if (Upload::get_errors('myimage')) {
   // do something
}
Process
process refers to the actual process of gathering information about the uploaded file. We can supply a new custom configuration using array. If no configuration is specified, then it will use the configuration defined in fuel/app/config/upload.php
Upload::process (array(
   'auto_rename' => false,
   'overwrite'   => true
));
save
save refers to the actual process of saving all the validated files in a proper location. We can specify the index to save only that particular entry.
Upload::save();
Upload::save(0);
Upload::save(0, 3);
Working Example
Let us create a new controller, Controller_Upload in our employee sample to test the upload functionality.
Step 1 − Create a file, fuel/app/classes/controller/upload.php. Create upload controller.
<?php
   class Controller_Upload extends Controller {
   }
Step 2 − Create a new action get_upload.
<?php
   class Controller_Upload extends Controller {
      public function get_index() {
         return \View::forge("upload/index");
      }
   }
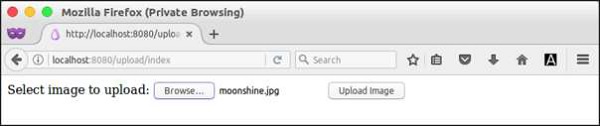
Step 3 − Create a new view for the action created.
<!DOCTYPE html>
<html>
   <body>

      <form action = "/upload/index" method = "post" enctype = "multipart/form-data">
         Select image to upload:
         <input type = "file" name = "fileToUpload" id = "fileToUpload">
         <input type = "submit" value = "Upload Image" name = "submit">
      </form>

   </body>
</html>
Step 4 − Create a new action post_action to process the uploaded file.
<?php
   class Controller_Upload extends Controller {
      public function get_index() {
         return \View::forge("upload/index");
      }
      public function post_index(){
         $config = array(
            'path' => DOCROOT.'files',
            'randomize' => true,
            'ext_whitelist' => array('img', 'jpg', 'jpeg', 'gif', 'png'),
         );
         Upload::process($config);
         // if there are any valid files

         if (Upload::is_valid()) {
            Upload::save();
            echo "success";
         } else {
            // and process any errors
            foreach (Upload::get_errors() as $file) {
               echo var_dump($file);
            }
         }
      }
   }
Finally, run the application by requesting the url, http://localhost:8080/upload/index and try to upload file.
Result