- FuelPHP - Home
- FuelPHP - Introduction
- FuelPHP - Installation
- FuelPHP - Architecture Overview
- FuelPHP - Simple Web Application
- FuelPHP - Configuration
- FuelPHP - Controllers
- FuelPHP - Routing
- FuelPHP - Requests & Response
- FuelPHP - Views
- FuelPHP - Presenters
- FuelPHP - Models & Database
- FuelPHP - Form Programming
- FuelPHP - Validation
- Advanced Form Programming
- FuelPHP - File Uploading
- FuelPHP - Ajax
- FuelPHP - HMVC Request
- FuelPHP - Themes
- FuelPHP - Modules
- FuelPHP - Packages
- Cookie & Session Management
- FuelPHP - Events
- FuelPHP - Email Management
- FuelPHP - Profiler
- Error Handling & Debugging
- FuelPHP - Unit Testing
- Complete Working Example
- FuelPHP Useful Resources
- FuelPHP - Quick Guide
- FuelPHP - Useful Resources
- FuelPHP - Discussion
FuelPHP - Advanced Form Programming
FuelPHP provides an advanced form programming through Fieldset and Fieldset_Field classes. Fieldset provides an object-oriented way to create a form. It has complete support for models. It has built-in support for client-side and server-side validation as well. To create a full-fledged form, it is enough to create a model with proper form and validation setting. Let us learn about Fieldset class and how to create a form using it in this chapter.
Fieldset
Fieldset is a collection of Fieldset_Field objects. Fieldset_Field defines the individual entry of a form such as firstname, lastname, etc. along with validations. Fieldset class has methods to add/edit/remove fields. It has options to identify the fields defined in a model and create the fields from the given model. Fieldset uses Form and Validation classes in the background to do the real work. Let us see some of the important methods of the Fieldset class.
forge
forge creates a new Fieldset instance. It has the following two parameters −
$name − identifier for the fieldset
$config − configuration array. Possible options are validation_instance and form_instance. validation_instance can have Validation object and form_instance can have Form object.
$employee_form = Fieldset::forge('employee');
instance
instance returns the previously created Fieldset instance by identifier.
$employee_form = Fieldset::instance('employee');
get_name
Gets the identifier of the fieldset instance.
$employee_form = Fieldset::forge('employee');
$name = $employee_form->get_name();
add
add creates a new Fieldset_Field instance and add it to the current fieldset. It contains the following four parameters,
$name − name of the field
$label − label for the field
$attributes − HTML tag attributes
$rules − validation rules
$employee_field = $employee_form-> add (
   'employee_lastname',
   'Lastname',
   array ('class' => 'pretty_input')
);

// with validation rules
$employee_form->add (
   'email', 'E-mail',
   array('type' => 'email', 'class' => 'pretty_input'),
   array('required', 'valid_email')
);
add_before
add_before is similar to add, except it has one extra parameter to specify the field before which the newly created field will be added.
$employee_form->add_before (
   'employee_firstname',
   'Firstname',
   array ('class' => 'pretty_input'),
   array(),
   'employee_lastname'
);
delete
delete deletes the specified field from the fieldset.
$employee_form->delete('employee_firstname');
field
field gets either all the fields or the specified one from the fieldset.
$fields = $employee_form->field();
$lastname_field = $employee_form->field('employee_lastname');
build
build is alias for $this->form()->build(). Generates the HTML markup of the form.
$employee_form->build(Uri::create('employee/add'));
enable
enable re-enables a field that has been previously disabled.
$employee_form->enable('employee_firstname');
disable
disable allows to disable a field in the fieldset from being build.
$employee_form->disable('employee_firstname');
form
form returns the Form instance of the current fieldset.
$form = employee_form->form();
add_model
add_model adds the model's field into the fieldset. It has the following three parameters,
$class − class name
$instance − instance of the class to populate the fields with value
$method − name of the method in the class. This method is used to add fields into the fieldset. Orm\Model has the required method. The default method name is set_form_fields.
$employee_form = Fieldset::forge('employee');
$employee_form->add_model('Model_Employee');
populate
populate sets the initial value of the fields in fieldset using model instance.
$emp = new Model_Employee();
$emp->name = "Jon";
$employee_form->populate($emp);
repopulate
repopulate is same as populate, except it repopulates the fields in the fieldset.
validation
validation gets the validation instance of the current fieldset.
$validation = $employee_form->validation();
validated
Alias for $this->validation()->validated().
input
Alias for $this->validation()->input().
error
Alias for $this->validation()->error().
show_errors
Alias for $this->validation()->show_errors().
Working Example
Let's create an advanced form to add new employee in our sample employee application using Fieldset class.
Update Model
Update the employee model with necessary validation rules and add a validation observer as follows.
<?php
   class Model_Employee extends Orm\Model {
      protected static $_connection = 'production';
      protected static $_table_name = 'employee';
      protected static $_primary_key = array('id');

      protected static $_properties = array (
         'id',
         'name' => array (
            'data_type' => 'varchar',
            'label' => 'Employee Name',
            'validation' => array (
               'required',
               'min_length' => array(3),
               'max_length' => array(80)
            ),
            'form' => array (
               'type' => 'text'
            ),
         ),
         'age' => array (
            'data_type' => 'int',
            'label' => 'Employee Age',
            'validation' => array (
               'required',
            ),
            'form' => array ('type' => 'text' ),
         ),
      );

      // Just add the Observer, and define the required event
      protected static $_observers = array('Orm\\Observer_Validation' => array (
         'events' => array('before_save')));
   }
Here, we have defined the validation rules for name and age fields and added a new observer to perform server side validation before saving the model into the database. The same validation rule will create necessary input validation attributes as well in the form.
Create Form
Create new action, action_advancedform in the employee controller as follows.
public function action_advancedform() {

   // create a new fieldset and add employee model
   $fieldset = Fieldset::forge('employee')->add_model('Model_Employee');

   // get form from fieldset
   $form = $fieldset->form();

   // add submit button to the form
   $form->add('Submit', '', array('type' => 'submit', 'value' => 'Submit'));

   // build the form  and set the current page as action
   $formHtml = $fieldset->build(Uri::create('employee/advancedform'));

   // set form in data
   $data = array();
   $data['form'] = $formHtml;
   return Response::forge(View::forge('employee/advancedform', $data, false));
}
Here, we have created the form using fieldset and send the form to the view. Next, add view for the action, fuel/app/views/employee/advancedform.php as follows.
<!DOCTYPE html>
<html lang = "en">

   <head>
      <title>Employee :: add page</title>
      <meta charset = "utf-8">
      <meta name = "viewport" content = "width = device-width, initial-scale = 1">
      <?php echo Asset::css('bootstrap.css'); ?>

      <style>
         table {
            width: 90%;
         }
         table tr {
            width: 90%
         }
         table tr td {
            width: 50%
         }
         input[type = text], select {
            width: 100%;
            padding: 12px 20px;
            margin: 8px 0;
            display: inline-block;
            border: 1px solid #ccc;
            border-radius: 4px;
            box-sizing: border-box;
         }
         input[type = submit] {
            width: 100%;
            background-color: #3c3c3c;
            color: white;
            padding: 14px 20px;
            margin: 8px 0;
            border: none;
            border-radius: 4px;
            cursor: pointer;
         }
         div {
            border-radius: 5px;
            background-color: #f2f2f2;
            padding: 20px;
         }
      </style>
   </head>

   <body>
      <div class = "container">
         <?php
            if(isset($errors)) {
               echo $errors;
            }
            echo $form;
         ?>
      </div>
   </body>

</html>
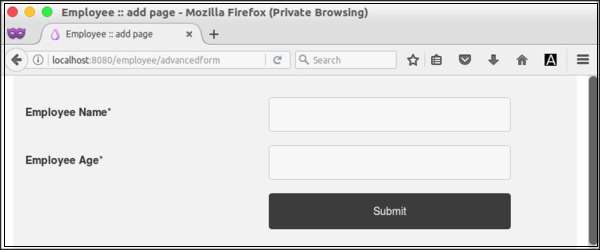
Now, requesting the page http://localhost:8080/employee/add will show the following form.
Process Form
Update the action method, action_advancedform to process the form and add the employee data entered by the user into the database in the employee controller as follows.
public function action_advancedform() {

   // create a new fieldset and add employee model
   $fieldset = Fieldset::forge('employee')->add_model('Model_Employee');

   // get form from fieldset
   $form = $fieldset->form();

   // add submit button to the form
   $form->add('Submit', '', array('type' => 'submit', 'value' => 'Submit'));

   // build the form  and set the current page as action
   $formHtml = $fieldset->build(Uri::create('employee/advancedform'));

   if (Input::param() != array()) {
      try {
         $article = Model_Employee::forge();
         $article->name = Input::param('name');
         $article->url = Input::param('age');
         $article->save();
         Response::redirect('employee/list');

      }
      catch (Orm\ValidationFailed $e) {
         $view = View::forge('employee/advancedform');
         $view->set('form', $formHtml, false);
         $view->set('errors', $e->getMessage(), false);
      }
   }

   return Response::forge($view);
}
Here, we have been redirected to employee list page, once the user entered data is validated and saved into the database. Otherwise, we will be shown the form again.
Create the Form
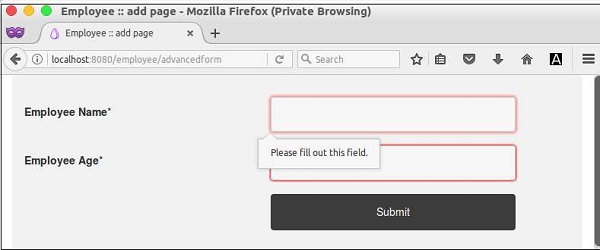
Now, request the URL, http://localhost:8080/employee/add and enter some employee data and submit the form. If the data is not provided, then the form will prompt the user to enter the data as shown in the following screenshot.
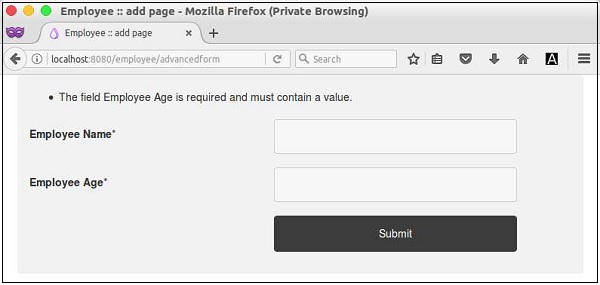
If the user bypasses the client side validation, then the server will validate the form and show an error as shown in the following screenshot.
If the data passed the client and server side validation, then the employee data will be saved into the database and the page gets redirected to list page.
