
- Eclipse - Home
- Eclipse - Overview
- Eclipse - Installation
- Eclipse - Explore Windows
- Eclipse - Explore Menus
- Eclipse - Explore Views
- Eclipse - Perspectives
- Eclipse - Workspaces
- Eclipse - Create Java Project
- Eclipse - Create Java Package
- Eclipse - Create Java Class
- Eclipse - Create Java Interface
- Eclipse - Create XML File
- Eclipse - Java Build Path
- Eclipse - Run Configuration
- Eclipse - Running Program
- Eclipse - Create Jar Files
- Eclipse - Close Project
- Eclipse - Reopen Project
- Eclipse - Build Project
- Eclipse - Debug Configuration
- Eclipse - Debugging Program
- Eclipse - Preferences
- Eclipse - Content Assist
- Eclipse - Quick Fix
- Eclipse - Hover Help
- Eclipse - Search Menu
- Eclipse - Navigation
- Eclipse - Refactoring
- Eclipse - Add Bookmarks
- Eclipse - Task Management
- Eclipse - Install Plugins
- Eclipse - Code Templates
- Eclipse - Shortcuts
- Eclipse - Restart Option
- Eclipse - Tips & Tricks
- Eclipse - Web Browsers
Eclipse - Useful Resources
Eclipse - Create Java Project
Opening the New Java Project wizard
The New Java Project wizard can be used to create a new java project. There are many ways to open this wizard −
By clicking on the File menu and choosing New → Java Project.
By right clicking anywhere in the Project Explorer and selecting New → Java Project.
By clicking on the New button (
 ) in the Tool bar and selecting Java Project.
Using the New Java Project wizard
The New Java Project Wizard has two pages. On the first page −
Enter the Project Name
Select the Java Runtime Environment (JRE) or leave it at the default
Select the Project Layout which determines whether there would be a separate folder for the source codes and class files. The recommended option is to create separate folders for sources and class files.
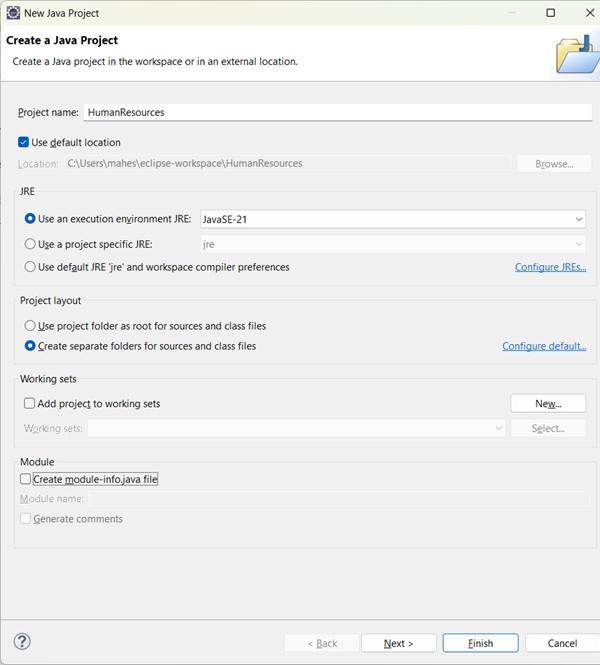
You can click on the Finish button to create the project or click on the Next button to change the java build settings.
On the second page you can change the Java Build Settings like setting the Project dependency (if there are multiple projects) and adding additional jar files to the build path.
Viewing the Newly Created Project
The package explorer shows the newly created Java project. The icon that represents a Project is decorated with a J
to show that it is a Java Project. The folder icon is decorated to show that it is a java source folder.

