- D Programming - Home
- D Programming - Overview
- D Programming - Environment
- D Programming - Basic Syntax
- D Programming - Variables
- D Programming - Data Types
- D Programming - Enums
- D Programming - Literals
- D Programming - Operators
- D Programming - Loops
- D Programming - Decisions
- D Programming - Functions
- D Programming - Characters
- D Programming - Strings
- D Programming - Arrays
- D Programming - Associative Arrays
- D Programming - Pointers
- D Programming - Tuples
- D Programming - Structs
- D Programming - Unions
- D Programming - Ranges
- D Programming - Aliases
- D Programming - Mixins
- D Programming - Modules
- D Programming - Templates
- D Programming - Immutables
- D Programming - File I/O
- D Programming - Concurrency
- D Programming - Exception Handling
- D Programming - Contract
- D - Conditional Compilation
- D Programming - Classes & Objects
- D Programming - Inheritance
- D Programming - Overloading
- D Programming - Encapsulation
- D Programming - Interfaces
- D Programming - Abstract Classes
- D Programming - Useful Resources
- D Programming - Quick Guide
- D Programming - Useful Resources
- D Programming - Discussion
D Programming - Quick Guide
D Programming - Overview
D programming language is an object-oriented multi-paradigm system programming language developed by Walter Bright of Digital Mars. Its development started in 1999 and was first released in 2001. The major version of D(1.0) was released in 2007. Currently, we have D2 version of D.
D is language with syntax being C style and uses static typing. There are many features of C and C++ in D but also there are some features from these language not included part of D. Some of the notable additions to D includes,
- Unit testing
- True modules
- Garbage collection
- First class arrays
- Free and open
- Associative arrays
- Dynamic arrays
- Inner classes
- Closures
- Anonymous functions
- Lazy evaluation
- Closures
Multiple Paradigms
D is a multiple paradigm programming language. The multiple paradigms includes,
- Imperative
- Object Oriented
- Meta programming
- Functional
- Concurrent
Example
import std.stdio;

void main(string[] args) {
   writeln("Hello World!");
}
Learning D
The most important thing to do when learning D is to focus on concepts and not get lost in language technical details.
The purpose of learning a programming language is to become a better programmer; that is, to become more effective at designing and implementing new systems and at maintaining old ones.
Scope of D
D programming has some interesting features and the official D programming site claims that D is convinient, powerful and efficient. D programming adds many features in the core language which C language has provided in the form of Standard libraries such as resizable array and string function. D makes an excellent second language for intermediate to advanced programmers. D is better in handling memory and managing the pointers that often causes trouble in C++.
D programming is intended mainly on new programs that conversion of existing programs. It provides built in testing and verification an ideal for large new project that will be written with millions of lines of code by large teams.
D Programming - Environment
Local Environment Setup for D
If you are still willing to set up your environment for D programming language, you need the following two softwares available on your computer, (a) Text Editor,(b)D Compiler.
Text Editor for D Programming
This will be used to type your program. Examples of few editors include Windows Notepad, OS Edit command, Brief, Epsilon, EMACS, and vim or vi.
Name and version of text editor can vary on different operating systems. For example, Notepad will be used on Windows, and vim or vi can be used on windows as well as Linux or UNIX.
The files you create with your editor are called source files and contain program source code. The source files for D programs are named with the extension ".d".
Before starting your programming, make sure you have one text editor in place and you have enough experience to write a computer program, save it in a file, build it and finally execute it.
The D Compiler
Most current D implementations compile directly into machine code for efficient execution.
We have multiple D compilers available and it includes the following.
DMD − The Digital Mars D compiler is the official D compiler by Walter Bright.
GDC − A front-end for the GCC back-end, built using the open DMD compiler source code.
LDC − A compiler based on the DMD front-end that uses LLVM as its compiler back-end.
The above different compilers can be downloaded from D downloads
We will be using D version 2 and we recommend not to download D1.
Lets have a helloWorld.d program as follows. We will use this as first program we run on platform you choose.
import std.stdio;

void main(string[] args) {
   writeln("Hello World!");
}
We can see the following output.
$ hello world
Installation of D on Windows
Download the windows installer.
Run the downloaded executable to install the D which can be done by following the on screen instructions.
Now we can build and run a d file say helloWorld.d by switching to folder containing the file using cd and then using the following steps −
C:\DProgramming> DMD helloWorld.d
C:\DProgramming> helloWorld
We can see the following output.
hello world
C:\DProgramming is the folder, I am using to save my samples. You can change it to the folder that you have saved D programs.
Installation of D on Ubuntu/Debian
Download the debian installer.
Run the downloaded executable to install the D which can be done by following the on screen instructions.
Now we can build and run a d file say helloWorld.d by switching to folder containing the file using cd and then using the following steps −
$ dmd helloWorld.d
$ ./helloWorld
We can see the following output.
$ hello world
Installation of D on Mac OS X
Download the Mac installer.
Run the downloaded executable to install the D which can be done by following the on screen instructions.
Now we can build and run a d file say helloWorld.d by switching to folder containing the file using cd and then using the following steps −
$ dmd helloWorld.d
$ ./helloWorld
We can see the following output.
$ hello world
Installation of D on Fedora
Download the fedora installer.
Run the downloaded executable to install the D which can be done by following the on screen instructions.
Now we can build and run a d file say helloWorld.d by switching to folder containing the file using cd and then using the following steps −
$ dmd helloWorld.d
$ ./helloWorld
We can see the following output.
$ hello world
Installation of D on OpenSUSE
Download the OpenSUSE installer.
Run the downloaded executable to install the D which can be done by following the on screen instructions.
Now we can build and run a d file say helloWorld.d by switching to folder containing the file using cd and then using the following steps −
$ dmd helloWorld.d
$ ./helloWorld
We can see the following output.
$ hello world
D IDE
We have IDE support for D in the form of plugins in most cases. This includes,
Visual D plugin is a plugin for Visual Studio 2005-13
DDT is a eclipse plugin that provides code completion, debugging with GDB.
Mono-D code completion, refactoring with dmd/ldc/gdc support. It has been part of GSoC 2012.
Code Blocks is a multi-platform IDE that supports D project creation, highlighting and debugging.
D Programming - Basic Syntax
D is quite simple to learn and lets start creating our first D program!
First D Program
Let us write a simple D program. All D files will have extension .d. So put the following source code in a test.d file.
import std.stdio;

/* My first program in D */
void main(string[] args) {
   writeln("test!");
}
Assuming D environment is setup correctly, lets run the programming using −
$ dmd test.d
$ ./test
We can see the following output.
test
Let us now see the basic structure of D program, so that it will be easy for you to understand basic building blocks of the D programming language.
Import in D
Libraries which are collections of reusable program parts can be made available to our project with the help of import. Here we import the standard io library which provides the basic I/O operations. writeln which is used in above program is a function in D's standard library. It is used for printing a line of text. Library contents in D are grouped into modules which is based on the types of tasks that they intend perform. The only module that this program uses is std.stdio, which handles data input and output.
Main Function
Main function is the starting of the program and it determines the order of execution and how other sections of the program should be executed.
Tokens in D
A D program consists of various tokens and a token is either a keyword, an identifier, a constant, a string literal, or a symbol. For example, the following D statement consists of four tokens −
writeln("test!");
The individual tokens are −
writeln (
   "test!"
)
;
Comments
Comments are like supporting text in your D program and they are ignored by the compiler. Multi line comment starts with /* and terminates with the characters */ as shown below −
/* My first program in D */
Single comment is written using // in the beginning of the comment.
// my first program in D
Identifiers
A D identifier is a name used to identify a variable, function, or any other userdefined item. An identifier starts with a letter A to Z or a to z or an underscore _ followed by zero or more letters, underscores, and digits (0 to 9).
D does not allow punctuation characters such as @, $, and % within identifiers. D is a case sensitive programming language. Thus Manpower and manpower are two different identifiers in D. Here are some examples of acceptable identifiers −
mohd       zara    abc   move_name  a_123
myname50   _temp   j     a23b9      retVal
Keywords
The following list shows few of the reserved words in D. These reserved words may not be used as constant or variable or any other identifier names.
| abstract | alias | align | asm |
| assert | auto | body | bool |
| byte | case | cast | catch |
| char | class | const | continue |
| dchar | debug | default | delegate |
| deprecated | do | double | else |
| enum | export | extern | false |
| final | finally | float | for |
| foreach | function | goto | if |
| import | in | inout | int |
| interface | invariant | is | long |
| macro | mixin | module | new |
| null | out | override | package |
| pragma | private | protected | public |
| real | ref | return | scope |
| short | static | struct | super |
| switch | synchronized | template | this |
| throw | true | try | typeid |
| typeof | ubyte | uint | ulong |
| union | unittest | ushort | version |
| void | wchar | while | with |
Whitespace in D
A line containing only whitespace, possibly with a comment, is known as a blank line, and a D compiler totally ignores it.
Whitespace is the term used in D to describe blanks, tabs, newline characters and comments. Whitespace separates one part of a statement from another and enables the interpreter to identify where one element in a statement, such as int, ends and the next element begins. Therefore, in the following statement −
local age
There must be at least one whitespace character (usually a space) between local and age for the interpreter to be able to distinguish them. On the other hand, in the following statement
int fruit = apples + oranges //get the total fruits
No whitespace characters are necessary between fruit and =, or between = and apples, although you are free to include some if you wish for readability purpose.
D Programming - Variables
A variable is nothing but a name given to a storage area that our programs can manipulate. Each variable in D has a specific type, which determines the size and layout of the variable's memory; the range of values that can be stored within that memory; and the set of operations that can be applied to the variable.
The name of a variable can be composed of letters, digits, and the underscore character. It must begin with either a letter or an underscore. Upper and lowercase letters are distinct because D is case-sensitive. Based on the basic types explained in the previous chapter, there will be the following basic variable types −
| Sr.No. | Type & Description |
|---|---|
| 1 | char Typically a single octet (one byte). This is an integer type. |
| 2 | int The most natural size of integer for the machine. |
| 3 | float A single-precision floating point value. |
| 4 | double A double-precision floating point value. |
| 5 | void Represents the absence of type. |
D programming language also allows to define various other types of variables such as Enumeration, Pointer, Array, Structure, Union, etc., which we will cover in subsequent chapters. For this chapter, let us study only basic variable types.
Variable Definition in D
A variable definition tells the compiler where and how much space to create for the variable. A variable definition specifies a data type and contains a list of one or more variables of that type as follows −
type variable_list;
Here, type must be a valid D data type including char, wchar, int, float, double, bool, or any user-defined object, etc., and variable_list may consist of one or more identifier names separated by commas. Some valid declarations are shown here −
int    i, j, k;
char   c, ch;
float  f, salary;
double d;
The line int i, j, k; both declares and defines the variables i, j and k; which instructs the compiler to create variables named i, j, and k of type int.
Variables can be initialized (assigned an initial value) in their declaration. The initializer consists of an equal sign followed by a constant expression as follows −
type variable_name = value;
Examples
extern int d = 3, f = 5;    // declaration of d and f.
int d = 3, f = 5;           // definition and initializing d and f.
byte z = 22;                // definition and initializes z.
char x = 'x';               // the variable x has the value 'x'.
When a variable is declared in D, it is always set to its 'default initializer', which can be manually accessed as T.init where T is the type (ex. int.init). The default initializer for integer types is 0, for Booleans false, and for floating-point numbers NaN.
Variable Declaration in D
A variable declaration provides assurance to the compiler that there is one variable existing with the given type and name so that compiler proceed for further compilation without needing complete detail about the variable. A variable declaration has its meaning at the time of compilation only, compiler needs actual variable declaration at the time of linking of the program.
Example
Try the following example, where variables have been declared at the start of the program, but are defined and initialized inside the main function −
import std.stdio;

int a = 10, b = 10;
int c;
float f;

int main () {
   writeln("Value of a is : ", a);

   /* variable re definition: */
   int a, b;
   int c;
   float f;

   /* Initialization */
   a = 30;
   b = 40;
   writeln("Value of a is : ", a);

   c = a + b;
   writeln("Value of c is : ", c);

   f = 70.0/3.0;
   writeln("Value of f is : ", f);
   return 0;
}
When the above code is compiled and executed, it produces the following result −
Value of a is : 10
Value of a is : 30
Value of c is : 70
Value of f is : 23.3333
Lvalues and Rvalues in D
There are two kinds of expressions in D −
lvalue − An expression that is an lvalue may appear as either the left-hand or right-hand side of an assignment.
rvalue − An expression that is an rvalue may appear on the right- but not left-hand side of an assignment.
Variables are lvalues and so may appear on the left-hand side of an assignment. Numeric literals are rvalues and so may not be assigned and cannot appear on the left-hand side. The following statement is valid −
int g = 20;
But the following is not a valid statement and would generate a compile-time error −
10 = 20;
D Programming - Data Types
In the D programming language, data types refer to an extensive system used for declaring variables or functions of different types. The type of a variable determines how much space it occupies in storage and how the stored bit pattern is interpreted.
The types in D can be classified as follows −
| Sr.No. | Types & Description |
|---|---|
| 1 | Basic Types They are arithmetic types and consist of the three types: (a) integer, (b) floating-point, and (c) character. |
| 2 | Enumerated types They are again arithmetic types. They are used to define variables that can only be assigned certain discrete integer values throughout the program. |
| 3 | The type void The type specifier void indicates that no value is available. |
| 4 | Derived types They include (a) Pointer types, (b) Array types, (c) Structure types, (d) Union types, and (e) Function types. |
The array types and structure types are referred to collectively as the aggregate types. The type of a function specifies the type of the function's return value. We will see basic types in the following section whereas other types will be covered in the upcoming chapters.
Integer Types
The following table gives lists standard integer types with their storage sizes and value ranges −
| Type | Storage size | Value range |
|---|---|---|
| bool | 1 byte | false or true |
| byte | 1 byte | -128 to 127 |
| ubyte | 1 byte | 0 to 255 |
| int | 4 bytes | -2,147,483,648 to 2,147,483,647 |
| uint | 4 bytes | 0 to 4,294,967,295 |
| short | 2 bytes | -32,768 to 32,767 |
| ushort | 2 bytes | 0 to 65,535 |
| long | 8 bytes | -9223372036854775808 to 9223372036854775807 |
| ulong | 8 bytes | 0 to 18446744073709551615 |
To get the exact size of a type or a variable, you can use the sizeof operator. The expression type.(sizeof) yields the storage size of the object or type in bytes. The following example gets the size of int type on any machine −
import std.stdio;

int main() {
   writeln("Length in bytes: ", ulong.sizeof);

   return 0;
}
When you compile and execute the above program, it produces the following result −
Length in bytes: 8
Floating-Point Types
The following table mentions standard float-point types with storage sizes, value ranges, and their purpose −
| Type | Storage size | Value range | Purpose |
|---|---|---|---|
| float | 4 bytes | 1.17549e-38 to 3.40282e+38 | 6 decimal places |
| double | 8 bytes | 2.22507e-308 to 1.79769e+308 | 15 decimal places |
| real | 10 bytes | 3.3621e-4932 to 1.18973e+4932 | either the largest floating point type that the hardware supports, or double; whichever is larger |
| ifloat | 4 bytes | 1.17549e-38i to 3.40282e+38i | imaginary value type of float |
| idouble | 8 bytes | 2.22507e-308i to 1.79769e+308i | imaginary value type of double |
| ireal | 10 bytes | 3.3621e-4932 to 1.18973e+4932 | imaginary value type of real |
| cfloat | 8 bytes | 1.17549e-38+1.17549e-38i to 3.40282e+38+3.40282e+38i | complex number type made of two floats |
| cdouble | 16 bytes | 2.22507e-308+2.22507e-308i to 1.79769e+308+1.79769e+308i | complex number type made of two doubles |
| creal | 20 bytes | 3.3621e-4932+3.3621e-4932i to 1.18973e+4932+1.18973e+4932i | complex number type made of two reals |
The following example prints storage space taken by a float type and its range values −
import std.stdio;

int main() {
   writeln("Length in bytes: ", float.sizeof);

   return 0;
}
When you compile and execute the above program, it produces the following result on Linux −
Length in bytes: 4
Character Types
The following table lists standard character types with storage sizes and its purpose.
| Type | Storage size | Purpose |
|---|---|---|
| char | 1 byte | UTF-8 code unit |
| wchar | 2 bytes | UTF-16 code unit |
| dchar | 4 bytes | UTF-32 code unit and Unicode code point |
The following example prints storage space taken by a char type.
import std.stdio;

int main() {
   writeln("Length in bytes: ", char.sizeof);

   return 0;
}
When you compile and execute the above program, it produces the following result −
Length in bytes: 1
The void Type
The void type specifies that no value is available. It is used in two kinds of situations −
| Sr.No. | Types & Description |
|---|---|
| 1 | Function returns as void There are various functions in D which do not return value or you can say they return void. A function with no return value has the return type as void. For example, void exit (int status); |
| 2 | Function arguments as void There are various functions in D which do not accept any parameter. A function with no parameter can accept as a void. For example, int rand(void); |
The void type may not be understood to you at this point, so let us proceed and we will cover these concepts in upcoming chapters.
D Programming - Enums
An enumeration is used for defining named constant values. An enumerated type is declared using the enum keyword.
The enum Syntax
The simplest form of an enum definition is the following −
enum enum_name {
   enumeration list
}
Where,
The enum_name specifies the enumeration type name.
The enumeration list is a comma-separated list of identifiers.
Each of the symbols in the enumeration list stands for an integer value, one greater than the symbol that precedes it. By default, the value of the first enumeration symbol is 0. For example −
enum Days { sun, mon, tue, wed, thu, fri, sat };
Example
The following example demonstrates the use of enum variable −
import std.stdio;

enum Days { sun, mon, tue, wed, thu, fri, sat };

int main(string[] args) {
   Days day;

   day = Days.mon;
   writefln("Current Day: %d", day);
   writefln("Friday : %d", Days.fri);
   return 0;
}
When the above code is compiled and executed, it produces the following result −
Current Day: 1
Friday : 5
In the above program, we can see how an enumeration can be used. Initially, we create a variable named day of our user defined enumeration Days. Then we set it to mon using the dot operator. We need to use the writefln method to print the value of mon that is been stored. You also need specify the type. It is of the type integer, hence we use %d for printing.
Named Enums Properties
The above example uses a name Days for the enumeration and is called named enums. These named enums have the following properties −
Init − It initializes the first value in the enumeration.
min − It returns the smallest value of enumeration.
max − It returns the largest value of enumeration.
sizeof − It returns the size of storage for enumeration.
Let us modify the previous example to make use of the properties.
import std.stdio;

// Initialized sun with value 1
enum Days { sun = 1, mon, tue, wed, thu, fri, sat };

int main(string[] args) {
   writefln("Min : %d", Days.min);
   writefln("Max : %d", Days.max);
   writefln("Size of: %d", Days.sizeof);
   return 0;
}
When the above code is compiled and executed, it produces the following result −
Min : 1
Max : 7
Size of: 4
Anonymous Enum
Enumeration without name is called anonymous enum. An example for anonymous enum is given below.
import std.stdio;

// Initialized sun with value 1
enum { sun , mon, tue, wed, thu, fri, sat };

int main(string[] args) {
   writefln("Sunday : %d", sun);
   writefln("Monday : %d", mon);
   return 0;
}
When the above code is compiled and executed, it produces the following result −
Sunday : 0
Monday : 1
Anonymous enums work pretty much the same way as named enums but they do not have the max, min, and sizeof properties.
Enum with Base Type Syntax
The syntax for enumeration with base type is shown below.
enum :baseType {
   enumeration list
}
Some of the base types includes long, int, and string. An example using long is shown below.
import std.stdio;

enum : string {
   A = "hello",
   B = "world",
}

int main(string[] args) {
   writefln("A : %s", A);
   writefln("B : %s", B);

   return 0;
}
When the above code is compiled and executed, it produces the following result −
A : hello
B : world
More Features
Enumeration in D provides features like initialization of multiple values in an enumeration with multiple types. An example is shown below.
import std.stdio;

enum {
   A = 1.2f,  // A is 1.2f of type float
   B,         // B is 2.2f of type float
   int C = 3, // C is 3 of type int
   D          // D is 4 of type int
}

int main(string[] args) {
   writefln("A : %f", A);
   writefln("B : %f", B);
   writefln("C : %d", C);
   writefln("D : %d", D);
   return 0;
}
When the above code is compiled and executed, it produces the following result −
A : 1.200000
B : 2.200000
C : 3
D : 4
D Programming - Literals
Constant values that are typed in the program as a part of the source code are called literals.
Literals can be of any of the basic data types and can be divided into Integer Numerals, Floating-Point Numerals, Characters, Strings, and Boolean Values.
Again, literals are treated just like regular variables except that their values cannot be modified after their definition.
Integer Literals
An integer literal can be a of the following types −
Decimal uses the normal number represention with the first digit cannot be 0 as that digit is reserved for indicating the octal system.This does not include 0 on its own: 0 is zero.
Octal uses 0 as prefix to number.
Binary uses 0b or 0B as prefix.
Hexadecimal uses 0x or 0X as prefix.
An integer literal can also have a suffix that is a combination of U and L, for unsigned and long, respectively. The suffix can be uppercase or lowercase and can be in any order.
When you dont use a suffix, the compiler itself chooses between int, uint, long, and ulong based on the magnitude of the value.
Here are some examples of integer literals −
212         // Legal
215u        // Legal
0xFeeL      // Legal
078         // Illegal: 8 is not an octal digit
032UU       // Illegal: cannot repeat a suffix
Following are other examples of various types of integer literals −
85         // decimal
0213       // octal
0x4b       // hexadecimal
30         // int
30u        // unsigned int
30l        // long
30ul       // unsigned long
0b001      // binary
Floating Point Literals
The floating point literals can be specified in either the decimal system as in 1.568 or in the hexadecimal system as in 0x91.bc.
In the decimal system, an exponent can be represented by adding the character e or E and a number after that. For example, 2.3e4 means "2.3 times 10 to the power of 4". A + character may be specified before the value of the exponent, but it has no effect. For example 2.3e4 and 2.3e + 4 are the same.
The - character added before the value of the exponent changes the meaning to be "divided by 10 to the power of". For example, 2.3e-2 means "2.3 divided by 10 to the power of 2".
In the hexadecimal system, the value starts with either 0x or 0X. The exponent is specified by p or P instead of e or E. The exponent does not mean "10 to the power of", but "2 to the power of". For example, the P4 in 0xabc.defP4 means "abc.de times 2 to the power of 4".
Here are some examples of floating-point literals −
3.14159       // Legal
314159E-5L    // Legal
510E          // Illegal: incomplete exponent
210f          // Illegal: no decimal or exponent
.e55          // Illegal: missing integer or fraction
0xabc.defP4   // Legal Hexa decimal with exponent
0xabc.defe4   // Legal Hexa decimal without exponent.
By default, the type of a floating point literal is double. The f and F mean float, and the L specifier means real.
Boolean Literals
There are two Boolean literals and they are part of standard D keywords −
A value of true representing true.
A value of false representing false.
You should not consider the value of true equal to 1 and value of false equal to 0.
Character Literals
Character literals are enclosed in single quotes.
A character literal can be a plain character (e.g., 'x'), an escape sequence (e.g., '\t'), ASCII character (e.g., '\x21'), Unicode character (e.g., '\u011e') or as named character (e.g. '\©','\♥', '\€' ).
There are certain characters in D when they are preceded by a backslash they will have special meaning and they are used to represent like newline (\n) or tab (\t). Here, you have a list of some of such escape sequence codes −
| Escape sequence | Meaning |
|---|---|
| \\ | \ character |
| \' | ' character |
| \" | " character |
| \? | ? character |
| \a | Alert or bell |
| \b | Backspace |
| \f | Form feed |
| \n | Newline |
| \r | Carriage return |
| \t | Horizontal tab |
| \v | Vertical tab |
The following example shows few escape sequence characters −
import std.stdio;

int main(string[] args) {
   writefln("Hello\tWorld%c\n",'\x21');
   writefln("Have a good day%c",'\x21');
   return 0;
}
When the above code is compiled and executed, it produces the following result −
Hello   World!

Have a good day!
String Literals
String literals are enclosed in double quotes. A string contains characters that are similar to character literals: plain characters, escape sequences, and universal characters.
You can break a long line into multiple lines using string literals and separate them using whitespaces.
Here are some examples of string literals −
import std.stdio;

int main(string[] args) {
   writeln(q"MY_DELIMITER
      Hello World
      Have a good day
      MY_DELIMITER");

   writefln("Have a good day%c",'\x21');
   auto str = q{int value = 20; ++value;};
   writeln(str);
}
In the above example, you can find the use of q"MY_DELIMITER MY_DELIMITER" to represent multi line characters. Also, you can see q{} to represent an D language statement itself.
D Programming - Operators
An operator is a symbol that tells the compiler to perform specific mathematical or logical manipulations. D language is rich in built-in operators and provides the following types of operators −
- Arithmetic Operators
- Relational Operators
- Logical Operators
- Bitwise Operators
- Assignment Operators
- Misc Operators
This chapter explains arithmetic, relational, logical, bitwise, assignment, and other operators one by one.
Arithmetic Operators
The following table shows all arithmetic operators supported by D language. Assume variable A holds 10 and variable B holds 20 then −
| Operator | Description | Example |
|---|---|---|
| + | It adds two operands. | A + B gives 30 |
| - | It subtracts second operand from the first. | A - B gives -10 |
| * | It multiplies both operands. | A * B gives 200 |
| / | It divides numerator by denumerator. | B / A gives 2 |
| % | It returns remainder of an integer division. | B % A gives 0 |
| ++ | The increment operator increases integer value by one. | A++ gives 11 |
| -- | The decrements operator decreases integer value by one. | A-- gives 9 |
Relational Operators
The following table shows all the relational operators supported by D language. Assume variable A holds 10 and variable B holds 20, then −
| Operator | Description | Example |
|---|---|---|
| == | Checks if the values of two operands are equal or not, if yes then condition becomes true. | (A == B) is not true. |
| != | Checks if the values of two operands are equal or not, if values are not equal then condition becomes true. | (A != B) is true. |
| > | Checks if the value of left operand is greater than the value of right operand, if yes then condition becomes true. | (A > B) is not true. |
| < | Checks if the value of left operand is less than the value of right operand, if yes then condition becomes true. | (A < B) is true. |
| >= | Checks if the value of left operand is greater than or equal to the value of right operand, if yes then condition becomes true. | (A >= B) is not true. |
| <= | Checks if the value of left operand is less than or equal to the value of right operand, if yes then condition becomes true. | (A <= B) is true. |
Logical Operators
The following table shows all the logical operators supported by D language. Assume variable A holds 1 and variable B holds 0, then −
| Operator | Description | Example |
|---|---|---|
| && | It is called Logical AND operator. If both the operands are non-zero, then condition becomes true. | (A && B) is false. |
| || | It is called Logical OR Operator. If any of the two operands is non-zero, then condition becomes true. | (A || B) is true. |
| ! | It is called Logical NOT Operator. Use to reverses the logical state of its operand. If a condition is true then Logical NOT operator will make false. | !(A && B) is true. |
Bitwise Operators
Bitwise operators works on bits and perform bit-by-bit operation. The truth tables for &, |, and ^ are as follows −
| p | q | p & q | p | q | p ^ q |
|---|---|---|---|---|
| 0 | 0 | 0 | 0 | 0 |
| 0 | 1 | 0 | 1 | 1 |
| 1 | 1 | 1 | 1 | 0 |
| 1 | 0 | 0 | 1 | 1 |
Assume if A = 60; and B = 13. In the binary format they will be as follows −
A = 0011 1100
B = 0000 1101
-----------------
A&B = 0000 1100
A|B = 0011 1101
A^B = 0011 0001
~A = 1100 0011
The Bitwise operators supported by D language are listed in the following table. Assume variable A holds 60 and variable B holds 13, then −
| Operator | Description | Example |
|---|---|---|
| & | Binary AND Operator copies a bit to the result if it exists in both operands. | (A & B) will give 12, Means 0000 1100. |
| | | Binary OR Operator copies a bit if it exists in either operand. | (A | B) gives 61. Means 0011 1101. |
| ^ | Binary XOR Operator copies the bit if it is set in one operand but not both. | (A ^ B) gives 49. Means 0011 0001 |
| ~ | Binary Ones Complement Operator is unary and has the effect of 'flipping' bits. | (~A ) gives -61. Means 1100 0011 in 2's complement form. |
| << | Binary Left Shift Operator. The left operands value is moved left by the number of bits specified by the right operand. | A << 2 give 240. Means 1111 0000 |
| >> | Binary Right Shift Operator. The left operands value is moved right by the number of bits specified by the right operand. | A >> 2 give 15. Means 0000 1111. |
Assignment Operators
The following assignment operators are supported by D language −
| Operator | Description | Example |
|---|---|---|
| = | It is simple assignment operator. It assigns values from right side operands to left side operand | C = A + B assigns value of A + B into C |
| += | It is add AND assignment operator. It adds right operand to the left operand and assign the result to left operand | C += A is equivalent to C = C + A |
| -= | It is subtract AND assignment operator. It subtracts right operand from the left operand and assign the result to left operand. | C -= A is equivalent to C = C - A |
| *= | It is multiply AND assignment operator. It multiplies right operand with the left operand and assigns the result to left operand. | C *= A is equivalent to C = C * A |
| /= | It is divide AND assignment operator. It divides left operand with the right operand and assign the result to left operand. | C /= A is equivalent to C = C / A |
| %= | It is modulus AND assignment operator. It takes modulus using two operands and assign the result to left operand. | C %= A is equivalent to C = C % A |
| <<= | It is Left shift AND assignment operator. | C <<= 2 is same as C = C << 2 |
| >>= | It is Right shift AND assignment operator. | C >>= 2 is same as C = C >> 2 |
| &= | It is bitwise AND assignment operator. | C &= 2 is same as C = C & 2 |
| ^= | It is bitwise exclusive OR and assignment operator. | C ^= 2 is same as C = C ^ 2 |
| |= | It is bitwise inclusive OR and assignment operator | C |= 2 is same as C = C | 2 |
Miscillaneous Operators − Sizeof and Ternary
There are few other important operators including sizeof and ? : supported by D Language.
| Operator | Description | Example |
|---|---|---|
| sizeof() | Returns the size of an variable. | sizeof(a), where a is integer, returns 4. |
| & | Returns the address of a variable. | &a; gives actual address of the variable. |
| * | Pointer to a variable. | *a; gives pointer to a variable. |
| ? : | Conditional Expression | If condition is true then value X: Otherwise value Y. |
Operators Precedence in D
Operator precedence determines the grouping of terms in an expression. This affects how an expression is evaluated. Certain operators are given precedence over others.
For example, the multiplication operator has higher precedence than the addition operator.
Let us consider an expression
x = 7 + 3 * 2.
Here, x is assigned 13, not 20. The simple reason is, the operator * has higher precedence than +, hence 3*2 is calculated first and then the result is added into 7.
Here, operators with the highest precedence appear at the top of the table, those with the lowest appear at the bottom. Within an expression, higher precedence operators are evaluated first.
| Category | Operator | Associativity |
|---|---|---|
| Postfix | () [] -> . ++ - - | Left to right |
| Unary | + - ! ~ ++ - - (type)* & sizeof | Right to left |
| Multiplicative | * / % | Left to right |
| Additive | + - | Left to right |
| Shift | << >> | Left to right |
| Relational | < <= > >= | Left to right |
| Equality | == != | Left to right |
| Bitwise AND | & | Left to right |
| Bitwise XOR | ^ | Left to right |
| Bitwise OR | | | Left to right |
| Logical AND | && | Left to right |
| Logical OR | || | Left to right |
| Conditional | ?: | Right to left |
| Assignment | = += -= *= /= %=>>= <<= &= ^= |= | Right to left |
| Comma | , | Left to right |
D Programming - Loops
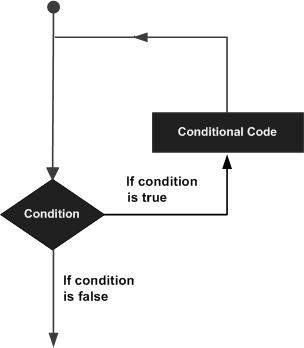
There may be a situation, when you need to execute a block of code several number of times. In general, statements are executed sequentially: The first statement in a function is executed first, followed by the second, and so on.
Programming languages provide various control structures that allow more complicated execution paths.
A loop statement executes a statement or group of statements multiple times. The following general form of a loop statement in mostly used in the programming languages −
D programming language provides the following types of loop to handle looping requirements. Click the following links to check their detail.
| Sr.No. | Loop Type & Description |
|---|---|
| 1 | while loop
It repeats a statement or group of statements while a given condition is true. It tests the condition before executing the loop body. |
| 2 | for loop
It executes a sequence of statements multiple times and abbreviates the code that manages the loop variable. |
| 3 | do...while loop
Like a while statement, except that it tests the condition at the end of the loop body. |
| 4 | nested loops
You can use one or more loop inside any another while, for, or do..while loop. |
Loop Control Statements
Loop control statements change execution from its normal sequence. When execution leaves a scope, all automatic objects that were created in that scope are destroyed.
D supports the following control statements −
| Sr.No. | Control Statement & Description |
|---|---|
| 1 | break statement
Terminates the loop or switch statement and transfers execution to the statement immediately following the loop or switch. |
| 2 | continue statement
Causes the loop to skip the remainder of its body and immediately retest its condition prior to reiterating. |
The Infinite Loop
A loop becomes infinite loop if a condition never becomes false. The for loop is traditionally used for this purpose. Since none of the three expressions that form the for loop are required, you can make an endless loop by leaving the conditional expression empty.
import std.stdio;

int main () {

   for( ; ; ) {
      writefln("This loop will run forever.");
   }
   return 0;
}
When the conditional expression is absent, it is assumed to be true. You may have an initialization and increment expression, but D programmers more commonly use the for(;;) construct to signify an infinite loop.
NOTE − You can terminate an infinite loop by pressing Ctrl + C keys.
D Programming - Decisions
The decision making structures contain condition to be evaluated along with the two sets of statements to be executed. One set of statements is executed if the condition it true and another set of statements is executed if the condition is false.
The following is the general form of a typical decision making structure found in most of the programming languages −
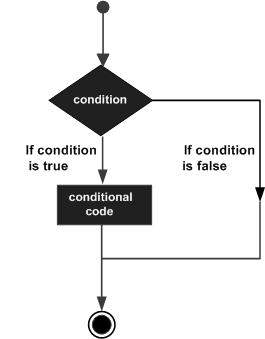
D programming language assumes any non-zero and non-null values as true, and if it is either zero or null, then it is assumed as false value.
D programming language provides the following types of decision making statements.
| Sr.No. | Statement & Description |
|---|---|
| 1 | if statement
An if statement consists of a boolean expression followed by one or more statements. |
| 2 | if...else statement
An if statement can be followed by an optional else statement, which executes when the boolean expression is false. |
| 3 | nested if statements
You can use one if or else if statement inside another if or else if statement(s). |
| 4 | switch statement
A switch statement allows a variable to be tested for equality against a list of values. |
| 5 | nested switch statements
You can use one switch statement inside another switch statement(s). |
The ? : Operator in D
We have covered conditional operator ? : in previous chapter which can be used to replace if...else statements. It has the following general form
Exp1 ? Exp2 : Exp3;
Where Exp1, Exp2, and Exp3 are expressions. Notice the use and placement of the colon.
The value of a ? expression is determined as follows −
Exp1 is evaluated. If it is true, then Exp2 is evaluated and becomes the value of the entire ? expression.
If Exp1 is false, then Exp3 is evaluated and its value becomes the value of the expression.
D Programming - Functions
This chapter describes the functions used in D programming.
Function Definition in D
A basic function definition consists of a function header and a function body.
Syntax
return_type function_name( parameter list ) {
   body of the function
}
Here are all the parts of a function −
Return Type − A function may return a value. The return_type is the data type of the value the function returns. Some functions perform the desired operations without returning a value. In this case, the return_type is the keyword void.
Function Name − This is the actual name of the function. The function name and the parameter list together constitute the function signature.
Parameters − A parameter is like a placeholder. When a function is invoked, you pass a value to the parameter. This value is referred to as actual parameter or argument. The parameter list refers to the type, order, and number of the parameters of a function. Parameters are optional; that is, a function may contain no parameters.
Function Body − The function body contains a collection of statements that define what the function does.
Calling a Function
You can a call a function as follows −
function_name(parameter_values)
Function Types in D
D programming supports a wide range of functions and they are listed below.
- Pure Functions
- Nothrow Functions
- Ref Functions
- Auto Functions
- Variadic Functions
- Inout Functions
- Property Functions
The various functions are explained below.
Pure Functions
Pure functions are functions which cannot access global or static, mutable state save through their arguments. This can enable optimizations based on the fact that a pure function is guaranteed to mutate nothing which is not passed to it, and in cases where the compiler can guarantee that a pure function cannot alter its arguments, it can enable full, functional purity, that is, the guarantee that the function will always return the same result for the same arguments).
import std.stdio;

int x = 10;
immutable int y = 30;
const int* p;

pure int purefunc(int i,const char* q,immutable int* s) {
   //writeln("Simple print"); //cannot call impure function 'writeln'

   debug writeln("in foo()"); // ok, impure code allowed in debug statement
   // x = i;  // error, modifying global state
   // i = x;  // error, reading mutable global state
   // i = *p; // error, reading const global state
   i = y;     // ok, reading immutable global state
   auto myvar = new int;     // Can use the new expression:
   return i;
}

void main() {
   writeln("Value returned from pure function : ",purefunc(x,null,null));
}
When the above code is compiled and executed, it produces the following result −
Value returned from pure function : 30
Nothrow Functions
Nothrow functions do not throw any exceptions derived from class Exception. Nothrow functions are covariant with throwing ones.
Nothrow guarantees that a function does not emit any exception.
import std.stdio;

int add(int a, int b) nothrow {
   //writeln("adding"); This will fail because writeln may throw
   int result;

   try {
      writeln("adding"); // compiles
      result = a + b;
   } catch (Exception error) { // catches all exceptions
   }

   return result;
}

void main() {
   writeln("Added value is ", add(10,20));
}
When the above code is compiled and executed, it produces the following result −
adding
Added value is 30
Ref Functions
Ref functions allow functions to return by reference. This is analogous to ref function parameters.
import std.stdio;

ref int greater(ref int first, ref int second) {
   return (first > second) ? first : second;
}

void main() {
   int a = 1;
   int b = 2;

   greater(a, b) += 10;
   writefln("a: %s, b: %s", a, b);
}
When the above code is compiled and executed, it produces the following result −
a: 1, b: 12
Auto Functions
Auto functions can return value of any type. There is no restriction on what type to be returned. A simple example for auto type function is given below.
import std.stdio;

auto add(int first, double second) {
   double result = first + second;
   return result;
}

void main() {
   int a = 1;
   double b = 2.5;

   writeln("add(a,b) = ", add(a, b));
}
When the above code is compiled and executed, it produces the following result −
add(a,b) = 3.5
Variadic Functions
Variadiac functions are those functions in which the number of parameters for a function is determined in runtime. In C, there is a limitation of having atleast one parameter. But in D programming, there is no such limitation. A simple example is shown below.
import std.stdio;
import core.vararg;

void printargs(int x, ...) {
   for (int i = 0; i < _arguments.length; i++) {
      write(_arguments[i]);

      if (_arguments[i] == typeid(int)) {
         int j = va_arg!(int)(_argptr);
         writefln("\t%d", j);
      } else if (_arguments[i] == typeid(long)) {
         long j = va_arg!(long)(_argptr);
         writefln("\t%d", j);
      } else if (_arguments[i] == typeid(double)) {
         double d = va_arg!(double)(_argptr);
         writefln("\t%g", d);
      }
   }
}

void main() {
   printargs(1, 2, 3L, 4.5);
}
When the above code is compiled and executed, it produces the following result −
int 2
long 3
double 4.5
Inout Functions
The inout can be used both for parameter and return types of functions. It is like a template for mutable, const, and immutable. The mutability attribute is deduced from the parameter. Means, inout transfers the deduced mutability attribute to the return type. A simple example showing how mutability gets changed is shown below.
import std.stdio;

inout(char)[] qoutedWord(inout(char)[] phrase) {
   return '"' ~ phrase ~ '"';
}

void main() {
   char[] a = "test a".dup;

   a = qoutedWord(a);
   writeln(typeof(qoutedWord(a)).stringof," ", a);

   const(char)[] b = "test b";
   b = qoutedWord(b);
   writeln(typeof(qoutedWord(b)).stringof," ", b);

   immutable(char)[] c = "test c";
   c = qoutedWord(c);
   writeln(typeof(qoutedWord(c)).stringof," ", c);
}
When the above code is compiled and executed, it produces the following result −
char[] "test a"
const(char)[] "test b"
string "test c"
Property Functions
Properties allow using member functions like member variables. It uses the @property keyword. The properties are linked with related function that return values based on requirement. A simple example for property is shown below.
import std.stdio;

struct Rectangle {
   double width;
   double height;

   double area() const @property {
      return width*height;
   }

   void area(double newArea) @property {
      auto multiplier = newArea / area;
      width *= multiplier;
      writeln("Value set!");
   }
}

void main() {
   auto rectangle = Rectangle(20,10);
   writeln("The area is ", rectangle.area);

   rectangle.area(300);
   writeln("Modified width is ", rectangle.width);
}
When the above code is compiled and executed, it produces the following result −
The area is 200
Value set!
Modified width is 30
D Programming - Characters
Characters are the building blocks of strings. Any symbol of a writing system is called a character: letters of alphabets, numerals, punctuation marks, the space character, etc. Confusingly, the building blocks of characters themselves are called characters as well.
The integer value of the lowercase a is 97 and the integer value of the numeral 1 is 49. These values have been assigned merely by conventions when the ASCII table has been designed.
The following table mentions standard character types with their storage sizes and purposes.
The characters are represented by the char type, which can hold only 256 distinct values. If you are familiar with the char type from other languages, you may already know that it is not large enough to support the symbols of many writing systems.
| Type | Storage size | Purpose |
|---|---|---|
| char | 1 byte | UTF-8 code unit |
| wchar | 2 bytes | UTF-16 code unit |
| dchar | 4 bytes | UTF-32 code unit and Unicode code point |
Some useful character functions are listed below −
isLower − Determines if a lowercase character?
isUpper − Determines if an uppercase character?
isAlpha − Determines if a Unicode alphanumeric character (generally, a letter or a numeral)?
isWhite − Determines if a whitespace character?
toLower − It produces the lowercase of the given character.
toUpper − It produces the uppercase of the given character.
import std.stdio;
import std.uni;

void main() {
   writeln("Is  lowercase? ", isLower(''));
   writeln("Is  lowercase? ", isLower(''));

   writeln("Is  uppercase? ", isUpper(''));
   writeln("Is  uppercase? ", isUpper(''));

   writeln("Is z alphanumeric? ",       isAlpha('z'));
   writeln("Is new-line whitespace? ",  isWhite('\n'));

   writeln("Is underline whitespace? ", isWhite('_'));

   writeln("The lowercase of : ", toLower(''));
   writeln("The lowercase of : ", toLower(''));

   writeln("The uppercase of : ", toUpper(''));
   writeln("The uppercase of : ", toUpper(''));
}
When the above code is compiled and executed, it produces the following result −
Is  lowercase? true
Is  lowercase? false
Is  uppercase? true
Is  uppercase? false
Is z alphanumeric? true
Is new-line whitespace? true
Is underline whitespace? false
The lowercase of :
The lowercase of : i
The uppercase of :
The uppercase of : I
Reading Characters in D
We can read characters using readf as shown below.
readf(" %s", &letter);
Since D programming support unicode, in order to read unicode characters, we need to read twice and write twice to get the expected result. This does not work on the online compiler. The example is shown below.
import std.stdio;

void main() {
   char firstCode;
   char secondCode;

   write("Please enter a letter: ");
   readf(" %s", &firstCode);
   readf(" %s", &secondCode);

   writeln("The letter that has been read: ", firstCode, secondCode);
}
When the above code is compiled and executed, it produces the following result −
Please enter a letter:
The letter that has been read:
D Programming - Strings
D provides following two types of string representations −
- Character array
- Core language string
Character Array
We can represent the character array in one of the two forms as shown below. The first form provides the size directly and the second form uses the dup method which creates a writable copy of the string "Good morning".
char[9]  greeting1 = "Hello all";
char[] greeting2 = "Good morning".dup;
Example
Here is a simple example using the above simple character array forms.
import std.stdio;

void main(string[] args) {
   char[9] greeting1 = "Hello all";
   writefln("%s",greeting1);

   char[] greeting2 = "Good morning".dup;
   writefln("%s",greeting2);
}
When the above code is compiled and executed, it produces result something as follows −
Hello all
Good morning
Core Language String
Strings are built-in to the core language of D. These strings are interoperable with the character array shown above. The following example shows a simple string representation.
string greeting1 = "Hello all";
Example
import std.stdio;

void main(string[] args) {
   string greeting1 = "Hello all";
   writefln("%s",greeting1);

   char[] greeting2 = "Good morning".dup;
   writefln("%s",greeting2);

   string greeting3 = greeting1;
   writefln("%s",greeting3);
}
When the above code is compiled and executed, it produces result something as follows −
Hello all
Good morning
Hello all
String Concatenation
String concatenation in D programming uses the tilde(~) symbol.
Example
import std.stdio;

void main(string[] args) {
   string greeting1 = "Good";
   char[] greeting2 = "morning".dup;

   char[] greeting3 = greeting1~" "~greeting2;
   writefln("%s",greeting3);

   string greeting4 = "morning";
   string greeting5 = greeting1~" "~greeting4;
   writefln("%s",greeting5);
}
When the above code is compiled and executed, it produces result something as follows −
Good morning
Good morning
Length of String
The length of string in bytes can retrieved with the help of the length fuction.
Example
import std.stdio;

void main(string[] args) {
   string greeting1 = "Good";
   writefln("Length of string greeting1 is %d",greeting1.length);

   char[] greeting2 = "morning".dup;
   writefln("Length of string greeting2 is %d",greeting2.length);
}
When the above code is compiled and executed, it produces the following result −
Length of string greeting1 is 4
Length of string greeting2 is 7
String Comparison
String comparison is quite easy in D programming. You can use the ==, <, and > operators for string comparisons.
Example
import std.stdio;

void main() {
   string s1 = "Hello";
   string s2 = "World";
   string s3 = "World";

   if (s2 == s3) {
      writeln("s2: ",s2," and S3: ",s3, "  are the same!");
   }

   if (s1 < s2) {
      writeln("'", s1, "' comes before '", s2, "'.");
   } else {
      writeln("'", s2, "' comes before '", s1, "'.");
   }
}
When the above code is compiled and executed, it produces result something as follows −
s2: World and S3: World are the same!
'Hello' comes before 'World'.
Replacing Strings
We can replace strings using the string[].
Example
import std.stdio;
import std.string;

void main() {
   char[] s1 = "hello world ".dup;
   char[] s2 = "sample".dup;

   s1[6..12] = s2[0..6];
   writeln(s1);
}
When the above code is compiled and executed, it produces result something as follows −
hello sample
Index Methods
Index methods for location of a substring in string including indexOf and lastIndexOf are explained in the following example.
Example
import std.stdio;
import std.string;

void main() {
   char[] s1 = "hello World ".dup;

   writeln("indexOf of llo in hello is ",std.string.indexOf(s1,"llo"));
   writeln(s1);
   writeln("lastIndexOf of O in hello is " ,std.string.lastIndexOf(s1,"O",CaseSensitive.no));
}
When the above code is compiled and executed, it produces the following result −
indexOf.of llo in hello is 2
hello World
lastIndexOf of O in hello is 7
Handling Cases
Methods used for changing cases is shown in the following example.
Example
import std.stdio;
import std.string;

void main() {
   char[] s1 = "hello World ".dup;
   writeln("Capitalized string of s1 is ",capitalize(s1));

   writeln("Uppercase string of s1 is ",toUpper(s1));

   writeln("Lowercase string of s1 is ",toLower(s1));
}
When the above code is compiled and executed, it produces the following result −
Capitalized string of s1 is Hello world
Uppercase string of s1 is HELLO WORLD
Lowercase string of s1 is hello world
Restricting Characters
Restring characters in strings are shown in the following example.
Example
import std.stdio;
import std.string;

void main() {
   string s = "H123Hello1";

   string result = munch(s, "0123456789H");
   writeln("Restrict trailing characters:",result);

   result = squeeze(s, "0123456789H");
   writeln("Restrict leading characters:",result);

   s = "  Hello World  ";
   writeln("Stripping leading and trailing whitespace:",strip(s));
}
When the above code is compiled and executed, it produces the following result −
Restrict trailing characters:H123H
Restrict leading characters:ello1
Stripping leading and trailing whitespace:Hello World
D Programming - Arrays
D programming language provides a data structure, named arrays, which stores a fixed-size sequential collection of elements of the same type. An array is used to store a collection of data. It is often more useful to think of an array as a collection of variables of the same type.
Instead of declaring individual variables, such as number0, number1, ..., and number99, you declare one array variable such as numbers and use numbers[0], numbers[1], and ..., numbers[99] to represent individual variables. A specific element in an array is accessed by an index.
All arrays consist of contiguous memory locations. The lowest address corresponds to the first element and the highest address to the last element.
Declaring Arrays
To declare an array in D programming language, the programmer specifies the type of the elements and the number of elements required by an array as follows −
type arrayName [ arraySize ];
This is called a single-dimension array. The arraySize must be an integer constant greater than zero and type can be any valid D programming language data type. For example, to declare a 10-element array called balance of type double, use this statement −
double balance[10];
Initializing Arrays
You can initialize D programming language array elements either one by one or using a single statement as follows
double balance[5] = [1000.0, 2.0, 3.4, 17.0, 50.0];
The number of values between square brackets[ ] on right side cannot be larger than the number of elements you declare for the array between square brackets [ ]. The following example assigns a single element of the array −
If you omit the size of the array, an array just big enough to hold the initialization is created. Therefore, if you write
double balance[] = [1000.0, 2.0, 3.4, 17.0, 50.0];
then you will create exactly the same array as you did in the previous example.
balance[4] = 50.0;
The above statement assigns element number 5th in the array a value of 50.0. Array with 4th index will be 5th, i.e., last element because all arrays have 0 as the index of their first element which is also called base index. The following pictorial representaion shows the same array we discussed above −

Accessing Array Elements
An element is accessed by indexing the array name. This is done by placing the index of the element within square brackets after the name of the array. For example −
double salary = balance[9];
The above statement takes 10th element from the array and assigns the value to the variable salary. The following example implements declaration, assignment, and accessing arrays −
import std.stdio;
void main() {
   int n[ 10 ]; // n is an array of 10 integers

   // initialize elements of array n to 0
   for ( int i = 0; i < 10; i++ ) {
      n[ i ] = i + 100; // set element at location i to i + 100
   }

   writeln("Element \t Value");

   // output each array element's value
   for ( int j = 0; j < 10; j++ ) {
      writeln(j," \t ",n[j]);
   }
}
When the above code is compiled and executed, it produces the following result −
Element   Value
0         100
1         101
2         102
3         103
4         104
5         105
6         106
7         107
8         108
9         109
Static Arrays Versus Dynamic Arrays
If the length of an array is specified while writing program, that array is a static array. When the length can change during the execution of the program, that array is a dynamic array.
Defining dynamic arrays is simpler than defining fixed-length arrays because omitting the length makes a dynamic array −
int[] dynamicArray;
Array Properties
Here are the properties of arrays −
| Sr.No. | Property & Description |
|---|---|
| 1 |
.init Static array returns an array literal with each element of the literal being the .init property of the array element type. |
| 2 |
.sizeof Static array returns the array length multiplied by the number of bytes per array element while dynamic arrays returns the size of the dynamic array reference, which is 8 in 32-bit builds and 16 on 64-bit builds. |
| 3 |
.length Static array returns the number of elements in the array while dynamic arrays is used to get/set number of elements in the array. Length is of type size_t. |
| 4 |
.ptr Returns a pointer to the first element of the array. |
| 5 |
.dup Create a dynamic array of the same size and copy the contents of the array into it. |
| 6 |
.idup Create a dynamic array of the same size and copy the contents of the array into it. The copy is typed as being immutable. |
| 7 |
.reverse Reverses in place the order of the elements in the array. Returns the array. |
| 8 |
.sort Sorts in place the order of the elements in the array. Returns the array. |
Example
The following example explains the various properties of an array −
import std.stdio;

void main() {
   int n[ 5 ]; // n is an array of 5 integers

   // initialize elements of array n to 0
   for ( int i = 0; i < 5; i++ ) {
      n[ i ] = i + 100; // set element at location i to i + 100
   }

   writeln("Initialized value:",n.init);

   writeln("Length: ",n.length);
   writeln("Size of: ",n.sizeof);
   writeln("Pointer:",n.ptr);

   writeln("Duplicate Array: ",n.dup);
   writeln("iDuplicate Array: ",n.idup);

   n = n.reverse.dup;
   writeln("Reversed Array: ",n);

   writeln("Sorted Array: ",n.sort);
}
When the above code is compiled and executed, it produces the following result −
Initialized value:[0, 0, 0, 0, 0]

Length: 5
Size of: 20

Pointer:7FFF5A373920
Duplicate Array: [100, 101, 102, 103, 104]
iDuplicate Array: [100, 101, 102, 103, 104]
Reversed Array: [104, 103, 102, 101, 100]
Sorted Array: [100, 101, 102, 103, 104]
Multi Dimensional Arrays in D
D programming allows multidimensional arrays. Here is the general form of a multidimensional array declaration −
type name[size1][size2]...[sizeN];
Example
The following declaration creates a three dimensional 5 . 10 . 4 integer array −
int threedim[5][10][4];
Two-Dimensional Arrays in D
The simplest form of the multidimensional array is the two-dimensional array. A two-dimensional array is, in essence, a list of one-dimensional arrays. To declare a two-dimensional integer array of size [x, y] you would write syntax as follows −
type arrayName [ x ][ y ];
Where type can be any valid D programming data type and arrayName will be a valid D programming identifier.
Where type can be any valid D programming data type and arrayName is a valid D programming identifier.
A two-dimensional array can be thought as a table, which has x number of rows and y number of columns. A two-dimensional array a containing three rows and four columns can be shown as below −
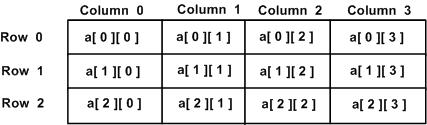
Thus, every element in array a is identified by an element as a[ i ][ j ], where a is the name of the array, and i and j are the subscripts that uniquely identify each element in a.
Initializing Two-Dimensional Arrays
Multidimensioned arrays may be initialized by specifying bracketed values for each row. The following array has 3 rows and each row has 4 columns.
int a[3][4] = [
   [0, 1, 2, 3] ,   /*  initializers for row indexed by 0 */
   [4, 5, 6, 7] ,   /*  initializers for row indexed by 1 */
   [8, 9, 10, 11]   /*  initializers for row indexed by 2 */
];
The nested braces, which indicate the intended row, are optional. The following initialization is equivalent to previous example −
int a[3][4] = [0,1,2,3,4,5,6,7,8,9,10,11];
Accessing Two-Dimensional Array Elements
An element in 2-dimensional array is accessed using the subscripts, means row index and column index of the array. For example
int val = a[2][3];
The above statement takes 4th element from the 3rd row of the array. You can verify it in the above digram.
import std.stdio;

void main () {
   // an array with 5 rows and 2 columns.
   int a[5][2] = [ [0,0], [1,2], [2,4], [3,6],[4,8]];

   // output each array element's value
   for ( int i = 0; i < 5; i++ ) for ( int j = 0; j < 2; j++ ) {
      writeln( "a[" , i , "][" , j , "]: ",a[i][j]);
   }
}
When the above code is compiled and executed, it produces the following result −
a[0][0]: 0
a[0][1]: 0
a[1][0]: 1
a[1][1]: 2
a[2][0]: 2
a[2][1]: 4
a[3][0]: 3
a[3][1]: 6
a[4][0]: 4
a[4][1]: 8
Common Array Operations in D
Here are various operations performed on the arrays −
Array Slicing
We often use part of an array and slicing array is often quite helpful. A simple example for array slicing is shown below.
import std.stdio;

void main () {
   // an array with 5 elements.
   double a[5] = [1000.0, 2.0, 3.4, 17.0, 50.0];
   double[] b;

   b = a[1..3];
   writeln(b);
}
When the above code is compiled and executed, it produces the following result −
[2, 3.4]
Array Copying
We also use copying array . A simple example for array copying is shown below.
import std.stdio;

void main () {
   // an array with 5 elements.
   double a[5] = [1000.0, 2.0, 3.4, 17.0, 50.0];
   double b[5];
   writeln("Array a:",a);
   writeln("Array b:",b);

   b[] = a;      // the 5 elements of a[5] are copied into b[5]
   writeln("Array b:",b);

   b[] = a[];   // the 5 elements of a[3] are copied into b[5]
   writeln("Array b:",b);

   b[1..2] = a[0..1]; // same as b[1] = a[0]
   writeln("Array b:",b);

   b[0..2] = a[1..3]; // same as b[0] = a[1], b[1] = a[2]
   writeln("Array b:",b);
}
When the above code is compiled and executed, it produces the following result −
Array a:[1000, 2, 3.4, 17, 50]
Array b:[nan, nan, nan, nan, nan]
Array b:[1000, 2, 3.4, 17, 50]
Array b:[1000, 2, 3.4, 17, 50]
Array b:[1000, 1000, 3.4, 17, 50]
Array b:[2, 3.4, 3.4, 17, 50]
Array Setting
A simple example for setting value in an array is shown below.
import std.stdio;

void main () {
   // an array with 5 elements.
   double a[5];
   a[] = 5;
   writeln("Array a:",a);
}
When the above code is compiled and executed, it produces the following result −
Array a:[5, 5, 5, 5, 5]
Array Concatenation
A simple example for concatenation of two arrays is shown below.
import std.stdio;

void main () {
   // an array with 5 elements.
   double a[5] = 5;
   double b[5] = 10;
   double [] c;
   c = a~b;
   writeln("Array c: ",c);
}
When the above code is compiled and executed, it produces the following result −
Array c: [5, 5, 5, 5, 5, 10, 10, 10, 10, 10]
D Programming - Associative Arrays
Associative arrays have an index that is not necessarily an integer, and can be sparsely populated. The index for an associative array is called the Key, and its type is called the KeyType.
Associative arrays are declared by placing the KeyType within the [ ] of an array declaration. A simple example for associative array is shown below.
import std.stdio;

void main () {
   int[string] e;      // associative array b of ints that are

   e["test"] = 3;
   writeln(e["test"]);

   string[string] f;

   f["test"] = "Tuts";
   writeln(f["test"]);

   writeln(f);

   f.remove("test");
   writeln(f);
}
When the above code is compiled and executed, it produces the following result −
3
Tuts
["test":"Tuts"]
[]
Initializing Associative Array
A simple initialization of associative array is shown below.
import std.stdio;

void main () {
   int[string] days =
      [ "Monday" : 0,
         "Tuesday" : 1,
         "Wednesday" : 2,
         "Thursday" : 3,
         "Friday" : 4,
         "Saturday" : 5,
         "Sunday" : 6 ];
   writeln(days["Tuesday"]);
}
When the above code is compiled and executed, it produces the following result −
1
Properties of Associative Array
Here are the properties of an associative array −
| Sr.No. | Property & Description |
|---|---|
| 1 | .sizeof Returns the size of the reference to the associative array; it is 4 in 32-bit builds and 8 on 64-bit builds. |
| 2 | .length Returns number of values in the associative array. Unlike for dynamic arrays, it is read-only. |
| 3 | .dup Create a new associative array of the same size and copy the contents of the associative array into it. |
| 4 | .keys Returns dynamic array, the elements of which are the keys in the associative array. |
| 5 | .values Returns dynamic array, the elements of which are the values in the associative array. |
| 6 | .rehash Reorganizes the associative array in place so that lookups are more efficient. rehash is effective when, for example, the program is done loading up a symbol table and now needs fast lookups in it. Returns a reference to the reorganized array. |
| 7 | .byKey() Returns a delegate suitable for use as an Aggregate to a ForeachStatement which will iterate over the keys of the associative array. |
| 8 | .byValue() Returns a delegate suitable for use as an Aggregate to a ForeachStatement which will iterate over the values of the associative array. |
| 9 | .get(Key key, lazy Value defVal) Looks up key; if it exists returns corresponding value else evaluates and returns defVal. |
| 10 | .remove(Key key) Removes an object for key. |
Example
An example for using the above properties is shown below.
import std.stdio;

void main () {
   int[string] array1;

   array1["test"] = 3;
   array1["test2"] = 20;

   writeln("sizeof: ",array1.sizeof);
   writeln("length: ",array1.length);
   writeln("dup: ",array1.dup);
   array1.rehash;

   writeln("rehashed: ",array1);
   writeln("keys: ",array1.keys);
   writeln("values: ",array1.values);

   foreach (key; array1.byKey) {
      writeln("by key: ",key);
   }

   foreach (value; array1.byValue) {
      writeln("by value ",value);
   }

   writeln("get value for key test: ",array1.get("test",10));
   writeln("get value for key test3: ",array1.get("test3",10));
   array1.remove("test");
   writeln(array1);
}
When the above code is compiled and executed, it produces the following result −
sizeof: 8
length: 2
dup: ["test":3, "test2":20]
rehashed: ["test":3, "test2":20]
keys: ["test", "test2"]
values: [3, 20]
by key: test
by key: test2
by value 3
by value 20
get value for key test: 3
get value for key test3: 10
["test2":20]
D Programming - Pointers
D programming pointers are easy and fun to learn. Some D programming tasks are performed more easily with pointers, and other D programming tasks, such as dynamic memory allocation, cannot be performed without them. A simple pointer is shown below.
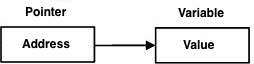
Instead of directly pointing to the variable, pointer points to the address of the variable. As you know every variable is a memory location and every memory location has its address defined which can be accessed using ampersand (&) operator which denotes an address in memory. Consider the following which prints the address of the variables defined −
import std.stdio;

void main () {
   int var1;
   writeln("Address of var1 variable: ",&var1);

   char var2[10];
   writeln("Address of var2 variable: ",&var2);
}
When the above code is compiled and executed, it produces the following result −
Address of var1 variable: 7FFF52691928
Address of var2 variable: 7FFF52691930
What Are Pointers?
A pointer is a variable whose value is the address of another variable. Like any variable or constant, you must declare a pointer before you can work with it. The general form of a pointer variable declaration is −
type *var-name;
Here, type is the pointer's base type; it must be a valid programming type and var-name is the name of the pointer variable. The asterisk you used to declare a pointer is the same asterisk that you use for multiplication. However; in this statement the asterisk is being used to designate a variable as a pointer. Following are the valid pointer declaration −
int    *ip;    // pointer to an integer
double *dp;    // pointer to a double
float  *fp;    // pointer to a float
char   *ch     // pointer to character
The actual data type of the value of all pointers, whether integer, float, character, or otherwise, is the same, a long hexadecimal number that represents a memory address. The only difference between pointers of different data types is the data type of the variable or constant that the pointer points to.
Using Pointers in D programming
There are few important operations, when we use the pointers very frequently.
we define a pointer variables
assign the address of a variable to a pointer
finally access the value at the address available in the pointer variable.
This is done by using unary operator * that returns the value of the variable located at the address specified by its operand. The following example makes use of these operations −
import std.stdio;

void main () {
   int var = 20;   // actual variable declaration.
   int *ip;        // pointer variable
   ip = &var;   // store address of var in pointer variable

   writeln("Value of var variable: ",var);

   writeln("Address stored in ip variable: ",ip);

   writeln("Value of *ip variable: ",*ip);
}
When the above code is compiled and executed, it produces the following result −
Value of var variable: 20
Address stored in ip variable: 7FFF5FB7E930
Value of *ip variable: 20
Null Pointers
It is always a good practice to assign the pointer NULL to a pointer variable in case you do not have exact address to be assigned. This is done at the time of variable declaration. A pointer that is assigned null is called a null pointer.
The null pointer is a constant with a value of zero defined in several standard libraries, including iostream. Consider the following program −
import std.stdio;

void main () {
   int  *ptr = null;
   writeln("The value of ptr is " , ptr) ;
}
When the above code is compiled and executed, it produces the following result −
The value of ptr is null
On most of the operating systems, programs are not permitted to access memory at address 0 because that memory is reserved by the operating system. However; the memory address 0 has special significance; it signals that the pointer is not intended to point to an accessible memory location.
By convention, if a pointer contains the null (zero) value, it is assumed to point to nothing. To check for a null pointer you can use an if statement as follows −
if(ptr)     // succeeds if p is not null
if(!ptr)    // succeeds if p is null
Thus, if all unused pointers are given the null value and you avoid the use of a null pointer, you can avoid the accidental misuse of an uninitialized pointer. Many times, uninitialized variables hold some junk values and it becomes difficult to debug the program.
Pointer Arithmetic
There are four arithmetic operators that can be used on pointers: ++, --, +, and -
To understand pointer arithmetic, let us consider an integer pointer named ptr, which points to the address 1000. Assuming 32-bit integers, let us perform the following arithmatic operation on the pointer −
ptr++
then the ptr will point to the location 1004 because each time ptr is incremented, it points to the next integer. This operation will move the pointer to next memory location without impacting the actual value at the memory location.
If ptr points to a character whose address is 1000, then the above operation points to the location 1001 because next character will be available at 1001.
Incrementing a Pointer
We prefer using a pointer in our program instead of an array because the variable pointer can be incremented, unlike the array name which cannot be incremented because it is a constant pointer. The following program increments the variable pointer to access each succeeding element of the array −
import std.stdio;

const int MAX = 3;

void main () {
   int var[MAX] = [10, 100, 200];
   int *ptr = &var[0];

   for (int i = 0; i < MAX; i++, ptr++) {
      writeln("Address of var[" , i , "] = ",ptr);
      writeln("Value of var[" , i , "] = ",*ptr);
   }
}
When the above code is compiled and executed, it produces the following result −
Address of var[0] = 18FDBC
Value of var[0] = 10
Address of var[1] = 18FDC0
Value of var[1] = 100
Address of var[2] = 18FDC4
Value of var[2] = 200
Pointers vs Array
Pointers and arrays are strongly related. However, pointers and arrays are not completely interchangeable. For example, consider the following program −
import std.stdio;

const int MAX = 3;

void main () {
   int var[MAX] = [10, 100, 200];
   int *ptr = &var[0];
   var.ptr[2]  = 290;
   ptr[0] = 220;

   for (int i = 0; i < MAX; i++, ptr++) {
      writeln("Address of var[" , i , "] = ",ptr);
      writeln("Value of var[" , i , "] = ",*ptr);
   }
}
In the above program, you can see var.ptr[2] to set the second element and ptr[0] which is used to set the zeroth element. Increment operator can be used with ptr but not with var.
When the above code is compiled and executed, it produces the following result −
Address of var[0] = 18FDBC
Value of var[0] = 220
Address of var[1] = 18FDC0
Value of var[1] = 100
Address of var[2] = 18FDC4
Value of var[2] = 290
Pointer to Pointer
A pointer to a pointer is a form of multiple indirection or a chain of pointers. Normally, a pointer contains the address of a variable. When we define a pointer to a pointer, the first pointer contains the address of the second pointer, which points to the location that contains the actual value as shown below.

A variable that is a pointer to a pointer must be declared as such. This is done by placing an additional asterisk in front of its name. For example, following is the syntax to declare a pointer to a pointer of type int −
int **var;
When a target value is indirectly pointed to by a pointer to a pointer, then accessing that value requires that the asterisk operator be applied twice, as is shown below in the example −
import std.stdio;

const int MAX = 3;

void main () {
   int var = 3000;
   writeln("Value of var :" , var);

   int *ptr = &var;
   writeln("Value available at *ptr :" ,*ptr);

   int **pptr = &ptr;
   writeln("Value available at **pptr :",**pptr);
}
When the above code is compiled and executed, it produces the following result −
Value of var :3000
Value available at *ptr :3000
Value available at **pptr :3000
Passing Pointer to Functions
D allows you to pass a pointer to a function. To do so, it simply declares the function parameter as a pointer type.
The following simple example passes a pointer to a function.
import std.stdio;

void main () {
   // an int array with 5 elements.
   int balance[5] = [1000, 2, 3, 17, 50];
   double avg;

   avg = getAverage( &balance[0], 5 ) ;
   writeln("Average is :" , avg);
}

double getAverage(int *arr, int size) {
   int    i;
   double avg, sum = 0;

   for (i = 0; i < size; ++i) {
      sum += arr[i];
   }

   avg = sum/size;
   return avg;
}
When the above code is compiled together and executed, it produces the following result −
Average is :214.4
Return Pointer from Functions
Consider the following function, which returns 10 numbers using a pointer, means the address of first array element.
import std.stdio;

void main () {
   int *p = getNumber();

   for ( int i = 0; i < 10; i++ ) {
      writeln("*(p + " , i , ") : ",*(p + i));
   }
}

int * getNumber( ) {
   static int r [10];

   for (int i = 0; i < 10; ++i) {
      r[i] = i;
   }

   return &r[0];
}
When the above code is compiled and executed, it produces the following result −
*(p + 0) : 0
*(p + 1) : 1
*(p + 2) : 2
*(p + 3) : 3
*(p + 4) : 4
*(p + 5) : 5
*(p + 6) : 6
*(p + 7) : 7
*(p + 8) : 8
*(p + 9) : 9
Pointer to an Array
An array name is a constant pointer to the first element of the array. Therefore, in the declaration −
double balance[50];
balance is a pointer to &balance[0], which is the address of the first element of the array balance. Thus, the following program fragment assigns p the address of the first element of balance −
double *p;
double balance[10];

p = balance;
It is legal to use array names as constant pointers, and vice versa. Therefore, *(balance + 4) is a legitimate way of accessing the data at balance[4].
Once you store the address of first element in p, you can access array elements using *p, *(p+1), *(p+2) and so on. The following example shows all the concepts discussed above −
import std.stdio;

void main () {
   // an array with 5 elements.
   double balance[5] = [1000.0, 2.0, 3.4, 17.0, 50.0];
   double *p;

   p = &balance[0];

   // output each array element's value
   writeln("Array values using pointer " );

   for ( int i = 0; i < 5; i++ ) {
      writeln( "*(p + ", i, ") : ", *(p + i));
   }
}
When the above code is compiled and executed, it produces the following result −
Array values using pointer
*(p + 0) : 1000
*(p + 1) : 2
*(p + 2) : 3.4
*(p + 3) : 17
*(p + 4) : 50
D Programming - Tuples
Tuples are used for combining multiple values as a single object. Tuples contains a sequence of elements. The elements can be types, expressions, or aliases. The number and elements of a tuple are fixed at compile time and they cannot be changed at run time.
Tuples have characteristics of both structs and arrays. The tuple elements can be of different types like structs. The elements can be accessed via indexing like arrays. They are implemented as a library feature by the Tuple template from the std.typecons module. Tuple makes use of TypeTuple from the std.typetuple module for some of its operations.
Tuple Using tuple()
Tuples can be constructed by the function tuple(). The members of a tuple are accessed by index values. An example is shown below.
Example
import std.stdio;
import std.typecons;

void main() {
   auto myTuple = tuple(1, "Tuts");
   writeln(myTuple);
   writeln(myTuple[0]);
   writeln(myTuple[1]);
}
When the above code is compiled and executed, it produces the following result −
Tuple!(int, string)(1, "Tuts")
1
Tuts
Tuple using Tuple Template
Tuple can also be constructed directly by the Tuple template instead of the tuple() function. The type and the name of each member are specified as two consecutive template parameters. It is possible to access the members by properties when created using templates.
import std.stdio;
import std.typecons;

void main() {
   auto myTuple = Tuple!(int, "id",string, "value")(1, "Tuts");
   writeln(myTuple);

   writeln("by index 0 : ", myTuple[0]);
   writeln("by .id : ", myTuple.id);

   writeln("by index 1 : ", myTuple[1]);
   writeln("by .value ", myTuple.value);
}
When the above code is compiled and executed, it produces the following result
Tuple!(int, "id", string, "value")(1, "Tuts")
by index 0 : 1
by .id : 1
by index 1 : Tuts
by .value Tuts
Expanding Property and Function Params
The members of Tuple can be expanded either by the .expand property or by slicing. This expanded/sliced value can be passed as function argument list. An example is shown below.
Example
import std.stdio;
import std.typecons;

void method1(int a, string b, float c, char d) {
   writeln("method 1 ",a,"\t",b,"\t",c,"\t",d);
}

void method2(int a, float b, char c) {
   writeln("method 2 ",a,"\t",b,"\t",c);
}

void main() {
   auto myTuple = tuple(5, "my string", 3.3, 'r');

   writeln("method1 call 1");
   method1(myTuple[]);

   writeln("method1 call 2");
   method1(myTuple.expand);

   writeln("method2 call 1");
   method2(myTuple[0], myTuple[$-2..$]);
}
When the above code is compiled and executed, it produces the following result −
method1 call 1
method 1 5 my string 3.3 r
method1 call 2
method 1 5 my string 3.3 r
method2 call 1
method 2 5 3.3 r
TypeTuple
TypeTuple is defined in the std.typetuple module. A comma-separated list of values and types. A simple example using TypeTuple is given below. TypeTuple is used to create argument list, template list, and array literal list.
import std.stdio;
import std.typecons;
import std.typetuple;

alias TypeTuple!(int, long) TL;

void method1(int a, string b, float c, char d) {
   writeln("method 1 ",a,"\t",b,"\t",c,"\t",d);
}

void method2(TL tl) {
   writeln(tl[0],"\t", tl[1] );
}

void main() {
   auto arguments = TypeTuple!(5, "my string", 3.3,'r');
   method1(arguments);
   method2(5, 6L);
}
When the above code is compiled and executed, it produces the following result −
method 1 5 my string 3.3 r
5     6
D Programming - Structs
The structure is yet another user defined data type available in D programming, which allows you to combine data items of different kinds.
Structures are used to represent a record. Suppose you want to keep track of your books in a library. You might want to track the following attributes about each book −
- Title
- Author
- Subject
- Book ID
Defining a Structure
To define a structure, you must use the struct statement. The struct statement defines a new data type, with more than one member for your program. The format of the struct statement is this −
struct [structure tag] {
   member definition;
   member definition;
   ...
   member definition;
} [one or more structure variables];
The structure tag is optional and each member definition is a normal variable definition, such as int i; or float f; or any other valid variable definition. At the end of the structure's definition before the semicolon, you can specify one or more structure variables which are optional. Here is the way you would declare the Books structure −
struct Books {
   char [] title;
   char [] author;
   char [] subject;
   int   book_id;
};
Accessing Structure Members
To access any member of a structure, you use the member access operator (.). The member access operator is coded as a period between the structure variable name and the structure member that we wish to access. You would use struct keyword to define variables of structure type. The following example explains the usage of structure −
import std.stdio;

struct Books {
   char [] title;
   char [] author;
   char [] subject;
   int   book_id;
};

void main( ) {
   Books Book1;        /* Declare Book1 of type Book */
   Books Book2;        /* Declare Book2 of type Book */

   /* book 1 specification */
   Book1.title = "D Programming".dup;
   Book1.author = "Raj".dup;
   Book1.subject = "D Programming Tutorial".dup;
   Book1.book_id = 6495407;

   /* book 2 specification */
   Book2.title = "D Programming".dup;
   Book2.author = "Raj".dup;
   Book2.subject = "D Programming Tutorial".dup;
   Book2.book_id = 6495700;

   /* print Book1 info */
   writeln( "Book 1 title : ", Book1.title);
   writeln( "Book 1 author : ", Book1.author);
   writeln( "Book 1 subject : ", Book1.subject);
   writeln( "Book 1 book_id : ", Book1.book_id);

   /* print Book2 info */
   writeln( "Book 2 title : ", Book2.title);
   writeln( "Book 2 author : ", Book2.author);
   writeln( "Book 2 subject : ", Book2.subject);
   writeln( "Book 2 book_id : ", Book2.book_id);
}
When the above code is compiled and executed, it produces the following result −
Book 1 title : D Programming
Book 1 author : Raj
Book 1 subject : D Programming Tutorial
Book 1 book_id : 6495407
Book 2 title : D Programming
Book 2 author : Raj
Book 2 subject : D Programming Tutorial
Book 2 book_id : 6495700
Structures as Function Arguments
You can pass a structure as a function argument in very similar way as you pass any other variable or pointer. You would access structure variables in the similar way as you have accessed in the above example −
import std.stdio;

struct Books {
   char [] title;
   char [] author;
   char [] subject;
   int   book_id;
};

void main( ) {
   Books Book1;        /* Declare Book1 of type Book */
   Books Book2;        /* Declare Book2 of type Book */

   /* book 1 specification */
   Book1.title = "D Programming".dup;
   Book1.author = "Raj".dup;
   Book1.subject = "D Programming Tutorial".dup;
   Book1.book_id = 6495407;

   /* book 2 specification */
   Book2.title = "D Programming".dup;
   Book2.author = "Raj".dup;
   Book2.subject = "D Programming Tutorial".dup;
   Book2.book_id = 6495700;

   /* print Book1 info */
   printBook( Book1 );

   /* Print Book2 info */
   printBook( Book2 );
}

void printBook( Books book ) {
   writeln( "Book title : ", book.title);
   writeln( "Book author : ", book.author);
   writeln( "Book subject : ", book.subject);
   writeln( "Book book_id : ", book.book_id);
}
When the above code is compiled and executed, it produces the following result −
Book title : D Programming
Book author : Raj
Book subject : D Programming Tutorial
Book book_id : 6495407
Book title : D Programming
Book author : Raj
Book subject : D Programming Tutorial
Book book_id : 6495700
Structs Initialization
Structs can be initialized in two forms, one using construtor and other using the {} format. An example is shown below.
Example
import std.stdio;

struct Books {
   char [] title;
   char [] subject = "Empty".dup;
   int   book_id = -1;
   char [] author = "Raj".dup;
};

void main( ) {
   Books Book1 = Books("D Programming".dup, "D Programming Tutorial".dup, 6495407 );
   printBook( Book1 );

   Books Book2 = Books("D Programming".dup,
      "D Programming Tutorial".dup, 6495407,"Raj".dup );
   printBook( Book2 );

   Books Book3 =  {title:"Obj C programming".dup, book_id : 1001};
   printBook( Book3 );
}

void printBook( Books book ) {
   writeln( "Book title : ", book.title);
   writeln( "Book author : ", book.author);
   writeln( "Book subject : ", book.subject);
   writeln( "Book book_id : ", book.book_id);
}
When the above code is compiled and executed, it produces the following result −
Book title : D Programming
Book author : Raj
Book subject : D Programming Tutorial
Book book_id : 6495407
Book title : D Programming
Book author : Raj
Book subject : D Programming Tutorial
Book book_id : 6495407
Book title : Obj C programming
Book author : Raj
Book subject : Empty
Book book_id : 1001
Static Members
Static variables are initialized only once. For example, to have the unique ids for the books we can make the book_id as static and increment the book id. An example is shown below.
Example
import std.stdio;

struct Books {
   char [] title;
   char [] subject = "Empty".dup;
   int   book_id;
   char [] author = "Raj".dup;
   static int id = 1000;
};

void main( ) {
   Books Book1 = Books("D Programming".dup, "D Programming Tutorial".dup,++Books.id );
   printBook( Book1 );

   Books Book2 = Books("D Programming".dup, "D Programming Tutorial".dup,++Books.id);
   printBook( Book2 );

   Books Book3 =  {title:"Obj C programming".dup, book_id:++Books.id};
   printBook( Book3 );
}

void printBook( Books book ) {
   writeln( "Book title : ", book.title);
   writeln( "Book author : ", book.author);
   writeln( "Book subject : ", book.subject);
   writeln( "Book book_id : ", book.book_id);
}
When the above code is compiled and executed, it produces the following result −
Book title : D Programming
Book author : Raj
Book subject : D Programming Tutorial
Book book_id : 1001
Book title : D Programming
Book author : Raj
Book subject : D Programming Tutorial
Book book_id : 1002
Book title : Obj C programming
Book author : Raj
Book subject : Empty
Book book_id : 1003
D Programming - Unions
A union is a special data type available in D that enables you to store different data types in the same memory location. You can define a union with many members, but only one member can contain a value at any given time. Unions provide an efficient way of using the same memory location for multiple purposes.
Defining a Union in D
To define a union, you must use the union statement in very similar way as you did while defining structure. The union statement defines a new data type, with more than one member for your program. The format of the union statement is as follows −
union [union tag] {
   member definition;
   member definition;
   ...
   member definition;
} [one or more union variables];
The union tag is optional and each member definition is a normal variable definition, such as int i; or float f; or any other valid variable definition. At the end of the union's definition, before the final semicolon, you can specify one or more union variables but it is optional. Here is the way you would define a union type named Data which has the three members i, f, and str −
union Data {
   int i;
   float f;
   char str[20];
} data;
A variable of Data type can store an integer, a floating-point number, or a string of characters. This means a single variable (same memory location) can be used to store multiple types of data. You can use any built-in or user defined data types inside a union based on your requirement.
The memory occupied by a union will be large enough to hold the largest member of the union. For example, in the above example, Data type will occupy 20 bytes of memory space because this is the maximum space which can be occupied by character string. The following example displays total memory size occupied by the above union −
import std.stdio;

union Data {
   int i;
   float f;
   char str[20];
};

int main( ) {
   Data data;

   writeln( "Memory size occupied by data : ", data.sizeof);

   return 0;
}
When the above code is compiled and executed, it produces the following result −
Memory size occupied by data : 20
Accessing Union Members
To access any member of a union, we use the member access operator (.). The member access operator is coded as a period between the union variable name and the union member that we wish to access. You would use union keyword to define variables of union type.
Example
The following example explains usage of union −
import std.stdio;

union Data {
   int i;
   float f;
   char str[13];
};

void main( ) {
   Data data;

   data.i = 10;
   data.f = 220.5;

   data.str = "D Programming".dup;
   writeln( "size of : ", data.sizeof);
   writeln( "data.i : ", data.i);
   writeln( "data.f : ", data.f);
   writeln( "data.str : ", data.str);
}
When the above code is compiled and executed, it produces the following result −
size of : 16
data.i : 1917853764
data.f : 4.12236e+30
data.str : D Programming
Here, you can see that values of i and f members of union got corrupted because final value assigned to the variable has occupied the memory location and this is the reason that the value of str member is getting printed very well.
Now let us look into the same example once again where we will use one variable at a time which is the main purpose of having union −
Modified Example
import std.stdio;

union Data {
   int i;
   float f;
   char str[13];
};
void main( ) {
   Data data;
   writeln( "size of : ", data.sizeof);

   data.i = 10;
   writeln( "data.i : ", data.i);

   data.f = 220.5;
   writeln( "data.f : ", data.f);

   data.str = "D Programming".dup;
   writeln( "data.str : ", data.str);
}
When the above code is compiled and executed, it produces the following result −
size of : 16
data.i : 10
data.f : 220.5
data.str : D Programming
Here, all the members are getting printed very well because one member is being used at a time.
D Programming - Ranges
Ranges are an abstraction of element access. This abstraction enables the use of great number of algorithms over great number of container types. Ranges emphasize how container elements are accessed, as opposed to how the containers are implemented. Ranges is a very simple concept that is based on whether a type defines certain sets of member functions.
Ranges are an integral part of D. D's slices happen to be implementations of the most powerful range RandomAccessRange, and there are many range features in Phobos. Many Phobos algorithms return temporary range objects. For example, filter() chooses elements that are greater than 10 in the following code actually returns a range object, not an array.
Number ranges
Number ranges are quite commonly used and these number ranges is of type int. A few examples for number ranges is shown below −
// Example 1
foreach (value; 3..7)

// Example 2
int[] slice = array[5..10];
Phobos Ranges
Ranges related to structs and class interfaces is phobos ranges. Phobos is the official runtime and standard library that comes with the D language compiler.
There are various types of ranges which include −
- InputRange
- ForwardRange
- BidirectionalRange
- RandomAccessRange
- OutputRange
InputRange
The simplest range is the input range. The other ranges bring more requirements on top of the range that they are based on. There are three functions that InputRange requires −
empty − It specifies whether the range is empty; it must return true when the range is considered to be empty; false otherwise.
front − It provides access to the element at the beginning of the range.
popFront() − It shortens the range from the beginning by removing the first element.
Example
import std.stdio;
import std.string;

struct Student {
   string name;
   int number;

   string toString() const {
      return format("%s(%s)", name, number);
   }
}

struct School {
   Student[] students;
}
struct StudentRange {
   Student[] students;

   this(School school) {
      this.students = school.students;
   }
   @property bool empty() const {
      return students.length == 0;
   }
   @property ref Student front() {
      return students[0];
   }
   void popFront() {
      students = students[1 .. $];
   }
}

void main() {
   auto school = School([ Student("Raj", 1), Student("John", 2), Student("Ram", 3)]);
   auto range = StudentRange(school);
   writeln(range);

   writeln(school.students.length);

   writeln(range.front);

   range.popFront;

   writeln(range.empty);
   writeln(range);
}
When the above code is compiled and executed, it produces the following result −
[Raj(1), John(2), Ram(3)]
3
Raj(1)
false
[John(2), Ram(3)]
ForwardRange
ForwardRange additionally requires the save member function part from the other three function of InputRange and return a copy of the range when the save function is called.
import std.array;
import std.stdio;
import std.string;
import std.range;

struct FibonacciSeries {
   int first = 0;
   int second = 1;
   enum empty = false;   //  infinite range

   @property int front() const {
      return first;
   }
   void popFront() {
      int third = first + second;
      first = second;
      second = third;
   }
   @property FibonacciSeries save() const {
      return this;
   }
}

void report(T)(const dchar[] title, const ref T range) {
   writefln("%s: %s", title, range.take(5));
}

void main() {
   auto range = FibonacciSeries();
   report("Original range", range);

   range.popFrontN(2);
   report("After removing two elements", range);

   auto theCopy = range.save;
   report("The copy", theCopy);

   range.popFrontN(3);
   report("After removing three more elements", range);
   report("The copy", theCopy);
}
When the above code is compiled and executed, it produces the following result −
Original range: [0, 1, 1, 2, 3]
After removing two elements: [1, 2, 3, 5, 8]
The copy: [1, 2, 3, 5, 8]
After removing three more elements: [5, 8, 13, 21, 34]
The copy: [1, 2, 3, 5, 8]
BidirectionalRange
BidirectionalRange additionally provides two member functions over the member functions of ForwardRange. The back function which is similar to front, provides access to the last element of the range. The popBack function is similar to popFront function and it removes the last element from the range.
Example
import std.array;
import std.stdio;
import std.string;

struct Reversed {
   int[] range;

   this(int[] range) {
      this.range = range;
   }
   @property bool empty() const {
      return range.empty;
   }
   @property int front() const {
      return range.back;  //  reverse
   }
   @property int back() const {
      return range.front; // reverse
   }
   void popFront() {
      range.popBack();
   }
   void popBack() {
      range.popFront();
   }
}

void main() {
   writeln(Reversed([ 1, 2, 3]));
}
When the above code is compiled and executed, it produces the following result −
[3, 2, 1]
Infinite RandomAccessRange
opIndex() is additionally required when compared to the ForwardRange. Also, the value of an empty function to be known at compile time as false. A simple example is explained with squares range is shown below.
import std.array;
import std.stdio;
import std.string;
import std.range;
import std.algorithm;

class SquaresRange {
   int first;
   this(int first = 0) {
      this.first = first;
   }
   enum empty = false;
   @property int front() const {
      return opIndex(0);
   }
   void popFront() {
      ++first;
   }
   @property SquaresRange save() const {
      return new SquaresRange(first);
   }
   int opIndex(size_t index) const {
      /* This function operates at constant time */
      immutable integerValue = first + cast(int)index;
      return integerValue * integerValue;
   }
}

bool are_lastTwoDigitsSame(int value) {
   /* Must have at least two digits */
   if (value < 10) {
      return false;
   }

   /* Last two digits must be divisible by 11 */
   immutable lastTwoDigits = value % 100;
   return (lastTwoDigits % 11) == 0;
}

void main() {
   auto squares = new SquaresRange();

   writeln(squares[5]);

   writeln(squares[10]);

   squares.popFrontN(5);
   writeln(squares[0]);

   writeln(squares.take(50).filter!are_lastTwoDigitsSame);
}
When the above code is compiled and executed, it produces the following result −
25
100
25
[100, 144, 400, 900, 1444, 1600, 2500]
Finite RandomAccessRange
opIndex() and length are additionally required when compared to bidirectional range. This is explained with the help of detailed example that uses the Fibonacci series and Squares Range example used earlier. This example works well on normal D compiler but does not work on online compiler.
Example
import std.array;
import std.stdio;
import std.string;
import std.range;
import std.algorithm;

struct FibonacciSeries {
   int first = 0;
   int second = 1;
   enum empty = false;   //  infinite range

   @property int front() const {
      return first;
   }
   void popFront() {
      int third = first + second;
      first = second;
      second = third;
   }
   @property FibonacciSeries save() const {
      return this;
   }
}

void report(T)(const dchar[] title, const ref T range) {
   writefln("%40s: %s", title, range.take(5));
}

class SquaresRange {
   int first;
   this(int first = 0) {
      this.first = first;
   }
   enum empty = false;
   @property int front() const {
      return opIndex(0);
   }
   void popFront() {
      ++first;
   }
   @property SquaresRange save() const {
      return new SquaresRange(first);
   }
   int opIndex(size_t index) const {
      /* This function operates at constant time */
      immutable integerValue = first + cast(int)index;
      return integerValue * integerValue;
   }
}

bool are_lastTwoDigitsSame(int value) {
   /* Must have at least two digits */
   if (value < 10) {
      return false;
   }

   /* Last two digits must be divisible by 11 */
   immutable lastTwoDigits = value % 100;
   return (lastTwoDigits % 11) == 0;
}

struct Together {
   const(int)[][] slices;
   this(const(int)[][] slices ...) {
      this.slices = slices.dup;
      clearFront();
      clearBack();
   }
   private void clearFront() {
      while (!slices.empty && slices.front.empty) {
         slices.popFront();
      }
   }
   private void clearBack() {
      while (!slices.empty && slices.back.empty) {
         slices.popBack();
      }
   }
   @property bool empty() const {
      return slices.empty;
   }
   @property int front() const {
      return slices.front.front;
   }
   void popFront() {
      slices.front.popFront();
      clearFront();
   }
   @property Together save() const {
      return Together(slices.dup);
   }
   @property int back() const {
      return slices.back.back;
   }
   void popBack() {
      slices.back.popBack();
      clearBack();
   }
   @property size_t length() const {
      return reduce!((a, b) => a + b.length)(size_t.init, slices);
   }
   int opIndex(size_t index) const {
      /* Save the index for the error message */
      immutable originalIndex = index;

      foreach (slice; slices) {
         if (slice.length > index) {
            return slice[index];
         } else {
            index -= slice.length;
         }
      }
      throw new Exception(
         format("Invalid index: %s (length: %s)", originalIndex, this.length));
   }
}
void main() {
   auto range = Together(FibonacciSeries().take(10).array, [ 777, 888 ],
      (new SquaresRange()).take(5).array);
   writeln(range.save);
}
When the above code is compiled and executed, it produces the following result −
[0, 1, 1, 2, 3, 5, 8, 13, 21, 34, 777, 888, 0, 1, 4, 9, 16]
OutputRange
OutputRange represents streamed element output, similar to sending characters to stdout. OutputRange requires support for the put(range, element) operation. put() is a function defined in the std.range module. It determines the capabilities of the range and the element at compile time and uses the most appropriate method to use to output the elements. A simple example is shown below.
import std.algorithm;
import std.stdio;

struct MultiFile {
   string delimiter;
   File[] files;

   this(string delimiter, string[] fileNames ...) {
      this.delimiter = delimiter;

      /* stdout is always included */
      this.files ~= stdout;

      /* A File object for each file name */
      foreach (fileName; fileNames) {
         this.files ~= File(fileName, "w");
      }
   }
   void put(T)(T element) {
      foreach (file; files) {
         file.write(element, delimiter);
      }
   }
}
void main() {
   auto output = MultiFile("\n", "output_0", "output_1");
   copy([ 1, 2, 3], output);
   copy([ "red", "blue", "green" ], output);
}
When the above code is compiled and executed, it produces the following result −
[1, 2, 3]
["red", "blue", "green"]
D Programming - Aliases
Alias, as the name refers provides an alternate name for existing names. The syntax for alias is shown below.
alias new_name = existing_name;
The following is the older syntax, just in case you refer some older format examples. Its is strongly discouraged the use of this.
alias existing_name new_name;
There is also another syntax that is used with expression and it is given below in which we can directly use the alias name instead of the expression.
alias expression alias_name ;
As you may know, a typedef adds the ability to create new types. Alias can do the work of a typedef and even more. A simple example for using alias is shown below that uses the std.conv header which provides the type conversion ability.
import std.stdio;
import std.conv:to;

alias to!(string) toString;

void main() {
   int a = 10;
   string s = "Test"~toString(a);
   writeln(s);
}
When the above code is compiled and executed, it produces the following result −
Test10
In the above example instead of using to!string(a), we assigned it to alias name toString making it more convenient and simpler to understand.
Alias for a Tuple
Let us a look at another example where we can set alias name for a Tuple.
import std.stdio;
import std.typetuple;

alias TypeTuple!(int, long) TL;

void method1(TL tl) {
   writeln(tl[0],"\t", tl[1] );
}

void main() {
   method1(5, 6L);
}
When the above code is compiled and executed, it produces the following result −
5 6
In the above example, the type tuple is assigned to the alias variable and it simplifies the method definition and access of variables. This kind of access is even more useful when we try to reuse such type tuples.
Alias for Data Types
Many times, we may define common data types that needs to be used across the application. When multiple programmers code an application, it can be cases where one person uses int, another double, and so on. To avoid such conflicts, we often use types for data types. A simple example is shown below.
Example
import std.stdio;

alias int myAppNumber;
alias string myAppString;

void main() {
   myAppNumber i = 10;
   myAppString s = "TestString";

   writeln(i,s);
}
When the above code is compiled and executed, it produces the following result −
10TestString
Alias for Class Variables
There is often a requirement where we need to access the member variables of the superclass in the subclass, this can made possible with alias, possibly under a different name.
In case you are new to the the concept of classes and inheritance, have a look at the tutorial on classes and inheritance before starting with this section.
Example
A simple example is shown below.
import std.stdio;

class Shape {
   int area;
}

class Square : Shape {
   string name() const @property {
      return "Square";
   }
   alias Shape.area squareArea;
}

void main() {
   auto square = new Square;
   square.squareArea = 42;
   writeln(square.name);
   writeln(square.squareArea);
}
When the above code is compiled and executed, it produces the following result −
Square
42
Alias This
Alias this provides the capability of automatic type conversions of user-defined types. The syntax is shown below where the keywords alias and this are written on either sides of the member variable or member function.
alias member_variable_or_member_function this;
Example
An example is shown below to show the power of alias this.
import std.stdio;

struct Rectangle {
   long length;
   long breadth;

   double value() const @property {
      return cast(double) length * breadth;
   }
   alias value this;
}
double volume(double rectangle, double height) {
   return rectangle * height;
}

void main() {
   auto rectangle = Rectangle(2, 3);
   writeln(volume(rectangle, 5));
}
In the above example, you can see that the struct rectangle is converted to double value with the help of alias this method.
When the above code is compiled and executed, it produces the following result −
30
D Programming - Mixins
Mixins are structs that allow mixing of the generated code into the source code. Mixins can be of the following types −
- String Mixins
- Template Mixins
- Mixin name spaces
String Mixins
D has the capability to insert code as string as long as that string is known at compile time. The syntax of string mixins is shown below −
mixin (compile_time_generated_string)
Example
A simple example for string mixins is shown below.
import std.stdio;

void main() {
   mixin(`writeln("Hello World!");`);
}
When the above code is compiled and executed, it produces the following result −
Hello World!
Here is another example where we can pass the string in compile time so that mixins can use the functions to reuse code. It is shown below.
import std.stdio;

string print(string s) {
   return `writeln("` ~ s ~ `");`;
}

void main() {
   mixin (print("str1"));
   mixin (print("str2"));
}
When the above code is compiled and executed, it produces the following result −
str1
str2
Template Mixins
D templates define common code patterns, for the compiler to generate actual instances from that pattern. The templates can generate functions, structs, unions, classes, interfaces, and any other legal D code. The syntax of template mixins is as shown below.
mixin a_template!(template_parameters)
A simple example for string mixins is shown below where we create a template with class Department and a mixin instantiating a template and hence making the the functions setName and printNames available to the structure college.
Example
import std.stdio;

template Department(T, size_t count) {
   T[count] names;
   void setName(size_t index, T name) {
      names[index] = name;
   }

   void printNames() {
      writeln("The names");

      foreach (i, name; names) {
         writeln(i," : ", name);
      }
   }
}

struct College {
   mixin Department!(string, 2);
}

void main() {
   auto college = College();
   college.setName(0, "name1");
   college.setName(1, "name2");
   college.printNames();
}
When the above code is compiled and executed, it produces the following result −
The names
0 : name1
1 : name2
Mixin Name Spaces
Mixin name spaces are used to avoid ambiguities in template mixins. For example, there can be two variables, one defined explicitly in main and the other is mixed in. When a mixed-in name is the same as a name that is in the surrounding scope, then the name that is in the surrounding scope gets used. This example is shown below.
Example
import std.stdio;

template Person() {
   string name;

   void print() {
      writeln(name);
   }
}

void main() {
   string name;

   mixin Person a;
   name = "name 1";
   writeln(name);

   a.name = "name 2";
   print();
}
When the above code is compiled and executed, it produces the following result −
name 1
name 2
D Programming - Modules
Modules are the building blocks of D. They are based on a simple concept. Every source file is a module. Accordingly, the single files in which we write the programs are individual modules. By default, the name of a module is the same as its filename without the .d extension.
When explicitly specified, the name of the module is defined by the module keyword, which must appear as the first non-comment line in the source file. For example, assume that the name of a source file is "employee.d". Then the name of the module is specified by the module keyword followed by employee. It is as shown below.
module employee;

class Employee {
   // Class definition goes here.
}
The module line is optional. When not specified, it is the same as the file name without the .d extension.
File and Module Names
D supports Unicode in source code and module names. However, the Unicode support of file systems vary. For example, although most Linux file systems support Unicode, the file names in Windows file systems may not distinguish between lower and upper case letters. Additionally, most file systems limit the characters that can be used in file and directory names. For portability reasons, I recommend that you use only lower case ASCII letters in file names. For example, "employee.d" would be a suitable file name for a class named employee.
Accordingly, the name of the module would consist of ASCII letters as well −
module employee;  // Module name consisting of ASCII letters

class eëmployëë { }
D Packages
A combination of related modules are called a package. D packages are a simple concept as well: The source files that are inside the same directory are considered to belong to the same package. The name of the directory becomes the name of the package, which must also be specified as the first parts of module names.
For example, if "employee.d" and "office.d" are inside the directory "company", then specifying the directory name along with the module name makes them be a part of the same package −
module company.employee;

class Employee { }
Similarly, for the office module −
module company.office;

class Office { }
Since package names correspond to directory names, the package names of modules that are deeper than one directory level must reflect that hierarchy. For example, if the "company" directory included a "branch" directory, the name of a module inside that directory would include branch as well.
module company.branch.employee;
Using Modules in Programs
The import keyword, which we have been using in almost every program so far, is for introducing a module to the current module −
import std.stdio;
The module name may contain the package name as well. For example, the std. part above indicates that stdio is a module that is a part of the std package.
Locations of Modules
The compiler finds the module files by converting the package and module names directly to directory and file names.
For example, the two modules employee and office would be located as "company/employee.d" and "animal/office.d", respectively (or "company\employee.d" and "company\office.d", depending on the file system) for company.employee and company.office.
Long and Short Module Names
The names that are used in the program may be spelled out with the module and package names as shown below.
import company.employee;
auto employee0 = Employee();
auto employee1 = company.employee.Employee();
The long names are normally not needed but sometimes there are name conflicts. For example, when referring to a name that appears in more than one module, the compiler cannot decide which one is meant. The following program is spelling out the long names to distinguish between two separate employee structs that are defined in two separate modules: company and college..
The first employee module in folder company is as follows.
module company.employee;

import std.stdio;

class Employee {
   public:
      string str;

   void print() {
      writeln("Company Employee: ",str);
   }
}
The second employee module in folder college is as follows.
module college.employee;

import std.stdio;

class Employee {
   public:
      string str;

   void print() {
      writeln("College Employee: ",str);
   }
}
The main module in hello.d should be saved in the folder which contains the college and company folders. It is as follows.
import company.employee;
import college.employee;

import std.stdio;

void main() {
   auto myemployee1 = new company.employee.Employee();
   myemployee1.str = "emp1";
   myemployee1.print();

   auto myemployee2 = new college.employee.Employee();
   myemployee2.str = "emp2";
   myemployee2.print();
}
The import keyword is not sufficient to make modules become parts of the program. It simply makes available the features of a module inside the current module. That much is needed only to compile the code.
For the program above to be built, "company/employee.d" and "college/employee.d" must also be specified on the compilation line.
When the above code is compiled and executed, it produces the following result −
$ dmd hello.d company/employee.d college/employee.d -ofhello.amx
$ ./hello.amx
Company Employee: emp1
College Employee: emp2
D Programming - Templates
Templates are the foundation of generic programming, which involve writing code in a way that is independent of any particular type.
A template is a blueprint or formula for creating a generic class or a function.
Templates are the feature that allows describing the code as a pattern, for the compiler to generate program code automatically. Parts of the source code may be left to the compiler to be filled in until that part is actually used in the program. The compiler fills in the missing parts.
Function Template
Defining a function as a template is leaving one or more of the types that it uses as unspecified, to be deduced later by the compiler. The types that are being left unspecified are defined within the template parameter list, which comes between the name of the function and the function parameter list. For that reason, function templates have two parameter lists −
- template parameter list
- function parameter list
import std.stdio;

void print(T)(T value) {
   writefln("%s", value);
}

void main() {
   print(42);

   print(1.2);

   print("test");
}
If we compile and run above code, this would produce the following result −
42
1.2
test
Function Template with Multiple Type Parameters
There can be multiple parameter types. They are shown in the following example.
import std.stdio;

void print(T1, T2)(T1 value1, T2 value2) {
   writefln(" %s %s", value1, value2);
}

void main() {
   print(42, "Test");

   print(1.2, 33);
}
If we compile and run above code, this would produce the following result −
 42 Test
 1.2 33
Class Templates
Just as we can define function templates, we can also define class templates. The following example defines class Stack and implements generic methods to push and pop the elements from the stack.
import std.stdio;
import std.string;

class Stack(T) {
   private:
      T[] elements;
   public:
      void push(T element) {
         elements ~= element;
      }
      void pop() {
         --elements.length;
      }
      T top() const @property {
         return elements[$ - 1];
      }
      size_t length() const @property {
         return elements.length;
      }
}

void main() {
   auto stack = new Stack!string;

   stack.push("Test1");
   stack.push("Test2");

   writeln(stack.top);
   writeln(stack.length);

   stack.pop;
   writeln(stack.top);
   writeln(stack.length);
}
When the above code is compiled and executed, it produces the following result −
Test2
2
Test1
1
D Programming - Immutable
We often use variables that are mutable but there can be many occasions mutability is not required. Immutable variables can be used in such cases. A few examples are given below where immutable variable can be used.
In case of math constants such as pi that never change.
In case of arrays where we want to retain values and it is not requirements of mutation.
Immutability makes it possible to understand whether the variables are immutable or mutable guaranteeing that certain operations do not change certain variables. It also reduces the risk of certain types of program errors. The immutability concept of D is represented by the const and immutable keywords. Although the two words themselves are close in meaning, their responsibilities in programs are different and they are sometimes incompatible.
The immutability concept of D is represented by the const and immutable keywords. Although the two words themselves are close in meaning, their responsibilities in programs are different and they are sometimes incompatible.
Types of Immutable Variables in D
There are three types of defining variables that can never be mutated.
- enum constants
- immutable variables
- const variables
enum Constants in D
The enum constants makes it possible to relate constant values to meaningful names. A simple example is shown below.
Example
import std.stdio;

enum Day{
   Sunday = 1,
   Monday,
   Tuesday,
   Wednesday,
   Thursday,
   Friday,
   Saturday
}

void main() {
   Day day;
   day = Day.Sunday;

   if (day == Day.Sunday) {
      writeln("The day is Sunday");
   }
}
When the above code is compiled and executed, it produces the following result −
The day is Sunday
Immutable Variables in D
Immutable variables can be determined during the execution of the program. It just directs the compiler that after the initialisation, it becomes immutable. A simple example is shown below.
Example
import std.stdio;
import std.random;

void main() {
   int min = 1;
   int max = 10;

   immutable number = uniform(min, max + 1);
   // cannot modify immutable expression number
   // number = 34;
   typeof(number) value = 100;

   writeln(typeof(number).stringof, number);
   writeln(typeof(value).stringof, value);
}
When the above code is compiled and executed, it produces the following result −
immutable(int)4
immutable(int)100
You can see in the above example how it is possible to transfer the data type to another variable and use stringof while printing.
Const Variables in D
Const variables cannot be modified similar to immutable. immutable variables can be passed to functions as their immutable parameters and hence it is recommended to use immutable over const. The same example used earlier is modified for const as shown below.
Example
import std.stdio;
import std.random;

void main() {
   int min = 1;
   int max = 10;

   const number = uniform(min, max + 1);
   // cannot modify const expression number|
   // number = 34;
   typeof(number) value = 100;

   writeln(typeof(number).stringof, number);
   writeln(typeof(value).stringof, value);
}
If we compile and run above code, this would produce the following result −
const(int)7
const(int)100
Immutable Parameters in D
const erases the information about whether the original variable is mutable or immutable and hence using immutable makes it pass it other functions with the original type retained. A simple example is shown below.
Example
import std.stdio;

void print(immutable int[] array) {
   foreach (i, element; array) {
      writefln("%s: %s", i, element);
   }
}

void main() {
   immutable int[] array = [ 1, 2 ];
   print(array);
}
When the above code is compiled and executed, it produces the following result −
0: 1
1: 2
D Programming - File I/O
Files are represented by the File struct of the std.stdio module. A file represents a sequence of bytes, does not matter if it is a text file or binary file.
D programming language provides access on high level functions as well as low level (OS level) calls to handle file on your storage devices.
Opening Files in D
The standard input and output streams stdin and stdout are already open when programs start running. They are ready to be used. On the other hand, files must first be opened by specifying the name of the file and the access rights that are needed.
File file = File(filepath, "mode");
Here, filename is string literal, which you use to name the file and access mode can have one of the following values −
| Sr.No. | Mode & Description |
|---|---|
| 1 | r Opens an existing text file for reading purpose. |
| 2 | w Opens a text file for writing, if it does not exist then a new file is created. Here your program will start writing content from the beginning of the file. |
| 3 | a Opens a text file for writing in appending mode, if it does not exist then a new file is created. Here your program will start appending content in the existing file content. |
| 4 | r+ Opens a text file for reading and writing both. |
| 5 | w+ Opens a text file for reading and writing both. It first truncate the file to zero length if it exists otherwise create the file if it does not exist. |
| 6 | a+ Opens a text file for reading and writing both. It creates the file if it does not exist. The reading will start from the beginning but writing can only be appended. |
Closing a File in D
To close a file, use the file.close() function where file holds the file reference. The prototype of this function is −
file.close();
Any file that has been opened by a program must be closed when the program finishes using that file. In most cases the files need not be closed explicitly; they are closed automatically when File objects are terminated.
Writing a File in D
file.writeln is used to write to an open file.
file.writeln("hello");
import std.stdio;
import std.file;

void main() {
   File file = File("test.txt", "w");
   file.writeln("hello");
   file.close();
}
When the above code is compiled and executed, it creates a new file test.txt in the directory that it has been started under (in the program working directory).
Reading a File in D
The following method reads a single line from a file −
string s = file.readln();
A complete example of read and write is shown below.
import std.stdio;
import std.file;

void main() {
   File file = File("test.txt", "w");
   file.writeln("hello");
   file.close();
   file = File("test.txt", "r");

   string s = file.readln();
   writeln(s);

   file.close();
}
When the above code is compiled and executed, it reads the file created in previous section and produces the following result −
hello
Here is another example for reading file till end of file.
import std.stdio;
import std.string;

void main() {
   File file = File("test.txt", "w");
   file.writeln("hello");
   file.writeln("world");
   file.close();
   file = File("test.txt", "r");

   while (!file.eof()) {
      string line = chomp(file.readln());
      writeln("line -", line);
   }
}
When the above code is compiled and executed, it reads the file created in previous section and produces the following result −
line -hello
line -world
line -
You can see in the above example an empty third line since writeln takes it to next line once it is executed.
D Programming - Concurrency
Concurrency is making a program run on multiple threads at a time. An example of a concurrent program is a web server responding many clients at the same time. Concurrency is easy with message passing but very difficult to write if they are based on data sharing.
Data that is passed between threads are called messages. Messages may be composed of any type and any number of variables. Every thread has an id, which is used for specifying recipients of messages. Any thread that starts another thread is called the owner of the new thread.
Initiating Threads in D
The function spawn() takes a pointer as a parameter and starts a new thread from that function. Any operations that are carried out by that function, including other functions that it may call, would be executed on the new thread. The owner and the worker both start executing separately as if they were independent programs.
Example
import std.stdio;
import std.stdio;
import std.concurrency;
import core.thread;

void worker(int a) {
   foreach (i; 0 .. 4) {
      Thread.sleep(1);
      writeln("Worker Thread ",a + i);
   }
}

void main() {
   foreach (i; 1 .. 4) {
      Thread.sleep(2);
      writeln("Main Thread ",i);
      spawn(≈worker, i * 5);
   }

   writeln("main is done.");
}
When the above code is compiled and executed, it reads the file created in previous section and produces the following result −
Main Thread 1
Worker Thread 5
Main Thread 2
Worker Thread 6
Worker Thread 10
Main Thread 3
main is done.
Worker Thread 7
Worker Thread 11
Worker Thread 15
Worker Thread 8
Worker Thread 12
Worker Thread 16
Worker Thread 13
Worker Thread 17
Worker Thread 18
Thread Identifiers in D
The thisTid variable available globally at the module level is always the id of the current thread. Also you can receive the threadId when spawn is called. An example is shown below.
Example
import std.stdio;
import std.concurrency;

void printTid(string tag) {
   writefln("%s: %s, address: %s", tag, thisTid, &thisTid);
}

void worker() {
   printTid("Worker");
}

void main() {
   Tid myWorker = spawn(&worker);

   printTid("Owner ");

   writeln(myWorker);
}
When the above code is compiled and executed, it reads the file created in previous section and produces the following result −
Owner : Tid(std.concurrency.MessageBox), address: 10C71A59C
Worker: Tid(std.concurrency.MessageBox), address: 10C71A59C
Tid(std.concurrency.MessageBox)
Message Passing in D
The function send() sends messages and the function receiveOnly() waits for a message of a particular type. There are other functions named prioritySend(), receive(), and receiveTimeout(), which are explained later.
The owner in the following program sends its worker a message of type int and waits for a message from the worker of type double. The threads continue sending messages back and forth until the owner sends a negative int. An example is shown below.
Example
import std.stdio;
import std.concurrency;
import core.thread;
import std.conv;

void workerFunc(Tid tid) {
   int value = 0;
   while (value >= 0) {
      value = receiveOnly!int();
      auto result = to!double(value) * 5; tid.send(result);
   }
}

void main() {
   Tid worker = spawn(&workerFunc,thisTid);

   foreach (value; 5 .. 10) {
      worker.send(value);
      auto result = receiveOnly!double();
      writefln("sent: %s, received: %s", value, result);
   }

   worker.send(-1);
}
When the above code is compiled and executed, it reads the file created in previous section and produces the following result −
sent: 5, received: 25
sent: 6, received: 30
sent: 7, received: 35
sent: 8, received: 40
sent: 9, received: 45
Message Passing with Wait in D
A simple example with the message passing with wait is shown below.
import std.stdio;
import std.concurrency;
import core.thread;
import std.conv;

void workerFunc(Tid tid) {
   Thread.sleep(dur!("msecs")( 500 ),);
   tid.send("hello");
}

void main() {
   spawn(&workerFunc,thisTid);
   writeln("Waiting for a message");
   bool received = false;

   while (!received) {
      received = receiveTimeout(dur!("msecs")( 100 ), (string message) {
         writeln("received: ", message);
      });

      if (!received) {
         writeln("... no message yet");
      }
   }
}
When the above code is compiled and executed, it reads the file created in previous section and produces the following result −
Waiting for a message
... no message yet
... no message yet
... no message yet
... no message yet
received: hello
D Programming - Exception Handling
An exception is a problem that arises during the execution of a program. A D exception is a response to an exceptional circumstance that arises while a program is running, such as an attempt to divide by zero.
Exceptions provide a way to transfer control from one part of a program to another. D exception handling is built upon three keywords try, catch, and throw.
throw − A program throws an exception when a problem shows up. This is done using a throw keyword.
catch − A program catches an exception with an exception handler at the place in a program where you want to handle the problem. The catch keyword indicates the catching of an exception.
try − A try block identifies a block of code for which particular exceptions are activated. It is followed by one or more catch blocks.
Assuming a block will raise an exception, a method catches an exception using a combination of the try and catch keywords. A try/catch block is placed around the code that might generate an exception. Code within a try/catch block is referred to as protected code, and the syntax for using try/catch looks like the following −
try {
   // protected code
}
catch( ExceptionName e1 ) {
   // catch block
}
catch( ExceptionName e2 ) {
   // catch block
}
catch( ExceptionName eN ) {
   // catch block
}
You can list down multiple catch statements to catch different type of exceptions in case your try block raises more than one exception in different situations.
Throwing Exceptions in D
Exceptions can be thrown anywhere within a code block using throw statements. The operand of the throw statements determines a type for the exception and can be any expression and the type of the result of the expression determines the type of exception thrown.
The following example throws an exception when dividing by zero condition occurs −
Example
double division(int a, int b) {
   if( b == 0 ) {
      throw new Exception("Division by zero condition!");
   }

   return (a/b);
}
Catching Exceptions in D
The catch block following the try block catches any exception. You can specify what type of exception you want to catch and this is determined by the exception declaration that appears in parentheses following the keyword catch.
try {
   // protected code
}

catch( ExceptionName e ) {
   // code to handle ExceptionName exception
}
The above code catches an exception of ExceptionName type. If you want to specify that a catch block should handle any type of exception that is thrown in a try block, you must put an ellipsis,..., between the parentheses enclosing the exception declaration as follows −
try {
   // protected code
}

catch(...) {
   // code to handle any exception
}
The following example throws a division by zero exception. It is caught in catch block.
import std.stdio;
import std.string;

string division(int a, int b) {
   string result = "";

   try {
      if( b == 0 ) {
         throw new Exception("Cannot divide by zero!");
      } else {
         result = format("%s",a/b);
      }
   } catch (Exception e) {
      result = e.msg;
   }

   return result;
}

void main () {
   int x = 50;
   int y = 0;

   writeln(division(x, y));

   y = 10;
   writeln(division(x, y));
}
When the above code is compiled and executed, it reads the file created in previous section and produces the following result −
Cannot divide by zero!
5
D - Contract Programming
Contract programming in D programming is focused on providing a simple and understandable means of error handling. Contract programming in D are implemented by three types of code blocks −
- body block
- in block
- out block
Body Block in D
Body block contains the actual functionality code of execution. The in and out blocks are optional while the body block is mandatory. A simple syntax is shown below.
return_type function_name(function_params)
in {
   // in block
}

out (result) {
   // in block
}

body {
   // actual function block
}
In Block for Pre Conditions in D
In block is for simple pre conditions that verify whether the input parameters are acceptable and in range that can be handled by the code. A benefit of an in block is that all of the entry conditions can be kept together and separate from the actual body of the function. A simple precondition for validating password for its minimum length is shown below.
import std.stdio;
import std.string;

bool isValid(string password)
in {
   assert(password.length>=5);
}

body {
   // other conditions
   return true;
}

void main() {
   writeln(isValid("password"));
}
When the above code is compiled and executed, it reads the file created in previous section and produces the following result −
true
Out Blocks for Post Conditions in D
The out block takes care of the return values from the function. It validates the return value is in expected range. A simple example containing both in and out is shown below that converts months, year to a combined decimal age form.
import std.stdio;
import std.string;

double getAge(double months,double years)
in {
   assert(months >= 0);
   assert(months <= 12);
}

out (result) {
   assert(result>=years);
}

body {
   return years + months/12;
}

void main () {
   writeln(getAge(10,12));
}
When the above code is compiled and executed, it reads the file created in previous section and produces the following result −
12.8333
D Programming - Conditional Compilation
Conditional compilation is the process of selecting which code to compile and which code to not compile similar to the #if / #else / #endif in C and C++. Any statement that is not compiled in still must be syntactically correct.
Conditional compilation involves condition checks that are evaluable at compile time. Runtime conditional statements like if, for, while are not conditional compilation features. The following features of D are meant for conditional compilation −
- debug
- version
- static if
Debug Statement in D
The debug is useful during program development. The expressions and statements that are marked as debug are compiled into the program only when the -debug compiler switch is enabled.
debug a_conditionally_compiled_expression;

debug {
   // ... conditionally compiled code ...
} else {
   // ... code that is compiled otherwise ...
}
The else clause is optional. Both the single expression and the code block above are compiled only when the -debug compiler switch is enabled.
Instead of being removed altogether, the lines can be marked as debug instead.
debug writefln("%s debug only statement", value);
Such lines are included in the program only when the -debug compiler switch is enabled.
dmd test.d -oftest -w -debug
Debug (tag) Statement in D
The debug statements can be given names (tags) to be included in the program selectively.
debug(mytag) writefln("%s not found", value);
Such lines are included in the program only when the -debug compiler switch is enabled.
dmd test.d -oftest -w -debug = mytag
The debug blocks can have tags as well.
debug(mytag) {
//
}
It is possible to enable more than one debug tag at a time.
dmd test.d -oftest -w -debug = mytag1 -debug = mytag2
Debug (level) Statement in D
Sometimes it is more useful to associate debug statements by numerical levels. Increasing levels can provide more detailed information.
import std.stdio;
void myFunction() {
debug(1) writeln("debug1");
debug(2) writeln("debug2");
}
void main() {
myFunction();
}
The debug expressions and blocks that are lower than or equal to the specified level would be compiled.
$ dmd test.d -oftest -w -debug = 1 $ ./test debug1
Version (tag) and Version (level) Statements in D
Version is similar to debug and is used in the same way. The else clause is optional. Although version works essentially the same as debug, having separate keywords helps distinguish their unrelated uses. As with debug, more than one version can be enabled.
import std.stdio;
void myFunction() {
version(1) writeln("version1");
version(2) writeln("version2");
}
void main() {
myFunction();
}
The debug expressions and blocks that are lower than or equal to the specified level would be compiled.
$ dmd test.d -oftest -w -version = 1 $ ./test version1
Static if
Static if is the compile time equivalent of the if statement. Just like the if statement, static if takes a logical expression and evaluates it. Unlike the if statement, static if is not about execution flow; rather, it determines whether a piece of code should be included in the program or not.
The if expression is unrelated to the is operator that we have seen earlier, both syntactically and semantically. It is evaluated at compile time. It produces an int value, either 0 or 1; depending on the expression specified in parentheses. Although the expression that it takes is not a logical expression, the is expression itself is used as a compile time logical expression. It is especially useful in static if conditionals and template constraints.
import std.stdio;
enum Days {
sun,
mon,
tue,
wed,
thu,
fri,
sat
};
void myFunction(T)(T mytemplate) {
static if (is (T == class)) {
writeln("This is a class type");
} else static if (is (T == enum)) {
writeln("This is an enum type");
}
}
void main() {
Days day;
myFunction(day);
}
When we compile and run we will get some output as follows.
This is an enum type
D Programming - Classes & Objects
Classes are the central feature of D programming that supports object-oriented programming and are often called user-defined types.
A class is used to specify the form of an object and it combines data representation and methods for manipulating that data into one neat package. The data and functions within a class are called members of the class.
D Class Definitions
When you define a class, you define a blueprint for a data type. This does not actually define any data, but it defines what the class name means, that is, what an object of the class will consist of and what operations can be performed on such an object.
A class definition starts with the keyword class followed by the class name; and the class body, enclosed by a pair of curly braces. A class definition must be followed either by a semicolon or a list of declarations. For example, we defined the Box data type using the keyword class as follows −
class Box {
public:
double length; // Length of a box
double breadth; // Breadth of a box
double height; // Height of a box
}
The keyword public determines the access attributes of the members of the class that follow it. A public member can be accessed from outside the class anywhere within the scope of the class object. You can also specify the members of a class as private or protected which we will discuss in a sub-section.
Defining D Objects
A class provides the blueprints for objects, so basically an object is created from a class. You declare objects of a class with exactly the same sort of declaration that you declare variables of basic types. The following statements declare two objects of class Box −
Box Box1; // Declare Box1 of type Box Box Box2; // Declare Box2 of type Box
Both of the objects Box1 and Box2 have their own copy of data members.
Accessing the Data Members
The public data members of objects of a class can be accessed using the direct member access operator (.). Let us try the following example to make the things clear −
import std.stdio;
class Box {
public:
double length; // Length of a box
double breadth; // Breadth of a box
double height; // Height of a box
}
void main() {
Box box1 = new Box(); // Declare Box1 of type Box
Box box2 = new Box(); // Declare Box2 of type Box
double volume = 0.0; // Store the volume of a box here
// box 1 specification
box1.height = 5.0;
box1.length = 6.0;
box1.breadth = 7.0;
// box 2 specification
box2.height = 10.0;
box2.length = 12.0;
box2.breadth = 13.0;
// volume of box 1
volume = box1.height * box1.length * box1.breadth;
writeln("Volume of Box1 : ",volume);
// volume of box 2
volume = box2.height * box2.length * box2.breadth;
writeln("Volume of Box2 : ", volume);
}
When the above code is compiled and executed, it produces the following result −
Volume of Box1 : 210 Volume of Box2 : 1560
It is important to note that private and protected members can not be accessed directly using direct member access operator (.). Shortly you will learn how private and protected members can be accessed.
Classes and Objects in D
So far, you have got very basic idea about D Classes and Objects. There are further interesting concepts related to D Classes and Objects which we will discuss in various sub-sections listed below −
| Sr.No. | Concept & Description |
|---|---|
| 1 | Class member functions
A member function of a class is a function that has its definition or its prototype within the class definition like any other variable. |
| 2 | Class access modifiers
A class member can be defined as public, private or protected. By default members would be assumed as private. |
| 3 | Constructor & destructor
A class constructor is a special function in a class that is called when a new object of the class is created. A destructor is also a special function which is called when created object is deleted. |
| 4 | The this pointer in D
Every object has a special pointer this which points to the object itself. |
| 5 | Pointer to D classes
A pointer to a class is done exactly the same way a pointer to a structure is. In fact a class is really just a structure with functions in it. |
| 6 | Static members of a class
Both data members and function members of a class can be declared as static. |
D Programming - Inheritance
One of the most important concepts in object-oriented programming is inheritance. Inheritance allows to define a class in terms of another class, which makes it easier to create and maintain an application. This also provides an opportunity to reuse the code functionality and fast implementation time.
When creating a class, instead of writing completely new data members and member functions, the programmer can designate that the new class should inherit the members of an existing class. This existing class is called the base class, and the new class is referred to as the derived class.
The idea of inheritance implements the is a relationship. For example, mammal IS-A animal, dog IS-A mammal hence dog IS-A animal as well and so on.
Base Classes and Derived Classes in D
A class can be derived from more than one classes, which means it can inherit data and functions from multiple base classes. To define a derived class, we use a class derivation list to specify the base class(es). A class derivation list names one or more base classes and has the form −
class derived-class: base-class
Consider a base class Shape and its derived class Rectangle as follows −
import std.stdio;
// Base class
class Shape {
public:
void setWidth(int w) {
width = w;
}
void setHeight(int h) {
height = h;
}
protected:
int width;
int height;
}
// Derived class
class Rectangle: Shape {
public:
int getArea() {
return (width * height);
}
}
void main() {
Rectangle Rect = new Rectangle();
Rect.setWidth(5);
Rect.setHeight(7);
// Print the area of the object.
writeln("Total area: ", Rect.getArea());
}
When the above code is compiled and executed, it produces the following result −
Total area: 35
Access Control and Inheritance
A derived class can access all the non-private members of its base class. Thus base-class members that should not be accessible to the member functions of derived classes should be declared private in the base class.
A derived class inherits all base class methods with the following exceptions −
- Constructors, destructors, and copy constructors of the base class.
- Overloaded operators of the base class.
Multi Level Inheritance
The inheritance can be of multiple levels and it is shown in the following example.
import std.stdio;
// Base class
class Shape {
public:
void setWidth(int w) {
width = w;
}
void setHeight(int h) {
height = h;
}
protected:
int width;
int height;
}
// Derived class
class Rectangle: Shape {
public:
int getArea() {
return (width * height);
}
}
class Square: Rectangle {
this(int side) {
this.setWidth(side);
this.setHeight(side);
}
}
void main() {
Square square = new Square(13);
// Print the area of the object.
writeln("Total area: ", square.getArea());
}
When the above code is compiled and executed, it produces the following result −
Total area: 169
D Programming - Overloading
D allows you to specify more than one definition for a function name or an operator in the same scope, which is called function overloading and operator overloading respectively.
An overloaded declaration is a declaration that had been declared with the same name as a previous declaration in the same scope, except that both declarations have different arguments and obviously different definition (implementation).
When you call an overloaded function or operator, the compiler determines the most appropriate definition to use by comparing the argument types you used to call the function or operator with the parameter types specified in the definitions. The process of selecting the most appropriate overloaded function or operator is called overload resolution..
Function Overloading
You can have multiple definitions for the same function name in the same scope. The definition of the function must differ from each other by the types and/or the number of arguments in the argument list. You cannot overload function declarations that differ only by return type.
Example
The following example uses same function print() to print different data types −
import std.stdio;
import std.string;
class printData {
public:
void print(int i) {
writeln("Printing int: ",i);
}
void print(double f) {
writeln("Printing float: ",f );
}
void print(string s) {
writeln("Printing string: ",s);
}
};
void main() {
printData pd = new printData();
// Call print to print integer
pd.print(5);
// Call print to print float
pd.print(500.263);
// Call print to print character
pd.print("Hello D");
}
When the above code is compiled and executed, it produces the following result −
Printing int: 5 Printing float: 500.263 Printing string: Hello D
Operator Overloading
You can redefine or overload most of the built-in operators available in D. Thus a programmer can use operators with user-defined types as well.
Operators can be overloaded using string op followed by Add, Sub, and so on based on the operator that is being overloaded. We can overload the operator + to add two boxes as shown below.
Box opAdd(Box b) {
Box box = new Box();
box.length = this.length + b.length;
box.breadth = this.breadth + b.breadth;
box.height = this.height + b.height;
return box;
}
The following example shows the concept of operator overloading using a member function. Here an object is passed as an argument whose properties are accessed using this object. The object which calls this operator can be accessed using this operator as explained below −
import std.stdio;
class Box {
public:
double getVolume() {
return length * breadth * height;
}
void setLength( double len ) {
length = len;
}
void setBreadth( double bre ) {
breadth = bre;
}
void setHeight( double hei ) {
height = hei;
}
Box opAdd(Box b) {
Box box = new Box();
box.length = this.length + b.length;
box.breadth = this.breadth + b.breadth;
box.height = this.height + b.height;
return box;
}
private:
double length; // Length of a box
double breadth; // Breadth of a box
double height; // Height of a box
};
// Main function for the program
void main( ) {
Box box1 = new Box(); // Declare box1 of type Box
Box box2 = new Box(); // Declare box2 of type Box
Box box3 = new Box(); // Declare box3 of type Box
double volume = 0.0; // Store the volume of a box here
// box 1 specification
box1.setLength(6.0);
box1.setBreadth(7.0);
box1.setHeight(5.0);
// box 2 specification
box2.setLength(12.0);
box2.setBreadth(13.0);
box2.setHeight(10.0);
// volume of box 1
volume = box1.getVolume();
writeln("Volume of Box1 : ", volume);
// volume of box 2
volume = box2.getVolume();
writeln("Volume of Box2 : ", volume);
// Add two object as follows:
box3 = box1 + box2;
// volume of box 3
volume = box3.getVolume();
writeln("Volume of Box3 : ", volume);
}
When the above code is compiled and executed, it produces the following result −
Volume of Box1 : 210 Volume of Box2 : 1560 Volume of Box3 : 5400
Operator Overloading Types
Basically, there are three types of operator overloading as listed below.
| Sr.No. | Overloading Types |
|---|---|
| 1 | Unary Operators Overloading |
| 2 | Binary Operators Overloading |
| 3 | Comparison Operators Overloading |
D Programming - Encapsulation
All D programs are composed of the following two fundamental elements −
Program statements (code) − This is the part of a program that performs actions and they are called functions.
Program data − It is the information of the program which affected by the program functions.
Encapsulation is an Object Oriented Programming concept that binds data and functions that manipulate the data together, and that keeps both safe from outside interference and misuse. Data encapsulation led to the important OOP concept of data hiding.
Data encapsulation is a mechanism of bundling the data, and the functions that use them and data abstraction is a mechanism of exposing only the interfaces and hiding the implementation details from the user.
D supports the properties of encapsulation and data hiding through the creation of user-defined types, called classes. We already have studied that a class can contain private, protected, and public members. By default, all items defined in a class are private. For example −
class Box {
public:
double getVolume() {
return length * breadth * height;
}
private:
double length; // Length of a box
double breadth; // Breadth of a box
double height; // Height of a box
};
The variables length, breadth, and height are private. This means that they can be accessed only by other members of the Box class, and not by any other part of your program. This is one way encapsulation is achieved.
To make parts of a class public (i.e., accessible to other parts of your program), you must declare them after the public keyword. All variables or functions defined after the public specifier are accessible by all other functions in your program.
Making one class a friend of another exposes the implementation details and reduces encapsulation. It is ideal to keep as many details of each class hidden from all other classes as possible.
Data Encapsulation in D
Any D program where you implement a class with public and private members is an example of data encapsulation and data abstraction. Consider the following example −
Example
import std.stdio;
class Adder {
public:
// constructor
this(int i = 0) {
total = i;
}
// interface to outside world
void addNum(int number) {
total += number;
}
// interface to outside world
int getTotal() {
return total;
};
private:
// hidden data from outside world
int total;
}
void main( ) {
Adder a = new Adder();
a.addNum(10);
a.addNum(20);
a.addNum(30);
writeln("Total ",a.getTotal());
}
When the above code is compiled and executed, it produces the following result −
Total 60
Above class adds numbers together, and returns the sum. The public members addNum and getTotal are the interfaces to the outside world and a user needs to know them to use the class. The private member total is something that is hidden from the outside world, but is needed for the class to operate properly.
Class Designing Strategy in D
Most of us have learned through bitter experience to make class members private by default unless we really need to expose them. That is just good encapsulation.
This wisdom is applied most frequently to data members, but it applies equally to all members, including virtual functions.
D Programming - Interfaces
An interface is a way of forcing the classes that inherit from it to have to implement certain functions or variables. Functions must not be implemented in an interface because they are always implemented in the classes that inherit from the interface.
An interface is created using the interface keyword instead of the class keyword even though the two are similar in a lot of ways. When you want to inherit from an interface and the class already inherits from another class then you need to separate the name of the class and the name of the interface with a comma.
Let us look at an simple example that explains the use of an interface.
Example
import std.stdio;
// Base class
interface Shape {
public:
void setWidth(int w);
void setHeight(int h);
}
// Derived class
class Rectangle: Shape {
int width;
int height;
public:
void setWidth(int w) {
width = w;
}
void setHeight(int h) {
height = h;
}
int getArea() {
return (width * height);
}
}
void main() {
Rectangle Rect = new Rectangle();
Rect.setWidth(5);
Rect.setHeight(7);
// Print the area of the object.
writeln("Total area: ", Rect.getArea());
}
When the above code is compiled and executed, it produces the following result −
Total area: 35
Interface with Final and Static Functions in D
An interface can have final and static method for which definitions should be included in interface itself. These functions cannot be overriden by the derived class. A simple example is shown below.
Example
import std.stdio;
// Base class
interface Shape {
public:
void setWidth(int w);
void setHeight(int h);
static void myfunction1() {
writeln("This is a static method");
}
final void myfunction2() {
writeln("This is a final method");
}
}
// Derived class
class Rectangle: Shape {
int width;
int height;
public:
void setWidth(int w) {
width = w;
}
void setHeight(int h) {
height = h;
}
int getArea() {
return (width * height);
}
}
void main() {
Rectangle rect = new Rectangle();
rect.setWidth(5);
rect.setHeight(7);
// Print the area of the object.
writeln("Total area: ", rect.getArea());
rect.myfunction1();
rect.myfunction2();
}
When the above code is compiled and executed, it produces the following result −
Total area: 35 This is a static method This is a final method
D Programming - Abstract Classes
Abstraction refers to the ability to make a class abstract in OOP. An abstract class is one that cannot be instantiated. All other functionality of the class still exists, and its fields, methods, and constructors are all accessed in the same manner. You just cannot create an instance of the abstract class.
If a class is abstract and cannot be instantiated, the class does not have much use unless it is subclass. This is typically how abstract classes come about during the design phase. A parent class contains the common functionality of a collection of child classes, but the parent class itself is too abstract to be used on its own.
Using Abstract Class in D
Use the abstract keyword to declare a class abstract. The keyword appears in the class declaration somewhere before the class keyword. The following shows an example of how abstract class can be inherited and used.
Example
import std.stdio;
import std.string;
import std.datetime;
abstract class Person {
int birthYear, birthDay, birthMonth;
string name;
int getAge() {
SysTime sysTime = Clock.currTime();
return sysTime.year - birthYear;
}
}
class Employee : Person {
int empID;
}
void main() {
Employee emp = new Employee();
emp.empID = 101;
emp.birthYear = 1980;
emp.birthDay = 10;
emp.birthMonth = 10;
emp.name = "Emp1";
writeln(emp.name);
writeln(emp.getAge);
}
When we compile and run the above program, we will get the following output.
Emp1 37
Abstract Functions
Similar to functions, classes can also be abstract. The implementation of such function is not given in its class but should be provided in the class that inherits the class with abstract function. The above example is updated with abstract function.
Example
import std.stdio;
import std.string;
import std.datetime;
abstract class Person {
int birthYear, birthDay, birthMonth;
string name;
int getAge() {
SysTime sysTime = Clock.currTime();
return sysTime.year - birthYear;
}
abstract void print();
}
class Employee : Person {
int empID;
override void print() {
writeln("The employee details are as follows:");
writeln("Emp ID: ", this.empID);
writeln("Emp Name: ", this.name);
writeln("Age: ",this.getAge);
}
}
void main() {
Employee emp = new Employee();
emp.empID = 101;
emp.birthYear = 1980;
emp.birthDay = 10;
emp.birthMonth = 10;
emp.name = "Emp1";
emp.print();
}
When we compile and run the above program, we will get the following output.
The employee details are as follows: Emp ID: 101 Emp Name: Emp1 Age: 37
