- CSS - Home
- CSS - Roadmap
- CSS - Introduction
- CSS - Syntax
- CSS - Inclusion
- CSS - Types
- CSS - Measurement Units
- CSS - Selectors
- CSS - Colors
- CSS - Backgrounds
- CSS - Fonts
- CSS - Text
- CSS - Images
- CSS - Links
- CSS - Tables
- CSS - Borders
- CSS - Border Block
- CSS - Border Inline
- CSS - Margins
- CSS - Lists
- CSS - Padding
- CSS - Cursor
- CSS - Outlines
- CSS - Dimension
- CSS - Scrollbars
- CSS - Inline Block
- CSS - Dropdowns
- CSS - Visibility
- CSS - Overflow
- CSS - Clearfix
- CSS - Float
- CSS - Arrows
- CSS - Resize
- CSS - Quotes
- CSS - Order
- CSS - Position
- CSS - Hyphens
- CSS - Hover
- CSS - Display
- CSS - Focus
- CSS - Zoom
- CSS - Translate
- CSS - Height
- CSS - Hyphenate Character
- CSS - Width
- CSS - Opacity
- CSS - Z-Index
- CSS - Bottom
- CSS - Navbar
- CSS - Overlay
- CSS - Forms
- CSS - Align
- CSS - Icons
- CSS - Image Gallery
- CSS - Comments
- CSS - Loaders
- CSS - Attr Selectors
- CSS - Combinators
- CSS - Root
- CSS - Box Model
- CSS - Counters
- CSS - Clip
- CSS - Writing Mode
- CSS - Unicode-bidi
- CSS - min-content
- CSS - All
- CSS - Inset
- CSS - Isolation
- CSS - Overscroll
- CSS - Justify Items
- CSS - Justify Self
- CSS - Tab Size
- CSS - Pointer Events
- CSS - Place Content
- CSS - Place Items
- CSS - Place Self
- CSS - Max Block Size
- CSS - Min Block Size
- CSS - Mix Blend Mode
- CSS - Max Inline Size
- CSS - Min Inline Size
- CSS - Offset
- CSS - Accent Color
- CSS - User Select
- CSS - Cascading
- CSS - Universal Selectors
- CSS - ID Selectors
- CSS - Group Selectors
- CSS - Class Selectors
- CSS - Child Selectors
- CSS - Element Selectors
- CSS - Descendant Selectors
- CSS - General Sibling Selectors
- CSS - Adjacent Sibling Selectors
- CSS Advanced
- CSS - Grid
- CSS - Grid Layout
- CSS - Flexbox
- CSS - Visibility
- CSS - Positioning
- CSS - Layers
- CSS - Pseudo Classes
- CSS - Pseudo Elements
- CSS - @ Rules
- CSS - Text Effects
- CSS - Paged Media
- CSS - Printing
- CSS - Layouts
- CSS - Validations
- CSS - Image Sprites
- CSS - Important
- CSS - Data Types
- CSS3 Advanced Features
- CSS - Rounded Corner
- CSS - Border Images
- CSS - Multi Background
- CSS - Color
- CSS - Gradients
- CSS - Box Shadow
- CSS - Box Decoration Break
- CSS - Caret Color
- CSS - Text Shadow
- CSS - Text
- CSS - 2d transform
- CSS - 3d transform
- CSS - Transition
- CSS - Animation
- CSS - Multi columns
- CSS - Box Sizing
- CSS - Tooltips
- CSS - Buttons
- CSS - Pagination
- CSS - Variables
- CSS - Media Queries
- CSS - Functions
- CSS - Math Functions
- CSS - Masking
- CSS - Shapes
- CSS - Style Images
- CSS - Specificity
- CSS - Custom Properties
- CSS Responsive
- CSS RWD - Introduction
- CSS RWD - Viewport
- CSS RWD - Grid View
- CSS RWD - Media Queries
- CSS RWD - Images
- CSS RWD - Videos
- CSS RWD - Frameworks
- CSS References
- CSS Interview Questions
- CSS Online Quiz
- CSS Online Test
- CSS Mock Test
- CSS - Quick Guide
- CSS - Cheatsheet
- CSS - Properties References
- CSS - Functions References
- CSS - Color References
- CSS - Web Browser References
- CSS - Web Safe Fonts
- CSS - Units
- CSS - Animation
- CSS Resources
- CSS - Useful Resources
- CSS - Discussion
CSS - Syntax
CSS stands for Cascade Style Sheet is popular stylesheet language used to design an interactive webpage. In this tutorial we will learn CSS syntax and usages of CSS along with HTML.
CSS Syntax
Following is the syntax of styling using CSS.
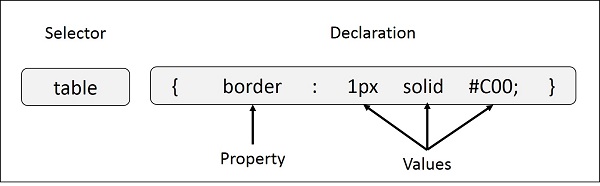
selector {
    property: value;
}
- Selector: CSS selectors are used to select the HTML element or groups of elements you want to style on a web page.
- Property: A CSS property is an aspect or characteristic of an HTML element that can be styled or modified using CSS, such as color, font-size, or margin.
- Value: Values are assigned to properties. For example, color property can have value like red, green etc.
For Example:
Multiple Style Rules
If you want to define multiple rules for a single selectors you can specify those in single block separated by a semicolon (;).
Syntax
selector{
    property1: value1;
    property2: value2;
    property3: value3;
}
Now let us look an example for styling using CSS.
Example
<!DOCTYPE html>
<html>

<head>
    <style>
        /* Style all the paragraphs */
        p {
            background-color: black;
            color: white;
            padding: 5px;
        }

        /* Style all elements with class 'special' */
        .special {
            color: lightblue; /* Change text color */
        }
    </style>
</head>

<body>
    <p>
        This a normal paragraph...
    </p>
    <br>

    <p class="special">
        This is a paragraph with class special...
    </p>
    <br>

    <div class="special">
        This is a div with class special...
    </div>
</body>

</html>
CSS Selectors Syntax
CSS Selectors are used to select the HTML elements you want to style on a web page. They allow you to target specific elements or groups of elements to apply styles like colors, fonts, margins, and more. Different types of selectors are mentioned below:
Universal Selector
Universal selectors select and apply styles to all elements in an HTML document.
* {
   font-family: Verdana, sans-serif;
   color: green;
}
Element Selectors
Element selectors select specific HTML elements.
h1 {
    color: #04af2f;
}
Class Selectors
Class selectors select and style an element with a specific value for its class attribute.
.myDiv {
    color: #04af2f;
}
Id Selectors
Id selectors select a single element with a particular value for the id attribute.
#myDiv {
    color: #04af2f;
}
Attribute Selectors
Attribute selectors select an element based on a specific attribute value.
a[target] {
   background-color: peachpuff;
}
Example: This example demonstrates the types of selectors mentioned above.
<!DOCTYPE html>
<html lang="en">
<head>
    <title>CSS Selector</title>
    <style>
        * {
            background-color: #04af2f;
            color: white;
        }

        h3 {
            text-align: center;
        }

        #myDiv {
            height: 200px;
            width: 200px;
            background-color: antiquewhite;
            color: black;
        }

        .para {
            border: 1px solid black;
        }

        a[href]{
         font-size: 2em;
         color: red;
      }
    </style>
</head>
<body>
    <h3>CSS selectors Example</h3>
    <div id="myDiv">This is a div element.</div>
    <p class="para">This is a paragraph element.</p>
    <a href="/css/css_padding.htm" target="_blank">This is a Link</a>
</body>
</html>
CSS Grouping and Nesting Syntax
Grouping and nesting selectors allow us to apply the same style to multiple elements at a time.
CSS Grouping Selector Syntax
Grouping selectors are comma-separated and used to select multiple elements and style them at a time.
div, p {
    background-color: #04af2f;
    color: white;
}
CSS Nesting Syntax
Nesting allows the nesting of one specific style rule within another.
div p {
    background-color: #04af2f;
    color: white;
    font-size: 20px;
    letter-spacing: 1px;
}
CSS Pseudo-Classes & Pseudo-Elements Syntax
Pseudo-class and pseudo-element, both select specific types of elements. The pseudo class defines the style for a specific state while the pseudo element targets a specific part of an element./p>
CSS Pseudo-Element Syntax
CSS pseudo-element styles specific parts of an element.
p:before {
    content: "NOTE:";
    font-weight: bold;
}
CSS Pseudo-Class Syntax
CSS pseudo-class in CSS is used to select and style elements based on their state.
a:hover {
    color: red;
}
CSS Inclusion Syntax
CSS can be used in any HTML document using three different methods which are: inline CSS, internal CSS, and external CSS.
Inline CSS Syntax
Inline CSS are used directly within HTML tags.
<div style="color: #04af2f;">Welcome to TutorialsPoint.</p>
Internal CSS Syntax
Internal CSS is used within the head section of an HTML document using a style tag.
<style>
    body {
        background-color: #04af2f;
    }
</style>
External CSS Syntax
External CSS is written in a separate file having a .css extension and linked to the HTML document using link tag.
<link rel="stylesheet" type="text/css" href="style.css">
CSS Media Queries Syntax
CSS media queries apply different CSS styles based on the screen size, resolution, and other characteristics and are often used for creating responsive designs.
@media (max-width: 700px) {
    body {
        background-color: #04af2f;
    }
}
CSS Variables Syntax
CSS Variables allows to store and reuse values throughout the CSS program.
:root {
    --main-color: #04af2f;
}
CSS Comments Syntax
CSS comments add an explanatory note about the code.
/* This is a single line CSS comment */
/* This is
a multi-line
CSS comment
*/
