- Kivy - Home
- Kivy Basics
- Kivy - Getting Started
- Kivy - Installation
- Kivy - Architecture
- Kivy - File Syntax
- Kivy - Applications
- Kivy - Hello World
- Kivy - App Life Cycle
- Kivy - Events
- Kivy - Properties
- Kivy - Inputs
- Kivy - Behaviors
- Kivy Buttons
- Kivy - Buttons
- Kivy - Button Events
- Kivy - Button Colors
- Kivy - Button Size
- Kivy - Button Position
- Kivy - Round Buttons
- Kivy - Disabled Buttons
- Kivy - Image Button
- Kivy Widgets
- Kivy - Widgets
- Kivy - Label
- Kivy - Text Input
- Kivy - Canvas
- Kivy - Line
- Kivy - Checkbox
- Kivy - Dropdown List
- Kivy - Windows
- Kivy - ScrollView
- Kivy - Carousel
- Kivy - Slider
- Kivy - Images
- Kivy - Popup
- Kivy - Switch
- Kivy - Spinner
- Kivy - Splitter
- Kivy - Progress Bar
- Kivy - Bubble
- Kivy - Tabbed Panel
- Kivy - Scatter
- Kivy - Accordion
- Kivy - File Chooser
- Kivy - Color Picker
- Kivy - Code Input
- Kivy - Modal View
- Kivy - Toggle Button
- Kivy - Camera
- Kivy - Tree View
- Kivy - reStructuredText
- Kivy - Action Bar
- Kivy - Video Player
- Kivy - Stencil View
- Kivy - VKeyboard
- Kivy - Touch Ripple
- Kivy - Audio
- Kivy - Videos
- Kivy - Spelling
- Kivy - Effects
- Kivy - Input Recorder
- Kivy - OpenGL
- Kivy - Text
- Kivy - Text Markup
- Kivy - Settings
- Kivy Layouts
- Kivy - Layouts
- Kivy - Float Layout
- Kivy - Grid Layouts
- Kivy - Box Layouts
- Kivy - Stack Layout
- Kivy - Anchor Layout
- Kivy - Relative Layout
- Kivy - Page Layout
- Kivy - Recycle Layout
- Kivy - Layouts in Layouts
- Kivy Advanced Concepts
- Kivy - Configuration Object
- Kivy - Atlas
- Kivy - Data Loader
- Kivy - Cache Manager
- Kivy - Console
- Kivy - Animation
- Kivy - Multistroke
- Kivy - Clock
- Kivy - SVGs
- Kivy - UrlRequest
- Kivy - Clipboard
- Kivy - Factory
- Kivy - Gesture
- Kivy - Language
- Kivy - Graphics
- Kivy - Drawing
- Kivy - Packaging
- Kivy - Garden
- Kivy - Storage
- Kivy - Vector
- Kivy - Utils
- Kivy - Inspector
- Kivy - Tools
- Kivy - Logger
- Kivy - Framebuffer
- Kivy Applications and Projects
- Kivy - Drawing App
- Kivy - Calculator App
- Kivy - Stopwatch App
- Kivy - Camera Handling
- Kivy - Image Viewer
- Kivy - Bezier
- Kivy - Canvas Stress
- Kivy - Circle Drawing
- Kivy - Widget Animation
- Kivy - Miscellaneous
- Kivy Useful Resources
- Kivy - Quick Guide
- Kivy - Useful Resources
- Kivy - Discussion
Kivy - Round Buttons
All the widgets in Kivy framework are rectangular in shape. A button object always has right-angled corners. Hence, creating buttons with rounded corners doesn't have a straightforward solution, however we can achieve it by a couple of tricks.
Using Image as a Button
We can define a class which extends ButtonBehavior mixin and Image class. Using any photo editor, create an elliptical shape looking like a round button, and use it as source property of Image object.
You can override the on_press() method of ButtonBehavior class that lets the image be used as a button.
from kivy.uix.behaviors import ButtonBehavior
from kivy.uix.image import Image
class imgbtn(ButtonBehavior, Image):
   def __init__(self, **kwargs):
      super(imgbtn, self).__init__(**kwargs)
      self.source = 'hello.png'
      self.pos_hint= {'center_x':.5, 'center_y':.6}

   def on_press(self):
      print("Button pressed")
We can now use imgbtn object in a Kivy App.
KivyMD Buttons
Using KivyMD extension, we can design more attractive interfaces. KivyMD is a collection of Material Design widgets, to be used in a Kivy app. The KivyMD library provides different button objects with rounded corners.
- MDRoundFlatButton
- MDRoundFlatIconButton
- MDFillRoundFlatButton
- MDFillRoundFlatIconButton
First, install the KivyMD extension (ensure that Kivy framework is installed earlier)
pip3 install KivyMD
The App class must be a subclass of MDApp class instead of App class. In this example, we will use MDRoundFlatButton class. Most of its properties are the same as Kivy Button.
from kivymd.app import MDApp
from kivymd.uix.button import MDRoundFlatButton

btn = MDRoundFlatButton(
   text= 'Hello Python',
   font_size= 20,
   size_hint= (.3, .1),
   pos_hint= {'center_x':.5, 'center_y':.3},
   line_width=3
)
Example
In the following example, we have a MDApp class. The build() method puts an image button and a MDRoundButton object in the application window.
from kivymd.app import MDApp
from kivy.core.window import Window
from kivy.uix.floatlayout import FloatLayout
from kivy.uix.image import Image
from kivy.uix.behaviors import ButtonBehavior
from kivymd.uix.button import MDRoundFlatButton

Window.size = (720, 300)

class imgbtn(ButtonBehavior, Image):
   def __init__(self, **kwargs):
      super(imgbtn, self).__init__(**kwargs)
      self.source = 'btnnormal.png'
      self.pos_hint= {'center_x':.5, 'center_y':.6}

   def on_press(self):
      print("Button pressed")

class ButtonApp(MDApp):
   def build(self):
      flo = FloatLayout()
      self.btn1 = imgbtn()
      self.btn2 = MDRoundFlatButton(
         text= 'Hello Python',
         font_size= 20, size_hint= (.3, .1),
         pos_hint= {'center_x':.5, 'center_y':.3},
         line_width=3
      )
      flo.add_widget(self.btn1)
      flo.add_widget(self.btn2)
      return flo

if __name__ == '__main__':
   ButtonApp().run()
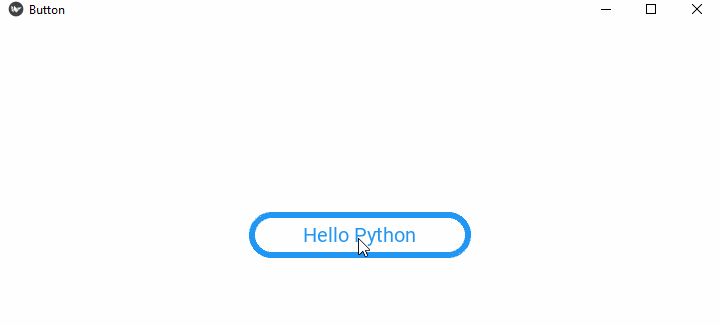
Output
Run the application. You should get the following output, having rounded buttons.
Using Canvas
In Kivy, canvas is the root object for drawing by a widget. To simulate a Label to work as a circular button, we define a class that extends ButtonBehavior and a Label. The "kv" file defines the structure of this object as −
<RoundCorneredButton>:
   canvas:
      Color:
         rgb: (1, 0, 0, 1) if self.state == 'normal' else (0, 0, 0, 1)
      RoundedRectangle:
         size: (self.size)
         pos: (self.pos)
         radius: [200, ]
   on_release:
      print("This is the button made up by the canvas")
The class definition is as follows −
class RoundCorneredButton(ButtonBehavior, Label):
   pass
Example
We shall use the above class and the kv design in the following App code −
from kivy.app import App
from kivy.uix.label import Label
from kivy.config import Config
from kivy.uix.button import ButtonBehavior
from kivy.graphics import Rectangle, Color

# Configuration
Config.set('graphics', 'width', '720')
Config.set('graphics', 'height', '300')
Config.set('graphics', 'resizable', '1')

from kivy.app import App
class RoundCorneredButton(ButtonBehavior, Label):
   pass

class HelloApp(App):
   def build(self):
      return RoundCorneredButton()

HelloApp().run()
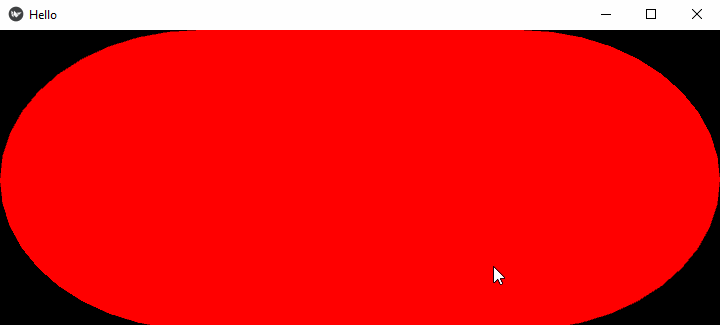
Output
Run the code now. You will get a button with a circular shape, as shown here −