 Data Structure
 Networking
 RDBMS
RDBMS Operating System
 Java
Java MS Excel
 iOS
iOS HTML
HTML CSS
CSS Android
 Python
 C Programming
 C++
C++ C#
C# MongoDB
 MySQL
MySQL Javascript
 PHP
PHP
- Selected Reading
- UPSC IAS Exams Notes
- Developer's Best Practices
- Questions and Answers
- Effective Resume Writing
- HR Interview Questions
- Computer Glossary
- Who is Who
Python - BoxLayout widget in Kivy
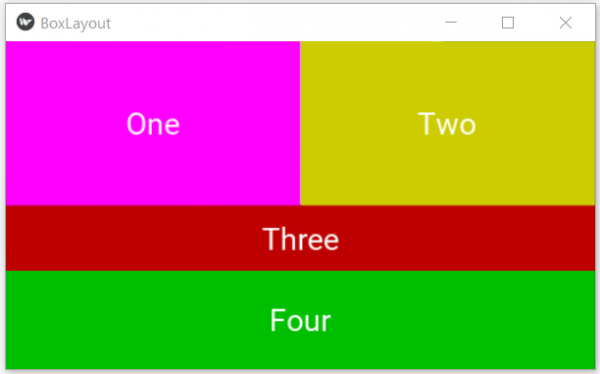
Kivy is an open source Python library for rapid development of applications that make use of innovative user interfaces, such as multi-touch apps. It is used to develop the Android application, as well as Desktops applications. In this article we will see how to use the BoxLayout widget to create buttons of different orientation and colours.
In the below code we first create an outer box whose orientation is vertical. Then we create a row 1 with horizontal orientation. Then two other rows again with vertical orientation. We wrap all these rows in the outer box and giver different text and background colour to the button widgets we create along the way.
Example
import kivy
from kivy.app import App
from kivy.uix.button import Button
from kivy.uix.boxlayout import BoxLayout

# Main Kivy class
class BoxLayoutApp(App):

   def build(self):
      # Outer vertical box
      outerBox = BoxLayout(orientation='vertical')

      # For widgets next to each other,
      Row1 = BoxLayout(orientation='horizontal')


      # Create buttons for Row 1
      btn1 = Button(text="One",
          background_normal ='',
          background_color= (1, 0, 1, 1),
          font_size=25,
          size_hint=(0.7, 1))
      btn2 = Button(text="Two",
          background_normal='',
          background_color=(1, 1, 0, 0.8),
          font_size=25,
          size_hint=(0.7, 1))

      # Add buttons to Row 1
      Row1.add_widget(btn1)
      Row1.add_widget(btn2)

      #Buttons for row 2 and 3
      Row_2_3 = BoxLayout(orientation='vertical')

      btn3 = Button(text="Three",
          background_normal='',
          background_color=(1,0,0,0.75),
          font_size=25,
          size_hint=(1, 10))
      btn4 = Button(text="Four",
          background_normal='',
          background_color=(0,1,0,0.75),
          font_size=25,
          size_hint=(1, 15))

      # Add buttons to Row 2 and 3
      Row_2_3.add_widget(btn3)
      Row_2_3.add_widget(btn4)

      # Add all widgets to outerbox
      outerBox.add_widget(Row1)
      outerBox.add_widget(Row_2_3)
      return outerBox

# creating the object root for BoxLayoutApp() class
main_layout = BoxLayoutApp()
main_layout.run()
Running the above code gives us the following result −
Output


Advertisements
