- ASP.NET - Home
- ASP.NET - Introduction
- ASP.NET - Environment
- ASP.NET - Life Cycle
- ASP.NET - First Example
- ASP.NET - Event Handling
- ASP.NET - Server Side
- ASP.NET - Server Controls
- ASP.NET - HTML Server
- ASP.NET - Client Side
- ASP.NET - Basic Controls
- ASP.NET - Directives
- ASP.NET - Managing State
- ASP.NET - Validators
- ASP.NET - Database Access
- ASP.NET - ADO.net
- ASP.NET - File Uploading
- ASP.NET - Ad Rotator
- ASP.NET - Calendars
- ASP.NET - Multi Views
- ASP.NET - Panel Controls
- ASP.NET - AJAX Control
- ASP.NET - Data Sources
- ASP.NET - Data Binding
- ASP.NET - Custom Controls
- ASP.NET - Personalization
- ASP.NET - Error Handling
- ASP.NET - Debugging
- ASP.NET - LINQ
- ASP.NET - Security
- ASP.NET - Data Caching
- ASP.NET - Web Services
- ASP.NET - Multi Threading
- ASP.NET - Configuration
- ASP.NET - Deployment
ASP.NET - Security
Implementing security in a site has the following aspects:
Authentication : It is the process of ensuring the user's identity and authenticity. ASP.NET allows four types of authentications:
- Windows Authentication
- Forms Authentication
- Passport Authentication
- Custom Authentication
Authorization : It is the process of defining and allotting specific roles to specific users.
Confidentiality : It involves encrypting the channel between the client browser and the web server.
Integrity : It involves maintaining the integrity of data. For example, implementing digital signature.
Forms-Based Authentication
Traditionally, forms-based authentication involves editing the web.config file and adding a login page with appropriate authentication code.
The web.config file could be edited and the following codes written on it:
<configuration>

<system.web>
   <authentication mode="Forms">
      <forms loginUrl ="login.aspx"/>
   </authentication>

   <authorization>
      <deny users="?"/>
   </authorization>
</system.web>
...
...
</configuration>
The login.aspx page mentioned in the above code snippet could have the following code behind file with the usernames and passwords for authentication hard coded into it.
protected bool authenticate(String uname, String pass)
{
   if(uname == "Tom")
   {
      if(pass == "tom123")
         return true;
   }

   if(uname == "Dick")
   {
      if(pass == "dick123")
         return true;
   }

   if(uname == "Harry")
   {
      if(pass == "har123")
         return true;
   }

   return false;
}

public void OnLogin(Object src, EventArgs e)
{
   if (authenticate(txtuser.Text, txtpwd.Text))
   {
      FormsAuthentication.RedirectFromLoginPage(txtuser.Text, chkrem.Checked);
   }
   else
   {
      Response.Write("Invalid user name or password");
   }
}
Observe that the FormsAuthentication class is responsible for the process of authentication.
However, Visual Studio allows you to implement user creation, authentication, and authorization with seamless ease without writing any code, through the Web Site Administration tool. This tool allows creating users and roles.
Apart from this, ASP.NET comes with readymade login controls set, which has controls performing all the jobs for you.
Implementing Forms-Based Security
To set up forms-based authentication, you need the following:
- A database of users to support the authentication process
- A website that uses the database
- User accounts
- Roles
- Restriction of users and group activities
- A default page, to display the login status of the users and other information.
- A login page, to allow users to log in, retrieve password, or change password
To create users, take the following steps:
Step (1) : Choose Website -> ASP.NET Configuration to open the Web Application Administration Tool.
Step (2) : Click on the Security tab.
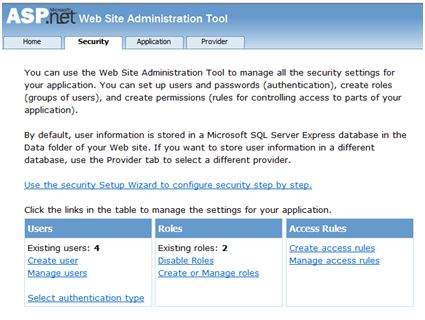
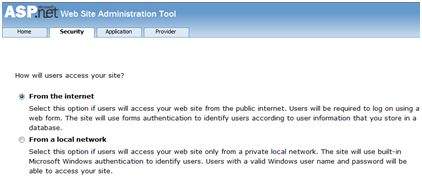
Step (3) : Select the authentication type to 'Forms based authentication' by selecting the 'From the Internet' radio button.
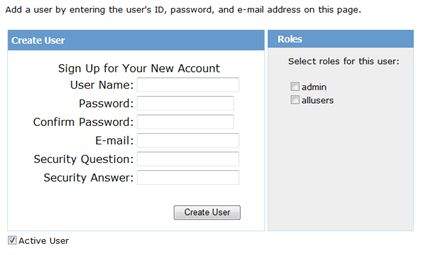
Step (4) : Click on 'Create Users' link to create some users. If you already had created roles, you could assign roles to the user, right at this stage.
Step (5) : Create a web site and add the following pages:
- Welcome.aspx
- Login.aspx
- CreateAccount.aspx
- PasswordRecovery.aspx
- ChangePassword.aspx
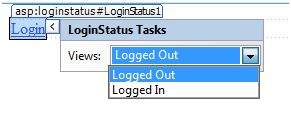
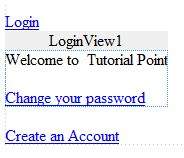
Step (6) : Place a LoginStatus control on the Welcome.aspx from the login section of the toolbox. It has two templates: LoggedIn and LoggedOut.
In LoggedOut template, there is a login link and in the LoggedIn template, there is a logout link on the control. You can change the login and logout text properties of the control from the Properties window.
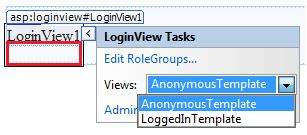
Step (7) : Place a LoginView control from the toolbox below the LoginStatus control. Here, you can put texts and other controls (hyperlinks, buttons etc.), which are displayed based on whether the user is logged in or not.
This control has two view templates: Anonymous template and LoggedIn template. Select each view and write some text for the users to be displayed for each template. The text should be placed on the area marked red.
Step (8) : The users for the application are created by the developer. You might want to allow a visitor to create a user account. For this, add a link beneath the LoginView control, which should link to the CreateAccount.aspx page.
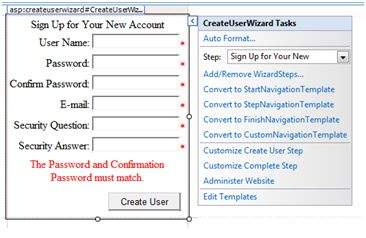
Step (9) : Place a CreateUserWizard control on the create account page. Set the ContinueDestinationPageUrl property of this control to Welcome.aspx.
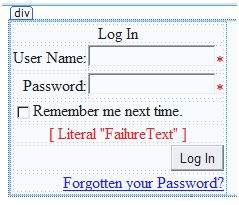
Step (10) : Create the Login page. Place a Login control on the page. The LoginStatus control automatically links to the Login.aspx. To change this default, make the following changes in the web.config file.
For example, if you want to name your log in page as signup.aspx, add the following lines to the <authentication> section of the web.config:
<configuration>
   <system.web>
      <authentication mode="Forms">
         <forms loginUrl ="signup.aspx" defaultUrl = Welcome.aspx />
      </authentication>
   </system.web>
</configuration>
Step (11) : Users often forget passwords. The PasswordRecovery control helps the user gain access to the account. Select the Login control. Open its smart tag and click 'Convert to Template'.
Customize the UI of the control to place a hyperlink control under the login button, which should link to the PassWordRecovery.aspx.
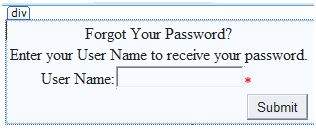
Step (12) : Place a PasswordRecovery control on the password recovery page. This control needs an email server to send the passwords to the users.
Step (13) : Create a link to the ChangePassword.aspx page in the LoggedIn template of the LoginView control in Welcome.aspx.
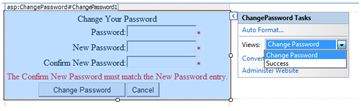
Step (14) : Place a ChangePassword control on the change password page. This control also has two views.
Now run the application and observe different security operations.
To create roles, go back to the Web Application Administration Tools and click on the Security tab. Click on 'Create Roles' and create some roles for the application.
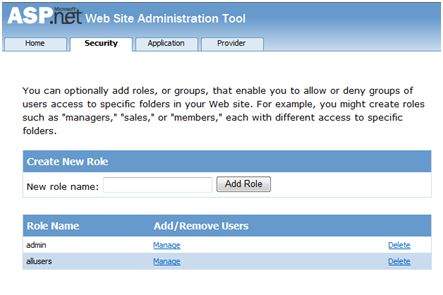
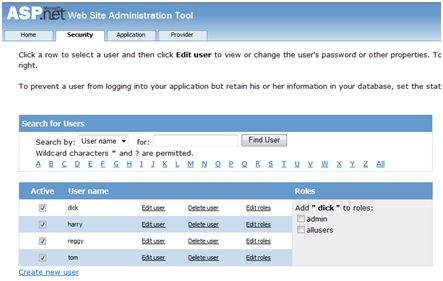
Click on the 'Manage Users' link and assign roles to the users.
IIS Authentication: SSL
The Secure Socket Layer or SSL is the protocol used to ensure a secure connection. With SSL enabled, the browser encrypts all data sent to the server and decrypts all data coming from the server. At the same time, the server encrypts and decrypts all data to and from browser.
The URL for a secure connection starts with HTTPS instead of HTTP. A small lock is displayed by a browser using a secure connection. When a browser makes an initial attempt to communicate with a server over a secure connection using SSL, the server authenticates itself by sending its digital certificate.
To use the SSL, you need to buy a digital secure certificate from a trusted Certification Authority (CA) and install it in the web server. Following are some of the trusted and reputed certification authorities:
- www.verisign.com
- www.geotrust.com
- www.thawte.com
SSL is built into all major browsers and servers. To enable SSL, you need to install the digital certificate. The strength of various digital certificates varies depending upon the length of the key generated during encryption. More the length, more secure is the certificate, hence the connection.
| Strength | Description |
|---|---|
| 40 bit | Supported by most browsers but easy to break. |
| 56 bit | Stronger than 40-bit. |
| 128 bit | Extremely difficult to break but all the browsers do not support it. |
