- ASP.NET - Home
- ASP.NET - Introduction
- ASP.NET - Environment
- ASP.NET - Life Cycle
- ASP.NET - First Example
- ASP.NET - Event Handling
- ASP.NET - Server Side
- ASP.NET - Server Controls
- ASP.NET - HTML Server
- ASP.NET - Client Side
- ASP.NET - Basic Controls
- ASP.NET - Directives
- ASP.NET - Managing State
- ASP.NET - Validators
- ASP.NET - Database Access
- ASP.NET - ADO.net
- ASP.NET - File Uploading
- ASP.NET - Ad Rotator
- ASP.NET - Calendars
- ASP.NET - Multi Views
- ASP.NET - Panel Controls
- ASP.NET - AJAX Control
- ASP.NET - Data Sources
- ASP.NET - Data Binding
- ASP.NET - Custom Controls
- ASP.NET - Personalization
- ASP.NET - Error Handling
- ASP.NET - Debugging
- ASP.NET - LINQ
- ASP.NET - Security
- ASP.NET - Data Caching
- ASP.NET - Web Services
- ASP.NET - Multi Threading
- ASP.NET - Configuration
- ASP.NET - Deployment
ASP.NET - Quick Guide
ASP.NET - Introduction
What is ASP.NET?
ASP.NET is a web development platform, which provides a programming model, a comprehensive software infrastructure and various services required to build up robust web applications for PC, as well as mobile devices.
ASP.NET works on top of the HTTP protocol, and uses the HTTP commands and policies to set a browser-to-server bilateral communication and cooperation.
ASP.NET is a part of Microsoft .Net platform. ASP.NET applications are compiled codes, written using the extensible and reusable components or objects present in .Net framework. These codes can use the entire hierarchy of classes in .Net framework.
The ASP.NET application codes can be written in any of the following languages:
- C#
- Visual Basic.Net
- Jscript
- J#
ASP.NET is used to produce interactive, data-driven web applications over the internet. It consists of a large number of controls such as text boxes, buttons, and labels for assembling, configuring, and manipulating code to create HTML pages.
ASP.NET Web Forms Model
ASP.NET web forms extend the event-driven model of interaction to the web applications. The browser submits a web form to the web server and the server returns a full markup page or HTML page in response.
All client side user activities are forwarded to the server for stateful processing. The server processes the output of the client actions and triggers the reactions.
Now, HTTP is a stateless protocol. ASP.NET framework helps in storing the information regarding the state of the application, which consists of:
- Page state
- Session state
The page state is the state of the client, i.e., the content of various input fields in the web form. The session state is the collective information obtained from various pages the user visited and worked with, i.e., the overall session state. To clear the concept, let us take an example of a shopping cart.
User adds items to a shopping cart. Items are selected from a page, say the items page, and the total collected items and price are shown on a different page, say the cart page. Only HTTP cannot keep track of all the information coming from various pages. ASP.NET session state and server side infrastructure keeps track of the information collected globally over a session.
The ASP.NET runtime carries the page state to and from the server across page requests while generating ASP.NET runtime codes, and incorporates the state of the server side components in hidden fields.
This way, the server becomes aware of the overall application state and operates in a two-tiered connected way.
The ASP.NET Component Model
The ASP.NET component model provides various building blocks of ASP.NET pages. Basically it is an object model, which describes:
Server side counterparts of almost all HTML elements or tags, such as <form> and <input>.
Server controls, which help in developing complex user-interface. For example, the Calendar control or the Gridview control.
ASP.NET is a technology, which works on the .Net framework that contains all web-related functionalities. The .Net framework is made of an object-oriented hierarchy. An ASP.NET web application is made of pages. When a user requests an ASP.NET page, the IIS delegates the processing of the page to the ASP.NET runtime system.
The ASP.NET runtime transforms the .aspx page into an instance of a class, which inherits from the base class page of the .Net framework. Therefore, each ASP.NET page is an object and all its components i.e., the server-side controls are also objects.
Components of .Net Framework 3.5
Before going to the next session on Visual Studio.Net, let us go through at the various components of the .Net framework 3.5. The following table describes the components of the .Net framework 3.5 and the job they perform:
| Components and their Description |
|---|
|
(1) Common Language Runtime or CLR It performs memory management, exception handling, debugging, security checking, thread execution, code execution, code safety, verification, and compilation. The code that is directly managed by the CLR is called the managed code. When the managed code is compiled, the compiler converts the source code into a CPU independent intermediate language (IL) code. A Just In Time(JIT) compiler compiles the IL code into native code, which is CPU specific. |
|
(2) .Net Framework Class Library It contains a huge library of reusable types. classes, interfaces, structures, and enumerated values, which are collectively called types. |
|
(3) Common Language Specification It contains the specifications for the .Net supported languages and implementation of language integration. |
|
(4) Common Type System It provides guidelines for declaring, using, and managing types at runtime, and cross-language communication. |
|
(5) Metadata and Assemblies Metadata is the binary information describing the program, which is either stored in a portable executable file (PE) or in the memory. Assembly is a logical unit consisting of the assembly manifest, type metadata, IL code, and a set of resources like image files. |
|
(6) Windows Forms Windows Forms contain the graphical representation of any window displayed in the application. |
|
(7) ASP.NET and ASP.NET AJAX ASP.NET is the web development model and AJAX is an extension of ASP.NET for developing and implementing AJAX functionality. ASP.NET AJAX contains the components that allow the developer to update data on a website without a complete reload of the page. |
|
(8) ADO.NET It is the technology used for working with data and databases. It provides access to data sources like SQL server, OLE DB, XML etc. The ADO.NET allows connection to data sources for retrieving, manipulating, and updating data. |
|
(9) Windows Workflow Foundation (WF) It helps in building workflow-based applications in Windows. It contains activities, workflow runtime, workflow designer, and a rules engine. |
|
(10)Windows Presentation Foundation It provides a separation between the user interface and the business logic. It helps in developing visually stunning interfaces using documents, media, two and three dimensional graphics, animations, and more. |
|
(11) Windows Communication Foundation (WCF) It is the technology used for building and executing connected systems. |
|
(12) Windows CardSpace It provides safety for accessing resources and sharing personal information on the internet. |
|
(13) LINQ It imparts data querying capabilities to .Net languages using a syntax which is similar to the tradition query language SQL. |
ASP.NET - Environment Setup
ASP.NET provides an abstraction layer on top of HTTP on which the web applications are built. It provides high-level entities such as classes and components within an object-oriented paradigm.
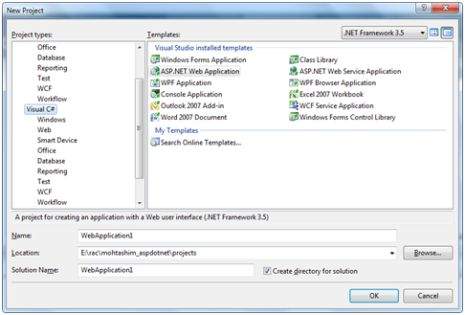
The key development tool for building ASP.NET applications and front ends is Visual Studio. In this tutorial, we work with Visual Studio 2008.
Visual Studio is an integrated development environment for writing, compiling, and debugging the code. It provides a complete set of development tools for building ASP.NET web applications, web services, desktop applications, and mobile applications.
The Visual Studio IDE
The new project window allows choosing an application template from the available templates.
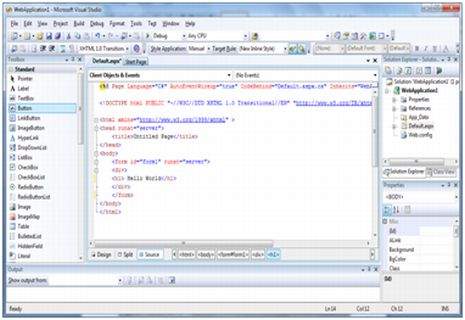
When you start a new web site, ASP.NET provides the starting folders and files for the site, including two files for the first web form of the site.
The file named Default.aspx contains the HTML and asp code that defines the form, and the file named Default.aspx.cs (for C# coding) or the file named Default.aspx.vb (for VB coding) contains the code in the language you have chosen and this code is responsible for the actions performed on a form.
The primary window in the Visual Studio IDE is the Web Forms Designer window. Other supporting windows are the Toolbox, the Solution Explorer, and the Properties window. You use the designer to design a web form, to add code to the control on the form so that the form works according to your need, you use the code editor.
Working with Views and Windows
You can work with windows in the following ways:
To change the Web Forms Designer from one view to another, click on the Design or source button.
To close a window, click on the close button on the upper right corner and to redisplay, select it from the View menu.
To hide a window, click on its Auto Hide button. The window then changes into a tab. To display again, click the Auto Hide button again.
To change the size of a window, just drag it.
Adding Folders and Files to your Website
When a new web form is created, Visual Studio automatically generates the starting HTML for the form and displays it in Source view of the web forms designer. The Solution Explorer is used to add any other files, folders or any existing item on the web site.
To add a standard folder, right-click on the project or folder under which you are going to add the folder in the Solution Explorer and choose New Folder.
To add an ASP.NET folder, right-click on the project in the Solution Explorer and select the folder from the list.
To add an existing item to the site, right-click on the project or folder under which you are going to add the item in the Solution Explorer and select from the dialog box.
Projects and Solutions
A typical ASP.NET application consists of many items: the web content files (.aspx), source files (.cs files), assemblies (.dll and .exe files), data source files (.mdb files), references, icons, user controls and miscellaneous other files and folders. All these files that make up the website are contained in a Solution.
When a new website is created. VB2008 automatically creates the solution and displays it in the solution explorer.
Solutions may contain one or more projects. A project contains content files, source files, and other files like data sources and image files. Generally, the contents of a project are compiled into an assembly as an executable file (.exe) or a dynamic link library (.dll) file.
Typically a project contains the following content files:
- Page file (.aspx)
- User control (.ascx)
- Web service (.asmx)
- Master page (.master)
- Site map (.sitemap)
- Website configuration file (.config)
Building and Running a Project
You can execute an application by:
- Selecting Start
- Selecting Start Without Debugging from the Debug menu,
- pressing F5
- Ctrl-F5
The program is built meaning, the .exe or the .dll files are generated by selecting a command from the Build menu.
ASP.NET - Life Cycle
ASP.NET life cycle specifies, how:
- ASP.NET processes pages to produce dynamic output
- The application and its pages are instantiated and processed
- ASP.NET compiles the pages dynamically
The ASP.NET life cycle could be divided into two groups:
- Application Life Cycle
- Page Life Cycle
ASP.NET Application Life Cycle
The application life cycle has the following stages:
User makes a request for accessing application resource, a page. Browser sends this request to the web server.
A unified pipeline receives the first request and the following events take place:
An object of the class ApplicationManager is created.
An object of the class HostingEnvironment is created to provide information regarding the resources.
Top level items in the application are compiled.
Response objects are created. The application objects such as HttpContext, HttpRequest and HttpResponse are created and initialized.
An instance of the HttpApplication object is created and assigned to the request.
The request is processed by the HttpApplication class. Different events are raised by this class for processing the request.
ASP.NET Page Life Cycle
When a page is requested, it is loaded into the server memory, processed, and sent to the browser. Then it is unloaded from the memory. At each of these steps, methods and events are available, which could be overridden according to the need of the application. In other words, you can write your own code to override the default code.
The Page class creates a hierarchical tree of all the controls on the page. All the components on the page, except the directives, are part of this control tree. You can see the control tree by adding trace= "true" to the page directive. We will cover page directives and tracing under 'directives' and 'event handling'.
The page life cycle phases are:
- Initialization
- Instantiation of the controls on the page
- Restoration and maintenance of the state
- Execution of the event handler codes
- Page rendering
Understanding the page cycle helps in writing codes for making some specific thing happen at any stage of the page life cycle. It also helps in writing custom controls and initializing them at right time, populate their properties with view-state data and run control behavior code.
Following are the different stages of an ASP.NET page:
Page request - When ASP.NET gets a page request, it decides whether to parse and compile the page, or there would be a cached version of the page; accordingly the response is sent.
Starting of page life cycle - At this stage, the Request and Response objects are set. If the request is an old request or post back, the IsPostBack property of the page is set to true. The UICulture property of the page is also set.
Page initialization - At this stage, the controls on the page are assigned unique ID by setting the UniqueID property and the themes are applied. For a new request, postback data is loaded and the control properties are restored to the view-state values.
Page load - At this stage, control properties are set using the view state and control state values.
Validation - Validate method of the validation control is called and on its successful execution, the IsValid property of the page is set to true.
Postback event handling - If the request is a postback (old request), the related event handler is invoked.
Page rendering - At this stage, view state for the page and all controls are saved. The page calls the Render method for each control and the output of rendering is written to the OutputStream class of the Response property of page.
Unload - The rendered page is sent to the client and page properties, such as Response and Request, are unloaded and all cleanup done.
ASP.NET Page Life Cycle Events
At each stage of the page life cycle, the page raises some events, which could be coded. An event handler is basically a function or subroutine, bound to the event, using declarative attributes such as Onclick or handle.
Following are the page life cycle events:
PreInit - PreInit is the first event in page life cycle. It checks the IsPostBack property and determines whether the page is a postback. It sets the themes and master pages, creates dynamic controls, and gets and sets profile property values. This event can be handled by overloading the OnPreInit method or creating a Page_PreInit handler.
Init - Init event initializes the control property and the control tree is built. This event can be handled by overloading the OnInit method or creating a Page_Init handler.
InitComplete - InitComplete event allows tracking of view state. All the controls turn on view-state tracking.
LoadViewState - LoadViewState event allows loading view state information into the controls.
LoadPostData - During this phase, the contents of all the input fields are defined with the <form> tag are processed.
PreLoad - PreLoad occurs before the post back data is loaded in the controls. This event can be handled by overloading the OnPreLoad method or creating a Page_PreLoad handler.
Load - The Load event is raised for the page first and then recursively for all child controls. The controls in the control tree are created. This event can be handled by overloading the OnLoad method or creating a Page_Load handler.
LoadComplete - The loading process is completed, control event handlers are run, and page validation takes place. This event can be handled by overloading the OnLoadComplete method or creating a Page_LoadComplete handler
PreRender - The PreRender event occurs just before the output is rendered. By handling this event, pages and controls can perform any updates before the output is rendered.
PreRenderComplete - As the PreRender event is recursively fired for all child controls, this event ensures the completion of the pre-rendering phase.
SaveStateComplete - State of control on the page is saved. Personalization, control state and view state information is saved. The HTML markup is generated. This stage can be handled by overriding the Render method or creating a Page_Render handler.
UnLoad - The UnLoad phase is the last phase of the page life cycle. It raises the UnLoad event for all controls recursively and lastly for the page itself. Final cleanup is done and all resources and references, such as database connections, are freed. This event can be handled by modifying the OnUnLoad method or creating a Page_UnLoad handler.
ASP.NET - First Example
An ASP.NET page is made up of a number of server controls along with HTML controls, text, and images. Sensitive data from the page and the states of different controls on the page are stored in hidden fields that form the context of that page request.
ASP.NET runtime controls the association between a page instance and its state. An ASP.NET page is an object of the Page or inherited from it.
All the controls on the pages are also objects of the related control class inherited from a parent Control class. When a page is run, an instance of the object page is created along with all its content controls.
An ASP.NET page is also a server side file saved with the .aspx extension. It is modular in nature and can be divided into the following core sections:
- Page Directives
- Code Section
- Page Layout
Page Directives
The page directives set up the environment for the page to run. The @Page directive defines page-specific attributes used by ASP.NET page parser and compiler. Page directives specify how the page should be processed, and which assumptions need to be taken about the page.
It allows importing namespaces, loading assemblies, and registering new controls with custom tag names and namespace prefixes.
Code Section
The code section provides the handlers for the page and control events along with other functions required. We mentioned that, ASP.NET follows an object model. Now, these objects raise events when some events take place on the user interface, like a user clicks a button or moves the cursor. The kind of response these events need to reciprocate is coded in the event handler functions. The event handlers are nothing but functions bound to the controls.
The code section or the code behind file provides all these event handler routines, and other functions used by the developer. The page code could be precompiled and deployed in the form of a binary assembly.
Page Layout
The page layout provides the interface of the page. It contains the server controls, text, inline JavaScript, and HTML tags.
The following code snippet provides a sample ASP.NET page explaining Page directives, code section and page layout written in C#:
<!-- directives -->
<% @Page Language="C#" %>
<!-- code section -->
<script runat="server">
private void convertoupper(object sender, EventArgs e)
{
string str = mytext.Value;
changed_text.InnerHtml = str.ToUpper();
}
</script>
<!-- Layout -->
<html>
<head> <title> Change to Upper Case </title>
</head>
<body>
<h3> Conversion to Upper Case </h3>
<form runat="server">
<input runat="server" id="mytext" type="text" />
<input runat="server" id="button1" type="submit"
value="Enter..." OnServerClick="convertoupper"/>
<hr />
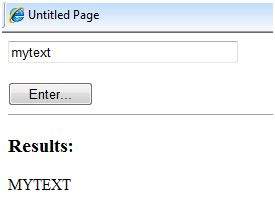
<h3> Results: </h3>
<span runat="server" id="changed_text" />
</form>
</body>
</html>
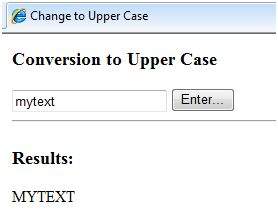
Copy this file to the web server root directory. Generally it is c:\iNETput\wwwroot. Open the file from the browser to execute it and it generates following result:
Using Visual Studio IDE
Let us develop the same example using Visual Studio IDE. Instead of typing the code, you can just drag the controls into the design view:
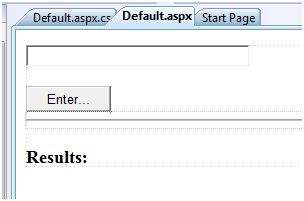
The content file is automatically developed. All you need to add is the Button1_Click routine, which is as follows:
protected void Button1_Click(object sender, EventArgs e)
{
   string buf = TextBox1.Text;
   changed_text.InnerHtml = buf.ToUpper();
}
The content file code is as given:
<%@ Page Language="C#" AutoEventWireup="true" CodeBehind="Default.aspx.cs"
   Inherits="firstexample._Default" %>

<!DOCTYPE html PUBLIC "-//W3C//DTD XHTML 1.0 Transitional//EN"
   "http://www.w3.org/TR/xhtml1/DTD/xhtml1-transitional.dtd">

<html xmlns="http://www.w3.org/1999/xhtml" >
   <head runat="server">
      <title>
         Untitled Page
      </title>
   </head>
   <body>
      <form id="form1" runat="server">
         <div>
            <asp:TextBox ID="TextBox1" runat="server" style="width:224px">
            </asp:TextBox>
            <br />
            <br />
            <asp:Button ID="Button1" runat="server" Text="Enter..."
               style="width:85px" onclick="Button1_Click" />
            <hr />
            <h3> Results: </h3>
            <span runat="server" id="changed_text" />
         </div>
      </form>
   </body>
</html>
Execute the example by right clicking on the design view and choosing 'View in Browser' from the popup menu. This generates the following result:
ASP.NET - Event Handling
What is an Event?
An event is an action or occurrence such as a mouse click, a key press, mouse movements, or any system-generated notification. A process communicates through events. For example, interrupts are system-generated events. When events occur, the application should be able to respond to it and manage it.
Events in ASP.NET raised at the client machine, and handled at the server machine. For example, a user clicks a button displayed in the browser. A Click event is raised. The browser handles this client-side event by posting it to the server.
The server has a subroutine describing what to do when the event is raised; it is called the event-handler. Therefore, when the event message is transmitted to the server, it checks whether the Click event has an associated event handler. If it has, the event handler is executed.
Event Arguments
ASP.NET event handlers generally take two parameters and return void. The first parameter represents the object raising the event and the second parameter is event argument.
The general syntax of an event is:
private void EventName (object sender, EventArgs e);
Application and Session Events
The most important application events are:
Application_Start - It is raised when the application/website is started.
Application_End - It is raised when the application/website is stopped.
Similarly, the most used Session events are:
Session_Start - It is raised when a user first requests a page from the application.
Session_End - It is raised when the session ends.
Page and Control Events
Common page and control events are:
DataBinding - It is raised when a control binds to a data source.
Disposed - It is raised when the page or the control is released.
Error - It is a page event, occurs when an unhandled exception is thrown.
Init - It is raised when the page or the control is initialized.
Load - It is raised when the page or a control is loaded.
PreRender - It is raised when the page or the control is to be rendered.
Unload - It is raised when the page or control is unloaded from memory.
Event Handling Using Controls
All ASP.NET controls are implemented as classes, and they have events which are fired when a user performs a certain action on them. For example, when a user clicks a button the 'Click' event is generated. For handling events, there are in-built attributes and event handlers. Event handler is coded to respond to an event, and take appropriate action on it.
By default, Visual Studio creates an event handler by including a Handles clause on the Sub procedure. This clause names the control and event that the procedure handles.
The ASP tag for a button control:
<asp:Button ID="btnCancel" runat="server" Text="Cancel" />
The event handler for the Click event:
Protected Sub btnCancel_Click(ByVal sender As Object, ByVal e As System.EventArgs)
Handles btnCancel.Click
End Sub
An event can also be coded without Handles clause. Then, the handler must be named according to the appropriate event attribute of the control.
The ASP tag for a button control:
<asp:Button ID="btnCancel" runat="server" Text="Cancel"
   Onclick="btnCancel_Click" />
The event handler for the Click event:
Protected Sub btnCancel_Click(ByVal sender As Object, ByVal e As System.EventArgs)
End Sub
The common control events are:
| Event | Attribute | Controls |
|---|---|---|
| Click | OnClick | Button, image button, link button, image map |
| Command | OnCommand | Button, image button, link button |
| TextChanged | OnTextChanged | Text box |
| SelectedIndexChanged | OnSelectedIndexChanged | Drop-down list, list box, radio button list, check box list. |
| CheckedChanged | OnCheckedChanged | Check box, radio button |
Some events cause the form to be posted back to the server immediately, these are called the postback events. For example, the click event such as, Button.Click.
Some events are not posted back to the server immediately, these are called non-postback events.
For example, the change events or selection events such as TextBox.TextChanged or CheckBox.CheckedChanged. The nonpostback events could be made to post back immediately by setting their AutoPostBack property to true.
Default Events
The default event for the Page object is Load event. Similarly, every control has a default event. For example, default event for the button control is the Click event.
The default event handler could be created in Visual Studio, just by double clicking the control in design view. The following table shows some of the default events for common controls:
| Control | Default Event |
|---|---|
| AdRotator | AdCreated |
| BulletedList | Click |
| Button | Click |
| Calender | SelectionChanged |
| CheckBox | CheckedChanged |
| CheckBoxList | SelectedIndexChanged |
| DataGrid | SelectedIndexChanged |
| DataList | SelectedIndexChanged |
| DropDownList | SelectedIndexChanged |
| HyperLink | Click |
| ImageButton | Click |
| ImageMap | Click |
| LinkButton | Click |
| ListBox | SelectedIndexChanged |
| Menu | MenuItemClick |
| RadioButton | CheckedChanged |
| RadioButtonList | SelectedIndexChanged |
Example
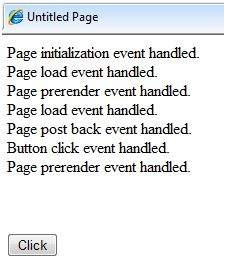
This example includes a simple page with a label control and a button control on it. As the page events such as Page_Load, Page_Init, Page_PreRender etc. take place, it sends a message, which is displayed by the label control. When the button is clicked, the Button_Click event is raised and that also sends a message to be displayed on the label.
Create a new website and drag a label control and a button control on it from the control tool box. Using the properties window, set the IDs of the controls as .lblmessage. and .btnclick. respectively. Set the Text property of the Button control as 'Click'.
The markup file (.aspx):
<%@ Page Language="C#" AutoEventWireup="true" CodeBehind="Default.aspx.cs"
   Inherits="eventdemo._Default" %>

<!DOCTYPE html PUBLIC "-//W3C//DTD XHTML 1.0 Transitional//EN"
   "http://www.w3.org/TR/xhtml1/DTD/xhtml1-transitional.dtd">

<html xmlns="http://www.w3.org/1999/xhtml" >
   <head runat="server">
      <title>Untitled Page</title>
   </head>
   <body>
      <form id="form1" runat="server">
         <div>
            <asp:Label ID="lblmessage" runat="server" >
            </asp:Label>
            <br />
            <br />
            <br />
            <asp:Button ID="btnclick" runat="server" Text="Click"
               onclick="btnclick_Click" />
         </div>
      </form>
   </body>
</html>
Double click on the design view to move to the code behind file. The Page_Load event is automatically created without any code in it. Write down the following self-explanatory code lines:
using System;
using System.Collections;
using System.Configuration;
using System.Data;
using System.Linq;
using System.Web;
using System.Web.Security;
using System.Web.UI;
using System.Web.UI.HtmlControls;
using System.Web.UI.WebControls;
using System.Web.UI.WebControls.WebParts;
using System.Xml.Linq;

namespace eventdemo
{
   public partial class _Default : System.Web.UI.Page{
      protected void Page_Load(object sender, EventArgs e)
      {
         lblmessage.Text += "Page load event handled. <br />";
         if (Page.IsPostBack)
         {
            lblmessage.Text += "Page post back event handled.<br/>";
         }
      }
      protected void Page_Init(object sender, EventArgs e){
         lblmessage.Text += "Page initialization event handled.<br/>";
      }
      protected void Page_PreRender(object sender, EventArgs e)
      {
         lblmessage.Text += "Page prerender event handled. <br/>";
      }
      protected void btnclick_Click(object sender, EventArgs e)
      {
         lblmessage.Text += "Button click event handled. <br/>";
      }
   }
}
Execute the page. The label shows page load, page initialization and, the page pre-render events. Click the button to see effect:
ASP.NET - Server Side
We have studied the page life cycle and how a page contains various controls. The page itself is instantiated as a control object. All web forms are basically instances of the ASP.NET Page class. The page class has the following extremely useful properties that correspond to intrinsic objects:
- Session
- Application
- Cache
- Request
- Response
- Server
- User
- Trace
We will discuss each of these objects in due time. In this tutorial we will explore the Server object, the Request object, and the Response object.
Server Object
The Server object in Asp.NET is an instance of the System.Web.HttpServerUtility class. The HttpServerUtility class provides numerous properties and methods to perform various jobs.
Properties and Methods of the Server object
The methods and properties of the HttpServerUtility class are exposed through the intrinsic Server object provided by ASP.NET.
The following table provides a list of the properties:
| Property | Description |
|---|---|
| MachineName | Name of server computer |
| ScriptTimeOut | Gets and sets the request time-out value in seconds. |
The following table provides a list of some important methods:
| Method | Description |
|---|---|
| CreateObject(String) | Creates an instance of the COM object identified by its ProgID (Programmatic ID). |
| CreateObject(Type) | Creates an instance of the COM object identified by its Type. |
| Equals(Object) | Determines whether the specified Object is equal to the current Object. |
| Execute(String) | Executes the handler for the specified virtual path in the context of the current request. |
| Execute(String, Boolean) | Executes the handler for the specified virtual path in the context of the current request and specifies whether to clear the QueryString and Form collections. |
| GetLastError | Returns the previous exception. |
| GetType | Gets the Type of the current instance. |
| HtmlEncode | Changes an ordinary string into a string with legal HTML characters. |
| HtmlDecode | Converts an Html string into an ordinary string. |
| ToString | Returns a String that represents the current Object. |
| Transfer(String) | For the current request, terminates execution of the current page and starts execution of a new page by using the specified URL path of the page. |
| UrlDecode | Converts an URL string into an ordinary string. |
| UrlEncodeToken | Works same as UrlEncode, but on a byte array that contains Base64-encoded data. |
| UrlDecodeToken | Works same as UrlDecode, but on a byte array that contains Base64-encoded data. |
| MapPath | Return the physical path that corresponds to a specified virtual file path on the server. |
| Transfer | Transfers execution to another web page in the current application. |
Request Object
The request object is an instance of the System.Web.HttpRequest class. It represents the values and properties of the HTTP request that makes the page loading into the browser.
The information presented by this object is wrapped by the higher level abstractions (the web control model). However, this object helps in checking some information such as the client browser and cookies.
Properties and Methods of the Request Object
The following table provides some noteworthy properties of the Request object:
| Property | Description |
|---|---|
| AcceptTypes | Gets a string array of client-supported MIME accept types. |
| ApplicationPath | Gets the ASP.NET application's virtual application root path on the server. |
| Browser | Gets or sets information about the requesting client's browser capabilities. |
| ContentEncoding | Gets or sets the character set of the entity-body. |
| ContentLength | Specifies the length, in bytes, of content sent by the client. |
| ContentType | Gets or sets the MIME content type of the incoming request. |
| Cookies | Gets a collection of cookies sent by the client. |
| FilePath | Gets the virtual path of the current request. |
| Files | Gets the collection of files uploaded by the client, in multipart MIME format. |
| Form | Gets a collection of form variables. |
| Headers | Gets a collection of HTTP headers. |
| HttpMethod | Gets the HTTP data transfer method (such as GET, POST, or HEAD) used by the client. |
| InputStream | Gets the contents of the incoming HTTP entity body. |
| IsSecureConnection | Gets a value indicating whether the HTTP connection uses secure sockets (that is, HTTPS). |
| QueryString | Gets the collection of HTTP query string variables. |
| RawUrl | Gets the raw URL of the current request. |
| RequestType | Gets or sets the HTTP data transfer method (GET or POST) used by the client. |
| ServerVariables | Gets a collection of Web server variables. |
| TotalBytes | Gets the number of bytes in the current input stream. |
| Url | Gets information about the URL of the current request. |
| UrlReferrer | Gets information about the URL of the client's previous request that is linked to the current URL. |
| UserAgent | Gets the raw user agent string of the client browser. |
| UserHostAddress | Gets the IP host address of the remote client. |
| UserHostName | Gets the DNS name of the remote client. |
| UserLanguages | Gets a sorted string array of client language preferences. |
The following table provides a list of some important methods:
| Method | Description |
|---|---|
| BinaryRead | Performs a binary read of a specified number of bytes from the current input stream. |
| Equals(Object) | Determines whether the specified object is equal to the current object. (Inherited from object.) |
| GetType | Gets the Type of the current instance. |
| MapImageCoordinates | Maps an incoming image-field form parameter to appropriate x-coordinate and y-coordinate values. |
| MapPath(String) | Maps the specified virtual path to a physical path. |
| SaveAs | Saves an HTTP request to disk. |
| ToString | Returns a String that represents the current object. |
| ValidateInput | Causes validation to occur for the collections accessed through the Cookies, Form, and QueryString properties. |
Response Object
The Response object represents the server's response to the client request. It is an instance of the System.Web.HttpResponse class.
In ASP.NET, the response object does not play any vital role in sending HTML text to the client, because the server-side controls have nested, object oriented methods for rendering themselves.
However, the HttpResponse object still provides some important functionalities, like the cookie feature and the Redirect() method. The Response.Redirect() method allows transferring the user to another page, inside as well as outside the application. It requires a round trip.
Properties and Methods of the Response Object
The following table provides some noteworthy properties of the Response object:
| Property | Description |
|---|---|
| Buffer | Gets or sets a value indicating whether to buffer the output and send it after the complete response is finished processing. |
| BufferOutput | Gets or sets a value indicating whether to buffer the output and send it after the complete page is finished processing. |
| Charset | Gets or sets the HTTP character set of the output stream. |
| ContentEncoding | Gets or sets the HTTP character set of the output stream. |
| ContentType | Gets or sets the HTTP MIME type of the output stream. |
| Cookies | Gets the response cookie collection. |
| Expires | Gets or sets the number of minutes before a page cached on a browser expires. |
| ExpiresAbsolute | Gets or sets the absolute date and time at which to remove cached information from the cache. |
| HeaderEncoding | Gets or sets an encoding object that represents the encoding for the current header output stream. |
| Headers | Gets the collection of response headers. |
| IsClientConnected | Gets a value indicating whether the client is still connected to the server. |
| Output | Enables output of text to the outgoing HTTP response stream. |
| OutputStream | Enables binary output to the outgoing HTTP content body. |
| RedirectLocation | Gets or sets the value of the Http Location header. |
| Status | Sets the status line that is returned to the client. |
| StatusCode | Gets or sets the HTTP status code of the output returned to the client. |
| StatusDescription | Gets or sets the HTTP status string of the output returned to the client. |
| SubStatusCode | Gets or sets a value qualifying the status code of the response. |
| SuppressContent | Gets or sets a value indicating whether to send HTTP content to the client. |
The following table provides a list of some important methods:
| Method | Description |
|---|---|
| AddHeader | Adds an HTTP header to the output stream. AddHeader is provided for compatibility with earlier versions of ASP. |
| AppendCookie | Infrastructure adds an HTTP cookie to the intrinsic cookie collection. |
| AppendHeader | Adds an HTTP header to the output stream. |
| AppendToLog | Adds custom log information to the InterNET Information Services (IIS) log file. |
| BinaryWrite | Writes a string of binary characters to the HTTP output stream. |
| ClearContent | Clears all content output from the buffer stream. |
| Close | Closes the socket connection to a client. |
| End | Sends all currently buffered output to the client, stops execution of the page, and raises the EndRequest event. |
| Equals(Object) | Determines whether the specified object is equal to the current object. |
| Flush | Sends all currently buffered output to the client. |
| GetType | Gets the Type of the current instance. |
| Pics | Appends a HTTP PICS-Label header to the output stream. |
| Redirect(String) | Redirects a request to a new URL and specifies the new URL. |
| Redirect(String, Boolean) | Redirects a client to a new URL. Specifies the new URL and whether execution of the current page should terminate. |
| SetCookie | Updates an existing cookie in the cookie collection. |
| ToString | Returns a String that represents the current Object. |
| TransmitFile(String) | Writes the specified file directly to an HTTP response output stream, without buffering it in memory. |
| Write(Char) | Writes a character to an HTTP response output stream. |
| Write(Object) | Writes an object to an HTTP response stream. |
| Write(String) | Writes a string to an HTTP response output stream. |
| WriteFile(String) | Writes the contents of the specified file directly to an HTTP response output stream as a file block. |
| WriteFile(String, Boolean) | Writes the contents of the specified file directly to an HTTP response output stream as a memory block. |
Example
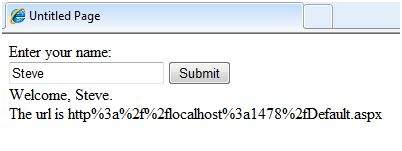
The following simple example has a text box control where the user can enter name, a button to send the information to the server, and a label control to display the URL of the client computer.
The content file:
<%@ Page Language="C#" AutoEventWireup="true" CodeBehind="Default.aspx.cs"
   Inherits="server_side._Default" %>

<!DOCTYPE html PUBLIC "-//W3C//DTD XHTML 1.0 Transitional//EN"
   "http://www.w3.org/TR/xhtml1/DTD/xhtml1-transitional.dtd">

<html xmlns="http://www.w3.org/1999/xhtml" >
   <head runat="server">
      <title>Untitled Page</title>
   </head>
   <body>
      <form id="form1" runat="server">
         <div>
            Enter your name:<br />
            <asp:TextBox ID="TextBox1" runat="server"></asp:TextBox>
            <asp:Button ID="Button1" runat="server"
               OnClick="Button1_Click" Text="Submit" />
            <br />
            <asp:Label ID="Label1" runat="server"/>

         </div>
      </form>
   </body>
</html>
The code behind Button1_Click:
protected void Button1_Click(object sender, EventArgs e)
{
   if (!String.IsNullOrEmpty(TextBox1.Text))
   {
      // Access the HttpServerUtility methods through
      // the intrinsic Server object.
      Label1.Text = "Welcome, " + Server.HtmlEncode(TextBox1.Text) +
         ".<br/> The url is " + Server.UrlEncode(Request.Url.ToString())
   }
}
Run the page to see the following result:
ASP.NET - Server Controls
Controls are small building blocks of the graphical user interface, which include text boxes, buttons, check boxes, list boxes, labels, and numerous other tools. Using these tools, the users can enter data, make selections and indicate their preferences.
Controls are also used for structural jobs, like validation, data access, security, creating master pages, and data manipulation.
ASP.NET uses five types of web controls, which are:
- HTML controls
- HTML Server controls
- ASP.NET Server controls
- ASP.NET Ajax Server controls
- User controls and custom controls
ASP.NET server controls are the primary controls used in ASP.NET. These controls can be grouped into the following categories:
Validation controls - These are used to validate user input and they work by running client-side script.
Data source controls - These controls provides data binding to different data sources.
Data view controls - These are various lists and tables, which can bind to data from data sources for displaying.
Personalization controls - These are used for personalization of a page according to the user preferences, based on user information.
Login and security controls - These controls provide user authentication.
Master pages - These controls provide consistent layout and interface throughout the application.
Navigation controls - These controls help in navigation. For example, menus, tree view etc.
Rich controls - These controls implement special features. For example, AdRotator, FileUpload, and Calendar control.
The syntax for using server controls is:
<asp:controlType  ID ="ControlID" runat="server"
   Property1=value1  [Property2=value2] />
In addition, visual studio has the following features, to help produce in error-free coding:
- Dragging and dropping of controls in design view
- IntelliSense feature that displays and auto-completes the properties
- The properties window to set the property values directly
Properties of the Server Controls
ASP.NET server controls with a visual aspect are derived from the WebControl class and inherit all the properties, events, and methods of this class.
The WebControl class itself and some other server controls that are not visually rendered are derived from the System.Web.UI.Control class. For example, PlaceHolder control or XML control.
ASP.Net server controls inherit all properties, events, and methods of the WebControl and System.Web.UI.Control class.
The following table shows the inherited properties, common to all server controls:
| Property | Description |
|---|---|
| AccessKey | Pressing this key with the Alt key moves focus to the control. |
| Attributes | It is the collection of arbitrary attributes (for rendering only) that do not correspond to properties on the control. |
| BackColor | Background color. |
| BindingContainer | The control that contains this control's data binding. |
| BorderColor | Border color. |
| BorderStyle | Border style. |
| BorderWidth | Border width. |
| CausesValidation | Indicates if it causes validation. |
| ChildControlCreated | It indicates whether the server control's child controls have been created. |
| ClientID | Control ID for HTML markup. |
| Context | The HttpContext object associated with the server control. |
| Controls | Collection of all controls contained within the control. |
| ControlStyle | The style of the Web server control. |
| CssClass | CSS class |
| DataItemContainer | Gets a reference to the naming container if the naming container implements IDataItemContainer. |
| DataKeysContainer | Gets a reference to the naming container if the naming container implements IDataKeysControl. |
| DesignMode | It indicates whether the control is being used on a design surface. |
| DisabledCssClass | Gets or sets the CSS class to apply to the rendered HTML element when the control is disabled. |
| Enabled | Indicates whether the control is grayed out. |
| EnableTheming | Indicates whether theming applies to the control. |
| EnableViewState | Indicates whether the view state of the control is maintained. |
| Events | Gets a list of event handler delegates for the control. |
| Font | Font. |
| Forecolor | Foreground color. |
| HasAttributes | Indicates whether the control has attributes set. |
| HasChildViewState | Indicates whether the current server control's child controls have any saved view-state settings. |
| Height | Height in pixels or %. |
| ID | Identifier for the control. |
| IsChildControlStateCleared | Indicates whether controls contained within this control have control state. |
| IsEnabled | Gets a value indicating whether the control is enabled. |
| IsTrackingViewState | It indicates whether the server control is saving changes to its view state. |
| IsViewStateEnabled | It indicates whether view state is enabled for this control. |
| LoadViewStateById | It indicates whether the control participates in loading its view state by ID instead of index. |
| Page | Page containing the control. |
| Parent | Parent control. |
| RenderingCompatibility | It specifies the ASP.NET version that the rendered HTML will be compatible with. |
| Site | The container that hosts the current control when rendered on a design surface. |
| SkinID | Gets or sets the skin to apply to the control. |
| Style | Gets a collection of text attributes that will be rendered as a style attribute on the outer tag of the Web server control. |
| TabIndex | Gets or sets the tab index of the Web server control. |
| TagKey | Gets the HtmlTextWriterTag value that corresponds to this Web server control. |
| TagName | Gets the name of the control tag. |
| TemplateControl | The template that contains this control. |
| TemplateSourceDirectory | Gets the virtual directory of the page or control containing this control. |
| ToolTip | Gets or sets the text displayed when the mouse pointer hovers over the web server control. |
| UniqueID | Unique identifier. |
| ViewState | Gets a dictionary of state information that saves and restores the view state of a server control across multiple requests for the same page. |
| ViewStateIgnoreCase | It indicates whether the StateBag object is case-insensitive. |
| ViewStateMode | Gets or sets the view-state mode of this control. |
| Visible | It indicates whether a server control is visible. |
| Width | Gets or sets the width of the Web server control. |
Methods of the Server Controls
The following table provides the methods of the server controls:
| Method | Description |
|---|---|
| AddAttributesToRender | Adds HTML attributes and styles that need to be rendered to the specified HtmlTextWriterTag. |
| AddedControl | Called after a child control is added to the Controls collection of the control object. |
| AddParsedSubObject | Notifies the server control that an element, either XML or HTML, was parsed, and adds the element to the server control's control collection. |
| ApplyStyleSheetSkin | Applies the style properties defined in the page style sheet to the control. |
| ClearCachedClientID | Infrastructure. Sets the cached ClientID value to null. |
| ClearChildControlState | Deletes the control-state information for the server control's child controls. |
| ClearChildState | Deletes the view-state and control-state information for all the server control's child controls. |
| ClearChildViewState | Deletes the view-state information for all the server control's child controls. |
| CreateChildControls | Used in creating child controls. |
| CreateControlCollection | Creates a new ControlCollection object to hold the child controls. |
| CreateControlStyle | Creates the style object that is used to implement all style related properties. |
| DataBind | Binds a data source to the server control and all its child controls. |
| DataBind(Boolean) | Binds a data source to the server control and all its child controls with an option to raise the DataBinding event. |
| DataBindChildren | Binds a data source to the server control's child controls. |
| Dispose | Enables a server control to perform final clean up before it is released from memory. |
| EnsureChildControls | Determines whether the server control contains child controls. If it does not, it creates child controls. |
| EnsureID | Creates an identifier for controls that do not have an identifier. |
| Equals(Object) | Determines whether the specified object is equal to the current object. |
| Finalize | Allows an object to attempt to free resources and perform other cleanup operations before the object is reclaimed by garbage collection. |
| FindControl(String) | Searches the current naming container for a server control with the specified id parameter. |
| FindControl(String, Int32) | Searches the current naming container for a server control with the specified id and an integer. |
| Focus | Sets input focus to a control. |
| GetDesignModeState | Gets design-time data for a control. |
| GetType | Gets the type of the current instance. |
| GetUniqueIDRelativeTo | Returns the prefixed portion of the UniqueID property of the specified control. |
| HasControls | Determines if the server control contains any child controls. |
| HasEvents | Indicates whether events are registered for the control or any child controls. |
| IsLiteralContent | Determines if the server control holds only literal content. |
| LoadControlState | Restores control-state information. |
| LoadViewState | Restores view-state information. |
| MapPathSecure | Retrieves the physical path that a virtual path, either absolute or relative, maps to. |
| MemberwiseClone | Creates a shallow copy of the current object. |
| MergeStyle | Copies any nonblank elements of the specified style to the web control, but does not overwrite any existing style elements of the control. |
| OnBubbleEvent | Determines whether the event for the server control is passed up the page's UI server control hierarchy. |
| OnDataBinding | Raises the data binding event. |
| OnInit | Raises the Init event. |
| OnLoad | Raises the Load event. |
| OnPreRender | Raises the PreRender event. |
| OnUnload | Raises the Unload event. |
| OpenFile | Gets a Stream used to read a file. |
| RemovedControl | Called after a child control is removed from the controls collection of the control object. |
| Render | Renders the control to the specified HTML writer. |
| RenderBeginTag | Renders the HTML opening tag of the control to the specified writer. |
| RenderChildren | Outputs the contents of a server control's children to a provided HtmlTextWriter object, which writes the contents to be rendered on the client. |
| RenderContents | Renders the contents of the control to the specified writer. |
| RenderControl(HtmlTextWriter) | Outputs server control content to a provided HtmlTextWriter object and stores tracing information about the control if tracing is enabled. |
| RenderEndTag | Renders the HTML closing tag of the control into the specified writer. |
| ResolveAdapter | Gets the control adapter responsible for rendering the specified control. |
| SaveControlState | Saves any server control state changes that have occurred since the time the page was posted back to the server. |
| SaveViewState | Saves any state that was modified after the TrackViewState method was invoked. |
| SetDesignModeState | Sets design-time data for a control. |
| ToString | Returns a string that represents the current object. |
| TrackViewState | Causes the control to track changes to its view state so that they can be stored in the object's view state property. |
Example
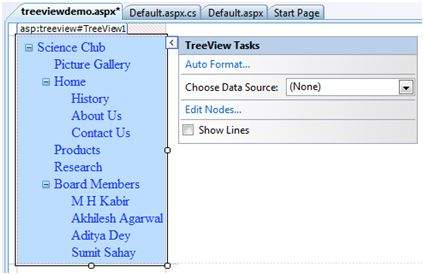
Let us look at a particular server control - a tree view control. A Tree view control comes under navigation controls. Other Navigation controls are: Menu control and SiteMapPath control.
Add a tree view control on the page. Select Edit Nodes... from the tasks. Edit each of the nodes using the Tree view node editor as shown:
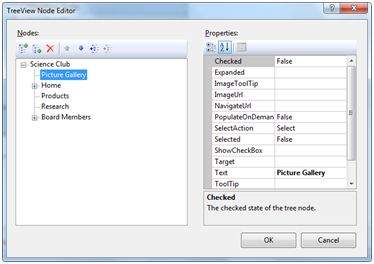
Once you have created the nodes, it looks like the following in design view:
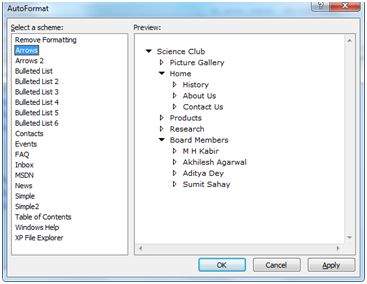
The AutoFormat... task allows you to format the tree view as shown:
Add a label control and a text box control on the page and name them lblmessage and txtmessage respectively.
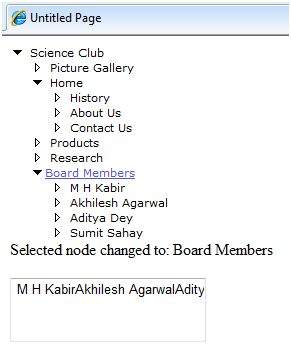
Write a few lines of code to ensure that when a particular node is selected, the label control displays the node text and the text box displays all child nodes under it, if any. The code behind the file should look like this:
using System;
using System.Collections;
using System.Configuration;
using System.Data;
using System.Linq;
using System.Web;
using System.Web.Security;
using System.Web.UI;
using System.Web.UI.HtmlControls;
using System.Web.UI.WebControls;
using System.Web.UI.WebControls.WebParts;
using System.Xml.Linq;

namespace eventdemo
{
   public partial class treeviewdemo : System.Web.UI.Page
   {
      protected void Page_Load(object sender, EventArgs e)
      {
         txtmessage.Text = " ";
      }
      protected void TreeView1_SelectedNodeChanged(object sender, EventArgs e)
      {
         txtmessage.Text = " ";
         lblmessage.Text = "Selected node changed to: " +
            TreeView1.SelectedNode.Text;
         TreeNodeCollection childnodes = TreeView1.SelectedNode.ChildNodes;
         if(childnodes != null)
         {
            txtmessage.Text = " ";
            foreach (TreeNode t in childnodes)
            {
               txtmessage.Text += t.Value;
            }
         }
      }
   }
}
Execute the page to see the effects. You will be able to expand and collapse the nodes.
ASP.NET - HTML Server
The HTML server controls are basically the standard HTML controls enhanced to enable server side processing. The HTML controls such as the header tags, anchor tags, and input elements are not processed by the server but are sent to the browser for display.
They are specifically converted to a server control by adding the attribute runat="server" and adding an id attribute to make them available for server-side processing.
For example, consider the HTML input control:
<input type="text" size="40">
It could be converted to a server control, by adding the runat and id attribute:
<input type="text" id="testtext" size="40" runat="server">
Advantages of using HTML Server Controls
Although ASP.NET server controls can perform every job accomplished by the HTML server controls, the later controls are useful in the following cases:
- Using static tables for layout purposes.
- Converting a HTML page to run under ASP.NET
The following table describes the HTML server controls:
| Control Name | HTML tag |
|---|---|
| HtmlHead | <head>element |
| HtmlInputButton | <input type=button|submit|reset> |
| HtmlInputCheckbox | <input type=checkbox> |
| HtmlInputFile | <input type = file> |
| HtmlInputHidden | <input type = hidden> |
| HtmlInputImage | <input type = image> |
| HtmlInputPassword | <input type = password> |
| HtmlInputRadioButton | <input type = radio> |
| HtmlInputReset | <input type = reset> |
| HtmlText | <input type = text|password> |
| HtmlImage | <img> element |
| HtmlLink | <link> element |
| HtmlAnchor | <a> element |
| HtmlButton | <button> element |
| HtmlButton | <button> element |
| HtmlForm | <form> element |
| HtmlTable | <table> element |
| HtmlTableCell | <td> and <th> |
| HtmlTableRow | <tr> element |
| HtmlTitle | <title> element |
| HtmlSelect | <select&t; element |
| HtmlGenericControl | All HTML controls not listed |
Example
The following example uses a basic HTML table for layout. It uses some boxes for getting input from the users such as name, address, city, state etc. It also has a button control, which is clicked to get the user data displayed in the last row of the table.
The page should look like this in the design view:
The code for the content page shows the use of the HTML table element for layout.
<%@ Page Language="C#" AutoEventWireup="true" CodeBehind="Default.aspx.cs"
   Inherits="htmlserver._Default" %>

<!DOCTYPE html PUBLIC "-//W3C//DTD XHTML 1.0 Transitional//EN"
   "http://www.w3.org/TR/xhtml1/DTD/xhtml1-transitional.dtd">

<html xmlns="http://www.w3.org/1999/xhtml" >
   <head runat="server">
      <title>Untitled Page</title>
      <style type="text/css">
         .style1
         {
            width: 156px;
         }
         .style2
         {
            width: 332px;
         }
      </style>
   </head>
   <body>
      <form id="form1" runat="server">
         <div>
            <table style="width: 54%;">
               <tr>
                  <td class="style1">Name:</td>
                  <td class="style2">
                     <asp:TextBox ID="txtname" runat="server"  style="width:230px">
                     </asp:TextBox>
                  </td>
               </tr>

               <tr>
                  <td class="style1">Street</td>
                  <td class="style2">
                     <asp:TextBox ID="txtstreet" runat="server"  style="width:230px">
                     </asp:TextBox>
                  </td>
               </tr>

               <tr>
                  <td class="style1">City</td>
                  <td class="style2">
                     <asp:TextBox ID="txtcity" runat="server"  style="width:230px">
                     </asp:TextBox>
                  </td>
               </tr>

               <tr>
                  <td class="style1">State</td>
                  <td class="style2">
                     <asp:TextBox ID="txtstate" runat="server" style="width:230px">
                     </asp:TextBox>
                  </td>
               </tr>

               <tr>
                  <td class="style1"> </td>
                  <td class="style2"></td>
               </tr>

               <tr>
                  <td class="style1"></td>
                  <td ID="displayrow" runat ="server" class="style2">
                  </td>
               </tr>
            </table>
         </div>
         <asp:Button ID="Button1" runat="server" onclick="Button1_Click" Text="Click" />
      </form>
   </body>
</html>
The code behind the button control:
protected void Button1_Click(object sender, EventArgs e)
{
   string str = "";
   str += txtname.Text + "<br />";
   str += txtstreet.Text + "<br />";
   str += txtcity.Text + "<br />";
   str += txtstate.Text + "<br />";
   displayrow.InnerHtml = str;
}
Observe the following:
The standard HTML tags have been used for the page layout.
The last row of the HTML table is used for data display. It needed server side processing, so an ID attribute and the runat attribute has been added to it.
ASP.NET - Client Side
ASP.NET client side coding has two aspects:
Client side scripts : It runs on the browser and in turn speeds up the execution of page. For example, client side data validation which can catch invalid data and warn the user accordingly without making a round trip to the server.
Client side source code : ASP.NET pages generate this. For example, the HTML source code of an ASP.NET page contains a number of hidden fields and automatically injected blocks of JavaScript code, which keeps information like view state or does other jobs to make the page work.
Client Side Scripts
All ASP.NET server controls allow calling client side code written using JavaScript or VBScript. Some ASP.NET server controls use client side scripting to provide response to the users without posting back to the server. For example, the validation controls.
Apart from these scripts, the Button control has a property OnClientClick, which allows executing client-side script, when the button is clicked.
The traditional and server HTML controls have the following events that can execute a script when they are raised:
| Event | Description |
|---|---|
| onblur | When the control loses focus |
| onfocus | When the control receives focus |
| onclick | When the control is clicked |
| onchange | When the value of the control changes |
| onkeydown | When the user presses a key |
| onkeypress | When the user presses an alphanumeric key |
| onkeyup | When the user releases a key |
| onmouseover | When the user moves the mouse pointer over the control |
| onserverclick | It raises the ServerClick event of the control, when the control is clicked |
Client Side Source Code
We have already discussed that, ASP.NET pages are generally written in two files:
- The content file or the markup file ( .aspx)
- The code-behind file
The content file contains the HTML or ASP.NET control tags and literals to form the structure of the page. The code behind file contains the class definition. At run-time, the content file is parsed and transformed into a page class.
This class, along with the class definition in the code file, and system generated code, together make the executable code (assembly) that processes all posted data, generates response, and sends it back to the client.
Consider the simple page:
<%@ Page Language="C#" AutoEventWireup="true" CodeBehind="Default.aspx.cs"
   Inherits="clientside._Default" %>

<!DOCTYPE html PUBLIC "-//W3C//DTD XHTML 1.0 Transitional//EN"
   "http://www.w3.org/TR/xhtml1/DTD/xhtml1-transitional.dtd">

<html xmlns="http://www.w3.org/1999/xhtml" >
   <head runat="server">
      <title>
         Untitled Page
      </title>
   </head>
   <body>
      <form id="form1" runat="server">
         <div>
            <asp:TextBox ID="TextBox1" runat="server"></asp:TextBox>
            <asp:Button ID="Button1" runat="server" OnClick="Button1_Click"   Text="Click" />
         </div>
         <hr />
         <h3><asp:Label ID="Msg" runat="server" Text=""></asp:Label>
         </h3>
      </form>
   </body>
</html>
When this page is run on the browser, the View Source option shows the HTML page sent to the browser by the ASP.Net runtime:
<!DOCTYPE html PUBLIC "-//W3C//DTD XHTML 1.0 Transitional//EN"
   "http://www.w3.org/TR/xhtml1/DTD/xhtml1-transitional.dtd">

<html xmlns="http://www.w3.org/1999/xhtml" >
   <head>
      <title>
         Untitled Page
      </title>
   </head>
   <body>
      <form name="form1" method="post" action="Default.aspx" id="form1">
         <div>
            <input type="hidden" name="__VIEWSTATE" id="__VIEWSTATE"
               value="/wEPDwUKMTU5MTA2ODYwOWRk31NudGDgvhhA7joJum9Qn5RxU2M=" />
         </div>

         <div>
            <input type="hidden" name="__EVENTVALIDATION"  id="__EVENTVALIDATION"
               value="/wEWAwKpjZj0DALs0bLrBgKM54rGBhHsyM61rraxE+KnBTCS8cd1QDJ/"/>
         </div>

         <div>
            <input name="TextBox1" type="text" id="TextBox1" />
            <input type="submit" name="Button1" value="Click" id="Button1" />
         </div>

         <hr />
         <h3><span id="Msg"></span></h3>
      </form>
   </body>
</html>
If you go through the code properly, you can see that first two <div> tags contain the hidden fields which store the view state and validation information.
ASP.NET - Basic Controls
In this chapter, we will discuss the basic controls available in ASP.NET.
Button Controls
ASP.NET provides three types of button control:
Button : It displays text within a rectangular area.
Link Button : It displays text that looks like a hyperlink.
Image Button : It displays an image.
When a user clicks a button, two events are raised: Click and Command.
Basic syntax of button control:
<asp:Button ID="Button1" runat="server" onclick="Button1_Click" Text="Click" / >
Common properties of the button control:
| Property | Description |
|---|---|
| Text | The text displayed on the button. This is for button and link button controls only. |
| ImageUrl | For image button control only. The image to be displayed for the button. |
| AlternateText | For image button control only. The text to be displayed if the browser cannot display the image. |
| CausesValidation | Determines whether page validation occurs when a user clicks the button. The default is true. |
| CommandName | A string value that is passed to the command event when a user clicks the button. |
| CommandArgument | A string value that is passed to the command event when a user clicks the button. |
| PostBackUrl | The URL of the page that is requested when the user clicks the button. |
Text Boxes and Labels
Text box controls are typically used to accept input from the user. A text box control can accept one or more lines of text depending upon the settings of the TextMode attribute.
Label controls provide an easy way to display text which can be changed from one execution of a page to the next. If you want to display text that does not change, you use the literal text.
Basic syntax of text control:
<asp:TextBox ID="txtstate" runat="server" ></asp:TextBox>
Common Properties of the Text Box and Labels:
| Property | Description |
|---|---|
| TextMode | Specifies the type of text box. SingleLine creates a standard text box, MultiLIne creates a text box that accepts more than one line of text and the Password causes the characters that are entered to be masked. The default is SingleLine. |
| Text | The text content of the text box. |
| MaxLength | The maximum number of characters that can be entered into the text box. |
| Wrap | It determines whether or not text wraps automatically for multi-line text box; default is true. |
| ReadOnly | Determines whether the user can change the text in the box; default is false, i.e., the user can not change the text. |
| Columns | The width of the text box in characters. The actual width is determined based on the font that is used for the text entry. |
| Rows | The height of a multi-line text box in lines. The default value is 0, means a single line text box. |
The mostly used attribute for a label control is 'Text', which implies the text displayed on the label.
Check Boxes and Radio Buttons
A check box displays a single option that the user can either check or uncheck and radio buttons present a group of options from which the user can select just one option.
To create a group of radio buttons, you specify the same name for the GroupName attribute of each radio button in the group. If more than one group is required in a single form, then specify a different group name for each group.
If you want check box or radio button to be selected when the form is initially displayed, set its Checked attribute to true. If the Checked attribute is set to true for multiple radio buttons in a group, then only the last one is considered as true.
Basic syntax of check box:
<asp:CheckBox ID= "chkoption" runat= "Server">
</asp:CheckBox>
Basic syntax of radio button:
<asp:RadioButton ID= "rdboption" runat= "Server">
</asp: RadioButton>
Common properties of check boxes and radio buttons:
| Property | Description |
|---|---|
| Text | The text displayed next to the check box or radio button. |
| Checked | Specifies whether it is selected or not, default is false. |
| GroupName | Name of the group the control belongs to. |
List Controls
ASP.NET provides the following controls
- Drop-down list,
- List box,
- Radio button list,
- Check box list,
- Bulleted list.
These control let a user choose from one or more items from the list. List boxes and drop-down lists contain one or more list items. These lists can be loaded either by code or by the ListItemCollection editor.
Basic syntax of list box control:
<asp:ListBox ID="ListBox1" runat="server" AutoPostBack="True"    OnSelectedIndexChanged="ListBox1_SelectedIndexChanged">
</asp:ListBox>
Basic syntax of drop-down list control:
<asp:DropDownList ID="DropDownList1" runat="server" AutoPostBack="True"   OnSelectedIndexChanged="DropDownList1_SelectedIndexChanged">
</asp:DropDownList>
Common properties of list box and drop-down Lists:
| Property | Description |
|---|---|
| Items | The collection of ListItem objects that represents the items in the control. This property returns an object of type ListItemCollection. |
| Rows | Specifies the number of items displayed in the box. If actual list contains more rows than displayed then a scroll bar is added. |
| SelectedIndex | The index of the currently selected item. If more than one item is selected, then the index of the first selected item. If no item is selected, the value of this property is -1. |
| SelectedValue | The value of the currently selected item. If more than one item is selected, then the value of the first selected item. If no item is selected, the value of this property is an empty string (""). |
| SelectionMode | Indicates whether a list box allows single selections or multiple selections. |
Common properties of each list item objects:
| Property | Description |
|---|---|
| Text | The text displayed for the item. |
| Selected | Indicates whether the item is selected. |
| Value | A string value associated with the item. |
It is important to notes that:
To work with the items in a drop-down list or list box, you use the Items property of the control. This property returns a ListItemCollection object which contains all the items of the list.
The SelectedIndexChanged event is raised when the user selects a different item from a drop-down list or list box.
The ListItemCollection
The ListItemCollection object is a collection of ListItem objects. Each ListItem object represents one item in the list. Items in a ListItemCollection are numbered from 0.
When the items into a list box are loaded using strings like: lstcolor.Items.Add("Blue"), then both the Text and Value properties of the list item are set to the string value you specify. To set it differently you must create a list item object and then add that item to the collection.
The ListItemCollection Editor is used to add item to a drop-down list or list box. This is used to create a static list of items. To display the collection editor, select edit item from the smart tag menu, or select the control and then click the ellipsis button from the Item property in the properties window.
Common properties of ListItemCollection:
| Property | Description |
|---|---|
| Item(integer) | A ListItem object that represents the item at the specified index. |
| Count | The number of items in the collection. |
Common methods of ListItemCollection:
| Methods | Description |
|---|---|
| Add(string) | Adds a new item at the end of the collection and assigns the string parameter to the Text property of the item. |
| Add(ListItem) | Adds a new item at the end of the collection. |
| Insert(integer, string) | Inserts an item at the specified index location in the collection, and assigns string parameter to the text property of the item. |
| Insert(integer, ListItem) | Inserts the item at the specified index location in the collection. |
| Remove(string) | Removes the item with the text value same as the string. |
| Remove(ListItem) | Removes the specified item. |
| RemoveAt(integer) | Removes the item at the specified index as the integer. |
| Clear | Removes all the items of the collection. |
| FindByValue(string) | Returns the item whose value is same as the string. |
| FindByValue(Text) | Returns the item whose text is same as the string. |
Radio Button list and Check Box list
A radio button list presents a list of mutually exclusive options. A check box list presents a list of independent options. These controls contain a collection of ListItem objects that could be referred to through the Items property of the control.
Basic syntax of radio button list:
<asp:RadioButtonList ID="RadioButtonList1" runat="server" AutoPostBack="True"
   OnSelectedIndexChanged="RadioButtonList1_SelectedIndexChanged">
</asp:RadioButtonList>
Basic syntax of check box list:
<asp:CheckBoxList ID="CheckBoxList1" runat="server" AutoPostBack="True"
   OnSelectedIndexChanged="CheckBoxList1_SelectedIndexChanged">
</asp:CheckBoxList>
Common properties of check box and radio button lists:
| Property | Description |
|---|---|
| RepeatLayout | This attribute specifies whether the table tags or the normal html flow to use while formatting the list when it is rendered. The default is Table. |
| RepeatDirection | It specifies the direction in which the controls to be repeated. The values available are Horizontal and Vertical. Default is Vertical. |
| RepeatColumns | It specifies the number of columns to use when repeating the controls; default is 0. |
Bulleted lists and Numbered lists
The bulleted list control creates bulleted lists or numbered lists. These controls contain a collection of ListItem objects that could be referred to through the Items property of the control.
Basic syntax of a bulleted list:
<asp:BulletedList ID="BulletedList1" runat="server">
</asp:BulletedList>
Common properties of the bulleted list:
| Property | Description |
|---|---|
| BulletStyle | This property specifies the style and looks of the bullets, or numbers. |
| RepeatDirection | It specifies the direction in which the controls to be repeated. The values available are Horizontal and Vertical. Default is Vertical. |
| RepeatColumns | It specifies the number of columns to use when repeating the controls; default is 0. |
HyperLink Control
The HyperLink control is like the HTML <a> element.
Basic syntax for a hyperlink control:
<asp:HyperLink ID="HyperLink1" runat="server">
   HyperLink
</asp:HyperLink>
It has the following important properties:
| Property | Description |
|---|---|
| ImageUrl | Path of the image to be displayed by the control. |
| NavigateUrl | Target link URL. |
| Text | The text to be displayed as the link. |
| Target | The window or frame which loads the linked page. |
Image Control
The image control is used for displaying images on the web page, or some alternative text, if the image is not available.
Basic syntax for an image control:
<asp:Image ID="Image1" runat="server">
It has the following important properties:
| Property | Description |
|---|---|
| AlternateText | Alternate text to be displayed in absence of the image. |
| ImageAlign | Alignment options for the control. |
| ImageUrl | Path of the image to be displayed by the control. |
ASP.NET - Directives
ASP.NET directives are instructions to specify optional settings, such as registering a custom control and page language. These settings describe how the web forms (.aspx) or user controls (.ascx) pages are processed by the .Net framework.
The syntax for declaring a directive is:
<%@ directive_name attribute=value [attribute=value] %>
In this section, we will just introduce the ASP.NET directives and we will use most of these directives throughout the tutorials.
The Application Directive
The Application directive defines application-specific attributes. It is provided at the top of the global.aspx file.
The basic syntax of Application directive is:
<%@ Application Language="C#" %>
The attributes of the Application directive are:
| Attributes | Description |
|---|---|
| Inherits | The name of the class from which to inherit. |
| Description | The text description of the application. Parsers and compilers ignore this. |
| Language | The language used in code blocks. |
The Assembly Directive
The Assembly directive links an assembly to the page or the application at parse time. This could appear either in the global.asax file for application-wide linking, in the page file, a user control file for linking to a page or user control.
The basic syntax of Assembly directive is:
<%@ Assembly Name ="myassembly" %>
The attributes of the Assembly directive are:
| Attributes | Description |
|---|---|
| Name | The name of the assembly to be linked. |
| Src | The path to the source file to be linked and compiled dynamically. |
The Control Directive
The control directive is used with the user controls and appears in the user control (.ascx) files.
The basic syntax of Control directive is:
<%@ Control Language="C#" EnableViewState="false" %>
The attributes of the Control directive are:
| Attributes | Description |
|---|---|
| AutoEventWireup | The Boolean value that enables or disables automatic association of events to handlers. |
| ClassName | The file name for the control. |
| Debug | The Boolean value that enables or disables compiling with debug symbols. |
| Description | The text description of the control page, ignored by compiler. |
| EnableViewState | The Boolean value that indicates whether view state is maintained across page requests. |
| Explicit | For VB language, tells the compiler to use option explicit mode. |
| Inherits | The class from which the control page inherits. |
| Language | The language for code and script. |
| Src | The filename for the code-behind class. |
| Strict | For VB language, tells the compiler to use the option strict mode. |
The Implements Directive
The Implement directive indicates that the web page, master page or user control page must implement the specified .Net framework interface.
The basic syntax for implements directive is:
<%@ Implements Interface="interface_name" %>
The Import Directive
The Import directive imports a namespace into a web page, user control page of application. If the Import directive is specified in the global.asax file, then it is applied to the entire application. If it is in a page of user control page, then it is applied to that page or control.
The basic syntax for import directive is:
<%@ namespace="System.Drawing" %>
The Master Directive
The Master directive specifies a page file as being the mater page.
The basic syntax of sample MasterPage directive is:
<%@ MasterPage Language="C#" AutoEventWireup="true" CodeFile="SiteMater.master.cs" Inherits="SiteMaster" %>
The MasterType Directive
The MasterType directive assigns a class name to the Master property of a page, to make it strongly typed.
The basic syntax of MasterType directive is:
<%@ MasterType attribute="value"[attribute="value" ...] %>
The OutputCache Directive
The OutputCache directive controls the output caching policies of a web page or a user control.
The basic syntax of OutputCache directive is:
<%@ OutputCache Duration="15" VaryByParam="None" %>
The Page Directive
The Page directive defines the attributes specific to the page file for the page parser and the compiler.
The basic syntax of Page directive is:
<%@ Page Language="C#" AutoEventWireup="true" CodeFile="Default.aspx.cs" Inherits="_Default" Trace="true" %>
The attributes of the Page directive are:
| Attributes | Description |
|---|---|
| AutoEventWireup | The Boolean value that enables or disables page events that are being automatically bound to methods; for example, Page_Load. |
| Buffer | The Boolean value that enables or disables HTTP response buffering. |
| ClassName | The class name for the page. |
| ClientTarget | The browser for which the server controls should render content. |
| CodeFile | The name of the code behind file. |
| Debug | The Boolean value that enables or disables compilation with debug symbols. |
| Description | The text description of the page, ignored by the parser. |
| EnableSessionState | It enables, disables, or makes session state read-only. |
| EnableViewState | The Boolean value that enables or disables view state across page requests. |
| ErrorPage | URL for redirection if an unhandled page exception occurs. |
| Inherits | The name of the code behind or other class. |
| Language | The programming language for code. |
| Src | The file name of the code behind class. |
| Trace | It enables or disables tracing. |
| TraceMode | It indicates how trace messages are displayed, and sorted by time or category. |
| Transaction | It indicates if transactions are supported. |
| ValidateRequest | The Boolean value that indicates whether all input data is validated against a hardcoded list of values. |
The PreviousPageType Directive
The PreviousPageType directive assigns a class to a page, so that the page is strongly typed.
The basic syntax for a sample PreviousPagetype directive is:
<%@ PreviousPageType attribute="value"[attribute="value" ...] %>
The Reference Directive
The Reference directive indicates that another page or user control should be compiled and linked to the current page.
The basic syntax of Reference directive is:
<%@ Reference Page ="somepage.aspx" %>
The Register Directive
The Register derivative is used for registering the custom server controls and user controls.
The basic syntax of Register directive is:
<%@ Register Src="~/footer.ascx" TagName="footer" TagPrefix="Tfooter" %>
ASP.NET - Managing State
Hyper Text Transfer Protocol (HTTP) is a stateless protocol. When the client disconnects from the server, the ASP.NET engine discards the page objects. This way, each web application can scale up to serve numerous requests simultaneously without running out of server memory.
However, there needs to be some technique to store the information between requests and to retrieve it when required. This information i.e., the current value of all the controls and variables for the current user in the current session is called the State.
ASP.NET manages four types of states:
- View State
- Control State
- Session State
- Application State
View State
The view state is the state of the page and all its controls. It is automatically maintained across posts by the ASP.NET framework.
When a page is sent back to the client, the changes in the properties of the page and its controls are determined, and stored in the value of a hidden input field named _VIEWSTATE. When the page is again posted back, the _VIEWSTATE field is sent to the server with the HTTP request.
The view state could be enabled or disabled for:
The entire application by setting the EnableViewState property in the <pages> section of web.config file.
A page by setting the EnableViewState attribute of the Page directive, as <%@ Page Language="C#" EnableViewState="false" %>
A control by setting the Control.EnableViewState property.
It is implemented using a view state object defined by the StateBag class which defines a collection of view state items. The state bag is a data structure containing attribute value pairs, stored as strings associated with objects.
The StateBag class has the following properties:
| Properties | Description |
|---|---|
| Item(name) | The value of the view state item with the specified name. This is the default property of the StateBag class. |
| Count | The number of items in the view state collection. |
| Keys | Collection of keys for all the items in the collection. |
| Values | Collection of values for all the items in the collection. |
The StateBag class has the following methods:
| Methods | Description |
|---|---|
| Add(name, value) | Adds an item to the view state collection and existing item is updated. |
| Clear | Removes all the items from the collection. |
| Equals(Object) | Determines whether the specified object is equal to the current object. |
| Finalize | Allows it to free resources and perform other cleanup operations. |
| GetEnumerator | Returns an enumerator that iterates over all the key/value pairs of the StateItem objects stored in the StateBag object. |
| GetType | Gets the type of the current instance. |
| IsItemDirty | Checks a StateItem object stored in the StateBag object to evaluate whether it has been modified. |
| Remove(name) | Removes the specified item. |
| SetDirty | Sets the state of the StateBag object as well as the Dirty property of each of the StateItem objects contained by it. |
| SetItemDirty | Sets the Dirty property for the specified StateItem object in the StateBag object. |
| ToString | Returns a string representing the state bag object. |
Example
The following example demonstrates the concept of storing view state. Let us keep a counter, which is incremented each time the page is posted back by clicking a button on the page. A label control shows the value in the counter.
The markup file code is as follows:
<%@ Page Language="C#" AutoEventWireup="true" CodeBehind="Default.aspx.cs"
   Inherits="statedemo._Default" %>

<!DOCTYPE html PUBLIC "-//W3C//DTD XHTML 1.0 Transitional//EN"
   "http://www.w3.org/TR/xhtml1/DTD/xhtml1-transitional.dtd">

<html xmlns="http://www.w3.org/1999/xhtml" >
   <head runat="server">
      <title>
         Untitled Page
      </title>
   </head>
   <body>
      <form id="form1" runat="server">
         <div>
            <h3>View State demo</h3>

            Page Counter:
            <asp:Label ID="lblCounter" runat="server" />
            <asp:Button ID="btnIncrement" runat="server" Text="Add Count"
               onclick="btnIncrement_Click" />
         </div>
      </form>
   </body>
</html>
The code behind file for the example is shown here:
public partial class _Default : System.Web.UI.Page
{
   public int counter
   {
      get
      {
         if (ViewState["pcounter"] != null)
         {
            return ((int)ViewState["pcounter"]);
         }
         else
         {
            return 0;
         }
      }
      set
      {
         ViewState["pcounter"] = value;
      }
   }

   protected void Page_Load(object sender, EventArgs e)
   {
      lblCounter.Text = counter.ToString();
      counter++;
   }
}
It would produce the following result:
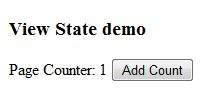
Control State
Control state cannot be modified, accessed directly, or disabled.
Session State
When a user connects to an ASP.NET website, a new session object is created. When session state is turned on, a new session state object is created for each new request. This session state object becomes part of the context and it is available through the page.
Session state is generally used for storing application data such as inventory, supplier list, customer record, or shopping cart. It can also keep information about the user and his preferences, and keep the track of pending operations.
Sessions are identified and tracked with a 120-bit SessionID, which is passed from client to server and back as cookie or a modified URL. The SessionID is globally unique and random.
The session state object is created from the HttpSessionState class, which defines a collection of session state items.
The HttpSessionState class has the following properties:
| Properties | Description |
|---|---|
| SessionID | The unique session identifier. |
| Item(name) | The value of the session state item with the specified name. This is the default property of the HttpSessionState class. |
| Count | The number of items in the session state collection. |
| TimeOut | Gets and sets the amount of time, in minutes, allowed between requests before the session-state provider terminates the session. |
The HttpSessionState class has the following methods:
| Methods | Description |
|---|---|
| Add(name, value) | Adds an item to the session state collection. |
| Clear | Removes all the items from session state collection. |
| Remove(name) | Removes the specified item from the session state collection. |
| RemoveAll | Removes all keys and values from the session-state collection. |
| RemoveAt | Deletes an item at a specified index from the session-state collection. |
The session state object is a name-value pair to store and retrieve some information from the session state object. You could use the following code for the same:
void StoreSessionInfo()
{
   String fromuser = TextBox1.Text;
   Session["fromuser"] = fromuser;
}
void RetrieveSessionInfo()
{
   String fromuser = Session["fromuser"];
   Label1.Text = fromuser;
}
The above code stores only strings in the Session dictionary object, however, it can store all the primitive data types and arrays composed of primitive data types, as well as the DataSet, DataTable, HashTable, and Image objects, as well as any user-defined class that inherits from the ISerializable object.
Example
The following example demonstrates the concept of storing session state. There are two buttons on the page, a text box to enter string and a label to display the text stored from last session.
The mark up file code is as follows:
<%@ Page Language="C#" AutoEventWireup="true" CodeFile="Default.aspx.cs"
Inherits="_Default" %>
<!DOCTYPE html PUBLIC "-//W3C//DTD XHTML 1.0 Transitional//EN"
"http://www.w3.org/TR/xhtml1/DTD/xhtml1-transitional.dtd">
<html xmlns="http://www.w3.org/1999/xhtml" >
<head runat="server">
<title>
Untitled Page
</title>
</head>
<body>
<form id="form1" runat="server">
<div>
<table style="width: 568px; height: 103px">
<tr>
<td style="width: 209px">
<asp:Label ID="lblstr" runat="server" Text="Enter a String" style="width:94px">
</asp:Label>
</td>
<td style="width: 317px">
<asp:TextBox ID="txtstr" runat="server" style="width:227px">
</asp:TextBox>
</td>
</tr>
<tr>
<td style="width: 209px"></td>
<td style="width: 317px"></td>
</tr>
<tr>
<td style="width: 209px">
<asp:Button ID="btnnrm" runat="server"
Text="No action button" style="width:128px" />
</td>
<td style="width: 317px">
<asp:Button ID="btnstr" runat="server"
OnClick="btnstr_Click" Text="Submit the String" />
</td>
</tr>
<tr>
<td style="width: 209px">
</td>
<td style="width: 317px">
</td>
</tr>
<tr>
<td style="width: 209px">
<asp:Label ID="lblsession" runat="server" style="width:231px" >
</asp:Label>
</td>
<td style="width: 317px">
</td>
</tr>
<tr>
<td style="width: 209px">
<asp:Label ID="lblshstr" runat="server">
</asp:Label>
</td>
<td style="width: 317px">
</td>
</tr>
</table>
</div>
</form>
</body>
</html>
It should look like the following in design view:
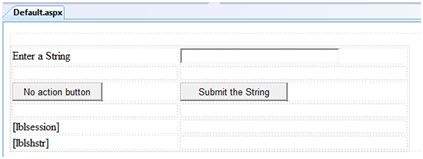
The code behind file is given here:
public partial class _Default : System.Web.UI.Page
{
   String mystr;
   protected void Page_Load(object sender, EventArgs e)
   {
      this.lblshstr.Text = this.mystr;
      this.lblsession.Text = (String)this.Session["str"];
   }
   protected void btnstr_Click(object sender, EventArgs e)
   {
      this.mystr = this.txtstr.Text;
      this.Session["str"] = this.txtstr.Text;
      this.lblshstr.Text = this.mystr;
      this.lblsession.Text = (String)this.Session["str"];
   }
}
Execute the file and observe how it works:
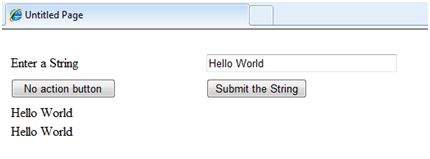
Application State
The ASP.NET application is the collection of all web pages, code and other files within a single virtual directory on a web server. When information is stored in application state, it is available to all the users.
To provide for the use of application state, ASP.NET creates an application state object for each application from the HTTPApplicationState class and stores this object in server memory. This object is represented by class file global.asax.
Application State is mostly used to store hit counters and other statistical data, global application data like tax rate, discount rate etc. and to keep the track of users visiting the site.
The HttpApplicationState class has the following properties:
| Properties | Description |
|---|---|
| Item(name) | The value of the application state item with the specified name. This is the default property of the HttpApplicationState class. |
| Count | The number of items in the application state collection. |
The HttpApplicationState class has the following methods:
| Methods | Description |
|---|---|
| Add(name, value) | Adds an item to the application state collection. |
| Clear | Removes all the items from the application state collection. |
| Remove(name) | Removes the specified item from the application state collection. |
| RemoveAll | Removes all objects from an HttpApplicationState collection. |
| RemoveAt | Removes an HttpApplicationState object from a collection by index. |
| Lock() | Locks the application state collection so only the current user can access it. |
| Unlock() | Unlocks the application state collection so all the users can access it. |
Application state data is generally maintained by writing handlers for the events:
- Application_Start
- Application_End
- Application_Error
- Session_Start
- Session_End
The following code snippet shows the basic syntax for storing application state information:
Void Application_Start(object sender, EventArgs e)
{
   Application["startMessage"] = "The application has started.";
}
Void Application_End(object sender, EventArgs e)
{
   Application["endtMessage"] = "The application has ended.";
}
ASP.NET - Validators
ASP.NET validation controls validate the user input data to ensure that useless, unauthenticated, or contradictory data don't get stored.
ASP.NET provides the following validation controls:
- RequiredFieldValidator
- RangeValidator
- CompareValidator
- RegularExpressionValidator
- CustomValidator
- ValidationSummary
BaseValidator Class
The validation control classes are inherited from the BaseValidator class hence they inherit its properties and methods. Therefore, it would help to take a look at the properties and the methods of this base class, which are common for all the validation controls:
| Members | Description |
|---|---|
| ControlToValidate | Indicates the input control to validate. |
| Display | Indicates how the error message is shown. |
| EnableClientScript | Indicates whether client side validation will take. |
| Enabled | Enables or disables the validator. |
| ErrorMessage | Indicates error string. |
| Text | Error text to be shown if validation fails. |
| IsValid | Indicates whether the value of the control is valid. |
| SetFocusOnError | It indicates whether in case of an invalid control, the focus should switch to the related input control. |
| ValidationGroup | The logical group of multiple validators, where this control belongs. |
| Validate() | This method revalidates the control and updates the IsValid property. |
RequiredFieldValidator Control
The RequiredFieldValidator control ensures that the required field is not empty. It is generally tied to a text box to force input into the text box.
The syntax of the control is as given:
<asp:RequiredFieldValidator ID="rfvcandidate"
   runat="server" ControlToValidate ="ddlcandidate"
   ErrorMessage="Please choose a candidate"
   InitialValue="Please choose a candidate">
</asp:RequiredFieldValidator>
RangeValidator Control
The RangeValidator control verifies that the input value falls within a predetermined range.
It has three specific properties:
| Properties | Description |
|---|---|
| Type | It defines the type of the data. The available values are: Currency, Date, Double, Integer, and String. |
| MinimumValue | It specifies the minimum value of the range. |
| MaximumValue | It specifies the maximum value of the range. |
The syntax of the control is as given:
<asp:RangeValidator ID="rvclass" runat="server" ControlToValidate="txtclass"
   ErrorMessage="Enter your class (6 - 12)" MaximumValue="12"
   MinimumValue="6" Type="Integer">
</asp:RangeValidator>
CompareValidator Control
The CompareValidator control compares a value in one control with a fixed value or a value in another control.
It has the following specific properties:
| Properties | Description |
|---|---|
| Type | It specifies the data type. |
| ControlToCompare | It specifies the value of the input control to compare with. |
| ValueToCompare | It specifies the constant value to compare with. |
| Operator | It specifies the comparison operator, the available values are: Equal, NotEqual, GreaterThan, GreaterThanEqual, LessThan, LessThanEqual, and DataTypeCheck. |
The basic syntax of the control is as follows:
<asp:CompareValidator ID="CompareValidator1" runat="server"
   ErrorMessage="CompareValidator">
</asp:CompareValidator>
RegularExpressionValidator
The RegularExpressionValidator allows validating the input text by matching against a pattern of a regular expression. The regular expression is set in the ValidationExpression property.
The following table summarizes the commonly used syntax constructs for regular expressions:
| Character Escapes | Description |
|---|---|
| \b | Matches a backspace. |
| \t | Matches a tab. |
| \r | Matches a carriage return. |
| \v | Matches a vertical tab. |
| \f | Matches a form feed. |
| \n | Matches a new line. |
| \ | Escape character. |
Apart from single character match, a class of characters could be specified that can be matched, called the metacharacters.
| Metacharacters | Description |
|---|---|
| . | Matches any character except \n. |
| [abcd] | Matches any character in the set. |
| [^abcd] | Excludes any character in the set. |
| [2-7a-mA-M] | Matches any character specified in the range. |
| \w | Matches any alphanumeric character and underscore. |
| \W | Matches any non-word character. |
| \s | Matches whitespace characters like, space, tab, new line etc. |
| \S | Matches any non-whitespace character. |
| \d | Matches any decimal character. |
| \D | Matches any non-decimal character. |
Quantifiers could be added to specify number of times a character could appear.
| Quantifier | Description |
|---|---|
| * | Zero or more matches. |
| + | One or more matches. |
| ? | Zero or one matches. |
| {N} | N matches. |
| {N,} | N or more matches. |
| {N,M} | Between N and M matches. |
The syntax of the control is as given:
<asp:RegularExpressionValidator ID="string" runat="server" ErrorMessage="string"
   ValidationExpression="string" ValidationGroup="string">
</asp:RegularExpressionValidator>
CustomValidator
The CustomValidator control allows writing application specific custom validation routines for both the client side and the server side validation.
The client side validation is accomplished through the ClientValidationFunction property. The client side validation routine should be written in a scripting language, such as JavaScript or VBScript, which the browser can understand.
The server side validation routine must be called from the control's ServerValidate event handler. The server side validation routine should be written in any .Net language, like C# or VB.Net.
The basic syntax for the control is as given:
<asp:CustomValidator ID="CustomValidator1" runat="server"
   ClientValidationFunction=.cvf_func. ErrorMessage="CustomValidator">
</asp:CustomValidator>
ValidationSummary
The ValidationSummary control does not perform any validation but shows a summary of all errors in the page. The summary displays the values of the ErrorMessage property of all validation controls that failed validation.
The following two mutually inclusive properties list out the error message:
ShowSummary : shows the error messages in specified format.
ShowMessageBox : shows the error messages in a separate window.
The syntax for the control is as given:
<asp:ValidationSummary ID="ValidationSummary1" runat="server"
   DisplayMode = "BulletList" ShowSummary = "true" HeaderText="Errors:" />
Validation Groups
Complex pages have different groups of information provided in different panels. In such situation, a need might arise for performing validation separately for separate group. This kind of situation is handled using validation groups.
To create a validation group, you should put the input controls and the validation controls into the same logical group by setting their ValidationGroup property.
Example
The following example describes a form to be filled up by all the students of a school, divided into four houses, for electing the school president. Here, we use the validation controls to validate the user input.
This is the form in design view:
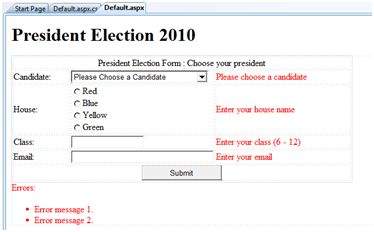
The content file code is as given:
<form id="form1" runat="server">
   <table style="width: 66%;">
      <tr>
         <td class="style1" colspan="3" align="center">
         <asp:Label ID="lblmsg"
            Text="President Election Form : Choose your president"
            runat="server" />
         </td>
      </tr>

      <tr>
         <td class="style3">
            Candidate:
         </td>

         <td class="style2">
            <asp:DropDownList ID="ddlcandidate" runat="server"  style="width:239px">
               <asp:ListItem>Please Choose a Candidate</asp:ListItem>
               <asp:ListItem>M H Kabir</asp:ListItem>
               <asp:ListItem>Steve Taylor</asp:ListItem>
               <asp:ListItem>John Abraham</asp:ListItem>
               <asp:ListItem>Venus Williams</asp:ListItem>
            </asp:DropDownList>
         </td>

         <td>
            <asp:RequiredFieldValidator ID="rfvcandidate"
               runat="server" ControlToValidate ="ddlcandidate"
               ErrorMessage="Please choose a candidate"
               InitialValue="Please choose a candidate">
            </asp:RequiredFieldValidator>
         </td>
      </tr>

      <tr>
         <td class="style3">
            House:
         </td>

         <td class="style2">
            <asp:RadioButtonList ID="rblhouse" runat="server" RepeatLayout="Flow">
               <asp:ListItem>Red</asp:ListItem>
               <asp:ListItem>Blue</asp:ListItem>
               <asp:ListItem>Yellow</asp:ListItem>
               <asp:ListItem>Green</asp:ListItem>
            </asp:RadioButtonList>
         </td>

         <td>
            <asp:RequiredFieldValidator ID="rfvhouse" runat="server"
               ControlToValidate="rblhouse" ErrorMessage="Enter your house name" >
            </asp:RequiredFieldValidator>
            <br />
         </td>
      </tr>

      <tr>
         <td class="style3">
            Class:
         </td>

         <td class="style2">
            <asp:TextBox ID="txtclass" runat="server"></asp:TextBox>
         </td>

         <td>
            <asp:RangeValidator ID="rvclass"
               runat="server" ControlToValidate="txtclass"
               ErrorMessage="Enter your class (6 - 12)" MaximumValue="12"
               MinimumValue="6" Type="Integer">
            </asp:RangeValidator>
         </td>
      </tr>

      <tr>
         <td class="style3">
            Email:
         </td>

         <td class="style2">
            <asp:TextBox ID="txtemail" runat="server" style="width:250px">
            </asp:TextBox>
         </td>

         <td>
            <asp:RegularExpressionValidator ID="remail" runat="server"
               ControlToValidate="txtemail" ErrorMessage="Enter your email"
               ValidationExpression="\w+([-+.']\w+)*@\w+([-.]\w+)*\.\w+([-.]\w+)*">
            </asp:RegularExpressionValidator>
         </td>
      </tr>

      <tr>
         <td class="style3" align="center" colspan="3">
            <asp:Button ID="btnsubmit" runat="server" onclick="btnsubmit_Click"
               style="text-align: center" Text="Submit" style="width:140px" />
         </td>
      </tr>
   </table>
   <asp:ValidationSummary ID="ValidationSummary1" runat="server"
      DisplayMode ="BulletList" ShowSummary ="true" HeaderText="Errors:" />
</form>
The code behind the submit button:
protected void btnsubmit_Click(object sender, EventArgs e)
{
   if (Page.IsValid)
   {
      lblmsg.Text = "Thank You";
   }
   else
   {
      lblmsg.Text = "Fill up all the fields";
   }
}
ASP.NET - Database Access
ASP.NET allows the following sources of data to be accessed and used:
- Databases (e.g., Access, SQL Server, Oracle, MySQL)
- XML documents
- Business Objects
- Flat files
ASP.NET hides the complex processes of data access and provides much higher level of classes and objects through which data is accessed easily. These classes hide all complex coding for connection, data retrieving, data querying, and data manipulation.
ADO.NET is the technology that provides the bridge between various ASP.NET control objects and the backend data source. In this tutorial, we will look at data access and working with the data in brief.
Retrieve and display data
It takes two types of data controls to retrieve and display data in ASP.NET:
A data source control - It manages the connection to the data, selection of data, and other jobs such as paging and caching of data etc.
A data view control - It binds and displays the data and allows data manipulation.
We will discuss the data binding and data source controls in detail later. In this section, we will use a SqlDataSource control to access data and a GridView control to display and manipulate data in this chapter.
We will also use an Access database, which contains the details about .Net books available in the market. Name of our database is ASPDotNetStepByStep.mdb and we will use the data table DotNetReferences.
The table has the following columns: ID, Title, AuthorFirstName, AuthorLastName, Topic, and Publisher.
Here is a snapshot of the data table:
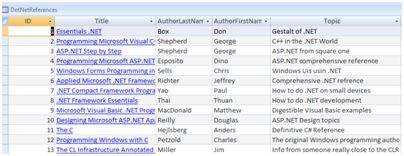
Let us directly move to action, take the following steps:
(1) Create a web site and add a SqlDataSourceControl on the web form.
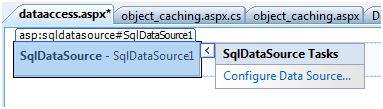
(2) Click on the Configure Data Source option.

(3) Click on the New Connection button to establish connection with a database.

(4) Once the connection is set up, you may save it for further use. At the next step, you are asked to configure the select statement:
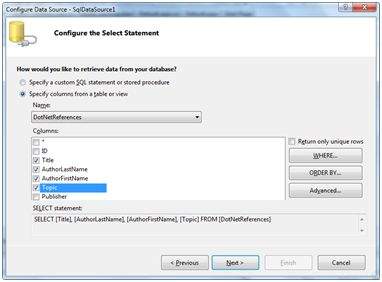
(5) Select the columns and click next to complete the steps. Observe the WHERE, ORDER BY, and the Advanced buttons. These buttons allow you to provide the where clause, order by clause, and specify the insert, update, and delete commands of SQL respectively. This way, you can manipulate the data.
(6) Add a GridView control on the form. Choose the data source and format the control using AutoFormat option.
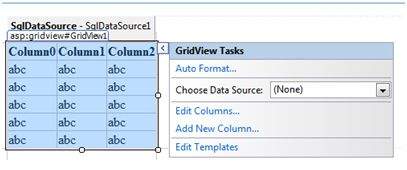
(7) After this the formatted GridView control displays the column headings, and the application is ready to execute.
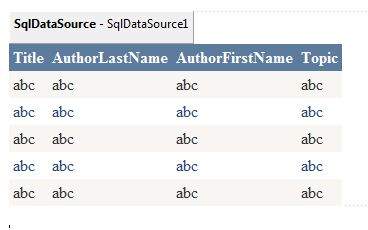
(8) Finally execute the application.
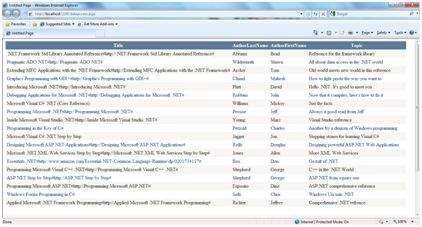
The content file code is as given:
<%@ Page Language="C#" AutoEventWireup="true" CodeBehind="dataaccess.aspx.cs"
   Inherits="datacaching.WebForm1" %>

<!DOCTYPE html PUBLIC "-//W3C//DTD XHTML 1.0 Transitional//EN"
   "http://www.w3.org/TR/xhtml1/DTD/xhtml1-transitional.dtd">

<html xmlns="http://www.w3.org/1999/xhtml" >
   <head runat="server">
      <title>
         Untitled Page
      </title>
   </head>
   <body>
      <form id="form1" runat="server">
         <div>
            <asp:SqlDataSource ID="SqlDataSource1" runat="server"
               ConnectionString= "<%$   ConnectionStrings:ASPDotNetStepByStepConnectionString%>"
               ProviderName= "<%$ ConnectionStrings:
                  ASPDotNetStepByStepConnectionString.ProviderName %>"
               SelectCommand="SELECT [Title], [AuthorLastName],
                  [AuthorFirstName], [Topic] FROM [DotNetReferences]">
            </asp:SqlDataSource>
            <asp:GridView ID="GridView1" runat="server"
               AutoGenerateColumns="False" CellPadding="4"
               DataSourceID="SqlDataSource1" ForeColor="#333333"
               GridLines="None">
               <RowStyle BackColor="#F7F6F3" ForeColor="#333333" />

               <Columns>
                  <asp:BoundField DataField="Title" HeaderText="Title"
                     SortExpression="Title" />
                  <asp:BoundField DataField="AuthorLastName"
                     HeaderText="AuthorLastName" SortExpression="AuthorLastName" />
                  <asp:BoundField DataField="AuthorFirstName"
                     HeaderText="AuthorFirstName" SortExpression="AuthorFirstName" />
                  <asp:BoundField DataField="Topic"
                     HeaderText="Topic" SortExpression="Topic" />
               </Columns>
               <FooterStyle BackColor="#5D7B9D"
                  Font-Bold="True" ForeColor="White" />
               <PagerStyle BackColor="#284775"
                  ForeColor="White" HorizontalAlign="Center" />
               <SelectedRowStyle BackColor="#E2DED6"
                  Font-Bold="True" ForeColor="#333333" />
               <HeaderStyle BackColor="#5D7B9D" Font-Bold="True"
                  ForeColor="White" />
               <EditRowStyle BackColor="#999999" />
               <AlternatingRowStyle BackColor="White" ForeColor="#284775" />
            </asp:GridView>
         </div>
      </form>
   </body>
</html>
ADO.NET
ADO.NET provides a bridge between the front end controls and the back end database. The ADO.NET objects encapsulate all the data access operations and the controls interact with these objects to display data, thus hiding the details of movement of data.
The following figure shows the ADO.NET objects at a glance:
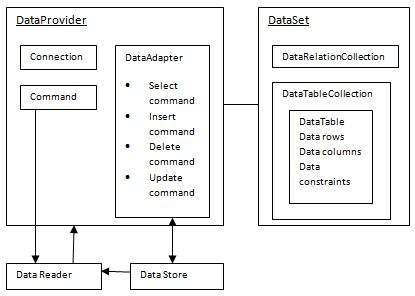
The DataSet Class
The dataset represents a subset of the database. It does not have a continuous connection to the database. To update the database a reconnection is required. The DataSet contains DataTable objects and DataRelation objects. The DataRelation objects represent the relationship between two tables.
Following table shows some important properties of the DataSet class:
| Properties | Description |
|---|---|
| CaseSensitive | Indicates whether string comparisons within the data tables are case-sensitive. |
| Container | Gets the container for the component. |
| DataSetName | Gets or sets the name of the current data set. |
| DefaultViewManager | Returns a view of data in the data set. |
| DesignMode | Indicates whether the component is currently in design mode. |
| EnforceConstraints | Indicates whether constraint rules are followed when attempting any update operation. |
| Events | Gets the list of event handlers that are attached to this component. |
| ExtendedProperties | Gets the collection of customized user information associated with the DataSet. |
| HasErrors | Indicates if there are any errors. |
| IsInitialized | Indicates whether the DataSet is initialized. |
| Locale | Gets or sets the locale information used to compare strings within the table. |
| Namespace | Gets or sets the namespace of the DataSet. |
| Prefix | Gets or sets an XML prefix that aliases the namespace of the DataSet. |
| Relations | Returns the collection of DataRelation objects. |
| Tables | Returns the collection of DataTable objects. |
The following table shows some important methods of the DataSet class:
| Methods | Description |
|---|---|
| AcceptChanges | Accepts all changes made since the DataSet was loaded or this method was called. |
| BeginInit | Begins the initialization of the DataSet. The initialization occurs at run time. |
| Clear | Clears data. |
| Clone | Copies the structure of the DataSet, including all DataTable schemas, relations, and constraints. Does not copy any data. |
| Copy | Copies both structure and data. |
| CreateDataReader() | Returns a DataTableReader with one result set per DataTable, in the same sequence as the tables appear in the Tables collection. |
| CreateDataReader(DataTable[]) | Returns a DataTableReader with one result set per DataTable. |
| EndInit | Ends the initialization of the data set. |
| Equals(Object) | Determines whether the specified Object is equal to the current Object. |
| Finalize | Free resources and perform other cleanups. |
| GetChanges | Returns a copy of the DataSet with all changes made since it was loaded or the AcceptChanges method was called. |
| GetChanges(DataRowState) | Gets a copy of DataSet with all changes made since it was loaded or the AcceptChanges method was called, filtered by DataRowState. |
| GetDataSetSchema | Gets a copy of XmlSchemaSet for the DataSet. |
| GetObjectData | Populates a serialization information object with the data needed to serialize the DataSet. |
| GetType | Gets the type of the current instance. |
| GetXML | Returns the XML representation of the data. |
| GetXMLSchema | Returns the XSD schema for the XML representation of the data. |
| HasChanges() | Gets a value indicating whether the DataSet has changes, including new, deleted, or modified rows. |
| HasChanges(DataRowState) | Gets a value indicating whether the DataSet has changes, including new, deleted, or modified rows, filtered by DataRowState. |
| IsBinarySerialized | Inspects the format of the serialized representation of the DataSet. |
| Load(IDataReader, LoadOption, DataTable[]) | Fills a DataSet with values from a data source using the supplied IDataReader, using an array of DataTable instances to supply the schema and namespace information. |
| Load(IDataReader, LoadOption, String[]) | Fills a DataSet with values from a data source using the supplied IDataReader, using an array of strings to supply the names for the tables within the DataSet. |
| Merge() | Merges the data with data from another DataSet. This method has different overloaded forms. |
| ReadXML() | Reads an XML schema and data into the DataSet. This method has different overloaded forms. |
| ReadXMLSchema(0) | Reads an XML schema into the DataSet. This method has different overloaded forms. |
| RejectChanges | Rolls back all changes made since the last call to AcceptChanges. |
| WriteXML() | Writes an XML schema and data from the DataSet. This method has different overloaded forms. |
| WriteXMLSchema() | Writes the structure of the DataSet as an XML schema. This method has different overloaded forms. |
The DataTable Class
The DataTable class represents the tables in the database. It has the following important properties; most of these properties are read only properties except the PrimaryKey property:
| Properties | Description |
|---|---|
| ChildRelations | Returns the collection of child relationship. |
| Columns | Returns the Columns collection. |
| Constraints | Returns the Constraints collection. |
| DataSet | Returns the parent DataSet. |
| DefaultView | Returns a view of the table. |
| ParentRelations | Returns the ParentRelations collection. |
| PrimaryKey | Gets or sets an array of columns as the primary key for the table. |
| Rows | Returns the Rows collection. |
The following table shows some important methods of the DataTable class:
| Methods | Description |
|---|---|
| AcceptChanges | Commits all changes since the last AcceptChanges. |
| Clear | Clears all data from the table. |
| GetChanges | Returns a copy of the DataTable with all changes made since the AcceptChanges method was called. |
| GetErrors | Returns an array of rows with errors. |
| ImportRows | Copies a new row into the table. |
| LoadDataRow | Finds and updates a specific row, or creates a new one, if not found any. |
| Merge | Merges the table with another DataTable. |
| NewRow | Creates a new DataRow. |
| RejectChanges | Rolls back all changes made since the last call to AcceptChanges. |
| Reset | Resets the table to its original state. |
| Select | Returns an array of DataRow objects. |
The DataRow Class
The DataRow object represents a row in a table. It has the following important properties:
| Properties | Description |
|---|---|
| HasErrors | Indicates if there are any errors. |
| Items | Gets or sets the data stored in a specific column. |
| ItemArrays | Gets or sets all the values for the row. |
| Table | Returns the parent table. |
The following table shows some important methods of the DataRow class:
| Methods | Description |
|---|---|
| AcceptChanges | Accepts all changes made since this method was called. |
| BeginEdit | Begins edit operation. |
| CancelEdit | Cancels edit operation. |
| Delete | Deletes the DataRow. |
| EndEdit | Ends the edit operation. |
| GetChildRows | Gets the child rows of this row. |
| GetParentRow | Gets the parent row. |
| GetParentRows | Gets parent rows of DataRow object. |
| RejectChanges | Rolls back all changes made since the last call to AcceptChanges. |
The DataAdapter Object
The DataAdapter object acts as a mediator between the DataSet object and the database. This helps the Dataset to contain data from multiple databases or other data source.
The DataReader Object
The DataReader object is an alternative to the DataSet and DataAdapter combination. This object provides a connection oriented access to the data records in the database. These objects are suitable for read-only access, such as populating a list and then breaking the connection.
DbCommand and DbConnection Objects
The DbConnection object represents a connection to the data source. The connection could be shared among different command objects.
The DbCommand object represents the command or a stored procedure sent to the database from retrieving or manipulating data.
Example
So far, we have used tables and databases already existing in our computer. In this example, we will create a table, add column, rows and data into it and display the table using a GridView object.
The source file code is as given:
<%@ Page Language="C#" AutoEventWireup="true" CodeBehind="Default.aspx.cs"
   Inherits="createdatabase._Default" %>

<!DOCTYPE html PUBLIC "-//W3C//DTD XHTML 1.0 Transitional//EN"
   "http://www.w3.org/TR/xhtml1/DTD/xhtml1-transitional.dtd">

<html xmlns="http://www.w3.org/1999/xhtml" >
   <head runat="server">
      <title>
         Untitled Page
      </title>
   </head>
   <body>
      <form id="form1" runat="server">
         <div>
            <asp:GridView ID="GridView1" runat="server">
            </asp:GridView>
         </div>
      </form>
   </body>
</html>
The code behind file is as given:
namespace createdatabase
{
   public partial class _Default : System.Web.UI.Page
   {
      protected void Page_Load(object sender, EventArgs e)
      {
         if (!IsPostBack)
         {
            DataSet ds = CreateDataSet();
            GridView1.DataSource = ds.Tables["Student"];
            GridView1.DataBind();
         }
      }
      private DataSet CreateDataSet()
      {
         //creating a DataSet object for tables
         DataSet dataset = new DataSet();

         // creating the student table
         DataTable Students = CreateStudentTable();
         dataset.Tables.Add(Students);
         return dataset;
      }
      private DataTable CreateStudentTable()
      {
         DataTable Students = new DataTable("Student");

         // adding columns
         AddNewColumn(Students, "System.Int32", "StudentID");
         AddNewColumn(Students, "System.String", "StudentName");
         AddNewColumn(Students, "System.String", "StudentCity");

         // adding rows
         AddNewRow(Students, 1, "M H Kabir", "Kolkata");
         AddNewRow(Students, 1, "Shreya Sharma", "Delhi");
         AddNewRow(Students, 1, "Rini Mukherjee", "Hyderabad");
         AddNewRow(Students, 1, "Sunil Dubey", "Bikaner");
         AddNewRow(Students, 1, "Rajat Mishra", "Patna");

         return Students;
      }

      private void AddNewColumn(DataTable table, string columnType, string  columnName)
      {
         DataColumn column = table.Columns.Add(columnName,  Type.GetType(columnType));
      }

      //adding data into the table
      private void AddNewRow(DataTable table, int id, string name, string city)
      {
         DataRow newrow = table.NewRow();
         newrow["StudentID"] = id;
         newrow["StudentName"] = name;
         newrow["StudentCity"] = city;
         table.Rows.Add(newrow);
      }
   }
}
When you execute the program, observe the following:
The application first creates a data set and binds it with the grid view control using the DataBind() method of the GridView control.
The Createdataset() method is a user defined function, which creates a new DataSet object and then calls another user defined method CreateStudentTable() to create the table and add it to the Tables collection of the data set.
The CreateStudentTable() method calls the user defined methods AddNewColumn() and AddNewRow() to create the columns and rows of the table as well as to add data to the rows.
When the page is executed, it returns the rows of the table as shown:
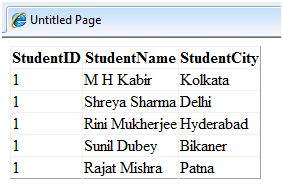
ASP.NET - File Uploading
ASP.NET has two controls that allow users to upload files to the web server. Once the server receives the posted file data, the application can save it, check it, or ignore it. The following controls allow the file uploading:
HtmlInputFile - an HTML server control
FileUpload - and ASP.NET web control
Both controls allow file uploading, but the FileUpload control automatically sets the encoding of the form, whereas the HtmlInputFile does not do so.
In this tutorial, we use the FileUpload control. The FileUpload control allows the user to browse for and select the file to be uploaded, providing a browse button and a text box for entering the filename.
Once, the user has entered the filename in the text box by typing the name or browsing, the SaveAs method of the FileUpload control can be called to save the file to the disk.
The basic syntax of FileUpload is:
<asp:FileUpload ID= "Uploader" runat = "server" />
The FileUpload class is derived from the WebControl class, and inherits all its members. Apart from those, the FileUpload class has the following read-only properties:
| Properties | Description |
|---|---|
| FileBytes | Returns an array of the bytes in a file to be uploaded. |
| FileContent | Returns the stream object pointing to the file to be uploaded. |
| FileName | Returns the name of the file to be uploaded. |
| HasFile | Specifies whether the control has a file to upload. |
| PostedFile | Returns a reference to the uploaded file. |
The posted file is encapsulated in an object of type HttpPostedFile, which could be accessed through the PostedFile property of the FileUpload class.
The HttpPostedFile class has the following frequently used properties:
| Properties | Description |
|---|---|
| ContentLength | Returns the size of the uploaded file in bytes. |
| ContentType | Returns the MIME type of the uploaded file. |
| FileName | Returns the full filename. |
| InputStream | Returns a stream object pointing to the uploaded file. |
Example
The following example demonstrates the FileUpload control and its properties. The form has a FileUpload control along with a save button and a label control for displaying the file name, file type, and file length.
In the design view, the form looks as follows:
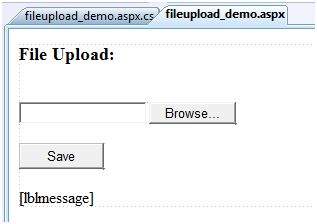
The content file code is as given:
<body>
   <form id="form1" runat="server">
      <div>
         <h3> File Upload:</h3>
         <br />
         <asp:FileUpload ID="FileUpload1" runat="server" />
         <br /><br />
         <asp:Button ID="btnsave" runat="server" onclick="btnsave_Click"  Text="Save" style="width:85px" />
         <br /><br />
         <asp:Label ID="lblmessage" runat="server" />
      </div>
   </form>
</body>
The code behind the save button is as given:
protected void btnsave_Click(object sender, EventArgs e)
{
   StringBuilder sb = new StringBuilder();
   if (FileUpload1.HasFile)
   {
      try
      {
         sb.AppendFormat(" Uploading file: {0}", FileUpload1.FileName);

         //saving the file
         FileUpload1.SaveAs("<c:\\SaveDirectory>" + FileUpload1.FileName);

         //Showing the file information
         sb.AppendFormat("<br/> Save As: {0}",  FileUpload1.PostedFile.FileName);
         sb.AppendFormat("<br/> File type: {0}",    FileUpload1.PostedFile.ContentType);
         sb.AppendFormat("<br/> File length: {0}",  FileUpload1.PostedFile.ContentLength);
         sb.AppendFormat("<br/> File name: {0}",  FileUpload1.PostedFile.FileName);
      }
      catch (Exception ex)
      {
         sb.Append("<br/> Error <br/>");
         sb.AppendFormat("Unable to save file <br/> {0}", ex.Message);
      }
   }
   else
   {
      lblmessage.Text = sb.ToString();
   }
}
Note the following:
The StringBuilder class is derived from System.IO namespace, so it needs to be included.
The try and catch blocks are used for catching errors, and display the error message.
ASP.NET - Ad Rotator
The AdRotator control randomly selects banner graphics from a list, which is specified in an external XML schedule file. This external XML schedule file is called the advertisement file.
The AdRotator control allows you to specify the advertisement file and the type of window that the link should follow in the AdvertisementFile and the Target property respectively.
The basic syntax of adding an AdRotator is as follows:
<asp:AdRotator runat = "server" AdvertisementFile = "adfile.xml" Target = "_blank" />
Before going into the details of the AdRotator control and its properties, let us look into the construction of the advertisement file.
The Advertisement File
The advertisement file is an XML file, which contains the information about the advertisements to be displayed.
Extensible Markup Language (XML) is a W3C standard for text document markup. It is a text-based markup language that enables you to store data in a structured format by using meaningful tags. The term 'extensible' implies that you can extend your ability to describe a document by defining meaningful tags for the application.
XML is not a language in itself, like HTML, but a set of rules for creating new markup languages. It is a meta-markup language. It allows developers to create custom tag sets for special uses. It structures, stores, and transports the information.
Following is an example of XML file:
<BOOK>
   <NAME> Learn XML </NAME>
   <AUTHOR> Samuel Peterson </AUTHOR>
   <PUBLISHER> NSS Publications </PUBLISHER>
   <PRICE> $30.00</PRICE>
</BOOK>
Like all XML files, the advertisement file needs to be a structured text file with well-defined tags delineating the data. There are the following standard XML elements that are commonly used in the advertisement file:
| Element | Description |
|---|---|
| Advertisements | Encloses the advertisement file. |
| Ad | Delineates separate ad. |
| ImageUrl | The path of image that will be displayed. |
| NavigateUrl | The link that will be followed when the user clicks the ad. |
| AlternateText | The text that will be displayed instead of the picture if it cannot be displayed. |
| Keyword | Keyword identifying a group of advertisements. This is used for filtering. |
| Impressions | The number indicating how often an advertisement will appear. |
| Height | Height of the image to be displayed. |
| Width | Width of the image to be displayed. |
Apart from these tags, customs tags with custom attributes could also be included. The following code illustrates an advertisement file ads.xml:
<Advertisements>
   <Ad>
      <ImageUrl>rose1.jpg</ImageUrl>
      <NavigateUrl>http://www.1800flowers.com</NavigateUrl>
      <AlternateText>
         Order flowers, roses, gifts and more
      </AlternateText>
      <Impressions>20</Impressions>
      <Keyword>flowers</Keyword>
   </Ad>

   <Ad>
      <ImageUrl>rose2.jpg</ImageUrl>
      <NavigateUrl>http://www.babybouquets.com.au</NavigateUrl>
      <AlternateText>Order roses and flowers</AlternateText>
      <Impressions>20</Impressions>
      <Keyword>gifts</Keyword>
   </Ad>

   <Ad>
      <ImageUrl>rose3.jpg</ImageUrl>
      <NavigateUrl>http://www.flowers2moscow.com</NavigateUrl>
      <AlternateText>Send flowers to Russia</AlternateText>
      <Impressions>20</Impressions>
      <Keyword>russia</Keyword>
   </Ad>

   <Ad>
      <ImageUrl>rose4.jpg</ImageUrl>
      <NavigateUrl>http://www.edibleblooms.com</NavigateUrl>
      <AlternateText>Edible Blooms</AlternateText>
      <Impressions>20</Impressions>
      <Keyword>gifts</Keyword>
   </Ad>
</Advertisements>
Properties and Events of the AdRotator Class
The AdRotator class is derived from the WebControl class and inherits its properties. Apart from those, the AdRotator class has the following properties:
| Properties | Description |
|---|---|
| AdvertisementFile | The path to the advertisement file. |
| AlternateTextFeild | The element name of the field where alternate text is provided. The default value is AlternateText. |
| DataMember | The name of the specific list of data to be bound when advertisement file is not used. |
| DataSource | Control from where it would retrieve data. |
| DataSourceID | Id of the control from where it would retrieve data. |
| Font | Specifies the font properties associated with the advertisement banner control. |
| ImageUrlField | The element name of the field where the URL for the image is provided. The default value is ImageUrl. |
| KeywordFilter | For displaying the keyword based ads only. |
| NavigateUrlField | The element name of the field where the URL to navigate to is provided. The default value is NavigateUrl. |
| Target | The browser window or frame that displays the content of the page linked. |
| UniqueID | Obtains the unique, hierarchically qualified identifier for the AdRotator control. |
Following are the important events of the AdRotator class:
| Events | Description |
|---|---|
| AdCreated | It is raised once per round trip to the server after creation of the control, but before the page is rendered |
| DataBinding | Occurs when the server control binds to a data source. |
| DataBound | Occurs after the server control binds to a data source. |
| Disposed | Occurs when a server control is released from memory, which is the last stage of the server control lifecycle when an ASP.NET page is requested |
| Init | Occurs when the server control is initialized, which is the first step in its lifecycle. |
| Load | Occurs when the server control is loaded into the Page object. |
| PreRender | Occurs after the Control object is loaded but prior to rendering. |
| Unload | Occurs when the server control is unloaded from memory. |
Working with AdRotator Control
Create a new web page and place an AdRotator control on it.
<form id="form1" runat="server">
   <div>
      <asp:AdRotator ID="AdRotator1" runat="server" AdvertisementFile  ="~/ads.xml" onadcreated="AdRotator1_AdCreated" />
   </div>
</form>
The ads.xml file and the image files should be located in the root directory of the web site.
Try to execute the above application and observe that each time the page is reloaded, the ad is changed.
ASP.NET - Calendars
The calendar control is a functionally rich web control, which provides the following capabilities:
- Displaying one month at a time
- Selecting a day, a week or a month
- Selecting a range of days
- Moving from month to month
- Controlling the display of the days programmatically
The basic syntax of a calendar control is:
<asp:Calender ID = "Calendar1" runat = "server">
</asp:Calender>
Properties and Events of the Calendar Control
The calendar control has many properties and events, using which you can customize the actions and display of the control. The following table provides some important properties of the Calendar control:
| Properties | Description |
|---|---|
| Caption | Gets or sets the caption for the calendar control. |
| CaptionAlign | Gets or sets the alignment for the caption. |
| CellPadding | Gets or sets the number of spaces between the data and the cell border. |
| CellSpacing | Gets or sets the space between cells. |
| DayHeaderStyle | Gets the style properties for the section that displays the day of the week. |
| DayNameFormat | Gets or sets format of days of the week. |
| DayStyle | Gets the style properties for the days in the displayed month. |
| FirstDayOfWeek | Gets or sets the day of week to display in the first column. |
| NextMonthText | Gets or sets the text for next month navigation control. The default value is >. |
| NextPrevFormat | Gets or sets the format of the next and previous month navigation control. |
| OtherMonthDayStyle | Gets the style properties for the days on the Calendar control that are not in the displayed month. |
| PrevMonthText | Gets or sets the text for previous month navigation control. The default value is <. |
| SelectedDate | Gets or sets the selected date. |
| SelectedDates | Gets a collection of DateTime objects representing the selected dates. |
| SelectedDayStyle | Gets the style properties for the selected dates. |
| SelectionMode | Gets or sets the selection mode that specifies whether the user can select a single day, a week or an entire month. |
| SelectMonthText | Gets or sets the text for the month selection element in the selector column. |
| SelectorStyle | Gets the style properties for the week and month selector column. |
| SelectWeekText | Gets or sets the text displayed for the week selection element in the selector column. |
| ShowDayHeader | Gets or sets the value indicating whether the heading for the days of the week is displayed. |
| ShowGridLines | Gets or sets the value indicating whether the gridlines would be shown. |
| ShowNextPrevMonth | Gets or sets a value indicating whether next and previous month navigation elements are shown in the title section. |
| ShowTitle | Gets or sets a value indicating whether the title section is displayed. |
| TitleFormat | Gets or sets the format for the title section. |
| Titlestyle | Get the style properties of the title heading for the Calendar control. |
| TodayDayStyle | Gets the style properties for today's date on the Calendar control. |
| TodaysDate | Gets or sets the value for today's date. |
| UseAccessibleHeader | Gets or sets a value that indicates whether to render the table header <th> HTML element for the day headers instead of the table data <td> HTML element. |
| VisibleDate | Gets or sets the date that specifies the month to display. |
| WeekendDayStyle | Gets the style properties for the weekend dates on the Calendar control. |
The Calendar control has the following three most important events that allow the developers to program the calendar control. They are:
| Events | Description |
|---|---|
| SelectionChanged | It is raised when a day, a week or an entire month is selected. |
| DayRender | It is raised when each data cell of the calendar control is rendered. |
| VisibleMonthChanged | It is raised when user changes a month. |
Working with the Calendar Control
Putting a bare-bone calendar control without any code behind file provides a workable calendar to a site, which shows the months and days of the year. It also allows navigation to next and previous months.
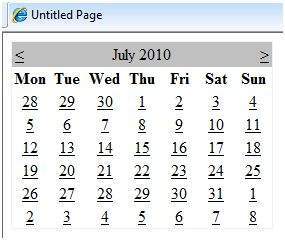
Calendar controls allow the users to select a single day, a week, or an entire month. This is done by using the SelectionMode property. This property has the following values:
| Properties | Description |
|---|---|
| Day | To select a single day. |
| DayWeek | To select a single day or an entire week. |
| DayWeekMonth | To select a single day, a week, or an entire month. |
| None | Nothing can be selected. |
The syntax for selecting days:
<asp:Calender ID = "Calendar1" runat = "server" SelectionMode="DayWeekMonth">
</asp:Calender>
When the selection mode is set to the value DayWeekMonth, an extra column with the > symbol appears for selecting the week, and a >> symbol appears to the left of the days name for selecting the month.
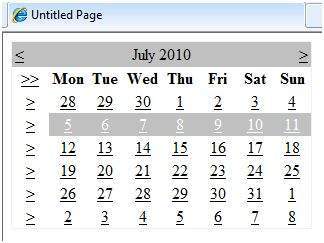
Example
The following example demonstrates selecting a date and displays the date in a label:
The content file code is as follows:
<%@ Page Language="C#" AutoEventWireup="true" CodeBehind="Default.aspx.cs"
   Inherits="calendardemo._Default" %>

<!DOCTYPE html PUBLIC "-//W3C//DTD XHTML 1.0 Transitional//EN"
   "http://www.w3.org/TR/xhtml1/DTD/xhtml1-transitional.dtd">

<html xmlns="http://www.w3.org/1999/xhtml" >
   <head runat="server">
      <title>
         Untitled Page
      </title>
   </head>
   <body>
      <form id="form1" runat="server">
         <div>
            <h3> Your Birthday:</h3>
            <asp:Calendar ID="Calendar1" runat="server  SelectionMode="DayWeekMonth"  onselectionchanged="Calendar1_SelectionChanged">
            </asp:Calendar>
         </div>
         <p>Todays date is:
            <asp:Label ID="lblday" runat="server"></asp:Label>
         </p>

         <p>Your Birday is:
            <asp:Label ID="lblbday" runat="server"></asp:Label>
         </p>
      </form>
   </body>
</html>
The event handler for the event SelectionChanged:
protected void Calendar1_SelectionChanged(object sender, EventArgs e)
{
   lblday.Text = Calendar1.TodaysDate.ToShortDateString();
   lblbday.Text = Calendar1.SelectedDate.ToShortDateString();
}
When the file is run, it should produce the following output:
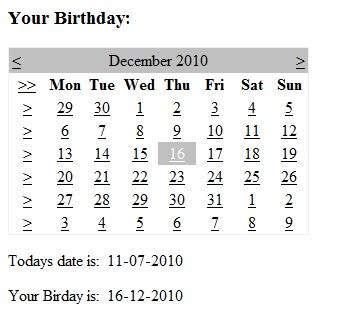
ASP.NET - Multi Views
MultiView and View controls allow you to divide the content of a page into different groups, displaying only one group at a time. Each View control manages one group of content and all the View controls are held together in a MultiView control.
The MultiView control is responsible for displaying one View control at a time. The View displayed is called the active view.
The syntax of MultiView control is:
<asp:MultView ID= "MultiView1" runat= "server">
</asp:MultiView>
The syntax of View control is:
<asp:View ID= "View1" runat= "server">
</asp:View>
However, the View control cannot exist on its own. It would render error if you try to use it stand-alone. It is always used with a Multiview control as:
<asp:MultView ID= "MultiView1" runat= "server">
   <asp:View ID= "View1" runat= "server"> </asp:View>
</asp:MultiView>
Properties of View and MultiView Controls
Both View and MultiView controls are derived from Control class and inherit all its properties, methods, and events. The most important property of the View control is Visible property of type Boolean, which sets the visibility of a view.
The MultiView control has the following important properties:
| Properties | Description |
|---|---|
| Views | Collection of View controls within the MultiView. |
| ActiveViewIndex | A zero based index that denotes the active view. If no view is active, then the index is -1. |
The CommandName attribute of the button control associated with the navigation of the MultiView control are associated with some related field of the MultiView control.
For example, if a button control with CommandName value as NextView is associated with the navigation of the multiview, it automatically navigates to the next view when the button is clicked.
The following table shows the default command names of the above properties:
| Properties | Description |
|---|---|
| NextViewCommandName | NextView |
| PreviousViewCommandName | PrevView |
| SwitchViewByIDCommandName | SwitchViewByID |
| SwitchViewByIndexCommandName | SwitchViewByIndex |
The important methods of the multiview control are:
| Methods | Description |
|---|---|
| SetActiveview | Sets the active view |
| GetActiveview | Retrieves the active view |
Every time a view is changed, the page is posted back to the server and a number of events are raised. Some important events are:
| Events | Description |
|---|---|
| ActiveViewChanged | Raised when a view is changed |
| Activate | Raised by the active view |
| Deactivate | Raised by the inactive view |
Apart from the above mentioned properties, methods and events, multiview control inherits the members of the control and object class.
Example
The example page has three views. Each view has two button for navigating through the views.
The content file code is as follows:
<%@ Page Language="C#" AutoEventWireup="true" CodeBehind="Default.aspx.cs"
   Inherits="multiviewdemo._Default" %>

<!DOCTYPE html PUBLIC "-//W3C//DTD XHTML 1.0 Transitional//EN"
   "http://www.w3.org/TR/xhtml1/DTD/xhtml1-transitional.dtd">

<html xmlns="http://www.w3.org/1999/xhtml" >
   <head runat="server">
      <title>
         Untitled Page
      </title>
   </head>
   <body>
      <form id="form1" runat="server">
         <div>
            <h2>MultiView and View Controls</h2>
            <asp:DropDownList ID="DropDownList1" runat="server"
               onselectedindexchanged="DropDownList1_SelectedIndexChanged">
            </asp:DropDownList>
            <hr />
            <asp:MultiView ID="MultiView1" runat="server" ActiveViewIndex="2"
               onactiveviewchanged="MultiView1_ActiveViewChanged" >
               <asp:View ID="View1" runat="server">
                  <h3>This is view 1</h3>
                  <br />
                  <asp:Button CommandName="NextView" ID="btnnext1"
                     runat="server" Text = "Go To Next" />
                  <asp:Button CommandArgument="View3"
                     CommandName="SwitchViewByID" ID="btnlast" runat="server" Text  ="Go To Last" />
               </asp:View>

               <asp:View ID="View2" runat="server">
                  <h3>This is view 2</h3>
                  <asp:Button CommandName="NextView" ID="btnnext2"
                     runat="server" Text = "Go To Next" />
                  <asp:Button CommandName="PrevView" ID="btnprevious2"
                     runat="server" Text = "Go To Previous View" />
               </asp:View>

               <asp:View ID="View3" runat="server">
                  <h3> This is view 3</h3>
                  <br />
                  <asp:Calendar ID="Calender1" runat="server"></asp:Calendar>
                  <br />
                  <asp:Button  CommandArgument="0"
                     CommandName="SwitchViewByIndex" ID="btnfirst"   runat="server" Text = "Go To Next" />
                  <asp:Button CommandName="PrevView" ID="btnprevious"
                     runat="server" Text = "Go To Previous View" />
               </asp:View>
            </asp:MultiView>
         </div>
      </form>
   </body>
</html>
Observe the following:
The MultiView.ActiveViewIndex determines which view will be shown. This is the only view rendered on the page. The default value for the ActiveViewIndex is -1, when no view is shown. Since the ActiveViewIndex is defined as 2 in the example, it shows the third view, when executed.
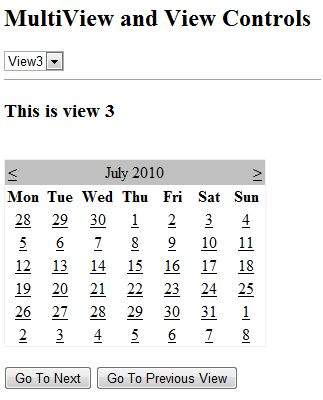
ASP.NET - Panel Controls
The Panel control works as a container for other controls on the page. It controls the appearance and visibility of the controls it contains. It also allows generating controls programmatically.
The basic syntax of panel control is as follows:
<asp:Panel ID= "Panel1"  runat = "server">
</asp:Panel>
The Panel control is derived from the WebControl class. Hence it inherits all the properties, methods and events of the same. It does not have any method or event of its own. However it has the following properties of its own:
| Properties | Description |
|---|---|
| BackImageUrl | URL of the background image of the panel. |
| DefaultButton | Gets or sets the identifier for the default button that is contained in the Panel control. |
| Direction | Text direction in the panel. |
| GroupingText | Allows grouping of text as a field. |
| HorizontalAlign | Horizontal alignment of the content in the panel. |
| ScrollBars | Specifies visibility and location of scrollbars within the panel. |
| Wrap | Allows text wrapping. |
Working with the Panel Control
Let us start with a simple scrollable panel of specific height and width and a border style. The ScrollBars property is set to both the scrollbars, hence both the scrollbars are rendered.
The source file has the following code for the panel tag:
<asp:Panel ID="Panel1" runat="server" BorderColor="#990000" BorderStyle="Solid"
   Borderstyle="width:1px" Height="116px" ScrollBars="Both" style="width:278px">

   This is a scrollable panel.
   <br />
   <br />

   <asp:Button ID="btnpanel" runat="server" Text="Button" style="width:82px" />
</asp:Panel>
The panel is rendered as follows:
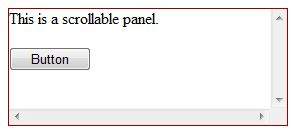
Example
The following example demonstrates dynamic content generation. The user provides the number of label controls and textboxes to be generated on the panel. The controls are generated programmatically.
Change the properties of the panel using the properties window. When you select a control on the design view, the properties window displays the properties of that particular control and allows you to make changes without typing.
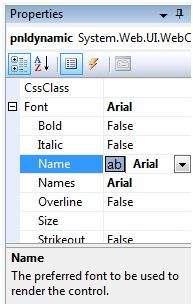
The source file for the example is as follows:
<form id="form1" runat="server">
   <div>
      <asp:Panel ID="pnldynamic" runat="server" BorderColor="#990000"
         BorderStyle="Solid" Borderstyle="width:1px" Height="150px"  ScrollBars="Auto" style="width:60%" BackColor="#CCCCFF"  Font-Names="Courier" HorizontalAlign="Center">

         This panel shows dynamic control generation:
         <br />
         <br />
      </asp:Panel>
   </div>

   <table style="width: 51%;">
      <tr>
         <td class="style2">No of Labels:</td>
         <td class="style1">
            <asp:DropDownList ID="ddllabels" runat="server">
               <asp:ListItem>0</asp:ListItem>
               <asp:ListItem>1</asp:ListItem>
               <asp:ListItem>2</asp:ListItem>
               <asp:ListItem>3</asp:ListItem>
               <asp:ListItem>4</asp:ListItem>
            </asp:DropDownList>
         </td>
      </tr>

      <tr>
         <td class="style2"> </td>
         <td class="style1"> </td>
      </tr>

      <tr>
         <td class="style2">No of Text Boxes :</td>
         <td class="style1">
            <asp:DropDownList ID="ddltextbox" runat="server">
               <asp:ListItem>0</asp:ListItem>
               <asp:ListItem Value="1"></asp:ListItem>
               <asp:ListItem>2</asp:ListItem>
               <asp:ListItem>3</asp:ListItem>
               <asp:ListItem Value="4"></asp:ListItem>
            </asp:DropDownList>
         </td>
      </tr>

      <tr>
         <td class="style2"> </td>
         <td class="style1"> </td>
      </tr>

      <tr>
         <td class="style2">
            <asp:CheckBox ID="chkvisible" runat="server"
               Text="Make the Panel Visible" />
         </td>

         <td class="style1">
            <asp:Button ID="btnrefresh" runat="server" Text="Refresh Panel"
               style="width:129px" />
         </td>
      </tr>
   </table>
</form>
The code behind the Page_Load event is responsible for generating the controls dynamically:
public partial class _Default : System.Web.UI.Page
{
   protected void Page_Load(object sender, EventArgs e)
   {
      //make the panel visible
      pnldynamic.Visible = chkvisible.Checked;

      //generating the lable controls:
      int n = Int32.Parse(ddllabels.SelectedItem.Value);
      for (int i = 1; i <= n; i++)
      {
         Label lbl = new Label();
         lbl.Text = "Label" + (i).ToString();
         pnldynamic.Controls.Add(lbl);
         pnldynamic.Controls.Add(new LiteralControl("<br />"));
      }

      //generating the text box controls:

      int m = Int32.Parse(ddltextbox.SelectedItem.Value);
      for (int i = 1; i <= m; i++)
      {
         TextBox txt = new TextBox();
         txt.Text = "Text Box" + (i).ToString();
         pnldynamic.Controls.Add(txt);
         pnldynamic.Controls.Add(new LiteralControl("<br />"));
      }
   }
}
When executed, the panel is rendered as:
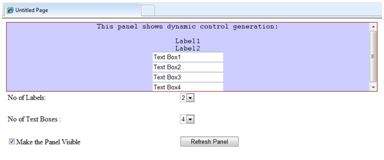
ASP.NET - Ajax Control
AJAX stands for Asynchronous JavaScript and XML. This is a cross platform technology which speeds up response time. The AJAX server controls add script to the page which is executed and processed by the browser.
However like other ASP.NET server controls, these AJAX server controls also can have methods and event handlers associated with them, which are processed on the server side.
The control toolbox in the Visual Studio IDE contains a group of controls called the 'AJAX Extensions'
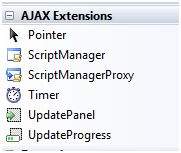
The ScriptManager Control
The ScriptManager control is the most important control and must be present on the page for other controls to work.
It has the basic syntax:
<asp:ScriptManager ID="ScriptManager1" runat="server">
</asp:ScriptManager>
If you create an 'Ajax Enabled site' or add an 'AJAX Web Form' from the 'Add Item' dialog box, the web form automatically contains the script manager control. The ScriptManager control takes care of the client-side script for all the server side controls.
The UpdatePanel Control
The UpdatePanel control is a container control and derives from the Control class. It acts as a container for the child controls within it and does not have its own interface. When a control inside it triggers a post back, the UpdatePanel intervenes to initiate the post asynchronously and update just that portion of the page.
For example, if a button control is inside the update panel and it is clicked, only the controls within the update panel will be affected, the controls on the other parts of the page will not be affected. This is called the partial post back or the asynchronous post back.
Example
Add an AJAX web form in your application. It contains the script manager control by default. Insert an update panel. Place a button control along with a label control within the update panel control. Place another set of button and label outside the panel.
The design view looks as follows:
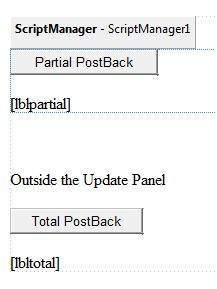
The source file is as follows:
<form id="form1" runat="server">
   <div>
      <asp:ScriptManager ID="ScriptManager1" runat="server" />
   </div>
   <asp:UpdatePanel ID="UpdatePanel1" runat="server">
      <ContentTemplate>
         <asp:Button ID="btnpartial" runat="server"
            onclick="btnpartial_Click" Text="Partial PostBack"/>
         <br />
         <br />
         <asp:Label ID="lblpartial" runat="server"></asp:Label>
      </ContentTemplate>
   </asp:UpdatePanel>
   <p> </p>
   <p>Outside the Update Panel</p>
   <p>
      <asp:Button ID="btntotal" runat="server"
         onclick="btntotal_Click" Text="Total PostBack" />
   </p>
   <asp:Label ID="lbltotal" runat="server"></asp:Label>
</form>
Both the button controls have same code for the event handler:
string time = DateTime.Now.ToLongTimeString();
lblpartial.Text = "Showing time from panel" + time;
lbltotal.Text = "Showing time from outside" + time;
Observe that when the page is executed, if the total post back button is clicked, it updates time in both the labels but if the partial post back button is clicked, it only updates the label within the update panel.
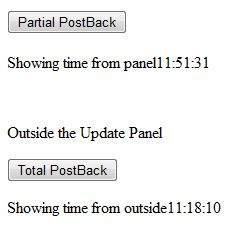
A page can contain multiple update panels with each panel containing other controls like a grid and displaying different part of data.
When a total post back occurs, the update panel content is updated by default. This default mode could be changed by changing the UpdateMode property of the control. Let us look at other properties of the update panel.
Properties of the UpdatePanel Control
The following table shows the properties of the update panel control:
| Properties | Description |
|---|---|
| ChildrenAsTriggers | This property indicates whether the post backs are coming from the child controls, which cause the update panel to refresh. |
| ContentTemplate | It is the content template and defines what appears in the update panel when it is rendered. |
| ContentTemplateContainer | Retrieves the dynamically created template container object and used for adding child controls programmatically. |
| IsInPartialRendering | Indicates whether the panel is being updated as part of the partial post back. |
| RenderMode | Shows the render modes. The available modes are Block and Inline. |
| UpdateMode | Gets or sets the rendering mode by determining some conditions. |
| Triggers | Defines the collection trigger objects each corresponding to an event causing the panel to refresh automatically. |
Methods of the UpdatePanel Control
The following table shows the methods of the update panel control:
| Methods | Description |
|---|---|
| CreateContentTemplateContainer | Creates a Control object that acts as a container for child controls that define the UpdatePanel control's content. |
| CreateControlCollection | Returns the collection of all controls that are contained in the UpdatePanel control. |
| Initialize | Initializes the UpdatePanel control trigger collection if partial-page rendering is enabled. |
| Update | Causes an update of the content of an UpdatePanel control. |
The behavior of the update panel depends upon the values of the UpdateMode property and ChildrenAsTriggers property.
| UpdateMode | ChildrenAsTriggers | Effect |
|---|---|---|
| Always | False | Illegal parameters. |
| Always | True | UpdatePanel refreshes if whole page refreshes or a child control on it posts back. |
| Conditional | False | UpdatePanel refreshes if whole page refreshes or a triggering control outside it initiates a refresh. |
| Conditional | True | UpdatePanel refreshes if whole page refreshes or a child control on it posts back or a triggering control outside it initiates a refresh. |
The UpdateProgress Control
The UpdateProgress control provides a sort of feedback on the browser while one or more update panel controls are being updated. For example, while a user logs in or waits for server response while performing some database oriented job.
It provides a visual acknowledgement like "Loading page...", indicating the work is in progress.
The syntax for the UpdateProgress control is:
<asp:UpdateProgress ID="UpdateProgress1" runat="server" DynamicLayout="true"
   AssociatedUpdatePanelID="UpdatePanel1" >
   <ProgressTemplate>
      Loading...
   </ProgressTemplate>
</asp:UpdateProgress>
The above snippet shows a simple message within the ProgressTemplate tag. However, it could be an image or other relevant controls. The UpdateProgress control displays for every asynchronous postback unless it is assigned to a single update panel using the AssociatedUpdatePanelID property.
Properties of the UpdateProgress Control
The following table shows the properties of the update progress control:
| Properties | Description |
|---|---|
| AssociatedUpdatePanelID | Gets and sets the ID of the update panel with which this control is associated. |
| Attributes | Gets or sets the cascading style sheet (CSS) attributes of the UpdateProgress control. |
| DisplayAfter | Gets and sets the time in milliseconds after which the progress template is displayed. The default is 500. |
| DynamicLayout | Indicates whether the progress template is dynamically rendered. |
| ProgressTemplate | Indicates the template displayed during an asynchronous post back which takes more time than the DisplayAfter time. |
Methods of the UpdateProgress Control
The following table shows the methods of the update progress control:
| Methods | Description |
|---|---|
| GetScriptDescriptors | Returns a list of components, behaviors, and client controls that are required for the UpdateProgress control's client functionality. |
| GetScriptReferences | Returns a list of client script library dependencies for the UpdateProgress control. |
The Timer Control
The timer control is used to initiate the post back automatically. This could be done in two ways:
(1) Setting the Triggers property of the UpdatePanel control:
<Triggers>
   <asp:AsyncPostBackTrigger ControlID="btnpanel2" EventName="Click" />
</Triggers>
(2) Placing a timer control directly inside the UpdatePanel to act as a child control trigger. A single timer can be the trigger for multiple UpdatePanels.
<asp:UpdatePanel ID="UpdatePanel1" runat="server" UpdateMode="Always">
   <ContentTemplate>
      <asp:Timer ID="Timer1" runat="server" Interval="1000">
      </asp:Timer>
      <asp:Label ID="Label1" runat="server" Height="101px" style="width:304px" >
      </asp:Label>
   </ContentTemplate>
</asp:UpdatePanel>
ASP.NET - Data Sources
A data source control interacts with the data-bound controls and hides the complex data binding processes. These are the tools that provide data to the data bound controls and support execution of operations like insertions, deletions, sorting, and updates.
Each data source control wraps a particular data provider-relational databases, XML documents, or custom classes and helps in:
- Managing connection
- Selecting data
- Managing presentation aspects like paging, caching, etc.
- Manipulating data
There are many data source controls available in ASP.NET for accessing data from SQL Server, from ODBC or OLE DB servers, from XML files, and from business objects.
Based on type of data, these controls could be divided into two categories:
- Hierarchical data source controls
- Table-based data source controls
The data source controls used for hierarchical data are:
XMLDataSource - It allows binding to XML files and strings with or without schema information.
SiteMapDataSource - It allows binding to a provider that supplies site map information.
The data source controls used for tabular data are:
| Data source controls | Description |
|---|---|
| SqlDataSource | It represents a connection to an ADO.NET data provider that returns SQL data, including data sources accessible via OLEDB and ODBC. |
| ObjectDataSource | It allows binding to a custom .Net business object that returns data. |
| LinqdataSource | It allows binding to the results of a Linq-to-SQL query (supported by ASP.NET 3.5 only). |
| AccessDataSource | It represents connection to a Microsoft Access database. |
Data Source Views
Data source views are objects of the DataSourceView class. Which represent a customized view of data for different data operations such as sorting, filtering, etc.
The DataSourceView class serves as the base class for all data source view classes, which define the capabilities of data source controls.
The following table provides the properties of the DataSourceView class:
| Properties | Description |
|---|---|
| CanDelete | Indicates whether deletion is allowed on the underlying data source. |
| CanInsert | Indicates whether insertion is allowed on the underlying data source. |
| CanPage | Indicates whether paging is allowed on the underlying data source. |
| CanRetrieveTotalRowCount | Indicates whether total row count information is available. |
| CanSort | Indicates whether the data could be sorted. |
| CanUpdate | Indicates whether updates are allowed on the underlying data source. |
| Events | Gets a list of event-handler delegates for the data source view. |
| Name | Name of the view. |
The following table provides the methods of the DataSourceView class:
| Methods | Description |
|---|---|
| CanExecute | Determines whether the specified command can be executed. |
| ExecuteCommand | Executes the specific command. |
| ExecuteDelete | Performs a delete operation on the list of data that the DataSourceView object represents. |
| ExecuteInsert | Performs an insert operation on the list of data that the DataSourceView object represents. |
| ExecuteSelect | Gets a list of data from the underlying data storage. |
| ExecuteUpdate | Performs an update operation on the list of data that the DataSourceView object represents. |
| Delete | Performs a delete operation on the data associated with the view. |
| Insert | Performs an insert operation on the data associated with the view. |
| Select | Returns the queried data. |
| Update | Performs an update operation on the data associated with the view. |
| OnDataSourceViewChanged | Raises the DataSourceViewChanged event. |
| RaiseUnsupportedCapabilitiesError | Called by the RaiseUnsupportedCapabilitiesError method to compare the capabilities requested for an ExecuteSelect operation against those that the view supports. |
The SqlDataSource Control
The SqlDataSource control represents a connection to a relational database such as SQL Server or Oracle database, or data accessible through OLEDB or Open Database Connectivity (ODBC). Connection to data is made through two important properties ConnectionString and ProviderName.
The following code snippet provides the basic syntax of the control:
<asp:SqlDataSource runat="server" ID="MySqlSource"
   ProviderName='<%$ ConnectionStrings:LocalNWind.ProviderName  %>'
   ConnectionString='<%$ ConnectionStrings:LocalNWind %>'
   SelectionCommand= "SELECT * FROM EMPLOYEES" />

<asp:GridView ID="GridView1" runat="server" DataSourceID="MySqlSource" />
Configuring various data operations on the underlying data depends upon the various properties (property groups) of the data source control.
The following table provides the related sets of properties of the SqlDataSource control, which provides the programming interface of the control:
| Property Group | Description |
|---|---|
|
DeleteCommand, DeleteParameters, DeleteCommandType |
Gets or sets the SQL statement, parameters, and type for deleting rows in the underlying data. |
|
FilterExpression, FilterParameters |
Gets or sets the data filtering string and parameters. |
|
InsertCommand, InsertParameters, InsertCommandType |
Gets or sets the SQL statement, parameters, and type for inserting rows in the underlying database. |
|
SelectCommand, SelectParameters, SelectCommandType |
Gets or sets the SQL statement, parameters, and type for retrieving rows from the underlying database. |
| SortParameterName | Gets or sets the name of an input parameter that the command's stored procedure will use to sort data. |
|
UpdateCommand, UpdateParameters, UpdateCommandType |
Gets or sets the SQL statement, parameters, and type for updating rows in the underlying data store. |
The following code snippet shows a data source control enabled for data manipulation:
<asp:SqlDataSource runat="server" ID= "MySqlSource"
   ProviderName='<%$ ConnectionStrings:LocalNWind.ProviderName  %>'
   ConnectionString=' <%$ ConnectionStrings:LocalNWind %>'
   SelectCommand= "SELECT * FROM EMPLOYEES"
   UpdateCommand= "UPDATE EMPLOYEES SET LASTNAME=@lame"
   DeleteCommand= "DELETE FROM EMPLOYEES WHERE EMPLOYEEID=@eid"
   FilterExpression= "EMPLOYEEID > 10">
   .....
   .....
</asp:SqlDataSource>
The ObjectDataSource Control
The ObjectDataSource Control enables user-defined classes to associate the output of their methods to data bound controls. The programming interface of this class is almost same as the SqlDataSource control.
Following are two important aspects of binding business objects:
The bindable class should have a default constructor, it should be stateless, and have methods that can be mapped to select, update, insert, and delete semantics.
The object must update one item at a time, batch operations are not supported.
Let us go directly to an example to work with this control. The student class is the class to be used with an object data source. This class has three properties: a student id, name, and city. It has a default constructor and a GetStudents method for retrieving data.
The student class:
public class Student
{
   public int StudentID { get; set; }
   public string Name { get; set; }
   public string City { get; set; }
   public Student()
   { }
   public DataSet GetStudents()
   {
      DataSet ds = new DataSet();
      DataTable dt = new DataTable("Students");
      dt.Columns.Add("StudentID", typeof(System.Int32));
      dt.Columns.Add("StudentName", typeof(System.String));
      dt.Columns.Add("StudentCity", typeof(System.String));
      dt.Rows.Add(new object[] { 1, "M. H. Kabir", "Calcutta" });
      dt.Rows.Add(new object[] { 2, "Ayan J. Sarkar", "Calcutta" });
      ds.Tables.Add(dt);
      return ds;
   }
}
Take the following steps to bind the object with an object data source and retrieve data:
Create a new web site.
Add a class (Students.cs) to it by right clicking the project from the Solution Explorer, adding a class template, and placing the above code in it.
Build the solution so that the application can use the reference to the class.
Place an object data source control in the web form.
Configure the data source by selecting the object.
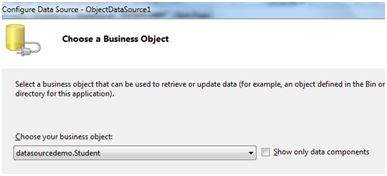
Select a data method(s) for different operations on data. In this example, there is only one method.
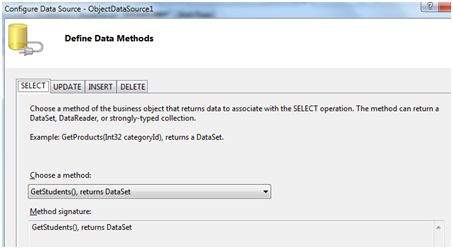
Place a data bound control such as grid view on the page and select the object data source as its underlying data source.
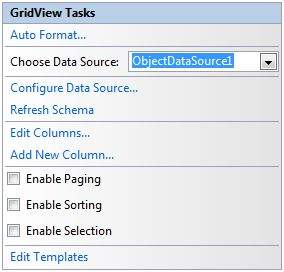
At this stage, the design view should look like the following:
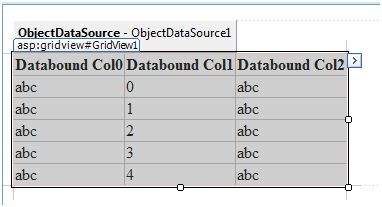
Run the project, it retrieves the hard coded tuples from the students class.
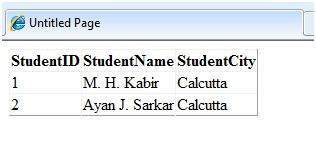
The AccessDataSource Control
The AccessDataSource control represents a connection to an Access database. It is based on the SqlDataSource control and provides simpler programming interface. The following code snippet provides the basic syntax for the data source:
<asp:AccessDataSource ID="AccessDataSource1 runat="server"
   DataFile="~/App_Data/ASPDotNetStepByStep.mdb" SelectCommand="SELECT * FROM  [DotNetReferences]">
</asp:AccessDataSource>
The AccessDataSource control opens the database in read-only mode. However, it can also be used for performing insert, update, or delete operations. This is done using the ADO.NET commands and parameter collection.
Updates are problematic for Access databases from within an ASP.NET application because an Access database is a plain file and the default account of the ASP.NET application might not have the permission to write to the database file.
ASP.NET - Data Binding
Every ASP.NET web form control inherits the DataBind method from its parent Control class, which gives it an inherent capability to bind data to at least one of its properties. This is known as simple data binding or inline data binding.
Simple data binding involves attaching any collection (item collection) which implements the IEnumerable interface, or the DataSet and DataTable classes to the DataSource property of the control.
On the other hand, some controls can bind records, lists, or columns of data into their structure through a DataSource control. These controls derive from the BaseDataBoundControl class. This is called declarative data binding.
The data source controls help the data-bound controls implement functionalities such as, sorting, paging, and editing data collections.
The BaseDataBoundControl is an abstract class, which is inherited by two more abstract classes:
- DataBoundControl
- HierarchicalDataBoundControl
The abstract class DataBoundControl is again inherited by two more abstract classes:
- ListControl
- CompositeDataBoundControl
The controls capable of simple data binding are derived from the ListControl abstract class and these controls are:
- BulletedList
- CheckBoxList
- DropDownList
- ListBox
- RadioButtonList
The controls capable of declarative data binding (a more complex data binding) are derived from the abstract class CompositeDataBoundControl. These controls are:
- DetailsView
- FormView
- GridView
- RecordList
Simple Data Binding
Simple data binding involves the read-only selection lists. These controls can bind to an array list or fields from a database. Selection lists takes two values from the database or the data source; one value is displayed by the list and the other is considered as the value corresponding to the display.
Let us take up a small example to understand the concept. Create a web site with a bulleted list and a SqlDataSource control on it. Configure the data source control to retrieve two values from your database (we use the same DotNetReferences table as in the previous chapter).
Choosing a data source for the bulleted list control involves:
- Selecting the data source control
- Selecting a field to display, which is called the data field
- Selecting a field for the value
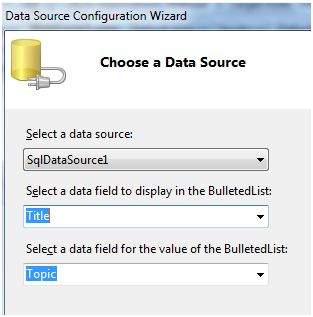
When the application is executed, check that the entire title column is bound to the bulleted list and displayed.
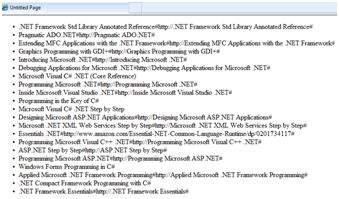
Declarative Data Binding
We have already used declarative data binding in the previous tutorial using GridView control. The other composite data bound controls capable of displaying and manipulating data in a tabular manner are the DetailsView, FormView, and RecordList control.
In the next tutorial, we will look into the technology for handling database, i.e, ADO.NET.
However, the data binding involves the following objects:
A dataset that stores the data retrieved from the database.
The data provider, which retrieves data from the database by using a command over a connection.
The data adapter that issues the select statement stored in the command object; it is also capable of update the data in a database by issuing Insert, Delete, and Update statements.
Relation between the data binding objects:
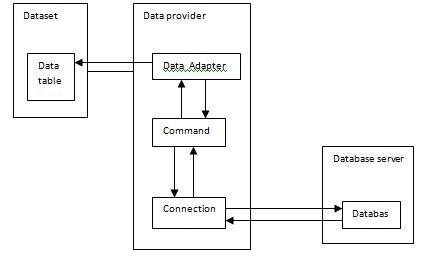
Example
Let us take the following steps:
Step (1) : Create a new website. Add a class named booklist by right clicking on the solution name in the Solution Explorer and choosing the item 'Class' from the 'Add Item' dialog box. Name it as booklist.cs.
using System;
using System.Data;
using System.Configuration;
using System.Linq;
using System.Web;
using System.Web.Security;
using System.Web.UI;
using System.Web.UI.HtmlControls;
using System.Web.UI.WebControls;
using System.Web.UI.WebControls.WebParts;
using System.Xml.Linq;

namespace databinding
{
   public class booklist
   {
      protected String bookname;
      protected String authorname;
      public booklist(String bname, String aname)
      {
         this.bookname = bname;
         this.authorname = aname;

      }
      public String Book
      {
         get
         {
            return this.bookname;
         }
         set
         {
            this.bookname = value;
         }
      }
      public String Author
      {
         get
         {
            return this.authorname;
         }
         set
         {
            this.authorname = value;
         }
      }
   }
}
Step (2) : Add four list controls on the page a list box control, a radio button list, a check box list, and a drop down list and four labels along with these list controls. The page should look like this in design view:
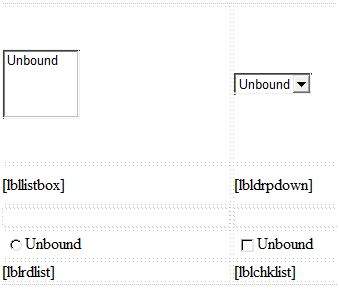
The source file should look as the following:
<form id="form1" runat="server">
   <div>
      <table style="width: 559px">
         <tr>
            <td style="width: 228px; height: 157px;">
               <asp:ListBox ID="ListBox1" runat="server" AutoPostBack="True"
                  OnSelectedIndexChanged="ListBox1_SelectedIndexChanged">
               </asp:ListBox>
            </td>

            <td style="height: 157px">
               <asp:DropDownList ID="DropDownList1" runat="server"
                  AutoPostBack="True" OnSelectedIndexChanged="DropDownList1_SelectedIndexChanged">
               </asp:DropDownList>
            </td>
         </tr>

         <tr>
            <td style="width: 228px; height: 40px;">
               <asp:Label ID="lbllistbox" runat="server"></asp:Label>
            </td>

            <td style="height: 40px">
               <asp:Label ID="lbldrpdown" runat="server">
               </asp:Label>
            </td>
         </tr>

         <tr>
            <td style="width: 228px; height: 21px">
            </td>

            <td style="height: 21px">
            </td>
         </tr>

         <tr>
            <td style="width: 228px; height: 21px">
               <asp:RadioButtonList ID="RadioButtonList1" runat="server"
                  AutoPostBack="True"  OnSelectedIndexChanged="RadioButtonList1_SelectedIndexChanged">
               </asp:RadioButtonList>
            </td>

            <td style="height: 21px">
               <asp:CheckBoxList ID="CheckBoxList1" runat="server"
                  AutoPostBack="True" OnSelectedIndexChanged="CheckBoxList1_SelectedIndexChanged">
               </asp:CheckBoxList>
            </td>
         </tr>

         <tr>
            <td style="width: 228px; height: 21px">
               <asp:Label ID="lblrdlist" runat="server">
               </asp:Label>
            </td>

            <td style="height: 21px">
               <asp:Label ID="lblchklist" runat="server">
               </asp:Label>
            </td>
         </tr>
      </table>
   </div>
</form>
Step (3) : Finally, write the following code behind routines of the application:
public partial class _Default : System.Web.UI.Page
{
   protected void Page_Load(object sender, EventArgs e)
   {
      IList bklist = createbooklist();
      if (!this.IsPostBack)
      {
         this.ListBox1.DataSource = bklist;
         this.ListBox1.DataTextField = "Book";
         this.ListBox1.DataValueField = "Author";
         this.DropDownList1.DataSource = bklist;
         this.DropDownList1.DataTextField = "Book";
         this.DropDownList1.DataValueField = "Author";
         this.RadioButtonList1.DataSource = bklist;
         this.RadioButtonList1.DataTextField = "Book";
         this.RadioButtonList1.DataValueField = "Author";
         this.CheckBoxList1.DataSource = bklist;
         this.CheckBoxList1.DataTextField = "Book";
         this.CheckBoxList1.DataValueField = "Author";
         this.DataBind();
      }
   }
   protected IList createbooklist()
   {
      ArrayList allbooks = new ArrayList();
      booklist bl;
      bl = new booklist("UNIX CONCEPTS", "SUMITABHA DAS");
      allbooks.Add(bl);
      bl = new booklist("PROGRAMMING IN C", "RICHI KERNIGHAN");
      allbooks.Add(bl);
      bl = new booklist("DATA STRUCTURE", "TANENBAUM");
      allbooks.Add(bl);
      bl = new booklist("NETWORKING CONCEPTS", "FOROUZAN");
      allbooks.Add(bl);
      bl = new booklist("PROGRAMMING IN C++", "B. STROUSTROUP");
      allbooks.Add(bl);
      bl = new booklist("ADVANCED JAVA", "SUMITABHA DAS");
      allbooks.Add(bl);
      return allbooks;
   }
   protected void ListBox1_SelectedIndexChanged(object sender, EventArgs e)
   {
      this.lbllistbox.Text = this.ListBox1.SelectedValue;
   }
   protected void DropDownList1_SelectedIndexChanged(object sender, EventArgs e)
   {
      this.lbldrpdown.Text = this.DropDownList1.SelectedValue;
   }
   protected void RadioButtonList1_SelectedIndexChanged(object sender, EventArgs e)
   {
      this.lblrdlist.Text = this.RadioButtonList1.SelectedValue;
   }
   protected void CheckBoxList1_SelectedIndexChanged(object sender, EventArgs e)
   {
      this.lblchklist.Text = this.CheckBoxList1.SelectedValue;
   }
}
Observe the following:
The booklist class has two properties: bookname and authorname.
The createbooklist method is a user defined method that creates an array of booklist objects named allbooks.
The Page_Load event handler ensures that a list of books is created. The list is of IList type, which implements the IEnumerable interface and capable of being bound to the list controls. The page load event handler binds the IList object 'bklist' with the list controls. The bookname property is to be displayed and the authorname property is considered as the value.
When the page is run, if the user selects a book, its name is selected and displayed by the list controls whereas the corresponding labels display the author name, which is the corresponding value for the selected index of the list control.
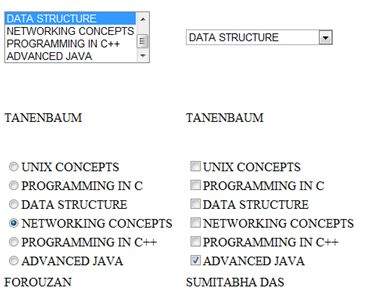
ASP.NET - Custom Controls
User Controls
User controls behaves like miniature ASP.NET pages or web forms, which could be used by many other pages. These are derived from the System.Web.UI.UserControl class. These controls have the following characteristics:
- They have an .ascx extension.
- They may not contain any <html>, <body>, or <form> tags.
- They have a Control directive instead of a Page directive.
To understand the concept, let us create a simple user control, which will work as footer for the web pages. To create and use the user control, take the following steps:
- Create a new web application.
- Right click on the project folder on the Solution Explorer and choose Add New Item.
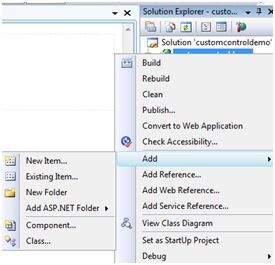
Select Web User Control from the Add New Item dialog box and name it footer.ascx. Initially, the footer.ascx contains only a Control directive.
<%@ Control Language="C#" AutoEventWireup="true" CodeBehind="footer.ascx.cs"
   Inherits="customcontroldemo.footer" %>
Add the following code to the file:
<table>
   <tr>
      <td align="center"> Copyright ©2010 TutorialPoints Ltd.</td>
   </tr>

   <tr>
      <td align="center"> Location: Hyderabad, A.P </td>
   </tr>
</table>
To add the user control to your web page, you must add the Register directive and an instance of the user control to the page. The following code shows the content file:
<%@ Page Language="C#" AutoEventWireup="true" CodeBehind="Default.aspx.cs"
   Inherits="customcontroldemo._Default" %>
<%@ Register Src="~/footer.ascx" TagName="footer" TagPrefix="Tfooter" %>
<!DOCTYPE html PUBLIC "-//W3C//DTD XHTML 1.0 Transitional//EN"
   "http://www.w3.org/TR/xhtml1/DTD/xhtml1-transitional.dtd">

<html xmlns="http://www.w3.org/1999/xhtml" >
   <head runat="server">
      <title>
         Untitled Page
      </title>
   </head>
   <body>
      <form id="form1" runat="server">
         <div>
            <asp:Label ID="Label1" runat="server"
               Text="Welcome to ASP.Net Tutorials "></asp:Label>
            <br />
            <br />
            <asp:Button ID="Button1" runat="server"
               onclick="Button1_Click"  Text="Copyright Info" />
         </div>
         <Tfooter:footer ID="footer1" runat="server" />
      </form>
   </body>
</html>
When executed, the page shows the footer and this control could be used in all the pages of your website.
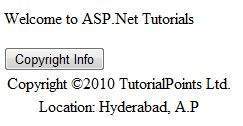
Observe the following:
(1) The Register directive specifies a tag name as well as tag prefix for the control.
<%@ Register Src="~/footer.ascx" TagName="footer" TagPrefix="Tfooter" %>
(2) The following tag name and prefix should be used while adding the user control on the page:
<Tfooter:footer ID="footer1" runat="server" />
Custom Controls
Custom controls are deployed as individual assemblies. They are compiled into a Dynamic Link Library (DLL) and used as any other ASP.NET server control. They could be created in either of the following way:
- By deriving a custom control from an existing control
- By composing a new custom control combing two or more existing controls.
- By deriving from the base control class.
To understand the concept, let us create a custom control, which will simply render a text message on the browser. To create this control, take the following steps:
Create a new website. Right click the solution (not the project) at the top of the tree in the Solution Explorer.

In the New Project dialog box, select ASP.NET Server Control from the project templates.
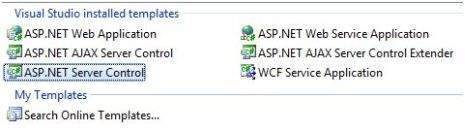
The above step adds a new project and creates a complete custom control to the solution, called ServerControl1. In this example, let us name the project CustomControls. To use this control, this must be added as a reference to the web site before registering it on a page. To add a reference to the existing project, right click on the project (not the solution), and click Add Reference.
Select the CustomControls project from the Projects tab of the Add Reference dialog box. The Solution Explorer should show the reference.
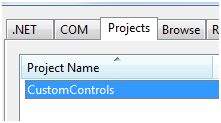
To use the control on a page, add the Register directive just below the @Page directive:
<%@ Register Assembly="CustomControls" Namespace="CustomControls" TagPrefix="ccs" %>
Further, you can use the control, similar to any other controls.
<form id="form1" runat="server">
   <div>
      <ccs:ServerControl1 runat="server"
         Text = "I am a Custom Server Control" />
   </div>
</form>
When executed, the Text property of the control is rendered on the browser as shown:
Working with Custom Controls
In the previous example, the value for the Text property of the custom control was set. ASP.NET added this property by default, when the control was created. The following code behind file of the control reveals this.
using System;
using System.Collections.Generic;
using System.ComponentModel;
using System.Linq;
using System.Text;
using System.Web;
using System.Web.UI;
using System.Web.UI.WebControls;

namespace CustomControls
{
   [DefaultProperty("Text")]
   [ToolboxData("<{0}:ServerControl1 runat=server></{0}:ServerControl1 >")]
   public class ServerControl1 : WebControl
   {
      [Bindable(true)]
      [Category("Appearance")]
      [DefaultValue("")]
      [Localizable(true)]
      public string Text
      {
         get
         {
            String s = (String)ViewState["Text"];
            return ((s == null) ? "[" + this.ID + "]" : s);
         }
         set
         {
            ViewState["Text"] = value;
         }
      }
      protected override void RenderContents(HtmlTextWriter output)
      {
         output.Write(Text);
      }
   }
}
The above code is automatically generated for a custom control. Events and methods could be added to the custom control class.
Example
Let us expand the previous custom control named SeverControl1. Let us give it a method named checkpalindrome, which gives it a power to check for palindromes.
Palindromes are words/literals that spell the same when reversed. For example, Malayalam, madam, saras, etc.
Extend the code for the custom control, which should look as:
using System;
using System.Collections.Generic;
using System.ComponentModel;
using System.Linq;
using System.Text;
using System.Web;
using System.Web.UI;
using System.Web.UI.WebControls;

namespace CustomControls
{
   [DefaultProperty("Text")]
   [ToolboxData("<{0}:ServerControl1 runat=server></{0}:ServerControl1  >")]
   public class ServerControl1 : WebControl
   {
      [Bindable(true)]
      [Category("Appearance")]
      [DefaultValue("")]
      [Localizable(true)]
      public string Text
      {
         get
         {
            String s = (String)ViewState["Text"];
            return ((s == null) ? "[" + this.ID + "]" : s);
         }
         set
         {
            ViewState["Text"] = value;
         }
      }
      protected override void RenderContents(HtmlTextWriter output)
      {
         if (this.checkpanlindrome())
         {
            output.Write("This is a palindrome: <br />");
            output.Write("<FONT size=5 color=Blue>");
            output.Write("<B>");
            output.Write(Text);
            output.Write("</B>");
            output.Write("</FONT>");
         }
         else
         {
            output.Write("This is not a palindrome: <br />");
            output.Write("<FONT size=5 color=red>");
            output.Write("<B>");
            output.Write(Text);
            output.Write("</B>");
            output.Write("</FONT>");
         }
      }
      protected bool checkpanlindrome()
      {
         if (this.Text != null)
         {
            String str = this.Text;
            String strtoupper = Text.ToUpper();
            char[] rev = strtoupper.ToCharArray();
            Array.Reverse(rev);
            String strrev = new String(rev);
            if (strtoupper == strrev)
            {
               return true;
            }
            else
            {
               return false;
            }
         }
         else
         {
            return false;
         }
      }
   }
}
When you change the code for the control, you must build the solution by clicking Build --> Build Solution, so that the changes are reflected in your project. Add a text box and a button control to the page, so that the user can provide a text, it is checked for palindrome, when the button is clicked.
<form id="form1" runat="server">
   <div>
      Enter a word:
      <br />
      <asp:TextBox ID="TextBox1" runat="server" style="width:198px">
      </asp:TextBox>
      <br />
      <br />
      <asp:Button ID="Button1" runat="server onclick="Button1_Click"
         Text="Check Palindrome" style="width:132px" />
      <br />
      <br />
      <ccs:ServerControl1 ID="ServerControl11" runat="server" Text = "" />
   </div>
</form>
The Click event handler for the button simply copies the text from the text box to the text property of the custom control.
protected void Button1_Click(object sender, EventArgs e)
{
   this.ServerControl11.Text = this.TextBox1.Text;
}
When executed, the control successfully checks palindromes.
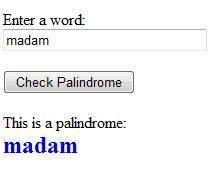
Observe the following:
(1) When you add a reference to the custom control, it is added to the toolbox and you can directly use it from the toolbox similar to any other control.
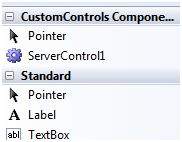
(2) The RenderContents method of the custom control class is overridden here, as you can add your own methods and events.
(3) The RenderContents method takes a parameter of HtmlTextWriter type, which is responsible for rendering on the browser.
ASP.NET - Personalization
Web sites are designed for repeated visits from the users. Personalization allows a site to remember the user identity and other information details, and it presents an individualistic environment to each user.
ASP.NET provides services for personalizing a web site to suit a particular client's taste and preference.
Understanding Profiles
ASP.NET personalization service is based on user profile. User profile defines the kind of information about the user that the site needs. For example, name, age, address, date of birth, and phone number.
This information is defined in the web.config file of the application and ASP.NET runtime reads and uses it. This job is done by the personalization providers.
The user profiles obtained from user data is stored in a default database created by ASP.NET. You can create your own database for storing profiles. The profile data definition is stored in the configuration file web.config.
Example
Let us create a sample site, where we want our application to remember user details like name, address, date of birth etc. Add the profile details in the web.config file within the <system.web> element.
<configuration>
<system.web>
<profile>
   <properties>
      <add name="Name" type ="String"/>
      <add name="Birthday" type ="System.DateTime"/>
      <group name="Address">
         <add name="Street"/>
         <add name="City"/>
         <add name="State"/>
         <add name="Zipcode"/>
      </group>
   </properties>
</profile>
</system.web>
</configuration>
When the profile is defined in the web.config file, the profile could be used through the Profile property found in the current HttpContext and also available via page.
Add the text boxes to take the user input as defined in the profile and add a button for submitting the data:
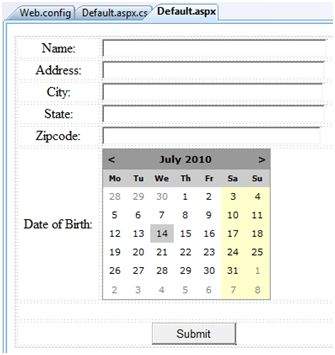
Update Page_load to display profile information:
using System;
using System.Data;
using System.Configuration;
using System.Web;
using System.Web.Security;
using System.Web.UI;
using System.Web.UI.WebControls;
using System.Web.UI.WebControls.WebParts;
using System.Web.UI.HtmlControls;

public partial class _Default : System.Web.UI.Page
{
   protected void Page_Load(object sender, EventArgs e)
   {
      if (!this.IsPostBack)
      {
         ProfileCommon pc=this.Profile.GetProfile(Profile.UserName);
         if (pc != null)
         {
            this.txtname.Text = pc.Name;
            this.txtaddr.Text = pc.Address.Street;
            this.txtcity.Text = pc.Address.City;
            this.txtstate.Text = pc.Address.State;
            this.txtzip.Text = pc.Address.Zipcode;
            this.Calendar1.SelectedDate = pc.Birthday;
         }
      }
   }
}
Write the following handler for the Submit button, for saving the user data into the profile:
protected void btnsubmit_Click(object sender, EventArgs e)
{
   ProfileCommon pc=this.Profile.GetProfile(Profile.UserName);
   if (pc != null)
   {
      pc.Name = this.txtname.Text;
      pc.Address.Street = this.txtaddr.Text;
      pc.Address.City = this.txtcity.Text;
      pc.Address.State = this.txtstate.Text;
      pc.Address.Zipcode = this.txtzip.Text;
      pc.Birthday = this.Calendar1.SelectedDate;
      pc.Save();
   }
}
When the page is executed for the first time, the user needs to enter the information. However, next time the user details would be automatically loaded.
Attributes for the <add> Element
Apart from the name and type attributes that we have used, there are other attributes to the <add> element. Following table illustrates some of these attributes:
| Attributes | Description |
|---|---|
| name | The name of the property. |
| type | By default the type is string but it allows any fully qualified class name as data type. |
| serializeAs | The format to use when serializing this value. |
| readOnly | A read only profile value cannot be changed, by default this property is false. |
| defaultValue | A default value that is used if the profile does not exist or does not have information. |
| allowAnonymous | A Boolean value indicating whether this property can be used with the anonymous profiles. |
| Provider | The profiles provider that should be used to manage just this property. |
Anonymous Personalization
Anonymous personalization allows the user to personalize the site before identifying themselves. For example, Amazon.com allows the user to add items in the shopping cart before they log in. To enable this feature, the web.config file could be configured as:
<anonymousIdentification enabled ="true" cookieName=".ASPXANONYMOUSUSER"
   cookieTimeout="120000" cookiePath="/" cookieRequiresSSL="false"
   cookieSlidingExpiration="true" cookieprotection="Encryption"
   coolieless="UseDeviceProfile"/>
ASP.NET - Error Handling
Error handling in ASP.NET has three aspects:
Tracing - tracing the program execution at page level or application level.
Error handling - handling standard errors or custom errors at page level or application level.
Debugging - stepping through the program, setting break points to analyze the code
In this chapter, we will discuss tracing and error handling and in this chapter, we will discuss debugging.
To understand the concepts, create the following sample application. It has a label control, a dropdown list, and a link. The dropdown list loads an array list of famous quotes and the selected quote is shown in the label below. It also has a hyperlink which has points to a nonexistent link.
<%@ Page Language="C#" AutoEventWireup="true" CodeBehind="Default.aspx.cs"
   Inherits="errorhandling._Default" %>

<!DOCTYPE html PUBLIC "-//W3C//DTD XHTML 1.0 Transitional//EN"
   "http://www.w3.org/TR/xhtml1/DTD/xhtml1-transitional.dtd">

<html xmlns="http://www.w3.org/1999/xhtml" >
   <head runat="server">
      <title>
         Tracing, debugging and error handling
      </title>
   </head>
   <body>
      <form id="form1" runat="server">
         <div>
            <asp:Label ID="lblheading" runat="server" Text="Tracing, Debuggin  and Error Handling">
            </asp:Label>
            <br />
            <br />
            <asp:DropDownList ID="ddlquotes" runat="server" AutoPostBack="True"
               onselectedindexchanged="ddlquotes_SelectedIndexChanged">
            </asp:DropDownList>
            <br />
            <br />
            <asp:Label ID="lblquotes" runat="server">
            </asp:Label>
            <br />
            <br />
            <asp:HyperLink ID="HyperLink1" runat="server"
               NavigateUrl="mylink.htm">Link to:</asp:HyperLink>
         </div>
      </form>
   </body>
</html>
The code behind file:
public partial class _Default : System.Web.UI.Page
{
   protected void Page_Load(object sender, EventArgs e)
   {
      if (!IsPostBack)
      {
         string[,] quotes =
         {
            {"Imagination is more important than Knowledge.", "Albert Einsten"},
            {"Assume a virtue, if you have it not" "Shakespeare"},
            {"A man cannot be comfortable without his own approval", "Mark Twain"},
            {"Beware the young doctor and the old barber", "Benjamin Franklin"},
            {"Whatever begun in anger ends in shame", "Benjamin Franklin"}
         };
         for (int i=0; i<quotes.GetLength(0); i++)
            ddlquotes.Items.Add(new ListItem(quotes[i,0], quotes[i,1]));
      }
   }
   protected void ddlquotes_SelectedIndexChanged(object sender, EventArgs e)
   {
      if (ddlquotes.SelectedIndex != -1)
      {
         lblquotes.Text = String.Format("{0}, Quote: {1}",
            ddlquotes.SelectedItem.Text, ddlquotes.SelectedValue);
      }
   }
}
Tracing
To enable page level tracing, you need to modify the Page directive and add a Trace attribute as shown:
<%@ Page Language="C#" AutoEventWireup="true" CodeBehind="Default.aspx.cs"
   Inherits="errorhandling._Default" Trace ="true" %>
Now when you execute the file, you get the tracing information:
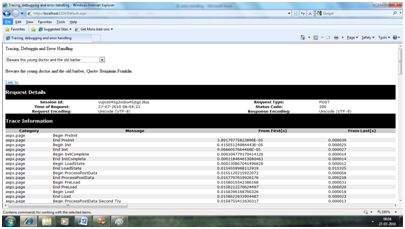
It provides the following information at the top:
- Session ID
- Status Code
- Time of Request
- Type of Request
- Request and Response Encoding
The status code sent from the server, each time the page is requested shows the name and time of error if any. The following table shows the common HTTP status codes:
| Number | Description |
|---|---|
| Informational (100 - 199) | |
| 100 | Continue |
| 101 | Switching protocols |
| Successful (200 - 299) | |
| 200 | OK |
| 204 | No content |
| Redirection (300 - 399) | |
| 301 | Moved permanently |
| 305 | Use proxy |
| 307 | Temporary redirect |
| Client Errors (400 - 499) | |
| 400 | Bad request |
| 402 | Payment required |
| 404 | Not found |
| 408 | Request timeout |
| 417 | Expectation failed |
| Server Errors (500 - 599) | |
| 500 | Internal server error |
| 503 | Service unavailable |
| 505 | HTTP version not supported |
Under the top level information, there is Trace log, which provides details of page life cycle. It provides elapsed time in seconds since the page was initialized.
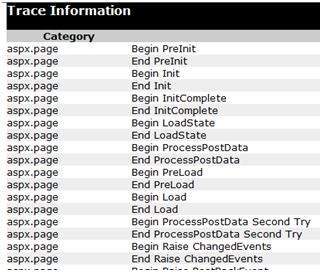
The next section is control tree, which lists all controls on the page in a hierarchical manner:
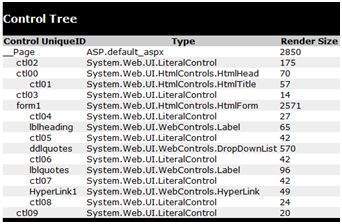
Last in the Session and Application state summaries, cookies, and headers collections followed by list of all server variables.
The Trace object allows you to add custom information to the trace output. It has two methods to accomplish this: the Write method and the Warn method.
Change the Page_Load event handler to check the Write method:
protected void Page_Load(object sender, EventArgs e)
{
   Trace.Write("Page Load");
   if (!IsPostBack)
   {
      Trace.Write("Not Post Back, Page Load");
      string[,] quotes =
      .......................
   }
}
Run to observe the effects:
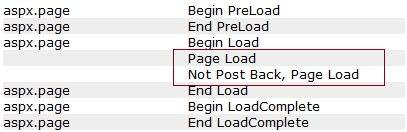
To check the Warn method, let us forcibly enter some erroneous code in the selected index changed event handler:
try
{
   int a = 0;
   int b = 9 / a;
}
catch (Exception e)
{
   Trace.Warn("UserAction", "processing 9/a", e);
}
Try-Catch is a C# programming construct. The try block holds any code that may or may not produce error and the catch block catches the error. When the program is run, it sends the warning in the trace log.

Application level tracing applies to all the pages in the web site. It is implemented by putting the following code lines in the web.config file:
<system.web>
   <trace enabled="true" />
</system.web>
Error Handling
Although ASP.NET can detect all runtime errors, still some subtle errors may still be there. Observing the errors by tracing is meant for the developers, not for the users.
Hence, to intercept such occurrence, you can add error handing settings in the web.config file of the application. It is application-wide error handling. For example, you can add the following lines in the web.config file:
<configuration>
   <system.web>
      <customErrors mode="RemoteOnly" defaultRedirect="GenericErrorPage.htm">
         <error statusCode="403" redirect="NoAccess.htm"	/>
         <error statusCode="404" redirect="FileNotFound.htm" />
      </customErrors>
   </system.web>
<configuration>
The <customErrors> section has the possible attributes:
Mode : It enables or disables custom error pages. It has the three possible values:
- On : displays the custom pages.
- Off : displays ASP.NET error pages (yellow pages)
- remoteOnly : It displays custom errors to client, display ASP.NET errors locally.
defaultRedirect : It contains the URL of the page to be displayed in case of unhandled errors.
To put different custom error pages for different type of errors, the <error> sub tags are used, where different error pages are specified, based on the status code of the errors.
To implement page level error handling, the Page directive could be modified:
<%@ Page Language="C#" AutoEventWireup="true" CodeBehind="Default.aspx.cs"
   Inherits="errorhandling._Default" Trace ="true" ErrorPage="PageError.htm" %>
Because ASP.NET Debugging is an important subject in itself, so we would discuss it in the next chapter separately.
ASP.NET - Debugging
Debugging allows the developers to see how the code works in a step-by-step manner, how the values of the variables change, how the objects are created and destroyed, etc.
When the site is executed for the first time, Visual Studio displays a prompt asking whether it should be enabled for debugging:
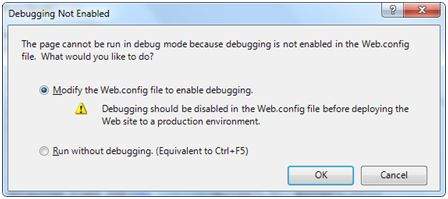
When debugging is enabled, the following lines of codes are shown in the web.config:
<system.web>
   <compilation debug="true">
      <assemblies>
      ..............
      </assemblies>
   </compilation>
</system.web>
The Debug toolbar provides all the tools available for debugging:

Breakpoints
Breakpoints specifies the runtime to run a specific line of code and then stop execution so that the code could be examined and perform various debugging jobs such as, changing the value of the variables, step through the codes, moving in and out of functions and methods etc.
To set a breakpoint, right click on the code and choose insert break point. A red dot appears on the left margin and the line of code is highlighted as shown:

Next when you execute the code, you can observe its behavior.
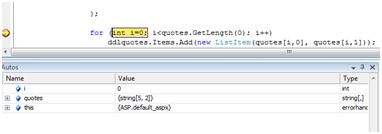
At this stage, you can step through the code, observe the execution flow and examine the value of the variables, properties, objects, etc.
You can modify the properties of the breakpoint from the Properties menu obtained by right clicking the breakpoint glyph:
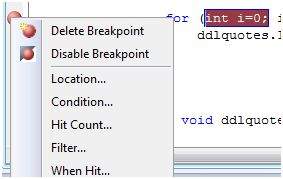
The location dialog box shows the location of the file, line number and the character number of the selected code. The condition menu item allows you to enter a valid expression, which is evaluated when the program execution reaches the breakpoint:
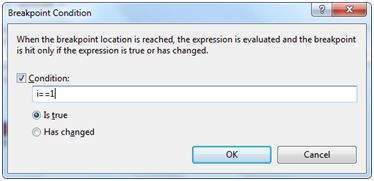
The Hit Count menu item displays a dialog box that shows the number of times the break point has been executed.
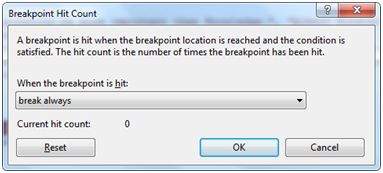
Clicking on any option presented by the drop down list opens an edit field where a target hit count is entered. This is particularly helpful in analyzing loop constructs in code.
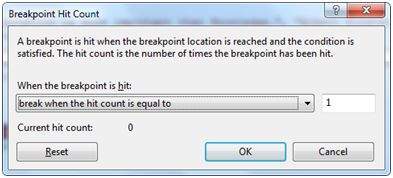
The Filter menu item allows setting a filter for specifying machines, processes, or threads or any combination, for which the breakpoint will be effective.
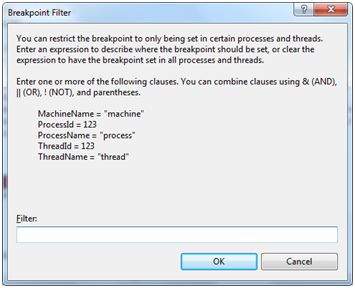
The When Hit menu item allows you to specify what to do when the break point is hit.
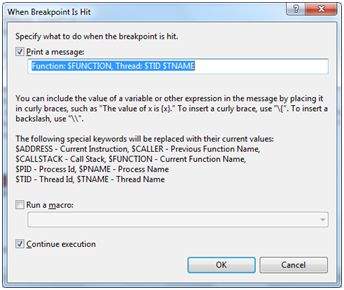
The Debug Windows
Visual Studio provides the following debug windows, each of which shows some program information. The following table lists the windows:
| Window | Description |
|---|---|
| Immediate | Displays variables and expressions. |
| Autos | Displays all variables in the current and previous statements. |
| Locals | Displays all variables in the current context. |
| Watch | Displays up to four different sets of variables. |
| Call Stack | Displays all methods in the call stack. |
| Threads | Displays and control threads. |
ASP.NET - LINQ
Most applications are data-centric, however most of the data repositories are relational databases. Over the years, designers and developers have designed applications based on object models.
The objects are responsible for connecting to the data access components - called the Data Access Layer (DAL). Here we have three points to consider:
All the data needed in an application are not stored in the same source. The source could be a relation database, some business object, XML file, or a web service.
Accessing in-memory object is simpler and less expensive than accessing data from a database or XML file.
The data accessed are not used directly, but needs to be sorted, ordered, grouped, altered etc.
Hence if there is one tool that makes all kind of data access easy that allows joining data from such disparate data sources and perform standard data processing operations, in few lines of codes, it would be of great help.
LINQ or Language-Integrated Query is such a tool. LINQ is set of extensions to the .Net Framework 3.5 and its managed languages that set the query as an object. It defines a common syntax and a programming model to query different types of data using a common language.
The relational operators like Select, Project, Join, Group, Partition, Set operations etc., are implemented in LINQ and the C# and VB compilers in the .Net framework 3.5, which support the LINQ syntax makes it possible to work with a configured data store without resorting to ADO.NET.
For example, querying the Customers table in the Northwind database, using LINQ query in C#, the code would be:
var data = from c in dataContext.Customers
where c.Country == "Spain"
select c;
Where:
The 'from' keyword logically loops through the contents of the collection.
The expression with the 'where' keyword is evaluated for each object in the collection.
The 'select' statement selects the evaluated object to add to the list being returned.
The 'var' keyword is for variable declaration. Since the exact type of the returned object is not known, it indicates that the information will be inferred dynamically.
LINQ query can be applied to any data-bearing class that inherits from IEnumerable<T>, here T is any data type, for example, List<Book>.
Let us look at an example to understand the concept. The example uses the following class: Books.cs
public class Books
{
   public string ID {get; set;}
   public string Title { get; set; }
   public decimal Price { get; set; }
   public DateTime DateOfRelease { get; set; }

   public static List<Books> GetBooks()
   {
      List<Books> list = new List<Books>();
      list.Add(new Books { ID = "001",
      Title = "Programming in C#",
      Price = 634.76m,
      DateOfRelease = Convert.ToDateTime("2010-02-05") });

      list.Add(new Books { ID = "002",
      Title = "Learn Java in 30 days",
      Price = 250.76m,
      DateOfRelease = Convert.ToDateTime("2011-08-15") });

      list.Add(new Books { ID = "003",
      Title = "Programming in ASP.Net 4.0",
      Price = 700.00m,
      DateOfRelease = Convert.ToDateTime("2011-02-05") });

      list.Add(new Books { ID = "004",
      Title = "VB.Net Made Easy",
      Price = 500.99m,
      DateOfRelease = Convert.ToDateTime("2011-12-31") });

      list.Add(new Books { ID = "005",
      Title = "Programming in C",
      Price = 314.76m,
      DateOfRelease = Convert.ToDateTime("2010-02-05") });

      list.Add(new Books { ID = "006",
      Title = "Programming in C++",
      Price = 456.76m,
      DateOfRelease = Convert.ToDateTime("2010-02-05") });

      list.Add(new Books { ID = "007",
      Title = "Datebase Developement",
      Price = 1000.76m,
      DateOfRelease = Convert.ToDateTime("2010-02-05") });
      return list;
   }
}
The web page using this class has a simple label control, which displays the titles of the books. The Page_Load event creates a list of books and returns the titles by using LINQ query:
public partial class simplequery : System.Web.UI.Page
{
   protected void Page_Load(object sender, EventArgs e)
   {
      List<Books> books = Books.GetBooks();
      var booktitles = from b in books select b.Title;

      foreach (var title in booktitles)
      lblbooks.Text += String.Format("{0} <br />", title);
   }
}
When the page is executed, the label displays the results of the query:
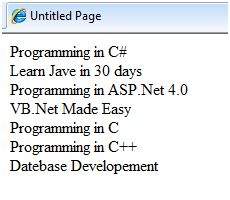
The above LINQ expression:
var booktitles =
from b in books
select b.Title;
Is equivalent to the following SQL query:
SELECT Title from Books
LINQ Operators
Apart from the operators used so far, there are several other operators, which implement all query clauses. Let us look at some of the operators and clauses.
The Join clause
The 'join clause' in SQL is used for joining two data tables and displays a data set containing columns from both the tables. LINQ is also capable of that. To check this, add another class named Saledetails.cs in the previous project:
public class Salesdetails
{
   public int sales { get; set; }
   public int pages { get; set; }
   public string ID {get; set;}

   public static IEnumerable<Salesdetails> getsalesdetails()
   {
      Salesdetails[] sd =
      {
         new Salesdetails { ID = "001", pages=678, sales = 110000},
         new Salesdetails { ID = "002", pages=789, sales = 60000},
         new Salesdetails { ID = "003", pages=456, sales = 40000},
         new Salesdetails { ID = "004", pages=900, sales = 80000},
         new Salesdetails { ID = "005", pages=456, sales = 90000},
         new Salesdetails { ID = "006", pages=870, sales = 50000},
         new Salesdetails { ID = "007", pages=675, sales = 40000},
      };
      return sd.OfType<Salesdetails>();
   }
}
Add the codes in the Page_Load event handler to query on both the tables using the join clause:
protected void Page_Load(object sender, EventArgs e)
{
   IEnumerable<Books> books = Books.GetBooks();
   IEnumerable<Salesdetails> sales = Salesdetails.getsalesdetails();
   var booktitles = from b in books join s in sales on b.ID equals s.ID
      select new { Name = b.Title, Pages = s.pages };
   foreach (var title in booktitles)
      lblbooks.Text += String.Format("{0} <br />", title);
}
The resulting page is as shown:
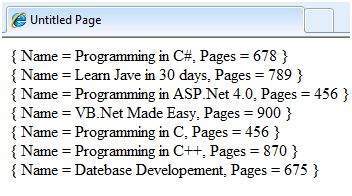
The Where clause
The 'where clause' allows adding some conditional filters to the query. For example, if you want to see the books, where the number of pages are more than 500, change the Page_Load event handler to:
var booktitles = from b in books join s in sales on b.ID equals s.ID
   where s.pages > 500 select new { Name = b.Title, Pages = s.pages };
The query returns only those rows, where the number of pages is more than 500:
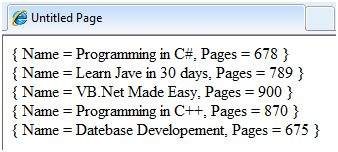
Orderby and Orderbydescending Clauses
These clauses allow sorting the query results. To query the titles, number of pages and price of the book, sorted by the price, write the following code in the Page_Load event handler:
var booktitles = from b in books join s in sales on b.ID equals s.ID
   orderby b.Price select new { Name = b.Title,  Pages = s.pages, Price = b.Price};
The returned tuples are:
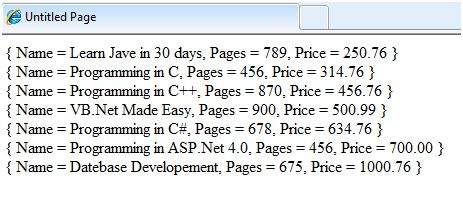
The Let clause
The let clause allows defining a variable and assigning it a value calculated from the data values. For example, to calculate the total sale from the above two sales, you need to calculate:
TotalSale = Price of the Book * Sales
To achieve this, add the following code snippets in the Page_Load event handler:
The let clause allows defining a variable and assigning it a value calculated from the data values. For example, to calculate the total sale from the above two sales, you need to calculate:
var booktitles = from b in book join s in sales on b.ID equals s.ID
   let totalprofit = (b.Price * s.sales)
   select new { Name = b.Title, TotalSale = totalprofit};
The resulting query page is as shown:

ASP.NET - Security
Implementing security in a site has the following aspects:
Authentication : It is the process of ensuring the user's identity and authenticity. ASP.NET allows four types of authentications:
- Windows Authentication
- Forms Authentication
- Passport Authentication
- Custom Authentication
Authorization : It is the process of defining and allotting specific roles to specific users.
Confidentiality : It involves encrypting the channel between the client browser and the web server.
Integrity : It involves maintaining the integrity of data. For example, implementing digital signature.
Forms-Based Authentication
Traditionally, forms-based authentication involves editing the web.config file and adding a login page with appropriate authentication code.
The web.config file could be edited and the following codes written on it:
<configuration>
<system.web>
   <authentication mode="Forms">
      <forms loginUrl ="login.aspx"/>
   </authentication>
   <authorization>
      <deny users="?"/>
   </authorization>
</system.web>
...
...
</configuration>
The login.aspx page mentioned in the above code snippet could have the following code behind file with the usernames and passwords for authentication hard coded into it.
protected bool authenticate(String uname, String pass)
{
   if(uname == "Tom")
   {
      if(pass == "tom123")
      return true;
   }
   if(uname == "Dick")
   {
      if(pass == "dick123")
      return true;
   }
   if(uname == "Harry")
   {
      if(pass == "har123")
      return true;
   }
   return false;
}
public void OnLogin(Object src, EventArgs e)
{
   if (authenticate(txtuser.Text, txtpwd.Text))
   {
      FormsAuthentication.RedirectFromLoginPage(txtuser.Text, chkrem.Checked);
   }
   else
   {
      Response.Write("Invalid user name or password");
   }
}
Observe that the FormsAuthentication class is responsible for the process of authentication.
However, Visual Studio allows you to implement user creation, authentication, and authorization with seamless ease without writing any code, through the Web Site Administration tool. This tool allows creating users and roles.
Apart from this, ASP.NET comes with readymade login controls set, which has controls performing all the jobs for you.
Implementing Forms-Based Security
To set up forms-based authentication, you need the following:
- A database of users to support the authentication process
- A website that uses the database
- User accounts
- Roles
- Restriction of users and group activities
- A default page, to display the login status of the users and other information.
- A login page, to allow users to log in, retrieve password, or change password
To create users, take the following steps:
Step (1) : Choose Website -> ASP.NET Configuration to open the Web Application Administration Tool.
Step (2) : Click on the Security tab.
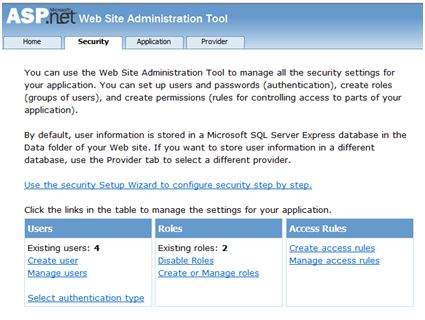
Step (3) : Select the authentication type to 'Forms based authentication' by selecting the 'From the Internet' radio button.
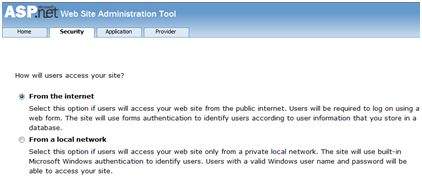
Step (4) : Click on 'Create Users' link to create some users. If you already had created roles, you could assign roles to the user, right at this stage.
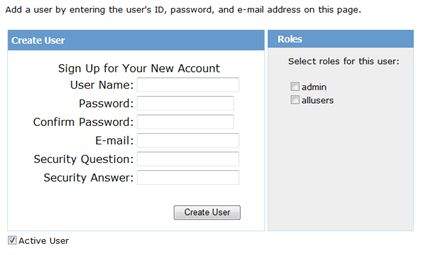
Step (5) : Create a web site and add the following pages:
- Welcome.aspx
- Login.aspx
- CreateAccount.aspx
- PasswordRecovery.aspx
- ChangePassword.aspx
Step (6) : Place a LoginStatus control on the Welcome.aspx from the login section of the toolbox. It has two templates: LoggedIn and LoggedOut.
In LoggedOut template, there is a login link and in the LoggedIn template, there is a logout link on the control. You can change the login and logout text properties of the control from the Properties window.
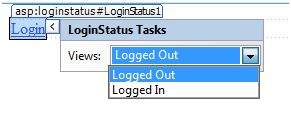
Step (7) : Place a LoginView control from the toolbox below the LoginStatus control. Here, you can put texts and other controls (hyperlinks, buttons etc.), which are displayed based on whether the user is logged in or not.
This control has two view templates: Anonymous template and LoggedIn template. Select each view and write some text for the users to be displayed for each template. The text should be placed on the area marked red.
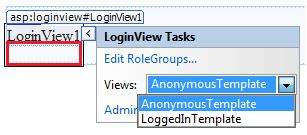
Step (8) : The users for the application are created by the developer. You might want to allow a visitor to create a user account. For this, add a link beneath the LoginView control, which should link to the CreateAccount.aspx page.
Step (9) : Place a CreateUserWizard control on the create account page. Set the ContinueDestinationPageUrl property of this control to Welcome.aspx.
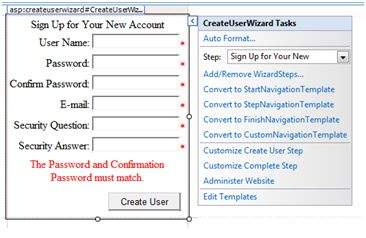
Step (10) : Create the Login page. Place a Login control on the page. The LoginStatus control automatically links to the Login.aspx. To change this default, make the following changes in the web.config file.
For example, if you want to name your log in page as signup.aspx, add the following lines to the <authentication> section of the web.config:
<configuration>
   <system.web>
      <authentication mode="Forms">
         <forms loginUrl ="signup.aspx" defaultUrl = Welcome.aspx />
      </authentication>
   </system.web>
</configuration>
Step (11) : Users often forget passwords. The PasswordRecovery control helps the user gain access to the account. Select the Login control. Open its smart tag and click 'Convert to Template'.
Customize the UI of the control to place a hyperlink control under the login button, which should link to the PassWordRecovery.aspx.
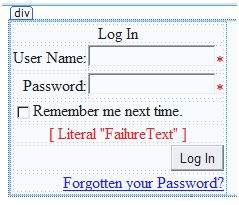
Step (12) : Place a PasswordRecovery control on the password recovery page. This control needs an email server to send the passwords to the users.
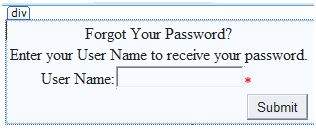
Step (13) : Create a link to the ChangePassword.aspx page in the LoggedIn template of the LoginView control in Welcome.aspx.
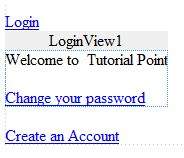
Step (14) : Place a ChangePassword control on the change password page. This control also has two views.
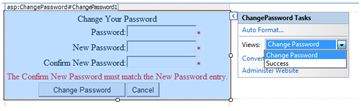
Now run the application and observe different security operations.
To create roles, go back to the Web Application Administration Tools and click on the Security tab. Click on 'Create Roles' and create some roles for the application.
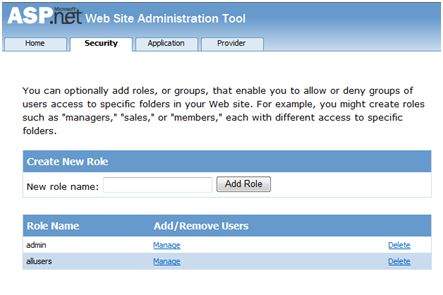
Click on the 'Manage Users' link and assign roles to the users.
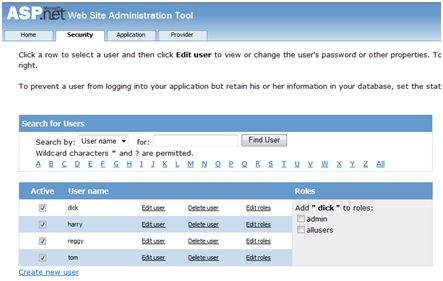
IIS Authentication: SSL
The Secure Socket Layer or SSL is the protocol used to ensure a secure connection. With SSL enabled, the browser encrypts all data sent to the server and decrypts all data coming from the server. At the same time, the server encrypts and decrypts all data to and from browser.
The URL for a secure connection starts with HTTPS instead of HTTP. A small lock is displayed by a browser using a secure connection. When a browser makes an initial attempt to communicate with a server over a secure connection using SSL, the server authenticates itself by sending its digital certificate.
To use the SSL, you need to buy a digital secure certificate from a trusted Certification Authority (CA) and install it in the web server. Following are some of the trusted and reputed certification authorities:
- www.verisign.com
- www.geotrust.com
- www.thawte.com
SSL is built into all major browsers and servers. To enable SSL, you need to install the digital certificate. The strength of various digital certificates varies depending upon the length of the key generated during encryption. More the length, more secure is the certificate, hence the connection.
| Strength | Description |
|---|---|
| 40 bit | Supported by most browsers but easy to break. |
| 56 bit | Stronger than 40-bit. |
| 128 bit | Extremely difficult to break but all the browsers do not support it. |
ASP.NET - Data Caching
What is Caching?
Caching is a technique of storing frequently used data/information in memory, so that, when the same data/information is needed next time, it could be directly retrieved from the memory instead of being generated by the application.
Caching is extremely important for performance boosting in ASP.NET, as the pages and controls are dynamically generated here. It is especially important for data related transactions, as these are expensive in terms of response time.
Caching places frequently used data in quickly accessed media such as the random access memory of the computer. The ASP.NET runtime includes a key-value map of CLR objects called cache. This resides with the application and is available via the HttpContext and System.Web.UI.Page.
In some respect, caching is similar to storing the state objects. However, the storing information in state objects is deterministic, i.e., you can count on the data being stored there, and caching of data is nondeterministic.
The data will not be available in the following cases:
- If its lifetime expires,
- If the application releases its memory,
- If caching does not take place for some reason.
You can access items in the cache using an indexer and may control the lifetime of objects in the cache and set up links between the cached objects and their physical sources.
Caching in ASP.Net
ASP.NET provides the following different types of caching:
Output Caching : Output cache stores a copy of the finally rendered HTML pages or part of pages sent to the client. When the next client requests for this page, instead of regenerating the page, a cached copy of the page is sent, thus saving time.
Data Caching : Data caching means caching data from a data source. As long as the cache is not expired, a request for the data will be fulfilled from the cache. When the cache is expired, fresh data is obtained by the data source and the cache is refilled.
Object Caching : Object caching is caching the objects on a page, such as data-bound controls. The cached data is stored in server memory.
Class Caching : Web pages or web services are compiled into a page class in the assembly, when run for the first time. Then the assembly is cached in the server. Next time when a request is made for the page or service, the cached assembly is referred to. When the source code is changed, the CLR recompiles the assembly.
Configuration Caching : Application wide configuration information is stored in a configuration file. Configuration caching stores the configuration information in the server memory.
In this tutorial, we will consider output caching, data caching, and object caching.
Output Caching
Rendering a page may involve some complex processes such as, database access, rendering complex controls etc. Output caching allows bypassing the round trips to server by caching data in memory. Even the whole page could be cached.
The OutputCache directive is responsible of output caching. It enables output caching and provides certain control over its behaviour.
Syntax for OutputCache directive:
<%@ OutputCache Duration="15" VaryByParam="None" %>
Put this directive under the page directive. This tells the environment to cache the page for 15 seconds. The following event handler for page load would help in testing that the page was really cached.
protected void Page_Load(object sender, EventArgs e)
{
   Thread.Sleep(10000);
   Response.Write("This page was generated and cache at:" +
   DateTime.Now.ToString());
}
The Thread.Sleep() method stops the process thread for the specified time. In this example, the thread is stopped for 10 seconds, so when the page is loaded for first time, it takes 10 seconds. However, next time you refresh the page it does not take any time, as the page is retrieved from the cache without being loaded.
The OutputCache directive has the following attributes, which helps in controlling the behaviour of the output cache:
| Attribute | Values | Description |
|---|---|---|
| DiskCacheable | true/false | Specifies that output could be written to a disk based cache. |
| NoStore | true/false | Specifies that the "no store" cache control header is sent or not. |
| CacheProfile | String name | Name of a cache profile as to be stored in web.config. |
| VaryByParam |
None * Param- name |
Semicolon delimited list of string specifies query string values in a GET request or variable in a POST request. |
| VaryByHeader |
* Header names |
Semicolon delimited list of strings specifies headers that might be submitted by a client. |
| VaryByCustom |
Browser Custom string |
Tells ASP.NET to vary the output cache by browser name and version or by a custom string. |
| Location |
Any Client Downstream Server None |
Any: page may be cached anywhere. Client: cached content remains at browser. Downstream: cached content stored in downstream and server both. Server: cached content saved only on server. None: disables caching. |
| Duration | Number | Number of seconds the page or control is cached. |
Let us add a text box and a button to the previous example and add this event handler for the button.
protected void btnmagic_Click(object sender, EventArgs e)
{
   Response.Write("<br><br>");
   Response.Write("<h2> Hello, " + this.txtname.Text + "</h2>");
}
Change the OutputCache directive:
<%@ OutputCache Duration="60" VaryByParam="txtname" %>
When the program is executed, ASP.NET caches the page on the basis of the name in the text box.
Data Caching
The main aspect of data caching is caching the data source controls. We have already discussed that the data source controls represent data in a data source, like a database or an XML file. These controls derive from the abstract class DataSourceControl and have the following inherited properties for implementing caching:
CacheDuration - It sets the number of seconds for which the data source will cache data.
CacheExpirationPolicy - It defines the cache behavior when the data in cache has expired.
CacheKeyDependency - It identifies a key for the controls that auto-expires the content of its cache when removed.
EnableCaching - It specifies whether or not to cache the data.
Example
To demonstrate data caching, create a new website and add a new web form on it. Add a SqlDataSource control with the database connection already used in the data access tutorials.
For this example, add a label to the page, which would show the response time for the page.
<asp:Label ID="lbltime" runat="server"></asp:Label>
Apart from the label, the content page is same as in the data access tutorial. Add an event handler for the page load event:
protected void Page_Load(object sender, EventArgs e)
{
   lbltime.Text = String.Format("Page posted at: {0}", DateTime.Now.ToLongTimeString());
}
The designed page should look as shown:
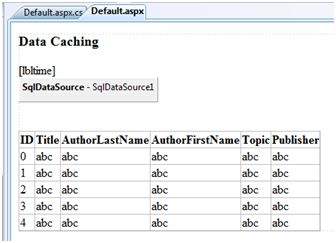
When you execute the page for the first time, nothing different happens, the label shows that, each time you refresh the page, the page is reloaded and the time shown on the label changes.
Next, set the EnableCaching attribute of the data source control to be 'true' and set the Cacheduration attribute to '60'. It will implement caching and the cache will expire every 60 seconds.
The timestamp changes with every refresh, but if you change the data in the table within these 60 seconds, it is not shown before the cache expires.
<asp:SqlDataSource ID="SqlDataSource1" runat="server"
   ConnectionString="<%$ ConnectionStrings:
   ASPDotNetStepByStepConnectionString %>"
   ProviderName="<%$ ConnectionStrings:
   ASPDotNetStepByStepConnectionString.ProviderName %>"
   SelectCommand="SELECT * FROM [DotNetReferences]"
   EnableCaching="true" CacheDuration = "60">
</asp:SqlDataSource>
Object Caching
Object caching provides more flexibility than other cache techniques. You can use object caching to place any object in the cache. The object can be of any type - a data type, a web control, a class, a dataset object, etc. The item is added to the cache simply by assigning a new key name, shown as follows Like:
Cache["key"] = item;
ASP.NET also provides the Insert() method for inserting an object to the cache. This method has four overloaded versions. Let us see them:
| Overload | Description |
|---|---|
| Cache.Insert((key, value); | Inserts an item into the cache with the key name and value with default priority and expiration. |
| Cache.Insert(key, value, dependencies); | Inserts an item into the cache with key, value, default priority, expiration and a CacheDependency name that links to other files or items so that when these change the cache item remains no longer valid. |
| Cache.Insert(key, value, dependencies, absoluteExpiration, slidingExpiration); | This indicates an expiration policy along with the above issues. |
| Cache.Insert(key, value, dependencies, absoluteExpiration, slidingExpiration, priority, onRemoveCallback); | This along with the parameters also allows you to set a priority for the cache item and a delegate that, points to a method to be invoked when the item is removed. |
Sliding expiration is used to remove an item from the cache when it is not used for the specified time span. The following code snippet stores an item with a sliding expiration of 10 minutes with no dependencies.
Cache.Insert("my_item", obj, null, DateTime.MaxValue, TimeSpan.FromMinutes(10));
Example
Create a page with just a button and a label. Write the following code in the page load event:
protected void Page_Load(object sender, EventArgs e)
{
   if (this.IsPostBack)
   {
      lblinfo.Text += "Page Posted Back.<br/>";
   }
   else
   {
      lblinfo.Text += "page Created.<br/>";
   }
   if (Cache["testitem"] == null)
   {
      lblinfo.Text += "Creating test item.<br/>";
      DateTime testItem = DateTime.Now;
      lblinfo.Text += "Storing test item in cache ";
      lblinfo.Text += "for 30 seconds.<br/>";
      Cache.Insert("testitem", testItem, null,
      DateTime.Now.AddSeconds(30), TimeSpan.Zero);
   }
   else
   {
      lblinfo.Text += "Retrieving test item.<br/>";
      DateTime testItem = (DateTime)Cache["testitem"];
      lblinfo.Text += "Test item is: " + testItem.ToString();
      lblinfo.Text += "<br/>";
   }
   lblinfo.Text += "<br/>";
}
When the page is loaded for the first time, it says:
Page Created.
Creating test item.
Storing test item in cache for 30 seconds.
If you click on the button again within 30 seconds, the page is posted back but the label control gets its information from the cache as shown:
Page Posted Back.
Retrieving test item.
Test item is: 14-07-2010 01:25:04
ASP.NET - Web Services
A web service is a web-based functionality accessed using the protocols of the web to be used by the web applications. There are three aspects of web service development:
- Creating the web service
- Creating a proxy
- Consuming the web service
Creating a Web Service
A web service is a web application which is basically a class consisting of methods that could be used by other applications. It also follows a code-behind architecture such as the ASP.NET web pages, although it does not have a user interface.
To understand the concept let us create a web service to provide stock price information. The clients can query about the name and price of a stock based on the stock symbol. To keep this example simple, the values are hardcoded in a two-dimensional array. This web service has three methods:
- A default HelloWorld method
- A GetName Method
- A GetPrice Method
Take the following steps to create the web service:
Step (1) : Select File -> New -> Web Site in Visual Studio, and then select ASP.NET Web Service.
Step (2) : A web service file called Service.asmx and its code behind file, Service.cs is created in the App_Code directory of the project.
Step (3) : Change the names of the files to StockService.asmx and StockService.cs.
Step (4) : The .asmx file has simply a WebService directive on it:
<%@ WebService Language="C#" CodeBehind="~/App_Code/StockService.cs"
   Class="StockService" %>
Step (5) : Open the StockService.cs file, the code generated in it is the basic Hello World service. The default web service code behind file looks like the following:
using System;
using System.Collections;
using System.ComponentModel;
using System.Data;
using System.Linq;
using System.Web;
using System.Web.Services;
using System.Web.Services.Protocols;
using System.Xml.Linq;
namespace StockService
{
   // <summary>
   // Summary description for Service1
   // <summary>
   [WebService(Namespace = "http://tempuri.org/")]
   [WebServiceBinding(ConformsTo = WsiProfiles.BasicProfile1_1)]
   [ToolboxItem(false)]
   // To allow this Web Service to be called from script,
   // using ASP.NET AJAX, uncomment the following line.
   // [System.Web.Script.Services.ScriptService]
   public class Service1 : System.Web.Services.WebService
   {
      [WebMethod]
      public string HelloWorld()
      {
         return "Hello World";
      }
   }
}
Step (6) : Change the code behind file to add the two dimensional array of strings for stock symbol, name and price and two web methods for getting the stock information.
using System;
using System.Linq;
using System.Web;
using System.Web.Services;
using System.Web.Services.Protocols;
using System.Xml.Linq;

[WebService(Namespace = "http://tempuri.org/")]
[WebServiceBinding(ConformsTo = WsiProfiles.BasicProfile1_1)]
// To allow this Web Service to be called from script,
// using ASP.NET AJAX, uncomment the following line.
// [System.Web.Script.Services.ScriptService]
public class StockService : System.Web.Services.WebService
{
   public StockService () {
      //Uncomment the following if using designed components
      //InitializeComponent();
   }
   string[,] stocks =
   {
      {"RELIND", "Reliance Industries", "1060.15"},
      {"ICICI", "ICICI Bank", "911.55"},
      {"JSW", "JSW Steel", "1201.25"},
      {"WIPRO", "Wipro Limited", "1194.65"},
      {"SATYAM", "Satyam Computers", "91.10"}
   };

   [WebMethod]
   public string HelloWorld() {
      return "Hello World";
   }
   [WebMethod]
   public double GetPrice(string symbol)
   {
      //it takes the symbol as parameter and returns price
      for (int i = 0; i < stocks.GetLength(0); i++)
      {
         if (String.Compare(symbol, stocks[i, 0], true) == 0)
         return Convert.ToDouble(stocks[i, 2]);
      }
      return 0;
   }
   [WebMethod]
   public string GetName(string symbol)
   {
      // It takes the symbol as parameter and
      // returns name of the stock
      for (int i = 0; i < stocks.GetLength(0); i++)
      {
         if (String.Compare(symbol, stocks[i, 0], true) == 0)
         return stocks[i, 1];
      }
      return "Stock Not Found";
   }
}
Step (7) : Running the web service application gives a web service test page, which allows testing the service methods.
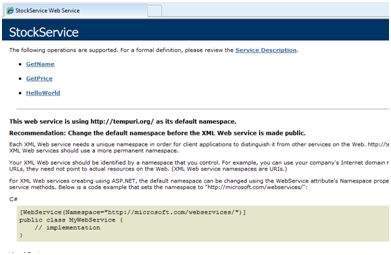
Step (8) : Click on a method name, and check whether it runs properly.
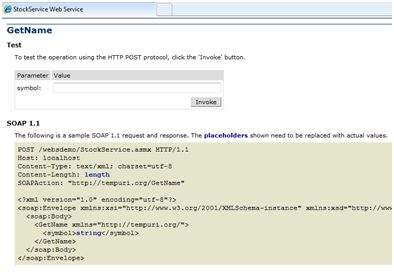
Step (9) : For testing the GetName method, provide one of the stock symbols, which are hard coded, it returns the name of the stock

Consuming the Web Service
For using the web service, create a web site under the same solution. This could be done by right clicking on the Solution name in the Solution Explorer. The web page calling the web service should have a label control to display the returned results and two button controls one for post back and another for calling the service.
The content file for the web application is as follows:
<%@ Page Language="C#" AutoEventWireup="true" CodeBehind="Default.aspx.cs"
   Inherits="wsclient._Default" %>

<!DOCTYPE html PUBLIC "-//W3C//DTD XHTML 1.0 Transitional//EN"
   "http://www.w3.org/TR/xhtml1/DTD/xhtml1-transitional.dtd">

<html xmlns="http://www.w3.org/1999/xhtml" >
   <head runat="server">
      <title>
         Untitled Page
      </title>
   </head>
   <body>
      <form id="form1" runat="server">
         <div>
            <h3>Using the Stock Service</h3>
            <br />
            <br />
            <asp:Label ID="lblmessage" runat="server"></asp:Label>
            <br />
            <br />
            <asp:Button ID="btnpostback" runat="server" onclick="Button1_Click"
               Text="Post Back" style="width:132px" />

            <asp:Button ID="btnservice" runat="server
               onclick="btnservice_Click"  Text="Get Stock" style="width:99px" />
         </div>
      </form>
   </body>
</html>
The code behind file for the web application is as follows:
using System;
using System.Collections;
using System.Configuration;
using System.Data;
using System.Linq;
using System.Web;
using System.Web.Security;
using System.Web.UI;
using System.Web.UI.HtmlControls;
using System.Web.UI.WebControls;
using System.Web.UI.WebControls.WebParts;
using System.Xml.Linq;

//this is the proxy
using localhost;

namespace wsclient
{
   public partial class _Default : System.Web.UI.Page
   {
      protected void Page_Load(object sender, EventArgs e)
      {
         if (!IsPostBack)
         {
            lblmessage.Text = "First Loading Time: " +  DateTime.Now.ToLongTimeString
         }
         else
         {
            lblmessage.Text = "PostBack at: " + DateTime.Now.ToLongTimeString();
         }
      }
      protected void btnservice_Click(object sender, EventArgs e)
      {
         StockService proxy = new StockService();
         lblmessage.Text = String.Format("Current SATYAM Price:{0}",
         proxy.GetPrice("SATYAM").ToString());
      }
   }
}
Creating the Proxy
A proxy is a stand-in for the web service codes. Before using the web service, a proxy must be created. The proxy is registered with the client application. Then the client application makes the calls to the web service as it were using a local method.
The proxy takes the calls, wraps it in proper format and sends it as a SOAP request to the server. SOAP stands for Simple Object Access Protocol. This protocol is used for exchanging web service data.
When the server returns the SOAP package to the client, the proxy decodes everything and presents it to the client application.
Before calling the web service using the btnservice_Click, a web reference should be added to the application. This creates a proxy class transparently, which is used by the btnservice_Click event.
protected void btnservice_Click(object sender, EventArgs e)
{
   StockService proxy = new StockService();
   lblmessage.Text = String.Format("Current SATYAM Price: {0}",
   proxy.GetPrice("SATYAM").ToString());
}
Take the following steps for creating the proxy:
Step (1) : Right click on the web application entry in the Solution Explorer and click on 'Add Web Reference'.
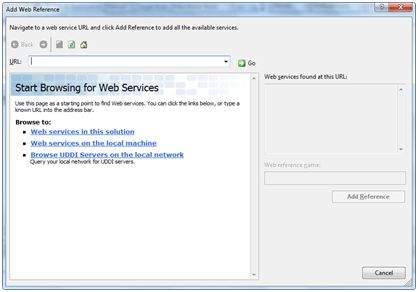
Step (2) : Select 'Web Services in this solution'. It returns the StockService reference.
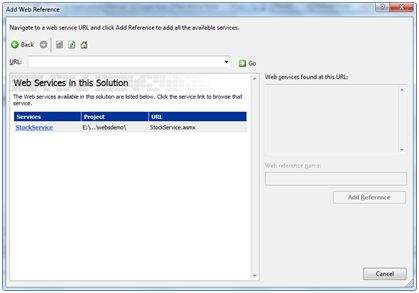
Step (3) : Clicking on the service opens the test web page. By default the proxy created is called 'localhost', you can rename it. Click on 'Add Reference' to add the proxy to the client application.
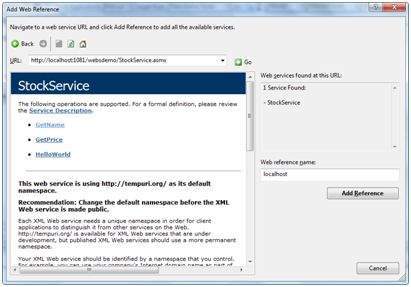
Include the proxy in the code behind file by adding:
using localhost;
ASP.NET - Multi Threading
A thread is defined as the execution path of a program. Each thread defines a unique flow of control. If your application involves complicated and time consuming operations such as database access or some intense I/O operations, then it is often helpful to set different execution paths or threads, with each thread performing a particular job.
Threads are lightweight processes. One common example of use of thread is implementation of concurrent programming by modern operating systems. Use of threads saves wastage of CPU cycle and increases efficiency of an application.
So far we compiled programs where a single thread runs as a single process which is the running instance of the application. However, this way the application can perform one job at a time. To make it execute multiple tasks at a time, it could be divided into smaller threads.
In .Net, the threading is handled through the 'System.Threading' namespace. Creating a variable of the System.Threading.Thread type allows you to create a new thread to start working with. It allows you to create and access individual threads in a program.
Creating Thread
A thread is created by creating a Thread object, giving its constructor a ThreadStart reference.
ThreadStart childthreat = new ThreadStart(childthreadcall);
Thread Life Cycle
The life cycle of a thread starts when an object of the System.Threading.Thread class is created and ends when the thread is terminated or completes execution.
Following are the various states in the life cycle of a thread:
The Unstarted State : It is the situation when the instance of the thread is created but the Start method is not called.
The Ready State : It is the situation when the thread is ready to execute and waiting CPU cycle.
The Not Runnable State : a thread is not runnable, when:
- Sleep method has been called
- Wait method has been called
- Blocked by I/O operations
The Dead State : It is the situation when the thread has completed execution or has been aborted.
Thread Priority
The Priority property of the Thread class specifies the priority of one thread with respect to other. The .Net runtime selects the ready thread with the highest priority.
The priorities could be categorized as:
- Above normal
- Below normal
- Highest
- Lowest
- Normal
Once a thread is created, its priority is set using the Priority property of the thread class.
NewThread.Priority = ThreadPriority.Highest;
Thread Properties & Methods
The Thread class has the following important properties:
| Property | Description |
|---|---|
| CurrentContext | Gets the current context in which the thread is executing. |
| CurrentCulture | Gets or sets the culture for the current thread. |
| CurrentPrinciple | Gets or sets the thread's current principal for role-based security. |
| CurrentThread | Gets the currently running thread. |
| CurrentUICulture | Gets or sets the current culture used by the Resource Manager to look up culture-specific resources at run time. |
| ExecutionContext | Gets an ExecutionContext object that contains information about the various contexts of the current thread. |
| IsAlive | Gets a value indicating the execution status of the current thread. |
| IsBackground | Gets or sets a value indicating whether or not a thread is a background thread. |
| IsThreadPoolThread | Gets a value indicating whether or not a thread belongs to the managed thread pool. |
| ManagedThreadId | Gets a unique identifier for the current managed thread. |
| Name | Gets or sets the name of the thread. |
| Priority | Gets or sets a value indicating the scheduling priority of a thread. |
| ThreadState | Gets a value containing the states of the current thread. |
The Thread class has the following important methods:
| Methods | Description |
|---|---|
| Abort | Raises a ThreadAbortException in the thread on which it is invoked, to begin the process of terminating the thread. Calling this method usually terminates the thread. |
| AllocateDataSlot | Allocates an unnamed data slot on all the threads. For better performance, use fields that are marked with the ThreadStaticAttribute attribute instead. |
| AllocateNamedDataSlot | Allocates a named data slot on all threads. For better performance, use fields that are marked with the ThreadStaticAttribute attribute instead. |
| BeginCriticalRegion | Notifies a host that execution is about to enter a region of code in which the effects of a thread abort or unhandled exception might endanger other tasks in the application domain. |
| BeginThreadAffinity | Notifies a host that managed code is about to execute instructions that depend on the identity of the current physical operating system thread. |
| EndCriticalRegion | Notifies a host that execution is about to enter a region of code in which the effects of a thread abort or unhandled exception are limited to the current task. |
| EndThreadAffinity | Notifies a host that managed code has finished executing instructions that depend on the identity of the current physical operating system thread. |
| FreeNamedDataSlot | Eliminates the association between a name and a slot, for all threads in the process. For better performance, use fields that are marked with the ThreadStaticAttribute attribute instead. |
| GetData | Retrieves the value from the specified slot on the current thread, within the current thread's current domain. For better performance, use fields that are marked with the ThreadStaticAttribute attribute instead. |
| GetDomain | Returns the current domain in which the current thread is running. |
| GetDomainID | Returns a unique application domain identifier. |
| GetNamedDataSlot | Looks up a named data slot. For better performance, use fields that are marked with the ThreadStaticAttribute attribute instead. |
| Interrupt | Interrupts a thread that is in the WaitSleepJoin thread state. |
| Join | Blocks the calling thread until a thread terminates, while continuing to perform standard COM and SendMessage pumping. This method has different overloaded forms. |
| MemoryBarrier | Synchronizes memory access as follows: The processor executing the current thread cannot reorder instructions in such a way that memory accesses prior to the call to MemoryBarrier execute after memory accesses that follow the call to MemoryBarrier. |
| ResetAbort | Cancels an Abort requested for the current thread. |
| SetData | Sets the data in the specified slot on the currently running thread, for that thread's current domain. For better performance, use fields marked with the ThreadStaticAttribute attribute instead. |
| Start | Starts a thread. |
| Sleep | Makes the thread pause for a period of time. |
| SpinWait | Causes a thread to wait the number of times defined by the iterations parameter. |
| VolatileRead() | Reads the value of a field. The value is the latest written by any processor in a computer, regardless of the number of processors or the state of processor cache. This method has different overloaded forms. |
| VolatileWrite() | Writes a value to a field immediately, so that the value is visible to all processors in the computer. This method has different overloaded forms. |
| Yield | Causes the calling thread to yield execution to another thread that is ready to run on the current processor. The operating system selects the thread to yield to. |
Example
The following example illustrates the uses of the Thread class. The page has a label control for displaying messages from the child thread. The messages from the main program are directly displayed using the Response.Write() method. Hence they appear on the top of the page.
The source file is as follows:
<%@ Page Language="C#" AutoEventWireup="true" CodeBehind="Default.aspx.cs"
   Inherits="threaddemo._Default" %>

<!DOCTYPE html PUBLIC "-//W3C//DTD XHTML 1.0 Transitional//EN"
   "http://www.w3.org/TR/xhtml1/DTD/xhtml1-transitional.dtd">

<html xmlns="http://www.w3.org/1999/xhtml" >
   <head runat="server">
      <title>
         Untitled Page
      </title>
   </head>
   <body>
      <form id="form1" runat="server">
         <div>
            <h3>Thread Example</h3>
         </div>
         <asp:Label ID="lblmessage" runat="server" Text="Label">
         </asp:Label>
      </form>
   </body>
</html>
The code behind file is as follows:
using System;
using System.Collections;
using System.Configuration;
using System.Data;
using System.Linq;
using System.Web;
using System.Web.Security;
using System.Web.UI;
using System.Web.UI.HtmlControls;
using System.Web.UI.WebControls;
using System.Web.UI.WebControls.WebParts;
using System.Xml.Linq;
using System.Threading;

namespace threaddemo
{
   public partial class _Default : System.Web.UI.Page
   {
      protected void Page_Load(object sender, EventArgs e)
      {
         ThreadStart childthreat = new ThreadStart(childthreadcall);
         Response.Write("Child Thread Started <br/>");
         Thread child = new Thread(childthreat);
         child.Start();
         Response.Write("Main sleeping  for 2 seconds.......<br/>");
         Thread.Sleep(2000);
         Response.Write("<br/>Main aborting child thread<br/>");
         child.Abort();
      }
      public void childthreadcall()
      {
         try{
            lblmessage.Text = "<br />Child thread started <br/>";
            lblmessage.Text += "Child Thread: Coiunting to 10";
            for( int i =0; i<10; i++)
            {
               Thread.Sleep(500);
               lblmessage.Text += "<br/> in Child thread </br>";
            }
            lblmessage.Text += "<br/> child thread finished";
         }
         catch(ThreadAbortException e)
         {
            lblmessage.Text += "<br /> child thread - exception";
         }
         finally{
            lblmessage.Text += "<br /> child thread - unable to catch the  exception";
         }
      }
   }
}
Observe the following
When the page is loaded, a new thread is started with the reference of the method childthreadcall(). The main thread activities are displayed directly on the web page.
The second thread runs and sends messages to the label control.
The main thread sleeps for 2000 ms, during which the child thread executes.
The child thread runs till it is aborted by the main thread. It raises the ThreadAbortException and is terminated.
Control returns to the main thread.
When executed the program sends the following messages:
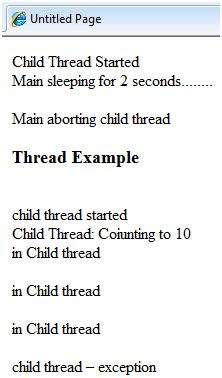
ASP.NET - Configuration
The behavior of an ASP.NET application is affected by different settings in the configuration files:
- machine.config
- web.config
The machine.config file contains default and the machine-specific value for all supported settings. The machine settings are controlled by the system administrator and applications are generally not given access to this file.
An application however, can override the default values by creating web.config files in its roots folder. The web.config file is a subset of the machine.config file.
If the application contains child directories, it can define a web.config file for each folder. Scope of each configuration file is determined in a hierarchical top-down manner.
Any web.config file can locally extend, restrict, or override any settings defined on the upper level.
Visual Studio generates a default web.config file for each project. An application can execute without a web.config file, however, you cannot debug an application without a web.config file.
The following figure shows the Solution Explorer for the sample example used in the web services tutorial:
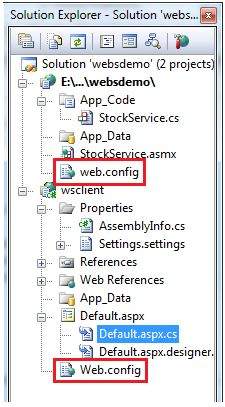
In this application, there are two web.config files for two projects i.e., the web service and the web site calling the web service.
The web.config file has the configuration element as the root node. Information inside this element is grouped into two main areas: the configuration section-handler declaration area, and the configuration section settings area.
The following code snippet shows the basic syntax of a configuration file:
<configuration>
   <!-- Configuration section-handler declaration area. -->
      <configSections>
         <section name="section1" type="section1Handler" />
         <section name="section2" type="section2Handler" />
      </configSections>
   <!-- Configuration section settings area. -->
   <section1>
      <s1Setting1 attribute1="attr1" />
   </section1>
   <section2>
      <s2Setting1 attribute1="attr1" />
   </section2>
   <system.web>
      <authentication mode="Windows" />
   </system.web>
</configuration>
Configuration Section Handler declarations
The configuration section handlers are contained within the <configSections> tags. Each configuration handler specifies name of a configuration section, contained within the file, which provides some configuration data. It has the following basic syntax:
<configSections>
   <section />
   <sectionGroup />
   <remove />
   <clear/>
</configSections>
It has the following elements:
Clear - It removes all references to inherited sections and section groups.
Remove - It removes a reference to an inherited section and section group.
Section - It defines an association between a configuration section handler and a configuration element.
Section group - It defines an association between a configuration section handler and a configuration section.
Application Settings
The application settings allow storing application-wide name-value pairs for read-only access. For example, you can define a custom application setting as:
<configuration>
   <appSettings>
      <add key="Application Name" value="MyApplication" />
   </appSettings>
</configuration>
For example, you can also store the name of a book and its ISBN number:
<configuration>
   <appSettings>
      <add key="appISBN" value="0-273-68726-3" />
      <add key="appBook" value="Corporate Finance" />
   </appSettings>
</configuration>
Connection Strings
The connection strings show which database connection strings are available to the website. For example:
<connectionStrings>
   <add name="ASPDotNetStepByStepConnectionString"
      connectionString="Provider=Microsoft.Jet.OLEDB.4.0;
      Data Source=E:\\projects\datacaching\ /
      datacaching\App_Data\ASPDotNetStepByStep.mdb"
      providerName="System.Data.OleDb" />
   <add name="booksConnectionString"
      connectionString="Provider=Microsoft.Jet.OLEDB.4.0;
      Data Source=C:\ \databinding\App_Data\books.mdb"
      providerName="System.Data.OleDb" />
</connectionStrings>
System.Web Element
The system.web element specifies the root element for the ASP.NET configuration section and contains configuration elements that configure ASP.NET Web applications and control how the applications behave.
It holds most of the configuration elements needed to be adjusted in common applications. The basic syntax for the element is as given:
<system.web>
   <anonymousIdentification>
   <authentication>
   <authorization>
   <browserCaps>
   <caching>
   <clientTarget>
   <compilation>
   <customErrors>
   <deployment>
   <deviceFilters>
   <globalization>
   <healthMonitoring>
   <hostingEnvironment>
   <httpCookies>
   <httpHandlers>
   <httpModules>
   <httpRuntime>
   <identity>
   <machineKey>
   <membership>
   <mobileControls>
   <pages>
   <processModel>
   <profile>
   <roleManager>
   <securityPolicy>
   <sessionPageState>
   <sessionState>
   <siteMap>
   <trace>
   <trust>
   <urlMappings>
   <webControls>
   <webParts>
   <webServices>
   <xhtmlConformance>
</system.web>
The following table provides brief description of some of common sub elements of the system.web element:
AnonymousIdentification
This is required to identify users who are not authenticated when authorization is required.
Authentication
It configures the authentication support. The basic syntax is as given:
<authentication mode="[Windows|Forms|Passport|None]">
   <forms>...</forms>
   <passport/>
</authentication>
Authorization
It configures the authorization support. The basic syntax is as given:
<authorization>
   <allow .../>
   <deny .../>
</authorization>
Caching
It Configures the cache settings. The basic syntax is as given:
<caching>
   <cache>...</cache>
   <outputCache>...</outputCache>
   <outputCacheSettings>...</outputCacheSettings>
   <sqlCacheDependency>...</sqlCacheDependency>
</caching>
CustomErrors
It defines custom error messages. The basic syntax is as given:
<customErrors defaultRedirect="url" mode="On|Off|RemoteOnly">
   <error. . ./>
</customErrors>
Deployment
It defines configuration settings used for deployment. The basic syntax is as follows:
<deployment retail="true|false" />
HostingEnvironment
It defines configuration settings for hosting environment. The basic syntax is as follows:
<hostingEnvironment idleTimeout="HH:MM:SS" shadowCopyBinAssemblies="true|false"
   shutdownTimeout="number" urlMetadataSlidingExpiration="HH:MM:SS" />
Identity
It configures the identity of the application. The basic syntax is as given:
<identity impersonate="true|false" userName="domain\username"
   password="<secure password>"/>
MachineKey
It configures keys to use for encryption and decryption of Forms authentication cookie data.
It also allows configuring a validation key that performs message authentication checks on view-state data and forms authentication tickets. The basic syntax is:
<machineKey validationKey="AutoGenerate,IsolateApps" [String]
   decryptionKey="AutoGenerate,IsolateApps" [String]
   validation="HMACSHA256" [SHA1 | MD5 | 3DES | AES | HMACSHA256 |
   HMACSHA384 | HMACSHA512 | alg:algorithm_name]
   decryption="Auto" [Auto | DES | 3DES | AES | alg:algorithm_name]
/>
Membership
This configures parameters of managing and authenticating user accounts. The basic syntax is:
<membership defaultProvider="provider name"
   userIsOnlineTimeWindow="number of minutes" hashAlgorithmType="SHA1">
   <providers>...</providers>
</membership>
Pages
It provides page-specific configurations. The basic syntax is:
<pages asyncTimeout="number" autoEventWireup="[True|False]"
   buffer="[True|False]" clientIDMode="[AutoID|Predictable|Static]"
   compilationMode="[Always|Auto|Never]"
   controlRenderingCompatibilityVersion="[3.5|4.0]"
   enableEventValidation="[True|False]"
   enableSessionState="[True|False|ReadOnly]"
   enableViewState="[True|False]"
   enableViewStateMac="[True|False]"
   maintainScrollPositionOnPostBack="[True|False]"
   masterPageFile="file path"
   maxPageStateFieldLength="number"
   pageBaseType="typename, assembly"
   pageParserFilterType="string"
   smartNavigation="[True|False]"
   styleSheetTheme="string"
   theme="string"
   userControlBaseType="typename"
   validateRequest="[True|False]"
   viewStateEncryptionMode="[Always|Auto|Never]" >
   <controls>...</controls>
   <namespaces>...</namespaces>
   <tagMapping>...</tagMapping>
   <ignoreDeviceFilters>...</ignoreDeviceFilters>
</pages>
Profile
It configures user profile parameters. The basic syntax is:
<profile enabled="true|false" inherits="fully qualified type reference"
   automaticSaveEnabled="true|false" defaultProvider="provider name">
   <properties>...</properties>
   <providers>...</providers>
</profile>
RoleManager
It configures settings for user roles. The basic syntax is:
<roleManager cacheRolesInCookie="true|false" cookieName="name"
   cookiePath="/" cookieProtection="All|Encryption|Validation|None"
   cookieRequireSSL="true|false " cookieSlidingExpiration="true|false "
   cookieTimeout="number of minutes" createPersistentCookie="true|false"
   defaultProvider="provider name" domain="cookie domain">
   enabled="true|false"
   maxCachedResults="maximum number of role names cached"
   <providers>...</providers>
</roleManager>
SecurityPolicy
It configures the security policy. The basic syntax is:
<securityPolicy>
   <trustLevel />
</securityPolicy>
UrlMappings
It defines mappings to hide the original URL and provide a more user friendly URL. The basic syntax is:
<urlMappings enabled="true|false">
   <add.../>
   <clear />
   <remove.../>
</urlMappings>
WebControls
It provides the name of shared location for client scripts. The basic syntax is:
<webControls clientScriptsLocation="String" />
WebServices
This configures the web services.
ASP.NET - Deployment
There are two categories of ASP.NET deployment:
Local deployment : In this case, the entire application is contained within a virtual directory and all the contents and assemblies are contained within it and available to the application.
Global deployment : In this case, assemblies are available to every application running on the server.
There are different techniques used for deployment, however, we will discuss the following most common and easiest ways of deployment:
- XCOPY deployment
- Copying a Website
- Creating a set up project
XCOPY Deployment
XCOPY deployment means making recursive copies of all the files to the target folder on the target machine. You can use any of the commonly used techniques:
- FTP transfer
- Using Server management tools that provide replication on a remote site
- MSI installer application
XCOPY deployment simply copies the application file to the production server and sets a virtual directory there. You need to set a virtual directory using the Internet Information Manager Microsoft Management Console (MMC snap-in).
Copying a Website
The Copy Web Site option is available in Visual Studio. It is available from the Website -> Copy Web Site menu option. This menu item allows copying the current web site to another local or remote location. It is a sort of integrated FTP tool.
Using this option, you connect to the target destination, select the desired copy mode:
- Overwrite
- Source to Target Files
- Sync UP Source And Target Projects
Then proceed with copying the files physically. Unlike the XCOPY deployment, this process of deployment is done from Visual Studio environment. However, there are following problems with both the above deployment methods:
- You pass on your source code.
- There is no pre-compilation and related error checking for the files.
- The initial page load will be slow.
Creating a Setup Project
In this method, you use Windows Installer and package your web applications so it is ready to deploy on the production server. Visual Studio allows you to build deployment packages. Let us test this on one of our existing project, say the data binding project.
Open the project and take the following steps:
Step (1) : Select File -> Add -> New Project with the website root directory highlighted in the Solution Explorer.
Step (2) : Select Setup and Deployment, under Other Project Types. Select Setup Wizard.
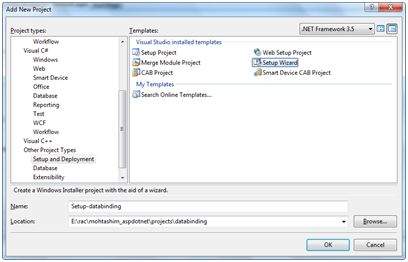
Step (3) : Choosing the default location ensures that the set up project will be located in its own folder under the root directory of the site. Click on okay to get the first splash screen of the wizard.
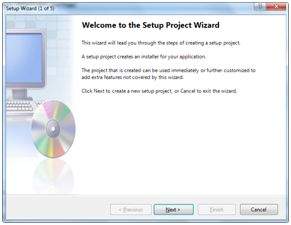
Step (4) : Choose a project type. Select 'Create a setup for a web application'.
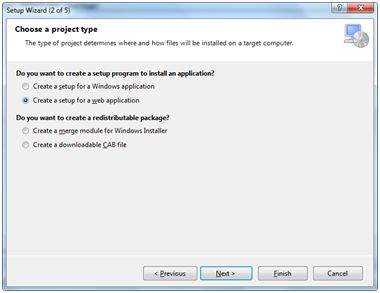
Step (5) : Next, the third screen asks to choose project outputs from all the projects in the solution. Check the check box next to 'Content Files from...'
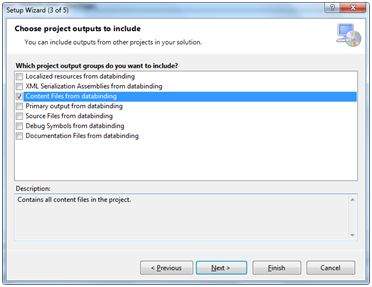
Step (6) : The fourth screen allows including other files like ReadMe. However, in our case there is no such file. Click on finish.
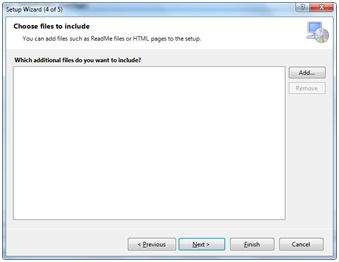
Step (7) : The final screen displays a summary of settings for the set up project.
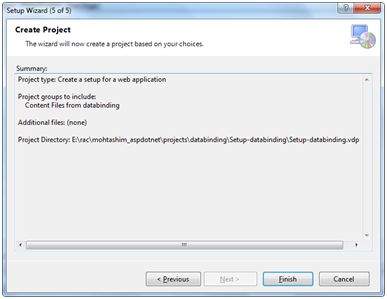
Step (8) : The Set up project is added to the Solution Explorer and the main design window shows a file system editor.

Step (9) : Next step is to build the setup project. Right click on the project name in the Solution Explorer and select Build.
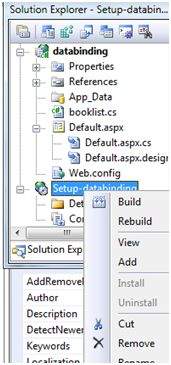
Step (10) : When build is completed, you get the following message in the Output window:

Two files are created by the build process:
- Setup.exe
- Setup-databinding.msi
You need to copy these files to the server. Double-click the setup file to install the content of the .msi file on the local machine.
