- ASP.NET - Home
- ASP.NET - Introduction
- ASP.NET - Environment
- ASP.NET - Life Cycle
- ASP.NET - First Example
- ASP.NET - Event Handling
- ASP.NET - Server Side
- ASP.NET - Server Controls
- ASP.NET - HTML Server
- ASP.NET - Client Side
- ASP.NET - Basic Controls
- ASP.NET - Directives
- ASP.NET - Managing State
- ASP.NET - Validators
- ASP.NET - Database Access
- ASP.NET - ADO.net
- ASP.NET - File Uploading
- ASP.NET - Ad Rotator
- ASP.NET - Calendars
- ASP.NET - Multi Views
- ASP.NET - Panel Controls
- ASP.NET - AJAX Control
- ASP.NET - Data Sources
- ASP.NET - Data Binding
- ASP.NET - Custom Controls
- ASP.NET - Personalization
- ASP.NET - Error Handling
- ASP.NET - Debugging
- ASP.NET - LINQ
- ASP.NET - Security
- ASP.NET - Data Caching
- ASP.NET - Web Services
- ASP.NET - Multi Threading
- ASP.NET - Configuration
- ASP.NET - Deployment
ASP.NET - File Uploading
ASP.NET has two controls that allow users to upload files to the web server. Once the server receives the posted file data, the application can save it, check it, or ignore it. The following controls allow the file uploading:
HtmlInputFile - an HTML server control
FileUpload - and ASP.NET web control
Both controls allow file uploading, but the FileUpload control automatically sets the encoding of the form, whereas the HtmlInputFile does not do so.
In this tutorial, we use the FileUpload control. The FileUpload control allows the user to browse for and select the file to be uploaded, providing a browse button and a text box for entering the filename.
Once, the user has entered the filename in the text box by typing the name or browsing, the SaveAs method of the FileUpload control can be called to save the file to the disk.
The basic syntax of FileUpload is:
<asp:FileUpload ID= "Uploader" runat = "server" />
The FileUpload class is derived from the WebControl class, and inherits all its members. Apart from those, the FileUpload class has the following read-only properties:
| Properties | Description |
|---|---|
| FileBytes | Returns an array of the bytes in a file to be uploaded. |
| FileContent | Returns the stream object pointing to the file to be uploaded. |
| FileName | Returns the name of the file to be uploaded. |
| HasFile | Specifies whether the control has a file to upload. |
| PostedFile | Returns a reference to the uploaded file. |
The posted file is encapsulated in an object of type HttpPostedFile, which could be accessed through the PostedFile property of the FileUpload class.
The HttpPostedFile class has the following frequently used properties:
| Properties | Description |
|---|---|
| ContentLength | Returns the size of the uploaded file in bytes. |
| ContentType | Returns the MIME type of the uploaded file. |
| FileName | Returns the full filename. |
| InputStream | Returns a stream object pointing to the uploaded file. |
Example
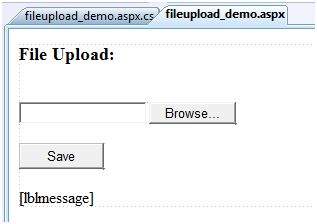
The following example demonstrates the FileUpload control and its properties. The form has a FileUpload control along with a save button and a label control for displaying the file name, file type, and file length.
In the design view, the form looks as follows:
The content file code is as given:
<body>
   <form id="form1" runat="server">

      <div>
         <h3> File Upload:</h3>
         <br />
         <asp:FileUpload ID="FileUpload1" runat="server" />
         <br /><br />
         <asp:Button ID="btnsave" runat="server" onclick="btnsave_Click"  Text="Save" style="width:85px" />
         <br /><br />
         <asp:Label ID="lblmessage" runat="server" />
      </div>

   </form>
</body>
The code behind the save button is as given:
protected void btnsave_Click(object sender, EventArgs e)
{
   StringBuilder sb = new StringBuilder();

   if (FileUpload1.HasFile)
   {
      try
      {
         sb.AppendFormat(" Uploading file: {0}", FileUpload1.FileName);

         //saving the file
         FileUpload1.SaveAs("<c:\\SaveDirectory>" + FileUpload1.FileName);

         //Showing the file information
         sb.AppendFormat("<br/> Save As: {0}",  FileUpload1.PostedFile.FileName);
         sb.AppendFormat("<br/> File type: {0}",    FileUpload1.PostedFile.ContentType);
         sb.AppendFormat("<br/> File length: {0}",  FileUpload1.PostedFile.ContentLength);
         sb.AppendFormat("<br/> File name: {0}",  FileUpload1.PostedFile.FileName);

      }catch (Exception ex)
      {
         sb.Append("<br/> Error <br/>");
         sb.AppendFormat("Unable to save file <br/> {0}", ex.Message);
      }
   }
   else
   {
      lblmessage.Text = sb.ToString();
   }
}
Note the following:
The StringBuilder class is derived from System.IO namespace, so it needs to be included.
The try and catch blocks are used for catching errors, and display the error message.
