- ASP.NET - Home
- ASP.NET - Introduction
- ASP.NET - Environment
- ASP.NET - Life Cycle
- ASP.NET - First Example
- ASP.NET - Event Handling
- ASP.NET - Server Side
- ASP.NET - Server Controls
- ASP.NET - HTML Server
- ASP.NET - Client Side
- ASP.NET - Basic Controls
- ASP.NET - Directives
- ASP.NET - Managing State
- ASP.NET - Validators
- ASP.NET - Database Access
- ASP.NET - ADO.net
- ASP.NET - File Uploading
- ASP.NET - Ad Rotator
- ASP.NET - Calendars
- ASP.NET - Multi Views
- ASP.NET - Panel Controls
- ASP.NET - AJAX Control
- ASP.NET - Data Sources
- ASP.NET - Data Binding
- ASP.NET - Custom Controls
- ASP.NET - Personalization
- ASP.NET - Error Handling
- ASP.NET - Debugging
- ASP.NET - LINQ
- ASP.NET - Security
- ASP.NET - Data Caching
- ASP.NET - Web Services
- ASP.NET - Multi Threading
- ASP.NET - Configuration
- ASP.NET - Deployment
ASP.NET - HTML Server
The HTML server controls are basically the standard HTML controls enhanced to enable server side processing. The HTML controls such as the header tags, anchor tags, and input elements are not processed by the server but are sent to the browser for display.
They are specifically converted to a server control by adding the attribute runat="server" and adding an id attribute to make them available for server-side processing.
For example, consider the HTML input control:
<input type="text" size="40">
It could be converted to a server control, by adding the runat and id attribute:
<input type="text" id="testtext" size="40" runat="server">
Advantages of using HTML Server Controls
Although ASP.NET server controls can perform every job accomplished by the HTML server controls, the later controls are useful in the following cases:
- Using static tables for layout purposes.
- Converting a HTML page to run under ASP.NET
The following table describes the HTML server controls:
| Control Name | HTML tag |
|---|---|
| HtmlHead | <head>element |
| HtmlInputButton | <input type=button|submit|reset> |
| HtmlInputCheckbox | <input type=checkbox> |
| HtmlInputFile | <input type = file> |
| HtmlInputHidden | <input type = hidden> |
| HtmlInputImage | <input type = image> |
| HtmlInputPassword | <input type = password> |
| HtmlInputRadioButton | <input type = radio> |
| HtmlInputReset | <input type = reset> |
| HtmlText | <input type = text|password> |
| HtmlImage | <img> element |
| HtmlLink | <link> element |
| HtmlAnchor | <a> element |
| HtmlButton | <button> element |
| HtmlButton | <button> element |
| HtmlForm | <form> element |
| HtmlTable | <table> element |
| HtmlTableCell | <td> and <th> |
| HtmlTableRow | <tr> element |
| HtmlTitle | <title> element |
| HtmlSelect | <select&t; element |
| HtmlGenericControl | All HTML controls not listed |
Example
The following example uses a basic HTML table for layout. It uses some boxes for getting input from the users such as name, address, city, state etc. It also has a button control, which is clicked to get the user data displayed in the last row of the table.
The page should look like this in the design view:
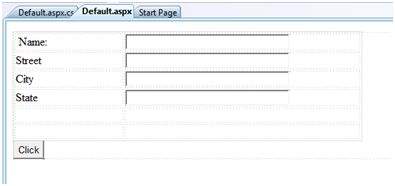
The code for the content page shows the use of the HTML table element for layout.
<%@ Page Language="C#" AutoEventWireup="true" CodeBehind="Default.aspx.cs" Inherits="htmlserver._Default" %>

<!DOCTYPE html PUBLIC "-//W3C//DTD XHTML 1.0 Transitional//EN" "http://www.w3.org/TR/xhtml1/DTD/xhtml1-transitional.dtd">

<html xmlns="http://www.w3.org/1999/xhtml" >

   <head runat="server">
      <title>Untitled Page</title>

      <style type="text/css">
         .style1
         {
            width: 156px;
         }
         .style2
         {
            width: 332px;
         }
      </style>

   </head>

   <body>
      <form id="form1" runat="server">
         <div>
            <table style="width: 54%;">
               <tr>
                  <td class="style1">Name:</td>
                  <td class="style2">
                     <asp:TextBox ID="txtname" runat="server"  style="width:230px">
                     </asp:TextBox>
                  </td>
               </tr>

               <tr>
                  <td class="style1">Street</td>
                  <td class="style2">
                     <asp:TextBox ID="txtstreet" runat="server"  style="width:230px">
                     </asp:TextBox>
                  </td>
               </tr>

               <tr>
                  <td class="style1">City</td>
                  <td class="style2">
                     <asp:TextBox ID="txtcity" runat="server"  style="width:230px">
                     </asp:TextBox>
                  </td>
               </tr>

               <tr>
                  <td class="style1">State</td>
                  <td class="style2">
                     <asp:TextBox ID="txtstate" runat="server" style="width:230px">
                     </asp:TextBox>
                  </td>
               </tr>

               <tr>
                  <td class="style1"> </td>
                  <td class="style2"></td>
               </tr>

               <tr>
                  <td class="style1"></td>
                  <td ID="displayrow" runat ="server" class="style2">
                  </td>
               </tr>
            </table>

         </div>
         <asp:Button ID="Button1" runat="server" onclick="Button1_Click" Text="Click" />
      </form>
   </body>
</html>
The code behind the button control:
protected void Button1_Click(object sender, EventArgs e)
{
   string str = "";
   str += txtname.Text + "<br />";
   str += txtstreet.Text + "<br />";
   str += txtcity.Text + "<br />";
   str += txtstate.Text + "<br />";
   displayrow.InnerHtml = str;
}
Observe the following:
The standard HTML tags have been used for the page layout.
The last row of the HTML table is used for data display. It needed server side processing, so an ID attribute and the runat attribute has been added to it.
