
- Android - Home
- Android - Overview
- Android - Environment Setup
- Android - Architecture
- Android - Application Components
- Android - Hello World Example
- Android - Resources
- Android - Activities
- Android - Services
- Android - Broadcast Receivers
- Android - Content Providers
- Android - Fragments
- Android - Intents/Filters
- Android - UI Layouts
- Android - UI Controls
- Android - Event Handling
- Android - Styles and Themes
- Android - Custom Components
- Android Advanced Concepts
- Android - Drag and Drop
- Android - Notifications
- Location Based Services
- Android - Sending Email
- Android - Sending SMS
- Android - Phone Calls
- Publishing Android Application
- Android Useful Examples
- Android - Alert Dialoges
- Android - Animations
- Android - Audio Capture
- Android - AudioManager
- Android - Auto Complete
- Android - Best Practices
- Android - Bluetooth
- Android - Camera
- Android - Clipboard
- Android - Custom Fonts
- Android - Data Backup
- Android - Developer Tools
- Android - Emulator
- Android - Facebook Integration
- Android - Gestures
- Android - Google Maps
- Android - Image Effects
- Android - ImageSwitcher
- Android - Internal Storage
- Android - JetPlayer
- Android - JSON Parser
- Android - Linkedin Integration
- Android - Loading Spinner
- Android - Localization
- Android - Login Screen
- Android - MediaPlayer
- Android - Multitouch
- Android - Navigation
- Android - Network Connection
- Android - NFC Guide
- Android - PHP/MySQL
- Android - Progress Circle
- Android - ProgressBar
- Android - Push Notification
- Android - RenderScript
- Android - RSS Reader
- Android - Screen Cast
- Android - SDK Manager
- Android - Sensors
- Android - Session Management
- Android - Shared Preferences
- Android - SIP Protocol
- Android - Spelling Checker
- Android - SQLite Database
- Android - Support Library
- Android - Testing
- Android - Text to Speech
- Android - TextureView
- Android - Twitter Integration
- Android - UI Design
- Android - UI Patterns
- Android - UI Testing
- Android - WebView Layout
- Android - Wi-Fi
- Android - Widgets
- Android - XML Parsers
- Android Useful Resources
- Android - Questions and Answers
- Android - Useful Resources
- Android - Discussion
Android - UI Testing
Android SDK provides the following tools to support automated, functional UI testing on your application.
- uiautomatorviewer
- uiautomator
uiautomatorviewer
A GUI tool to scan and analyse the UI components of an Android application.
The uiautomatorviewer tool provides a convenient visual interface to inspect the layout hierarchy and view the properties of the individual UI components that are displayed on the test device. Using this information, you can later create uiautomator tests with selector objects that target specific UI components to test.
To analyse the UI components of the application that you want to test, perform the following steps after installing the application given in the example.
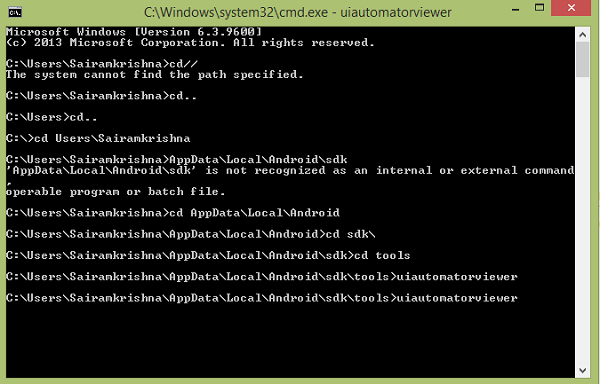
- Connect your Android device to your development machine
- Open a terminal window and navigate to <android-sdk>/tools/
- Run the tool with this command
uiautomatorviewer
Commands would be followed as shown below
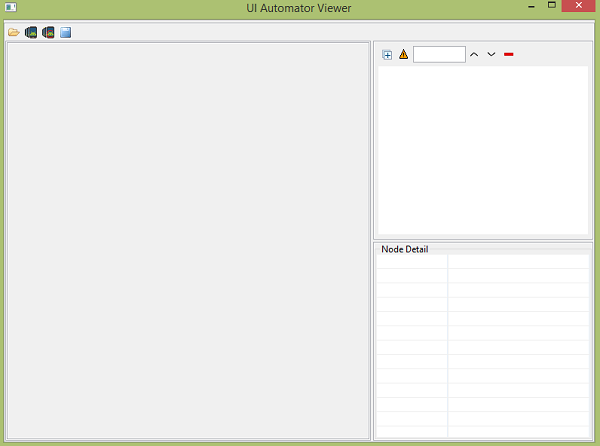
You will see the following window appear. It is the default window of the UI Automator Viewer.
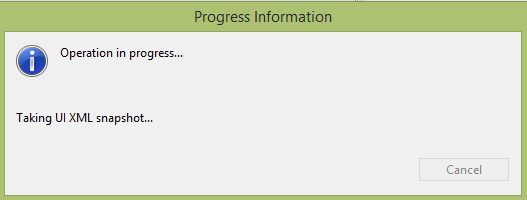
Click on the devices icon at the top right corner. It will start taking the UI XML snapshot of the screen currently opened in the device. It would be something like this.
After that, you will see the snapshot of your device screen in the uiautomatorviewer window.
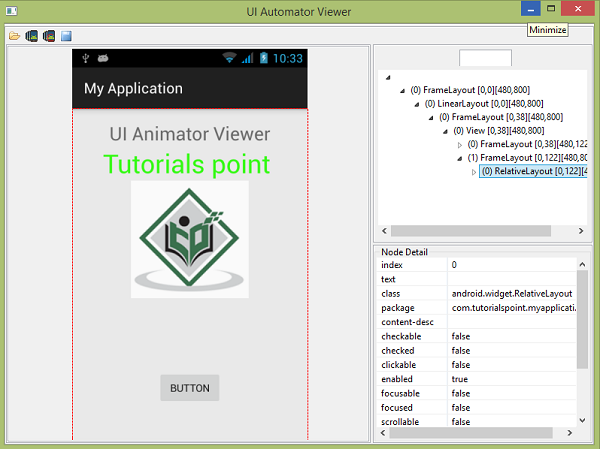
On the right side of this window, you will see two partitions. The upper partition explains the Nodes structure, the way the UI components are arranged and contained. Clicking on each node gives detail in the lower partition.
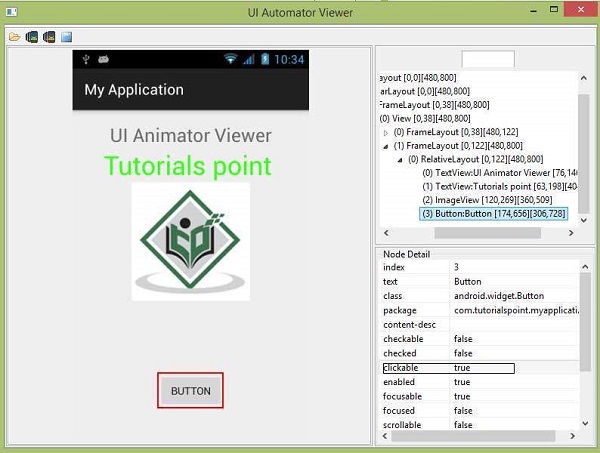
As an example, consider the below figure. When you click on the button, you can see in the upper partition that Button is selected, and in the lower partition, its details are shown. Since this button is click able, that's why its property of click able is set to true.
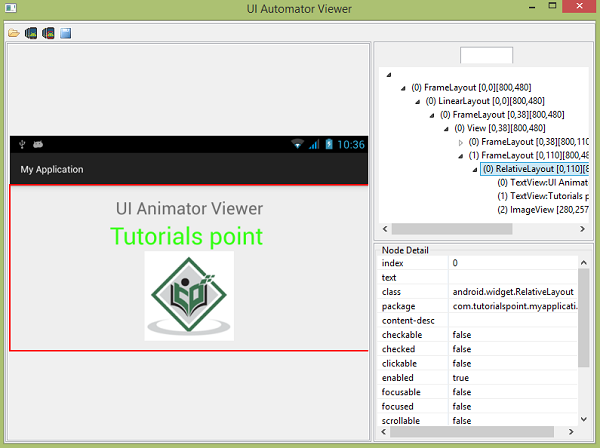
UI Automator Viewer also helps you to examine your UI in different orientations. For example, just change your device orientation to landscape, and again capture the screen shot. It is shown in the figure below −
uiautomator
Now you can create your own test cases and run it with uiautomatorviewer to examine them. In order to create your own test case, you need to perform the following steps −
From the Project Explorer, right-click on the new project that you created, then select Properties > Java Build Path, and do the following −
Click Add Library > JUnit then select JUnit3 to add JUnit support.
Click Add External JARs... and navigate to the SDK directory. Under the platforms directory, select the latest SDK version and add both the uiautomator.jar and android.jar files.
Extend your class with UiAutomatorTestCase
Right the necessary test cases.
Once you have coded your test, follow these steps to build and deploy your test JAR to your target Android test device.
Create the required build configuration files to build the output JAR. To generate the build configuration files, open a terminal and run the following command:
<android-sdk>/tools/android create uitest-project -n <name> -t 1 -p <path>
The <name> is the name of the project that contains your uiautomator test source files, and the <path> is the path to the corresponding project directory.
From the command line, set the ANDROID_HOME variable.
set ANDROID_HOME=<path_to_your_sdk>
- Go to the project directory where your build.xml file is located and build your test JAR.
ant build
- Deploy your generated test JAR file to the test device by using the adb push command.
adb push <path_to_output_jar> /data/local/tmp/
- Run your test by following command −
adb shell uiautomator runtest LaunchSettings.jar -c com.uia.example.my.LaunchSettings
Example
The below example demonstrates the use of UITesting. It crates a basic application which can be used for uiautomatorviewer.
To experiment with this example, you need to run this on an actual device and then follow the uiautomatorviewer steps explained in the beginning.
| Steps | Description |
|---|---|
| 1 | You will use Android studio to create an Android application under a package com.tutorialspoint.myapplication. |
| 2 | Modify src/MainActivity.java file to add Activity code. |
| 3 | Modify layout XML file res/layout/activity_main.xml add any GUI component if required. |
| 4 | Create src/second.java file to add Activity code. |
| 5 | Modify layout XML file res/layout/view.xml add any GUI component if required. |
| 6 | Run the application and choose a running android device and install the application on it and verify the results. |
Here is the content of MainActivity.java.
package com.tutorialspoint.myapplication;

import android.content.Intent;
import android.support.v7.app.ActionBarActivity;
import android.os.Bundle;
import android.view.View;
import android.widget.Button;

public class MainActivity extends ActionBarActivity {
   Button b1;

   @Override
   protected void onCreate(Bundle savedInstanceState) {
      super.onCreate(savedInstanceState);
      setContentView(R.layout.activity_main);

      b1=(Button)findViewById(R.id.button);
      b1.setOnClickListener(new View.OnClickListener() {
         @Override
         public void onClick(View v) {
            Intent in =new Intent(MainActivity.this,second.class);
            startActivity(in);
         }
      });
   }
}
Here is the content of second.java.
package com.tutorialspoint.myapplication;

import android.app.Activity;
import android.os.Bundle;
import android.view.View;
import android.widget.Button;
import android.widget.Toast;

public class second extends Activity {
   @Override
   protected void onCreate(Bundle savedInstanceState) {
      super.onCreate(savedInstanceState);
      setContentView(R.layout.view);
      Button b1=(Button)findViewById(R.id.button2);

      b1.setOnClickListener(new View.OnClickListener() {
         @Override
         public void onClick(View v) {
            Toast.makeText(second.this,"Thanks",Toast.LENGTH_LONG).show();
         }
      });
   }
}
Here is the content of activity_main.xml
In the following code abc indicates the logo of tutorialspoint.com
<?xml version="1.0" encoding="utf-8"?>
<RelativeLayout xmlns:android="http://schemas.android.com/apk/res/android"
   xmlns:tools="http://schemas.android.com/tools" android:layout_width="match_parent"
   android:layout_height="match_parent" android:paddingLeft="@dimen/activity_horizontal_margin"
   android:paddingRight="@dimen/activity_horizontal_margin"
   android:paddingTop="@dimen/activity_vertical_margin"
   android:paddingBottom="@dimen/activity_vertical_margin" tools:context=".MainActivity">

   <TextView
      android:layout_width="wrap_content"
      android:layout_height="wrap_content"
      android:text="UI Animator Viewer"
      android:id="@+id/textView"
      android:textSize="25sp"
      android:layout_centerHorizontal="true" />

   <TextView
      android:layout_width="wrap_content"
      android:layout_height="wrap_content"
      android:text="Tutorials point"
      android:id="@+id/textView2"
      android:layout_below="@+id/textView"
      android:layout_alignRight="@+id/textView"
      android:layout_alignEnd="@+id/textView"
      android:textColor="#ff36ff15"
      android:textIsSelectable="false"
      android:textSize="35dp" />

   <ImageView
      android:layout_width="wrap_content"
      android:layout_height="wrap_content"
      android:id="@+id/imageView"
      android:src="@drawable/abc"
      android:layout_below="@+id/textView2"
      android:layout_centerHorizontal="true" />

   <Button
      android:layout_width="wrap_content"
      android:layout_height="wrap_content"
      android:text="Button"
      android:id="@+id/button"
      android:layout_marginTop="98dp"
      android:layout_below="@+id/imageView"
      android:layout_centerHorizontal="true" />

</RelativeLayout>
Here is the content of view.xml.
<?xml version="1.0" encoding="utf-8"?>
<RelativeLayout xmlns:android="http://schemas.android.com/apk/res/android"
   android:orientation="vertical" android:layout_width="match_parent"
   android:layout_height="match_parent">

   <Button
      android:layout_width="wrap_content"
      android:layout_height="wrap_content"
      android:text=" Button"
      android:id="@+id/button2"
      android:layout_gravity="center_horizontal"
      android:layout_centerVertical="true"
      android:layout_centerHorizontal="true" />
</RelativeLayout>
Here is the content of Strings.xml.
<resources>
   <string name="app_name">My Application</string>
</resources>
Here is the content of AndroidManifest.xml.
<?xml version="1.0" encoding="utf-8"?>
<manifest xmlns:android="http://schemas.android.com/apk/res/android"
   package="com.tutorialspoint.myapplication" >

   <application
      android:allowBackup="true"
      android:icon="@mipmap/ic_launcher"
      android:label="@string/app_name"
      android:theme="@style/AppTheme" >

      <activity
         android:name=".MainActivity"
         android:label="@string/app_name" >

         <intent-filter>
            <action android:name="android.intent.action.MAIN" />
            <category android:name="android.intent.category.LAUNCHER" />
         </intent-filter>

      </activity>

      <activity android:name=".second"></activity>

   </application>
</manifest>
Let's try to run your UI Testing application. I assume you have connected your actual Android Mobile device with your computer. To run the app from Android studio, open one of your project's activity files and click Run  icon from the tool bar. Before starting your application, Android studio will display following window to select an option where you want to run your Android application.

Select your mobile device as an option and then check your mobile device which will display application screen. Now just follow the steps mentioned at the top under the ui automator viewer section in order to perform ui testing on this application.
