
- Android - Home
- Android - Overview
- Android - Environment Setup
- Android - Architecture
- Android - Application Components
- Android - Hello World Example
- Android - Resources
- Android - Activities
- Android - Services
- Android - Broadcast Receivers
- Android - Content Providers
- Android - Fragments
- Android - Intents/Filters
- Android - UI Layouts
- Android - UI Controls
- Android - Event Handling
- Android - Styles and Themes
- Android - Custom Components
- Android Advanced Concepts
- Android - Drag and Drop
- Android - Notifications
- Location Based Services
- Android - Sending Email
- Android - Sending SMS
- Android - Phone Calls
- Publishing Android Application
- Android Useful Examples
- Android - Alert Dialoges
- Android - Animations
- Android - Audio Capture
- Android - AudioManager
- Android - Auto Complete
- Android - Best Practices
- Android - Bluetooth
- Android - Camera
- Android - Clipboard
- Android - Custom Fonts
- Android - Data Backup
- Android - Developer Tools
- Android - Emulator
- Android - Facebook Integration
- Android - Gestures
- Android - Google Maps
- Android - Image Effects
- Android - ImageSwitcher
- Android - Internal Storage
- Android - JetPlayer
- Android - JSON Parser
- Android - Linkedin Integration
- Android - Loading Spinner
- Android - Localization
- Android - Login Screen
- Android - MediaPlayer
- Android - Multitouch
- Android - Navigation
- Android - Network Connection
- Android - NFC Guide
- Android - PHP/MySQL
- Android - Progress Circle
- Android - ProgressBar
- Android - Push Notification
- Android - RenderScript
- Android - RSS Reader
- Android - Screen Cast
- Android - SDK Manager
- Android - Sensors
- Android - Session Management
- Android - Shared Preferences
- Android - SIP Protocol
- Android - Spelling Checker
- Android - SQLite Database
- Android - Support Library
- Android - Testing
- Android - Text to Speech
- Android - TextureView
- Android - Twitter Integration
- Android - UI Design
- Android - UI Patterns
- Android - UI Testing
- Android - WebView Layout
- Android - Wi-Fi
- Android - Widgets
- Android - XML Parsers
- Android Useful Resources
- Android - Questions and Answers
- Android - Useful Resources
- Android - Discussion
Android - Testing
The Android framework includes an integrated testing framework that helps you test all aspects of your application and the SDK tools include tools for setting up and running test applications. Whether you are working in Eclipse with ADT or working from the command line, the SDK tools help you set up and run your tests within an emulator or the device you are targeting.
Test Structure
Android's build and test tools assume that test projects are organized into a standard structure of tests, test case classes, test packages, and test projects.

Testing Tools in android
There are many tools that can be used for testing android applications. Some are official like Junit,Monkey and some are third party tools that can be used to test android applications. In this chapter we are going to explain these two tools to test android applications.
- JUnit
- Monkey
JUnit
You can use the JUnit TestCase class to do unit testing on a class that doesn't call Android APIs. TestCase is also the base class for AndroidTestCase, which you can use to test Android-dependent objects. Besides providing the JUnit framework, AndroidTestCase offers Android-specific setup, teardown, and helper methods.
In order to use TestCase, extend your class with TestCase class and implement a method call setUp(). Its syntax is given below −
public class MathTest extends TestCase {
   protected double fValue1;
   protected double fValue2;

   protected void setUp() {
      fValue1= 2.0;
      fValue2= 3.0;
   }
}
For each test implement a method which interacts with the fixture. Verify the expected results with assertions specified by calling assertTrue(String, boolean) with a boolean.
public void testAdd() {
   double result= fValue1 + fValue2;
   assertTrue(result == 5.0);
}
The assert methods compare values you expect from a test to the actual results and throw an exception if the comparison fails.
Once the methods are defined you can run them. Its syntax is given below −
TestCase test= new MathTest("testAdd");
test.run();
Monkey
The UI/Application Exerciser Monkey, usually called "monkey", is a command-line tool that sends pseudo-random streams of keystrokes, touches, and gestures to a device. You run it with the Android Debug Bridge (adb) tool.
You use it to stress-test your application and report back errors that are encountered. You can repeat a stream of events by running the tool each time with the same random number seed.
Monkey features
Monkey has many features, but it can be all be summed up to these four categories.
- Basic configuration options
- Operational constraints
- Event types and frequencies
- Debugging options
Monkey Usage
In order to use monkey, open up a command prompt and just navigate to the following directory.
android ->sdk ->platform-tools
Once inside the directory, attach your device with the PC , and run the following command.
adb shell monkey -p your.package.name -v 500
This command can be broken down into these steps.
- adb - Android Debug Bridge. A tool used to connect and sends commands to your Android phone from a desktop or laptop computer.
- shell - shell is just an interface on the device that translates our commands to system commands.
- monkey - monkey is the testing tool.
- v - v stands for verbose method.
- 500- it is the frequency conut or the number of events to be sent for testing.
This is also shown in the figure −
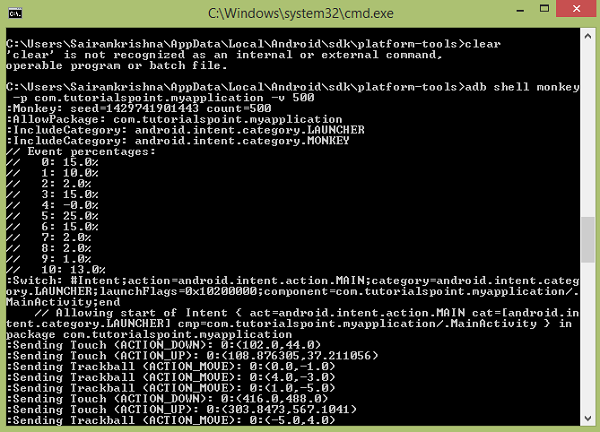
In the above command, you run the monkey tool on the default android UI application. Now in order to run it to your application , here what you have to do.
finally you will get finish as shown bellow
This has also been shown in the figure below. By typing this command , you are actually generating 500 random events for testing.

Example
The below example demonstrates the use of Testing. It crates a basic application which can be used for monkey.
To experiment with this example, you need to run this on an actual device and then follow the monkey steps explained in the beginning.
| Steps | Description |
|---|---|
| 1 | You will useAndroid studio to create an Android application under a package com.tutorialspoint.myapplication. |
| 2 | Modify src/MainActivity.java file to add Activity code. |
| 3 | Modify layouta XML file res/layout/activity_main.xml add any GUI component if required. |
| 4 | Create src/second.java file to add Activity code. |
| 5 | Modify layout XML file res/layout/view.xml add any GUI component if required. |
| 6 | Run the application and choose a running android device and install the application on it and verify the results. |
Here is the content of MainActivity.java.
package com.tutorialspoint.myapplication;

import android.content.Intent;
import android.os.Bundle;
import android.support.v7.app.AppCompatActivity;
import android.view.View;
import android.widget.Button;

public class MainActivity extends AppCompatActivity {
   Button b1;
   @Override

   protected void onCreate(Bundle savedInstanceState) {
      super.onCreate(savedInstanceState);
      setContentView(R.layout.activity_main);
      b1=(Button)findViewById(R.id.button);
   }

   public void button(View v){
      Intent in =new Intent(MainActivity.this,second.class);
      startActivity(in);
   }

}
Here is the content of second.java.
package com.tutorialspoint.myapplication;

import android.app.Activity;
import android.os.Bundle;
import android.view.View;
import android.widget.Button;
import android.widget.Toast;

public class second extends Activity{
   @Override

   protected void onCreate(Bundle savedInstanceState) {
      super.onCreate(savedInstanceState);
      setContentView(R.layout.view);
      Button b1=(Button)findViewById(R.id.button2);

      b1.setOnClickListener(new View.OnClickListener() {
         @Override
         public void onClick(View v) {
            Toast.makeText(second.this,"Thanks",Toast.LENGTH_SHORT).show();
         }
      });
   }
}
Here is the content of activity_main.xml.
In the below code abc indicates the logo of tutorialspoint.com
<?xml version="1.0" encoding="utf-8"?>
<RelativeLayout xmlns:android="http://schemas.android.com/apk/res/android"
   xmlns:tools="http://schemas.android.com/tools" android:layout_width="match_parent"
   android:layout_height="match_parent" android:paddingLeft="@dimen/activity_horizontal_margin"
   android:paddingRight="@dimen/activity_horizontal_margin"
   android:paddingTop="@dimen/activity_vertical_margin"
   android:paddingBottom="@dimen/activity_vertical_margin" tools:context=".MainActivity">

   <TextView
      android:layout_width="wrap_content"
      android:layout_height="wrap_content"
      android:text="UI Animator Viewer"
      android:id="@+id/textView"
      android:textSize="25sp"
      android:layout_centerHorizontal="true" />

   <TextView
      android:layout_width="wrap_content"
      android:layout_height="wrap_content"
      android:text="Tutorials point"
      android:id="@+id/textView2"
      android:layout_below="@+id/textView"
      android:layout_alignRight="@+id/textView"
      android:layout_alignEnd="@+id/textView"
      android:textColor="#ff36ff15"
      android:textIsSelectable="false"
      android:textSize="35dp" />

   <ImageView
      android:layout_width="wrap_content"
      android:layout_height="wrap_content"
      android:id="@+id/imageView"
      android:src="@drawable/abc"
      android:layout_below="@+id/textView2"
      android:layout_centerHorizontal="true" />

   <Button
      android:layout_width="wrap_content"
      android:layout_height="wrap_content"
      android:text="Button"
      android:onClick="button"
      android:id="@+id/button"
      android:layout_below="@+id/imageView"
      android:layout_centerHorizontal="true"
      android:layout_marginTop="100dp" />

</RelativeLayout>
Here is the content of view.xml
<?xml version="1.0" encoding="utf-8"?>
<RelativeLayout xmlns:android="http://schemas.android.com/apk/res/android"
   android:layout_width="match_parent" android:layout_height="match_parent">

   <Button
      android:layout_width="wrap_content"
      android:layout_height="wrap_content"
      android:text="button"
      android:id="@+id/button2"
      android:layout_centerVertical="true"
      android:layout_centerHorizontal="true" />

   <TextView
      android:layout_width="wrap_content"
      android:layout_height="wrap_content"
      android:text="Tutorials point "
      android:id="@+id/textView3"
      android:textColor="#ff3aff22"
      android:textSize="35dp"
      android:layout_above="@+id/button2"
      android:layout_centerHorizontal="true"
      android:layout_marginBottom="90dp" />

</RelativeLayout>
Here is the content of Strings.xml.
<resources>
   <string name="app_name">My Application</string>
</resources>
Here is the content of AndroidManifest.xml.
<?xml version="1.0" encoding="utf-8"?>
<manifest xmlns:android="http://schemas.android.com/apk/res/android"
   package="com.tutorialspoint.myapplication" >

   <application
      android:allowBackup="true"
      android:icon="@mipmap/ic_launcher"
      android:label="@string/app_name"
      android:theme="@style/AppTheme" >

      <activity
         android:name=".MainActivity"
         android:label="@string/app_name" >

         <intent-filter>
            <action android:name="android.intent.action.MAIN" />
            <category android:name="android.intent.category.LAUNCHER" />
         </intent-filter>

      </activity>

      <activity android:name=".second"></activity>

   </application>
</manifest>
Let's try to run your Android Testing application. I assume you have connected your actual Android Mobile device with your computer. To run the app from Android studio, open one of your project's activity files and click Run  icon from the toolbar. Before starting your application, Android studio will display following window to select an option where you want to run your Android application.

Select your mobile device as an option and then check your mobile device which will display application screen. Now just follow the steps mentioned at the top under the monkey section in order to perform testing on this application.
