
- Android - Home
- Android - Overview
- Android - Environment Setup
- Android - Architecture
- Android - Application Components
- Android - Hello World Example
- Android - Resources
- Android - Activities
- Android - Services
- Android - Broadcast Receivers
- Android - Content Providers
- Android - Fragments
- Android - Intents/Filters
- Android - UI Layouts
- Android - UI Controls
- Android - Event Handling
- Android - Styles and Themes
- Android - Custom Components
- Android Advanced Concepts
- Android - Drag and Drop
- Android - Notifications
- Location Based Services
- Android - Sending Email
- Android - Sending SMS
- Android - Phone Calls
- Publishing Android Application
- Android Useful Examples
- Android - Alert Dialoges
- Android - Animations
- Android - Audio Capture
- Android - AudioManager
- Android - Auto Complete
- Android - Best Practices
- Android - Bluetooth
- Android - Camera
- Android - Clipboard
- Android - Custom Fonts
- Android - Data Backup
- Android - Developer Tools
- Android - Emulator
- Android - Facebook Integration
- Android - Gestures
- Android - Google Maps
- Android - Image Effects
- Android - ImageSwitcher
- Android - Internal Storage
- Android - JetPlayer
- Android - JSON Parser
- Android - Linkedin Integration
- Android - Loading Spinner
- Android - Localization
- Android - Login Screen
- Android - MediaPlayer
- Android - Multitouch
- Android - Navigation
- Android - Network Connection
- Android - NFC Guide
- Android - PHP/MySQL
- Android - Progress Circle
- Android - ProgressBar
- Android - Push Notification
- Android - RenderScript
- Android - RSS Reader
- Android - Screen Cast
- Android - SDK Manager
- Android - Sensors
- Android - Session Management
- Android - Shared Preferences
- Android - SIP Protocol
- Android - Spelling Checker
- Android - SQLite Database
- Android - Support Library
- Android - Testing
- Android - Text to Speech
- Android - TextureView
- Android - Twitter Integration
- Android - UI Design
- Android - UI Patterns
- Android - UI Testing
- Android - WebView Layout
- Android - Wi-Fi
- Android - Widgets
- Android - XML Parsers
- Android Useful Resources
- Android - Questions and Answers
- Android - Useful Resources
- Android - Discussion
Android - Data Backup
Android allows you to backup your application data to remote "cloud" storage, in order to provide a restore point for the application data and settings. You can only backup your application data. In order to access the other applications data, you need to root your phone.
In order to make a data backup application, you need to register your application with google backup service. This has been explained in the example. After registering , you have to specify its key in the AndroidManifest.XML
<application
   android:allowBackup="true"
   android:backupAgent="MyBackupPlace">

   <meta-data
      android:name="com.google.android.backup.api_key"
      android:value="AEdPqrEAAAAIErlxFByGgNz2ywBeQb6TsmLpp5Ksh1PW-ZSexg" />
</application>
Android provides BackUpAgentHelper class to handle all the operations of data backup. In order to use this class , you have to extend your class with it. Its syntax is given below −
public class MyBackUpPlace extends BackupAgentHelper {
}
The persistent data that you want to backup is in either of the two forms. Either it could be SharedPrefrences or it could be File. Android supports both types of backup in the respective classes of SharedPreferencesBackupHelper and FileBackupHelper.
In order to use SharedPerefernceBackupHelper, you need to instantiate its object with the name of your sharedPerefernces File. Its syntax is given below −
static final String File_Name_Of_Prefrences = "myPrefrences";
SharedPreferencesBackupHelper helper = new SharedPreferencesBackupHelper(this, File_Name_Of_Prefrences);
The last thing you need to do is to call addHelper method by specifying the backup key string , and the helper object. Its syntax is given below −
addHelper(PREFS_BACKUP_KEY, helper);
The addHelper method will automatically add a helper to a given data subset to the agent's configuration.
Apart from these methods, there are other methods defined in the BackupAgentHelper class. They are defined below −
| Sr.No | Method & description |
|---|---|
| 1 |
onBackup(ParcelFileDescriptor oldState, BackupDataOutput data, ParcelFileDescriptor newState) Run the backup process on each of the configured handlers |
| 2 |
onRestore(BackupDataInput data, int appVersionCode, ParcelFileDescriptor newState) Run the restore process on each of the configured handlers |
The methods of the SharedPreferencesBackUpHelper class are listed below.
| Sr.No | Method & description |
|---|---|
| 1 |
performBackup(ParcelFileDescriptor oldState, BackupDataOutput data, ParcelFileDescriptor newState) Backs up the configured SharedPreferences groups |
| 2 |
restoreEntity(BackupDataInputStream data) Restores one entity from the restore data stream to its proper shared preferences file store |
Example
The following example demonstrates the use of BackupAgentHelper class to create backup of your application data.
To experiment with this example, you need to run this on an actual device or in an emulator.
| Steps | Description |
|---|---|
| 1 | You will use Android studio to create an Android application and name it as Backup under a package com.example.backup. |
| 2 | Register your application with Google backup service. |
| 3 | Modify the AndroidManifest to add respective necessary key and other components |
| 4 | Create backup agent class with the name you specify at AndroidManifest.XML |
| 5 | Run the application and verify the results |
Register you android application with google backup service. In order to do that , visit this link. You must agree to the terms of service, and then enter the application package name. It is shown below −
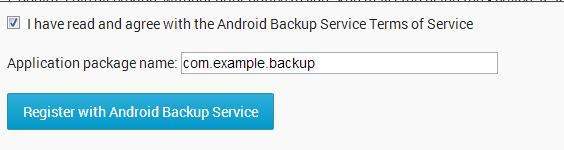
Then click on Register with android backup service. It would give you your key, along with your AndroidManifest code to copy. Just copy the key. It is shown below −

Once you copy the key , you need to write it in your AndroidManifest.XML file. Its code is given below −
<?xml version="1.0" encoding="utf-8"?>
<manifest xmlns:android="http://schemas.android.com/apk/res/android"
   package="com.example.backup" >

   <application
      android:allowBackup="true"
      android:icon="@drawable/ic_launcher"
      android:label="@string/app_name"
      android:backupAgent="MyBackUpPlace"
      android:theme="@style/AppTheme" >

      <activity
         android:name="com.example.backup.MainActivity"
         android:label="@string/app_name" >

         <intent-filter>
            <action android:name="android.intent.action.MAIN" />
            <category android:name="android.intent.category.LAUNCHER" />
         </intent-filter>

      </activity>

      <meta-data
         android:name="com.google.android.backup.api_key"
         android:value="AEdPqrEAAAAIErlxFByGgNz2ywBeQb6TsmLpp5Ksh1PW-ZSexg" />

   </application>
</manifest>
Here is the code of BackUpAgentHelper class. The name of the class should be the same as you specified in the backupAgent tag under application in AndroidManifest.XML
package com.example.backup;

import android.app.backup.BackupAgentHelper;
import android.app.backup.SharedPreferencesBackupHelper;

public class MyBackUpPlace extends BackupAgentHelper {
   static final String File_Name_Of_Prefrences = "myPrefrences";
   static final String PREFS_BACKUP_KEY = "backup";

   @Override
   public void onCreate() {
      SharedPreferencesBackupHelper helper = new SharedPreferencesBackupHelper(this,
      File_Name_Of_Prefrences);
      addHelper(PREFS_BACKUP_KEY, helper);
   }
}
Test your BackupAgent
Once you've implemented your backup agent, you can test the backup and restore functionality with the following procedure, using bmgr.
Install your application on a suitable Android system image.
If using the emulator, create and use an AVD with Android 2.2 (API Level 8).
If using a device, the device must be running Android 2.2 or greater and have Google Play built in.
Ensure data backup is enabled
If using the emulator, you can enable backup with the following command from your SDK tools/ path −
adb shell bmgr enable true
If using a device, open the system Settings, select Privacy, then enable Back up my data and Automatic restore.
Performing backup
For testing purposes, you can also make a request with the following bmgr command −
adb shell bmgr backup your.package.name
Initiate a backup operation by typing the following command.
adb shell bmgr run
This forces the Backup Manager to perform all backup requests that are in its queue.
Uninstall and reinstall your application
Uninstall the application with the following command −
adb uninstall your.package.name
Then reinstall the application and verify the results.
