
- Android - Home
- Android - Overview
- Android - Environment Setup
- Android - Architecture
- Android - Application Components
- Android - Hello World Example
- Android - Resources
- Android - Activities
- Android - Services
- Android - Broadcast Receivers
- Android - Content Providers
- Android - Fragments
- Android - Intents/Filters
- Android - UI Layouts
- Android - UI Controls
- Android - Event Handling
- Android - Styles and Themes
- Android - Custom Components
- Android Advanced Concepts
- Android - Drag and Drop
- Android - Notifications
- Location Based Services
- Android - Sending Email
- Android - Sending SMS
- Android - Phone Calls
- Publishing Android Application
- Android Useful Examples
- Android - Alert Dialoges
- Android - Animations
- Android - Audio Capture
- Android - AudioManager
- Android - Auto Complete
- Android - Best Practices
- Android - Bluetooth
- Android - Camera
- Android - Clipboard
- Android - Custom Fonts
- Android - Data Backup
- Android - Developer Tools
- Android - Emulator
- Android - Facebook Integration
- Android - Gestures
- Android - Google Maps
- Android - Image Effects
- Android - ImageSwitcher
- Android - Internal Storage
- Android - JetPlayer
- Android - JSON Parser
- Android - Linkedin Integration
- Android - Loading Spinner
- Android - Localization
- Android - Login Screen
- Android - MediaPlayer
- Android - Multitouch
- Android - Navigation
- Android - Network Connection
- Android - NFC Guide
- Android - PHP/MySQL
- Android - Progress Circle
- Android - ProgressBar
- Android - Push Notification
- Android - RenderScript
- Android - RSS Reader
- Android - Screen Cast
- Android - SDK Manager
- Android - Sensors
- Android - Session Management
- Android - Shared Preferences
- Android - SIP Protocol
- Android - Spelling Checker
- Android - SQLite Database
- Android - Support Library
- Android - Testing
- Android - Text to Speech
- Android - TextureView
- Android - Twitter Integration
- Android - UI Design
- Android - UI Patterns
- Android - UI Testing
- Android - WebView Layout
- Android - Wi-Fi
- Android - Widgets
- Android - XML Parsers
- Android Useful Resources
- Android - Questions and Answers
- Android - Useful Resources
- Android - Discussion
Android - Services
A service is a component that runs in the background to perform long-running operations without needing to interact with the user and it works even if application is destroyed. A service can essentially take two states −
| Sr.No. | State & Description |
|---|---|
| 1 |
Started A service is started when an application component, such as an activity, starts it by calling startService(). Once started, a service can run in the background indefinitely, even if the component that started it is destroyed. |
| 2 |
Bound A service is bound when an application component binds to it by calling bindService(). A bound service offers a client-server interface that allows components to interact with the service, send requests, get results, and even do so across processes with interprocess communication (IPC). |
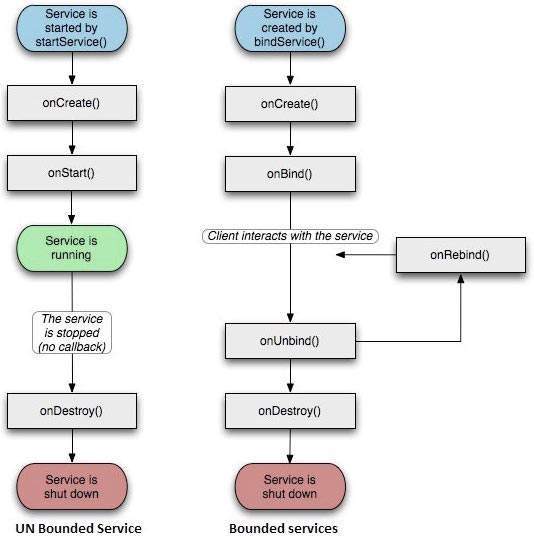
A service has life cycle callback methods that you can implement to monitor changes in the service's state and you can perform work at the appropriate stage. The following diagram on the left shows the life cycle when the service is created with startService() and the diagram on the right shows the life cycle when the service is created with bindService(): (image courtesy : android.com )
To create an service, you create a Java class that extends the Service base class or one of its existing subclasses. The Service base class defines various callback methods and the most important are given below. You don't need to implement all the callbacks methods. However, it's important that you understand each one and implement those that ensure your app behaves the way users expect.
| Sr.No. | Callback & Description |
|---|---|
| 1 | onStartCommand() The system calls this method when another component, such as an activity, requests that the service be started, by calling startService(). If you implement this method, it is your responsibility to stop the service when its work is done, by calling stopSelf() or stopService() methods. |
| 2 |
onBind() The system calls this method when another component wants to bind with the service by calling bindService(). If you implement this method, you must provide an interface that clients use to communicate with the service, by returning an IBinder object. You must always implement this method, but if you don't want to allow binding, then you should return null. |
| 3 |
onUnbind() The system calls this method when all clients have disconnected from a particular interface published by the service. |
| 4 |
onRebind() The system calls this method when new clients have connected to the service, after it had previously been notified that all had disconnected in its onUnbind(Intent). |
| 5 |
onCreate() The system calls this method when the service is first created using onStartCommand() or onBind(). This call is required to perform one-time set-up. |
| 6 |
onDestroy() The system calls this method when the service is no longer used and is being destroyed. Your service should implement this to clean up any resources such as threads, registered listeners, receivers, etc. |
The following skeleton service demonstrates each of the life cycle methods −
package com.tutorialspoint;

import android.app.Service;
import android.os.IBinder;
import android.content.Intent;
import android.os.Bundle;

public class HelloService extends Service {

   /** indicates how to behave if the service is killed */
   int mStartMode;

   /** interface for clients that bind */
   IBinder mBinder;

   /** indicates whether onRebind should be used */
   boolean mAllowRebind;

   /** Called when the service is being created. */
   @Override
   public void onCreate() {

   }

   /** The service is starting, due to a call to startService() */
   @Override
   public int onStartCommand(Intent intent, int flags, int startId) {
      return mStartMode;
   }

   /** A client is binding to the service with bindService() */
   @Override
   public IBinder onBind(Intent intent) {
      return mBinder;
   }

   /** Called when all clients have unbound with unbindService() */
   @Override
   public boolean onUnbind(Intent intent) {
      return mAllowRebind;
   }

   /** Called when a client is binding to the service with bindService()*/
   @Override
   public void onRebind(Intent intent) {

   }

   /** Called when The service is no longer used and is being destroyed */
   @Override
   public void onDestroy() {

   }
}
Example
This example will take you through simple steps to show how to create your own Android Service. Follow the following steps to modify the Android application we created in Hello World Example chapter −
| Step | Description |
|---|---|
| 1 | You will use Android StudioIDE to create an Android application and name it as My Application under a package com.example.tutorialspoint7.myapplication as explained in the Hello World Example chapter. |
| 2 | Modify main activity file MainActivity.java to add startService() and stopService() methods. |
| 3 | Create a new java file MyService.java under the package com.example.My Application. This file will have implementation of Android service related methods. |
| 4 | Define your service in AndroidManifest.xml file using <service.../> tag. An application can have one or more services without any restrictions. |
| 5 | Modify the default content of res/layout/activity_main.xml file to include two buttons in linear layout. |
| 6 | No need to change any constants in res/values/strings.xml file. Android studio take care of string values |
| 7 | Run the application to launch Android emulator and verify the result of the changes done in the application. |
Following is the content of the modified main activity file MainActivity.java. This file can include each of the fundamental life cycle methods. We have added startService() and stopService() methods to start and stop the service.
package com.example.tutorialspoint7.myapplication;

import android.content.Intent;
import android.support.v7.app.AppCompatActivity;
import android.os.Bundle;

import android.os.Bundle;
import android.app.Activity;
import android.util.Log;
import android.view.View;

public class MainActivity extends Activity {
   String msg = "Android : ";

   /** Called when the activity is first created. */
   @Override
   public void onCreate(Bundle savedInstanceState) {
      super.onCreate(savedInstanceState);
      setContentView(R.layout.activity_main);
      Log.d(msg, "The onCreate() event");
   }

   public void startService(View view) {
      startService(new Intent(getBaseContext(), MyService.class));
   }

   // Method to stop the service
   public void stopService(View view) {
      stopService(new Intent(getBaseContext(), MyService.class));
   }
}
Following is the content of MyService.java. This file can have implementation of one or more methods associated with Service based on requirements. For now we are going to implement only two methods onStartCommand() and onDestroy() −
package com.example.tutorialspoint7.myapplication;

import android.app.Service;
import android.content.Intent;
import android.os.IBinder;
import android.support.annotation.Nullable;
import android.widget.Toast;

/**
   * Created by TutorialsPoint7 on 8/23/2016.
*/

public class MyService extends Service {
   @Nullable
   @Override
   public IBinder onBind(Intent intent) {
      return null;
   }

   @Override
   public int onStartCommand(Intent intent, int flags, int startId) {
      // Let it continue running until it is stopped.
      Toast.makeText(this, "Service Started", Toast.LENGTH_LONG).show();
      return START_STICKY;
   }

   @Override
   public void onDestroy() {
      super.onDestroy();
      Toast.makeText(this, "Service Destroyed", Toast.LENGTH_LONG).show();
   }
}
Following will the modified content of AndroidManifest.xml file. Here we have added <service.../> tag to include our service −
<?xml version="1.0" encoding="utf-8"?>
<manifest xmlns:android="http://schemas.android.com/apk/res/android"
   package="com.example.tutorialspoint7.myapplication">

   <application
      android:allowBackup="true"
      android:icon="@mipmap/ic_launcher"
      android:label="@string/app_name"
      android:supportsRtl="true"
      android:theme="@style/AppTheme">

      <activity android:name=".MainActivity">
         <intent-filter>
            <action android:name="android.intent.action.MAIN" />

            <category android:name="android.intent.category.LAUNCHER" />
         </intent-filter>
      </activity>

      <service android:name=".MyService" />
   </application>

</manifest>
Following will be the content of res/layout/activity_main.xml file to include two buttons −
<RelativeLayout xmlns:android="http://schemas.android.com/apk/res/android"
   xmlns:tools="http://schemas.android.com/tools" android:layout_width="match_parent"
   android:layout_height="match_parent" android:paddingLeft="@dimen/activity_horizontal_margin"
   android:paddingRight="@dimen/activity_horizontal_margin"
   android:paddingTop="@dimen/activity_vertical_margin"
   android:paddingBottom="@dimen/activity_vertical_margin" tools:context=".MainActivity">

   <TextView
      android:id="@+id/textView1"
      android:layout_width="wrap_content"
      android:layout_height="wrap_content"
      android:text="Example of services"
      android:layout_alignParentTop="true"
      android:layout_centerHorizontal="true"
      android:textSize="30dp" />

   <TextView
      android:id="@+id/textView2"
      android:layout_width="wrap_content"
      android:layout_height="wrap_content"
      android:text="Tutorials point "
      android:textColor="#ff87ff09"
      android:textSize="30dp"
      android:layout_above="@+id/imageButton"
      android:layout_centerHorizontal="true"
      android:layout_marginBottom="40dp" />

   <ImageButton
      android:layout_width="wrap_content"
      android:layout_height="wrap_content"
      android:id="@+id/imageButton"
      android:src="@drawable/abc"
      android:layout_centerVertical="true"
      android:layout_centerHorizontal="true" />

   <Button
      android:layout_width="wrap_content"
      android:layout_height="wrap_content"
      android:id="@+id/button2"
      android:text="Start Services"
      android:onClick="startService"
      android:layout_below="@+id/imageButton"
      android:layout_centerHorizontal="true" />

   <Button
      android:layout_width="wrap_content"
      android:layout_height="wrap_content"
      android:text="Stop Services"
      android:id="@+id/button"
      android:onClick="stopService"
      android:layout_below="@+id/button2"
      android:layout_alignLeft="@+id/button2"
      android:layout_alignStart="@+id/button2"
      android:layout_alignRight="@+id/button2"
      android:layout_alignEnd="@+id/button2" />

</RelativeLayout>
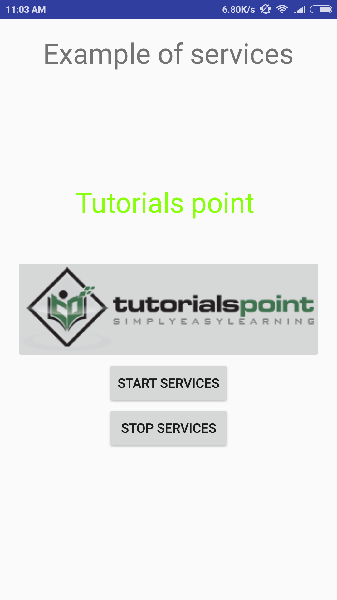
Let's try to run our modified Hello World! application we just modified. I assume you had created your AVD while doing environment setup. To run the app from Android studio, open one of your project's activity files and click Run  icon from the tool bar. Android Studio installs the app on your AVD and starts it and if everything is fine with your set-up and application, it will display following Emulator window −
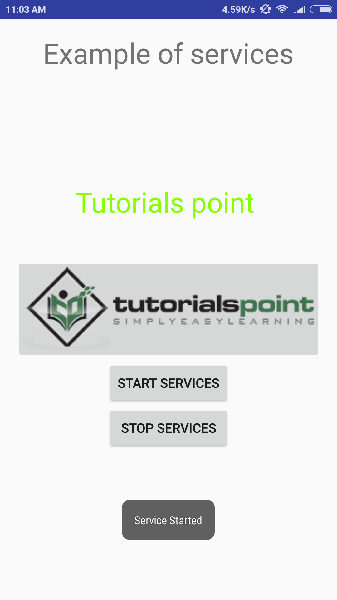
Now to start your service, let's click on Start Service button, this will start the service and as per our programming in onStartCommand() method, a message Service Started will appear on the bottom of the the simulator as follows −
To stop the service, you can click the Stop Service button.
