- Android - Home
- Android - Overview
- Android - Environment Setup
- Android - Architecture
- Android - Application Components
- Android - Hello World Example
- Android - Resources
- Android - Activities
- Android - Services
- Android - Broadcast Receivers
- Android - Content Providers
- Android - Fragments
- Android - Intents/Filters
- Android - UI Layouts
- Android - UI Controls
- Android - Event Handling
- Android - Styles and Themes
- Android - Custom Components
- Android Advanced Concepts
- Android - Drag and Drop
- Android - Notifications
- Location Based Services
- Android - Sending Email
- Android - Sending SMS
- Android - Phone Calls
- Publishing Android Application
- Android Useful Examples
- Android - Alert Dialoges
- Android - Animations
- Android - Audio Capture
- Android - AudioManager
- Android - Auto Complete
- Android - Best Practices
- Android - Bluetooth
- Android - Camera
- Android - Clipboard
- Android - Custom Fonts
- Android - Data Backup
- Android - Developer Tools
- Android - Emulator
- Android - Facebook Integration
- Android - Gestures
- Android - Google Maps
- Android - Image Effects
- Android - ImageSwitcher
- Android - Internal Storage
- Android - JetPlayer
- Android - JSON Parser
- Android - Linkedin Integration
- Android - Loading Spinner
- Android - Localization
- Android - Login Screen
- Android - MediaPlayer
- Android - Multitouch
- Android - Navigation
- Android - Network Connection
- Android - NFC Guide
- Android - PHP/MySQL
- Android - Progress Circle
- Android - ProgressBar
- Android - Push Notification
- Android - RenderScript
- Android - RSS Reader
- Android - Screen Cast
- Android - SDK Manager
- Android - Sensors
- Android - Session Management
- Android - Shared Preferences
- Android - SIP Protocol
- Android - Spelling Checker
- Android - SQLite Database
- Android - Support Library
- Android - Testing
- Android - Text to Speech
- Android - TextureView
- Android - Twitter Integration
- Android - UI Design
- Android - UI Patterns
- Android - UI Testing
- Android - WebView Layout
- Android - Wi-Fi
- Android - Widgets
- Android - XML Parsers
- Android Useful Resources
- Android - Questions and Answers
- Android - Useful Resources
- Android - Discussion
Android - Theme Demo Example
Following example demonstrates how you can use a theme for an application. For demo purpose we will modify our default AppTheme wehere default text, its size, family, shadow etc will be changed. Let's start with creating a simple Android application as per the following steps −
| Step | Description |
|---|---|
| 1 | You will use Eclipse IDE to create an Android application and name it as ThemeDemo under a package com.example.themedemo as explained in the Hello World Example chapter. |
| 2 | Modify src/MainActivity.java file to add click event listeners and handlers for the two buttons defined. |
| 3 | Define your style in global style file res/values/style.xml to define custom attributes for a button and change default theme of the application to play with the text. |
| 4 | Modify the detault content of res/layout/activity_main.xml file to include a set of Android UI controls and make use of the defined style. |
| 5 | Define required constants in res/values/strings.xml file |
| 6 | Run the application to launch Android emulator and verify the result of the changes done in the aplication. |
Following is the content of the modified main activity file src/com.example.themedemo/MainActivity.java. This file can include each of the fundamental lifecycle methods.
package com.example.themedemo;

import android.os.Bundle;
import android.app.Activity;
import android.view.Menu;
import android.view.View;
import android.widget.Button;
import android.widget.TextView;

public class MainActivity extends Activity {
   @Override
   protected void onCreate(Bundle savedInstanceState) {
      super.onCreate(savedInstanceState);
      setContentView(R.layout.activity_main);

      //--- find both the buttons---
      Button sButton = (Button) findViewById(R.id.button_s);
      Button lButton = (Button) findViewById(R.id.button_l);

      // -- register click event with first button ---
      sButton.setOnClickListener(new View.OnClickListener() {
         public void onClick(View v) {
            // --- find the text view --
            TextView txtView = (TextView) findViewById(R.id.text_id);

            // -- change text size --
            txtView.setTextSize(20);
         }
      });

      // -- register click event with second button ---
      lButton.setOnClickListener(new View.OnClickListener() {
         public void onClick(View v) {
            // --- find the text view --
            TextView txtView = (TextView) findViewById(R.id.text_id);

            // -- change text size --
            txtView.setTextSize(24);
         }
      });
   }

   @Override
   public boolean onCreateOptionsMenu(Menu menu) {
      getMenuInflater().inflate(R.menu.main, menu);
      return true;
   }
}
Following will be the content of res/values/style.xml file which will have addition style CustomButtonStyle defined −
<resources>

   <!--
      Base application theme, dependent on API level. This theme is replaced
      by AppBaseTheme from res/values-vXX/styles.xml on newer devices.
   -->

   <style name="AppBaseTheme" parent="android:Theme.Light">
     <!--
         Theme customizations available in newer API levels can go in
         res/values-vXX/styles.xml, while customizations related to
         backward-compatibility can go here.
      -->
   </style>

   <!-- Application theme. -->
   <style name="AppTheme" parent="AppBaseTheme">
      <!-- All customizations that are NOT specific to a particular API-level can go here. -->
      <item name="android:capitalize">characters</item>
      <item name="android:typeface">monospace</item>
      <item name="android:shadowDx">1.2</item>
      <item name="android:shadowDy">1.2</item>
      <item name="android:shadowRadius">2</item>
      <item name="android:textColor">#494948</item>/>
      <item name="android:gravity" >center</item>
      <item name="android:layout_margin" >3dp</item>
      <item name="android:textSize" >5pt</item>
      <item name="android:shadowColor" >#000000</item>
   </style>

   <!-- Custom Style defined for the buttons. -->
   <style name="CustomButtonStyle">
      <item name="android:layout_width">100dp</item>
      <item name="android:layout_height">38dp</item>
   </style>

</resources>
Following will be the content of res/layout/activity_main.xml file −
<?xml version="1.0" encoding="utf-8"?>
<LinearLayout xmlns:android="http://schemas.android.com/apk/res/android"
   android:layout_width="fill_parent"
   android:layout_height="fill_parent"
   android:orientation="vertical" >

   <Button
      android:id="@+id/button_s"
      style="@style/CustomButtonStyle"
      android:text="@string/button_small"
      android:onClick="doSmall"/>

   <Button
      android:id="@+id/button_l"
      style="@style/CustomButtonStyle"
      android:text="@string/button_large"
      android:onClick="doLarge"/>

   <TextView
      android:id="@+id/text_id"
      android:layout_width="wrap_content"
      android:layout_height="wrap_content"
      android:capitalize="characters"
      android:text="@string/hello_world" />

</LinearLayout>
Following will be the content of res/values/strings.xml to define two new constants −
<?xml version="1.0" encoding="utf-8"?>
<resources>
   <string name="app_name">ThemeDemo</string>
   <string name="action_settings">Settings</string>
   <string name="hello_world">Hello world!</string>
   <string name="button_small">Small Font</string>
   <string name="button_large">Large Font</string>
</resources>
Following is the default content of AndroidManifest.xml. Here we do not need to change anything because we kept out theme name unchanged. But if you define fresh new theme or inherit a default them with different name then you will have to replace AppTheme name with the new them name.
<?xml version="1.0" encoding="utf-8"?>
<manifest xmlns:android="http://schemas.android.com/apk/res/android"
   package="com.example.guidemo"
   android:versionCode="1"
   android:versionName="1.0" >

   <uses-sdk
      android:minSdkVersion="8"
      android:targetSdkVersion="17" />

   <application
      android:allowBackup="true"
      android:icon="@drawable/ic_launcher"
      android:label="@string/app_name"
      android:theme="@style/AppTheme" >

      <activity
         android:name="com.example.guidemo.MainActivity"
         android:label="@string/app_name" >

         <intent-filter>
            <action android:name="android.intent.action.MAIN" />
            <category android:name="android.intent.category.LAUNCHER" />
         </intent-filter>

      </activity>

   </application>
</manifest>
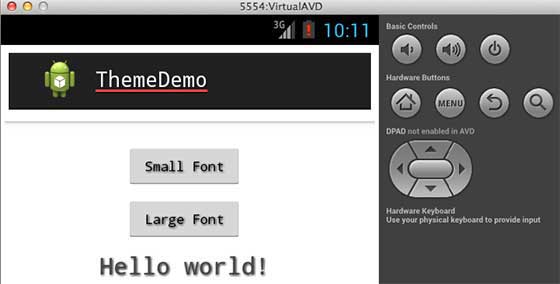
Let's try to run your ThemeDemo application. I assume you had created your AVD while doing environment setup. To run the app from Eclipse, open one of your project's activity files and click Run  icon from the toolbar. Eclipse installs the app on your AVD and starts it and if everything is fine with your setup and application, it will display following Emulator window −