
- Android - Home
- Android - Overview
- Android - Environment Setup
- Android - Architecture
- Android - Application Components
- Android - Hello World Example
- Android - Resources
- Android - Activities
- Android - Services
- Android - Broadcast Receivers
- Android - Content Providers
- Android - Fragments
- Android - Intents/Filters
- Android - UI Layouts
- Android - UI Controls
- Android - Event Handling
- Android - Styles and Themes
- Android - Custom Components
- Android Advanced Concepts
- Android - Drag and Drop
- Android - Notifications
- Location Based Services
- Android - Sending Email
- Android - Sending SMS
- Android - Phone Calls
- Publishing Android Application
- Android Useful Examples
- Android - Alert Dialoges
- Android - Animations
- Android - Audio Capture
- Android - AudioManager
- Android - Auto Complete
- Android - Best Practices
- Android - Bluetooth
- Android - Camera
- Android - Clipboard
- Android - Custom Fonts
- Android - Data Backup
- Android - Developer Tools
- Android - Emulator
- Android - Facebook Integration
- Android - Gestures
- Android - Google Maps
- Android - Image Effects
- Android - ImageSwitcher
- Android - Internal Storage
- Android - JetPlayer
- Android - JSON Parser
- Android - Linkedin Integration
- Android - Loading Spinner
- Android - Localization
- Android - Login Screen
- Android - MediaPlayer
- Android - Multitouch
- Android - Navigation
- Android - Network Connection
- Android - NFC Guide
- Android - PHP/MySQL
- Android - Progress Circle
- Android - ProgressBar
- Android - Push Notification
- Android - RenderScript
- Android - RSS Reader
- Android - Screen Cast
- Android - SDK Manager
- Android - Sensors
- Android - Session Management
- Android - Shared Preferences
- Android - SIP Protocol
- Android - Spelling Checker
- Android - SQLite Database
- Android - Support Library
- Android - Testing
- Android - Text to Speech
- Android - TextureView
- Android - Twitter Integration
- Android - UI Design
- Android - UI Patterns
- Android - UI Testing
- Android - WebView Layout
- Android - Wi-Fi
- Android - Widgets
- Android - XML Parsers
- Android Useful Resources
- Android - Questions and Answers
- Android - Useful Resources
- Android - Discussion
Android - Single Fragments
Single Frame Fragment
Single frame fragment is designed for small screen devices such as hand hold devices(mobiles) and it should be above android 3.0 version.
Example
This example will explain you how to create your own Fragments. Here we will create two fragments and one of them will be used when device is in landscape mode and another fragment will be used in case of portrait mode. So let's follow the following steps to similar to what we followed while creating Hello World Example −
| Step | Description |
|---|---|
| 1 | You will use Android StudioIDE to create an Android application and name it as MyFragments under a package com.example.myfragments, with blank Activity. |
| 2 | Modify main activity file MainActivity.java as shown below in the code. Here we will check orientation of the device and accordingly we will switch between different fragments. |
| 3 | Create a two java files PM_Fragment.java and LM_Fragement.java under the package com.example.myfragments to define your fragments and associated methods. |
| 4 | Create layouts files res/layout/lm_fragment.xml and res/layout/pm_fragment.xml and define your layouts for both the fragments. |
| 5 | Modify the default content of res/layout/activity_main.xml file to include both the fragments. |
| 6 | Define required constants in res/values/strings.xml file |
| 7 | Run the application to launch Android emulator and verify the result of the changes done in the application. |
Following is the content of the modified main activity file MainActivity.java −
package com.example.myfragments;

import android.app.Activity;
import android.app.FragmentManager;
import android.app.FragmentTransaction;
import android.content.res.Configuration;
import android.os.Bundle;

public class MainActivity extends Activity {

   /** Called when the activity is first created. */
   @Override
   public void onCreate(Bundle savedInstanceState) {
      super.onCreate(savedInstanceState);
      Configuration config = getResources().getConfiguration();

      FragmentManager fragmentManager = getFragmentManager();
      FragmentTransaction fragmentTransaction = fragmentManager.beginTransaction();

      /**
         * Check the device orientation and act accordingly
      */

      if (config.orientation == Configuration.ORIENTATION_LANDSCAPE) {
         /**
            * Landscape mode of the device
         */
         LM_Fragement ls_fragment = new LM_Fragement();
         fragmentTransaction.replace(android.R.id.content, ls_fragment);
      }else{
         /**
            * Portrait mode of the device
         */
         PM_Fragement pm_fragment = new PM_Fragement();
         fragmentTransaction.replace(android.R.id.content, pm_fragment);
      }
      fragmentTransaction.commit();
   }

}
Create two fragment files LM_Fragement.java and PM_Fragment.java
Following is the content of LM_Fragement.java file −
package com.example.myfragments;

import android.app.Fragment;
import android.os.Bundle;
import android.view.LayoutInflater;
import android.view.View;
import android.view.ViewGroup;

/**
   * Created by TutorialsPoint7 on 8/23/2016.
*/

public class LM_Fragement extends Fragment {
   @Override
   public View onCreateView(LayoutInflater inflater, ViewGroup container, Bundle savedInstanceState) {
      /**
         * Inflate the layout for this fragment
      */
      return inflater.inflate(R.layout.lm_fragment, container, false);
   }
}
Following is the content of PM_Fragement.java file −
package com.example.myfragments;

import android.app.Fragment;
import android.os.Bundle;
import android.view.LayoutInflater;
import android.view.View;
import android.view.ViewGroup;

/**
   * Created by TutorialsPoint7 on 8/23/2016.
*/

public class PM_Fragement extends Fragment {
   @Override
   public View onCreateView(LayoutInflater inflater, ViewGroup container, Bundle savedInstanceState) {
      /**
         * Inflate the layout for this fragment
      */
      return inflater.inflate(R.layout.pm_fragment, container, false);
   }
}
Create two layout files lm_fragement.xml and pm_fragment.xml under res/layout directory.
Following is the content of lm_fragement.xml file −
<?xml version="1.0" encoding="utf-8"?>
   <LinearLayout
      xmlns:android="http://schemas.android.com/apk/res/android"
      android:orientation="vertical"
      android:layout_width="fill_parent"
      android:layout_height="fill_parent"
      android:background="#7bae16">

   <TextView
      android:layout_width="fill_parent"
      android:layout_height="wrap_content"
      android:text="@string/landscape_message"
      android:textColor="#000000"
      android:textSize="20px" />

<!-- More GUI components go here  -->

</LinearLayout>
Following is the content of pm_fragment.xml file −
<?xml version="1.0" encoding="utf-8"?>
<LinearLayout
   xmlns:android="http://schemas.android.com/apk/res/android"
   android:orientation="horizontal"
   android:layout_width="fill_parent"
   android:layout_height="fill_parent"
   android:background="#666666">

   <TextView
      android:layout_width="fill_parent"
      android:layout_height="wrap_content"
      android:text="@string/portrait_message"
      android:textColor="#000000"
      android:textSize="20px" />

<!-- More GUI components go here  -->

</LinearLayout>
Following will be the content of res/layout/activity_main.xml file which includes your fragments −
<?xml version="1.0" encoding="utf-8"?>
<LinearLayout xmlns:android="http://schemas.android.com/apk/res/android"
   xmlns:tools="http://schemas.android.com/tools"
   android:layout_width="fill_parent"
   android:layout_height="fill_parent"
   android:orientation="horizontal">

   <fragment
      android:name="com.example.fragments"
      android:id="@+id/lm_fragment"
      android:layout_weight="1"
      android:layout_width="0dp"
      android:layout_height="match_parent" />

   <fragment
      android:name="com.example.fragments"
      android:id="@+id/pm_fragment"
      android:layout_weight="2"
      android:layout_width="0dp"
      android:layout_height="match_parent" />

</LinearLayout>
Make sure you have following content of res/values/strings.xml file −
<?xml version="1.0" encoding="utf-8"?>
<resources>
   <string name="app_name">My Application</string>
   <string name="landscape_message">This is Landscape mode fragment</string>
   <string name="portrait_message">This is Portrait mode fragment></string>
</resources>
Let's try to run our modified MyFragments application we just created. I assume you had created your AVD while doing environment set-up. To run the app from Android Studio, open one of your project's activity files and click Run icon from the tool bar. Android Studio installs the app on your AVD and starts it and if everything is fine with your set-up and application, it will display Emulator window where you will click on Menu button to see the following window. Be patience because it may take sometime based on your computer speed −
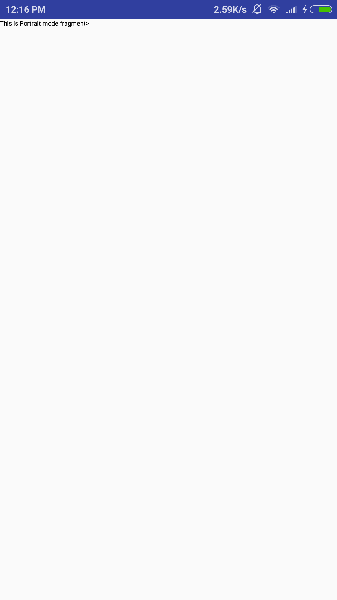
To change the mode of the emulator screen, let's do the following −
fn+control+F11 on Mac to change the landscape to portrait and vice versa.
ctrl+F11 on Windows.
ctrl+F11 on Linux.
Once you changed the mode, you will be able to see the GUI which you have implemented for landscape mode as below −
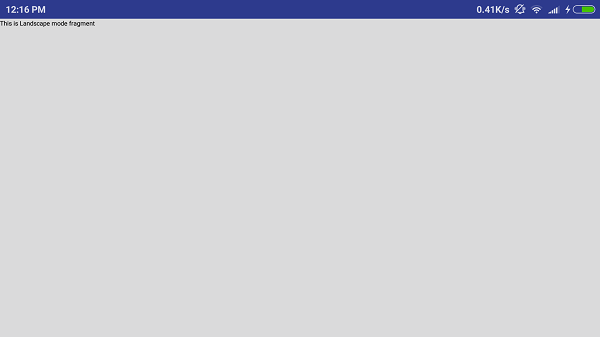
This way you can use same activity but different GUI's through different fragments. You can use different type of GUI components for different GUI's based on your requirements.
