- XAML Tutorial
- XAML - Home
- XAML - Overview
- XAML - Environment Setup
- Writing XAML Aplication On MAC OS
- XAML Vs C# Code
- XAML Vs.VB.NET
- XAML - Building Blocks
- XAML - Controls
- XAML - Layouts
- XAML - Event Handling
- XAML - Data Binding
- XAML - Markup Extensions
- XAML - Dependency Properties
- XAML - Resources
- XAML - Templates
- XAML - Styles
- XAML - Triggers
- XAML - Debugging
- XAML - Custom Controls
- XAML Useful Resources
- XAML - Quick Guide
- XAML - Useful Resources
- XAML - Discussion
XAML - Debugging
If you are familiar with debugging in any procedural language (such as C#, C/C++ etc.) and you know the usage of break and are expecting the same kind of debugging in XAML, then you will be surprised to know that it is not possible yet to debug an XAML code like the way you used to debug any other procedural language code. Debugging an XAML app means trying to find an error;
In data binding, your data doesn't show up on screen and you don't know why
Or an issue is related to complex layouts.
Or an alignment issue or issues in margin color, overlays, etc. with some extensive templates like ListBox and combo box.
Debugging in XAML is something you typically do to check if your bindings work, and if it is not working, then to check what's wrong. Unfortunately, setting breakpoints in XAML bindings isn't possible except in Silverlight, but we can use the Output window to check for data binding errors. Let's have a look at the following XAML code to find the error in data binding.
<Window x:Class = "DataBindingOneWay.MainWindow"
   xmlns = "http://schemas.microsoft.com/winfx/2006/xaml/presentation"
   xmlns:x = "http://schemas.microsoft.com/winfx/2006/xaml"
   Title = "MainWindow" Height = "350" Width = "604">

   <Grid>
      <StackPanel Name = "Display">
         <StackPanel Orientation = "Horizontal" Margin = "50, 50, 0, 0">
            <TextBlock Text = "Name: " Margin = "10" Width = "100"/>
            <TextBlock Margin = "10" Width = "100" Text = "{Binding FirstName}"/>
         </StackPanel>

         <StackPanel Orientation = "Horizontal" Margin = "50,0,50,0">
            <TextBlock Text = "Title: " Margin = "10" Width = "100"/>
            <TextBlock Margin = "10" Width="100" Text = "{Binding Title}" />
         </StackPanel>
      </StackPanel>
   </Grid>

</Window>
Text properties of the two text blocks are set to “Name” and “Title” statically, while the other two text block’s Text properties are bound to “FirstName” and “Title”. But the class variables are intentionally taken as Name and Title in the Employee class which are incorrect variable names. Let us now try to understand where we can find this type of mistake when the desired output is not shown.
using System;
using System.Collections.Generic;
using System.Linq;
using System.Text;
using System.Threading.Tasks;

namespace DataBindingOneWay {
   public class Employee {
      public string Name { get; set; }
      public string Title { get; set; }

      public static Employee GetEmployee() {
         var emp = new Employee() {
            Name = "Ali Ahmed",
            Title = "Developer"
         };
         return emp;
      }
   }
}
Here is the implementation of MainWindow class in C# code −
using System;
using System.Windows;
using System.Windows.Controls;

namespace DataBindingOneWay {
   /// <summary>
      /// Interaction logic for MainWindow.xaml
   /// </summary>

   public partial class MainWindow : Window {
      public MainWindow() {
         InitializeComponent();
         DataContext = Employee.GetEmployee();
      }
   }
}
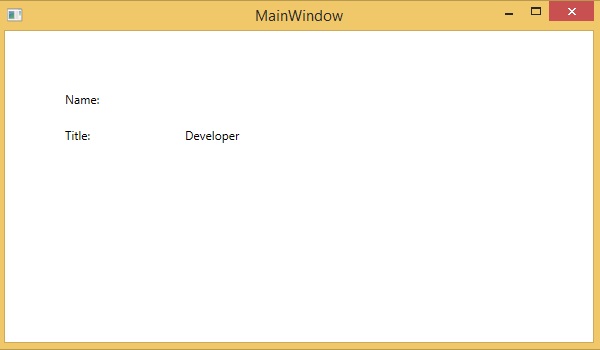
Let's run this application and you can see immediately in our MainWindow that we have successfully bound to the Title of that Employee object but the name is not bound.
To check what happened with the name, let’s look at the output window where a lot of log is generated.
The easiest way to find an error is to just search for error and you will find the below mentioned error which says “BindingExpression path error: 'FirstName' property not found on 'object' ''Employe”
System.Windows.Data Error: 40 : BindingExpression path error: 'FirstName'
   property not found on 'object' ''Employee' (HashCode = 11611730)'.
BindingExpression:Path = FirstName;
DataItem = 'Employee' (HashCode = 11611730); target element is 'TextBlock' (Name = '');
target property is 'Text' (type 'String')
Which clearly indicate that FirstName is not a member of Employee class, so it helps to fix this type of issues in your application.
When you change the FirstName to Name again, you will see the desired output.
UI Debugging Tools for XAML
UI debugging tools for XAML are introduced with Visual Studio 2015 to inspect the XAML code at runtime. With the help of these tools, XAML code is presented in the form of visual tree of your running WPF application and also the different UI element properties in the tree. To enable this tool, follow the steps given below.
Step 1 − Go to the Tools menu and select Options from the Tools menu.
Step 2 − You will get to see the following dialog box.
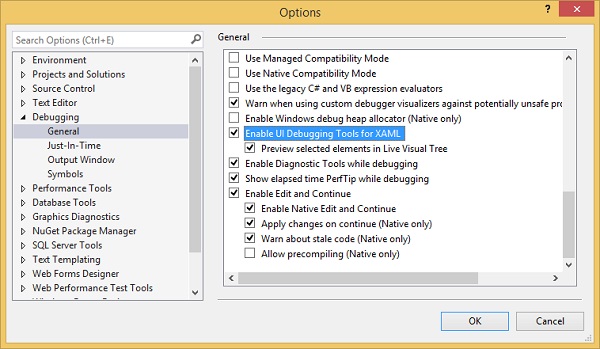
Step 3 − Go to the General Options under Debugging item on the left side.
Step 4 − Check the highlighted option, i.e, “Enable UI Debugging Tools for XAML”
Step 5 − Press the OK button.
Now run any XAML application or use the following XAML code −
<Window x:Class = "XAMLTestBinding.MainWindow"
   xmlns = "http://schemas.microsoft.com/winfx/2006/xaml/presentation"
   xmlns:x = "http://schemas.microsoft.com/winfx/2006/xaml"
   Title = "MainWindow" Height = "350" Width = "604">

   <StackPanel>
      <ComboBox Name = "comboBox" Margin = "50" Width = "100">
         <ComboBoxItem Content = "Green"/>
         <ComboBoxItem Content = "Yellow" IsSelected = "True"/>
         <ComboBoxItem Content = "Orange" />
      </ComboBox>

      <TextBox Name = "textBox" Margin = "50" Width = "100"
         Height = "23" VerticalAlignment = "Top" Text = "{
         Binding ElementName = comboBox, Path = SelectedItem.Content,
         Mode = TwoWay, UpdateSourceTrigger = PropertyChanged}"
         Background = "{Binding ElementName = comboBox, Path = SelectedItem.Content}">
      </TextBox>
   </StackPanel>

</Window>
When the application executes, it will show the Live Visual Tree where all the elements are shown in a tree.
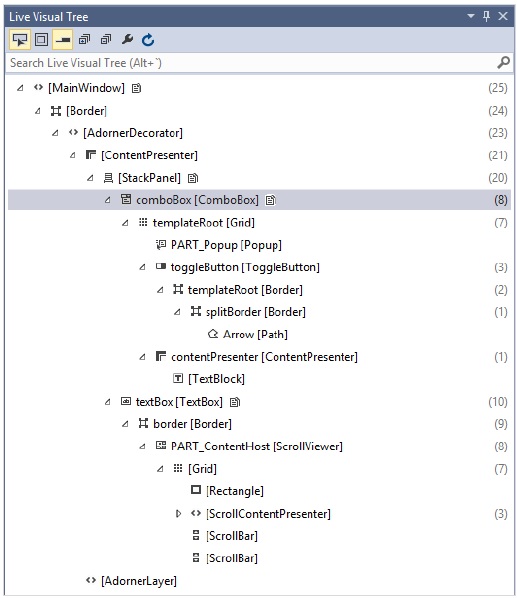
This Live Visual Tree shows the complete layout structure to understand where the UI elements are placed. But this option is only available in Visual Studio 2015. If you are using an older version of Visual studio, then you can’t use this tool; however there is another tool which can be integrated with Visual Studio such as XAML Spy for Visual Studio. You can download it from http://xamlspy.com/download. We recommend you to download this tool if you are using an older version of Visual Studio.